Shiro官方快速入门10min例子源码解析框架1-初始化
Shiro,一个易用的Java安全框架,主要集合身份认证、授权、加密和session管理的功能。
这系文章主要简介Shiro架构,并通过官方的quickstart例程分析最简实现下Shiro的工作流程及其源码
(1-初始化)主要由从零到获取一个subject
本文使用的是shiro 1.3.2版本,配合源码食用更佳~

它的架构如下
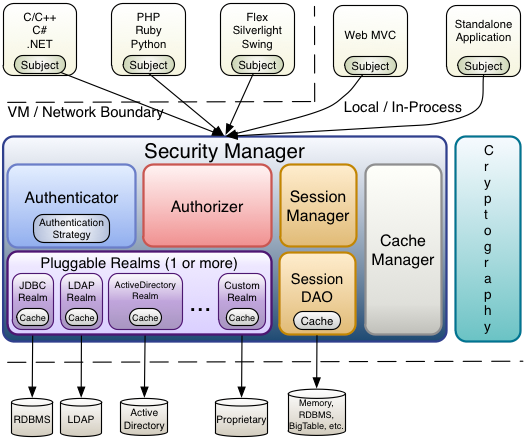
Subject:与框架交互的实体(Entity)的安全视图(security-specific ‘view’),这个实体可以是用户、第三方应用、定时任务(cron job)等
SecurityManager:是Shiro的框架核心,协调设置内部组件对外提供统一的对象视图,一旦Shiro对外提供Subject后外部基本上只需要对Subject进行交互,而不需要管理内部机制。在简化的概念下调用者只需关心Subject、SecurityManager、Realm三者就可以轻松地使用shiro ,这体现了其极好的封装性。

Realms:上面谈到的Realm是Shiro连接应用安全信息数据(即用户的密码、权限等信息)的组件,类似于DAO层,Realms自身提供JDBC、LDAP、文本等Realm实现,也可以根据需要继承对应接口实现自定义数据源
Authenticator:用户身份验证组件,用户尝试登陆时,会通过Authenticator进行验证,它调用Realms并通过一定策略(Authentication Strategy)来确认用户身份的真实性。
Authorizer:在确认用户登录后,权限验证的组件。同样它会调用Realm获得安全数据来判断用户对资源的权限。
SessionManager:shiro自身维护了一套session管理组件,它并不单纯依赖WEB/Servlet/EJB容器等环境,即它可以独立使用,在WEB环境下或者普通应用环境下,可以理解为将session概念复用到了一般应用环境。另外,组件还可拔插地支持SessionDAO实现session的持久化及应用的分布式,外接mysql或redis等数据库
CacheManager:缓存方面提供了CacheManager、Cache、CacheManagerAware三个接口和一个基于内存的实现类MemoryConstrainedCacheManager,可以自己实现类来实现其他诸如Hazelcast, Ehcache, OSCache, Terracotta的支持,官方可能有前两个缓存的支持计划(官方文档显示TBD~~)。需要注意的是,在使用缓存情况下,改变User的安全权限后务必使用clearCachedAuthorizationInfo方法删除现用缓存以避免不同步的情况。
Cryptography:加密支持组件。shiro提供了便携的加密算法类实现一般的哈希功能,可用在用身份确认时来源密码hash与realms中数据校验
以上是Shiro的架构概况,下面结合一个官方demo来阐述Shiro运行流程
1-首先是获得Subject的过程
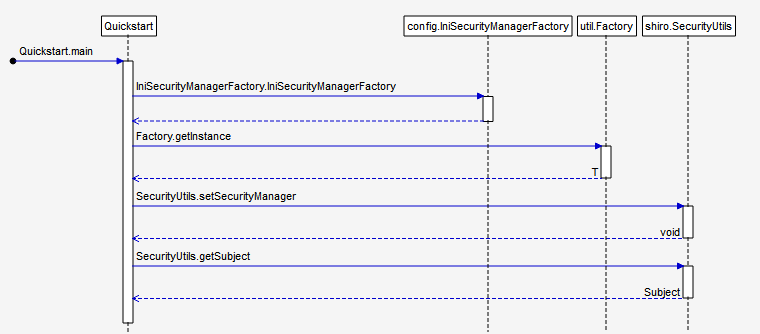
1.1首先,获得一个产生SecurityManager工厂
Factory<SecurityManager> factory = new IniSecurityManagerFactory("classpath:shiro.ini");
IniSecurityManagerFactory的参数是ini文件的路径,它是一个支持ini文件作为realms数据源的SecurityManager工厂类
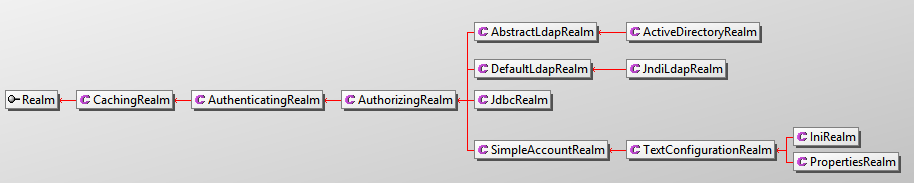
SecurityManager的继承关系如下,AbstractFactory则实现了Factory接口

在构建工厂实例时,使用了构造器IniSecurityManagerFactory(String iniResourcePath),其中调用了以下构造器
public IniSecurityManagerFactory(Ini config) {
        this();
        setIni(config);
    }
其具体方法在IniFactorySupport中实现
public Ini getIni() {
        return ini;
    }
1.2获得 SecurityManager实例
SecurityManager securityManager = factory.getInstance();
其工厂的接口方法在AbstractFactory中重写,由下可见securityManager在程序中是以单例存在
public T getInstance() {
        T instance;
        if (isSingleton()) {
            if (this.singletonInstance == null) {
                this.singletonInstance = createInstance();
            }
            instance = this.singletonInstance;
        } else {
            instance = createInstance();
        }
        if (instance == null) {
            String msg = "Factory 'createInstance' implementation returned a null object.";
            throw new IllegalStateException(msg);
        }
        return instance;
    }
其中createInstance是抽象方法
protected abstract T createInstance();
其在IniFactorySupport类中实现
public T createInstance() {
        Ini ini = resolveIni();

        T instance;

        if (CollectionUtils.isEmpty(ini)) {
            log.debug("No populated Ini available.  Creating a default instance.");
            instance = createDefaultInstance();
            if (instance == null) {
                String msg = getClass().getName() + " implementation did not return a default instance in " +
                        "the event of a null/empty Ini configuration.  This is required to support the " +
                        "Factory interface.  Please check your implementation.";
                throw new IllegalStateException(msg);
            }
        } else {
            log.debug("Creating instance from Ini [" + ini + "]");
            instance = createInstance(ini);
            if (instance == null) {
                String msg = getClass().getName() + " implementation did not return a constructed instance from " +
                        "the createInstance(Ini) method implementation.";
                throw new IllegalStateException(msg);
            }
        }

        return instance;
    }
其中createInstance为抽象方法在IniSecurityManagerFactory中实现
protected SecurityManager createInstance(Ini ini) {
        if (CollectionUtils.isEmpty(ini)) {
            throw new NullPointerException("Ini argument cannot be null or empty.");
        }
        SecurityManager securityManager = createSecurityManager(ini);
        if (securityManager == null) {
            String msg = SecurityManager.class + " instance cannot be null.";
            throw new ConfigurationException(msg);
        }
        return securityManager;
    }
里面createSecurityManager(ini)方法又调用了一下方法传入的Ini.Section mainSection是在createSecurityManager(ini)方法中获得的ini文件的主节点,这里看到了下一个关键组件 Realms
private SecurityManager createSecurityManager(Ini ini, Ini.Section mainSection) {

        Map<String, ?> defaults = createDefaults(ini, mainSection);
        Map<String, ?> objects = buildInstances(mainSection, defaults);

        SecurityManager securityManager = getSecurityManagerBean();

        boolean autoApplyRealms = isAutoApplyRealms(securityManager);

        if (autoApplyRealms) {
            //realms and realm factory might have been created - pull them out first so we can
            //initialize the securityManager:
            Collection<Realm> realms = getRealms(objects);
            //set them on the SecurityManager
            if (!CollectionUtils.isEmpty(realms)) {
                applyRealmsToSecurityManager(realms, securityManager);
            }
        }

        return securityManager;
    }
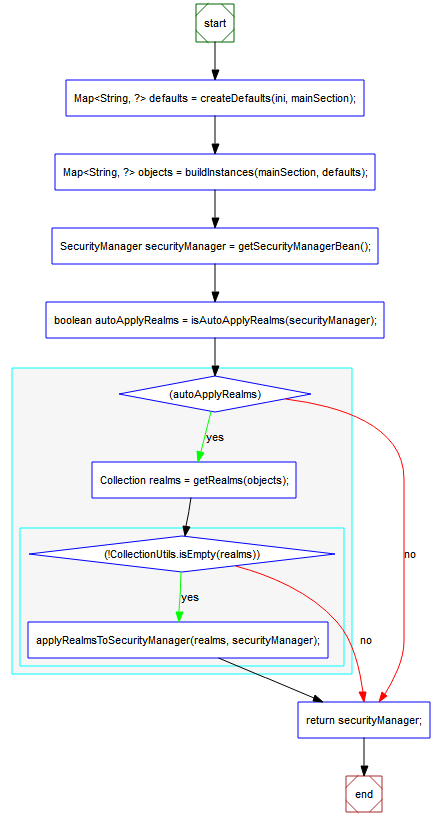
这里详细说明一下createSecurityManager内的过程
1.2.1:根据ini返回含DefaultSecurityManager和IniRealm的map
1.2.2:将节点信息转化为bean 调用LifecycleUtils初始化cache等
1.2.3:getSecurityManagerBean调用builder.getBean获取objects中key为securityManager的Bean
1.2.4:判断是否AutoApply的SecurityManager 实体(未被其他user设置过)
1.2.5:没有被设置过则进入流程,如果被设置过则直接return
1.2.6:从object中获取realm实例,这里可以看出shiro支持多个realm。从objects中获取realm
1.2.7:判断realms是否为空,如果是空则直接return securityManager ,如果不是的话则继续流程
1.2.8:将realms推至securityManager 。这里赋予除了还将CacheManager,EventBus设置到realm
1.3获取Subject
SecurityUtils.setSecurityManager(securityManager);
Subject currentUser = SecurityUtils.getSubject();
调用SecurityUtils.setSecurityManager 设置 securityManager,调用getSubjext

首先确认线程中是否有绑定subject,有则直接return对应subject ,无则进入获取流程,并绑定到线程再return
public static Subject getSubject() {
        Subject subject = ThreadContext.getSubject();
        if (subject == null) {
            subject = (new Subject.Builder()).buildSubject();
            ThreadContext.bind(subject);
        }
        return subject;
    }
用内部类Subject.Builder()构建,调用设置SecurityManager
this(SecurityUtils.getSecurityManager());
调用DefaultSecurityManager.createSubject 初始化确认Subject中的信息,然后在session中保存,如果subject开启了持久化则会实现持久化(调用subjectDAO.save很有迷惑性~
public Subject createSubject(SubjectContext subjectContext) {
        //create a copy so we don't modify the argument's backing map:
        SubjectContext context = copy(subjectContext);

        //ensure that the context has a SecurityManager instance, and if not, add one:
        context = ensureSecurityManager(context);

        //Resolve an associated Session (usually based on a referenced session ID), and place it in the context before
        //sending to the SubjectFactory.  The SubjectFactory should not need to know how to acquire sessions as the
        //process is often environment specific - better to shield the SF from these details:
        context = resolveSession(context);

        //Similarly, the SubjectFactory should not require any concept of RememberMe - translate that here first
        //if possible before handing off to the SubjectFactory:
        context = resolvePrincipals(context);

        Subject subject = doCreateSubject(context);

        //save this subject for future reference if necessary:
        //(this is needed here in case rememberMe principals were resolved and they need to be stored in the
        //session, so we don't constantly rehydrate the rememberMe PrincipalCollection on every operation).
        //Added in 1.2:
        save(subject);

        return subject;
    }
然后是返回subject
至此初始化工作完成,并获得了对外的实例subject后续只要操作Suject API即可
参考:
http://shiro.apache.org/10-minute-tutorial.html
http://shiro.apache.org/architecture.html
http://www.apache.org/dyn/closer.cgi/shiro/1.3.2/shiro-root-1.3.2-source-release.zip
转载请注明作者及来源:https://www.cnblogs.com/codflow/

 浙公网安备 33010602011771号