Spring系列之Mybatis动态代理实现全过程?回答正确率不到1%
面试中,可能会问到Spring怎么绑定Mapper接口和SQL语句的。一般的答案是Spring会为Mapper生成一个代理类,调用的时候实际调用的是代理类的实现。但是如果被追问代理类实现的细节,很多同学会卡壳,今天借助2张图来阅读一下代码如何实现的。
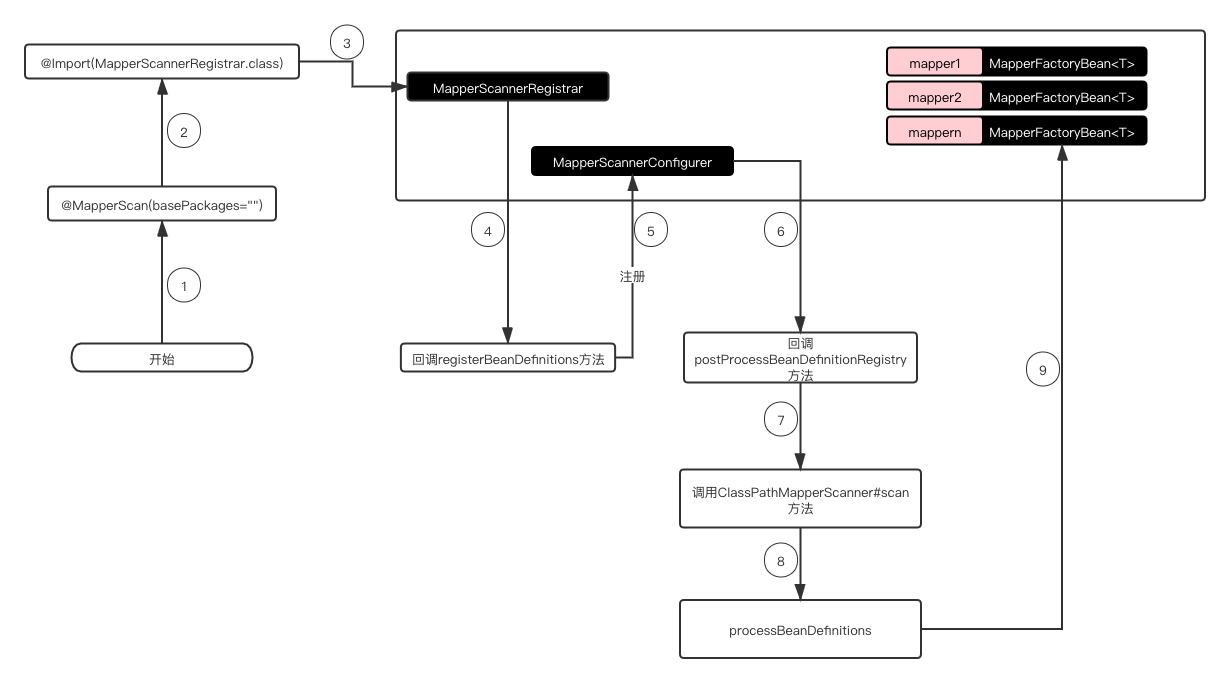
一、代理工厂类生成的过程
步骤1
在启动类上加上注解MapperScan
@SpringBootApplication
@MapperScan(basePackages = "com.example.springdatasourcedruid.dal")
public class SpringDatasourceDruidApplication {
	public static void main(String[] args) {
		SpringApplication.run(SpringDatasourceDruidApplication.class, args);
	}
}
步骤2
/**
*指定mapper接口所在的包,然后包下面的所有接口在编译之后都会生成相应的实现类
*这个注解引入了MapperScannerRegistrar类
*/
@Retention(RetentionPolicy.RUNTIME)
@Target(ElementType.TYPE)
@Documented
@Import(MapperScannerRegistrar.class)
@Repeatable(MapperScans.class)
public @interface MapperScan {
  //扫描的包路径列表
  String[] basePackages() default {};
  //代理工厂类类型
  Class<? extends MapperFactoryBean> factoryBean() default MapperFactoryBean.class;
  //作用范围,这里默认是单例
  String defaultScope() default AbstractBeanDefinition.SCOPE_DEFAULT;
}
步骤3、4
实现ImportBeanDefinitionRegistrar接口,目的是实现动态创建自定义的bean
public class MapperScannerRegistrar implements ImportBeanDefinitionRegistrar, ResourceLoaderAware {

  //Spring 会回调该方法
  @Override
  public void registerBeanDefinitions(AnnotationMetadata importingClassMetadata, BeanDefinitionRegistry registry) {
    //获取MapperScan注解设置的全部属性信息
    AnnotationAttributes mapperScanAttrs = AnnotationAttributes
        .fromMap(importingClassMetadata.getAnnotationAttributes(MapperScan.class.getName()));
    if (mapperScanAttrs != null) {
      //调用具体的实现
      registerBeanDefinitions(importingClassMetadata, mapperScanAttrs, registry,
          generateBaseBeanName(importingClassMetadata, 0));
    }
  }
  //注册一个 BeanDefinition  ,这里会构建并且向容器中注册一个bd 也就是一个自定义的扫描器 MapperScannerConfigurer
  //mapperFactoryBeanClass的类型MapperFactoryBean
  void registerBeanDefinitions(AnnotationMetadata annoMeta, AnnotationAttributes annoAttrs,
      BeanDefinitionRegistry registry, String beanName) {
    //构建一个 BeanDefinition 他的实例对象是 MapperScannerConfigurer
    BeanDefinitionBuilder builder = BeanDefinitionBuilder.genericBeanDefinition(MapperScannerConfigurer.class);
    builder.addPropertyValue("processPropertyPlaceHolders", true);


    Class<? extends MapperFactoryBean> mapperFactoryBeanClass = annoAttrs.getClass("factoryBean");
    if (!MapperFactoryBean.class.equals(mapperFactoryBeanClass)) {
      builder.addPropertyValue("mapperFactoryBeanClass", mapperFactoryBeanClass);
    }

    registry.registerBeanDefinition(beanName, builder.getBeanDefinition());

  }
}
步骤5
将MapperScannerConfigurer注册到beanFactory,MapperScannerConfigurer是为了解决MapperFactoryBean繁琐而生的,有了MapperScannerConfigurer就不需要我们去为每个映射接口去声明一个bean了。大大缩减了开发的效率
步骤6、7
回调postProcessBeanDefinitionRegistry方法,目的是初始化扫描器,并且回调扫描basePackages下的接口,获取到所有符合条件的记录
public void postProcessBeanDefinitionRegistry(BeanDefinitionRegistry registry) {
    if (this.processPropertyPlaceHolders) {
      processPropertyPlaceHolders();
    }
    //初始化扫描器,可以扫描项目下的class文件转换成BeanDefinition
    ClassPathMapperScanner scanner = new ClassPathMapperScanner(registry);
    scanner.setAddToConfig(this.addToConfig);
    scanner.setAnnotationClass(this.annotationClass);
    scanner.setMarkerInterface(this.markerInterface);
    scanner.setSqlSessionFactory(this.sqlSessionFactory);
    scanner.setSqlSessionTemplate(this.sqlSessionTemplate);
    scanner.setSqlSessionFactoryBeanName(this.sqlSessionFactoryBeanName);
    scanner.setSqlSessionTemplateBeanName(this.sqlSessionTemplateBeanName);
    scanner.setResourceLoader(this.applicationContext);
    scanner.setBeanNameGenerator(this.nameGenerator);
    scanner.setMapperFactoryBeanClass(this.mapperFactoryBeanClass);
    if (StringUtils.hasText(lazyInitialization)) {
      scanner.setLazyInitialization(Boolean.valueOf(lazyInitialization));
    }
    if (StringUtils.hasText(defaultScope)) {
      scanner.setDefaultScope(defaultScope);
    }
	//这一步是很重要的,他是注册了一系列的过滤器,使得Spring在扫描到Mapper接口的时候不被过滤掉
    scanner.registerFilters();
	//执行扫描
    scanner.scan(
        StringUtils.tokenizeToStringArray(this.basePackage, ConfigurableApplicationContext.CONFIG_LOCATION_DELIMITERS));
  }
步骤8、9
将Mapper接口的实现设置为MapperFactoryBean,并且注册到容器中,后面其他类依赖注入首先获取到的是MapperFactoryBean
private void processBeanDefinitions(Set<BeanDefinitionHolder> beanDefinitions) {
    AbstractBeanDefinition definition;
    BeanDefinitionRegistry registry = getRegistry();
    for (BeanDefinitionHolder holder : beanDefinitions) {
      definition = (AbstractBeanDefinition) holder.getBeanDefinition();

      String beanClassName = definition.getBeanClassName();

      definition.getConstructorArgumentValues().addGenericArgumentValue(beanClassName); // issue #59
      //将对应的Mapper接口,设置为MapperFactoryBean
      definition.setBeanClass(this.mapperFactoryBeanClass);

      definition.getPropertyValues().add("addToConfig", this.addToConfig);
      //-------忽略了非关键代码--------------------------------
      //将Mapper接口注册到BeanDefinition,这时候实际的实现类已经被指定为MapperFactoryBean
      registry.registerBeanDefinition(proxyHolder.getBeanName(), proxyHolder.getBeanDefinition());
      }

}
二、代理类的生成以及使用
我们根据上面的情况已经知道,实际在容器中保存的是MapperFactoryBean,这里也并不没有和SQL关联上,实际在依赖注入的时候,还会进行加工,获取到真正的代理类,在下面的图中进一步解释。
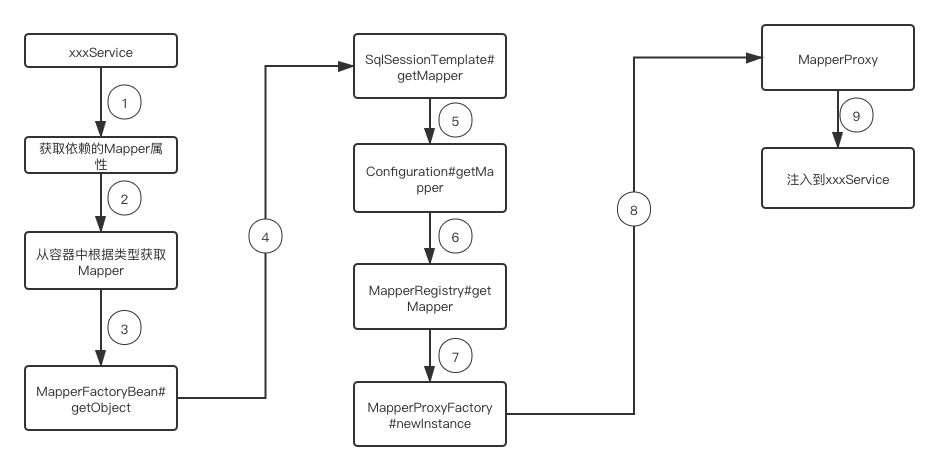
步骤1
在xxxService用注解@Autowired(@Resource)、构造方法方式引入xxxMapper属性
步骤2
通过调用AbstractBeanFactory.getBean方法获取bean,此为方法入口
public <T> T getBean(String name, Class<T> requiredType) throws BeansException {
		return this.doGetBean(name, requiredType, (Object[])null, false);
}
步骤3
因为容器中存在是MapperFactoryBean,所以后续是调用MapperFactoryBean.getObject方法,SqlSessionDaoSupport类中getSqlSession实际返回的是sqlSessionTemplate
public class MapperFactoryBean<T> extends SqlSessionDaoSupport implements FactoryBean<T> {
	@Override
	public T getObject() throws Exception {
		return getSqlSession().getMapper(this.mapperInterface);
	}
}
步骤4
调用sqlSessionTemplate.getMapper,getConfiguration()获取到的对象就是Configuration
@Override
public <T> T getMapper(Class<T> type) {
	return getConfiguration().getMapper(type, this);
}
步骤5
调用Configuration.getMapper方法
public <T> T getMapper(Class<T> type, SqlSession sqlSession) {
		return this.mapperRegistry.getMapper(type, sqlSession);
}
步骤6
调用MapperRegistry.getMapper方法,这里先从缓存中获取MapperProxyFactory,然后再生成相应的实例
public <T> T getMapper(Class<T> type, SqlSession sqlSession) {
		MapperProxyFactory<T> mapperProxyFactory = (MapperProxyFactory)this.knownMappers.get(type);
		if (mapperProxyFactory == null) {
				throw new BindingException("Type " + type + " is not known to the MapperRegistry.");
		} else {
				try {
						return mapperProxyFactory.newInstance(sqlSession);
				} catch (Exception var5) {
						throw new BindingException("Error getting mapper instance. Cause: " + var5, var5);
				}
		}
}
步骤7、8
调用java动态代理类生成代理对象MapperProxy,并且返回
    protected T newInstance(MapperProxy<T> mapperProxy) {
        return Proxy.newProxyInstance(this.mapperInterface.getClassLoader(), new Class[]{this.mapperInterface}, mapperProxy);
    }

    public T newInstance(SqlSession sqlSession) {
        MapperProxy<T> mapperProxy = new MapperProxy(sqlSession, this.mapperInterface, this.methodCache);
        return this.newInstance(mapperProxy);
    }
步骤9
将xxxMapper设置到xxxService完成属性注入
三、使用Mapper的过程
比如说我们要调用xxxMapper.insert方法
步骤1
上面讲到我们实际注入的是动态代理对象MapperProxy,因此实际调用的是MapperProxy.invoke方法,依据代码我们很容易得出后续走的方法是cachedInvoker.invoke,proxy即使MapperProxy对象,method即insert方法,args即为传入要插入的实体对象
public Object invoke(Object proxy, Method method, Object[] args) throws Throwable {
		try {
				return Object.class.equals(method.getDeclaringClass()) ? method.invoke(this, args) : this.cachedInvoker(method).invoke(proxy, method, args, this.sqlSession);
		} catch (Throwable var5) {
				throw ExceptionUtil.unwrapThrowable(var5);
		}
}
因insert不是默认方法,因此执行的逻辑是 MapperProxy.PlainMethodInvoke
private MapperProxy.MapperMethodInvoker cachedInvoker(Method method) throws Throwable {
        try {
            return (MapperProxy.MapperMethodInvoker)MapUtil.computeIfAbsent(this.methodCache, method, (m) -> {
                if (m.isDefault()) {
                    try {
                        return privateLookupInMethod == null ? new MapperProxy.DefaultMethodInvoker(this.getMethodHandleJava8(method)) : new MapperProxy.DefaultMethodInvoker(this.getMethodHandleJava9(method));
                    } catch (InstantiationException | InvocationTargetException | NoSuchMethodException | IllegalAccessException var4) {
                        throw new RuntimeException(var4);
                    }
                } else {
								   //如果不是默认方法,执行该段逻辑
                    return new MapperProxy.PlainMethodInvoker(new MapperMethod(this.mapperInterface, method, this.sqlSession.getConfiguration()));
                }
            });
        } catch (RuntimeException var4) {
            Throwable cause = var4.getCause();
            throw (Throwable)(cause == null ? var4 : cause);
        }
    }
步骤2
执行PlainMethodInvoker.invoke方法
public Object invoke(Object proxy, Method method, Object[] args, SqlSession sqlSession) throws Throwable {
		return this.mapperMethod.execute(sqlSession, args);
}
步骤3
这里才是真正和SQL相关的部分,方法的类型是根据xml文件中节点名称获取的,比如我们的例子中是insert,这里对应的就是case INSERT,后续的调用就是sqlSession和数据库的关联了
public Object execute(SqlSession sqlSession, Object[] args) {
		Object result;
		Object param;
		switch(this.command.getType()) {
		case INSERT:
				param = this.method.convertArgsToSqlCommandParam(args);
				result = this.rowCountResult(sqlSession.insert(this.command.getName(), param));
				break;
		case UPDATE:
				param = this.method.convertArgsToSqlCommandParam(args);
				result = this.rowCountResult(sqlSession.update(this.command.getName(), param));
				break;
		case DELETE:
				param = this.method.convertArgsToSqlCommandParam(args);
				result = this.rowCountResult(sqlSession.delete(this.command.getName(), param));
				break;
		case SELECT:
				if (this.method.returnsVoid() && this.method.hasResultHandler()) {
						this.executeWithResultHandler(sqlSession, args);
						result = null;
				} else if (this.method.returnsMany()) {
						result = this.executeForMany(sqlSession, args);
				} else if (this.method.returnsMap()) {
						result = this.executeForMap(sqlSession, args);
				} else if (this.method.returnsCursor()) {
						result = this.executeForCursor(sqlSession, args);
				} else {
						param = this.method.convertArgsToSqlCommandParam(args);
						result = sqlSession.selectOne(this.command.getName(), param);
						if (this.method.returnsOptional() && (result == null || !this.method.getReturnType().equals(result.getClass()))) {
								result = Optional.ofNullable(result);
						}
				}
				break;
		case FLUSH:
				result = sqlSession.flushStatements();
				break;
		default:
				throw new BindingException("Unknown execution method for: " + this.command.getName());
		}

		if (result == null && this.method.getReturnType().isPrimitive() && !this.method.returnsVoid()) {
				throw new BindingException("Mapper method '" + this.command.getName() + " attempted to return null from a method with a primitive return type (" + this.method.getReturnType() + ").");
		} else {
				return result;
		}
}
四、总结
这里基本上从代理工厂类的生成、代理类的生成、以及使用的过程,结合上面两幅图和代码,相信你已经有了充分的了解。
关注我,一起成长和进步,下一篇继续


 浙公网安备 33010602011771号