(三)logstash配置
1、logstash配置
所有过滤相关代码都是配置在对应的配置文件中,配置文件在启动的时候指定,这里的配置文件是:logstash_filebeat2es.conf
# Sample Logstash configuration for creating a simple
# Beats -> Logstash -> Elasticsearch pipeline.

input {
  beats {
    port => 5044
  }
}


filter {
  grok {
    match => {
      "message" => '%{TIMESTAMP_ISO8601:timestamp}\s*%{LOGLEVEL:level} - \[(?<record>.*)]\ - %{NUMBER:pid} --- \[(?<thread>.*?)]\ - \[(?<traceId>.*?)]\  %{JAVACLASS:class}\s+:(?<msg>.*)'
    }
  }

  mutate {
	add_field => { "path" => "%{[log][file][path]}" }
	update => {"message" => "%{[msg]}"}
  }

  grok {
    match => {
      "msg" => '\[(?<logMdc>.*)]· (?<logMsg>.*)'
    }
  }

  grok {
    match => {
      "path" => '/data/log/(?<team>.*)/(?<teamProject>.*).log'
    }
  }

  mutate {
    add_field => { "indexPath" => "%{[team]}-%{[teamProject]}" }
    remove_field => ["path","team","teamProject"]
  }

  date {
    match => [ "timestamp", "dd/MMM/YYYY:HH:mm:ss Z" ]
    locale => en
  }

  if [level] == "ERROR" and [logMdc] == "SKIP" and [record] == "OFF" {
    drop{}
  }

  if [logMdc] and [logMdc] != "SKIP"{
    mutate {
      split => ["logMdc","|"]
	    add_field => { "logtype" => "%{[logMdc][0]}" }
	    add_field => { "topic" => "%{[logMdc][1]}" }
	    add_field => { "tag" => "%{[logMdc][2]}" }
	    add_field => { "operation" => "%{[logMdc][3]}" }
	    update => {"message" => "%{[logMsg]}"}
    }
  } else if [logMdc] == "SKIP" {
    mutate {
	    update => {"message" => "%{[logMsg]}"}
	  }
  }


  if [level] == "ERROR" or [logtype] == "CORE" or [record] == "ON" {
    mutate {
        add_tag => [ "_allowOutput" ]
		remove_field => ["input.type","logMdc","msg","@version","logMsg"]
    }
  }

  if "_allowOutput" not in [tags]{
    drop{}
  }
}


output {
  elasticsearch {
    hosts => "es:9200"
    index => "%{[indexPath]}-%{+YYYY.MM.dd}"
 }
}
2、上面配置最终效果
效果1:Filebeat 读取某一个日志的文件路劲是:/data/log/scm/sp-service.log ,所以这里最终创建的索引是:scm-sp-service-{当前日期}
、
[log][file][path]是Filebeat自带的参数,这里给做下解析和重组;
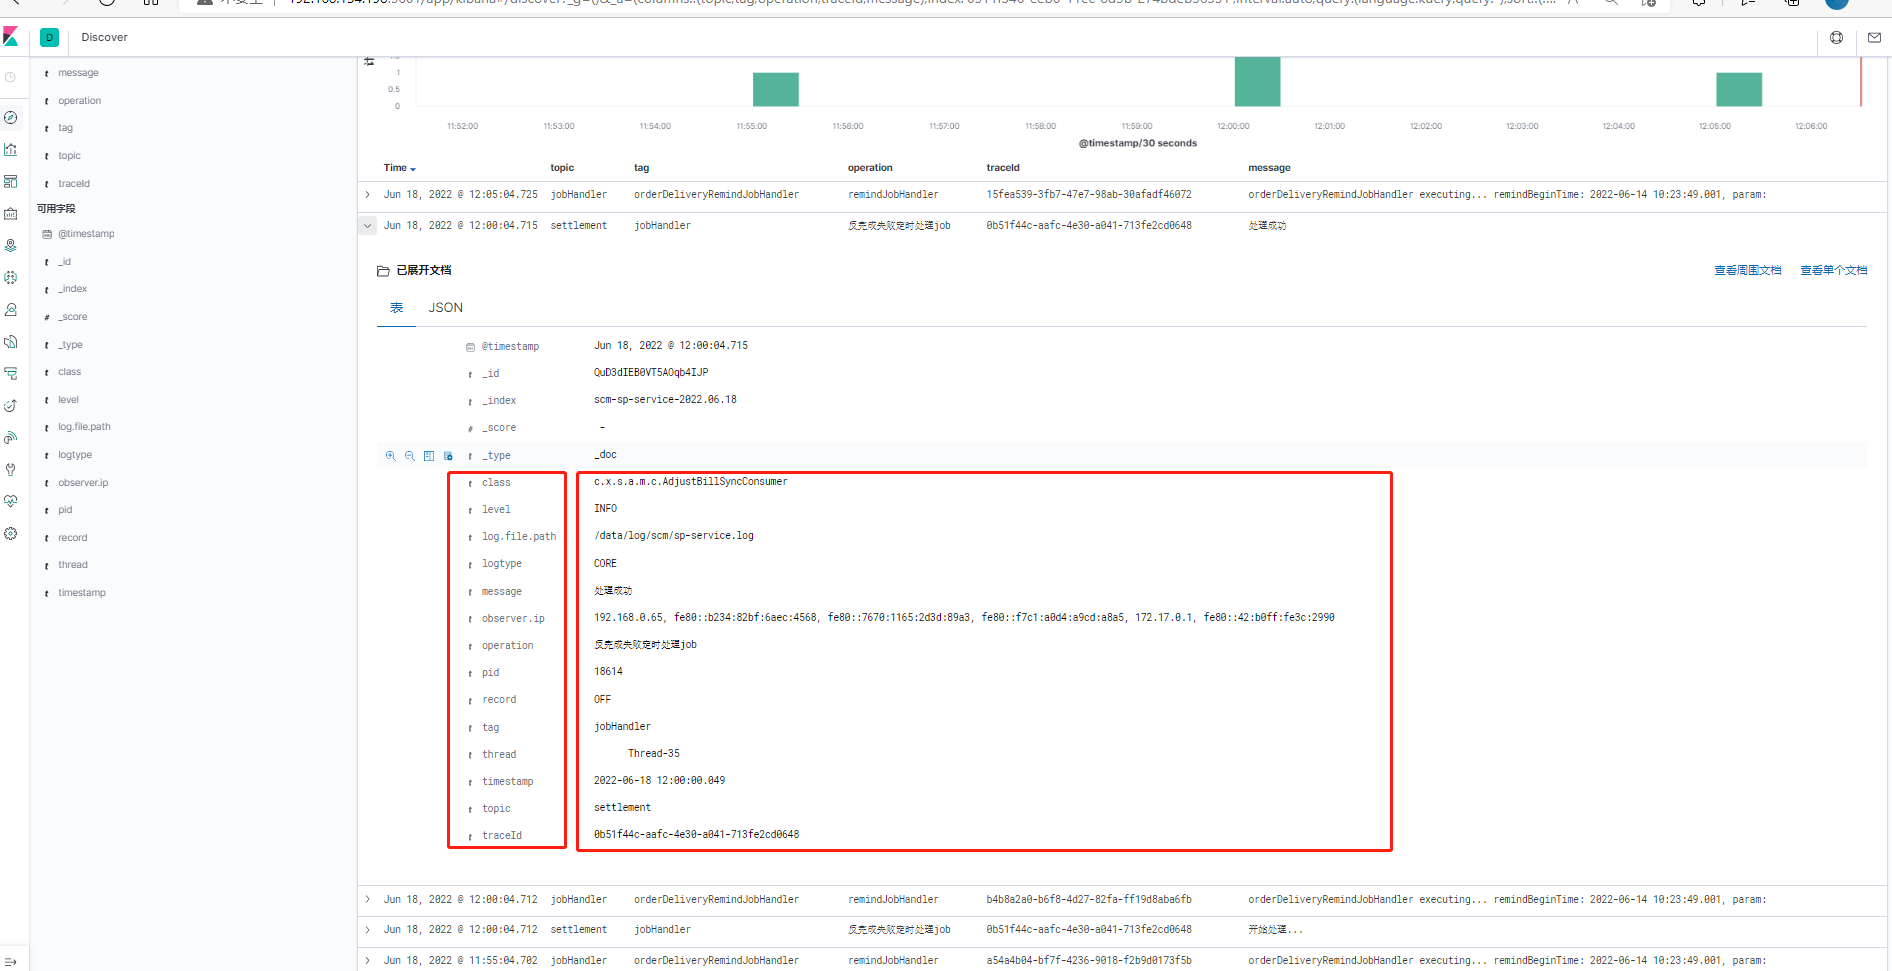
效果2:输入的是一个不规则的日志,最终输出是keyValue形式
输入示例:
2022-06-17 13:50:11.029  INFO - [OFF] - 31925 --- [io-17101-exec-2] - [6e810125-1f09-431f-9442-d9a9ba5e8e17]  c.x.s.o.s.impl.OrderDeliveryServiceImpl  : [CORE|orderDelivery|CG20009499|发货]· 正常采购 结束生成发货单 一共耗时: 10532
2022-06-17 13:50:11.043  INFO - [OFF] - 31925 --- [io-17101-exec-2] - [6e810125-1f09-431f-9442-d9a9ba5e8e17]  c.xfs.common.filter.HttpTraceLogFilter   : Http trace log: {"path":"/order/confirmDelivery","parameterMap":"{}","method":"POST","timeTaken":10792,"time":"2022-06-17T13:50:11.043","status":200,"requestBody":"{\"currentSupplierNo\":\"S00001\",\"currentUserId\":13520,\"currentName\":\"张磊\",\"orderNo\":\"CG20009499\",\"type\":2,\"deliveryTime\":\"2022-06-17 13:49:39\",\"predictArrivalTime\":\"2022-06-18\",\"deliveryPersonName\":\"/zl-t2\",\"deliveryPersonPhone\":\"17786699841\",\"logisticsType\":2,\"logisticsCompany\":null,\"logisticsNo\":null,\"driverName\":null,\"driverPhone\":null,\"licensePlateNumber\":null,\"remark\":null,\"settlementLegalId\":11,\"settlementLegalPerson\":\"北京鑫方盛五金交电有限公司\"}","responseBody":"true"}
最终效果:
3、logstash的自定义解析规则
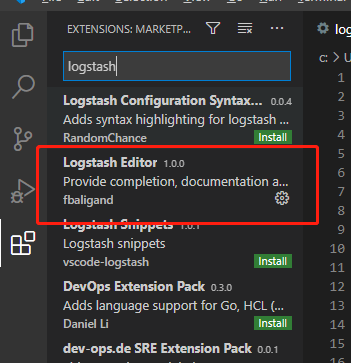
3.1 配置文件可使用VSCode编辑器编写,里面会有相关的提示,但是需要先安装对应的插件
3.2 正则匹配可以使用文档1中提供的grokUtil工具,将日志进行分词
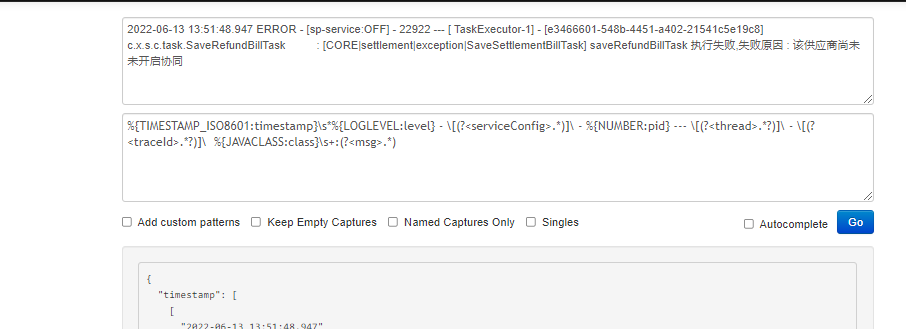
比如这里,就将这一行日志拆分成了:
timestamp |
2022-06-13 13:51:48.947 |
level |
ERROR |
serviceConfig |
sp-service:OFF |
... |
... |
4、java后端logback的配置
logging.pattern.console = %clr(%d{${LOG_DATEFORMAT_PATTERN:yyyy-MM-dd HH:mm:ss.SSS}}){faint} %clr(${LOG_LEVEL_PATTERN:%5p}) - [%X{record:-OFF}] - %clr(${PID:- }){magenta} %clr(---){faint} %clr([%15.15t]){faint} - [%X{PtxId}]  %clr(%-40.40logger{39}){cyan} %clr(:){faint} %m%n${LOG_EXCEPTION_CONVERSION_WORD:%wEx}
logging.pattern.file = %clr(%d{${LOG_DATEFORMAT_PATTERN:yyyy-MM-dd HH:mm:ss.SSS}}){faint} %clr(${LOG_LEVEL_PATTERN:%5p}) - [%X{record:-OFF}] - %clr(${PID:- }){magenta} %clr(---){faint} %clr([%15.15t]){faint} - [%X{PtxId}]  %clr(%-40.40logger{39}){cyan} %clr(:){faint} %m%n${LOG_EXCEPTION_CONVERSION_WORD:%wEx}
我们曾如此渴望生命的波澜,到后来才发现,人生最曼妙的风景是内心的淡定与从容

 浙公网安备 33010602011771号