分布式锁之Redisson可重入锁
前言
最近在项目中要用到分布式锁, 这里使用的Redisson作分布式锁,这里先记录一下Redisson的可重入锁。
Redisson可重入锁
可以参考官方文档:https://github.com/redisson/redisson/wiki/8.-分布式锁和同步器
可重入锁
A调用B。AB都需要同一锁,此时可重入锁就可以重入,A就可以调用B。不可重入锁时,A调用B将死锁
编写Redisson配置
MyRedissonConfig
package com.atguigu.product.config;

import org.redisson.Redisson;
import org.redisson.api.RedissonClient;
import org.redisson.config.Config;

import org.springframework.context.annotation.Bean;
import org.springframework.context.annotation.Configuration;

import java.io.IOException;

/**
 * description: MyRedissonConfig
 * date: 2022/11/15 19:32
 * author: MR.孙
 */
@Configuration
public class MyRedissonConfig {

    /**
     * 所有的Redisson的使用都是通过RedissonClient对象
     * @return
     * @throws IOException
     */
    @Bean(destroyMethod="shutdown")
    public RedissonClient redisson() throws IOException {
        // 1、创建配置
        Config config = new Config();
        config.useSingleServer().setAddress("redis://127.0.0.1:6379");

        // 2、根据Config创建出实例
        RedissonClient redissonClient = Redisson.create(config);

        return redissonClient;

    }

}
我们现在用一个Controller来测试Redisson可重入锁。
Controller
@Autowired
private RedissonClient redisson;
@ResponseBody
@GetMapping("/hello")
public String hello(){
//1. 获取一把锁, 只要锁的名字一样,就是同一把锁
RLock lock = redisson.getLock("my-lock");
//2. 加锁
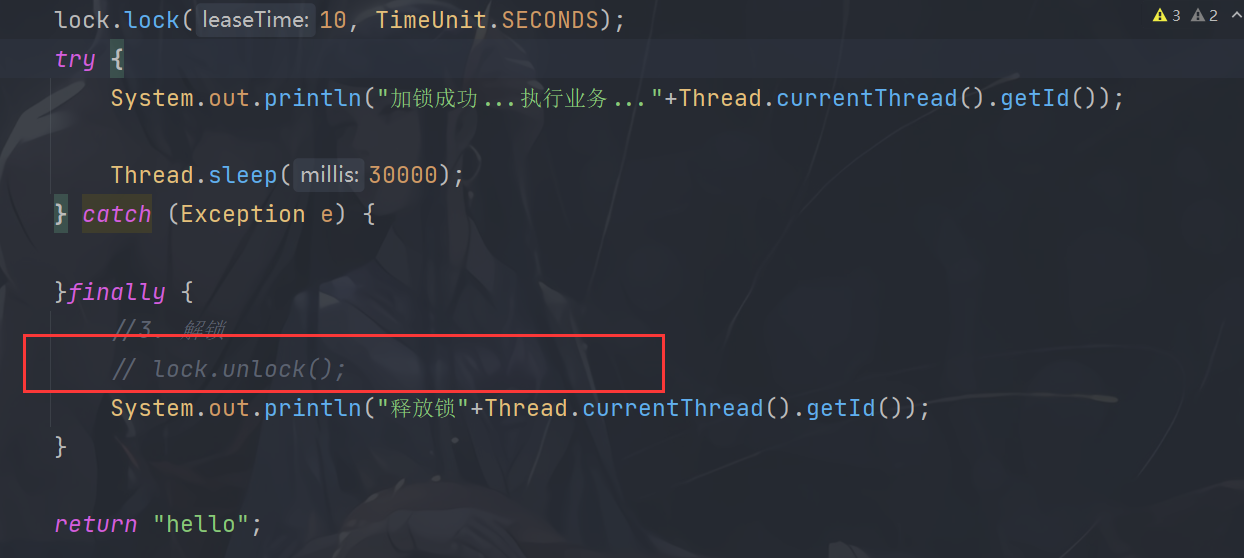
lock.lock();//阻塞式等待
try {
System.out.println("加锁成功...执行业务..."+Thread.currentThread().getId());
Thread.sleep(30000);
} catch (Exception e) {
}finally {
//3. 解锁
lock.unlock();
System.out.println("释放锁"+Thread.currentThread().getId());
}
return "hello";
}
现在用的Redisson可重入锁默认是阻塞等待的,也就是前一个独占锁后没有释放锁,后面的将会阻塞等待上一个释放锁才能继续执行。
结论
我们现在来验证一下,这个结论。
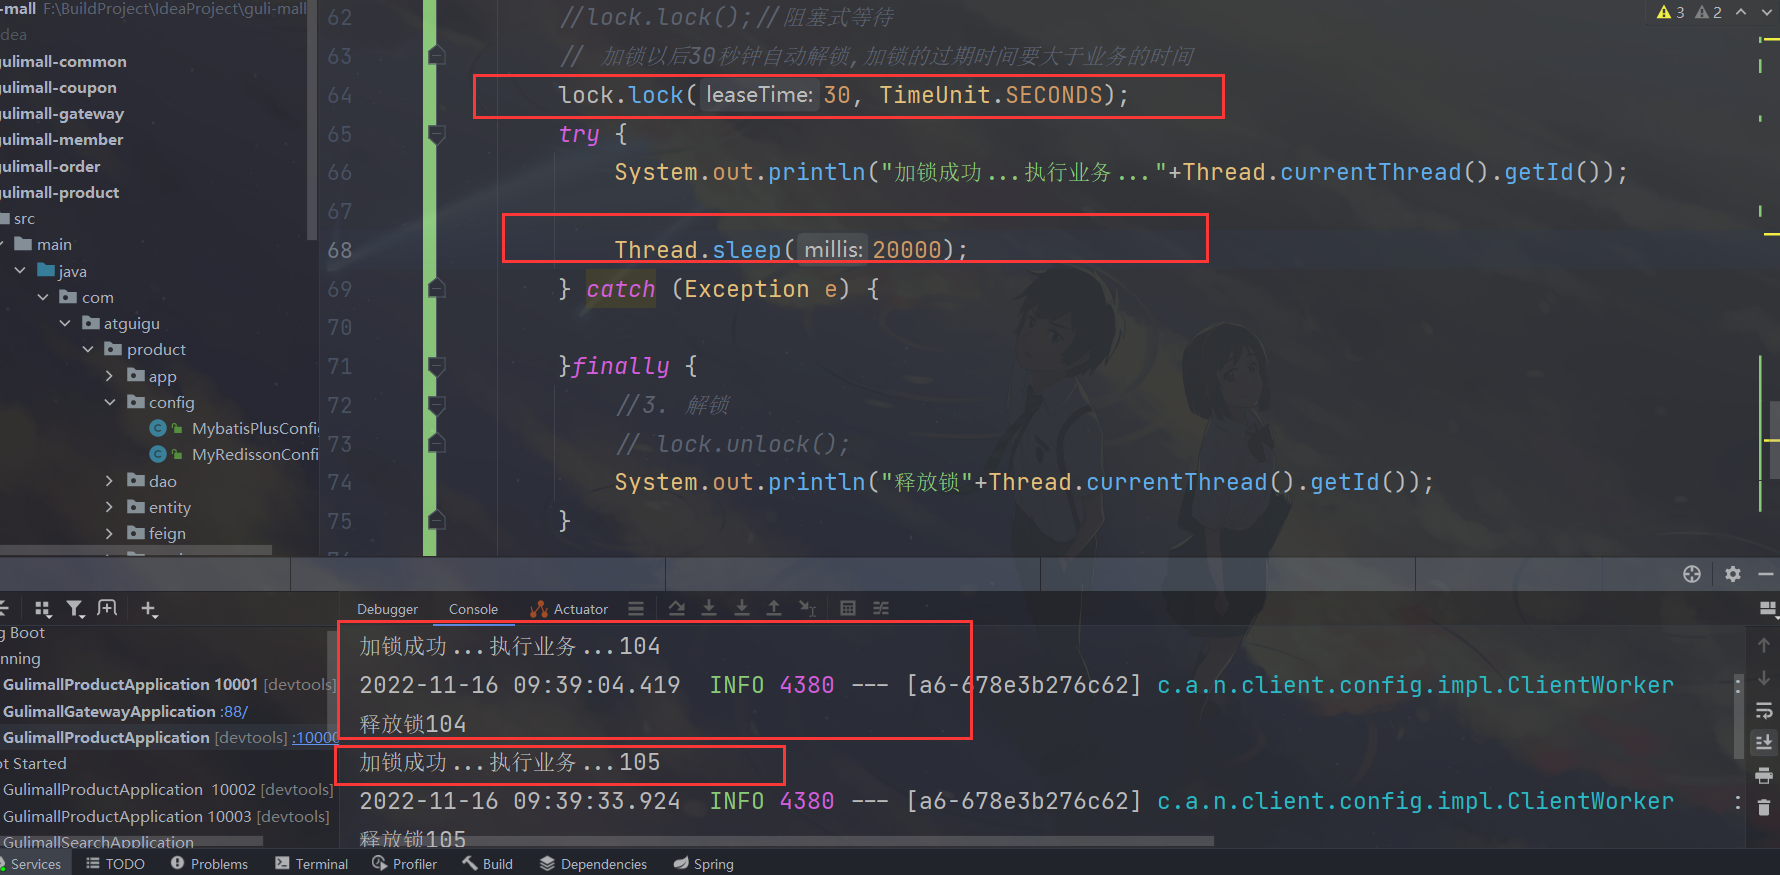
我们这里模拟一下分布式的一个场景,现在有两个商品服务一个是10000端口,一个是100001端口。

现在同时对10000端口和10001端口进行访问,看看是否第二个服务会被阻塞。

当我们对10000端口进行访问时,进行加锁执行业务,在10001端口并没有打印出相同的提示,而是一直等待10000端口释放锁后才能进行访问。


redisson的可重入的锁是不会发生死锁的情况的:
我们这里模仿一下突然断电的操作,也就是来不及释放锁,看它会不会发生死锁
同时对10000端口和10001端口进行访问,在锁没有释放的时候关掉服务。

可以看到10000端口的锁还没有释放,那么10001端口能获取锁吗?答案是可以的。

可以看到计时我们10000端口的锁还没有释放,但是10001端口依然能获取到锁。原因就是看门狗对过期时间进行自动续期的一个机制,默认是30s,即使不手动解锁,锁默认在30s以后自动删除。
总结:
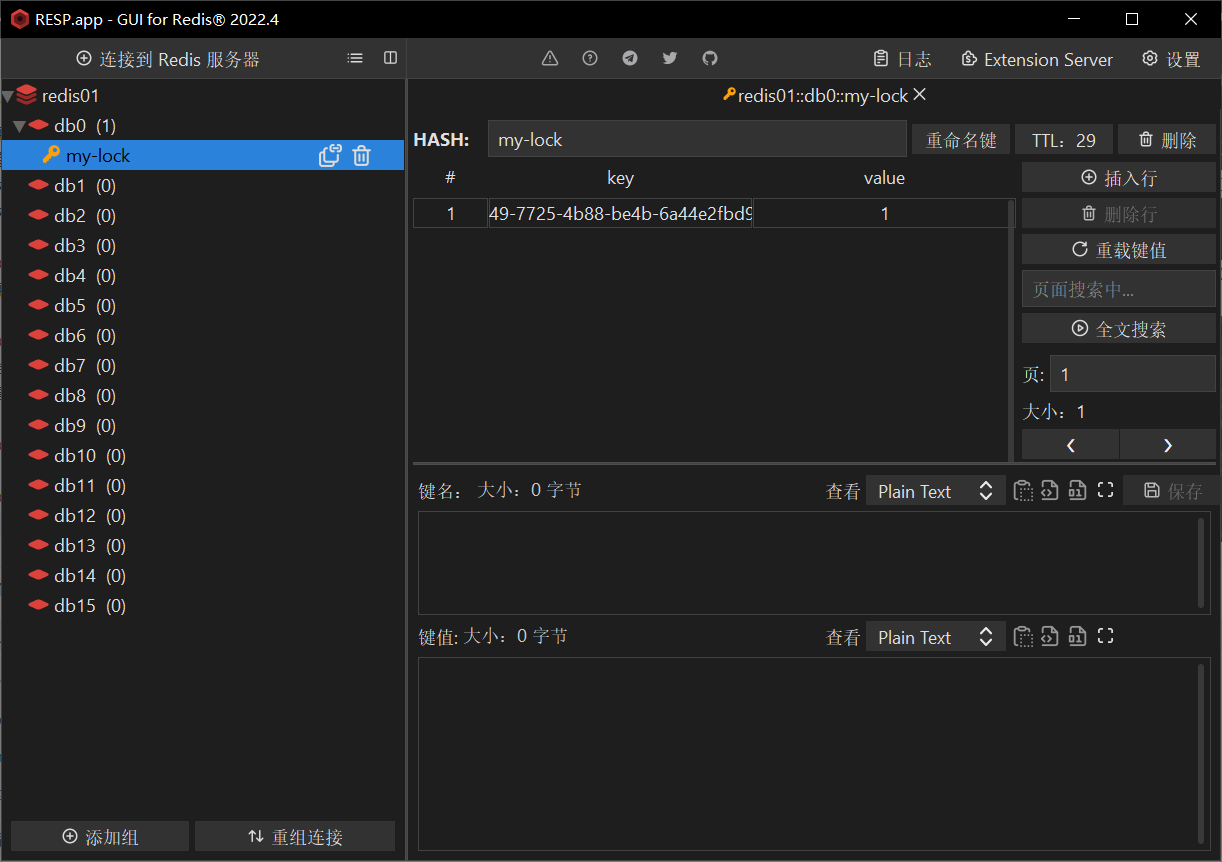
当我们去redis中去看这把锁的时候发现,这把锁的名称就是键的名称,并且值是uuid的一个形式,并且它的默认过期时间是30s,当我们的业务逻辑耗时过长时,redisson中有个叫做看门狗的东西,对锁会进行自动续期,当业务执行完后,锁的自动过期会被删掉,只要加锁的业务运行完成,就不会给当前锁续期,即使不手动解锁,锁默认在30s以后自动删除。
手动设置锁过期时间
    // 加锁以后10秒钟自动解锁
        // 无需调用unlock方法手动解锁
        lock.lock(10, TimeUnit.SECONDS);
手动加锁过后,看门狗将不会进行锁的自动续期,并且在指定的过期时间内自动解锁完成,无需手动解锁。
验证:
我们对10000端口进行访问时,并没有手动释放锁,但是因为设置了自动过期时间,所以最终会自动释放锁。

并且我们先发第一次对10000端口的请求,在第一次请求没有解锁的时候第二次发起对10000端口的请求,发现这个锁并没有锁住全部的服务,但是最终会被释放,因为它设置了自动过期时间。


需要注意的是,手动设置的自动过期时间必须大于业务的时间,否则将会出现释放的不是自身的锁,释放的是别人的锁,只要设置了手动过期时间大于业务的时间,那么我们在第一次请求10000端口后,在10000端口没有执行完发起第二次请求那么它也是锁住了所有的服务的。
源码解析
先来看看默认的不设置过期时间的上锁方法lock()
    @Override
    public void lock() {
        try {
            lock(-1, null, false);
        } catch (InterruptedException e) {
            throw new IllegalStateException();
        }
    }


private void lock(long leaseTime, TimeUnit unit, boolean interruptibly) throws InterruptedException {
        long threadId = Thread.currentThread().getId();
        Long ttl = tryAcquire(-1, leaseTime, unit, threadId);
        // lock acquired
        if (ttl == null) {
            return;
        }
}

   private Long tryAcquire(long waitTime, long leaseTime, TimeUnit unit, long threadId) {
        return get(tryAcquireAsync(waitTime, leaseTime, unit, threadId));
    }


   private <T> RFuture<Long> tryAcquireAsync(long waitTime, long leaseTime, TimeUnit unit, long threadId) {
        RFuture<Long> ttlRemainingFuture;
        if (leaseTime != -1) {
            ttlRemainingFuture = tryLockInnerAsync(waitTime, leaseTime, unit, threadId, RedisCommands.EVAL_LONG);
        } else {
            ttlRemainingFuture = tryLockInnerAsync(waitTime, internalLockLeaseTime,
                    TimeUnit.MILLISECONDS, threadId, RedisCommands.EVAL_LONG);
        }
        ttlRemainingFuture.onComplete((ttlRemaining, e) -> {
            if (e != null) {
                return;
            }

            // lock acquired
            if (ttlRemaining == null) {
                if (leaseTime != -1) {
                    internalLockLeaseTime = unit.toMillis(leaseTime);
                } else {
                    scheduleExpirationRenewal(threadId);
                }
            }
        });
        return ttlRemainingFuture;
    }


  private void renewExpiration() {
        ExpirationEntry ee = EXPIRATION_RENEWAL_MAP.get(getEntryName());
        if (ee == null) {
            return;
        }

        Timeout task = commandExecutor.getConnectionManager().newTimeout(new TimerTask() {
            @Override
            public void run(Timeout timeout) throws Exception {
                ExpirationEntry ent = EXPIRATION_RENEWAL_MAP.get(getEntryName());
                if (ent == null) {
                    return;
                }
                Long threadId = ent.getFirstThreadId();
                if (threadId == null) {
                    return;
                }

                RFuture<Boolean> future = renewExpirationAsync(threadId);
                future.onComplete((res, e) -> {
                    if (e != null) {
                        log.error("Can't update lock " + getRawName() + " expiration", e);
                        EXPIRATION_RENEWAL_MAP.remove(getEntryName());
                        return;
                    }

                    if (res) {
                        // reschedule itself
                        renewExpiration();
                    }
                });
            }
        }, internalLockLeaseTime / 3, TimeUnit.MILLISECONDS);

        ee.setTimeout(task);
    }
可以看到不设置默认时间看门狗默认的自动过期时间为30s,并且通过上面的源码发现,如果业务没有执行完成,会有一个定时任务,每次自动续期,当过了internalLockLeaseTime / 3的时候。

接下来看一下手动设置过期时间的void lock(long leaseTime, TimeUnit unit);方法
   @Override
    public void lock(long leaseTime, TimeUnit unit) {
        try {
            lock(leaseTime, unit, false);
        } catch (InterruptedException e) {
            throw new IllegalStateException();
        }
    }


  private void lock(long leaseTime, TimeUnit unit, boolean interruptibly) throws InterruptedException {
        long threadId = Thread.currentThread().getId();
        Long ttl = tryAcquire(-1, leaseTime, unit, threadId);
        // lock acquired
        if (ttl == null) {
            return;
        }
}


   private Long tryAcquire(long waitTime, long leaseTime, TimeUnit unit, long threadId) {
        return get(tryAcquireAsync(waitTime, leaseTime, unit, threadId));
    }


   private <T> RFuture<Long> tryAcquireAsync(long waitTime, long leaseTime, TimeUnit unit, long threadId) {
        RFuture<Long> ttlRemainingFuture;
        if (leaseTime != -1) {
            ttlRemainingFuture = tryLockInnerAsync(waitTime, leaseTime, unit, threadId, RedisCommands.EVAL_LONG);
        } else {
            ttlRemainingFuture = tryLockInnerAsync(waitTime, internalLockLeaseTime,
                    TimeUnit.MILLISECONDS, threadId, RedisCommands.EVAL_LONG);
        }
	}


    <T> RFuture<T> tryLockInnerAsync(long waitTime, long leaseTime, TimeUnit unit, long threadId, RedisStrictCommand<T> command) {
        return evalWriteAsync(getRawName(), LongCodec.INSTANCE, command,
                "if (redis.call('exists', KEYS[1]) == 0) then " +
                        "redis.call('hincrby', KEYS[1], ARGV[2], 1); " +
                        "redis.call('pexpire', KEYS[1], ARGV[1]); " +
                        "return nil; " +
                        "end; " +
                        "if (redis.call('hexists', KEYS[1], ARGV[2]) == 1) then " +
                        "redis.call('hincrby', KEYS[1], ARGV[2], 1); " +
                        "redis.call('pexpire', KEYS[1], ARGV[1]); " +
                        "return nil; " +
                        "end; " +
                        "return redis.call('pttl', KEYS[1]);",
                Collections.singletonList(getRawName()), unit.toMillis(leaseTime), getLockName(threadId));
    }
可以看到手动设置过期时间最终也会使用Lua的脚本。
完整代码
    @ResponseBody
    @GetMapping(value = "/hello")
    public String hello() {

        //1、获取一把锁,只要锁的名字一样,就是同一把锁
        RLock myLock = redisson.getLock("my-lock");

        //2、加锁
        myLock.lock();      //阻塞式等待。默认加的锁都是30s
        //1)、锁的自动续期,如果业务超长,运行期间自动锁上新的30s。不用担心业务时间长,锁自动过期被删掉
        //2)、加锁的业务只要运行完成,就不会给当前锁续期,即使不手动解锁,锁默认会在30s内自动过期,不会产生死锁问题
        // myLock.lock(10,TimeUnit.SECONDS);   //10秒钟自动解锁,自动解锁时间一定要大于业务执行时间
        //问题:在锁时间到了以后,不会自动续期
        //1、如果我们传递了锁的超时时间,就发送给redis执行脚本,进行占锁,默认超时就是 我们制定的时间
        //2、如果我们指定锁的超时时间,就使用 lockWatchdogTimeout = 30 * 1000 【看门狗默认时间】
        //只要占锁成功,就会启动一个定时任务【重新给锁设置过期时间,新的过期时间就是看门狗的默认时间】,每隔10秒都会自动的再次续期,续成30秒
        // internalLockLeaseTime 【看门狗时间】 / 3, 10s
        try {
            System.out.println("加锁成功,执行业务..." + Thread.currentThread().getId());
            try { TimeUnit.SECONDS.sleep(20); } catch (InterruptedException e) { e.printStackTrace(); }
        } catch (Exception ex) {
            ex.printStackTrace();
        } finally {
            //3、解锁  假设解锁代码没有运行,Redisson会不会出现死锁
            System.out.println("释放锁..." + Thread.currentThread().getId());
            myLock.unlock();
        }

        return "hello";
    }

 浙公网安备 33010602011771号