
Linux便捷的系统之----线程池
1.线程池
0)总述
在前段时间我们写了进程池的代码,那么今天,我们已经学习完了线程的内容,下面我们也来写一下线程池吧~这是本Linux系统中最后一个大项目了,逻辑较为复杂,需要综合前几篇博客的代码!这里仅讲解分享新写的内容,旧的代码内容直接给出~
要设计线程池,必然涉及多线程,那锁是肯定需要了~,之后锁的开关要看条件变量,那之前的comnd.hpp文件也不能少~,之后我们要像是日志那样打印出来,上一篇博客的日志代码也需要了~我们设计的是线程池,是一个池化的工程,里面必然有很多线程吧?那就又要在写一个文件来实现各个线程~之后我们要线程去做任务,那么之前写的Task文件应该也需要了~
先把之前的代码放在这里:
1)mutex.hpp
#pragma once
#include
#include
#include
class Mutex
{
public:
    Mutex()
    {
        pthread_mutex_init(&_lock, nullptr);
    }
    void Lock()
    {
        pthread_mutex_lock(&_lock);
    }
    void UnLock()
    {
        pthread_mutex_unlock(&_lock);
    }
    pthread_mutex_t *Get()
    {
        return &_lock;
    }
    ~Mutex()
    {
        pthread_mutex_destroy(&_lock);
    }
private:
    pthread_mutex_t _lock;
};
class LockGuard
{
public:
    LockGuard(Mutex*_mutex)
    :_mutexp(_mutex)
    {
        _mutex->Lock();
    }
    ~LockGuard()
    {
        _mutexp->UnLock();
    }
private:
    Mutex* _mutexp;
};
2)Cond.hpp
#pragma once
#include
#include
#include"Mutex.hpp"
class Cond
{
public:
    Cond()
    {
        pthread_cond_init(&_cond,nullptr);
    }
    void Wait(Mutex &lock)
    {
        int n=pthread_cond_wait(&_cond,lock.Get());
    }
    void NotifyOne()   //激活一个线程
    {
        int n=pthread_cond_signal(&_cond);
        (void)n;
    }
    void NotifyAll()
    {
        int n=pthread_cond_broadcast(&_cond);
        (void)n;
    }
    ~Cond()
   {
    pthread_cond_destroy(&_cond);
   }
private:
    pthread_cond_t _cond;
};
3)Task.hpp
#pragma once
#include
#include
#include
using namespace std;
class Task
{
public:
    Task()
    {
    }
    Task(int x, int y) : a(x), b(y)
    {
    }
    void Excute()
    {
        result=a+b;
    }
    void operator()()
    {
        Excute();
    }
    void Print()
    {
        cout<#pragma once
#include
#include
#include  // C++17 文件操作
#include
#include
#include
#include
#include
#include "Mutex.hpp"
using namespace std;
// 规定出场景的日志等级
enum class LogLevel
{
    DEBUG,
    INFO,
    WARNING,
    ERROR,
    FATAL
};
string Level2String(LogLevel level)
{
    switch (level)
    {
    case LogLevel::DEBUG:
        return "DEBUG";
    case LogLevel::INFO:
        return "Info";
    case LogLevel::WARNING:
        return "Warning";
    case LogLevel::ERROR:
        return "Error";
    case LogLevel::FATAL:
        return "Fatal";
    default:
        return "Unknown";
    }
}
// 20XX-08-04 12:27:03
string GetCurrentTime()
{
    // 1. 获取时间戳
    time_t currtime = time(nullptr);
    // 2. 如何把时间戳转换成为20XX-08-04 12:27:03
    struct tm currtm;
    localtime_r(&currtime, &currtm);
    // 3. 转换成为字符串 -- dubug?
    char timebuffer[64];
    snprintf(timebuffer, sizeof(timebuffer), "%4d-%02d-%02d %02d:%02d:%02d",
             currtm.tm_year + 1900,
             currtm.tm_mon + 1,
             currtm.tm_mday,
             currtm.tm_hour,
             currtm.tm_min,
             currtm.tm_sec);
    return timebuffer;
}
// 1. 刷新的问题 -- 假设我们已经有了一条完整的日志,string->设备(显示器,文件)
// 基类方法
class LogStrategy
{
public:
    virtual ~LogStrategy() = default;
    virtual void SyncLog(const string &logmessage) = 0;
};
// 显示器刷新
class ConsoleLogStrategy : public LogStrategy
{
public:
    ~ConsoleLogStrategy()
    {
    }
    void SyncLog(const string &logmessage) override
    {
        {
            LockGuard lockgurad(&_lock);
            cout << logmessage << endl;
        }
    }
private:
    Mutex _lock;
};
const std::string logdefaultdir = "log";
const static std::string logfilename = "test.log";
// 文件刷新
class FileLogStrategy : public LogStrategy
{
public:
    FileLogStrategy(const string &dir = logdefaultdir,
                    const string filename = logfilename)
        : _dir_path_name(dir), _filename(filename)
    {
        LockGuard lockguard(&_lock);
        if (filesystem::exists(_dir_path_name))
        {
            return;
        }
        try
        {
            filesystem::create_directories(_dir_path_name);
        }
        catch (const filesystem::filesystem_error &e)
        {
            std::cerr << e.what() << "\r\n";
        }
    }
    void SyncLog(const string &logmessage) override
    {
        LockGuard lockguard(&_lock);
        string target = _dir_path_name;
        target += "/";
        target += _filename;
        ofstream out(target.c_str(), std::ios::app);
        if (!out.is_open())
        {
            return;
        }
        out << logmessage << "\n"; // out.write
        out.close();
    }
    ~FileLogStrategy()
    {
    }
private:
    string _dir_path_name; // log
    string _filename;      // hello.log => log/hello.log
    Mutex _lock;
};
// 网络刷新
// 1. 定制刷新策略
// 2. 构建完整的日志
class Logger
{
public:
    Logger()
    {
    }
    void EnableConsoleLogStrategy() // 显示器刷新
    {
        _strategy = make_unique();
    }
    void EnableFileLogStrategy()
    {
        _strategy = make_unique();
    }
    // 形成一条完整日志的方式
    class LogMessage
    {
    public:
        LogMessage(LogLevel level, std::string &filename, int line, Logger &logger)
            : _curr_time(GetCurrentTime()),
              _level(level),
              _pid(getpid()),
              _filename(filename),
              _line(line),
              _logger(logger)
            {
            std::stringstream ss;
            ss << "[" << _curr_time << "] "
               << "[" << Level2String(_level) << "] "
               << "[" << _pid << "] "
               << "[" << _filename << "] "
               << "[" << _line << "]"
               << " - ";
            _loginfo = ss.str();
            }
        template
        LogMessage& operator << (const T &info)
        {
            stringstream ss;
            ss<SyncLog(_loginfo);
            }
        }
    private:
        string _curr_time; // 日志时间
        LogLevel _level;   // 日志等级
        pid_t _pid;        // 进程pid
        string _filename;
        int _line;
        string _loginfo; // 一条合并完成的,完整的日志信息
        Logger &_logger; // 提供刷新策略的具体做法
    };
    LogMessage operator()(LogLevel level, std::string filename, int line)
    {
        return LogMessage(level, filename, line, *this);
    }
    ~Logger()
    {
    }
private:
    unique_ptr _strategy;
};
Logger logger;
#define LOG(level) logger(level, __FILE__, __LINE__)
#define EnableConsoleLogStrategy() logger.EnableConsoleLogStrategy()
#define EnableFileLogStrategy() logger.EnableFileLogStrategy()
下面是本节的重点代码:
首先就是线程的设计,我们还是可以用一个类来封装我们的线程,其私有成员变量包括
_isrunning:表示线程是否正在运行。
_tid:线程的POSIX线程ID。
_lwpid:线程的轻量级进程ID。
_name:线程的名称。
_func:线程函数,类型为 func_t。
之后对其进行初始化,写一个构造函数即可,
线程函数上,包括start,stop,join,以及析构函数,这些就是一些C++库函数的调用与封装,这里直接给出代码:
5)Thread.hpp
#ifndef __THREAD_HPP__
#define __THREAD_HPP__
#include
#include
#include
#include
#include
#include /* For SYS_xxx definitions */
#include "Logger.hpp"
#define get_lwp_id() syscall(SYS_gettid)
using namespace std;
using func_t = function;
const string threadnamedefault = "None-Name";
class Thread
{
public:
Thread(func_t func,const string& name=threadnamedefault)
:_name(name)
,_func(func)
,_isrunning(false)
{
LOG(LogLevel::INFO)<<_name<<" create thread obj success";
}
static void *start_route(void *args) //让线程开始运行
{
Thread *self=static_cast(args);
self->_isrunning=true;
self->_lwpid=get_lwp_id();
self->_func(self->_name);
pthread_exit((void*)0);
}
void Start()
{
int n=pthread_create(&_tid,nullptr,start_route,this); //???为什么传递this指针
if(n==0)
{
LOG(LogLevel::INFO)<<_name<<"running success";
}
}
void Stop()
{
int n=pthread_cancel(_tid);// 太简单粗暴了
(void)n;
}
// 检测线程结束并且回收的功能
void Join()
{
if(!_isrunning)
return;
int n=pthread_join(_tid,nullptr);
if(n==0)
{
LOG(LogLevel::INFO)<<_name<<" pthread_join success";
}
}
~Thread()
{
}
private:
bool _isrunning;
pthread_t _tid;
pid_t _lwpid;
string _name;
func_t _func;
};
#endif
下面是线程池的设计:
首先还是用一个类来封装,其私有成员主要包含一下内容:任务队列、多个线程、保护机制、是否运行、队列判空、以及线程执行逻辑,类的成员函数包括入队列,开始运行,停止运行,以及等待,大体逻辑跟上述差不多,直接看代码吧,里面有注释
6)ThreadPool.hpp
#pragma once
#include
#include
#include
#include
#include
#include "Mutex.hpp"
#include "Cond.hpp"
#include "thread.hpp"
// 普通线程池
const static int defaultthreadnum = 3; // for debug
template
class ThreadPool
{
public:
ThreadPool(int threadnum = defaultthreadnum)
: _threadnum(threadnum), _is_running(false), _wait_thread_num(0)
{
for (int i = 0; i < _threadnum; i++)
{
// 方法1:
// auto f = std::bind(hello, this);
// 方法2
string name = "thread-" + to_string(i + 1);
_threads.emplace_back([this](const string &name)
{ this->Routine(name); }, name);
}
LOG(LogLevel::INFO) << "thread pool obj create success";
}
void Start()
{
if (_is_running) // 线程要是已经跑起来了那就直接返回好了,这个函数对其来说就没啥用了
return;
_is_running = true;
for (auto &t : _threads)
{
t.Start();
}
LOG(LogLevel::INFO) << "thread pool running success";
}
// 核心思想:我们应该让线程走正常的唤醒逻辑退出
// 线程池要退出
// 1. 如果被唤醒 && 任务队列没有任务 = 让线程退出
// 2. 如果被唤醒 && 任务队列有任务 = 线程不能立即退出,而应该让线程把任务处理完,在退出
// 3. 线程本身没有被休眠,我们应该让他把他能处理的任务全部处理完成, 在退出
// 3 || 2 -> 1
// 如果任务队列有任务,线程是不会休眠的!
void Stop()
{
if (!_is_running) // 已经不运行了
return;
_is_running = false;
if (_wait_thread_num) // 还有等待的线程
_cond.NotifyAll();
// 这种做法不推荐
// if (!_is_running)
// return;
// _is_running = false;
// for (auto &t : _threads)
// {
// t.Stop();
// }
// LOG(LogLevel::INFO) << "thread pool stop success";
}
void Wait()
{
for (auto &t : _threads)
{
t.Join();
}
LOG(LogLevel::INFO) << "thread pool wait success";
}
void Enqueue(const T &t)
{
if (!_is_running) // 线程都不运行了,那就别提入队列了~
return;
{
LockGuard lockguard(&_lock);
_q.push(t);
if (_wait_thread_num > 0)
_cond.NotifyOne();
}
}
~ThreadPool()
{
}
private:
// 任务队列
std::queue _q; // 整体使用的临界资源
// 多个线程
vector _threads; // 1. 创建线程对象 2. 让线程对象启动
int _threadnum;
int _wait_thread_num;
// 保护机制
Mutex _lock;
Cond _cond;
// 其他属性
bool _is_running;
bool QueueIsEmpty()
{
return _q.empty();
}
void Routine(const string &name)
{
while (1)
{
// 把任务从线程获取到线程私有!临界区 -> 私有的栈
T t;
{
LockGuard lockguard(&_lock);
while (QueueIsEmpty() && _is_running) // 队列为空并且运行
{
_wait_thread_num++;
_cond.Wait(_lock);
_wait_thread_num--;
}
if (!_is_running && QueueIsEmpty()) // 队列为空并且线程没运行
{
LOG(LogLevel::INFO) << " 线程池退出 && 任务队列为空, " << name << " 退出";
break;
}
// 队列中一定有任务了!, 但是
// 1. 线程池退出 -- 消耗历史
// 2. 线程池没有退出 -- 正常工作
t = _q.front(); // 取出第一个元素
_q.pop();
}
t();
LOG(LogLevel::DEBUG) << name << "handler task:" << t.Result2String();
}
}
};
最后是main函数,我们就种一个随机数种子来执行任务就行了~
7)main.cc
#include "Task.hpp"
#include "ThreadPool.hpp"
#include
#include
using namespace std;
int main()
{
srand(time(nullptr) ^ getpid());
EnableConsoleLogStrategy();
unique_ptr> tp = make_unique>(10);
//unique_ptr> tp2 = make_unique>(10);
//unique_ptr> tp3 = make_unique>(10);
tp->Start();
int cnt = 10;
while (cnt--)
{
// 生产任务
int x = rand() % 10 + 1;
usleep(rand() % 73);
int y = rand() % 5 + 1;
Task t(x, y);
// push到线程池中,处理
tp->Enqueue(t);
sleep(1);
// 如果线程池本身,被多线程访问呢?
}
tp->Stop();
tp->Wait();
return 0;
}
8)Makefile
这个正常写,只不过要用C++17来做
main:main.cc
g++ -o $@ $^ -std=c++17 -lpthread
.PHONY:clean
clean:
rm -f clean;
9)代码运行
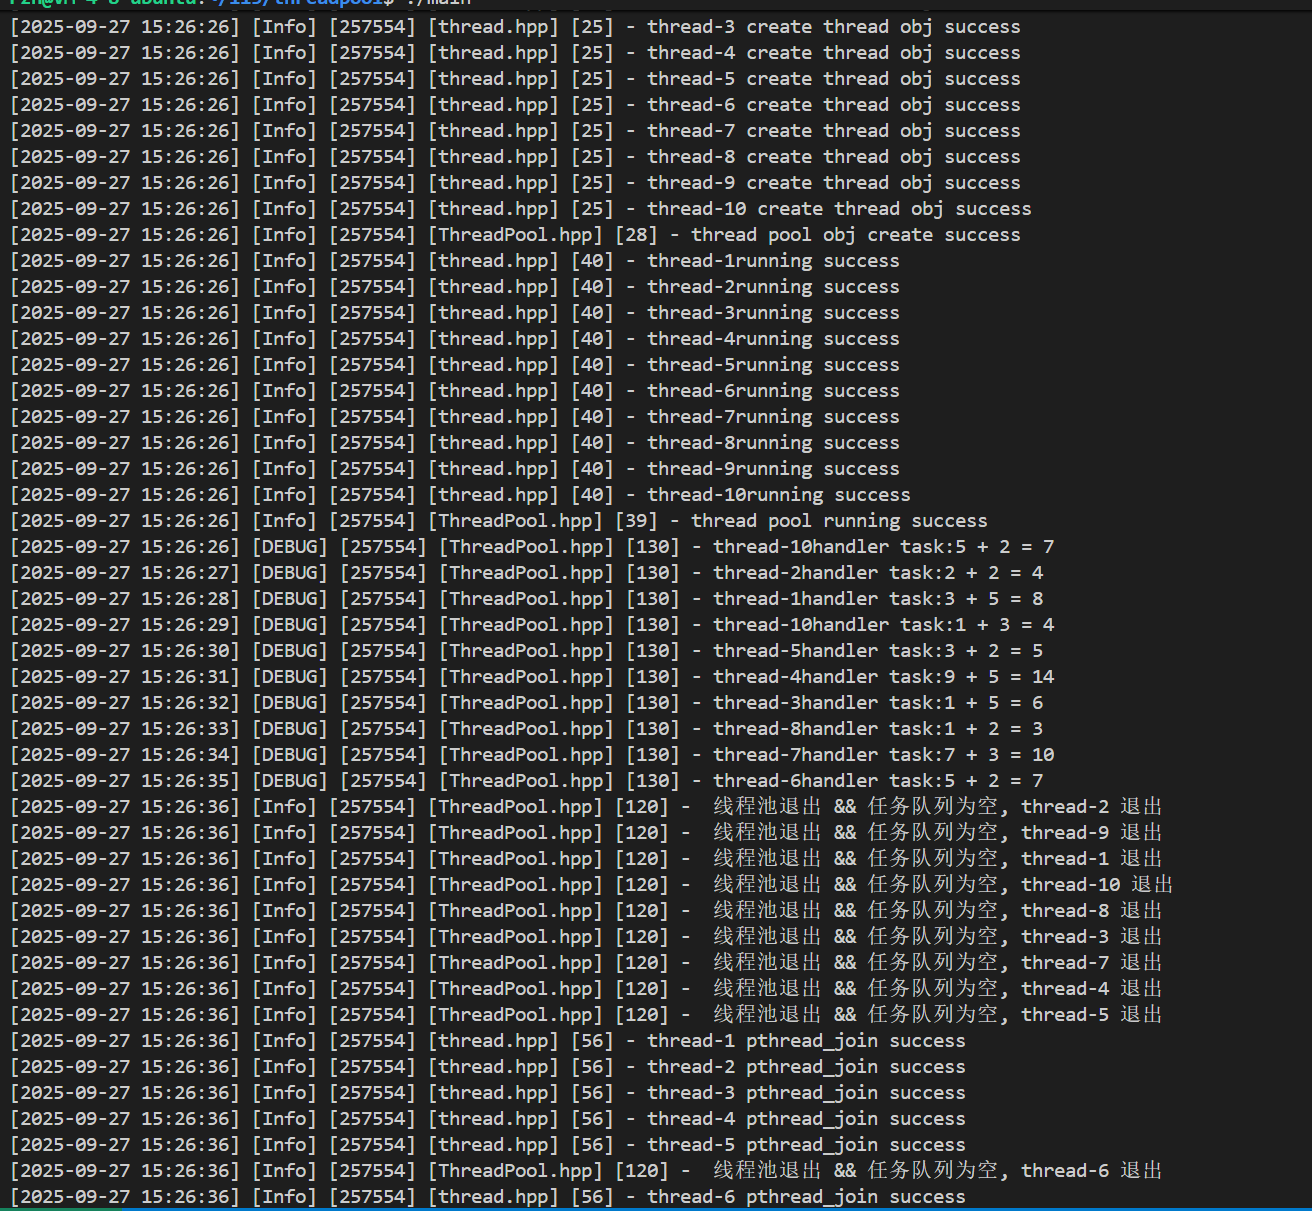
接下来我们要将其改造一下~
2.单例模式
在Linux系统中,单例模式(Singleton Pattern)是一种常见的设计模式,它确保一个类只有一个实例,并提供一个全局访问点来获取这个实例。这种模式在系统编程中非常有用,尤其是在需要全局资源管理、配置管理或日志记录等场景中。
就像是正常的恋爱中,一个男生只能有一个女朋友一样~如果一个男生同时找了多个女朋友的话,可能会引发一系列的连锁问题!!!!严重时会导致恋情崩溃!!
那在很多服务器开发场景也是一样的, 我们经常需要让服务器加载很多的数据 (上百G) 到内存中. 此时往往要⽤⼀个单例的类来管理这些数据。而不是说找来一堆类来管理,这样会导致数据资源的竞争甚至说是进程的崩溃!!!实现其有两种模式:懒汉模式和饿汉模式2.1 懒汉模式
形象一点来说就是吃完饭, 先把碗放下, 然后下⼀顿饭⽤到这个碗了再洗碗, 就是懒汉模式。
如果单例对象构造十分耗时或者占用很多资源,比如加载插件啊,初始化网络连接啊,读取文件啊等等,而有可能该对象程序运行时不会用到,那么也要在程序一开始就进行初始化,就会导致程序启动时非常的缓慢。所以这种情况使用懒汉模式(延迟加载)更好。
代码示例:
template
class Singleton{
static T* inst;
public:
static T* GetInstance()
{
if(inst==NULL)
inst=new T()
}
};
可以看出,是用的时候再创建!!!(从那个if语句可以看出来)
2.2 饿汉模式
形象一点来说就是
吃完饭, 立刻洗碗, 这种就是饿汉模式. 因为下⼀顿吃的时候可以立刻拿着碗就能吃饭. 就是说不管你将来用不用,程序启动时就创建一个唯一的实例对象。如果这个单例对象在多线程高并发环境下频繁使用,性能要求较高,那么显然使用饿汉模式来避免资源竞争,提高响应速度更好。
template
class Singleton {
static T data;
public:
static T* GetInstance() {
return &data;
}
};
可以看出,不管用不用都创建了!!!
3.单例线程池
我们仅需要把ThreadPool.hpp文件重写一下即可,加入单例的代码~
我们将其命名为ThreadPoolSingle.hpp
ThreadPoolSingle.hpp
#pragma once
#include
#include
#include
#include
#include
#include "Mutex.hpp"
#include "Cond.hpp"
#include "thread.hpp"
using namespace std;
// 单例线程池 - 懒汉模式
const static int defaultthreadnum = 3; // for debug
template
class ThreadPool
{
public:
void Start()
{
if (_isrunning)
return;
_isrunning = true;
for (auto &t : _threads)
{
t.Start();
}
LOG(LogLevel::INFO) << "thread pool running success";
}
void Stop()
{
if (!_isrunning)
return;
_isrunning = false;
if (_wait_thread_num)
_cond.NotifyAll();
}
void Wait()
{
for (auto &t : _threads)
{
t.Join();
}
LOG(LogLevel::INFO) << "thread pool wait success";
}
void Enqueue(const T &t)
{
if (!_isrunning)
return;
{
LockGuard lockguard(&_lock);
_q.push(t);
if (_wait_thread_num > 0)
_cond.NotifyOne();
}
}
// debug
static std::string ToHex(ThreadPool *addr)
{
char buffer[64];
snprintf(buffer, sizeof(buffer), "%p", addr);
return buffer;
}
// 获取单例 ??
static ThreadPool *GetInstance()
{
// A, B, c
{
// 线程安全,提高效率式的获取单例
if(!_instance)
{
LockGuard lockguard(&_singleton_lock);
if(!_instance)
{
_instance=new ThreadPool();
LOG(LogLevel::DEBUG) << "线程池单例首次被使用,创建并初始化, addr: " <Start();
}
}
}
return _instance;
}
~ThreadPool()
{
}
private:
// 任务队列
std::queue _q; // 整体使用的临界资源
// 多个线程
vector _threads; // 1. 创建线程对象 2. 让线程对象启动
int _threadnum;
int _wait_thread_num;
// 保护机制
Mutex _lock;
Cond _cond;
// 其他属性
bool _isrunning;
// 单例中静态指针
static ThreadPool *_instance;
static Mutex _singleton_lock;
bool QueueIsEmpty()
{
return _q.empty();
}
void Routine(const string &name)
{
while (1)
{
T t;
LockGuard lockguard(&_lock);
while (QueueIsEmpty() && _isrunning)
{
_wait_thread_num++;
_cond.Wait(_lock);
_wait_thread_num--;
}
if (!_isrunning && QueueIsEmpty())
{
LOG(LogLevel::INFO) << " 线程池退出 && 任务队列为空, " << name << " 退出";
break;
}
// 队列中一定有任务了!, 但是
// 1. 线程池退出 -- 消耗历史
// 2. 线程池没有退出 -- 正常工作
t = _q.front();
_q.pop();
t();
LOG(LogLevel::DEBUG) << name << " handler task: " << t.Result2String();
}
}
ThreadPool(int threadnum = defaultthreadnum)
: _threadnum(threadnum), _isrunning(false), _wait_thread_num(0)
{
for (int i = 0; i < _threadnum; i++)
{
// 方法1:
// auto f = std::bind(hello, this);
// 方法2
string name = "thread-" + to_string(i + 1);
_threads.emplace_back([this](const string &name)
{ this->Routine(name); }, name);
// Thread t([this](){
// this->hello();
// }, name);
// _threads.push_back(st::move(t));
}
LOG(LogLevel::INFO) << "thread pool obj create success";
}
ThreadPool &operator=(const ThreadPool &) = delete;
ThreadPool(const ThreadPool &) = delete;
};
// 静态成员变量需要在类外进行定义和初始化
template
ThreadPool *ThreadPool::_instance = nullptr;
template
Mutex ThreadPool::_singleton_lock;
main1.cc
#include "Task.hpp"
#include "ThreadPoolSingle.hpp"
#include
#include
int main()
{
srand(time(nullptr) ^ getpid());
EnableConsoleLogStrategy();
int cnt = 10;
while (cnt--)
{
// 生产任务
int x = rand() % 10 + 1;
usleep(rand() % 73);
int y = rand() % 5 + 1;
Task t(x, y);
// push到线程池中,处理
ThreadPool::GetInstance()->Enqueue(t); //类的静态成员函数可以访问类中其他函数
sleep(1);
}
ThreadPool::GetInstance()->Stop();
ThreadPool::GetInstance()->Wait();
return 0;
}
makefile
.PHONY:all
all:main main1
main:main.cc
g++ -o $@ $^ -std=c++17 -lpthread
main1:main1.cc
g++ -o $@ $^ -std=c++17 -lpthread
.PHONY:clean
clean:
rm -f main main1;
运行一下:
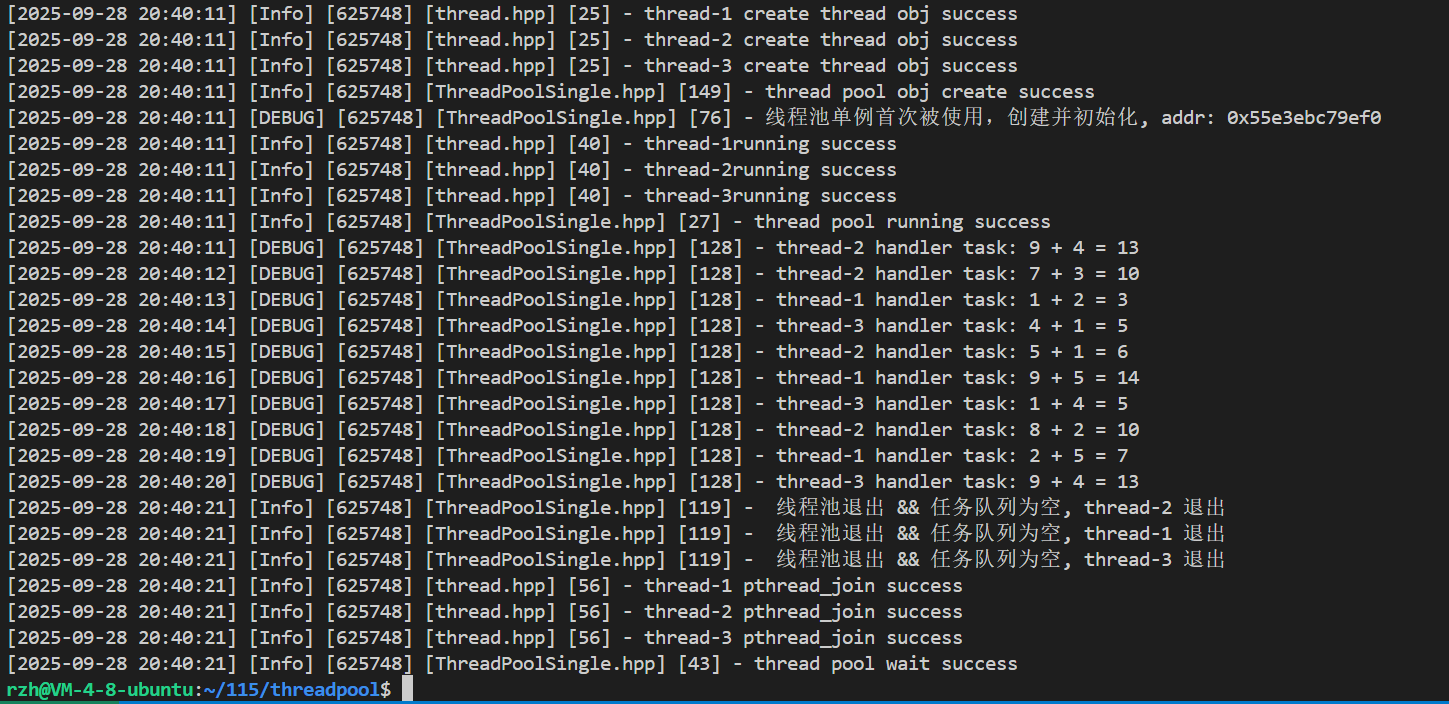
搞定!!!
4.死锁
4.1 定义
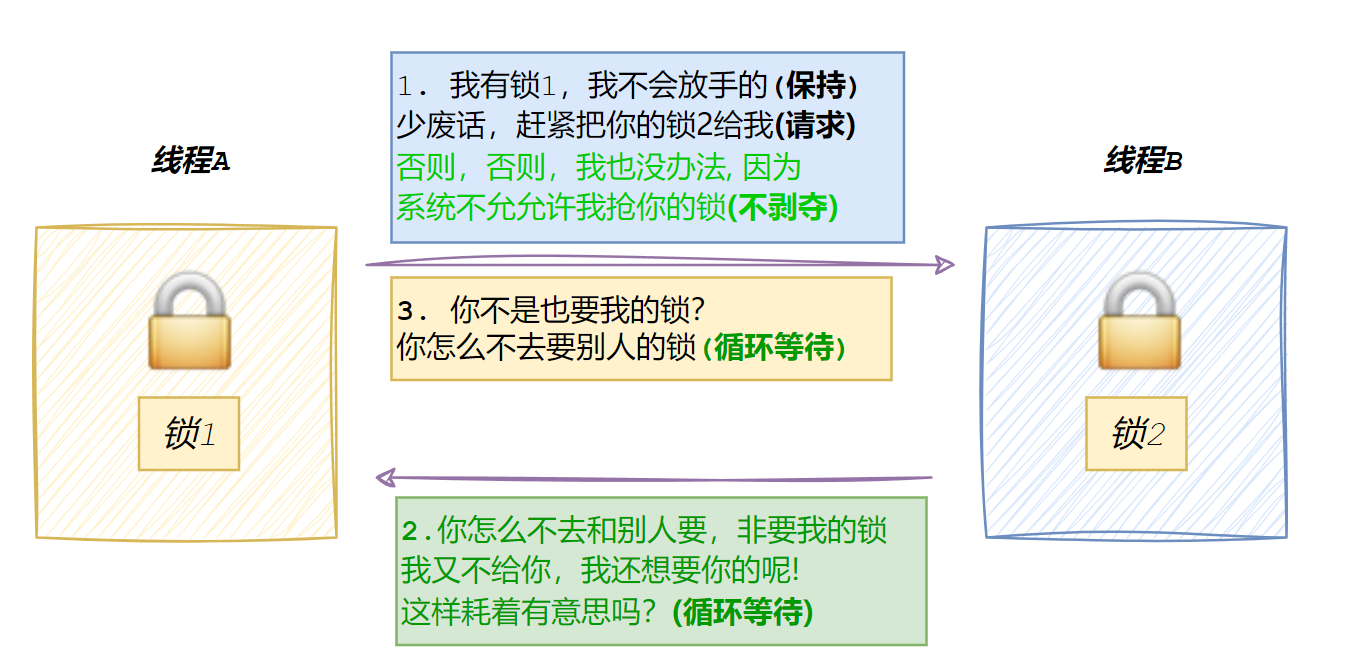
死锁是计算机科学中一个常见的问题,特别是在并发编程和操作系统中。当两个或多个进程在执行过程中,因争夺资源而造成的一种互相等待的现象,若无外力干预,它们都将无法向前推进,此时称系统处于死锁状态。
4.2 四个条件
4.2.1 互斥条件
资源不能被共享,即一个资源一次只能被一个进程使用。如果资源正在被使用,那么其他请求该资源的进程必须等待。
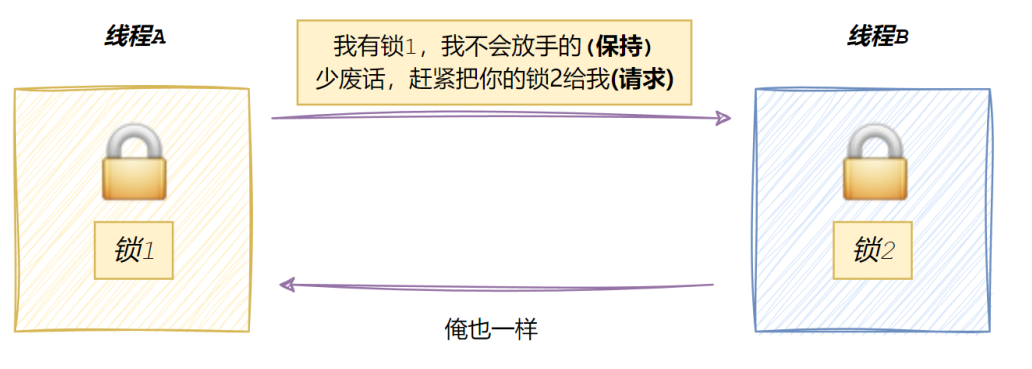
4.2.2请求与保持条件
进程至少占有一个资源,并且等待获取更多的资源,而这些资源正被其他进程占有
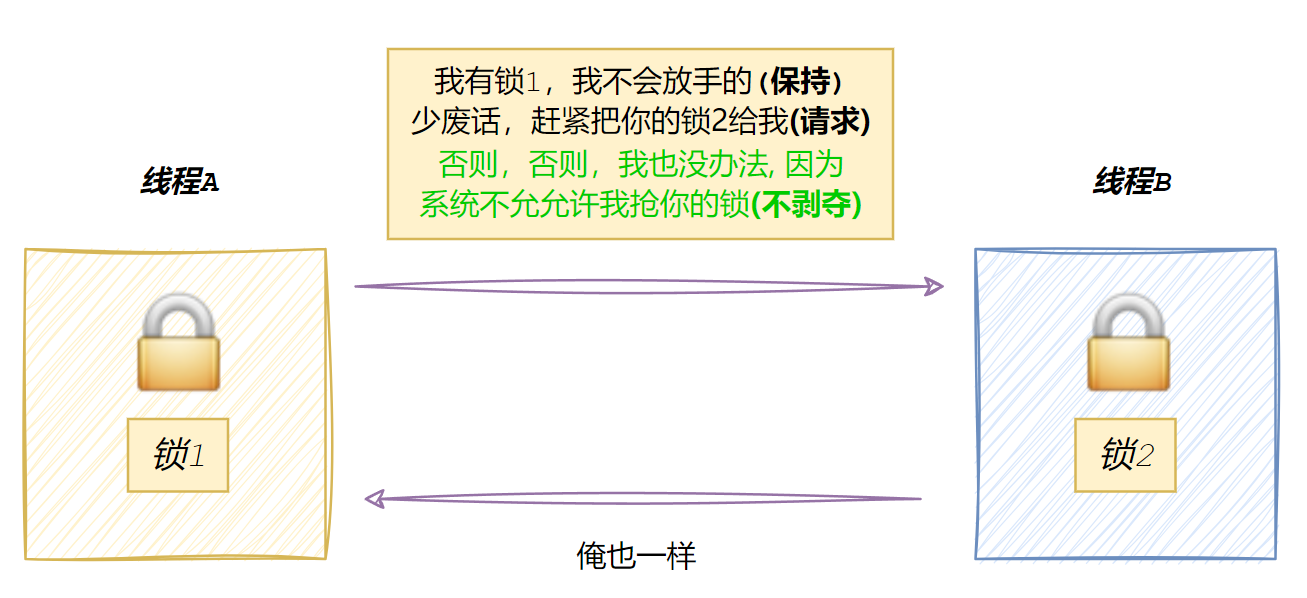
4.2.3 不可剥夺
已经分配给进程的资源不能被强制剥夺,只能由占有它的进程使用完后自行释放。
4.2.4 循环等待
存在一个进程等待环,其中每个进程都在等待下一个进程所占有的资源。即存在一个进程链,链中的每个进程都在等待下一个进程释放资源。
4.3 避免死锁
破坏互斥条件:允许资源被多个进程共享,但这可能会影响资源的独占性,导致其他问题。
破坏占有并等待条件:要求进程在开始执行前一次性申请其所需的全部资源。
破坏不可剥夺条件:允许资源被强制从进程中剥夺,但这可能会导致进程执行的不确定性。
破坏循环等待条件:为所有资源类型分配一个全局顺序,所有进程都必须按顺序请求资源。

 浙公网安备 33010602011771号