C# DateTime的11种构造函数 [Abp 源码分析]十五、自动审计记录 .Net 登陆的时候添加验证码 使用Topshelf开发Windows服务、记录日志 日常杂记——C#验证码 c#_生成图片式验证码 C# 利用SharpZipLib生成压缩包 Sql2012如何将远程服务器数据库及表、表结构、表数据导入本地数据库
C# DateTime的11种构造函数
别的也不多说没直接贴代码

using System;
using System.Collections.Generic;
using System.Globalization;
using System.Linq;
using System.Text;
using System.Text.RegularExpressions;
using System.Threading;
using System.Threading.Tasks;

namespace Time20180929_DateTime
{
    class Program
    {
        static void Main(string[] args)
        {
            /*
             * 1.DateTime(Int64):将 DateTime 结构的新实例初始化为指定的刻度数。
             * 2.DateTime(Int64, DateTimeKind):将 DateTime 结构的新实例初始化为指定的计时周期数以及协调世界时 (UTC) 或本地时间。
             * 3.DateTime(Int32, Int32, Int32):将 DateTime 结构的新实例初始化为指定的年、月和日。
             * 4.DateTime(Int32, Int32, Int32, Calendar):将 DateTime 结构的新实例初始化为指定日历的指定年、月和日。
             * 5.DateTime(Int32, Int32, Int32, Int32, Int32, Int32):将 DateTime 结构的新实例初始化为指定的年、月、日、小时、分钟和秒。
             * 6.DateTime(Int32, Int32, Int32, Int32, Int32, Int32, DateTimeKind)    :将 DateTime 结构的新实例初始化为指定年、月、日、小时、分钟、秒和协调世界时 (UTC) 或本地时间。
             * 7.DateTime(Int32, Int32, Int32, Int32, Int32, Int32, Calendar):将 DateTime 结构的新实例初始化为指定日历的年、月、日、小时、分钟和秒。
             * 8.DateTime(Int32, Int32, Int32, Int32, Int32, Int32, Int32):将 DateTime 结构的新实例初始化为指定的年、月、日、小时、分钟、秒和毫秒。
             * 9.DateTime(Int32, Int32, Int32, Int32, Int32, Int32, Int32, DateTimeKind):将 DateTime 结构的新实例初始化为指定年、月、日、小时、分钟、秒、毫秒和协调世界时 (UTC) 或本地时间。
             * 10.DateTime(Int32, Int32, Int32, Int32, Int32, Int32, Int32, Calendar):将 DateTime 结构的新实例初始化为指定日历的指定年、月、日、小时、分钟、秒和毫秒。
             * 11.DateTime(Int32, Int32, Int32, Int32, Int32, Int32, Int32, Calendar, DateTimeKind):将 DateTime 结构的新实例初始化为指定日历的指定年、月、日、小时、分钟、秒、毫秒和协调世界时 (UTC) 或本地时间。
             */


            /*
             * 1.public DateTime (long ticks):
             * 一个日期和时间,以公历 0001 年 1 月 1 日 00:00:00.000 以来所经历的以 100 纳秒为间隔的间隔数来表示。
             * ticks 小于 MinValue 或大于 MaxValue。
             */
            //时间属性MinValue和MaxValue
            long _minval = DateTime.MinValue.Ticks;
            long _maxval = DateTime.MaxValue.Ticks;
            DateTime _mintime = DateTime.MinValue;
            DateTime _maxtime = DateTime.MaxValue;
            string desc = "minval:{0}, _maxval:{1}, _mintime:{2}, _maxtime:{3}";

            string format = "{0}) The {1} date and time is {2:MM/dd/yy hh:mm:ss tt}";
            DateTime dt1 = new DateTime(DateTime.MinValue.Ticks);
            DateTime dt2 = new DateTime(DateTime.MaxValue.Ticks);

            //创建一个传统时间为上午2018/9/29 10:39:50基于名称指定的区域性"en-US"并基于布尔值(指定是否使用系统中用户选定的区域性设文化ticks
            long ticks = new DateTime(2018, 9, 29, 10, 39, 50, new CultureInfo("en-US", false).Calendar).Ticks;
            DateTime dt3 = new DateTime(ticks);

            Console.WriteLine(desc, _minval, _maxval, _mintime, _maxtime);
            Console.WriteLine(format, 1, "minimum", dt1);
            Console.WriteLine(format, 2, "maxmum", dt2);
            Console.WriteLine(format, 3, "custom ", dt3);
            Console.WriteLine("\nThe custom date and time is created from {0:N0} ticks.", ticks);
            Console.WriteLine("\nThe custom date and time is created from {0} ticks.", ticks);

            /*
            minval:0, _maxval:3155378975999999999, _mintime:0001/1/1 0:00:00, _maxtime:9999/12/31 23:59:59
            1) The minimum date and time is 01/01/01 12:00:00 上午
            2) The maxmum date and time is 12/31/99 11:59:59 下午
            3) The custom  date and time is 09/29/18 10:39:50 上午

            The custom date and time is created from 636,738,143,900,000,000 ticks.

            The custom date and time is created from 636738143900000000 ticks.
             */

            /*
             * 2.public DateTime (long ticks, DateTimeKind kind);
             * DateTime(Int64, DateTimeKind):将 DateTime 结构的新实例初始化为指定的计时周期数以及协调世界时 (UTC) 或本地时间。
             * kind:
             * Unspecified  0   表示的时间既未指定为本地时间,也未指定为协调通用时间 (UTC)。
             * Utc          1   表示的时间为 UTC。
             * Local        2   表示的时间为本地时间
             */
            long ticks2 = new DateTime(2018, 9, 29, 10, 39, 50, new CultureInfo("en-US", false).Calendar).Ticks;
            Console.WriteLine("2018-09-29 10:39:50");
            Console.WriteLine("Unspecified:{0}", new DateTime(ticks2, DateTimeKind.Unspecified));
            Console.WriteLine("Utc:{0}", new DateTime(ticks2, DateTimeKind.Utc));
            Console.WriteLine("Local:{0}", new DateTime(ticks2, DateTimeKind.Local));
            /*
             2018-09-29 10:39:50
            Unspecified:2018/9/29 10:39:50
            Utc:2018/9/29 10:39:50
            Local:2018/9/29 10:39:50
             */
            /*
             * 3.public DateTime (int year, int month, int day);
             * DateTime(Int32, Int32, Int32)
             * 将 DateTime 结构的新实例初始化为指定的年、月和日。
             * year:1-9999,month:0-12,day:1-moth中的天数
             */
            DateTime dt4 = new DateTime(2018, 9, 18);
            Console.WriteLine("dt4的值为{0}", dt4.ToString());
            /*
             dt4的值为2018/9/18 0:00:00
             */


            /*
             * 4.public DateTime (int year, int month, int day, System.Globalization.Calendar calendar);
             * DateTime(Int32, Int32, Int32, Calendar):将 DateTime 结构的新实例初始化为指定日历的指定年、月和日。
             * year:1-9999,month:0-12,day:1-moth中的天数,Calendar用于解释 year、month 和 day 的日历。
             */
            /*
             下面的示例调用DateTime(Int32, Int32, Int32, Calendar)构造函数两次实例化两个DateTime值。 第一次调用实例化DateTime通过使用值PersianCalendar对象。 由于波斯日历不能指定为区域性的默认日历,显示日期与波斯历需要单独调用其PersianCalendar.GetMonth, PersianCalendar.GetDayOfMonth,和PersianCalendar.GetYear方法。 构造函数的第二个调用实例化DateTime通过使用值HijriCalendar对象。 该示例将当前区域性更改为阿拉伯语 (叙利亚) 和当前区域性的默认日历更改为回历。 因为回历是当前区域性的默认日历,Console.WriteLine方法使用它来设置日期格式。 还原先前的当前区域性 (这在此情况下是英语 (美国)) 时,Console.WriteLine方法使用当前区域性的默认公历日历来设置日期格式。
             */
           Console.WriteLine("Using the Persian Calendar:");
           PersianCalendar persian = new PersianCalendar();
           DateTime dt5 = new DateTime(2018,9,29, persian);
           Console.WriteLine(dt5.ToString());
           Console.WriteLine("{0}/{1}/{2}\n", persian.GetMonth(dt5),persian.GetDayOfMonth(dt5),persian.GetYear(dt5));

           Console.WriteLine("Using the Hijri Calendar:");
           CultureInfo dftCulture = Thread.CurrentThread.CurrentCulture;

           // Define Hijri calendar.
           HijriCalendar hijri = new HijriCalendar();
           // Make ar-SY the current culture and Hijri the current calendar.
           Thread.CurrentThread.CurrentCulture = new CultureInfo("ar-SY");
           CultureInfo current = CultureInfo.CurrentCulture;
           current.DateTimeFormat.Calendar = hijri;
           string dFormat = current.DateTimeFormat.ShortDatePattern;
           // Ensure year is displayed as four digits.
           dFormat = Regex.Replace(dFormat, "/yy$", "/yyyy");
           current.DateTimeFormat.ShortDatePattern = dFormat;
           DateTime date2 = new DateTime(2018,9,29, hijri);
           Console.WriteLine("{0} culture using the {1} calendar: {2:d}", current,GetCalendarName(hijri), date2);

           // Restore previous culture.
           Thread.CurrentThread.CurrentCulture = dftCulture;
           Console.WriteLine("{0} culture using the {1} calendar: {2:d}",CultureInfo.CurrentCulture,GetCalendarName(CultureInfo.CurrentCulture.Calendar),date2);
           /*
            Using the Persian Calendar:
           2639/12/20 0:00:00
           9/29/2018

           Using the Hijri Calendar:
           ar-SY culture using the Hijri calendar: 29/09/2018
           zh-CN culture using the Gregorian calendar: 2580/3/16
            */

            /*
             * 5.public DateTime (int year, int month, int day, int hour, int minute, int second);
             * DateTime(Int32, Int32, Int32, Int32, Int32, Int32)
             * 将 DateTime 结构的新实例初始化为指定的年、月、日、小时、分钟和秒。
             * year:1-9999,month:0-12,day:1-moth中的天数,hour:0-23,minuye:0-59,second:0-59
             */
            DateTime date1 = new DateTime(2018, 9, 29, 11, 20, 26);
            Console.WriteLine(date1.ToString());
            /*2018/9/29 11:20:26*/

            /*
             * 6.public DateTime (int year, int month, int day, int hour, int minute, int second, DateTimeKind kind);
             * DateTime(Int32, Int32, Int32, Int32, Int32, Int32, DateTimeKind)
             * 将 DateTime 结构的新实例初始化为指定年、月、日、小时、分钟、秒和协调世界时 (UTC) 或本地时间。
             * year:1-9999,month:0-12,day:1-moth中的天数,hour:0-23,minuye:0-59,second:0-59
             *kind:
             *Unspecified  0   表示的时间既未指定为本地时间,也未指定为协调通用时间 (UTC)。
             *Utc          1   表示的时间为 UTC。
             *Local        2   表示的时间为本地时间
             */
            DateTime date9 = new DateTime(2010, 8, 18, 16, 32, 0, DateTimeKind.Local);
            Console.WriteLine("日期:{0}\nDateTimeKind:{1}", date9, date9.Kind);
            /*
             日期:2010/8/18 16:32:00
              DateTimeKind:Local
             */

            /*
             *7.public DateTime (int year, int month, int day, int hour, int minute, int second, System.Globalization.Calendar calendar);
             * DateTime(Int32, Int32, Int32, Int32, Int32, Int32, Calendar)
             * 将 DateTime 结构的新实例初始化为指定日历的年、月、日、小时、分钟和秒。
             * year:1-9999,month:0-12,day:1-moth中的天数,hour:0-23,minuye:0-59,second:0-59,
             * calendar:用于解释 year、month 和 day 的日历。
             */

            /*
             *8.public DateTime (int year, int month, int day, int hour, int minute, int second, int millisecond);
             * DateTime(Int32, Int32, Int32, Int32, Int32, Int32, Int32)
             * 将 DateTime 结构的新实例初始化为指定的年、月、日、小时、分钟、秒和毫秒。
             * year:1-9999,month:0-12,day:1-moth中的天数,hour:0-23,minuye:0-59,second:0-59,millisecond:0-999
             */

            DateTime date3 = new DateTime(2018, 9, 29, 13, 44, 30, 555);
            Console.WriteLine(date3.ToString("MM/dd/yyyy HH:mm:ss.fff tt"));
            /*09/29/2018 13:44:30.555 下午*/

            /*
             * 9.public DateTime (int year, int month, int day, int hour, int minute, int second, int millisecond, DateTimeKind kind);
             * DateTime(Int32, Int32, Int32, Int32, Int32, Int32, Int32, DateTimeKind)
             * 将 DateTime 结构的新实例初始化为指定年、月、日、小时、分钟、秒、毫秒和协调世界时 (UTC) 或本地时间。
             * year:1-9999,month:0-12,day:1-moth中的天数,hour:0-23,minuye:0-59,second:0-59,millisecond:0-999
             * kind:枚举值之一,该值指示 year、month、day、hour、minute、second 和 millisecond 指定了本地时间、
             * 协调世界时 (UTC),还是两者皆未指定。
             */
            DateTime date4 = new DateTime(2018, 9, 29, 13, 48, 30, 500, DateTimeKind.Local);
            Console.WriteLine("{0:M/dd/yyyy h:mm:ss.fff tt} {1}", date4, date4.Kind);
            /*
             * 9/29/2018 1:48:30.500 下午 Local
             */

            /*
             * 10.public DateTime (int year, int month, int day, int hour, int minute, int second, int millisecond, System.Globalization.Calendar calendar);
             * DateTime(Int32, Int32, Int32, Int32, Int32, Int32, Int32, Calendar)
             * 将 DateTime 结构的新实例初始化为指定日历的指定年、月、日、小时、分钟、秒和毫秒。
             * year:1-9999,month:0-12,day:1-moth中的天数,hour:0-23,minuye:0-59,second:0-59,millisecond:0-999
             * calendar:用于解释 year、month 和 day 的日历
             */

            /*
             下面的示例调用DateTime(Int32, Int32, Int32, Int32, Int32, Int32, Int32, Calendar)构造函数两次实例化两个DateTime值。 第一次调用实例化DateTime通过使用值PersianCalendar对象。 由于波斯日历不能指定为区域性的默认日历,显示日期与波斯历需要单独调用其PersianCalendar.GetMonth, PersianCalendar.GetDayOfMonth,和PersianCalendar.GetYear方法。 构造函数的第二个调用实例化DateTime通过使用值HijriCalendar对象。 该示例将当前区域性更改为阿拉伯语 (叙利亚) 和当前区域性的默认日历更改为回历。 因为回历是当前区域性的默认日历,Console.WriteLine方法使用它来设置日期格式。 还原先前的当前区域性 (这在此情况下是英语 (美国)) 时,Console.WriteLine方法使用当前区域性的默认公历日历来设置日期格式。
             */
            Console.WriteLine("Using the Persian Calendar:");
            PersianCalendar persian2 = new PersianCalendar();
            DateTime date5 = new DateTime(1397, 3, 29, 16, 32, 18, 500, persian2);
            Console.WriteLine(date5.ToString("M/dd/yyyy h:mm:ss.fff tt"));
            Console.WriteLine("{0}/{1}/{2} {3}{7}{4:D2}{7}{5:D2}.{6:G3}\n",
                                             persian2.GetMonth(date5),
                                             persian2.GetDayOfMonth(date5),
                                             persian2.GetYear(date5),
                                             persian2.GetHour(date5),
                                             persian2.GetMinute(date5),
                                             persian2.GetSecond(date5),
                                             persian2.GetMilliseconds(date5),
                                             DateTimeFormatInfo.CurrentInfo.TimeSeparator);

            Console.WriteLine("Using the Hijri Calendar:");
            // Get current culture so it can later be restored.
            CultureInfo dftCulture2 = Thread.CurrentThread.CurrentCulture;

            // Define strings for use in composite formatting.
            string dFormat2;
            string fmtString;
            // Define Hijri calendar.
            HijriCalendar hijri2 = new HijriCalendar();
            // Make ar-SY the current culture and Hijri the current calendar.
            Thread.CurrentThread.CurrentCulture = new CultureInfo("ar-SY");
            CultureInfo current2 = CultureInfo.CurrentCulture;
            current2.DateTimeFormat.Calendar = hijri2;
            dFormat2 = current.DateTimeFormat.ShortDatePattern;
            // Ensure year is displayed as four digits.
            dFormat2 = Regex.Replace(dFormat2, "/yy$", "/yyyy") + " H:mm:ss.fff";
            fmtString = "{0} culture using the {1} calendar: {2:" + dFormat2 + "}";
            DateTime date6 = new DateTime(1431, 9, 9, 16, 32, 18, 500, hijri2);
            Console.WriteLine(fmtString, current2, GetCalendarName(hijri2), date6);

            // Restore previous culture.
            Thread.CurrentThread.CurrentCulture = dftCulture;
            dFormat2 = DateTimeFormatInfo.CurrentInfo.ShortDatePattern + " H:mm:ss.fff";
            fmtString = "{0} culture using the {1} calendar: {2:" + dFormat2 + "}";
            Console.WriteLine(fmtString,
                              CultureInfo.CurrentCulture,
                              GetCalendarName(CultureInfo.CurrentCulture.Calendar),
                              date6);

            /*
             Using the Persian Calendar:
             6/19/2018 4:32:18.500 下午
             3/29/1397 16:32:18.500

             Using the Hijri Calendar:
             ar-SY culture using the Hijri calendar: 09/09/1431 16:32:18.500
             zh-CN culture using the Gregorian calendar: 2010/8/18 16:32:18.500
             */

            /*
             * 11.public DateTime (int year, int month, int day, int hour, int minute, int second, int millisecond, System.Globalization.Calendar calendar, DateTimeKind kind);
             * DateTime(Int32, Int32, Int32, Int32, Int32, Int32, Int32, Calendar, DateTimeKind)
             * 将 DateTime 结构的新实例初始化为指定日历的指定年、月、日、小时、分钟、秒、毫秒和协调世界时 (UTC) 或本地时间。
             * year:1-9999,month:0-12,day:1-moth中的天数,hour:0-23,minuye:0-59,second:0-59,millisecond:0-999
             * calendar:用于解释 year、month 和 day 的日历
             * kind:枚举值之一,该值指示 year、month、day、hour、minute、second 和 millisecond 指定了本地时间、
             * 协调世界时 (UTC),还是两者皆未指定。
             */
            /*
            下面的示例调用DateTime(Int32, Int32, Int32, Int32, Int32, Int32, Int32, Calendar, DateTimeKind)构造函数两次实例化两个DateTime值。 第一次调用实例化DateTime通过使用值PersianCalendar对象。 由于波斯日历不能指定为区域性的默认日历,显示日期与波斯历需要单独调用其PersianCalendar.GetMonth, PersianCalendar.GetDayOfMonth,和PersianCalendar.GetYear方法。 构造函数的第二个调用实例化DateTime通过使用值HijriCalendar对象。 该示例将当前区域性更改为阿拉伯语 (叙利亚) 和当前区域性的默认日历更改为回历。 因为回历是当前区域性的默认日历,Console.WriteLine方法使用它来设置日期格式。 还原先前的当前区域性 (这在此情况下是英语 (美国)) 时,Console.WriteLine方法使用当前区域性的默认公历日历来设置日期格式。
            */
            Console.WriteLine("Using the Persian Calendar:");
            PersianCalendar persian3 = new PersianCalendar();
            DateTime date7 = new DateTime(1397, 3, 29, 16, 32, 18, 500,
                                          persian3, DateTimeKind.Local);
            Console.WriteLine("{0:M/dd/yyyy h:mm:ss.fff tt} {1}", date7, date7.Kind);
            Console.WriteLine("{0}/{1}/{2} {3}{8}{4:D2}{8}{5:D2}.{6:G3} {7}\n",
                                             persian3.GetMonth(date7),
                                             persian3.GetDayOfMonth(date7),
                                             persian3.GetYear(date7),
                                             persian3.GetHour(date7),
                                             persian3.GetMinute(date7),
                                             persian3.GetSecond(date7),
                                             persian3.GetMilliseconds(date7),
                                             date7.Kind,
                                             DateTimeFormatInfo.CurrentInfo.TimeSeparator);

            Console.WriteLine("Using the Hijri Calendar:");
            // Get current culture so it can later be restored.
            CultureInfo dftCulture3 = Thread.CurrentThread.CurrentCulture;

            // Define strings for use in composite formatting.
            string dFormat3;
            string fmtString3;
            // Define Hijri calendar.
            HijriCalendar hijri3 = new HijriCalendar();
            // Make ar-SY the current culture and Hijri the current calendar.
            Thread.CurrentThread.CurrentCulture = new CultureInfo("ar-SY");
            CultureInfo current3 = CultureInfo.CurrentCulture;
            current3.DateTimeFormat.Calendar = hijri3;
            dFormat3 = current3.DateTimeFormat.ShortDatePattern;
            // Ensure year is displayed as four digits.
            dFormat3 = Regex.Replace(dFormat3, "/yy$", "/yyyy") + " H:mm:ss.fff";
            fmtString3 = "{0} culture using the {1} calendar: {2:" + dFormat3 + "} {3}";
            DateTime date8 = new DateTime(1431, 9, 9, 16, 32, 18, 500,
                                          hijri3, DateTimeKind.Local);
            Console.WriteLine(fmtString3, current3, GetCalendarName(hijri3),
                              date8, date8.Kind);

            // Restore previous culture.
            Thread.CurrentThread.CurrentCulture = dftCulture3;
            dFormat3 = DateTimeFormatInfo.CurrentInfo.ShortDatePattern + " H:mm:ss.fff";
            fmtString3= "{0} culture using the {1} calendar: {2:" + dFormat3 + "} {3}";
            Console.WriteLine(fmtString3,
                              CultureInfo.CurrentCulture,
                              GetCalendarName(CultureInfo.CurrentCulture.Calendar),
                              date8, date8.Kind);
            /*
             Using the Persian Calendar:
             6/19/2018 4:32:18.500 下午 Local
             3/29/1397 16:32:18.500 Local

             Using the Hijri Calendar:
             ar-SY culture using the Hijri calendar: 09/09/1431 16:32:18.500 Local
             zh-CN culture using the Gregorian calendar: 2010/8/18 16:32:18.500 Local
             */
            Console.ReadKey();
        }
        private static string GetCalendarName(Calendar cal)
        {
            return Regex.Match(cal.ToString(), "\\.(\\w+)Calendar").Groups[1].Value;
        }
    }
}
[Abp 源码分析]十五、自动审计记录
正文
0.简介
Abp 框架为我们自带了审计日志功能,审计日志可以方便地查看每次请求接口所耗的时间,能够帮助我们快速定位到某些性能有问题的接口。除此之外,审计日志信息还包含有每次调用接口时客户端请求的参数信息,客户端的 IP 与客户端使用的浏览器。有了这些数据之后,我们就可以很方便地复现接口产生 BUG 时的一些环境信息。
当然如果你脑洞更大的话,可以根据这些数据来开发一个可视化的图形界面,方便开发与测试人员来快速定位问题。
PS:
如果使用了 Abp.Zero 模块则自带的审计记录实现是存储到数据库当中的,但是在使用 EF Core + MySQL(EF Provider 为 Pomelo.EntityFrameworkCore.MySql) 在高并发的情况下会有数据库连接超时的问题,这块推荐是重写实现,自己采用 Redis 或者其他存储方式。
如果需要禁用审计日志功能,则需要在任意模块的预加载方法(PreInitialize()) 当中增加如下代码关闭审计日志功能。
public class XXXStartupModule
{
    public override PreInitialize()
    {
        // 禁用审计日志
        Configuration.Auditing.IsEnabled = false;
    }
}1.启动流程
审计组件与参数校验组件一样,都是通过 MVC 过滤器与 Castle 拦截器来实现记录的。也就是说,在每次调用接口/方法时都会进入 过滤器/拦截器 并将其写入到数据库表 AbpAuditLogs 当中。
其核心思想十分简单,就是在执行具体接口方法的时候,先使用 StopWatch 对象来记录执行完一个方法所需要的时间,并且还能够通过 HttpContext 来获取到一些客户端的关键信息。

2.1 过滤器注入
同上一篇文章所讲的一样,过滤器是在 AddAbp() 方法内部的 ConfigureAspNetCore() 方法注入的。
private static void ConfigureAspNetCore(IServiceCollection services, IIocResolver iocResolver)
{
    // ... 其他代码

    //Configure MVC
    services.Configure<MvcOptions>(mvcOptions =>
    {
        mvcOptions.AddAbp(services);
    });

    // ... 其他代码
}
而下面就是过滤器的注入方法:
internal static class AbpMvcOptionsExtensions
{
    public static void AddAbp(this MvcOptions options, IServiceCollection services)
    {
        // ... 其他代码
        AddFilters(options);
        // ... 其他代码
    }

    // ... 其他代码

    private static void AddFilters(MvcOptions options)
    {
        // ... 其他过滤器注入

        // 注入审计日志过滤器
        options.Filters.AddService(typeof(AbpAuditActionFilter));

        // ... 其他过滤器注入
    }

    // ... 其他代码
}
2.2 拦截器注入
注入拦截器的地方与 DTO 自动验证的拦截器的位置一样,都是在 AbpBootstrapper 对象被构造的时候进行注册。
public class AbpBootstrapper : IDisposable
{
    private AbpBootstrapper([NotNull] Type startupModule, [CanBeNull] Action<AbpBootstrapperOptions> optionsAction = null)
    {
        // ... 其他代码

        if (!options.DisableAllInterceptors)
        {
            AddInterceptorRegistrars();
        }
    }

    // ... 其他代码

    // 添加各种拦截器
    private void AddInterceptorRegistrars()
    {
        ValidationInterceptorRegistrar.Initialize(IocManager);
        AuditingInterceptorRegistrar.Initialize(IocManager);
        EntityHistoryInterceptorRegistrar.Initialize(IocManager);
        UnitOfWorkRegistrar.Initialize(IocManager);
        AuthorizationInterceptorRegistrar.Initialize(IocManager);
    }

    // ... 其他代码
}
转到 AuditingInterceptorRegistrar 的具体实现可以发现,他在内部针对于审计日志拦截器的注入是区分了类型的。
internal static class AuditingInterceptorRegistrar
{
    public static void Initialize(IIocManager iocManager)
    {
        iocManager.IocContainer.Kernel.ComponentRegistered += (key, handler) =>
        {
            // 如果审计日志配置类没有被注入,则直接跳过
            if (!iocManager.IsRegistered<IAuditingConfiguration>())
            {
                return;
            }

            var auditingConfiguration = iocManager.Resolve<IAuditingConfiguration>();

            // 判断当前 DI 所注入的类型是否应该为其绑定审计日志拦截器
            if (ShouldIntercept(auditingConfiguration, handler.ComponentModel.Implementation))
            {
                handler.ComponentModel.Interceptors.Add(new InterceptorReference(typeof(AuditingInterceptor)));
            }
        };
    }

    // 本方法主要用于判断当前类型是否符合绑定拦截器的条件
    private static bool ShouldIntercept(IAuditingConfiguration auditingConfiguration, Type type)
    {
        // 首先判断当前类型是否在配置类的注册类型之中,如果是,则进行拦截器绑定
        if (auditingConfiguration.Selectors.Any(selector => selector.Predicate(type)))
        {
            return true;
        }

        // 当前类型如果拥有 Audited 特性,则进行拦截器绑定
        if (type.GetTypeInfo().IsDefined(typeof(AuditedAttribute), true))
        {
            return true;
        }

        // 如果当前类型内部的所有方法当中有一个方法拥有 Audited 特性,则进行拦截器绑定
        if (type.GetMethods().Any(m => m.IsDefined(typeof(AuditedAttribute), true)))
        {
            return true;
        }

        // 都不满足则返回 false,不对当前类型进行绑定
        return false;
    }
}
可以看到在判断是否绑定拦截器的时候,Abp 使用了 auditingConfiguration.Selectors 的属性来进行判断,那么默认 Abp 为我们添加了哪些类型是必定有审计日志的呢?
通过代码追踪,我们来到了 AbpKernalModule 类的内部,在其预加载方法里面有一个 AddAuditingSelectors() 的方法,该方法的作用就是添加了一个针对于应用服务类型的一个选择器对象。
public sealed class AbpKernelModule : AbpModule
{
    public override void PreInitialize()
    {
        // ... 其他代码

        AddAuditingSelectors();

        // ... 其他代码
    }

    // ... 其他代码

    private void AddAuditingSelectors()
    {
        Configuration.Auditing.Selectors.Add(
            new NamedTypeSelector(
                "Abp.ApplicationServices",
                type => typeof(IApplicationService).IsAssignableFrom(type)
            )
        );
    }

    // ... 其他代码
}
我们先看一下 NamedTypeSelector 的一个作用是什么,其基本类型定义由一个 string 和 Func<Type, bool> 组成,十分简单,重点就出在这个断言委托上面。
public class NamedTypeSelector
{
    // 选择器名称
    public string Name { get; set; }

    // 断言委托
    public Func<Type, bool> Predicate { get; set; }

    public NamedTypeSelector(string name, Func<Type, bool> predicate)
    {
        Name = name;
        Predicate = predicate;
    }
}
回到最开始的地方,当 Abp 为 Selectors 添加了一个名字为 "Abp.ApplicationServices" 的类型选择器。其断言委托的大体意思就是传入的 type 参数是继承自 IApplicationService 接口的话,则返回 true,否则返回 false。
这样在程序启动的时候,首先注入类型的时候,会首先进入上文所述的拦截器绑定类当中,这个时候会使用 Selectors 内部的类型选择器来调用这个集合内部的断言委托,只要这些选择器对象有一个返回 true,那么就直接与当前注入的 type 绑定拦截器。
2.代码分析
2.1 过滤器代码分析
首先查看这个过滤器的整体类型结构,一个标准的过滤器,肯定要实现 IAsyncActionFilter 接口。从下面的代码我们可以看到其注入了 IAbpAspNetCoreConfiguration 和一个 IAuditingHelper 对象。这两个对象的作用分别是判断是否记录日志,另一个则是用来真正写入日志所使用的。
public class AbpAuditActionFilter : IAsyncActionFilter, ITransientDependency
{
    // 审计日志组件配置对象
    private readonly IAbpAspNetCoreConfiguration _configuration;
    // 真正用来写入审计日志的工具类
    private readonly IAuditingHelper _auditingHelper;

    public AbpAuditActionFilter(IAbpAspNetCoreConfiguration configuration, IAuditingHelper auditingHelper)
    {
        _configuration = configuration;
        _auditingHelper = auditingHelper;
    }

    public async Task OnActionExecutionAsync(ActionExecutingContext context, ActionExecutionDelegate next)
    {
        // ... 代码实现
    }

    // ... 其他代码
}
接着看 AbpAuditActionFilter() 方法内部的实现,进入这个过滤器的时候,通过 ShouldSaveAudit() 方法来判断是否要写审计日志。
之后呢与 DTO 自动验证的过滤器一样,通过 AbpCrossCuttingConcerns.Applying() 方法为当前的对象增加了一个标识,用来告诉拦截器说我已经处理过了,你就不要再重复处理了。
再往下就是创建审计信息,执行具体接口方法,并且如果产生了异常的话,也会存放到审计信息当中。
最后接口无论是否执行成功,还是说出现了异常信息,都会将其性能计数信息同审计信息一起,通过 IAuditingHelper 存储起来。
public async Task OnActionExecutionAsync(ActionExecutingContext context, ActionExecutionDelegate next)
{
    // 判断是否写日志
    if (!ShouldSaveAudit(context))
    {
        await next();
        return;
    }

    // 为当前类型打上标识
    using (AbpCrossCuttingConcerns.Applying(context.Controller, AbpCrossCuttingConcerns.Auditing))
    {
        // 构造审计信息(AuditInfo)
        var auditInfo = _auditingHelper.CreateAuditInfo(
            context.ActionDescriptor.AsControllerActionDescriptor().ControllerTypeInfo.AsType(),
            context.ActionDescriptor.AsControllerActionDescriptor().MethodInfo,
            context.ActionArguments
        );

        // 开始性能计数
        var stopwatch = Stopwatch.StartNew();

        try
        {
            // 尝试调用接口方法
            var result = await next();

            // 产生异常之后,将其异常信息存放在审计信息之中
            if (result.Exception != null && !result.ExceptionHandled)
            {
                auditInfo.Exception = result.Exception;
            }
        }
        catch (Exception ex)
        {
            // 产生异常之后,将其异常信息存放在审计信息之中
            auditInfo.Exception = ex;
            throw;
        }
        finally
        {
            // 停止计数,并且存储审计信息
            stopwatch.Stop();
            auditInfo.ExecutionDuration = Convert.ToInt32(stopwatch.Elapsed.TotalMilliseconds);
            await _auditingHelper.SaveAsync(auditInfo);
        }
    }
}
2.2 拦截器代码分析
拦截器处理时的总体思路与过滤器类似,其核心都是通过 IAuditingHelper 来创建审计信息和持久化审计信息的。只不过呢由于拦截器不仅仅是处理 MVC 接口,也会处理内部的一些类型的方法,所以针对同步方法与异步方法的处理肯定会复杂一点。
拦截器呢,我们关心一下他的核心方法 Intercept() 就行了。
public void Intercept(IInvocation invocation)
{
    // 判断过滤器是否已经处理了过了
    if (AbpCrossCuttingConcerns.IsApplied(invocation.InvocationTarget, AbpCrossCuttingConcerns.Auditing))
    {
        invocation.Proceed();
        return;
    }

    // 通过 IAuditingHelper 来判断当前方法是否需要记录审计日志信息
    if (!_auditingHelper.ShouldSaveAudit(invocation.MethodInvocationTarget))
    {
        invocation.Proceed();
        return;
    }

    // 构造审计信息
    var auditInfo = _auditingHelper.CreateAuditInfo(invocation.TargetType, invocation.MethodInvocationTarget, invocation.Arguments);

    // 判断方法的类型,同步方法与异步方法的处理逻辑不一样
    if (invocation.Method.IsAsync())
    {
        PerformAsyncAuditing(invocation, auditInfo);
    }
    else
    {
        PerformSyncAuditing(invocation, auditInfo);
    }
}

// 同步方法的处理逻辑与 MVC 过滤器逻辑相似
private void PerformSyncAuditing(IInvocation invocation, AuditInfo auditInfo)
{
    var stopwatch = Stopwatch.StartNew();

    try
    {
        invocation.Proceed();
    }
    catch (Exception ex)
    {
        auditInfo.Exception = ex;
        throw;
    }
    finally
    {
        stopwatch.Stop();
        auditInfo.ExecutionDuration = Convert.ToInt32(stopwatch.Elapsed.TotalMilliseconds);
        _auditingHelper.Save(auditInfo);
    }
}

// 异步方法处理
private void PerformAsyncAuditing(IInvocation invocation, AuditInfo auditInfo)
{
    var stopwatch = Stopwatch.StartNew();

    invocation.Proceed();

    if (invocation.Method.ReturnType == typeof(Task))
    {
        invocation.ReturnValue = InternalAsyncHelper.AwaitTaskWithFinally(
            (Task) invocation.ReturnValue,
            exception => SaveAuditInfo(auditInfo, stopwatch, exception)
        );
    }
    else //Task<TResult>
    {
        invocation.ReturnValue = InternalAsyncHelper.CallAwaitTaskWithFinallyAndGetResult(
            invocation.Method.ReturnType.GenericTypeArguments[0],
            invocation.ReturnValue,
            exception => SaveAuditInfo(auditInfo, stopwatch, exception)
        );
    }
}

private void SaveAuditInfo(AuditInfo auditInfo, Stopwatch stopwatch, Exception exception)
{
    stopwatch.Stop();
    auditInfo.Exception = exception;
    auditInfo.ExecutionDuration = Convert.ToInt32(stopwatch.Elapsed.TotalMilliseconds);

    _auditingHelper.Save(auditInfo);
}
这里异步方法的处理在很早之前的工作单元拦截器就有过讲述,这里就不再重复说明了。
2.3 核心的 IAuditingHelper
从代码上我们就可以看到,不论是拦截器还是过滤器都是最终都是通过 IAuditingHelper 对象来储存审计日志的。Abp 依旧为我们实现了一个默认的 AuditingHelper ,实现了其接口的所有方法。我们先查看一下这个接口的定义:
public interface IAuditingHelper
{
    // 判断当前方法是否需要存储审计日志信息
    bool ShouldSaveAudit(MethodInfo methodInfo, bool defaultValue = false);

    // 根据参数集合创建一个审计信息,一般用于拦截器
    AuditInfo CreateAuditInfo(Type type, MethodInfo method, object[] arguments);

    // 根据一个参数字典类来创建一个审计信息,一般用于 MVC 过滤器
    AuditInfo CreateAuditInfo(Type type, MethodInfo method, IDictionary<string, object> arguments);

    // 同步保存审计信息
    void Save(AuditInfo auditInfo);

    // 异步保存审计信息
    Task SaveAsync(AuditInfo auditInfo);
}
我们来到其默认实现 AuditingHelper 类型,先看一下其内部注入了哪些接口。
public class AuditingHelper : IAuditingHelper, ITransientDependency
{
    // 日志记录器,用于记录日志
    public ILogger Logger { get; set; }
    // 用于获取当前登录用户的信息
    public IAbpSession AbpSession { get; set; }
    // 用于持久话审计日志信息
    public IAuditingStore AuditingStore { get; set; }

    // 主要作用是填充审计信息的客户端调用信息
    private readonly IAuditInfoProvider _auditInfoProvider;
    // 审计日志组件的配置相关
    private readonly IAuditingConfiguration _configuration;
    // 在调用 AuditingStore 进行持久化的时候使用,创建一个工作单元
    private readonly IUnitOfWorkManager _unitOfWorkManager;
    // 用于序列化参数信息为 JSON 字符串
    private readonly IAuditSerializer _auditSerializer;

    public AuditingHelper(
        IAuditInfoProvider auditInfoProvider,
        IAuditingConfiguration configuration,
        IUnitOfWorkManager unitOfWorkManager,
        IAuditSerializer auditSerializer)
    {
        _auditInfoProvider = auditInfoProvider;
        _configuration = configuration;
        _unitOfWorkManager = unitOfWorkManager;
        _auditSerializer = auditSerializer;

        AbpSession = NullAbpSession.Instance;
        Logger = NullLogger.Instance;
        AuditingStore = SimpleLogAuditingStore.Instance;
    }

    // ... 其他实现的接口
}
2.3.1 判断是否创建审计信息
首先分析一下其内部的 ShouldSaveAudit() 方法,整个方法的核心作用就是根据传入的方法类型来判定是否为其创建审计信息。
其实在这一串 if 当中,你可以发现有一句代码对方法是否标注了 DisableAuditingAttribute 特性进行了判断,如果标注了该特性,则不为该方法创建审计信息。所以我们就可以通过该特性来控制自己应用服务类,控制里面的的接口是否要创建审计信息。同理,我们也可以通过显式标注 AuditedAttribute 特性来让拦截器为这个方法创建审计信息。
public bool ShouldSaveAudit(MethodInfo methodInfo, bool defaultValue = false)
{
    if (!_configuration.IsEnabled)
    {
        return false;
    }

    if (!_configuration.IsEnabledForAnonymousUsers && (AbpSession?.UserId == null))
    {
        return false;
    }

    if (methodInfo == null)
    {
        return false;
    }

    if (!methodInfo.IsPublic)
    {
        return false;
    }

    if (methodInfo.IsDefined(typeof(AuditedAttribute), true))
    {
        return true;
    }

    if (methodInfo.IsDefined(typeof(DisableAuditingAttribute), true))
    {
        return false;
    }

    var classType = methodInfo.DeclaringType;
    if (classType != null)
    {
        if (classType.GetTypeInfo().IsDefined(typeof(AuditedAttribute), true))
        {
            return true;
        }

        if (classType.GetTypeInfo().IsDefined(typeof(DisableAuditingAttribute), true))
        {
            return false;
        }

        if (_configuration.Selectors.Any(selector => selector.Predicate(classType)))
        {
            return true;
        }
    }

    return defaultValue;
}
2.3.2 创建审计信息
审计信息在创建的时候,就为我们将当前调用接口时的用户信息存放在了审计信息当中,之后通过 IAuditInfoProvider 的 Fill() 方法填充了客户端 IP 与浏览器信息。
public AuditInfo CreateAuditInfo(Type type, MethodInfo method, IDictionary<string, object> arguments)
{
    // 构建一个审计信息对象
    var auditInfo = new AuditInfo
    {
        TenantId = AbpSession.TenantId,
        UserId = AbpSession.UserId,
        ImpersonatorUserId = AbpSession.ImpersonatorUserId,
        ImpersonatorTenantId = AbpSession.ImpersonatorTenantId,
        ServiceName = type != null
            ? type.FullName
            : "",
        MethodName = method.Name,
        // 将参数转换为 JSON 字符串
        Parameters = ConvertArgumentsToJson(arguments),
        ExecutionTime = Clock.Now
    };

    try
    {
        // 填充客户 IP 与浏览器信息等
        _auditInfoProvider.Fill(auditInfo);
    }
    catch (Exception ex)
    {
        Logger.Warn(ex.ToString(), ex);
    }

    return auditInfo;
}
2.4 审计信息持久化
通过上一小节我们知道了在调用审计信息保存接口的时候,实际上是调用的 IAuditingStore 所提供的 SaveAsync(AuditInfo auditInfo) 方法来持久化这些审计日志信息的。
如果你没有集成 Abp.Zero 项目的话,则使用的是默认的实现,就是简单通过 ILogger 输出审计信息到日志当中。

默认有这两种实现,至于第一种是 Abp 的单元测试项目所使用的。
这里我们就简单将一下 AuditingStore 这个实现吧,其实很简单的,就是注入了一个仓储,在保存的时候往审计日志表插入一条数据即可。
这里使用了 AuditLog.CreateFromAuditInfo() 方法将 AuditInfo 类型的审计信息转换为数据库实体,用于仓储进行插入操作。
public class AuditingStore : IAuditingStore, ITransientDependency
{
    private readonly IRepository<AuditLog, long> _auditLogRepository;

    public AuditingStore(IRepository<AuditLog, long> auditLogRepository)
    {
        _auditLogRepository = auditLogRepository;
    }

    public virtual Task SaveAsync(AuditInfo auditInfo)
    {
        // 向表中插入数据
        return _auditLogRepository.InsertAsync(AuditLog.CreateFromAuditInfo(auditInfo));
    }
}
同样,这里建议重新实现一个 AuditingStore,存储在 Redis 或者其他地方。
3. 后记
前几天发现 Abp 的团队有开了一个新坑,叫做 Abp vNext 框架,该框架全部基于 .NET Core 进行开发,而且会针对微服务项目进行专门的设计,有兴趣的朋友可以持续关注。
其 GitHub 地址为:https://github.com/abpframework/abp/
官方地址为:https://abp.io/
4.点此跳转到总目录
.Net 登陆的时候添加验证码
一、ASPX 登陆界面验证码
1、登陆验证码图片和输入验证码框
<asp:TextBox ID="txtValiCode" runat="server" Width="50px"></asp:TextBox>
<asp:Image ID="ValiCode" ImageUrl="CreateValiImg.aspx" runat="server" style="position:relative;top:4px;" />
2、js

 $(function () {
            $("#loginBtn").click(function () {
                var Pwd = $("#PwdTbx").val();
                var md5pwd = $.md5(Pwd);
                $("#PwdTbx").val(md5pwd);

            });
            $("#txtValiCode").val("");

            $("#ValiCode").click(function () {
                location.reload();
            });

        });
3、创建生产验证码的aspx页 CreateValiImg.aspx
<%@ Page Language="C#" AutoEventWireup="true" CodeFile="CreateValiImg.aspx.cs" Inherits="CreateValiImg" %>

<!DOCTYPE html>

<html xmlns="http://www.w3.org/1999/xhtml">
<head runat="server">
<meta http-equiv="Content-Type" content="text/html; charset=utf-8"/>
    <title></title>
</head>
<body>
    <form id="form1" runat="server">
    <div>

    </div>
    </form>
</body>
</html>
后台代码
using System;
using System.Collections.Generic;
using System.Drawing;
using System.Linq;
using System.Web;
using System.Web.UI;
using System.Web.UI.WebControls;

public partial class CreateValiImg : System.Web.UI.Page
{
    protected void Page_Load(object sender, EventArgs e)
    {
        string validateNum = CreateRandomNum(4);
        CreateImage(validateNum);
        Session["ValidateNum"] = validateNum;
    }

    //生产随机数
    private string CreateRandomNum(int NumCount)
    {
        string allChar = "0,1,2,3,4,5,6,7,8,9,A,B,C,D,E,F,G,H,I,J,K,O,P,Q,R,S,T,U,W,X,Y,Z,a,b,c,d,e,f,g,h,i,j,k,m,n,o,p,q,s,t,u,w,x,y,z";
        string[] allCharArray = allChar.Split(',');//拆分成数组
        string randomNum = "";
        int temp = -1;                             //记录上次随机数的数值,尽量避免产生几个相同的随机数
        Random rand = new Random();
        for (int i = 0; i < NumCount; i++)
        {
            if (temp != -1)
            {
                rand = new Random(i * temp * ((int)DateTime.Now.Ticks));
            }
            int t = rand.Next(35);
            if (temp == t)
            {
                return CreateRandomNum(NumCount);
            }
            temp = t;
            randomNum += allCharArray[t];


        }
        return randomNum;
    }
    //生产图片
    private void CreateImage(string validateNum)
    {
        if (validateNum == null || validateNum.Trim() == string.Empty)
            return;
        //生成BitMap图像
        System.Drawing.Bitmap image = new System.Drawing.Bitmap(validateNum.Length * 12 + 12, 22);
        Graphics g = Graphics.FromImage(image);
        try
        {
            //生成随机生成器
            Random random = new Random();
            //清空图片背景
            g.Clear(Color.White);
            //画图片的背景噪音线
            for (int i = 0; i < 25; i++)
            {
                int x1 = random.Next(image.Width);
                int x2 = random.Next(image.Width);
                int y1 = random.Next(image.Height);
                int y2 = random.Next(image.Height);
                g.DrawLine(new Pen(Color.Silver), x1, x2, y1, y2);
            }
            Font font = new System.Drawing.Font("Arial", 12, (System.Drawing.FontStyle.Bold | System.Drawing.FontStyle.Italic));
            System.Drawing.Drawing2D.LinearGradientBrush brush = new System.Drawing.Drawing2D.LinearGradientBrush(new Rectangle(0, 0, image.Width, image.Height), Color.Blue, Color.DarkRed, 1.2f, true);
            g.DrawString(validateNum, font, brush, 2, 2);
            //画图片的前景噪音点
            for (int i = 0; i < 100; i++)
            {
                int x = random.Next(image.Width);
                int y = random.Next(image.Height);
                image.SetPixel(x, y, Color.FromArgb(random.Next()));

            }
            //画图片的边框线
            g.DrawRectangle(new Pen(Color.Silver), 0, 0, image.Width - 1, image.Height - 1);
            System.IO.MemoryStream ms = new System.IO.MemoryStream();
            //将图像保存到指定流
            image.Save(ms, System.Drawing.Imaging.ImageFormat.Gif);
            Response.ClearContent();
            Response.ContentType = "image/Gif";
            Response.BinaryWrite(ms.ToArray());
        }
        finally
        {
            g.Dispose();
            image.Dispose();
        }
    }
}
4、运行效果

5、登陆提交账号密码验证码的时候验证
if (ValiCode != Session["ValidateNum"].ToString()){ ... }
二、MVC中使用验证码
1、在登陆页添加输入验证码框和图片
 验证码 <input ID="txtValiCode" type="text"  style="width:60px;" />
       <img ID="ValiCode" src="/Login/CreatevaliImg"   style="position:relative;top:4px;" />
2、登陆界面js、点击验证码图片刷新验证码
  $(function () {
        $("#txtValiCode").val("");
        $("#ValiCode").click(function () {
            location.reload();
        });
    });
3、在controller里添加 CreatevaliImg 方法生产验证码,供界面里img url调用
 public void CreatevaliImg()
        {
            string validateNum = CreateRandomNum(4);
            CreateImage(validateNum);
            Session["ValidateNum"] = validateNum;
        }

        //生产随机数
        private string CreateRandomNum(int NumCount)
        {
            string allChar = "0,1,2,3,4,5,6,7,8,9,A,B,C,D,E,F,G,H,I,J,K,O,P,Q,R,S,T,U,W,X,Y,Z,a,b,c,d,e,f,g,h,i,j,k,m,n,o,p,q,s,t,u,w,x,y,z";
            string[] allCharArray = allChar.Split(',');//拆分成数组
            string randomNum = "";
            int temp = -1;                             //记录上次随机数的数值,尽量避免产生几个相同的随机数
            Random rand = new Random();
            for (int i = 0; i < NumCount; i++)
            {
                if (temp != -1)
                {
                    rand = new Random(i * temp * ((int)DateTime.Now.Ticks));
                }
                int t = rand.Next(35);
                if (temp == t)
                {
                    return CreateRandomNum(NumCount);
                }
                temp = t;
                randomNum += allCharArray[t];


            }
            return randomNum;
        }
        //生产图片
        private void CreateImage(string validateNum)
        {
            if (validateNum == null || validateNum.Trim() == string.Empty)
                return;
            //生成BitMap图像
            System.Drawing.Bitmap image = new System.Drawing.Bitmap(validateNum.Length * 12 + 12, 22);
            Graphics g = Graphics.FromImage(image);
            try
            {
                //生成随机生成器
                Random random = new Random();
                //清空图片背景
                g.Clear(Color.White);
                //画图片的背景噪音线
                for (int i = 0; i < 25; i++)
                {
                    int x1 = random.Next(image.Width);
                    int x2 = random.Next(image.Width);
                    int y1 = random.Next(image.Height);
                    int y2 = random.Next(image.Height);
                    g.DrawLine(new Pen(Color.Silver), x1, x2, y1, y2);
                }
                Font font = new System.Drawing.Font("Arial", 12, (System.Drawing.FontStyle.Bold | System.Drawing.FontStyle.Italic));
                System.Drawing.Drawing2D.LinearGradientBrush brush = new System.Drawing.Drawing2D.LinearGradientBrush(new Rectangle(0, 0, image.Width, image.Height), Color.Blue, Color.DarkRed, 1.2f, true);
                g.DrawString(validateNum, font, brush, 2, 2);
                //画图片的前景噪音点
                for (int i = 0; i < 100; i++)
                {
                    int x = random.Next(image.Width);
                    int y = random.Next(image.Height);
                    image.SetPixel(x, y, Color.FromArgb(random.Next()));

                }
                //画图片的边框线
                g.DrawRectangle(new Pen(Color.Silver), 0, 0, image.Width - 1, image.Height - 1);
                System.IO.MemoryStream ms = new System.IO.MemoryStream();
                //将图像保存到指定流
                image.Save(ms, System.Drawing.Imaging.ImageFormat.Gif);
                Response.ClearContent();
                Response.ContentType = "image/Gif";
                Response.BinaryWrite(ms.ToArray());
            }
            finally
            {
                g.Dispose();
                image.Dispose();
            }
        }
4、运行效果

5、登陆的时候校验下 页面中的输入内容和 后台生成的 Session["ValidateNum"] 作校验
使用Topshelf开发Windows服务、记录日志
开发windows服务,除了在vs里新建服务项目外(之前有写过具体开发方法,可点击查看),还可以使用Topshelf。
不过使用topshelf需要.netframework 4.5.2版本,在vs2013上引用不成功,我这里使用的是vs2017。
以下为具体步骤:
一、引用topshelf 并使用
1、在vs里新建控制台程序

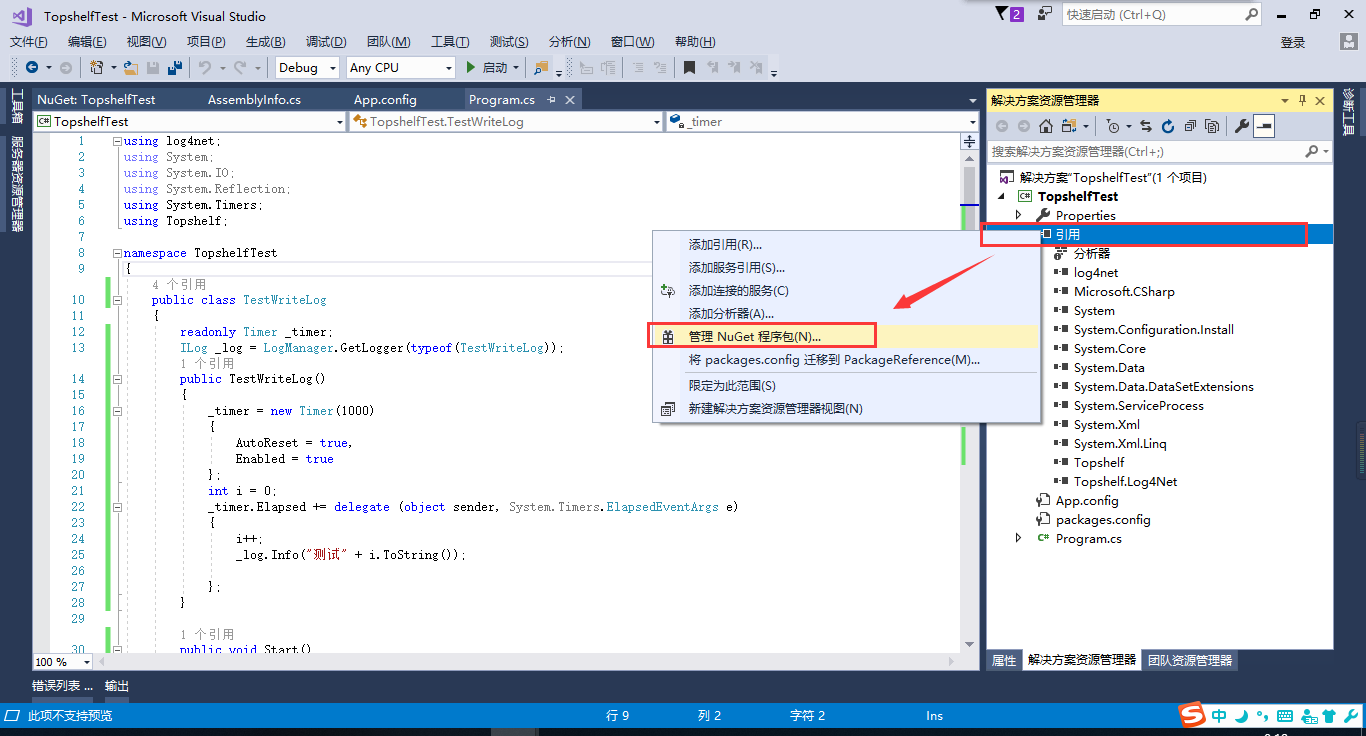
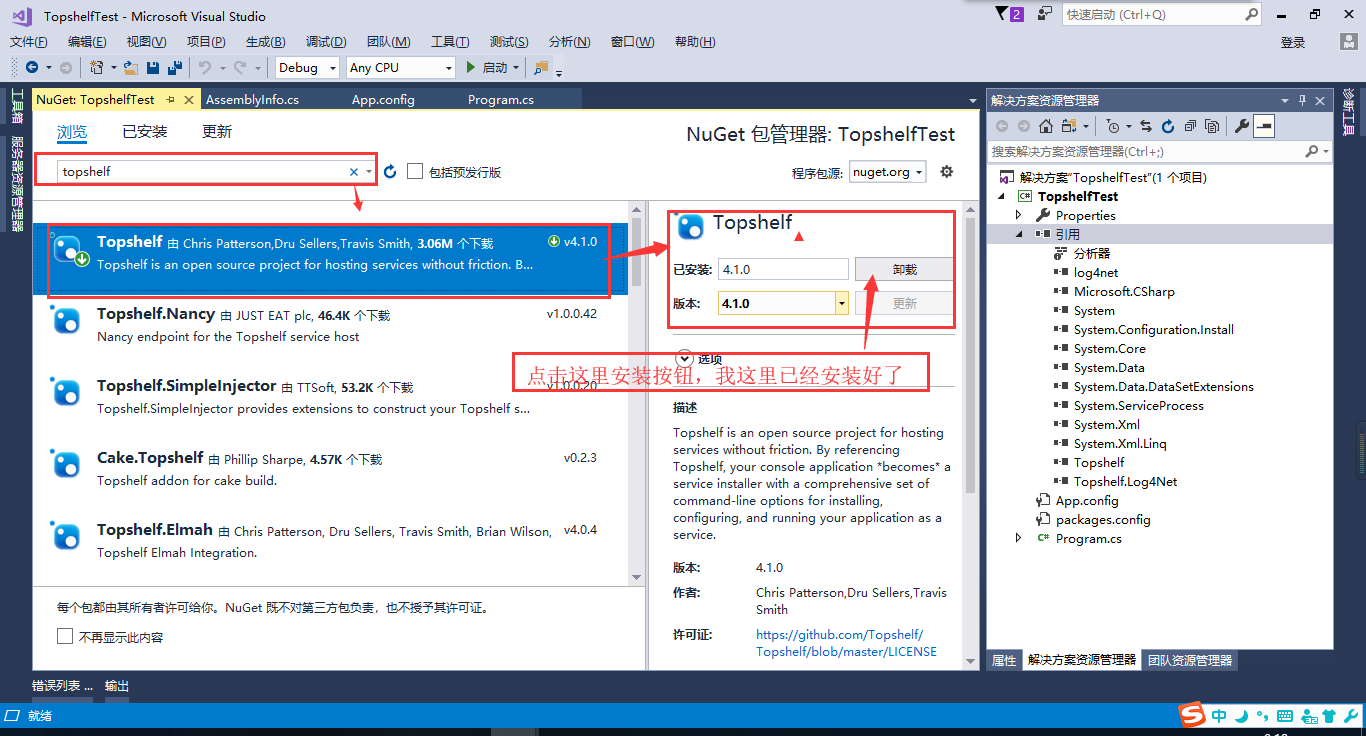
2、在引用里使用NuGet搜索topshelf并安装
3、程序代码
using log4net;
using System;
using System.IO;
using System.Reflection;
using System.Timers;
using Topshelf;

namespace TopshelfTest
{
    public class TestWriteLog
    {
        readonly Timer _timer;
        ILog _log = LogManager.GetLogger(typeof(TestWriteLog));
        public TestWriteLog()
        {
            _timer = new Timer(1000)
            {
                AutoReset = true,
                Enabled = true
            };
            int i = 0;
            _timer.Elapsed += delegate (object sender, System.Timers.ElapsedEventArgs e)
            {
                i++;
                _log.Info("测试" + i.ToString());

            };
        }

        public void Start()
        {
            _log.Info("Service is Started");
            _timer.Start();
        }
        public void Stop()
        {
            _log.Info("Service is Stopped");
            _timer.Stop();
        }


        /// <summary>
        /// 应用程序的主入口点。
        /// </summary>
        static void Main()
        {

            HostFactory.Run(c =>
            {
                c.Service<TestWriteLog>((x) =>
                {
                    x.ConstructUsing(name => new TestWriteLog());
                    x.WhenStarted((t) => t.Start());
                    x.WhenStopped((t) => t.Stop());
                });
                c.RunAsLocalSystem();
                //服务描述
                c.SetDescription("TestServices测试服务描述");
                //服务显示名称
                c.SetDisplayName("TestServices测试服务显示名称");
                //服务的真实名称
                c.SetServiceName("TestServices");
            });
        }
    }
}
4、log4net引用和配置方法
4.1 使用以上方法引用log4net.dll
4.2 在app.config 里作如下配置
<configSections>
<section name="log4net" type="log4net.Config.Log4NetConfigurationSectionHandler, log4net" />
</configSections>
<log4net>
<!-- OFF, FATAL, ERROR, WARN, INFO, DEBUG, ALL -->
<!-- Set root logger level to ERROR and its appenders -->
<root>
<level value="ALL" />
<appender-ref ref="SysAppender" />
</root>
<!-- Print only messages of level DEBUG or above in the packages -->
<logger name="WebLogger">
<level value="log" />
</logger>
<appender name="SysAppender" type="log4net.Appender.RollingFileAppender,log4net">
<!--<param name="File" value="App_Data/" />-->
<File value="Logs\log" />
<!--日志文件位置和文件名-->
<param name="AppendToFile" value="true" />
<param name="RollingStyle" value="Date" />
<!--<param name="DatePattern" value=""Logs_"yyyyMMdd".txt"" />-->
<param name="DatePattern" value="yyyyMMdd".txt"" />
<!--在文件名后面加内容 比如 log名变为log20180808-->
<param name="StaticLogFileName" value="false" />
<layout type="log4net.Layout.PatternLayout,log4net">
<param name="ConversionPattern" value="%d [%t] %-5p %c - %m%n" />
</layout>
</appender>
<appender name="consoleApp" type="log4net.Appender.ConsoleAppender,log4net">
<layout type="log4net.Layout.PatternLayout,log4net">
<param name="ConversionPattern" value="%d [%t] %-5p %c - %m%n" />
</layout>
</appender>
</log4net>
4.3 在properties的AssemblyInfo.cs里 加如下配置
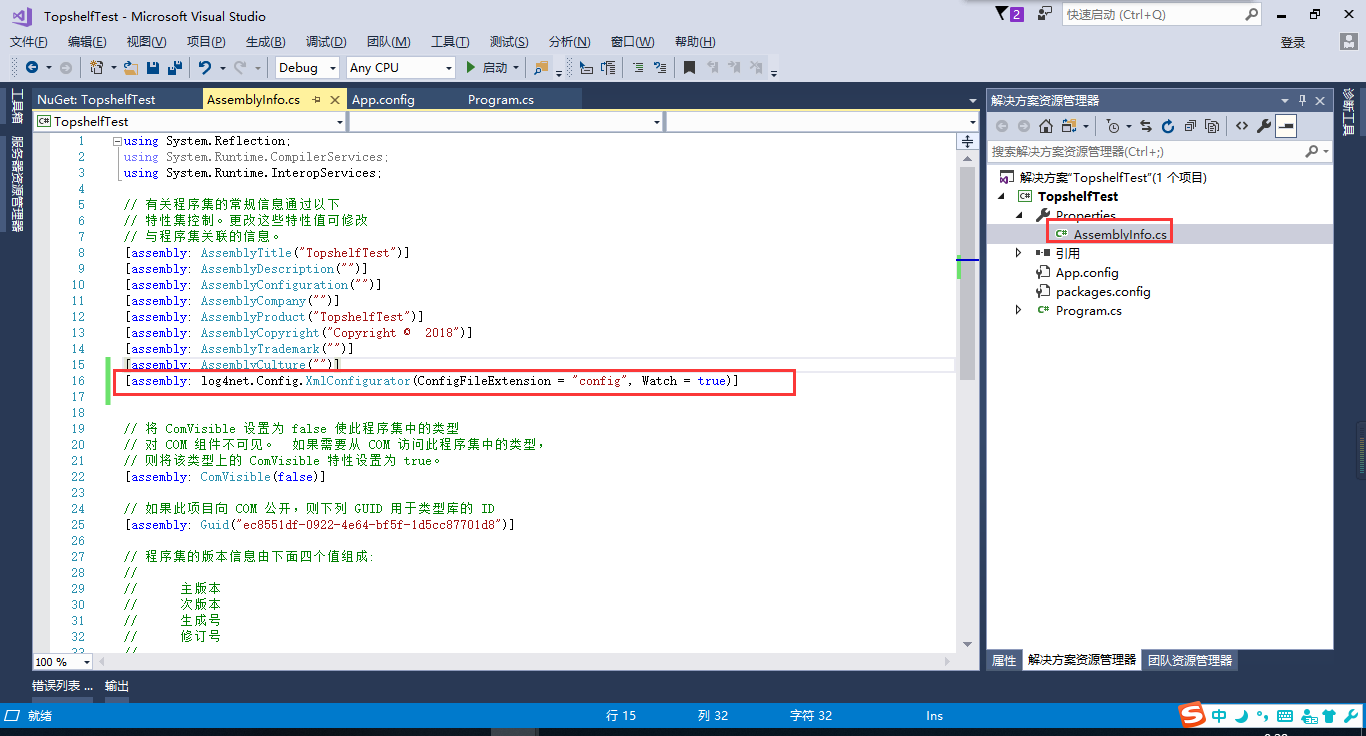
[assembly: log4net.Config.XmlConfigurator(ConfigFileExtension = "config", Watch = true)]
5、生成项目
生成项目后可以将bin\debug里的内容拷出来单独放服务的位置,
6、安装、卸载服务
使用管理员运行cmd,cd到你的服务文件位置,我这里直接在debug里安装服务的。
服务.exe install -----安装服务

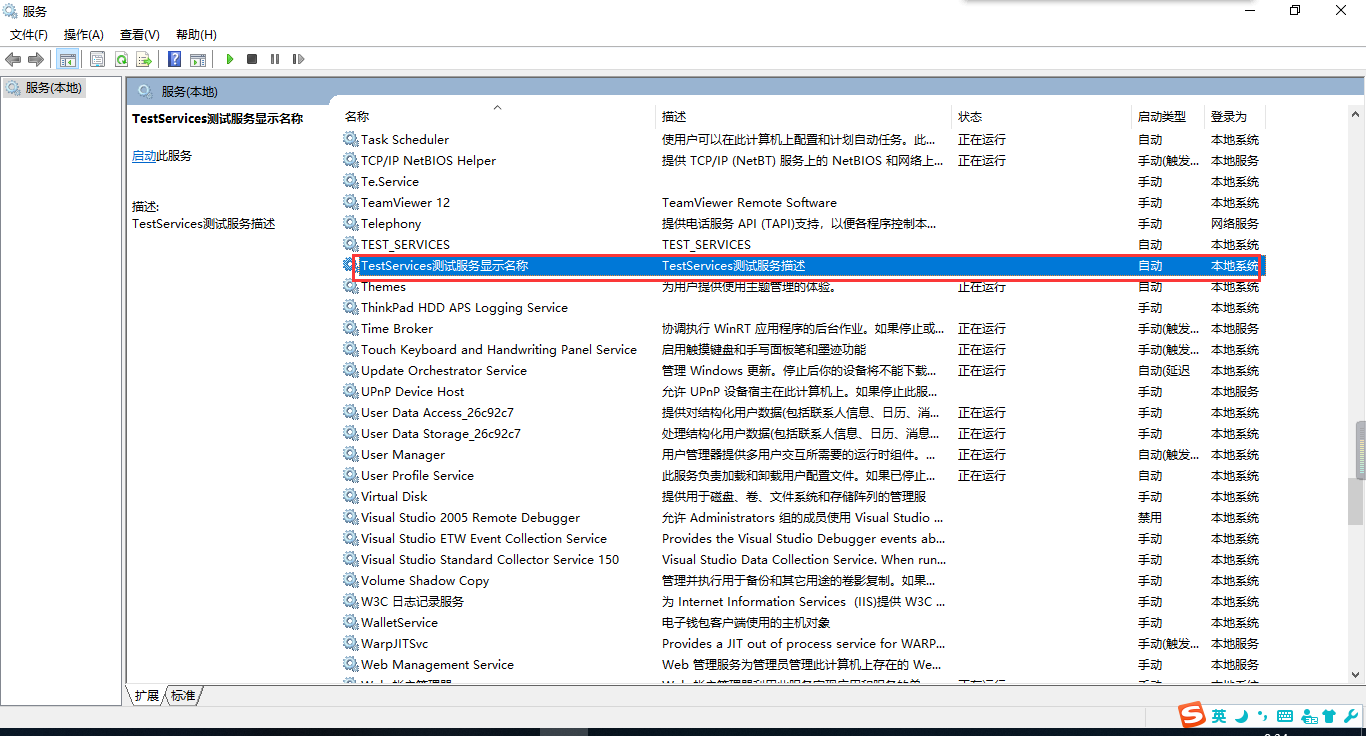
在服务里就可以看到安装的服务了
服务.exe uninstall -----卸载服务
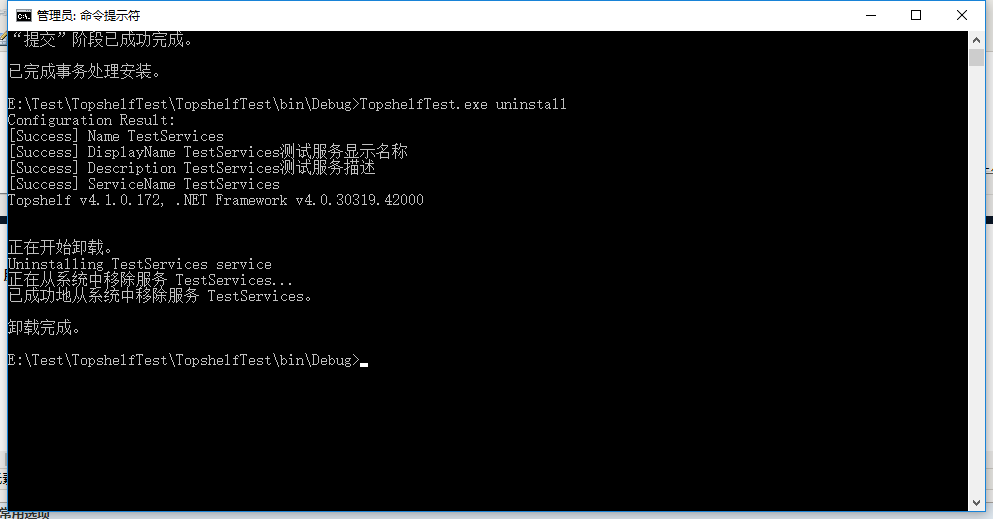
7、运行结果
在安装服务后开启服务

日常杂记——C#验证码
c#_生成图片式验证码
废话不多说直接上代码。
 1     class Check_Code
 2     {
 3         /// <summary>
 4         /// 生成随机验证码数字+字母
 5         /// </summary>
 6         /// <param name="codelen">验证码长度</param>
 7         /// <returns>返回验证码</returns>
 8         public static string MakeCode(int codelen)
 9         {
10             if (codelen < 1)
11             {
12                 return string.Empty;
13             }
14             int number;
15             StringBuilder strCheckCode = new StringBuilder();
16             Random random = new Random();
17             for (int index = 0; index < codelen; index++)
18             {
19                 number = random.Next();
20                 if (number % 2 == 0)
21                 {
22                     strCheckCode.Append((char)('0' + (char)(number % 10)));//生成随机数字
23                 }
24                 else
25                 {
26                     strCheckCode.Append((char)('A' + (char)(number % 26)));//生成随机字母
27                 }
28             }
29             return strCheckCode.ToString();
30         }
31         public static MemoryStream CheckCodeImage(string CheckCode)
32         {
33             if (string.IsNullOrEmpty(CheckCode))
34             {
35                 return null;
36             }
37             Bitmap image = new Bitmap((int)Math.Ceiling((CheckCode.Length * 12.5)), 22);
38             Graphics graphic = Graphics.FromImage(image);//创建一个验证码图片
39             try
40             {
41                 Random random = new Random();
42                 graphic.Clear(Color.White);
43                 int x1 = 0, y1 = 0, x2 = 0, y2 = 0;
44                 for (int index = 0; index < 25; index++)
45                 {
46                     x1 = random.Next(image.Width);
47                     x2 = random.Next(image.Width);
48                     y1 = random.Next(image.Height);
49                     y2 = random.Next(image.Height);
50                     graphic.DrawLine(new Pen(Color.Silver), x1, y1, x2, y2);
51                 }
52                 Font font = new Font("Arial", 12, (FontStyle.Bold | FontStyle.Italic));//Font设置字体,字号,字形
53                 //设置图形渐变色的起始颜色与终止颜色,渐变角度
54                 LinearGradientBrush brush = new LinearGradientBrush(new Rectangle(0, 0, image.Width, image.Height), Color.Red, Color.DarkRed, 1.2f, true);
55                 graphic.DrawString(CheckCode, font, brush, 2, 2);
56                 int X = 0; int Y = 0;
57                 //绘制图片的前景噪点
58                 for (int i = 0; i < 100; i++)
59                 {
60                     X = random.Next(image.Width);
61                     Y = random.Next(image.Height);
62                     image.SetPixel(X, Y, Color.FromArgb(random.Next()));
63                 }
64                 //画图片的边框线
65                 graphic.DrawRectangle(new Pen(Color.Silver), 0, 0, image.Width - 1, image.Height - 1);
66                 //将图片保存为stream流返回
67                 MemoryStream ms = new MemoryStream();
68                 image.Save(ms, System.Drawing.Imaging.ImageFormat.Gif);
69                 return ms;
70             }
71             finally
72             {
73                 graphic.Dispose();
74                 image.Dispose();
75             }
76         }
77     }
生成验证码图片,需要先生成验证码,再将验证码处理为图片。
转载引用黎木博客-https://www.cnblogs.com/running-mydream/p/4071528.html
本文通过一个简单的小例子简述SharpZipLib压缩文件的常规用法,仅供学习分享使用,如有不足之处,还请指正。
什么是SharpZipLib ?
SharpZipLib是一个C#的类库,主要用来解压缩Zip,GZip,BZip2,Tar等格式,是以托管程序集的方式实现,可以方便的应用于其他的项目之中。
在工程中引用SharpZipLib
在项目中,点击项目名称右键-->管理NuGet程序包,打开NuGet包管理器窗口,进行搜索下载即可,如下图所示:

SharpZipLib的关键类结构图
如下所示:

涉及知识点:
- ZipOutputStream 压缩输出流,将文件一个接一个的写入压缩文档,此类不是线程安全的。
- PutNextEntry 开始一个新的ZIP条目,ZipOutputStream中的方法。
- ZipEntry 一个ZIP文件中的条目,可以理解为压缩包里面的一个文件夹/文件。
- ZipInputStream 解压缩输出流,从压缩包中一个接一个的读出文档。
- GetNextEntry 读出ZIP条目,ZipInputStream中的方法。
示例效果图:
关于解压缩小例子的示例效果图,如下:

核心代码
  1 using ICSharpCode.SharpZipLib.Checksum;
  2 using ICSharpCode.SharpZipLib.Zip;
  3 using System;
  4 using System.Collections.Generic;
  5 using System.IO;
  6 using System.Linq;
  7 using System.Text;
  8 using System.Threading.Tasks;
  9
 10 namespace DemoZip
 11 {
 12     class ZipHelper
 13     {
 14         private string rootPath = string.Empty;
 15
 16         #region 压缩
 17
 18         /// <summary>
 19         /// 递归压缩文件夹的内部方法
 20         /// </summary>
 21         /// <param name="folderToZip">要压缩的文件夹路径</param>
 22         /// <param name="zipStream">压缩输出流</param>
 23         /// <param name="parentFolderName">此文件夹的上级文件夹</param>
 24         /// <returns></returns>
 25         private  bool ZipDirectory(string folderToZip, ZipOutputStream zipStream, string parentFolderName)
 26         {
 27             bool result = true;
 28             string[] folders, files;
 29             ZipEntry ent = null;
 30             FileStream fs = null;
 31             Crc32 crc = new Crc32();
 32
 33             try
 34             {
 35                 string entName = folderToZip.Replace(this.rootPath, string.Empty)+"/";
 36                 //Path.Combine(parentFolderName, Path.GetFileName(folderToZip) + "/")
 37                 ent = new ZipEntry(entName);
 38                 zipStream.PutNextEntry(ent);
 39                 zipStream.Flush();
 40
 41                 files = Directory.GetFiles(folderToZip);
 42                 foreach (string file in files)
 43                 {
 44                     fs = File.OpenRead(file);
 45
 46                     byte[] buffer = new byte[fs.Length];
 47                     fs.Read(buffer, 0, buffer.Length);
 48                     ent = new ZipEntry(entName + Path.GetFileName(file));
 49                     ent.DateTime = DateTime.Now;
 50                     ent.Size = fs.Length;
 51
 52                     fs.Close();
 53
 54                     crc.Reset();
 55                     crc.Update(buffer);
 56
 57                     ent.Crc = crc.Value;
 58                     zipStream.PutNextEntry(ent);
 59                     zipStream.Write(buffer, 0, buffer.Length);
 60                 }
 61
 62             }
 63             catch
 64             {
 65                 result = false;
 66             }
 67             finally
 68             {
 69                 if (fs != null)
 70                 {
 71                     fs.Close();
 72                     fs.Dispose();
 73                 }
 74                 if (ent != null)
 75                 {
 76                     ent = null;
 77                 }
 78                 GC.Collect();
 79                 GC.Collect(1);
 80             }
 81
 82             folders = Directory.GetDirectories(folderToZip);
 83             foreach (string folder in folders)
 84                 if (!ZipDirectory(folder, zipStream, folderToZip))
 85                     return false;
 86
 87             return result;
 88         }
 89
 90         /// <summary>
 91         /// 压缩文件夹
 92         /// </summary>
 93         /// <param name="folderToZip">要压缩的文件夹路径</param>
 94         /// <param name="zipedFile">压缩文件完整路径</param>
 95         /// <param name="password">密码</param>
 96         /// <returns>是否压缩成功</returns>
 97         public  bool ZipDirectory(string folderToZip, string zipedFile, string password)
 98         {
 99             bool result = false;
100             if (!Directory.Exists(folderToZip))
101                 return result;
102
103             ZipOutputStream zipStream = new ZipOutputStream(File.Create(zipedFile));
104             zipStream.SetLevel(6);
105             if (!string.IsNullOrEmpty(password)) zipStream.Password = password;
106
107             result = ZipDirectory(folderToZip, zipStream, "");
108
109             zipStream.Finish();
110             zipStream.Close();
111
112             return result;
113         }
114
115         /// <summary>
116         /// 压缩文件夹
117         /// </summary>
118         /// <param name="folderToZip">要压缩的文件夹路径</param>
119         /// <param name="zipedFile">压缩文件完整路径</param>
120         /// <returns>是否压缩成功</returns>
121         public  bool ZipDirectory(string folderToZip, string zipedFile)
122         {
123             bool result = ZipDirectory(folderToZip, zipedFile, null);
124             return result;
125         }
126
127         /// <summary>
128         /// 压缩文件
129         /// </summary>
130         /// <param name="fileToZip">要压缩的文件全名</param>
131         /// <param name="zipedFile">压缩后的文件名</param>
132         /// <param name="password">密码</param>
133         /// <returns>压缩结果</returns>
134         public  bool ZipFile(string fileToZip, string zipedFile, string password)
135         {
136             bool result = true;
137             ZipOutputStream zipStream = null;
138             FileStream fs = null;
139             ZipEntry ent = null;
140
141             if (!File.Exists(fileToZip))
142                 return false;
143
144             try
145             {
146                 fs = File.OpenRead(fileToZip);
147                 byte[] buffer = new byte[fs.Length];
148                 fs.Read(buffer, 0, buffer.Length);
149                 fs.Close();
150
151                 fs = File.Create(zipedFile);
152                 zipStream = new ZipOutputStream(fs);
153                 if (!string.IsNullOrEmpty(password)) zipStream.Password = password;
154                 ent = new ZipEntry(Path.GetFileName(fileToZip));
155                 zipStream.PutNextEntry(ent);
156                 zipStream.SetLevel(6);
157
158                 zipStream.Write(buffer, 0, buffer.Length);
159
160             }
161             catch
162             {
163                 result = false;
164             }
165             finally
166             {
167                 if (zipStream != null)
168                 {
169                     zipStream.Finish();
170                     zipStream.Close();
171                 }
172                 if (ent != null)
173                 {
174                     ent = null;
175                 }
176                 if (fs != null)
177                 {
178                     fs.Close();
179                     fs.Dispose();
180                 }
181             }
182             GC.Collect();
183             GC.Collect(1);
184
185             return result;
186         }
187
188         /// <summary>
189         /// 压缩文件
190         /// </summary>
191         /// <param name="fileToZip">要压缩的文件全名</param>
192         /// <param name="zipedFile">压缩后的文件名</param>
193         /// <returns>压缩结果</returns>
194         public  bool ZipFile(string fileToZip, string zipedFile)
195         {
196             bool result = ZipFile(fileToZip, zipedFile, null);
197             return result;
198         }
199
200         /// <summary>
201         /// 压缩文件或文件夹
202         /// </summary>
203         /// <param name="fileToZip">要压缩的路径</param>
204         /// <param name="zipedFile">压缩后的文件名</param>
205         /// <param name="password">密码</param>
206         /// <returns>压缩结果</returns>
207         public  bool Zip(string fileToZip, string zipedFile, string password)
208         {
209             bool result = false;
210             if (Directory.Exists(fileToZip))
211             {
212                 this.rootPath = Path.GetDirectoryName(fileToZip);
213                 result = ZipDirectory(fileToZip, zipedFile, password);
214             }
215             else if (File.Exists(fileToZip))
216             {
217                 this.rootPath = Path.GetDirectoryName(fileToZip);
218                 result = ZipFile(fileToZip, zipedFile, password);
219             }
220             return result;
221         }
222
223         /// <summary>
224         /// 压缩文件或文件夹
225         /// </summary>
226         /// <param name="fileToZip">要压缩的路径</param>
227         /// <param name="zipedFile">压缩后的文件名</param>
228         /// <returns>压缩结果</returns>
229         public  bool Zip(string fileToZip, string zipedFile)
230         {
231             bool result = Zip(fileToZip, zipedFile, null);
232             return result;
233
234         }
235
236         #endregion
237
238         #region 解压
239
240         /// <summary>
241         /// 解压功能(解压压缩文件到指定目录)
242         /// </summary>
243         /// <param name="fileToUnZip">待解压的文件</param>
244         /// <param name="zipedFolder">指定解压目标目录</param>
245         /// <param name="password">密码</param>
246         /// <returns>解压结果</returns>
247         public bool UnZip(string fileToUnZip, string zipedFolder, string password)
248         {
249             bool result = true;
250             FileStream fs = null;
251             ZipInputStream zipStream = null;
252             ZipEntry ent = null;
253             string fileName;
254
255             if (!File.Exists(fileToUnZip))
256                 return false;
257
258             if (!Directory.Exists(zipedFolder))
259                 Directory.CreateDirectory(zipedFolder);
260
261             try
262             {
263                 zipStream = new ZipInputStream(File.OpenRead(fileToUnZip));
264                 if (!string.IsNullOrEmpty(password)) zipStream.Password = password;
265                 while ((ent = zipStream.GetNextEntry()) != null)
266                 {
267                     if (!string.IsNullOrEmpty(ent.Name))
268                     {
269                         fileName = Path.Combine(zipedFolder, ent.Name);
270                         fileName = fileName.Replace('/', '\\');//change by Mr.HopeGi
271
272                         if (fileName.EndsWith("\\"))
273                         {
274                             Directory.CreateDirectory(fileName);
275                             continue;
276                         }
277
278                         fs = File.Create(fileName);
279                         int size = 2048;
280                         byte[] data = new byte[size];
281                         while (true)
282                         {
283                             size = zipStream.Read(data, 0, data.Length);
284                             if (size > 0)
285                                 fs.Write(data, 0, data.Length);
286                             else
287                                 break;
288                         }
289                     }
290                 }
291             }
292             catch
293             {
294                 result = false;
295             }
296             finally
297             {
298                 if (fs != null)
299                 {
300                     fs.Close();
301                     fs.Dispose();
302                 }
303                 if (zipStream != null)
304                 {
305                     zipStream.Close();
306                     zipStream.Dispose();
307                 }
308                 if (ent != null)
309                 {
310                     ent = null;
311                 }
312                 GC.Collect();
313                 GC.Collect(1);
314             }
315             return result;
316         }
317
318         /// <summary>
319         /// 解压功能(解压压缩文件到指定目录)
320         /// </summary>
321         /// <param name="fileToUnZip">待解压的文件</param>
322         /// <param name="zipedFolder">指定解压目标目录</param>
323         /// <returns>解压结果</returns>
324         public bool UnZip(string fileToUnZip, string zipedFolder)
325         {
326             bool result = UnZip(fileToUnZip, zipedFolder, null);
327             return result;
328         }
329
330         #endregion
331     }
332 }
备注
关于生成压缩的方法还有很多,如通过命令行调用winrar的执行文件,SharpZipLib只是方法之一。
关于SharpZipLib的的API文档,可参看链接。
关于源码下载链接
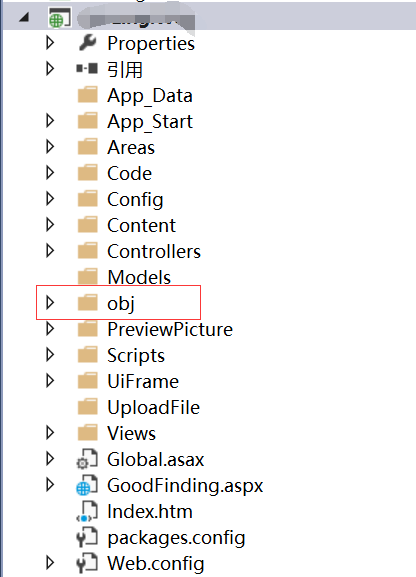
未能将文件obj\...复制到obj\...未能找到路径
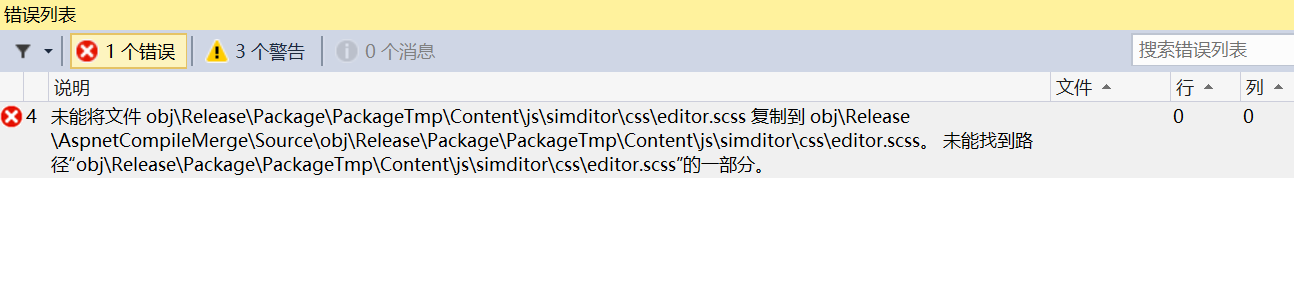
解决办法:将web项目文件下的obj文件夹从项目中排除,然后再发布就OK了
Sql2012如何将远程服务器数据库及表、表结构、表数据导入本地数据库
1、第一步,在本地数据库中建一个与服务器同名的数据库
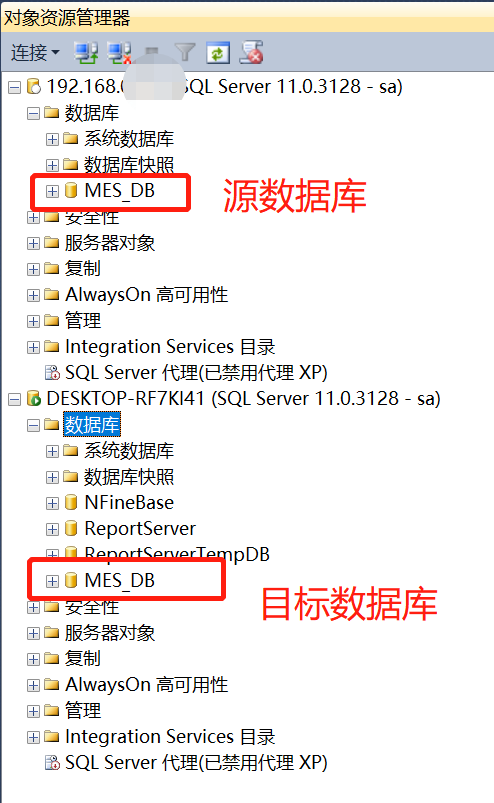
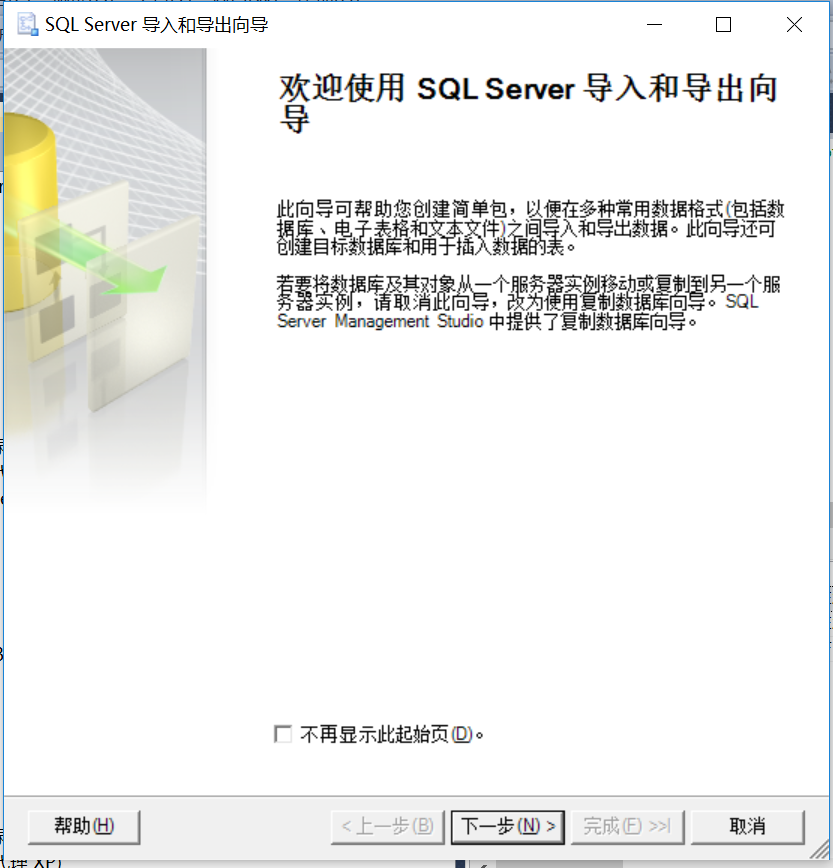
2、第二步,右键源数据库,任务》导出数据,弹出导入导出提示框,点下一步继续
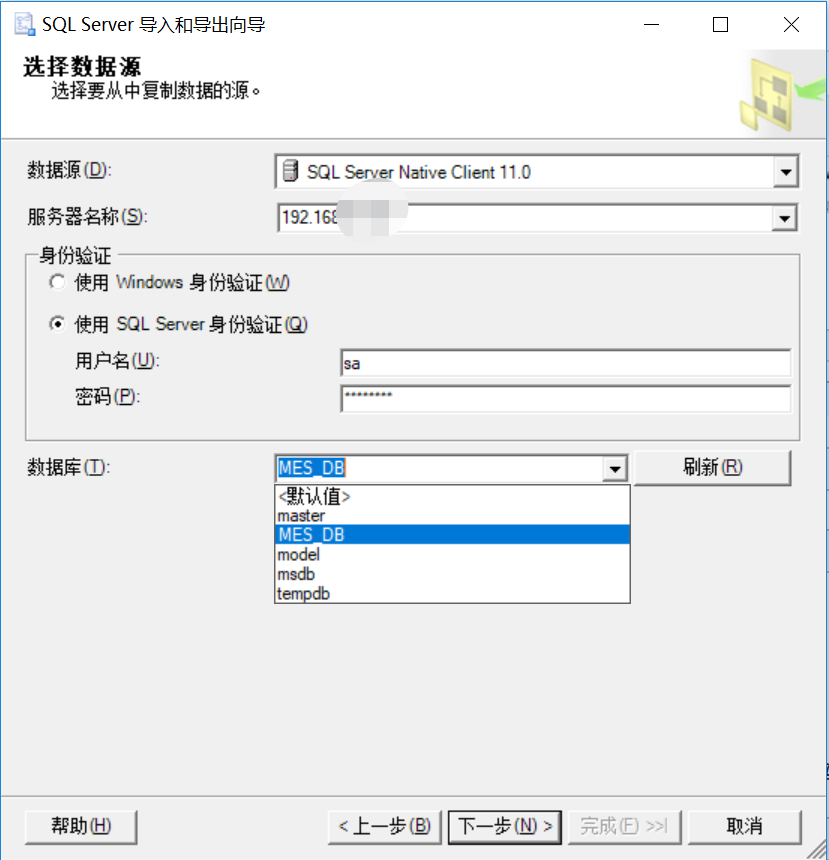
3、远程数据库操作,确认服务器名称(服务器地址)、身份验证(输入用户名、密码)、选择需要导出的源数据库,点下一步继续
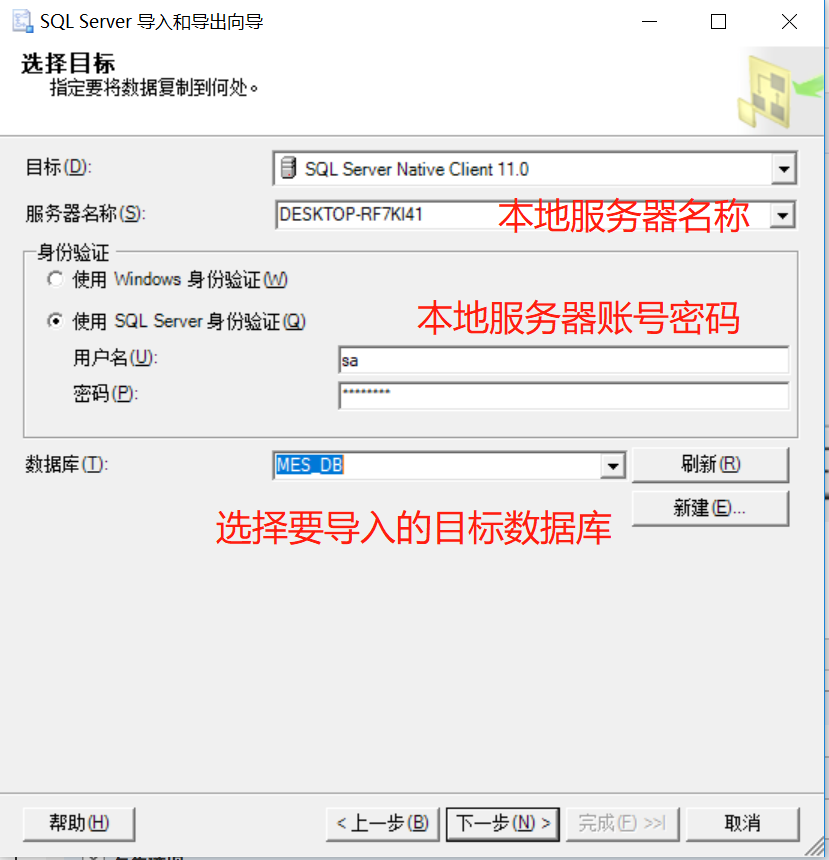
4、本地目标服务器操作,确认服务器名称、输入用户名密码、选择要导入的目标数据库(一般与远程数据库同名),点下一步继续
5、这一步选择默认,点下一步继续
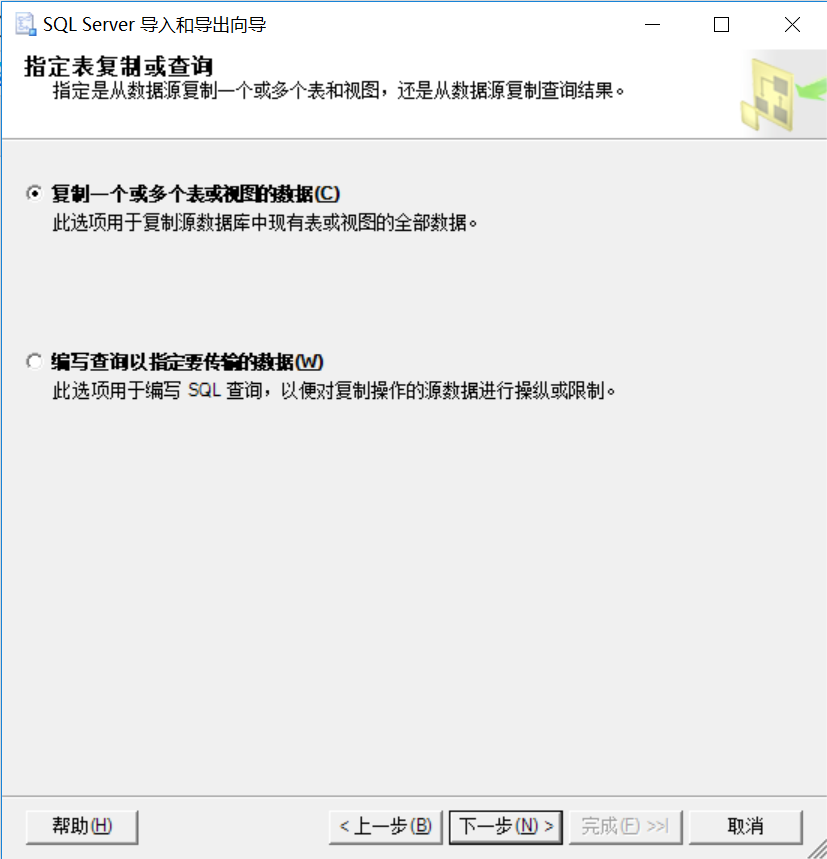
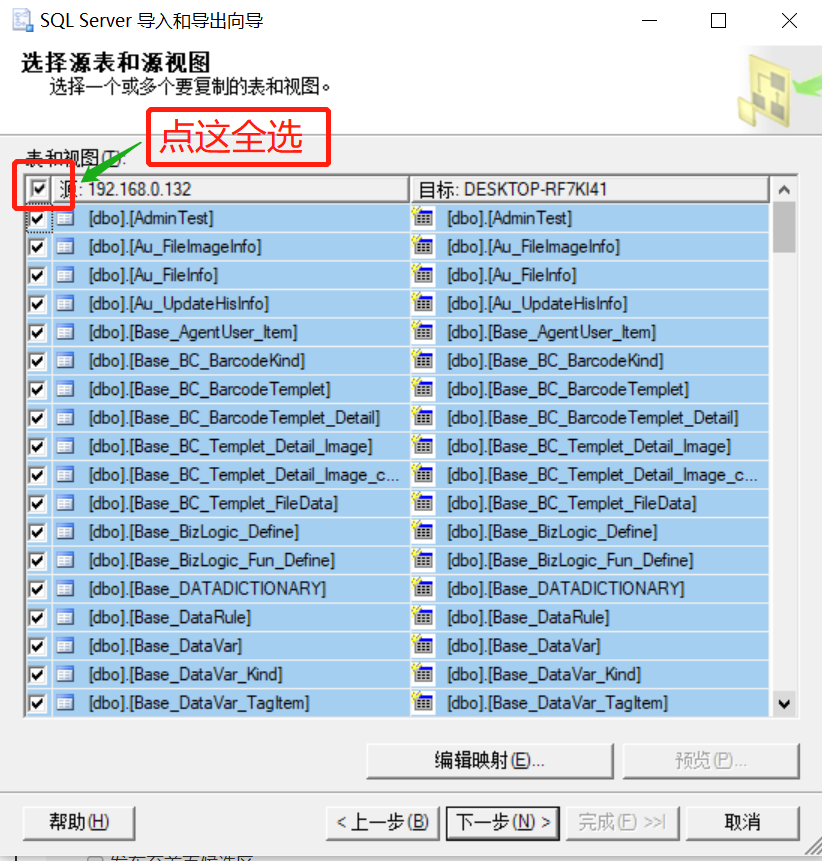
6、选择需要复制的表或视图(一般全选就是),点下一步继续
7、选择默认,点下一步继续

8、选择完成,执行表结构及表数据复制过程,表及数据复制过程

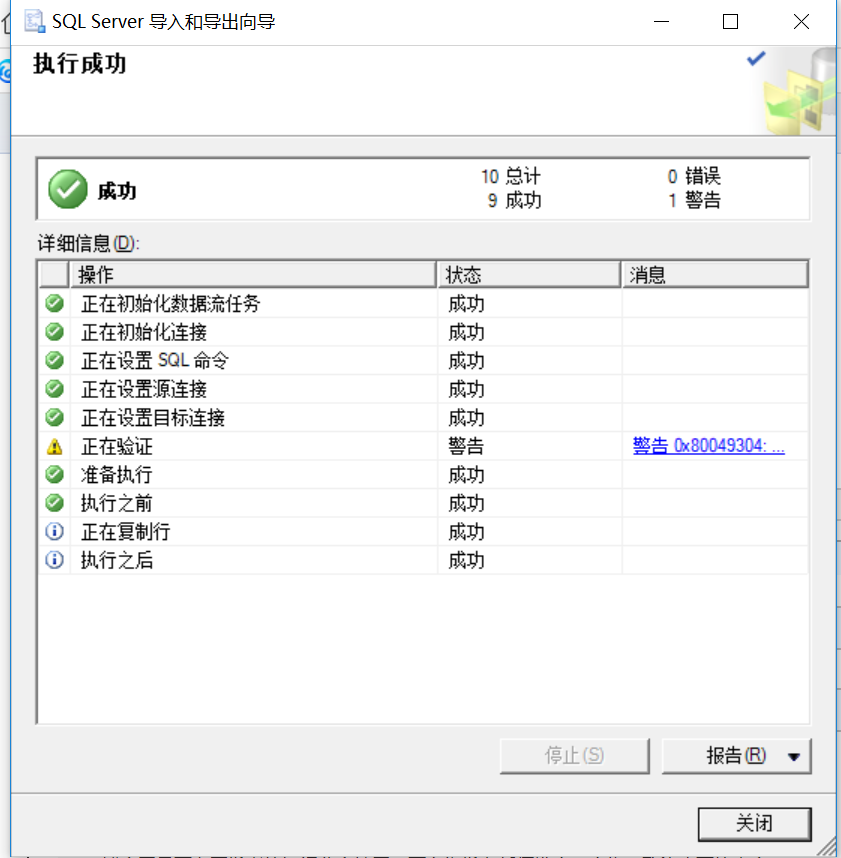
9、到这一步,表示整个过程执行成功
自定义日志记录功能,按日记录,很方便
一、定义日志类型
public enum LogType
{
Debug = 0,
Error = 1,
Info = 2,
Warn = 3
}
二、添加静态LogHelper 类
public static class LogHelper
{
public static void Write(string msg, LogType logtype = LogType.Debug)
{
try
{
string basePath = Path.Combine(AppDomain.CurrentDomain.BaseDirectory, "Logs");
Directory.CreateDirectory(basePath);
string logPath = Path.Combine(basePath, DateTime.Today.ToString("yyyyMMdd") + ".log");
using (FileStream stream = new FileStream(logPath, FileMode.Append, FileAccess.Write, FileShare.Read))
{
using (StreamWriter writer = new StreamWriter(stream, Encoding.UTF8))
{
string messge = string.Format("{0} {1} - 操作人:【{2}】,Messge:{3}",
DateTime.Now.ToString(), logtype.ToString(), DeluxeIdentity.Current.User.DisplayName,msg);
writer.WriteLine(messge);
writer.Flush();
}
}
}
catch (Exception e)
{
throw new Exception( "日志写入异常:" + e.ToString());
}
}
}
三、调用方法
LogHelper.Write("检测拟单页面审批意见是否重复保存异常,原因:" + e.ToString(), LogType.Error);
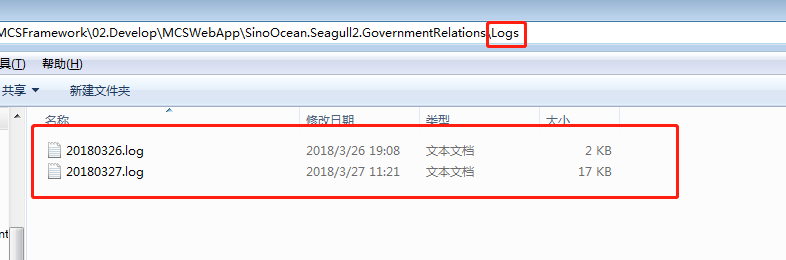
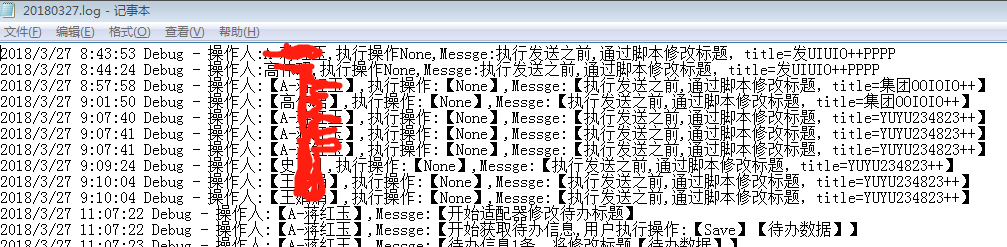
四、效果
DotNetty网络通信框架学习
目录:
一.DotNetty网络通信框架学习之初视Netty

 浙公网安备 33010602011771号