Apache Guacamole 部署安装(不使用数据库版)
Apache Guacamole 是一个基于 HTML5 的远程桌面网关,支持 VNC、RDP 和 SSH 等标准协议。
一.官方链接
1. 官方文档
https://guacamole.apache.org/doc/gug/guacamole-architecture.html
2. 项目位置:
https://guacamole.apache.org/
https://gitcode.com/gh_mirrors/gua/guacamole-server
二.安装
1. 安装依赖
yum install -y cairo-devel libjpeg-turbo-devel libpng-devel uuid-devel
yum install -y ffmpeg ffmpeg-devel openssl openssl-devel
yum install -y freerdp freerdp-devel freerdp-plugins pango-devel libssh2-devel
yum install -y libtelnet-devel libvncserver-devel pulseaudio-libs-devel
yum install -y libvorbis-devel libwebp-devel
yum install -y libwebsockets-devel gnu-free-mono-fonts
yum -y install gcc-c++
2. 安装java和tomcat,mysql
# 安装 java
yum install java-11-openjdk java-11-openjdk-devel
ls -l $(which java)
ls -lrt /etc/alternatives/java
vi /etc/profile
export JAVA_HOME=/usr/lib/jvm/java-11-openjdk-11.0.16.0.8-1.el7_9.x86_64
export JRE_HOME=$JAVA_HOME/jre
export CLASSPATH=$JAVA_HOME/lib:$JRE_HOME/lib:$CLASSPATH
export PATH=$JAVA_HOME/bin:$JRE_HOME/bin:$PATH

source /etc/profile
echo $JAVA_HOME


# 安装tomcat
yum install -y tomcat tomcat-webapps tomcat-admin-webapps
systemctl enable tomcat
systemctl start tomcat


# ------------mysql可不安装(用不到)-----------------
#安装mysql服务
yum install mysql-server
systemctl enable mysqld
systemctl start mysqld


#配置mysql
mysql -u root -p
CREATE DATABASE guacamole_db;
CREATE USER 'guacamole_user'@'localhost' IDENTIFIED BY 'Password';
GRANT SELECT,INSERT,UPDATE,DELETE ON guacamole_db.* TO 'guacamole_user'@'localhost';
FLUSH PRIVILEGES;
show databases;
show tables from guacamole_db;
show grants for guacamole_user@localhost;
exit
2. 下载项目
wget https://dlcdn.apache.org/guacamole/1.5.5/source/guacamole-server-1.5.5.tar.gz
3. 解压后,编译安装服务端
tar zxvf guacamole-server-1.5.5.tar.gz
cd guacamole-server-1.5.5
./configure
结果如下:

接着安装命令:
make -j4
make install

#ldconfig 是一个用于管理共享库缓存的命令行工具(make install后运行)
ldconfig
# LD_LIBRARY_PATH 是一个环境变量,用于指定动态链接器在运行时搜索共享库的路径。方便调用*ssh.so等。(建议直接放入.bashrc)
export LD_LIBRARY_PATH=/usr/local/lib:$LD_LIBRARY_PATH
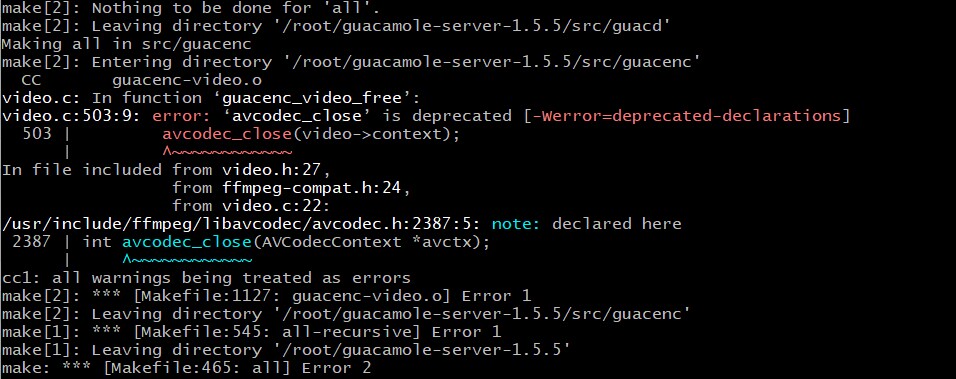
# 报错解决:
make后报错 删除/root/guacamole-server-1.5.5/src/guacenc/video.c中的503行
4. 添加配置文件
文件1:
vim /etc/guacamole/guacamole.properties
# Hostname and port of guacamole proxy
guacd-hostname:127.0.0.1
guacd-port: 4822
文件2:
vim /etc/guacamole/user-mapping.xml
<user-mapping>
    <!-- 这么配置用hhb登陆之后会看到设备选择页面 -->
    <authorize username="guacadmin" password="guacadmin">
        <connection name="test1">
           <protocol>ssh</protocol>
           <param name="hostname">xxx.xxx.xxx.xxx</param>
           <param name="port">22</param>
           <param name="username">root</param>
           <param name="password">123456</param>
        </connection>
        <connection name="test2">
            <protocol>ssh</protocol>
            <param name="hostname">xxx.xxx.xxx.xxx</param>
            <param name="port">22</param>
           <param name="username">root</param>
           <param name="password">123456</param>
        </connection>
    </authorize>
    <!-- 这么配置用test登陆之后直接进入ssh窗口 -->
    <authorize username="test" password="123456">
         <protocol>rdp</protocol>
         <param name="hostname">xxx.xxx.xxx.xxx</param>
         <param name="port">3389</param>
    </authorize>

</user-mapping>
5. 安装前端
# 下载guacamole-1.5.5.war文件
wget https://dlcdn.apache.org/guacamole/1.5.5/binary/guacamole-1.5.5.war

# 复制解压
cp /root/guacamole-1.5.5.war  /var/lib/tomcat/webapps/guacamole.war

# 重启tomcat生效
systemctl restart tomcat
6.启动 guacd
/usr/local/sbin/guacd -b 0.0.0.0 -f &> /var/log/guacd.log &
7.访问
http://xxxx:8080/guacamole/#/

 浙公网安备 33010602011771号