PythonProgramming.net TensorFlow 目标检测(转)
PythonProgramming.net TensorFlow 目标检测(转)
译者:飞龙
一、引言
你好,欢迎阅读 TensorFlow 目标检测 API 迷你系列。 这个 API 可以用于检测图像和/或视频中的对象,带有使用边界框,使用可用的一些预先训练好的模型,或者你自己可以训练的模型(API 也变得更容易)。
首先,你要确保你有 TensorFlow 和所有的依赖。 对于 TensorFlow CPU,你可以执行pip install tensorflow,但是,当然,GPU 版本的 TensorFlow 在处理上要快得多,所以它是理想的。 如果你需要安装 TensorFlow GPU :
安装 TensorFlow GPU 的链接:
如果你没有足够强大的 GPU 来运行 GPU 版本的 TensorFlow,则可以选择使用 PaperSpace。 使用该链接会给你 10 美元的起始折扣,10-20 小时的使用时间。
除此之外,其他的 Python 依赖包括:
pip install pillow
pip install lxml
pip install jupyter
pip install matplotlib
接下来,我们需要克隆 github。 我们可以使用git来完成,或者你可以将仓库下载到.zip:
git clone https://github.com/tensorflow/models.git或者点击https://github.com/tensorflow/model页面上绿色的“克隆或下载”按钮,下载.zip并解压。
一旦你有了模型目录(或models-master,如果你下载并解压.zip),在你的终端或cmd.exe中访问这个目录。 在 Ubuntu 和 Windows 下的步骤略有不同。
Ubuntu:
protoc object_detection/protos/*.proto --python_out=.
并且...
export PYTHONPATH=$PYTHONPATH:`pwd`:`pwd`/slim
如果 Ubuntu 上的protoc命令出现错误,请使用protoc --version检查你运行的版本,如果它不是最新版本,你可能需要更新。 我写这个的时候,我们使用 3.4.0。 为了更新或获取protoc,请前往protoc发布页面。 下载 python 版本,解压,访问目录,然后执行:
sudo ./configure
sudo make check
sudo make install
之后,再次尝试protoc命令(再次确保你在模型目录中执行)。
Windows
前往protoc发布页面并下载protoc-3.4.0-win32.zip,解压缩,然后在bin目录中找到protoc.exe。
如果你喜欢,你可以把它移到更合适的地方,或者把它放在这里。 我最终为我的程序文件生成protoc目录,并放在那里。
现在,从models(或models-master)目录中,可以使用protoc命令,如下所示:
"C:/Program Files/protoc/bin/protoc" object_detection/protos/*.proto --python_out=.
接下来,从models/object_detection目录中打开terminal/cmd.exe,然后用jupyter notebook打开 Jupyter 笔记本。 从这里选择object_detection_tutorial.ipynb。 从这里,你应该能在主菜单中运行单元格,并选择全部运行。
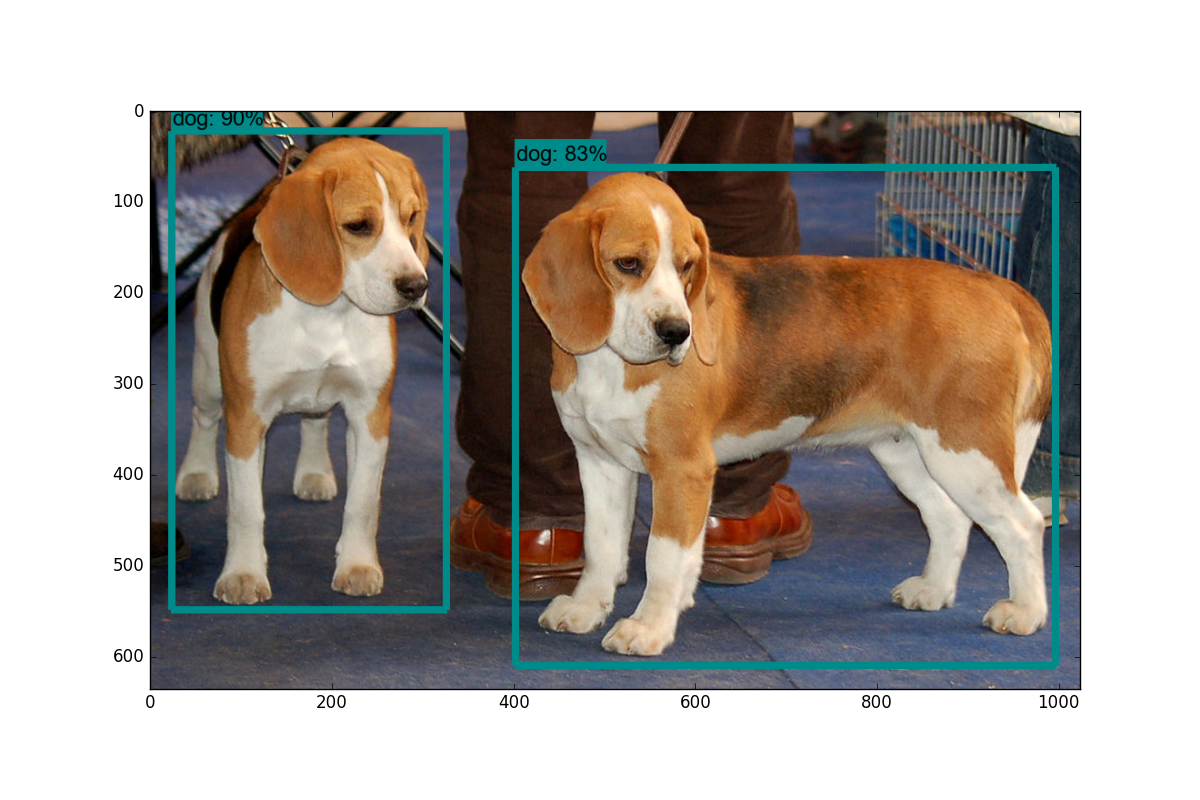
你应该得到以下结果:
在下一个教程中,我们将介绍,如何通过稍微修改此示例代码,来实时标注来自网络摄像头流的数据。
二、视频流的目标检测
欢迎阅读 TensorFlow 目标检测 API 教程的第二部分。 在本教程中,我们将介绍如何调整 API 的 github 仓库中的示例代码,来将对象检测应用到来自摄像头的视频流。
首先,我们将首先修改笔记本,将其转换为.py文件。 如果你想保存在笔记本中,那也没关系。 为了转换,你可以访问file > save as > python file。 一旦完成,你需要注释掉get_ipython().magic('matplotlib inline')这一行。
接下来,我们将引入 Python OpenCV 包装器:
如果你没有安装 OpenCV,你需要获取它。 说明请参阅 OpenCV 简介。
import cv2

cap = cv2.VideoCapture(0)
这将准备cap变量来访问你的摄像头。
接下来,你将下面的代码:
    for image_path in TEST_IMAGE_PATHS:
      image = Image.open(image_path)
      # the array based representation of the image will be used later in order to prepare the
      # result image with boxes and labels on it.
      image_np = load_image_into_numpy_array(image)
替换为:
    while True:
      ret, image_np = cap.read()
最后将这些东西:
      plt.figure(figsize=IMAGE_SIZE)
      plt.imshow(image_np)
      plt.show()
替换为:
      cv2.imshow('object detection', cv2.resize(image_np, (800,600)))
      if cv2.waitKey(25) & 0xFF == ord('q'):
        cv2.destroyAllWindows()
        break
这就好了。完整代码:
import numpy as np
import os
import six.moves.urllib as urllib
import sys
import tarfile
import tensorflow as tf
import zipfile

from collections import defaultdict
from io import StringIO
from matplotlib import pyplot as plt
from PIL import Image

import cv2
cap = cv2.VideoCapture(1)

# This is needed since the notebook is stored in the object_detection folder.
sys.path.append("..")


# ## Object detection imports
# Here are the imports from the object detection module.

# In[3]:

from utils import label_map_util

from utils import visualization_utils as vis_util


# # Model preparation

# ## Variables
#
# Any model exported using the `export_inference_graph.py` tool can be loaded here simply by changing `PATH_TO_CKPT` to point to a new .pb file.
#
# By default we use an "SSD with Mobilenet" model here. See the [detection model zoo](https://github.com/tensorflow/models/blob/master/object_detection/g3doc/detection_model_zoo.md) for a list of other models that can be run out-of-the-box with varying speeds and accuracies.

# In[4]:

# What model to download.
MODEL_NAME = 'ssd_mobilenet_v1_coco_11_06_2017'
MODEL_FILE = MODEL_NAME + '.tar.gz'
DOWNLOAD_BASE = 'http://download.tensorflow.org/models/object_detection/'

# Path to frozen detection graph. This is the actual model that is used for the object detection.
PATH_TO_CKPT = MODEL_NAME + '/frozen_inference_graph.pb'

# List of the strings that is used to add correct label for each box.
PATH_TO_LABELS = os.path.join('data', 'mscoco_label_map.pbtxt')

NUM_CLASSES = 90


# ## Download Model

# In[5]:

opener = urllib.request.URLopener()
opener.retrieve(DOWNLOAD_BASE + MODEL_FILE, MODEL_FILE)
tar_file = tarfile.open(MODEL_FILE)
for file in tar_file.getmembers():
  file_name = os.path.basename(file.name)
  if 'frozen_inference_graph.pb' in file_name:
    tar_file.extract(file, os.getcwd())


# ## Load a (frozen) Tensorflow model into memory.

# In[6]:

detection_graph = tf.Graph()
with detection_graph.as_default():
  od_graph_def = tf.GraphDef()
  with tf.gfile.GFile(PATH_TO_CKPT, 'rb') as fid:
    serialized_graph = fid.read()
    od_graph_def.ParseFromString(serialized_graph)
    tf.import_graph_def(od_graph_def, name='')


# ## Loading label map
# Label maps map indices to category names, so that when our convolution network predicts `5`, we know that this corresponds to `airplane`.  Here we use internal utility functions, but anything that returns a dictionary mapping integers to appropriate string labels would be fine

# In[7]:

label_map = label_map_util.load_labelmap(PATH_TO_LABELS)
categories = label_map_util.convert_label_map_to_categories(label_map, max_num_classes=NUM_CLASSES, use_display_name=True)
category_index = label_map_util.create_category_index(categories)


# ## Helper code

# In[8]:

def load_image_into_numpy_array(image):
  (im_width, im_height) = image.size
  return np.array(image.getdata()).reshape(
      (im_height, im_width, 3)).astype(np.uint8)


# # Detection

# In[9]:

# For the sake of simplicity we will use only 2 images:
# image1.jpg
# image2.jpg
# If you want to test the code with your images, just add path to the images to the TEST_IMAGE_PATHS.
PATH_TO_TEST_IMAGES_DIR = 'test_images'
TEST_IMAGE_PATHS = [ os.path.join(PATH_TO_TEST_IMAGES_DIR, 'image{}.jpg'.format(i)) for i in range(1, 3) ]

# Size, in inches, of the output images.
IMAGE_SIZE = (12, 8)


# In[10]:

with detection_graph.as_default():
  with tf.Session(graph=detection_graph) as sess:
    while True:
      ret, image_np = cap.read()
      # Expand dimensions since the model expects images to have shape: [1, None, None, 3]
      image_np_expanded = np.expand_dims(image_np, axis=0)
      image_tensor = detection_graph.get_tensor_by_name('image_tensor:0')
      # Each box represents a part of the image where a particular object was detected.
      boxes = detection_graph.get_tensor_by_name('detection_boxes:0')
      # Each score represent how level of confidence for each of the objects.
      # Score is shown on the result image, together with the class label.
      scores = detection_graph.get_tensor_by_name('detection_scores:0')
      classes = detection_graph.get_tensor_by_name('detection_classes:0')
      num_detections = detection_graph.get_tensor_by_name('num_detections:0')
      # Actual detection.
      (boxes, scores, classes, num_detections) = sess.run(
          [boxes, scores, classes, num_detections],
          feed_dict={image_tensor: image_np_expanded})