20192426 2021-2022-2 《网络与系统攻防技术》实验八实验报告
20192426 2021-2022-2 《网络与系统攻防技术》实验八实验报告
1.实验内容
-
Web前端HTML
能正常安装、启停Apache。理解HTML,理解表单,理解GET与POST方法,编写一个含有表单的HTML。 -
Web前端javascipt
理解JavaScript的基本功能,理解DOM。
在(1)的基础上,编写JavaScript验证用户名、密码的规则。在用户点击登陆按钮后回显“欢迎+输入的用户名”
尝试注入攻击:利用回显用户名注入HTML及JavaScript。
-
Web后端:MySQL基础:正常安装、启动MySQL,建库、创建用户、修改密码、建表
-
Web后端:编写PHP网页,连接数据库,进行用户认证
-
最简单的SQL注入,XSS攻击测试
-
安装Webgoat或类似平台,并完成SQL注入、XSS、CSRF攻击。
2.实验过程
2.1 Web前端HTML
-
首先我们进行启停Apache,在实验中我们使用XAMPP进行实验,单击启动即可启动,这时点击Admin即可进入首页。

图一 启动Apache首页页面如图二所示。

图二 Apache首页 -
HTML:超文本标记语言(英语:HyperText Markup Language,简称:HTML)是一种用于创建网页的标准标记语言。HTML是一种基础技术,常与CSS、JavaScript一起被众多网站用于设计网页、网页应用程序以及移动应用程序的用户界面。网页浏览器可以读取HTML文件,并将其渲染成可视化网页。HTML描述了一个网站的结构语义随着线索的呈现,使之成为一种标记语言而非编程语言。
HTML元素是构建网站的基石。HTML允许嵌入图像与对象,并且可以用于创建交互式表单,它被用来结构化信息——例如标题、段落和列表等等,也可用来在一定程度上描述文档的外观和语义。HTML的语言形式为尖括号包围的HTML元素(如),浏览器使用HTML标签和脚本来诠释网页内容,但不会将它们显示在页面上。
HTML可以嵌入如JavaScript的脚本语言,它们会影响HTML网页的行为。网页浏览器也可以引用层叠样式表(CSS)来定义文本和其它元素的外观与布局。
-
网页表单(英语:WebForms)可以将用户输入的数据,发送到服务器进行处理。因为互联网的使用者会操作复选框、单选按钮或文本框来填写网页上的表格,所以网页表单的形式类似文件或数据库的表单(form)。例如,网页表单可应用在线上的电子商务:以信用卡订购产品、要求货运,或可用于检索数据(例如,搜索引擎上搜索)。
表单被HTML的
<form>元素所包含。并指出提交数据所用的HTTP request方法:GET或POST。 -
GET方法:向指定的资源发出“显示”请求。使用GET方法应该只用在读取资料,而不应当被用于产生“副作用”的操作中,例如在网络应用程序中。其中一个原因是GET可能会被网络爬虫等随意访问。参见安全方法。浏览器直接发出的GET只能由一个url触发。GET上要在url之外带一些参数就只能依靠url上附带querystring。
-
POST方法:向指定资源提交数据,请求服务器进行处理(例如提交表单或者上传文件)。数据被包含在请求本文中。这个请求可能会创建新的资源或修改现有资源,或二者皆有。每次提交,表单的数据被浏览器用编码到HTTP请求的body里。浏览器发出的POST请求的body主要有两种格式,一种是application/x-www-form-urlencoded用来传输简单的数据,大概就是"key1=value1&key2=value2"这样的格式。另外一种是传文件,会采用multipart/form-data格式。采用后者是因为application/x-www-form-urlencoded的编码方式对于文件这种二进制的数据非常低效。
-
编写一个含有表单的HTML,代码如下所示:
<!DOCTYPE html>
<html lang="en">

<head>
    <meta charset="UTF-8">
    <meta name="viewport" content="width=device-width, initial-scale=1.0">
    <link rel="stylesheet" href="http://at.alicdn.com/t/font_1786038_m62pqneyrzf.css">
    <title>Document</title>
    <style>
        * {
            margin: 0;
            padding: 0;
        }

        html {
            height: 100%;
        }

        body {
            height: 100%;
            font-family: JetBrains Mono Medium;
            display: flex;
            align-items: center;
            justify-content: center;
            background: url('LoginBG.jpg') no-repeat;
            background-size: 100% 100%;
        }

        .form-wrapper {
            width: 300px;
            background-color: rgba(41, 45, 62, .8);
            color: #fff;
            border-radius: 2px;
            padding: 50px;
        }

        .form-wrapper .header {
            text-align: center;
            font-size: 35px;
            text-transform: uppercase;
            line-height: 100px;
        }

        .form-wrapper .input-wrapper input {
            background-color: rgb(41, 45, 62);
            border: 0;
            width: 100%;
            text-align: center;
            font-size: 15px;
            color: #fff;
            outline: none;
        }

        .form-wrapper .input-wrapper input::placeholder {
            text-transform: uppercase;
        }

        .form-wrapper .input-wrapper .border-wrapper {
            background-image: linear-gradient(to right, #e8198b, #0eb4dd);
            width: 100%;
            height: 50px;
            margin-bottom: 20px;
            border-radius: 30px;
            display: flex;
            align-items: center;
            justify-content: center;
        }

        .form-wrapper .input-wrapper .border-wrapper .border-item {
            height: calc(100% - 4px);
            width: calc(100% - 4px);
            border-radius: 30px;
        }

        .form-wrapper .action {
            display: flex;
            justify-content: center;
        }

        .form-wrapper .action .btn {
            width: 60%;
            text-transform: uppercase;
            border: 2px solid #0e92b3;
            text-align: center;
            line-height: 50px;
            border-radius: 30px;
            cursor: pointer;
        }

        .form-wrapper .action .btn:hover {
            background-image: linear-gradient(120deg, #84fab0 0%, #8fd3f4 100%);
        }

        .form-wrapper .icon-wrapper {
            text-align: center;
            width: 60%;
            margin: 0 auto;
            margin-top: 20px;
            border-top: 1px dashed rgb(146, 146, 146);
            padding: 20px;
        }

        .form-wrapper .icon-wrapper i {
            font-size: 20px;
            color: rgb(187, 187, 187);
            cursor: pointer;
            border: 1px solid #fff;
            padding: 5px;
            border-radius: 20px;
        }

        .form-wrapper .icon-wrapper i:hover {
            background-color: #0e92b3;
        }
    </style>
</head>

<body>
<div class="form-wrapper">
    <div class="header">
        欢迎
    </div>
    <div class="input-wrapper">
        <div class="border-wrapper">
            <input type="text" name="username" placeholder="用户名" class="border-item" autocomplete="off">
        </div>
        <div class="border-wrapper">
            <input type="password" name="password" placeholder="密码" class="border-item" autocomplete="off">
        </div>
    </div>
    <div class="action">
        <div class="btn">登录</div>
    </div>
</div>
</body>

</html>
显示效果如图三所示:
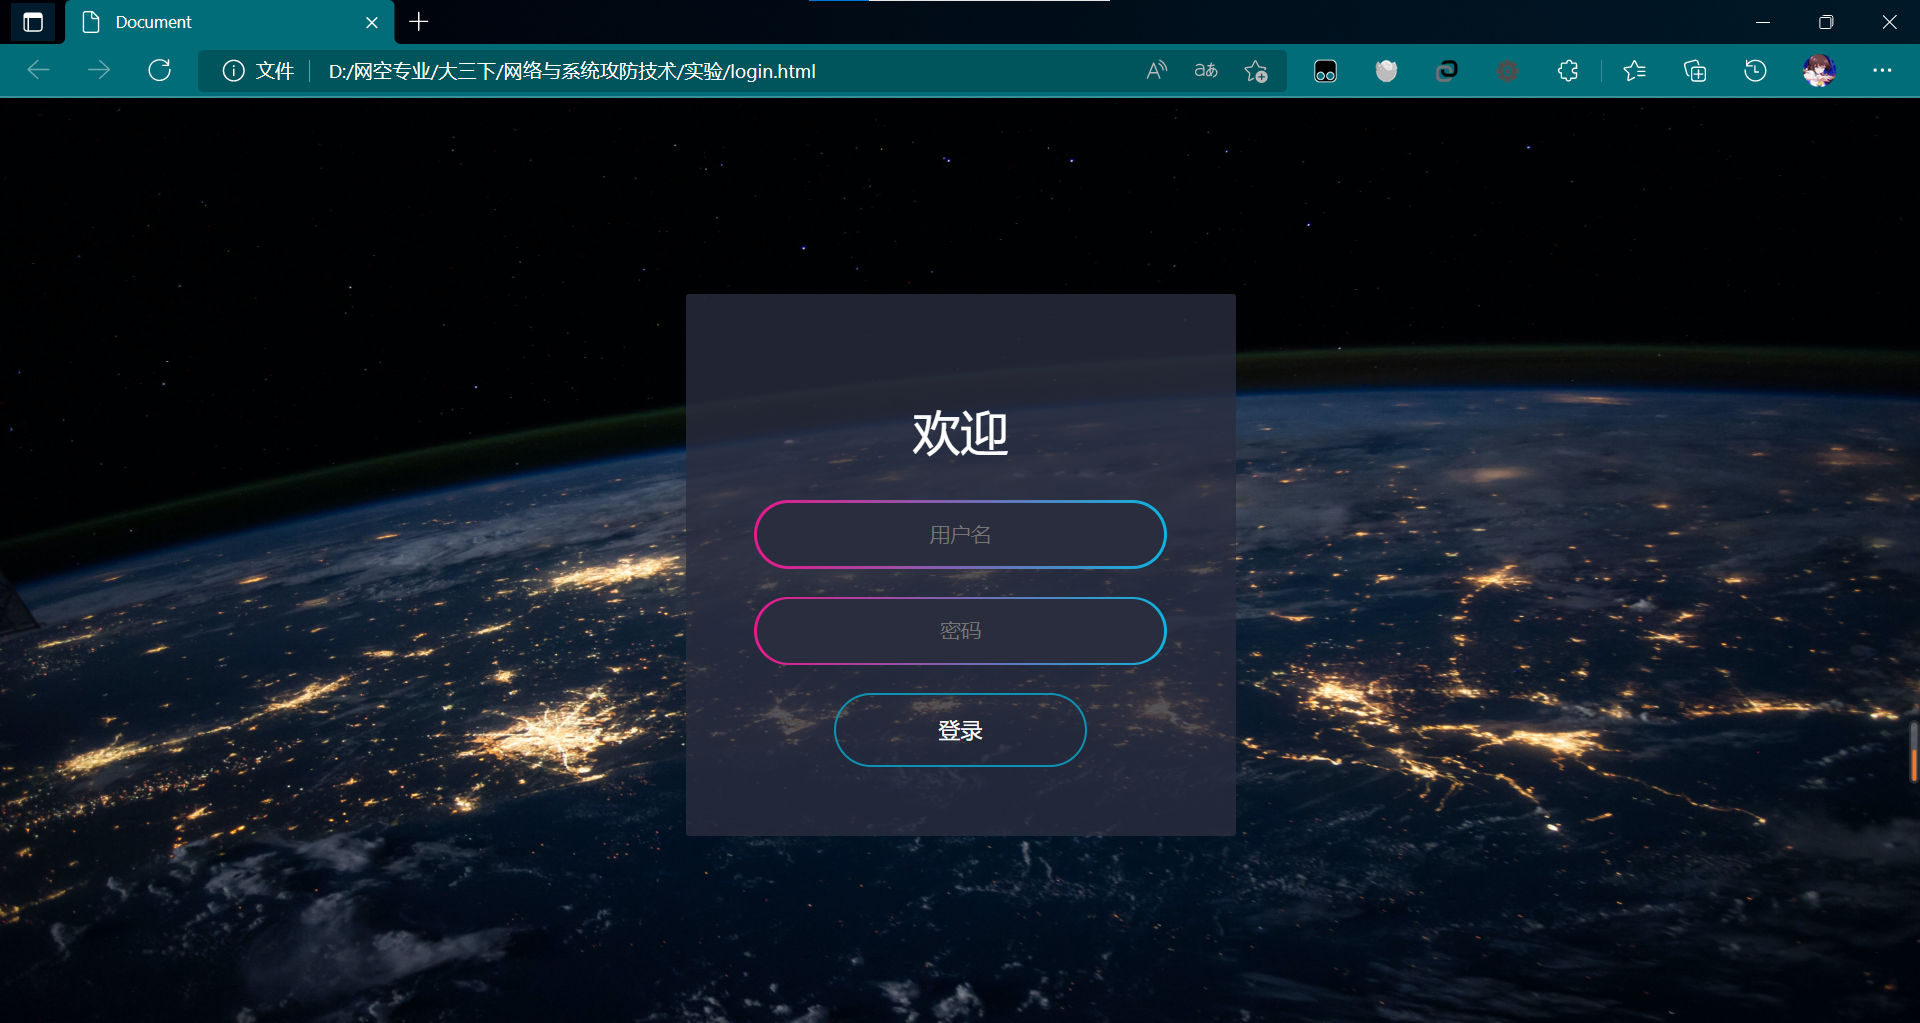
图三 HTML表单页面
2.2 Web前端javascipt
-
JavaScript:通常缩写为JS,是一种高级的、解释型的编程语言。JavaScript是一门基于原型、头等函数的语言,是一门多范式的语言,它支持面向对象程序设计,指令式编程,以及函数式编程。它提供语法来操控文本、数组、日期以及正则表达式等,不支持I/O,比如网络、存储和图形等,但这些都可以由它的宿主环境提供支持。它已经由ECMA(欧洲电脑制造商协会)通过ECMAScript实现语言的标准化。它被世界上的绝大多数网站所使用,也被世界主流浏览器(Chrome、IE、Firefox、Safari、Opera)支持。
JavaScript与Java在名字或语法上都有很多相似性,但这两门编程语言从设计之初就有很大的不同,JavaScript的语言设计主要受到了Self(一种基于原型的编程语言)和Scheme(一门函数式编程语言)的影响。在语法结构上它又与C语言有很多相似(例如if条件语句、switch语句、while循环、do-while循环等)。
随着最新的HTML5和CSS3语言标准的推行它还可用于游戏、桌面和移动应用程序的开发和在服务器端网络环境运行如Node.js。
-
DOM:文档对象模型(英语:Document Object Model,缩写DOM),是W3C组织推荐的处理可扩展置标语言的标准编程接口。
它是一种与平台和语言无关的应用程序接口(API),它可以动态地访问程序和脚本,更新其内容、结构和www文档的风格(HTML和XML文档是通过说明部分定义的)。文档可以进一步被处理,处理的结果可以加入到当前的页面。DOM是一种基于树的API文档,它要求在处理过程中整个文档都表示在存储器中。另外一种简单的API是基于事件的SAX,它可以用于处理很大的XML文档。
-
编写JavaScript验证用户名、密码的规则,代码如下:
<!DOCTYPE html> <html lang="en"> <head> <meta charset="UTF-8"> <meta name="viewport" content="width=device-width, initial-scale=1.0"> <link rel="stylesheet" href="http://at.alicdn.com/t/font_1786038_m62pqneyrzf.css"> <link href="https://netdna.bootstrapcdn.com/font-awesome/4.5.0/css/font-awesome.min.css" rel="stylesheet"> <title>Document</title> <style> * { margin: 0; padding: 0; } html { height: 100%; } body { height: 100%; font-family: JetBrains Mono Medium; display: flex; align-items: center; justify-content: center; background: url('LoginBG.jpg') no-repeat; background-size: 100% 100%; } .form-wrapper { width: 300px; background-color: rgba(41, 45, 62, .8); color: #fff; border-radius: 2px; padding: 50px; } .form-wrapper .header { text-align: center; font-size: 35px; text-transform: uppercase; line-height: 100px; } .form-wrapper .input-wrapper input { background-color: rgb(41, 45, 62); border: 0; width: 100%; text-align: center; font-size: 15px; color: #fff; outline: none; } .form-wrapper .input-wrapper input::placeholder { text-transform: uppercase; } .form-wrapper .input-wrapper .border-wrapper { background-image: linear-gradient(to right, #e8198b, #0eb4dd); width: 100%; height: 50px; margin-bottom: 20px; border-radius: 30px; display: flex; align-items: center; justify-content: center; } .form-wrapper .input-wrapper .border-wrapper .border-item { height: calc(100% - 4px); width: calc(100% - 4px); border-radius: 30px; } .form-wrapper .action { display: flex; justify-content: center; } .form-wrapper .action .btn { width: 60%; text-transform: uppercase; border: 2px solid #0e92b3; text-align: center; line-height: 50px; border-radius: 30px; cursor: pointer; } .form-wrapper .action .btn:hover { background-image: linear-gradient(120deg, #84fab0 0%, #8fd3f4 100%); } .form-wrapper .icon-wrapper { text-align: center; width: 60%; margin: 0 auto; margin-top: 20px; border-top: 1px dashed rgb(146, 146, 146); padding: 20px; } .form-wrapper .icon-wrapper i { font-size: 20px; color: rgb(187, 187, 187); cursor: pointer; border: 1px solid #fff; padding: 5px; border-radius: 20px; } .form-wrapper .icon-wrapper i:hover { background-color: #0e92b3; } #info { display: flex; align-items: center; color: #FF3300; justify-content: center; margin: 0 auto; margin-bottom: 20px; } #user { display: flex; align-items: center; color: #36DB70; justify-content: center; margin: 0 auto; margin-bottom: 20px; } </style> <script type="text/javascript"> function login() { //判断用户名是否为空 document.getElementById("info").innerHTML = ""; document.getElementById("user").innerHTML = ""; if(form1.username.value==""|| form1.password.value==""){ document.getElementById("info").innerHTML = "<i class=\"fa fa-exclamation-circle\" aria-hidden=\"true\"></i> 用户名或密码不能为空!"; }else{ document.getElementById("user").innerHTML = "欢迎"+form1.username.value; } } </script> </head> <body> <div class="form-wrapper"> <div class="header"> 登录 </div> <form name="form1" action="login" method="post"> <div class="input-wrapper"> <div class="border-wrapper"> <input type="text" name="username" placeholder="用户名" class="border-item" autocomplete="off"> </div> <div class="border-wrapper"> <input type="password" name="password" placeholder="密码" class="border-item" autocomplete="off"> </div> </div> </form> <span id="info"></span> <span id="user"></span> <div class="action"> <div class="btn" onclick="login()">登录</div> </div> </div> </body> </html>如果用户名或密码有一个没有输入,则会提示”用户名或密码不能为空!“,如图四所示。

图四 提示“用户名或密码不能为空!”如果输入了用户名和密码,则会提示“欢迎+对应的用户名”,如图五所示。
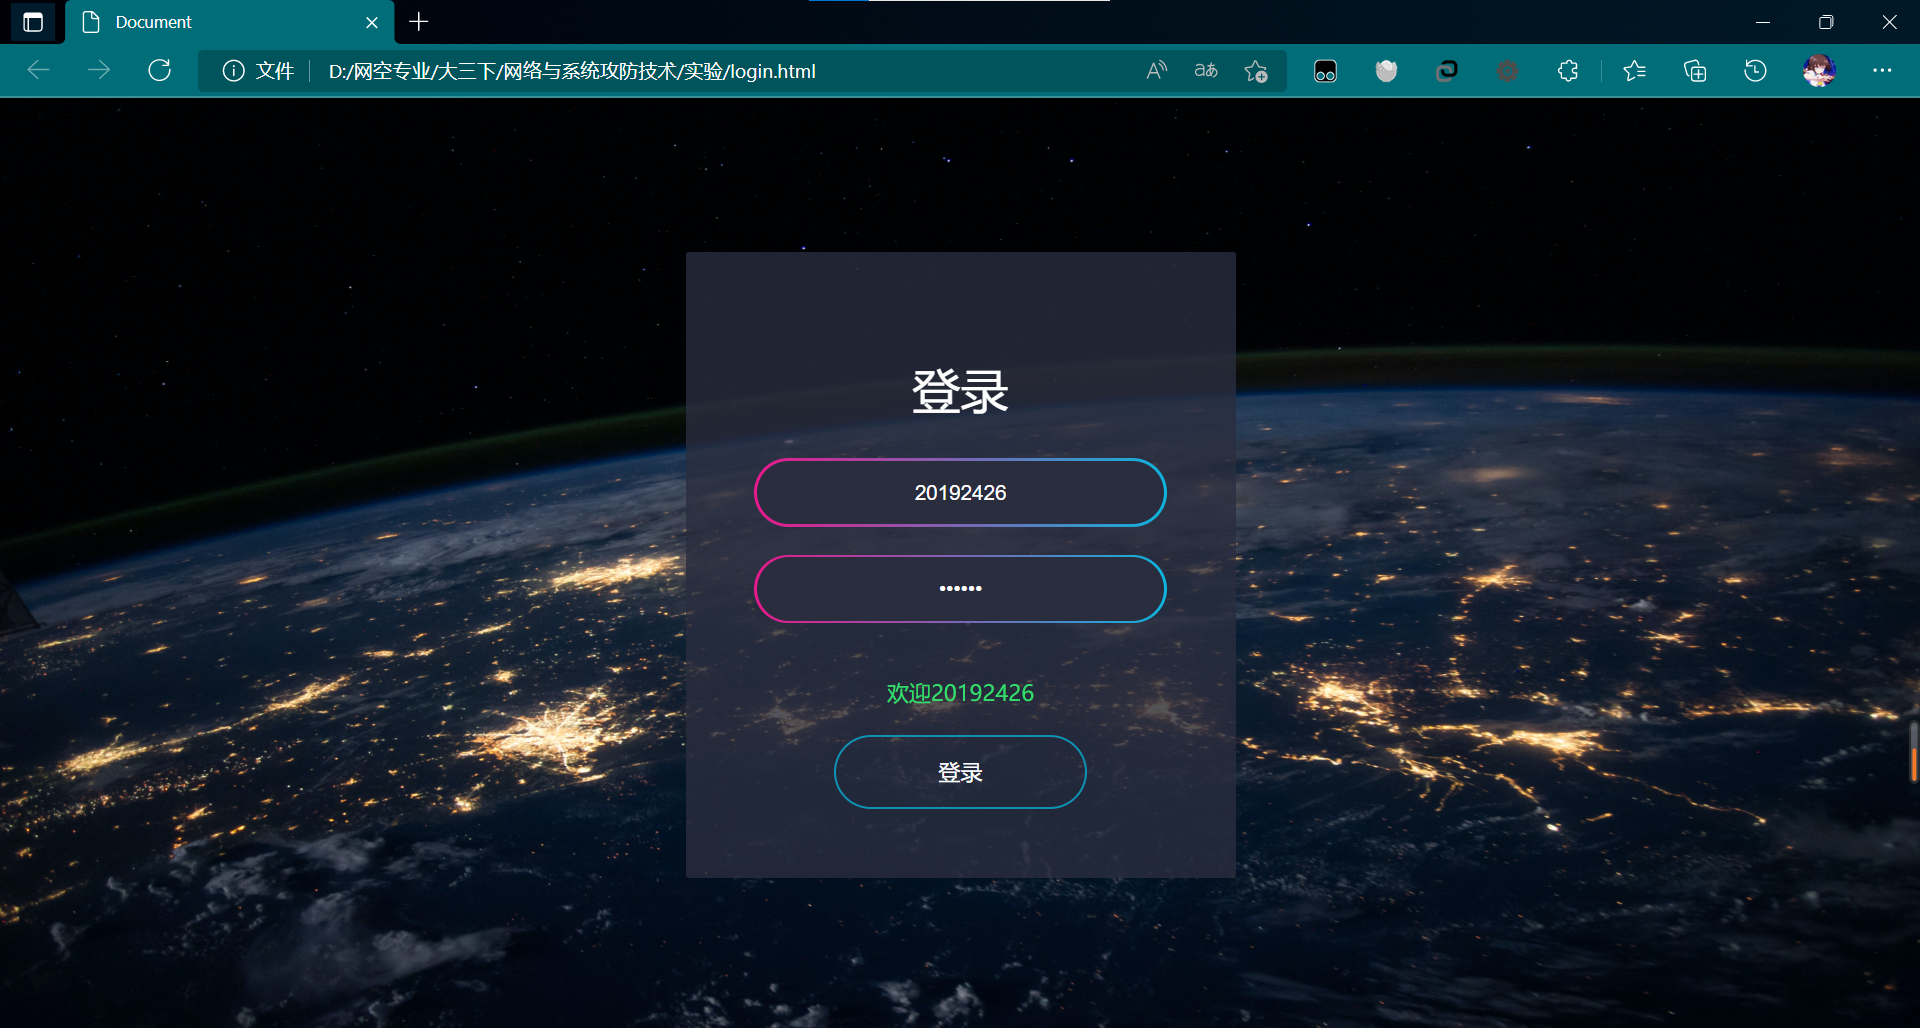
图五 “欢迎+对应的用户名” -
尝试注入攻击:利用回显用户名注入HTML及JavaScript。
首先利用
<br><p>20192426陈瀚文HTML注入</p>尝试,如图六所示,可以发现虽然成功写入了DOM,但并没有作用。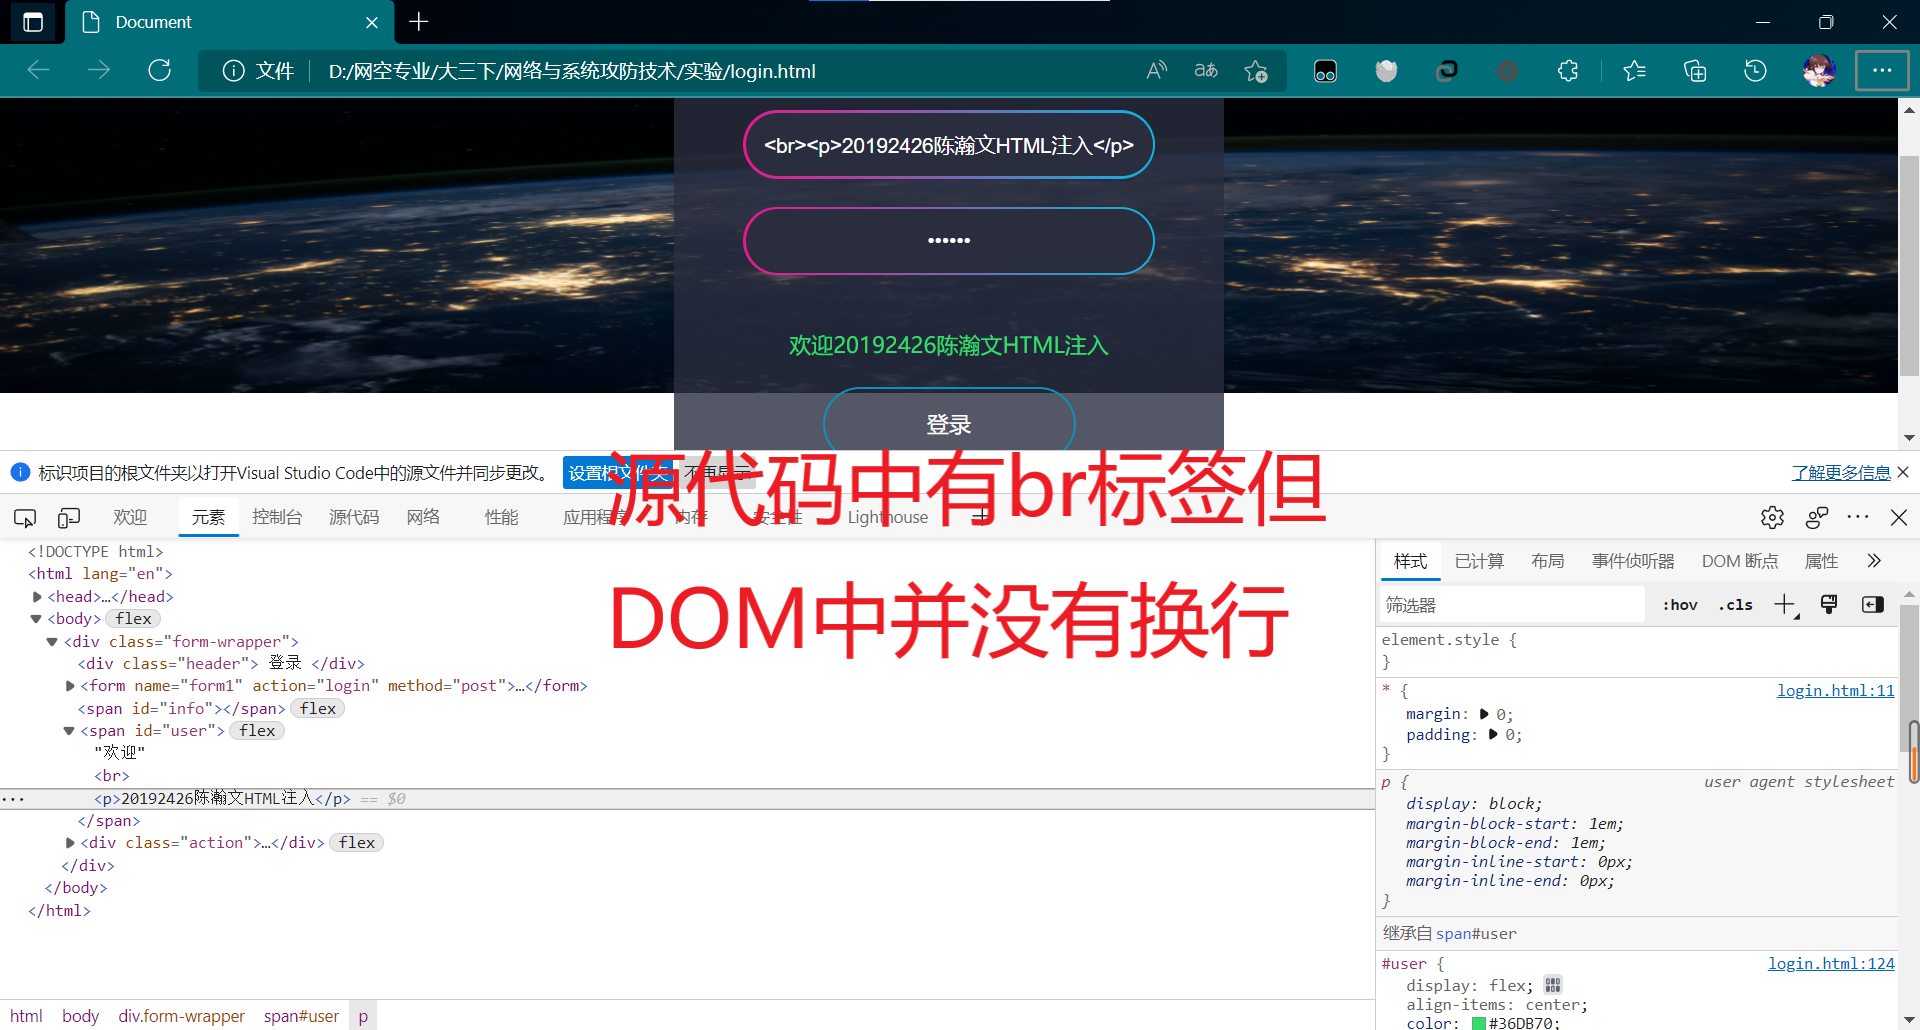
图六 尝试注入p标签及内容然后利用
<script type="text/javascript"> alert("20192426陈瀚文JavaScript注入") </script>,如图七所示,可以发现虽然成功写入了DOM,但并没有作用。
图七 尝试注入js代码出现这种情况的原因是我在之前的js代码中的指令
document.getElementById("info").innerHTML,这种直接通过innerHTML动态嵌入的script和HTML标签,浏览器会当做普通的文本,不会当作对应的节点维护到DOM里面,所以调用的时候找不到,也就是说我的js代码已经防止了这种简单的注入攻击。
2.3 Web后端:MySQL基础:正常安装、启动MySQL,建库、创建用户、修改密码、建表
-
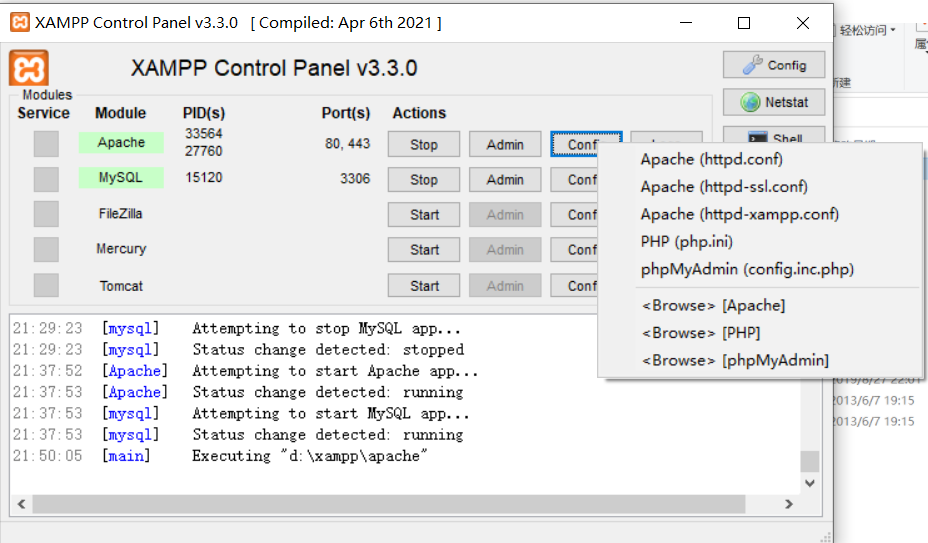
之前的XAMPP已经内置了MySQL,所以这里直接启动即可,如图八所示。
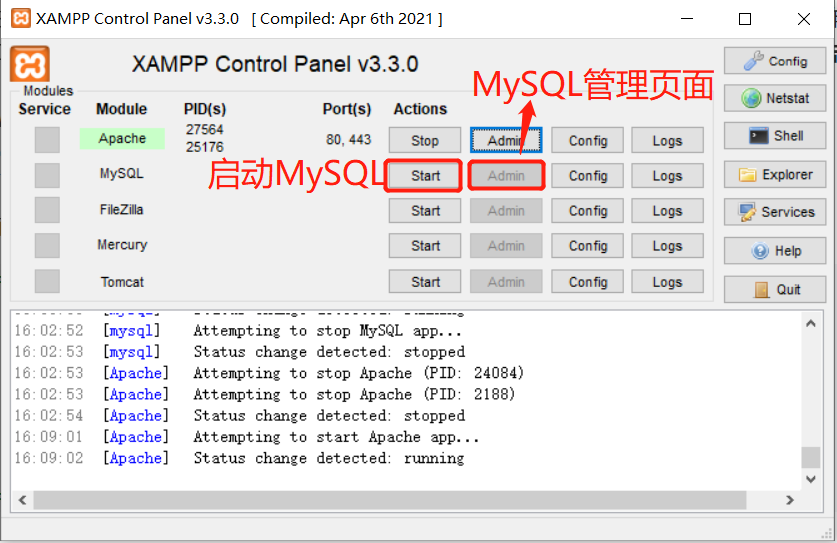
图八 启动MySQL -
点击Admin进入管理页面,选择SQL并输入
CREATE DATABASE "20192426_exp";进行数据库建立,如图九所示。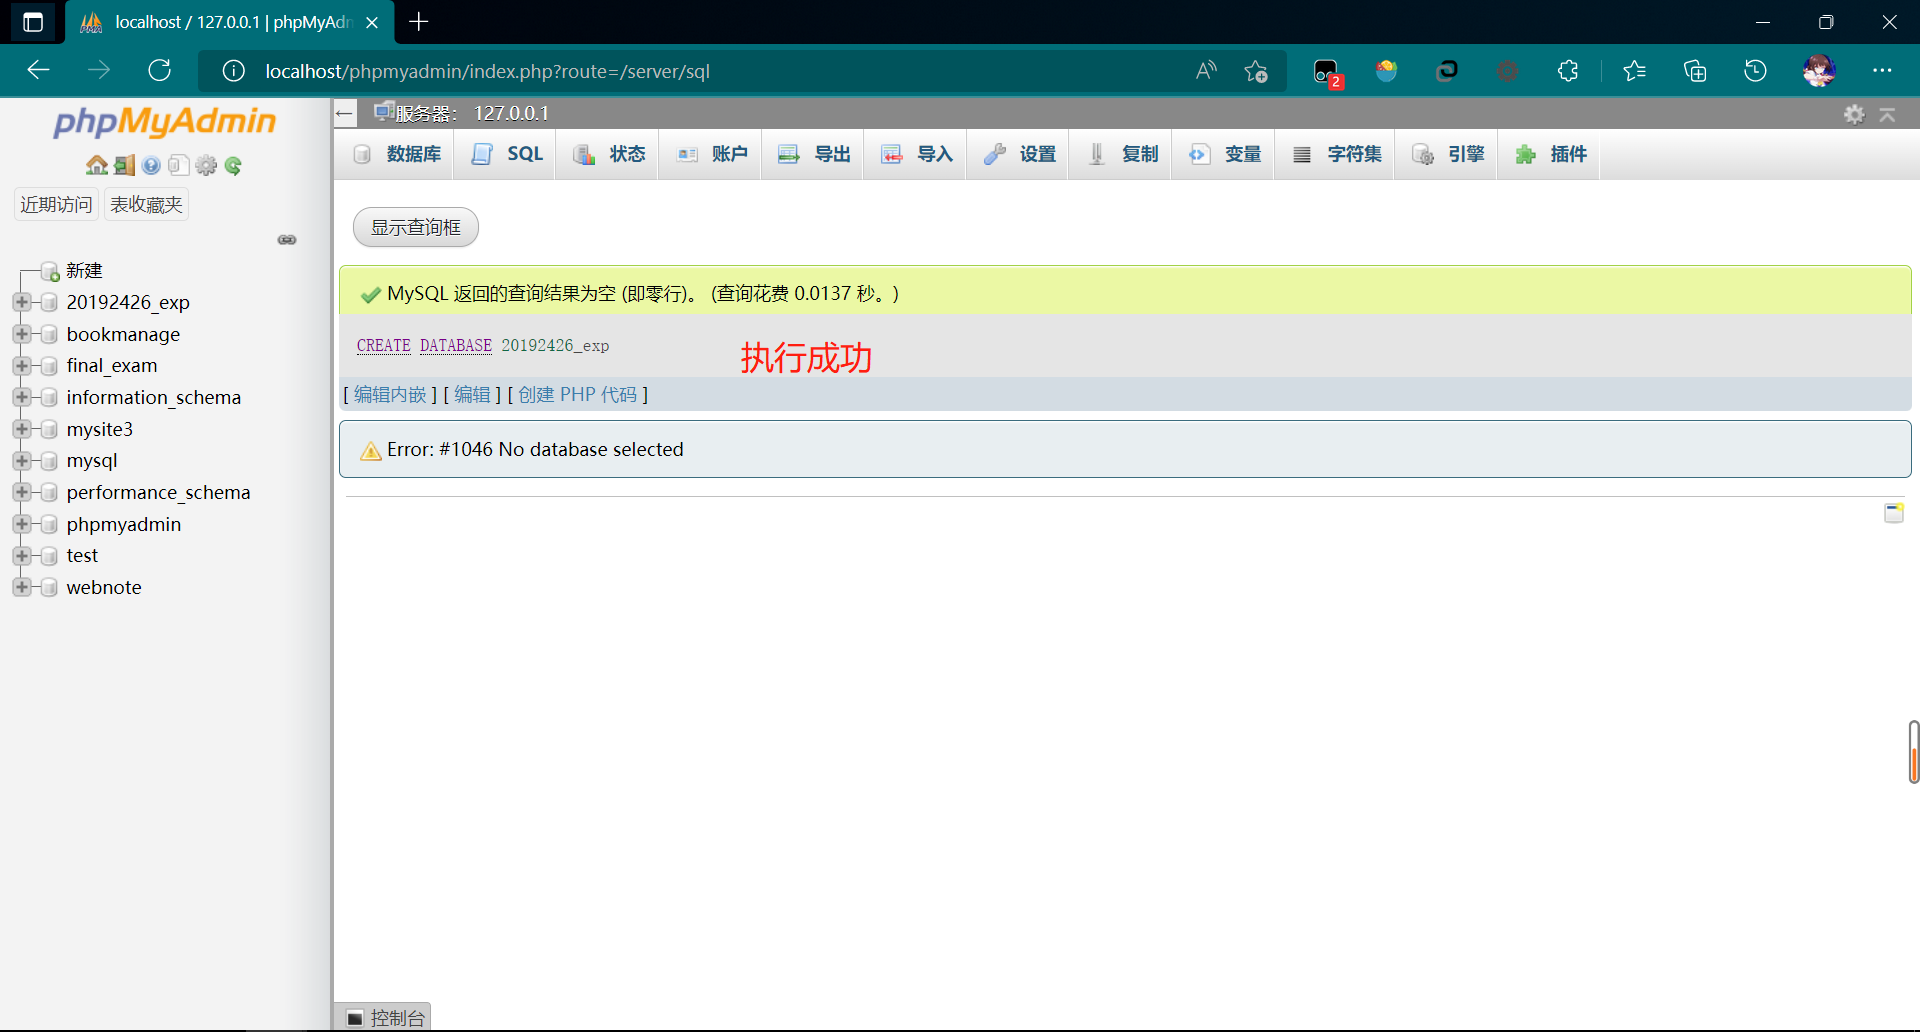
图九 进入MySQL管理界面并建库 -
继续输入SQL语句
CREATE USER '20192426'@'localhost' IDENTIFIED BY '20192426',执行后如图十所示。
图十 新建用户 -
输入SQL语句
ALTER user '20192426'@'localhost' IDENTIFIED BY 'besti20192426';更改20192426用户的密码,执行后如图十一所示。
图十一 更改用户密码 -
在20192426_exp数据库中单击SQL,然后输入如下SQL语句进行建表:
CREATE TABLE IF NOT EXISTS `users`(
`user_id` INT UNSIGNED AUTO_INCREMENT,
`username` VARCHAR(100) NOT NULL,
`password` VARCHAR(40) NOT NULL,
PRIMARY KEY ( `user_id` )
)ENGINE=InnoDB DEFAULT CHARSET=utf8;
执行结果如图十二所示。

图十二 建表
2.4 Web后端:编写PHP网页,连接数据库,进行用户认证
-
修改前端代码,如下所示:
<!DOCTYPE html> <html lang="en"> <head> <meta charset="UTF-8"> <meta name="viewport" content="width=device-width, initial-scale=1.0"> <link rel="stylesheet" href="http://at.alicdn.com/t/font_1786038_m62pqneyrzf.css"> <link href="https://netdna.bootstrapcdn.com/font-awesome/4.5.0/css/font-awesome.min.css" rel="stylesheet"> <title>Document</title> <style> * { margin: 0; padding: 0; } html { height: 100%; } body { height: 100%; font-family: JetBrains Mono Medium; display: flex; align-items: center; justify-content: center; background: url('LoginBG.jpg') no-repeat; background-size: 100% 100%; } .form-wrapper { width: 300px; background-color: rgba(41, 45, 62, .8); color: #fff; border-radius: 2px; padding: 50px; } .form-wrapper .header { text-align: center; font-size: 35px; text-transform: uppercase; line-height: 100px; } .form-wrapper .input-wrapper input { background-color: rgb(41, 45, 62); border: 0; width: 100%; text-align: center; font-size: 15px; color: #fff; outline: none; } .form-wrapper .input-wrapper input::placeholder { text-transform: uppercase; } .form-wrapper .input-wrapper .border-wrapper { background-image: linear-gradient(to right, #e8198b, #0eb4dd); width: 100%; height: 50px; margin-bottom: 20px; border-radius: 30px; display: flex; align-items: center; justify-content: center; } .form-wrapper .input-wrapper .border-wrapper .border-item { height: calc(100% - 4px); width: calc(100% - 4px); border-radius: 30px; } .form-wrapper .action { display: flex; justify-content: center; } .form-wrapper .action .btn { width: 60%; text-transform: uppercase; border: 2px solid #0e92b3; text-align: center; line-height: 50px; border-radius: 30px; cursor: pointer; } .form-wrapper .action .btn:hover { background-image: linear-gradient(120deg, #84fab0 0%, #8fd3f4 100%); } .form-wrapper .icon-wrapper { text-align: center; width: 60%; margin: 0 auto; margin-top: 20px; border-top: 1px dashed rgb(146, 146, 146); padding: 20px; } .form-wrapper .icon-wrapper i { font-size: 20px; color: rgb(187, 187, 187); cursor: pointer; border: 1px solid #fff; padding: 5px; border-radius: 20px; } .form-wrapper .icon-wrapper i:hover { background-color: #0e92b3; } #info { display: flex; align-items: center; color: #FF3300; justify-content: center; margin: 0 auto; margin-bottom: 20px; } #user { display: flex; align-items: center; color: #36DB70; justify-content: center; margin: 0 auto; margin-bottom: 20px; } </style> <script type="text/javascript"> function login() { //判断用户名是否为空 document.getElementById("info").innerHTML = ""; document.getElementById("user").innerHTML = ""; if(form1.username.value==""|| form1.password.value==""){ document.getElementById("info").innerHTML = "<i class=\"fa fa-exclamation-circle\" aria-hidden=\"true\"></i> 用户名或密码不能为空!"; }else{ document.getElementById("user").innerHTML = "欢迎"+form1.username.value; form1.submit(); } } </script> </head> <body> <div class="form-wrapper"> <div class="header"> 登录 </div> <form name="form1" action="login.php" method="post"> <div class="input-wrapper"> <div class="border-wrapper"> <input type="text" name="username" placeholder="用户名" class="border-item" autocomplete="off"> </div> <div class="border-wrapper"> <input type="password" name="password" placeholder="密码" class="border-item" autocomplete="off"> </div> </div> </form> <span id="info"></span> <span id="user"></span> <div class="action"> <div class="btn" onclick="login()">登录</div> </div> </div> </body> </html>编写php代码,如下所示:
<?php //支持中文 header("Content-type:text/html;charset=utf-8"); $username=$_POST["username"]; $password=$_POST["password"]; $conn=mysqli_connect("localhost","root",""); mysqli_select_db($conn, "20192426_exp"); $result1=mysqli_query($conn,"select * from users where username='$username' and password='$password'"); $result2=mysqli_query($conn,"select * from users where username='$username'"); //1表示用户名存在密码正确,2表示用户名存在密码错误,0表示用户名不存在 if(mysqli_num_rows($result1)==1){ echo "用户名密码正确,登陆成功<br>"; echo "欢迎 "; echo $username; }else if(mysqli_num_rows($result2)==1){ echo "用户名正确,密码错误"; }else if(mysqli_num_rows($result2)==0){ echo "用户名不存在"; } mysqli_close($conn); ?> -
在XAMPP文件夹中创建wwwroot文件夹,并修改httpd.conf。如图十三所示。
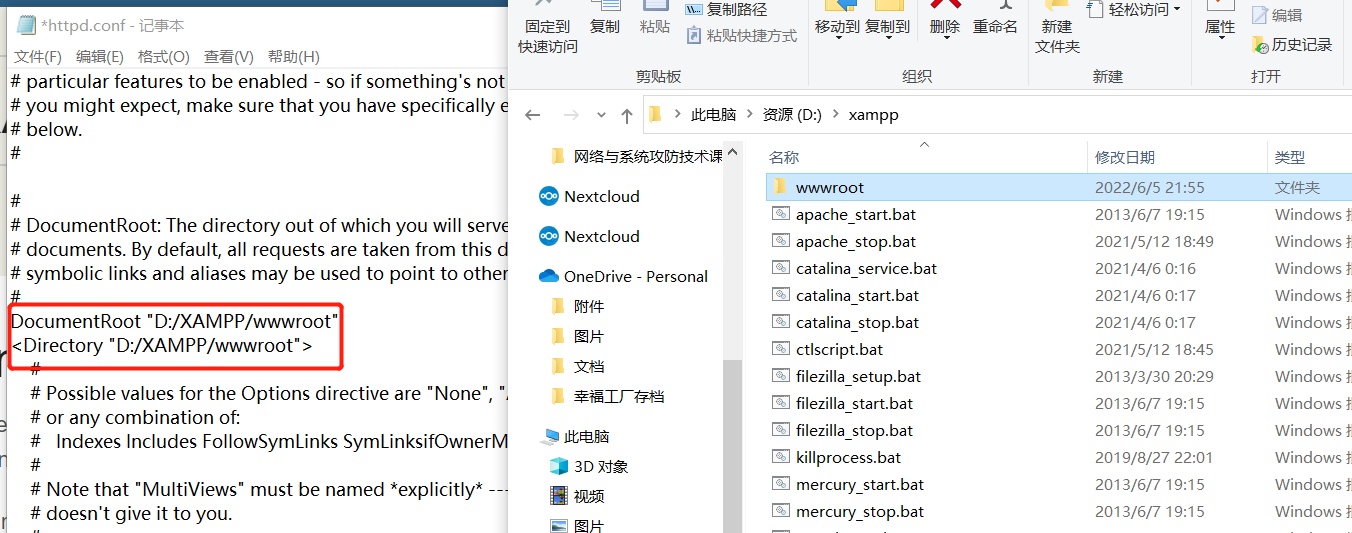
图十三 修改Apache配置其中,httpd.conf的入口如图十四所示。
图十四 httpd.conf的入口 -
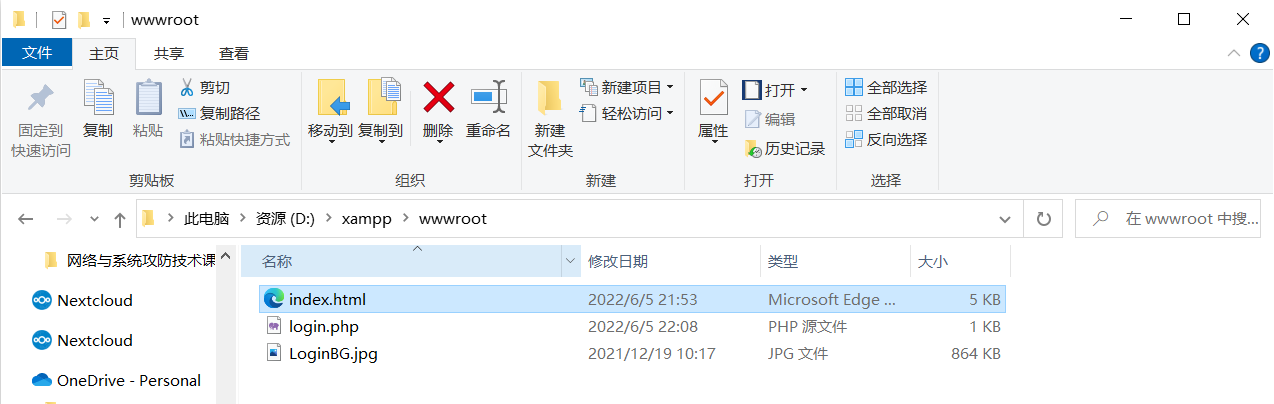
将上面的HTML文件起名为index.html并和PHP文件一起放入wwwroot文件夹中,如图十五所示:
图十五 将文件放入wwwroot中 -
经过ipconfig可知本机IP为192.168.1.206,我们打开Apache,然后访问该IP,可以正常显示HTML页面,如图十六所示。

图十六 正常显示页面 -
数据库中的数据如图十七所示。

图十七 数据库中的数据 -
如果输入用户名为20192426,密码12345,则会出现图十八的提示。
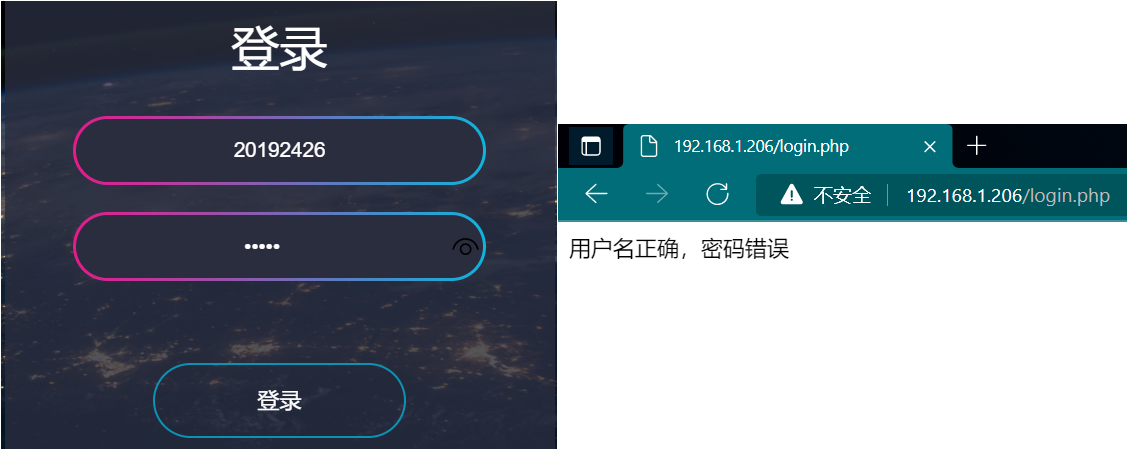
图十八 存在的用户和错误的密码 -
如果输入用户名为20192100,密码12345,则会出现图十九的提示。
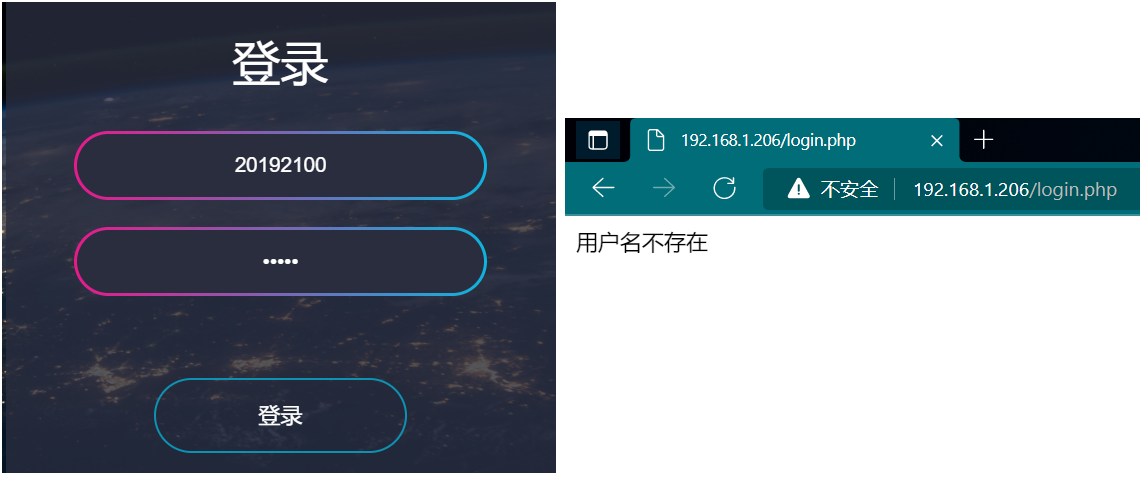
图十九 不存在的用户 -
如果输入用户名为20192426,密码20192426,则会出现图十八的提示
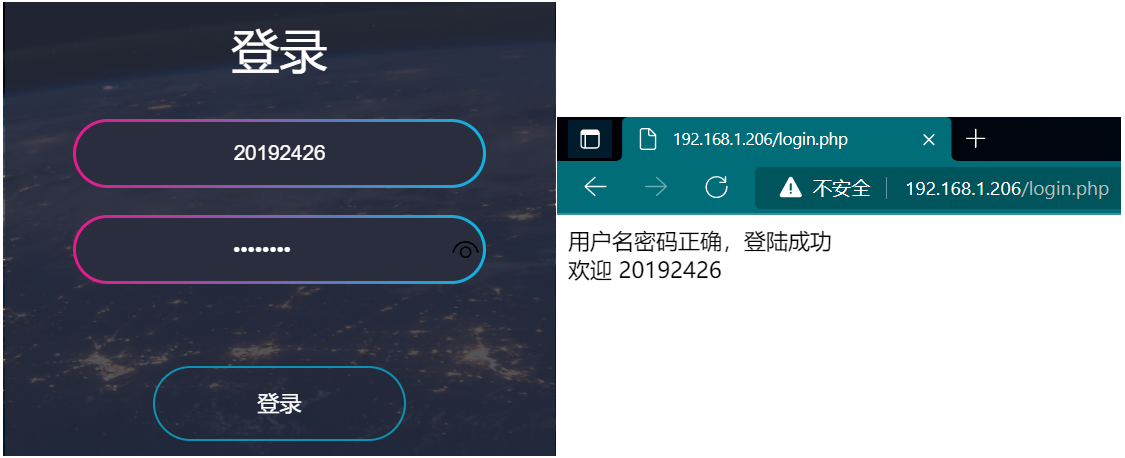
图二十 存在的用户和正确的密码
2.5 最简单的SQL注入,XSS攻击测试
-
使用如下用户名登录即可进行SQL注入:
20192426' or '1'='1
图二十一 SQL注入成功 -
使用如下用户名即可进行XSS攻击:
20192426' or '1'='1' limit 1-- <script type="text/javascript">alert('XSS攻击')</script>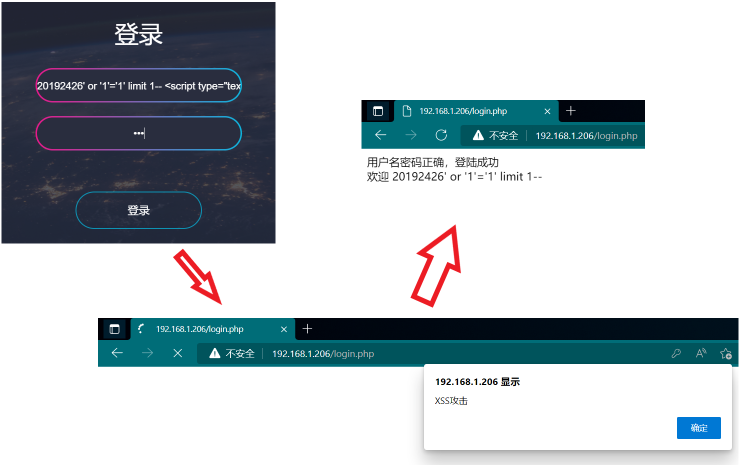
图二十二 XSS注入成功
2.6 安装Webgoat或类似平台,并完成SQL注入、XSS、CSRF攻击
-
下载并运行WebGoat 8.1,这里使用了Github镜像源加速,使用命令如下:
wget https://hub.連接.台灣/WebGoat/WebGoat/releases/download/v8.1.0/webgoat-server-8.1.0.jar # 等待下载完成,执行如下命令 java -jar webgoat-server-8.1.0.jar执行完后不要关闭终端,进入浏览器,输入http://localhost:8080/WebGoat/login访问WebGoat,如图二十三所示。

图二十三 访问WebGoat -
首先注册一个账号,流程如图二十四所示。
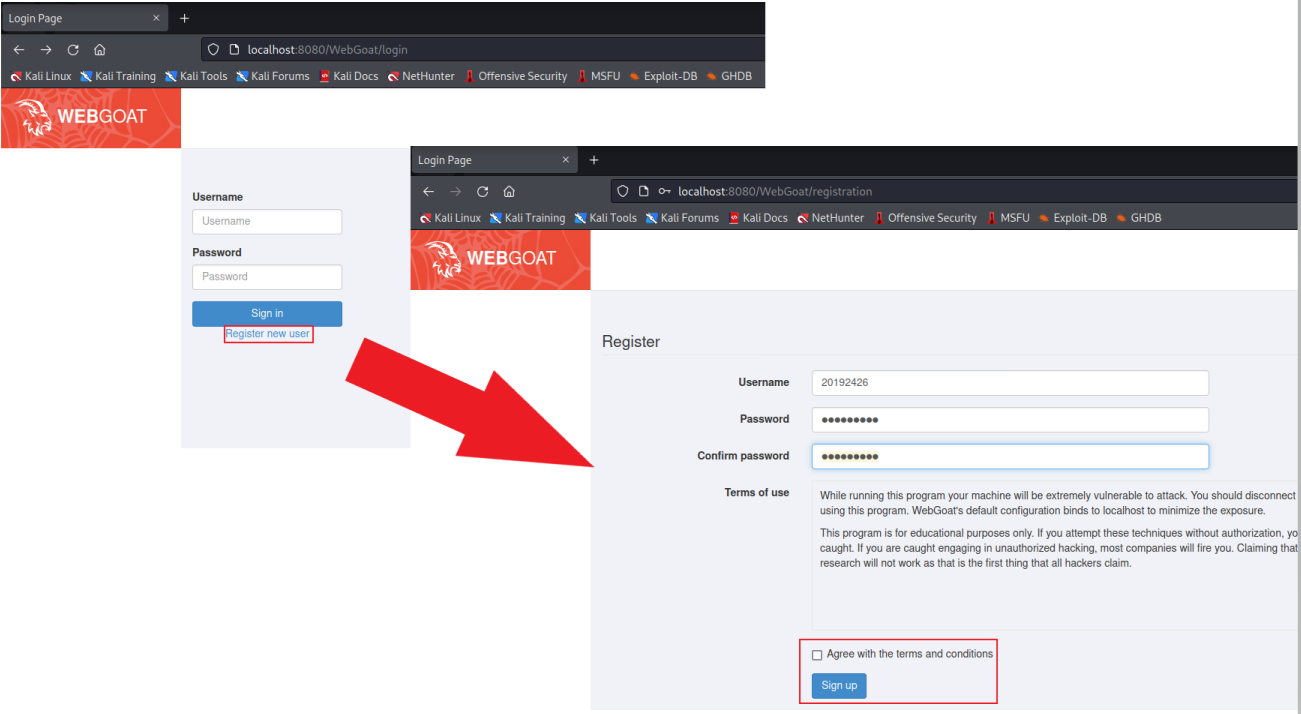
图二十四 注册账号 -
登录后找到Injection板块进行SQL注入(A1)的学习。
-
其中从第9课开始便为SQL注入的练习题,第9课解法如图二十五所示:
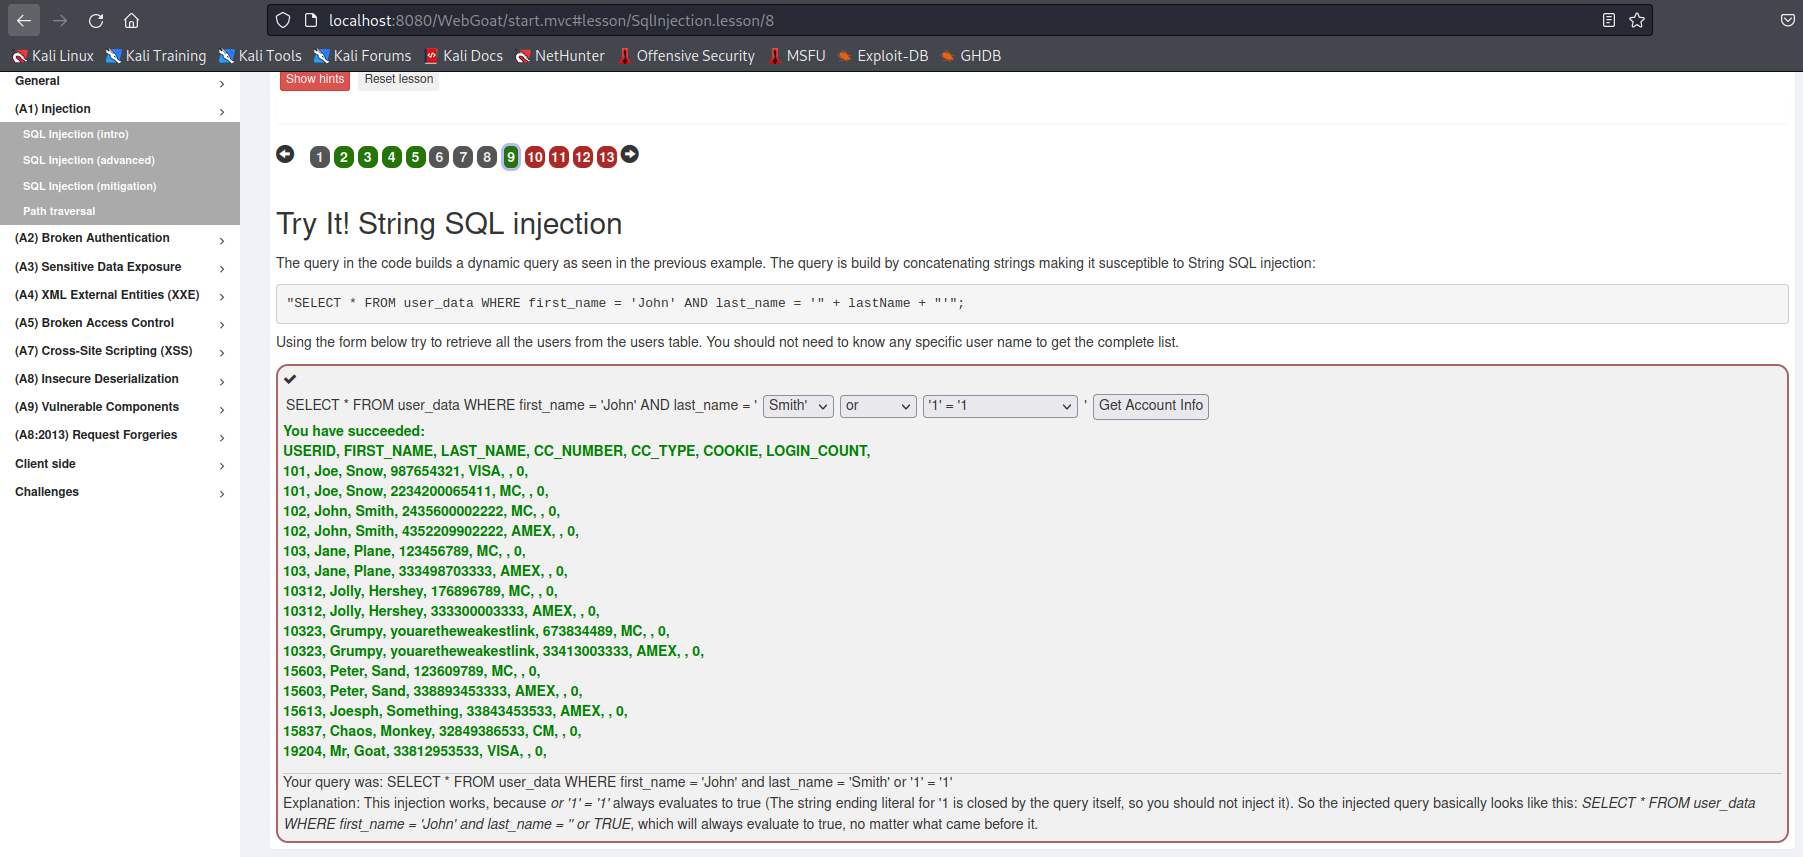
图二十五 第9课解法 -
第10课的解法如图二十六所示(经过测试,可以发现第一项进行了防注入,我们只能注入第二项):
1 or 1=1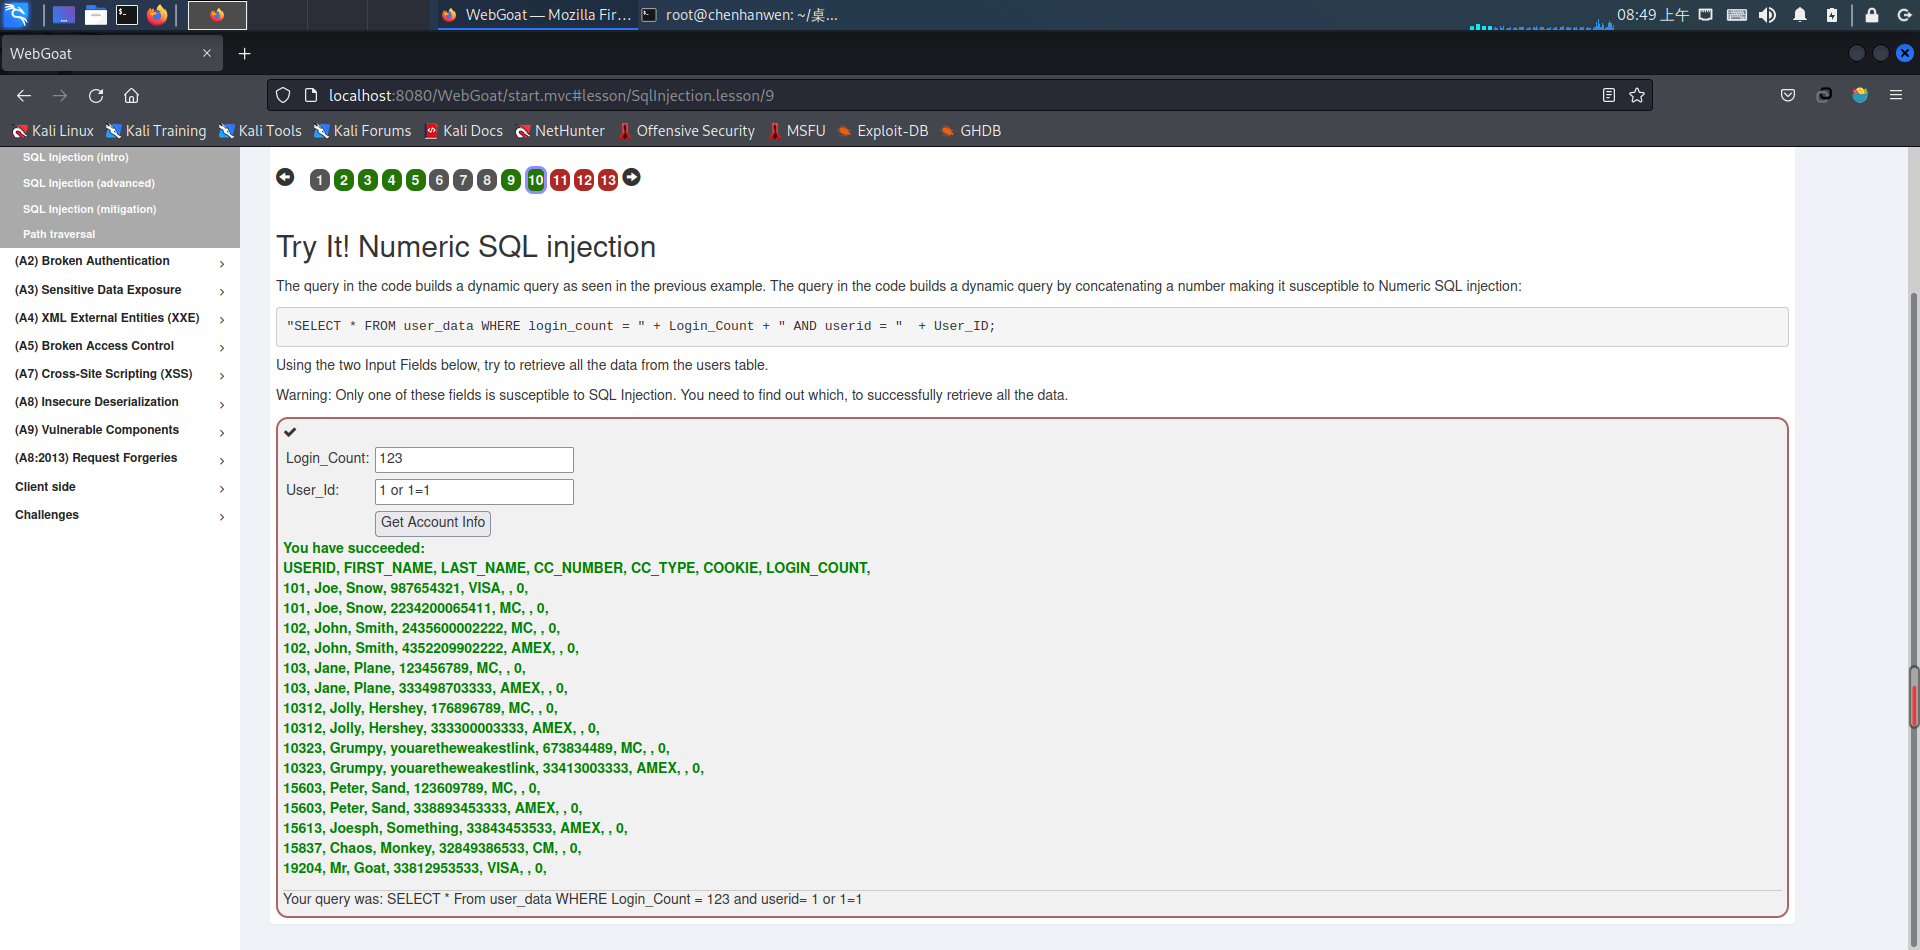
图二十六 第10课解法 -
第11课的解法如图二十七所示:
smith' or 1=1--(最后有一个空格)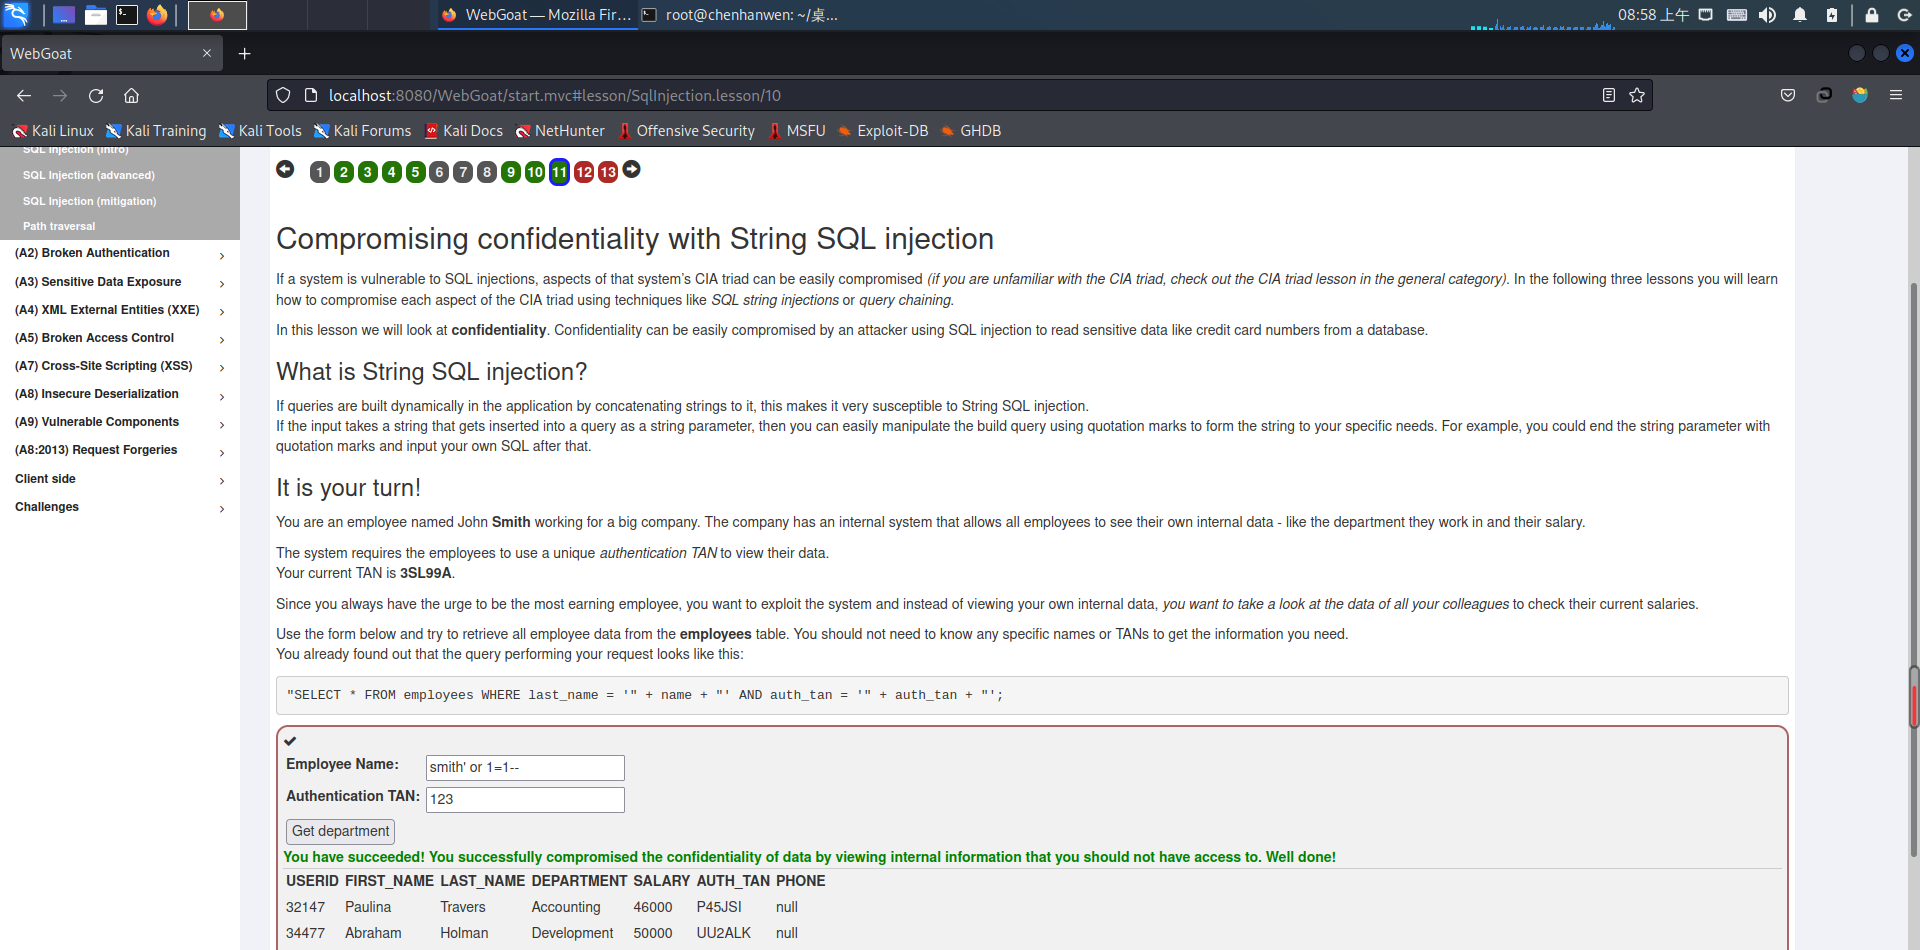
图二十七 第11课解法 -
之后选择XSS(A7)进行学习。
-
第7课的解法如图二十八所示。
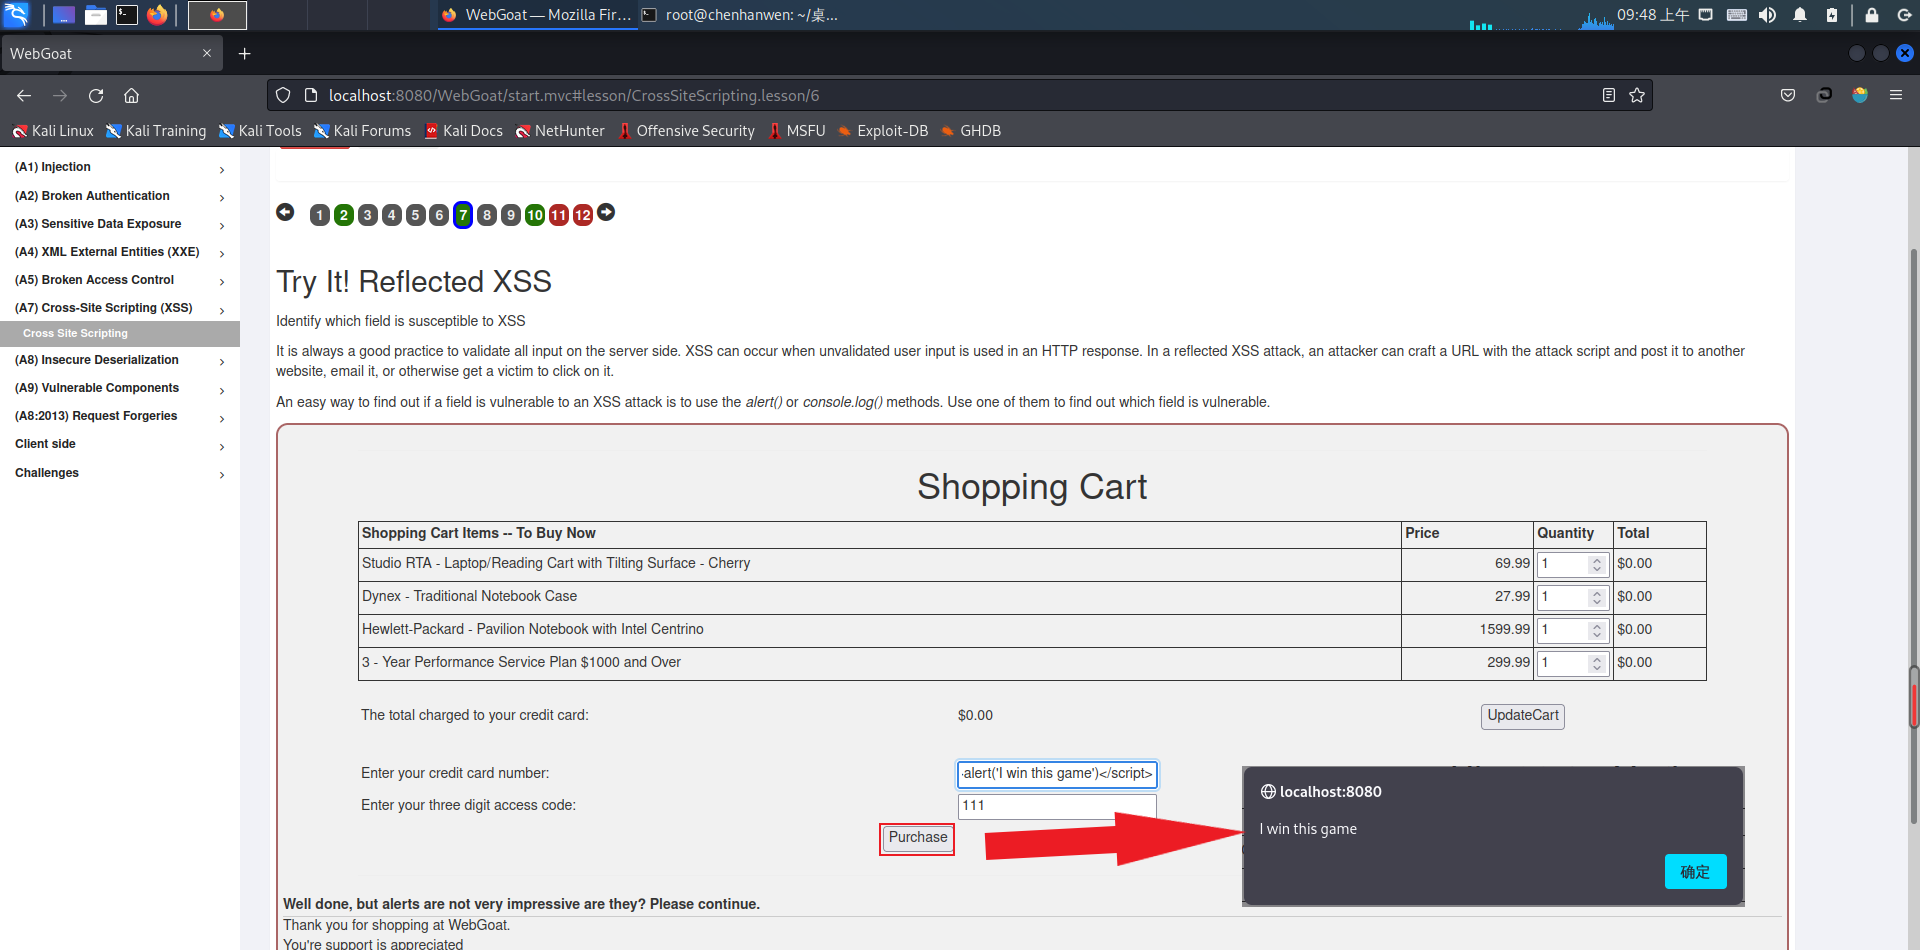
图二十八 XSS第7课解法 -
最后选择CSRF(A8:2013)进行学习。
-
想要解决第3课,首先将提交查询处的HTML代码拷贝出来,如图二十九所示。

图二十九 拷贝HTML代码 -
然后新建一个HTML文件,在里面填入拷贝的内容并加上HTML的必要标签,HTML代码如下所示:
<html> <body> <form accept-charset="UNKNOWN" id="basic-csrf-get" method="POST" name="form1" target="_blank" successcallback="" action="http://localhost:8080/WebGoat/csrf/basic-get-flag"> <input name="csrf" type="hidden" value="true"> <input type="submit" name="submit"> </form> </body> </html> -
使用浏览器打开该文件,点击按钮即可获得flag,如图三十所示
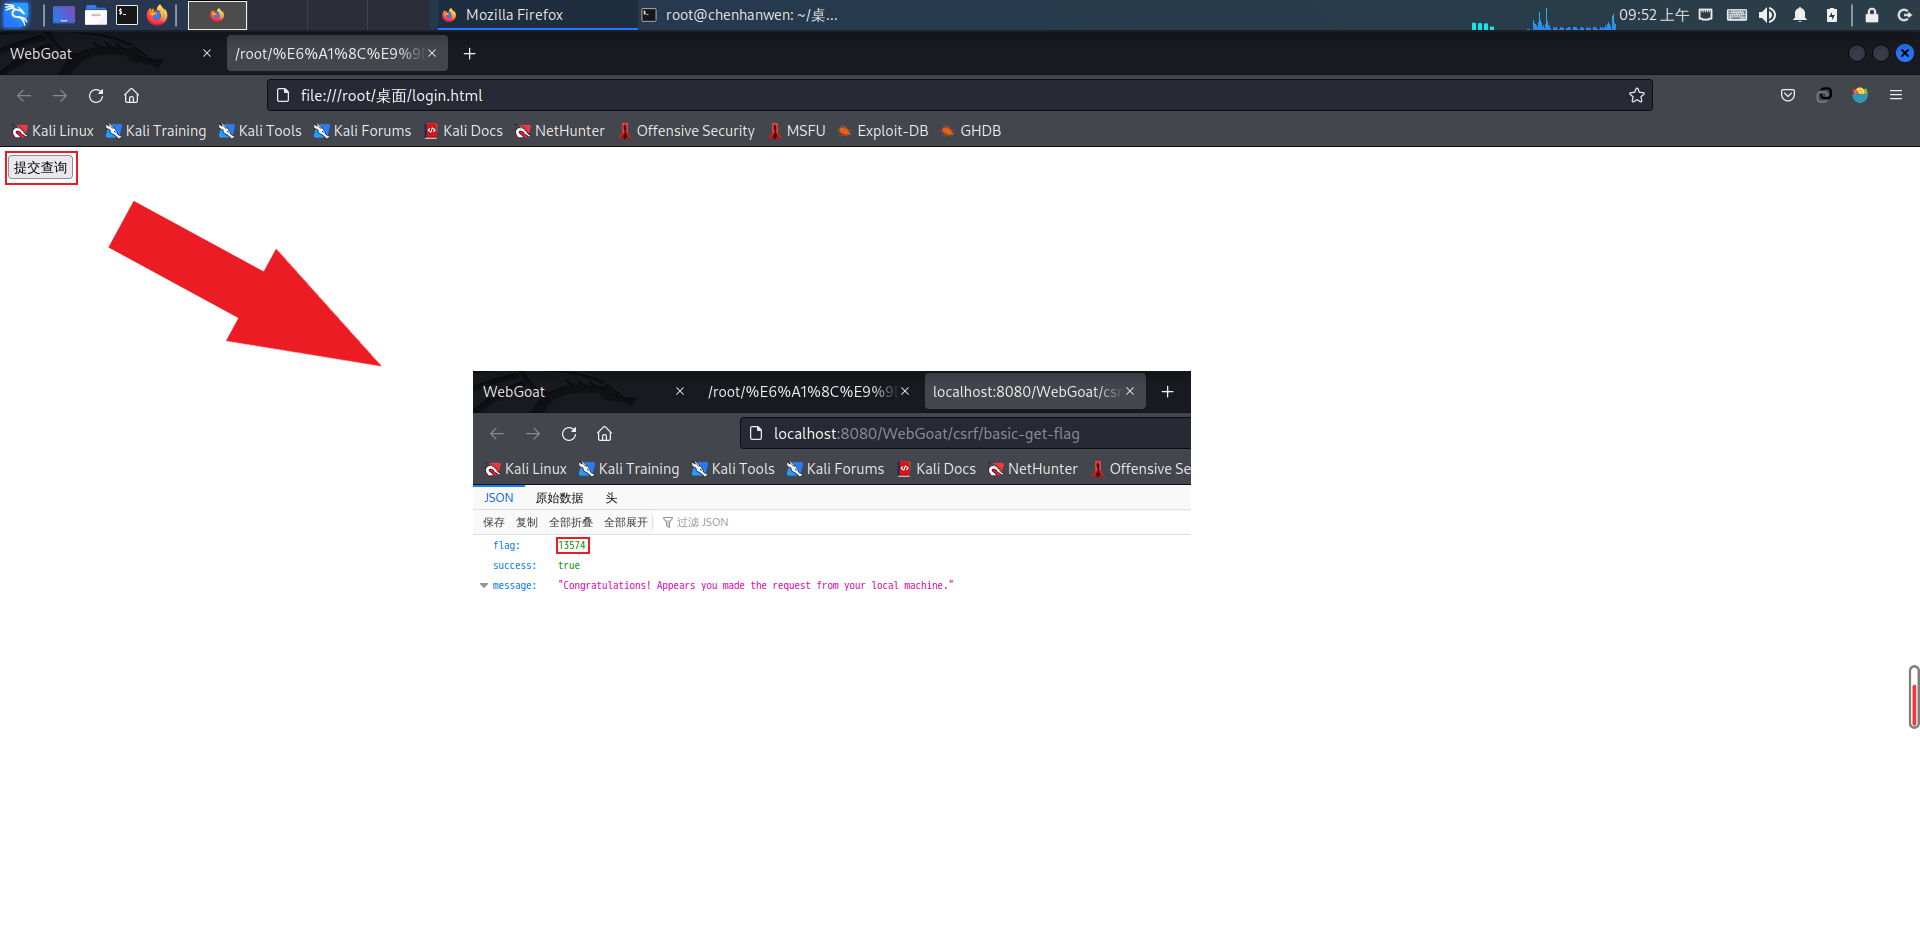
图三十 获取flag
3.问题及解决方案
-
问题1:在下载WebGoat的时候如果下载最新版在使用Java运行的时候会提示版本不兼容
-
问题1解决方案:为了兼容java版本,我更换为WebGoat 8.1,解决了这个问题。
4.学习感悟、思考等
本次实验进行了Web安全相关的实践,通过动手实践的方式我对Web的前端和后端以及前后端交互都有了一定的了解,此外,我还掌握了基本的SQL注入和CSRF攻击方式。在本次实验中,经过在网上寻找相关资料,我成功地完成了相关的实验内容。这次的实验内容也提醒我在编写网页的过程中应当关注可能出现的漏洞,在编写代码的时候就将相关漏洞处理好,尽量避免一些简单的漏洞出现在网站中。
感谢王老师的细心讲解和耐心帮助,也感谢在实验过程中给我帮助的同学们。正因为有你们的帮助我才能够顺利地完成本次实验,谢谢!

 浙公网安备 33010602011771号