LDD3 笔记: 第3章 字符设备的驱动
第3章 字符设备驱动
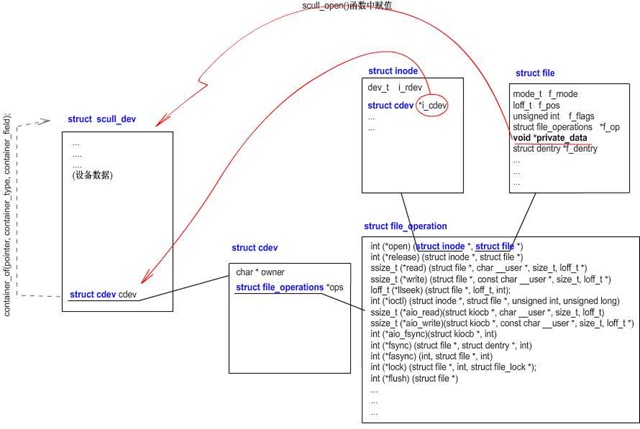
一些重要的数据结构以及引用关系:
第一步:MAJOR设备编号的动态分配
int register_chrdev_region(dev_t first, unsigned int count, char *name);
int alloc_chrdev_region(dev_t *dev, unsigned int firstminor, unsigned int count, char *name); //动态分配
void unregister_chrdev_region(dev_t first, unsigned int count);
获取设备编号的代码:
if (scull_major) { devno = MKDEV(scull_major, scull_minor);// dev_t devno result = register_chrdev_region(devno, scull_nr_devs, "scull");} else { result = alloc_chrdev_region(&devno, scull_minor, scull_nr_devs, "scull");scull_major = MAJOR(dev);
}
if (result < 0) { printk(KERN_WARNING "scull: can't get major %d\n", scull_major); return result;}
一般,提供缺省的MAJOR, 用户指定的MAJOR则通过选项参数传入;如果冲突则动态分配设备编号
加载模块并创建设备文件的脚本:
#!/bin/shmodule="scull"device="scull"mode="664"# invoke insmod with all arguments we got# and use a pathname, as newer modutils don't look in . by default/sbin/insmod ./$module.ko $* || exit 1
# remove stale nodesrm -f /dev/${device}[0-3]major=$(awk "\\$2==\"$module\" {print \\$1}" /proc/devices) mknod /dev/${device}0 c $major 0mknod /dev/${device}1 c $major 1mknod /dev/${device}2 c $major 2mknod /dev/${device}3 c $major 3# give appropriate group/permissions, and change the group.# Not all distributions have staff, some have "wheel" instead.group="staff"grep -q '^staff:' /etc/group || group="wheel"
chgrp $group /dev/${device}[0-3]chmod $mode /dev/${device}[0-3]
第二步:建立具体的设备结构
一般的,此设备中嵌入cdev结构(见上图最左边方框)
struct scull_dev { struct scull_qset *data; /* Pointer to first quantum set */
int quantum; /* the current quantum size */
int qset; /* the current array size */
unsigned long size; /* amount of data stored here */
unsigned int access_key; /* used by sculluid and scullpriv */
struct semaphore sem; /* mutual exclusion semaphore */
struct cdev cdev; /* Char device structure */
};
第三步:向内核注册字符设备
方法一:动态分配cdev
struct cdev *my_cdev = cdev_alloc();my_cdev->ops = &my_fops;
方法二:已经嵌入到我们的结构体,即已存在了
void cdev_init(struct cdev *cdev, struct file_operations *fops);//先初始化
int cdev_add(struct cdev *dev, dev_t devno, unsigned int count); //注册到内核
void cdev_del(struct cdev *dev); //卸载cdev
因为cdev_ini中已经初始化了ops成员,所以再使用dev->ops = &scull_fops;就是赘余了,如下:
static void scull_setup_cdev(struct scull_dev *dev, int index)
{ int err, devno = MKDEV(scull_major, scull_minor + index);cdev_init(&dev->cdev, &scull_fops);
dev->cdev.owner = THIS_MODULE;
dev->cdev.ops = &scull_fops;
err = cdev_add (&dev->cdev, devno, 1);
/* Fail gracefully if need be */ if (err) printk(KERN_NOTICE "Error %d adding scull%d", err, index);}
第四步:写file_operation结构体中的操作函数指针成员的实现
省略
一个值得一提的技巧:通常将struct file的成员private_data指针指向我们的设备结构体(这里是struct scull_dev). 做这个赋值,是在open函数中做的。其他操作函数直接可以通过file的private成员获得设备结构体,很方便。而且真正这样做的原因在多个设备文件时的驱动时,才真正体现作用

 浙公网安备 33010602011771号