Nginx(一):安装与常用命令
简介
Nginx ("engine x") 是一个高性能的 HTTP 和反向代理服务器,特点是占有内存少,并发能 力强,事实上nginx的并发能力确实在同类型的网页服务器中表现较好,在高连接并发的情况下,Nginx是Apache服务器不错的替代品。中国大陆使用nginx 网站用户有:百度、京东、新浪、网易、腾讯、淘宝等。
nginx 原理与参数
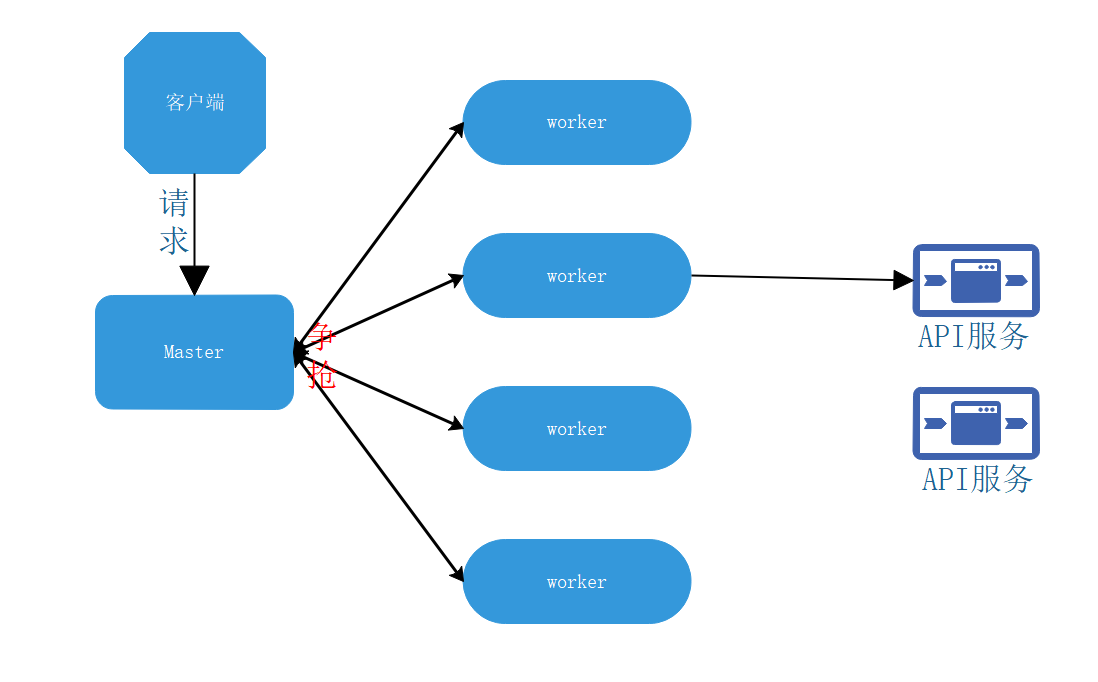
master-workers 的机制的好处
首先,对于每个 worker 进程来说,独立的进程,不需要加锁,所以省掉了锁带来的开销, 同时在编程以及问题查找时,也会方便很多。其次,采用独立的进程,可以让互相之间不会 影响,一个进程退出后,其它进程还在工作,服务不会中断,master 进程则很快启动新的 worker 进程。当然,worker 进程的异常退出,肯定是程序有 bug 了,异常退出,会导致当 前 worker 上的所有请求失败,不过不会影响到所有请求,所以降低了风险。
设置 worker
Nginx 同 redis 类似都采用了 io 多路复用机制,每个 worker 都是一个独立的进程,但每个进 程里只有一个主线程,通过异步非阻塞的方式来处理请求, 即使是千上万个请求也不在话 下。每个 worker 的线程可以把一个 cpu 的性能发挥到极致。所以 worker 数和服务器的 cpu 数相等是最为适宜的。设少了会浪费 cpu,设多了会造成 cpu 频繁切换上下文带来的损耗。
连接数 worker_connection
这个值是表示每个 worker 进程所能建立连接的最大值,所以,一个 nginx 能建立的最大连接数,应该是 worker_connections * worker_processes。当然,这里说的是最大连接数,对于 HTTP 请 求 本 地 资 源 来 说 , 能 够 支 持 的 最 大 并 发 数 量 是 worker_connections * worker_processes,如果是支持 http1.1 的浏览器每次访问要占两个连接,所以普通的静态访 问最大并发数是: worker_connections * worker_processes /2,而如果是 HTTP 作 为反向代理来说,最大并发数量应该是 worker_connections * worker_processes/4。因为作为反向代理服务器,每个并发会建立与客户端的连接和与后端服务的连接,会占用两个连接。
安装
初次安装
[root@localhost ~]# yum install -y nginx
Loaded plugins: fastestmirror
Loading mirror speeds from cached hostfile
 * base: mirrors.tuna.tsinghua.edu.cn
 * extras: mirrors.huaweicloud.com
 * updates: mirrors.huaweicloud.com
No package nginx available.
Error: Nothing to do
原因是nginx位于第三方的yum源里面,而不在centos官方yum源里面
解决方案
#使用 yum-config-manager 软件包命令
[root@localhost ~]# yum install -y yum-utils
#安装wget
[root@localhost ~]#yum install -y wget
#切换到repo配置文件目录
[root@localhost ~]# cd /etc/yum.repos.d/
#备份CentOs-Base.repo源文件
[root@localhost yum.repos.d]# mv CentOs-Base.repo CentOs-Base.repo.bak
#网络下载centos官方和扩展.repo文件
[root@localhost yum.repos.d]# wget http://mirrors.aliyun.com/repo/Centos-7.repo
#安装epel-release
[root@localhost yum.repos.d]# yum install -y epel-release
[root@localhost yum.repos.d]#mv /etc/yum.repos.d/epel-testing.repo /etc/yum.repos.d/epel-testing.repo.backup
[root@localhost yum.repos.d]# wget http://mirrors.aliyun.com/repo/epel-7.repo
#清理软件源缓存
[root@localhost yum.repos.d]# yum clean all
#重建缓存
[root@localhost yum.repos.d]# yum makecache
#可选选项,更新系统 可选操作
[root@localhost yum.repos.d]# yum update
# 也可以使用yum-config-manager --add-repo 命令。进行以下操作推荐备份原.repo文件。yum-config-manager命令必要条件: yum install -y yum-utils
[root@localhost ~]# yum-config-manager --add-repo http://mirrors.aliyun.com/repo/Centos-7.repo
[root@localhost ~]# yum-config-manager --add-repo http://mirrors.aliyun.com/repo/epel-7.repo
二次安装
[root@localhost ~]# yum install -y nginx
[root@localhost ~]# find / -name 'nginx'
/etc/logrotate.d/nginx
/etc/nginx
/var/lib/nginx
/var/log/nginx
/usr/sbin/nginx
/usr/lib64/perl5/vendor_perl/auto/nginx
/usr/lib64/nginx
/usr/share/nginx
校验
# 启动
[root@localhost ~]# cd /usr/sbin/
[root@localhost sbin]# ./nginx
# 查看状态
[root@localhost sbin]# ps -ef|grep nginx
root      40783      1  0 21:25 ?        00:00:00 nginx: master process ./nginx
nginx     40784  40783  0 21:25 ?        00:00:00 nginx: worker process
nginx     40785  40783  0 21:25 ?        00:00:00 nginx: worker process
nginx     40786  40783  0 21:25 ?        00:00:00 nginx: worker process
nginx     40787  40783  0 21:25 ?        00:00:00 nginx: worker process
停止
[root@localhost sbin]# ./nginx -s stop
重载
[root@localhost sbin]# ./nginx -s reload
# 重载指定配置文件
[root@localhost sbin]# ./nginx -s reload -c /etc/nginx/nginx.conf
第二种启动方式
# 启动
[root@localhost ~]# systemctl start nginx
# 查看状态
[root@localhost ~]# systemctl status nginx
● nginx.service - The nginx HTTP and reverse proxy server
   Loaded: loaded (/usr/lib/systemd/system/nginx.service; disabled; vendor preset: disabled)
   Active: active (running) since Sat 2020-04-04 21:52:43 CST; 50s ago
  Process: 42188 ExecStart=/usr/sbin/nginx (code=exited, status=0/SUCCESS)
  Process: 42185 ExecStartPre=/usr/sbin/nginx -t (code=exited, status=0/SUCCESS)
  Process: 42183 ExecStartPre=/usr/bin/rm -f /run/nginx.pid (code=exited, status=0/SUCCESS)
 Main PID: 42191 (nginx)
   CGroup: /system.slice/nginx.service
           ├─42191 nginx: master process /usr/sbin/nginx
           ├─42192 nginx: worker process
           ├─42193 nginx: worker process
           ├─42194 nginx: worker process
           └─42195 nginx: worker process

Apr 04 21:52:43 localhost systemd[1]: Starting The nginx HTTP and reverse proxy server...
Apr 04 21:52:43 localhost nginx[42185]: nginx: the configuration file /etc/nginx/nginx.conf syntax is ok
Apr 04 21:52:43 localhost nginx[42185]: nginx: configuration file /etc/nginx/nginx.conf test is successful
Apr 04 21:52:43 localhost systemd[1]: Started The nginx HTTP and reverse proxy server.
# 停止
[root@localhost ~]# systemctl stop nginx
[root@localhost ~]# systemctl status nginx
● nginx.service - The nginx HTTP and reverse proxy server
   Loaded: loaded (/usr/lib/systemd/system/nginx.service; disabled; vendor preset: disabled)
   Active: inactive (dead)

Apr 04 21:48:37 localhost nginx[41953]: nginx: configuration file /etc/nginx/nginx.conf test is successful
Apr 04 21:48:37 localhost systemd[1]: Started The nginx HTTP and reverse proxy server.
Apr 04 21:49:40 localhost systemd[1]: Stopping The nginx HTTP and reverse proxy server...
Apr 04 21:49:40 localhost systemd[1]: Stopped The nginx HTTP and reverse proxy server.
Apr 04 21:52:43 localhost systemd[1]: Starting The nginx HTTP and reverse proxy server...
Apr 04 21:52:43 localhost nginx[42185]: nginx: the configuration file /etc/nginx/nginx.conf syntax is ok
Apr 04 21:52:43 localhost nginx[42185]: nginx: configuration file /etc/nginx/nginx.conf test is successful
Apr 04 21:52:43 localhost systemd[1]: Started The nginx HTTP and reverse proxy server.
Apr 04 21:54:12 localhost systemd[1]: Stopping The nginx HTTP and reverse proxy server...
Apr 04 21:54:12 localhost systemd[1]: Stopped The nginx HTTP and reverse proxy server.

 浙公网安备 33010602011771号