完整案例——配置前端和后端API应用的安全认证——基于Azure实现
这篇文章记录了我的一些实践。官方文档是 https://docs.microsoft.com/en-us/azure/app-service/tutorial-auth-aad?pivots=platform-linux
案例场景
- 我有一个API 服务,用dotnet core 编写的
- 我有一个前端网站,用React 编写的
- 我希望这个前端网站,可以安全地访问到API服务
- 我不希望其他人在没有经过登录的情况下,直接访问到这个API服务
关键技术
- 两个应用都是需要启用身份认证的。这个官方文档采用的方案是利用最新的Azure的功能,叫做Easy Auth , 官方文档在这里 https://docs.microsoft.com/en-us/azure/app-service/overview-authentication-authorization。 我们采用Azure Active Directory来做认证,所以会创建对应的两个Azure AD application。
- 配置前端应用对应的Azure AD application, 让他可以访问后端API应用。
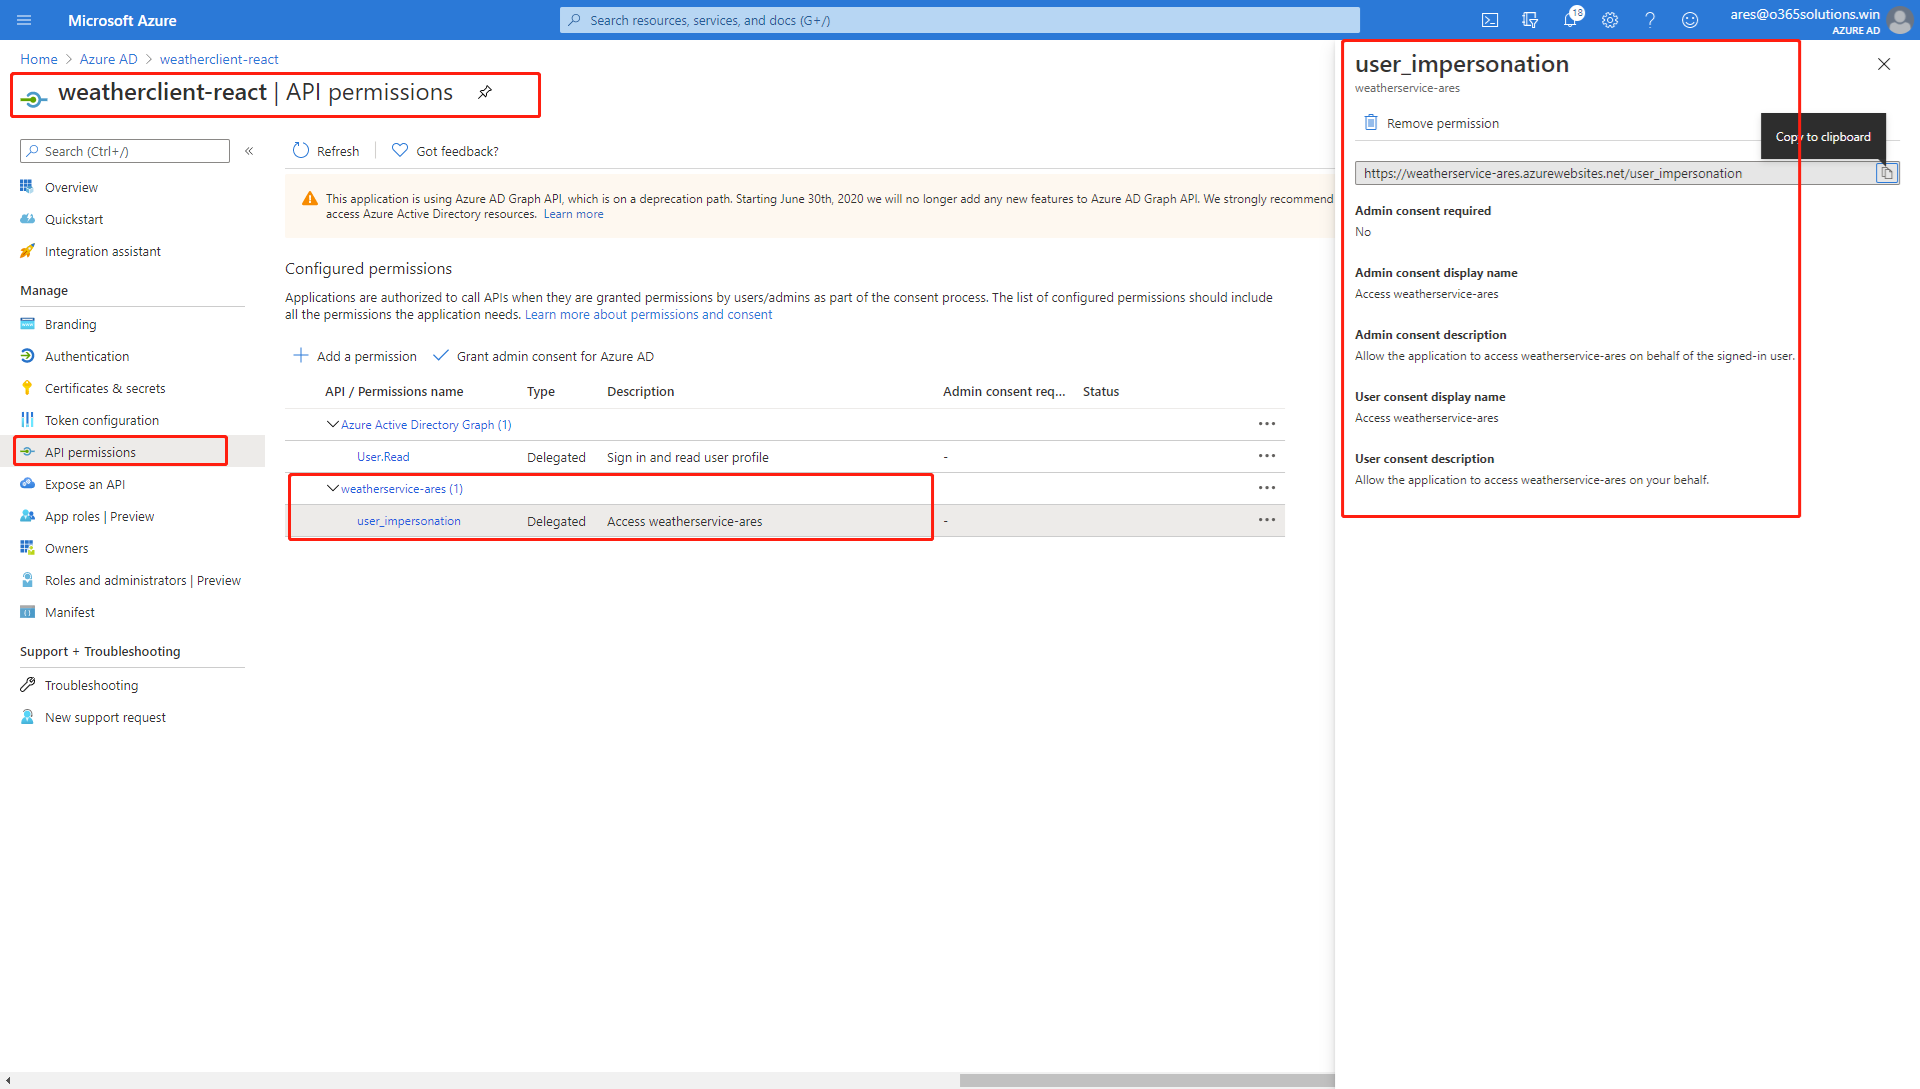
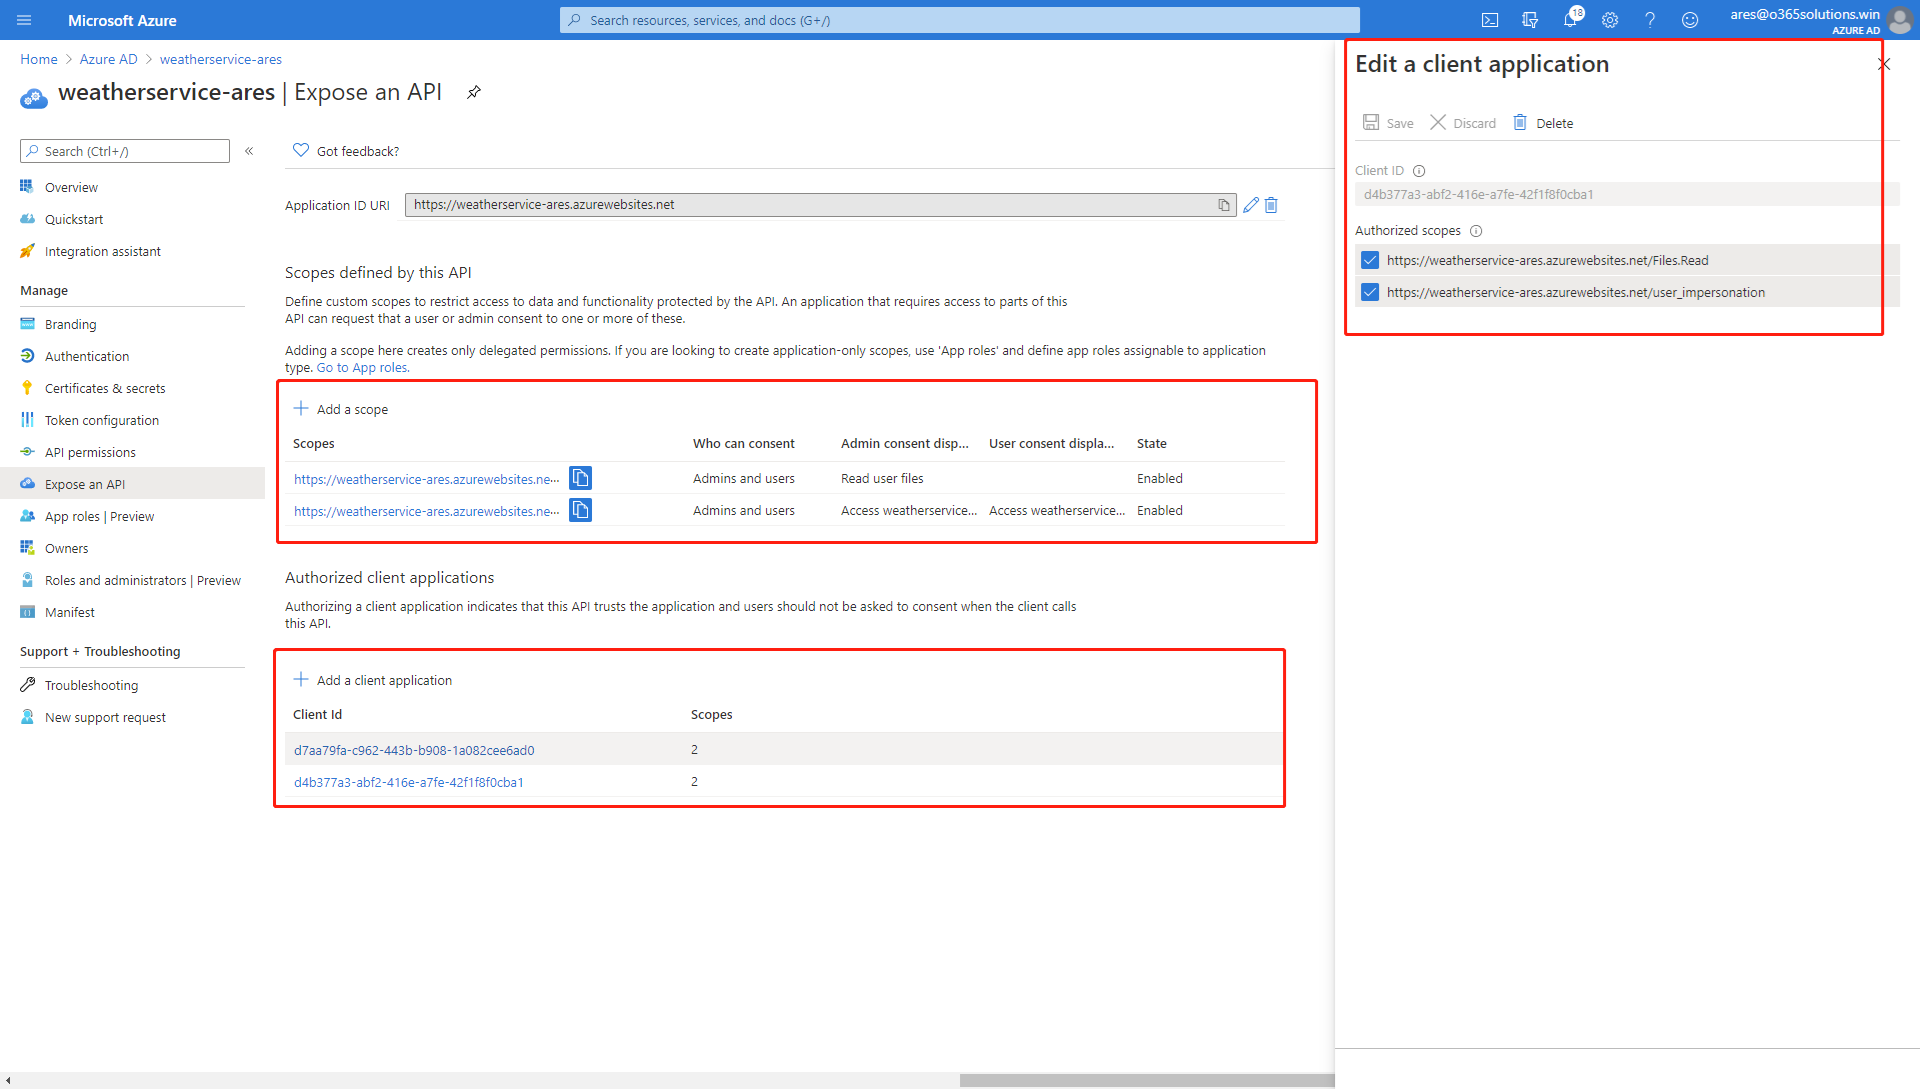
- 配置API 应用对应的Azure AD application, 让他自动授权,信任前端应用对应的Azure AD application。(这一步是官方文档中没有的,但这样添加了更加方便,因为不会弹出一个让用户额外授权的提示框)。这里比较有意思的还有,就是可以添加一个或多个scope,这个可以在后续的代码中验证,实现类似于Microsoft Graph的效果。
- 配置前端应用在做身份认证时,顺带就把访问后端API服务的id_token取过来。这一步很关键。需要访问 https://resources.azure.com 这个网站进行修改authSettings.
"additionalLoginParams": [
"response_type=code id_token",
"resource=ee8a72b8-81f1-4a2f-b98c-aa394559f487"
],

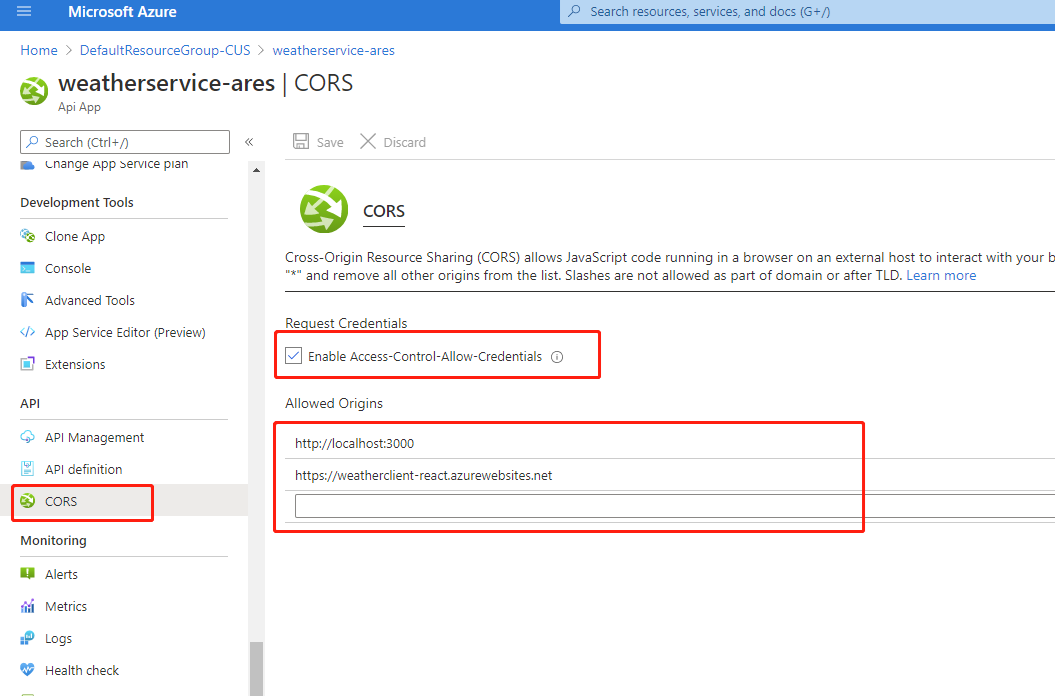
- 为了让前端应用(React)可以访问到这个后端API 服务,还需要设置后端API服务的CORS
请注意,如果不想做CORS的控制,则可以取消 "Enable Access-Control-Allow-Credentials" 这个复选框,然后在Allowed Origins 中删除所有的地址,输入一个 * 就可以了。
- 这样配置完后,当用户尝试去打开前端这个React 应用时,会自动弹出Azure AD 的身份认证的窗口,并且自动完成认证。那么如何在React中得到对应的ID_TOKEN呢?有意思的是,这里只要访问 /.auth/me 这个地址即可获得。然后就可以用这个access_token去继续访问后端的API服务了
fetch("/.auth/me")
.then(res => {
return res.json()
})
.then(data => {
const token = data[0].access_token;
/* 读取天气数据 */
let remote_url = "https://weatherservice-ares.azurewebsites.net/WeatherForecast";
fetch(remote_url, {
headers: {
'Authorization': 'bearer ' + token
}
})
.then(res => {
return res.json();
})
.then(items => {
setLoaded(true);
setItems(items)
});
})
题外话:如果前端这个应用,不是用React写的静态网页,而也是一个服务器技术开发的网页,例如ASP.NET Core,可以使用下面的方式进行access_token的传递。也就是说,Azure 提供的Easy Auth 会自动地把用户登录后得到的token,在每个请求的header中,通过 X-MS-TOKEN-AAD-ACCESS-TOKEN 这个传递过来。
public override void OnActionExecuting(ActionExecutingContext context)
{
base.OnActionExecuting(context);
_client.DefaultRequestHeaders.Accept.Clear();
_client.DefaultRequestHeaders.Authorization =
new AuthenticationHeaderValue("Bearer", Request.Headers["X-MS-TOKEN-AAD-ACCESS-TOKEN"]);
}
- 如何在API服务端判断用户的身份,包括租户信息,账号信息呢。下面几行几行代码即可
var user = HttpContext.User.Identity.Name;
var provider = HttpContext.User.FindFirst("http://schemas.microsoft.com/identity/claims/identityprovider")?.Value;
var tid = HttpContext.User.FindFirst("http://schemas.microsoft.com/identity/claims/tenantid")?.Value;
var oid = HttpContext.User.FindFirst("http://schemas.microsoft.com/identity/claims/objectidentifier")?.Value;
var scp = HttpContext.User.FindFirst("http://schemas.microsoft.com/identity/claims/scope")?.Value;
但是这里会有一个问题,默认情况下,你上面获取到的信息都是空白的。这是一个已知的问题,需要通过一个第三方库来解决。 https://github.com/MaximRouiller/MaximeRouiller.Azure.AppService.EasyAuth
具体的做法就是,添加这个package : MaximeRouiller.Azure.AppService.EasyAuth,然后注入服务
services.AddAuthentication().AddEasyAuthAuthentication((o) => { });
然后在具体的Controller或者Action上面添加
[Authorize(AuthenticationSchemes = "EasyAuth")]
- 如何判断当前的token是否具有指定的scope,以确定哪些用户能访问什么服务。
这个我们可以通过封装一个类来检测
using Microsoft.AspNetCore.Http;
using Microsoft.AspNetCore.Mvc;
using Microsoft.AspNetCore.Mvc.Filters;
using System;
using System.Collections.Generic;
using System.Linq;
using System.Threading.Tasks;
namespace webapisample
{
public static class HttpContextExtension
{
public static bool VerifyUserHasAnyAcceptedScope(this HttpContext ctx, string[] scopes)
{
var scp = ctx.User.FindFirst("http://schemas.microsoft.com/identity/claims/scope")?.Value;
if (string.IsNullOrEmpty(scp))
return false;
return scp.Split(' ').Intersect(scopes).Count() == scopes.Count();
}
}
public class ScopeFilterAttribute : Attribute, IActionFilter
{
public string[] Scopes { get; set; }
public void OnActionExecuted(ActionExecutedContext context)
{
}
public void OnActionExecuting(ActionExecutingContext context)
{
if (!context.HttpContext.VerifyUserHasAnyAcceptedScope(Scopes))
context.Result = new UnauthorizedResult();
}
}
}
这个ScopeFilter使用起来也很简单,如下所示
[ScopeFilter(Scopes = new string[] { "Files.Read" })]

 浙公网安备 33010602011771号