使用Postman工具做接口测试(五)——生成随机参数
引言
我们平时使用最多的接口调试工具就是postman了,比如开发将一个接口给到你,你想看看接口是否正常。最常用的方法就是用postman去调一下。如果通,就写接口测试用例。我们测试接口时,避免不了重复调用一个接口,这样的话,需要随机数来参数化关键的业务字段。
Postman三种内置随机数
其实postman还有其他内置随机数,这里介绍postman三种随机数,打开postman,输入{{,可以看到,如图:
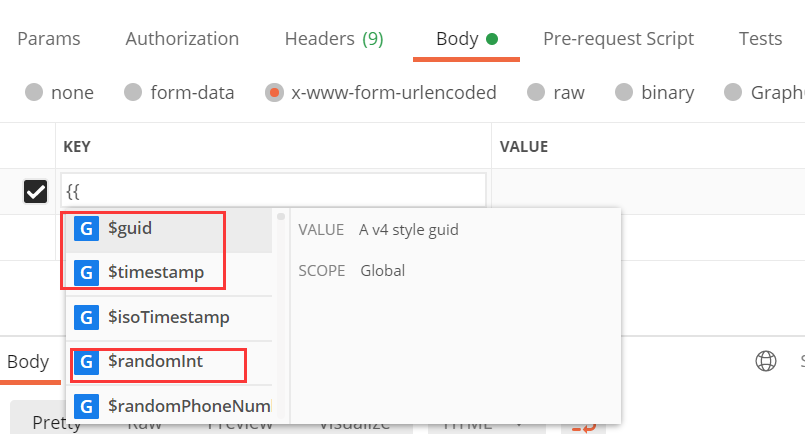
随机数如下:
{{$guid}}:添加一个V4风格GUID(如: aa002-44ac-45ca-aae3-52bf19650e2d)
{{$timestamp}}:将当前的时间戳,精确到秒
{{$randomInt}}:添加0和1000之间的随机整数
我们分别在postman中使用,如下:
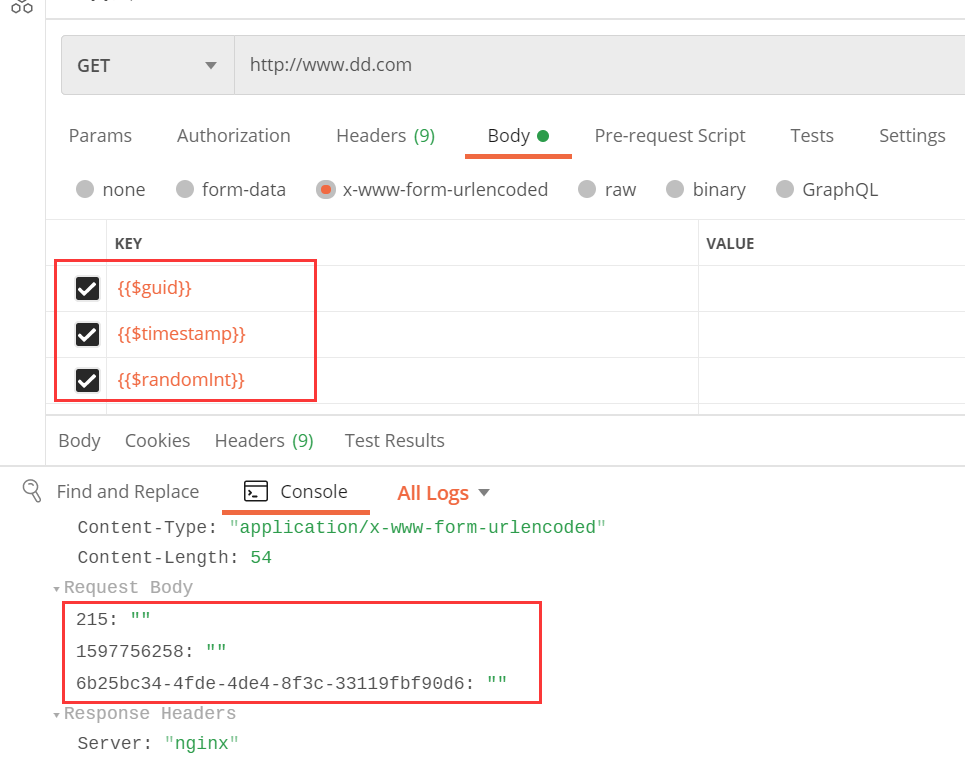
是不是挺好用,这样我们就可以用它来参数化了,重复调用接口也不会导致报文中数据重复使用同一份数据。
但是,如果我想要生成6位,10位随机整数呢? 要怎么做?
这个时候需要自定义随机数。
Postman自定义随机函数
自定义随机整数
代码如下:
第一种:
|
1
2
3
|
// 结果为0-1间的一个随机数(包括0,不包括1)var randomNum1 = Math.random();console.log(randomNum1); |

第二种:
|
1
2
3
4
5
6
7
8
|
// 获取最小值到最大值之前的整数随机数function GetRandomNum(Min, Max) { var Range = Max - Min; var Rand = Math.random(); return(Min + Math.round(Rand * Range));}var num = GetRandomNum(100000, 999999);console.log(num); |

第三种:
|
1
2
3
4
5
6
7
8
9
10
11
|
/*** 产生随机整数,包含下限值,但不包括上限值* @param {Number} lower 下限* @param {Number} upper 上限* @return {Number} 返回在下限到上限之间的一个随机整数*/function random(lower, upper) {return Math.floor(Math.random() * (upper - lower)) + lower;}console.log(random(100000,999999)); |

第四种:这种就有可能第一位是0
|
1
2
3
4
5
6
7
8
9
10
11
12
|
var Num="";for ( var i=0;i<10; i++ ){Num += Math.floor(Math.random() * 10);}console.log(Num); |

上面都是生成自定义位数的随机数,你可以根据需要传入参数来决定几位。
自定义随机时间
通常情况下,很多接口使用的是时间戳,其实我们也可以用这个来做随机数参数化,如图:
|
1
2
3
4
5
6
7
8
9
10
11
12
13
14
15
16
17
18
|
//十三位毫秒时间戳let a = Date.now();console.log(a);//十三位毫秒时间戳b = new Date().getTime();console.log(b)//十位秒时间戳let c = Date.now()/1000;console.log(c.toString().substring(0,10)); //截取第 0~9 位console.log(parseInt(c))// 将 13 位时间戳除以 1000 然后再取整,得到 10 位时间戳数字parseInt(+new Date()/1000);// 将 13 位时间戳转换为字符串截取前 10 位,得到 10 位时间戳字符串(+new Date()).toString().substring(0,10); // 截取第 0~9 位(+new Date()).toString().substr(0,10); // 从第 0 位开始截取 10 位 |

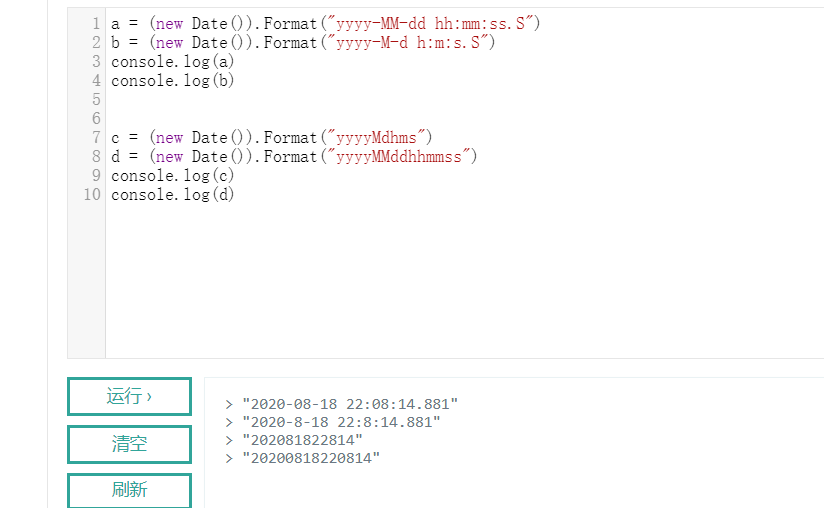
如果我们想使用具体时间作为随机参数,例如,获取当前年月日时分秒,可以这样,如图:
|
1
2
3
4
5
6
7
8
9
10
|
a = (new Date()).Format("yyyy-MM-dd hh:mm:ss.S")b = (new Date()).Format("yyyy-M-d h:m:s.S")console.log(a)console.log(b)c = (new Date()).Format("yyyyMdhms")d = (new Date()).Format("yyyyMMddhhmmss")console.log(c)console.log(d) |
Postman实操
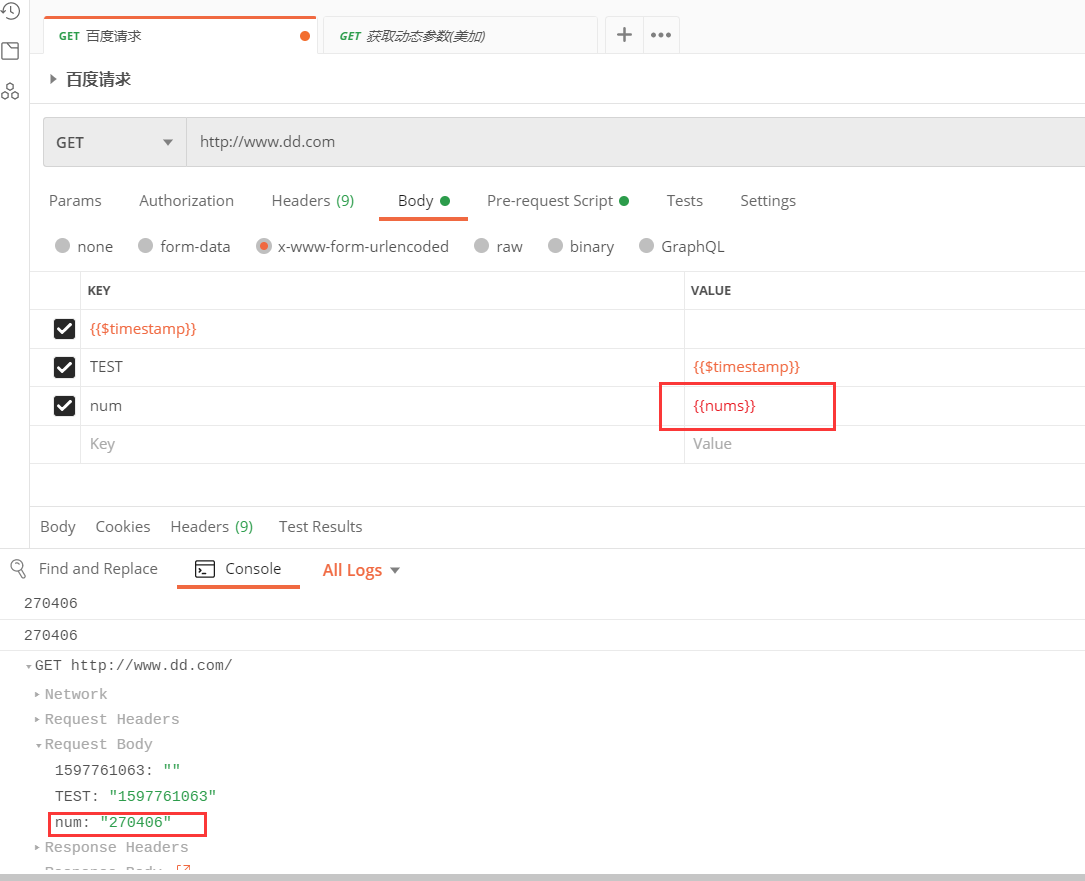
结合上面的例子,我们在postman中使用如下:
|
1
2
3
4
5
6
7
8
9
10
|
function random(lower, upper) {return Math.floor(Math.random() * (upper - lower)) + lower;}var nums = random(100000,999999)console.log(nums);pm.environment.set('nums',nums);console.log(nums); |
运行结果:
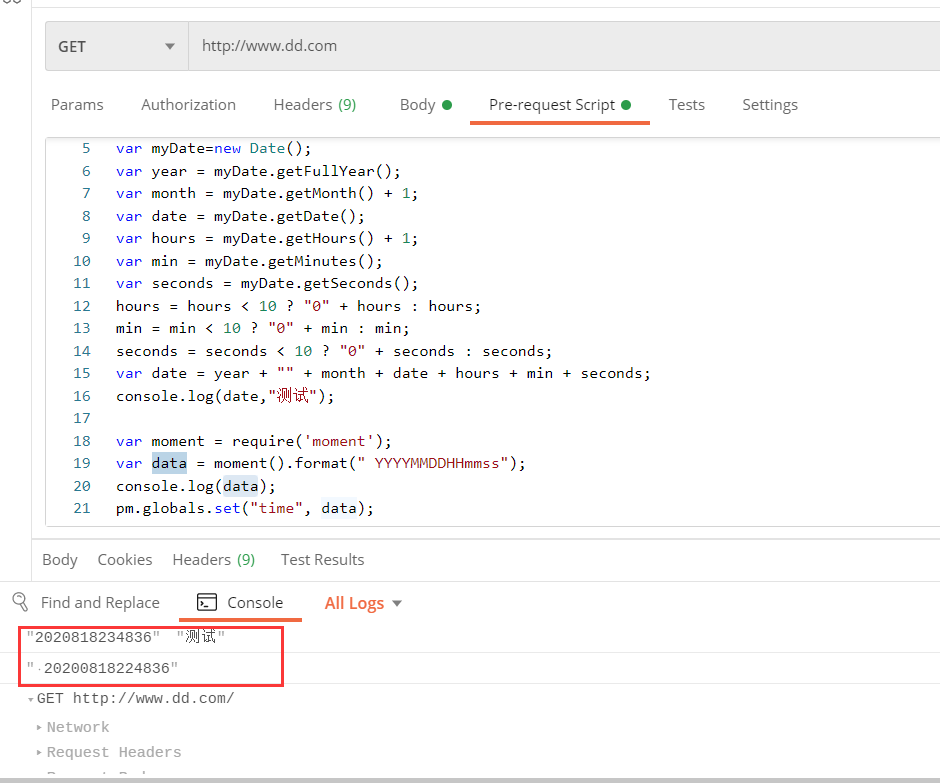
时间参数化:
|
1
2
3
4
5
6
7
8
9
10
11
12
13
14
15
16
17
18
19
|
# 方法1var myDate=new Date();var year = myDate.getFullYear();var month = myDate.getMonth() + 1;var date = myDate.getDate();var hours = myDate.getHours() + 1;var min = myDate.getMinutes();var seconds = myDate.getSeconds();hours = hours < 10 ? "0" + hours : hours;min = min < 10 ? "0" + min : min;seconds = seconds < 10 ? "0" + seconds : seconds;var date = year + "" + month + date + hours + min + seconds;console.log(date,"测试");#方法2var moment = require('moment');var data = moment().format(" YYYYMMDDHHmmss");console.log(data);pm.globals.set("time", data); |
运行结果如图:
声明 欢迎转载,但请保留文章原始出处:) 博客园:https://www.cnblogs.com/chenxiaomeng/
如出现转载未声明 将追究法律责任~谢谢合作

 浙公网安备 33010602011771号