
07-模块与包-1
模块与包
一、模块与包
模块
为了提高代码复用率,将一些定义的python程序保存到.py文件中,其他程序可以用import语句进行调用,此文件称为“模块”,模块的目的是为了其他程序进行引用。
- 模块是保存python程序的".py"文件
- 将模块中的对象引入到当前环境
#!/usr/bin/env python
# -*- coding: utf-8 -*-
"""
# Author:ChengZi
# Version:1.0
# Date:2021-01-28 21:42
# Filename: foo.py
# Description:This script is used for
"""
def func_a(x,y):
    return x ** y

f = func_a(10,2)
print(f)
- 交互模式验证代码复用情况
#交互模式验证代码复用
PS F:\PyProject\pyscripts\project1\mymodule> python
Python 3.7.6 (tags/v3.7.6:43364a7ae0, Dec 19 2019, 00:42:30) [MSC v.1916 64 bit (AMD64)] on
win32
Type "help", "copyright", "credits" or "license" for more information.
>>>
>>> import foo
>>> dir(foo)
['__builtins__', '__cached__', '__doc__', '__file__', '__loader__', '__name__', '__package__', '__spec__', 'f', 'func_a']
>>> foo.func_a(2,3)
8
>>> foo.func_a(5,3)
125
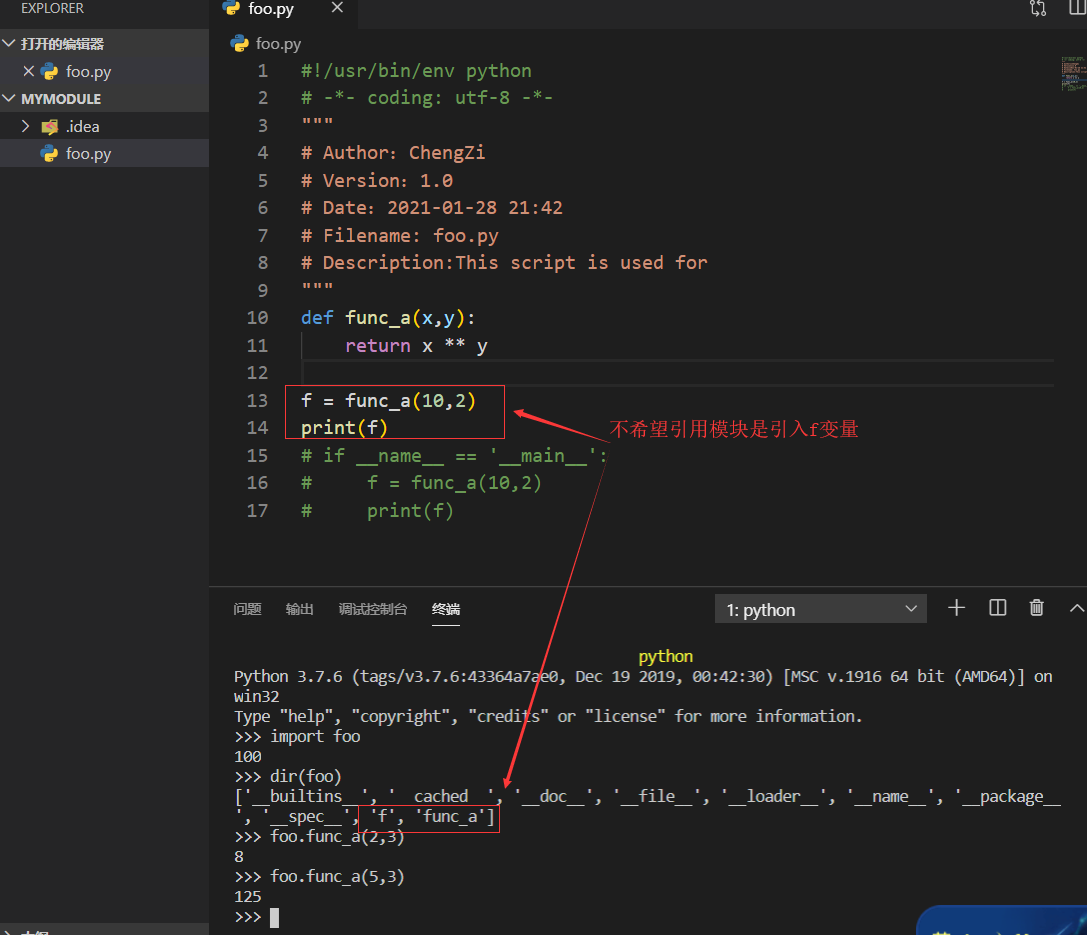
- 不希望在引入代码块是显示13、14行内容,则代码修改为如下:
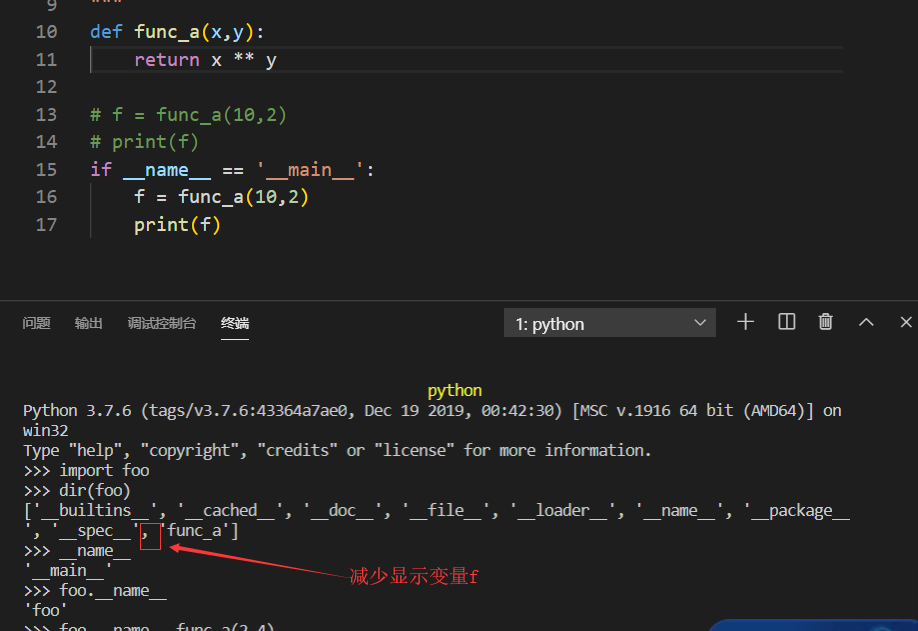
- __name__:
- 当前环境下,__name__的值是“__main__”。
- 在某个模块内,__name__的值是“模块名称”,例如foo。
- if __name__ == ''__main__":
- 相当于python模拟的“主程序入口”
- import语句及其变式
- import module1[,module2[module3[,..moduleN]]]
- from modulename import name1[,name2[,...nameN]]
- from modulename import *
- 命名别名:import modules as of othername
def func_a(x,y):
    return x ** y

# f = func_a(10,2)
# print(f)
if __name__ == '__main__':
    f = func_a(10,2)
    print(f)
    print("foo.py is being run.")
else:
    print("foo.py is being imported"

#验证结果
PS F:\PyProject\pyscripts\project1\mymodule> python foo.py
100
foo.py is being run.
- 创建新文件bar.py,引入foo.py,验证结果
import foo

f = foo.func_a(5,2)
print(f)

if __name__ == '__main__':
    print("bar.py is being run.")
else:
    print("bar.py is being imported")

#验证结果
PS F:\PyProject\pyscripts\project1\mymodule> python bar.py
foo.py is being imported
25
bar.py is being run.
#引入模块示例
PS F:\PyProject\pyscripts\project1\mymodule> python
Python 3.7.6 (tags/v3.7.6:43364a7ae0, Dec 19 2019, 00:42:30) [MSC v.1916 64 bit (AMD64)] on
win32
Type "help", "copyright", "credits" or "license" for more information.
>>> import foo,bar
foo.py is being imported
25
bar.py is being imported
>>> from foo import func_a
>>> func_a(2,3)
8
>>> from foo import *
>>> import bar as b
- 引入模块的搜索路径顺序
- 内存中已经加载的模块
- 内置模块
- sys.path路径中包含的模块
#当前路径是在 F:\PyProject\pyscripts\project1\mymodule
>>>python
Python 3.7.6 (tags/v3.7.6:43364a7ae0, Dec 19 2019, 00:42:30) [MSC v.1916 64 bit (AMD64)] on
win32
Type "help", "copyright", "credits" or "license" for more information.
>>> import sys
>>> sys.path
['', 'D:\\Program Files (x86)\\Python376\\python37.zip', 'D:\\Program Files (x86)\\Python376\\DLLs', 'D:\\Program Files (x86)\\Python376\\lib', 'D:\\Program Files (x86)\\Python376', 'D:\\Program Files (x86)\\Python376\\lib\\site-packages']
>>> import foo
foo.py is being imported
#通过sys.path来使用新的路径,避免报错
PS F:\PyProject\pyscripts\project1\mymodule> cd ../
PS F:\PyProject\pyscripts\project1> dir


    目录: F:\PyProject\pyscripts\project1


Mode                LastWriteTime         Length Name
----                -------------         ------ ----
d-----        2020/12/8     21:26                .idea
d-----         2020/6/6      2:49                .vscode
d-----       2020/12/26      0:36                20200210
d-----        2021/1/13     21:55                20200319
d-----        2021/1/21     18:46                20200524
d-----        2021/1/29      0:01                mymodule


PS F:\PyProject\pyscripts\project1> python
Python 3.7.6 (tags/v3.7.6:43364a7ae0, Dec 19 2019, 00:42:30) [MSC v.1916 64 bit (AMD64)] on
win32
Type "help", "copyright", "credits" or "license" for more information.
>>> import foo
Traceback (most recent call last):
  File "<stdin>", line 1, in <module>
ModuleNotFoundError: No module named 'foo'
>>> import sys
>>> sys.path.append("F:\PyProject\pyscripts\project1\mymodule")
>>> dir
<built-in function dir>
>>> import foo
foo.py is being imported
- .pyc文件
- 模块文件所在目录中的:__pycache__目录
- .pyc文件:将模块文件编译后,保存为此类文件
- 再次载入此模块(未修改),则装在此.pyc文件中
- 模块文件所在目录中的:__pycache__目录
包
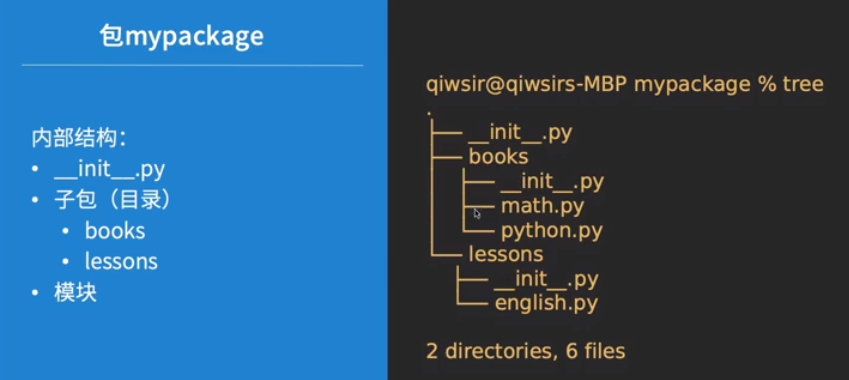
包(package)是包含模块文件的目录
- 包里面有模块
- 保姆了内还有子目录
- 每层目录中,必须有:__init__.py
- 不是任何目录都是包,必须有:__init__.py标记的才是包
- 当包被引入时执行此文件
- 通常可以为空,也可以写一些初始化的代码,比如用__all__ == [ 'module_name' ,]的方式规定引入的内容
- 导入包的本质:就是执行这个包下面的__init__.py文件
- 包的示例
- 参考资料:https://www.cnblogs.com/janson071/p/10407459.html
二、pip和虚拟环境
什么是pip?
- pip是python中“包”(package)的管理工具
- 任何人都可以编写包,并发布
- 网站:https://pypi.org/
- 查看pip版本,并安装依赖包方式
#Windows环境:
pip --version
pip 19.2.3 from d:\program files (x86)\python376\lib\site-packages\pip (python 3.7)
PS F:\PyProject\pyscripts\project1\mymodule>

#linux环境
[oldboy@node3 ~]$ pip3 --version
pip 19.0.3 from /usr/local/python3.7.4/lib/python3.7/site-packages/pip (python 3.7)
[oldboy@node3 ~]$ pip3 install package_name==1.4.3
[oldboy@node3 ~]$ pip3 install package_name>=1.4.3
- pip其他操作
#更新、升级
pip install package_name -U
pip install --upgrade package_name

#列表
pip list

#删除或卸载
pip uninstall package_name

#更新源(由于pypi源位于国外,若因网络问题可使用国内pip源)
pip config set global.index -url https://pypi.tuna.tsinghua.edu.cn/
虚拟环境
- 为什么需要虚拟环境?
- python应用程序通畅会使用不在标准库内的软件包和模块,应用程序有时需要安装特定版本的库(包、模块)
- 系统中的python安装可能无法满足每个应用程序的要求
- 创建虚拟环境—解决需求相冲突
创建虚拟环境
- 方法1:使用virtualenv
- 安装virtualenv:pip3 install virtualenv --user
- 创建虚拟环境:
- 创建目录myvenv,并进入目录myvenv:mkdir myvenv && cd myvenv
- 创建虚拟环境:virtualenv -p python3 venv-one
- 参数说明:
- -p python3:知名当前虚拟环境所使用的的python版本
- venv-one:虚拟环境所在目录
- 进入虚拟环境目录venv-one,激活当前虚拟环境
- cd ~/myvenv/venv-one && source $(pwd)/bin/activate
- 在虚拟环境中操作:
- 查看当前环境的包:pip list
- 安装包:pip install novas
- 进入交互模式,测试:import novas
- 在非虚拟环境中,对比测试
- 退出虚拟环境:deactivate
[oldboy@node3 ~]$ pip3 install virtualenv --user
[oldboy@node3 ~]$ mkdir myvenv && cd myvenv/
[oldboy@node3 ~/myvenv]$ virtualenv -p python3 venv-one
[oldboy@node3 ~/myvenv/venv-one]$ ll
total 4
drwxrwxr-x 2 oldboy oldboy 285 Jan 31 21:12 bin
drwxrwxr-x 3 oldboy oldboy  23 Jan 31 21:12 lib
-rw-rw-r-- 1 oldboy oldboy 275 Jan 31 21:12 pyvenv.cfg
[oldboy@node3 ~/myvenv]$ cd ~/myvenv/venv-one && source $(pwd)/bin/activate
(venv-one) [oldboy@node3 ~/myvenv/venv-one]$
(venv-one) [oldboy@node3 ~/myvenv/venv-one]$ pip
pip      pip-3.7  pip3     pip3.7
(venv-one) [oldboy@node3 ~/myvenv/venv-one]$ pip list
Package    Version
---------- -------
pip        21.0.1
polysh     0.4
setuptools 52.0.0
wheel      0.36.2
(venv-one) [oldboy@node3 ~/myvenv/venv-one]$ deactivate
[oldboy@node3 ~/myvenv/venv-one]$ pip3 list
Package            Version
------------------ -------
appdirs            1.4.4
distlib            0.3.1
filelock           3.0.12
importlib-metadata 3.4.0
pip                19.0.3
polysh             0.4
setuptools         40.8.0
six                1.15.0
typing-extensions  3.7.4.3
virtualenv         20.4.1
zipp               3.4.0
You are using pip version 19.0.3, however version 21.0.1 is available.
You should consider upgrading via the 'pip install --upgrade pip' command
#虚拟环境的依赖包比系统层环境的要少很多
(venv-one) [oldboy@node3 ~/myvenv/venv-one]$ python
Python 3.7.4 (default, Mar 29 2020, 02:42:02)
[GCC 7.3.1 20180303 (Red Hat 7.3.1-5)] on linux
Type "help", "copyright", "credits" or "license" for more information.
#由于虚拟环境创建时指定了使用python3,故python交互模式默认是3.7.4
>>> exit()
(venv-one) [oldboy@node3 ~/myvenv/venv-one]$ python3
Python 3.7.4 (default, Mar 29 2020, 02:42:02)
[GCC 7.3.1 20180303 (Red Hat 7.3.1-5)] on linux
Type "help", "copyright", "credits" or "license" for more information.
>>> exit()
(venv-one) [oldboy@node3 ~/myvenv/venv-one]$ python3
Python 3.7.4 (default, Mar 29 2020, 02:42:02)
[GCC 7.3.1 20180303 (Red Hat 7.3.1-5)] on linux
Type "help", "copyright", "credits" or "license" for more information.
>>> import novas
#系统层import novas报错
[oldboy@node3 ~]$ python3
Python 3.7.4 (default, Mar 29 2020, 02:42:02)
[GCC 7.3.1 20180303 (Red Hat 7.3.1-5)] on linux
Type "help", "copyright", "credits" or "license" for more information.
>>> import navas
Traceback (most recent call last):
  File "<stdin>", line 1, in <module>
ModuleNotFoundError: No module named 'navas'
- 方法2:使用pyvenv
- python3.3以后,默认提供(缺点:不能指定虚拟环境所使用的的python版本)
- 在myvenv目录下,创建虚拟环境:pyvenv venv-two
- 进入venv-two,并激活:source $(pwd)/bin/activate
- 退出:deactivate
- 参考资料:
- https://www.linuxidc.com/Linux/2017-05/143685.htm
- https://www.cnblogs.com/dingtianwei/p/9383230.html
- 方法3:使用pipenv(集成方法1和pip)
- 安装:pip3 install pipenv && ln -sv $(find / -type f -name "pipenv") /usr/bin/pipenv
- 在myvenv目录下,创建虚拟环境:
- 创建新目录:mkdir venv-three && cd venv-three
- 声明使用python3:pipenv --three
- 查看当前虚拟环境的包:cat Pipfile
- 激活虚拟环境:
- 进入:pipenv shell
- 安装:pipenv install novas
- 退出:exit
[root@node3 ~]# pip3 install pipenv
[root@node3 ~]# pip3 install -U pipenv
[root@node3 ~]# cat .bashrc
# .bashrc

# User specific aliases and functions

alias rm='rm -i'
alias cp='cp -i'
alias mv='mv -i'

# Source global definitions
if [ -f /etc/bashrc ]; then
        . /etc/bashrc
fi
#add pyvenv environment at 20210131
export PATH="/home/oldboy/.pyenv/bin:$PATH"
eval "$(pyenv init -)"
eval "$(pyenv virtualenv-init -)"
[root@node3 ~]# source .bashrc
[root@node3 ~]# find / -type f -name "pipenv"
/usr/local/python3.7.4/bin/pipenv
[root@node3 ~]# ln -sv /usr/local/python3.7.4/bin/pipenv /usr/bin/pipenv#创建pipenv全局环境
'/usr/bin/pipenv' -> '/usr/local/python3.7.4/bin/pipenv'
[oldboy@node3 ~/myvenv]$ mkdir venv-three && cd venv-three#创建虚拟摸了
[oldboy@node3 ~/myvenv/venv-three]$ pipenv --three#表示虚拟环境python版本为python3
Creating a virtualenv for this project...
Pipfile: /home/oldboy/myvenv/venv-three/Pipfile
Using /usr/local/bin/python3 (3.7.4) to create virtualenv...
⠏ Creating virtual environment...created virtual environment CPython3.7.4.final.0-64 in 1431ms
  creator CPython3Posix(dest=/home/oldboy/.local/share/virtualenvs/venv-three-Pl0XrQjp, clear=False, no_vcs_ignore=False, global=False)
  seeder FromAppData(download=False, pip=bundle, setuptools=bundle, wheel=bundle, via=copy, app_data_dir=/home/oldboy/.local/share/virtualenv)
    added seed packages: pip==21.0.1, setuptools==52.0.0, wheel==0.36.2
  activators BashActivator,CShellActivator,FishActivator,PowerShellActivator,PythonActivator,XonshActivator

✔ Successfully created virtual environment!
Virtualenv location: /home/oldboy/.local/share/virtualenvs/venv-three-Pl0XrQjp
Creating a Pipfile for this project...
[oldboy@node3 ~/myvenv/venv-three]$ pipenv shell#进入虚拟环境
Launching subshell in virtual environment...
 . /home/oldboy/.local/share/virtualenvs/venv-three-Pl0XrQjp/bin/activate
[oldboy@node3 ~/myvenv/venv-three]$  . /home/oldboy/.local/share/virtualenvs/venv-three-Pl0XrQjp/bin/activate
(venv-three) [oldboy@node3 ~/myvenv/venv-three]$ pipenv install novas#在虚拟环境中安装novas包
Installing novas...
Adding novas to Pipfile's [packages]...
✔ Installation Succeeded
Pipfile.lock not found, creating...
Locking [dev-packages] dependencies...
Locking [packages] dependencies...
Building requirements...
Resolving dependencies...
✔ Success!
Updated Pipfile.lock (43df3a)!
Installing dependencies from Pipfile.lock (43df3a)...
     ▉▉▉▉▉▉▉▉▉▉▉▉▉▉▉▉▉▉▉▉▉▉▉▉▉▉▉▉▉▉▉▉ 0/0 — 00:00:00
(venv-three) [oldboy@node3 ~/myvenv/venv-three]$ pip --version
pip 21.0.1 from /home/oldboy/.local/share/virtualenvs/venv-three-Pl0XrQjp/lib/python3.7/site-packages/pip (python 3.7)
(venv-three) [oldboy@node3 ~/myvenv/venv-three]$ pip list
Package    Version
---------- -------
novas      3.1.1.5
pip        21.0.1
polysh     0.4
setuptools 52.0.0
wheel      0.36.2
三、内置模块
- python标准库非常庞大,所提供的组件涉及范围十分广泛;此外还有标准库之外的第三方库和包,构成了完整的应用开发框架。
- python官方中文文档:https://docs.python.org/zh-cn/library/index.html
os与sys模块
- os模块提供了非常丰富的方法,详情参考:
-
https://www.runoob.com/python3/python3-os-file-methods.html
-
https://www.cnblogs.com/mainstream/p/11275834.html
-
https://www.cnblogs.com/ginvip/p/6439679.html
-
os模块常用方法
文件操作
os.getcwd()
#返回当前工作路径

os.path.isabs()
#判断是否是绝对路径

os.path.isfile()
#检验给出的路径是否是一个文件

os.path.isdir()
#检验给出的路径是否是一个目录

os.sep
#文件的路径分隔符 如:在windows上是 '\'  而在Linux上是 '/'

os.walk()
#文件遍历
如:def file_name(file_dir):
    for root, dirs, files in os.walk(file_dir):
        print('root_dir:', root)  # 当前目录路径
        print('sub_dirs:', dirs)  # 当前路径下所有子目录
        print('files:', files)  # 当前路径下所有非目录子文件

    file_name('E:/vmware')

os.path.splitext()
#分离扩展名

os.system()
#运行shell命令

os.path.exists()
#检验给出的路径是否真地存

os.getenv() 与os.putenv()
#读取和设置环境变量

os.linesep
#给出当前平台使用的行终止符,如: windowss使用'\r\n'  ,Linux使用'\n'而Mac使用'\r'

os.name
#指示你正在使用的平台,如:对于Windows,它是'nt',而对于Linux/Unix用户,它是'posix'

os.chmod(file)
#修改文件权限与时间戳

os.exit()
#终止当前进程
目录操作
os.makedirs("file1/file2/file3")
#创建文件夹目录. 创建多级目录
os.mkdir("file")
# 创建文件夹. 但是上级目录必须存在

os.copy("oldfile","newfile")
#oldfile只能是文件夹,newfile可以是文件,也可以是目标目录

os.rename("oldname","newname")
#重命名文件(目录)    文件或目录都是使用这条命令

os.removedirs()
# 删除多级目录, 要求必须是空的
os.rmdir("dir")
#只能删除空目录

os.listdir()
#返回指定目录下的所有文件和目录名

os.path.split(path)
#返回一个路径的目录名和文件名
os.path.dirname()
#获取路径名
os.path.basename()
#获取文件名

os.path.getsize(filename
#获取文件大小

os.chdir("path")
#换路径
文件读写操作
os.remove()
#删除文件 或空文件夹

os.stat()
#获取文件属性

with open("abc.txt",mode="w",encoding="utf-8") as f:
#写文件,当文件不存在时,就直接创建此文件
   pass
encoding #文件编码
mode #打开模式
name #文件名

#关于open 模式:
w     以写方式打开,
a     以追加模式打开 (从 EOF 开始, 必要时创建新文件)
r     以读写模式打开
w+     以读写模式打开 (参见 w )
a+     以读写模式打开 (参见 a )
rb     以二进制读模式打开
wb     以二进制写模式打开 (参见 w )
ab     以二进制追加模式打开 (参见 a )
rb+    以二进制读写模式打开 (参见 r+ )
wb+    以二进制读写模式打开 (参见 w+ )
ab+    以二进制读写模式打开 (参见 a+ )

lines = object_file.readlines( )#读第一行
for line in file_object:#如果文件是文本文件,还可以直接遍历文件对象获取每行:
     print(line)
- os模块常用方法实战:https://blog.csdn.net/xxlovesht/article/details/80913193
[oldboy@node3 ~]$ python3
Python 3.7.4 (default, Mar 29 2020, 02:42:02)
[GCC 7.3.1 20180303 (Red Hat 7.3.1-5)] on linux
Type "help", "copyright", "credits" or "license" for more information.
>>> import os
>>> os.listdir()
['.bash_logout', '.bashrc', '.bash_history', 'tools', '.ssh', 'scripts', 'polysh', '.vimrc', '.bash_profile', 'hostlist', '.python_history', '.rnd', 'pyscripts', '.cache', '.local', '.pki', '.pyenv', 'iplist', 'perl5', '.viminfo', 'myvenv']>>> os.listdir("/home/oldboy/")
['.bash_logout', '.bashrc', '.bash_history', 'tools', '.ssh', 'scripts', 'polysh', '.vimrc', '.bash_profile', 'hostlist', '.python_history', '.rnd', 'pyscripts', '.cache', '.local', '.pki', '.pyenv', 'iplist', 'perl5', '.viminfo', 'myvenv']
>>> os.listdir("/home/oldboy/myvenv")
['venv-one', 'venv-three']
>>> os.getcwd()
'/home/oldboy'
>>> os.chdir("tools")
>>> os.getcwd()
'/home/oldboy/tools'
>>> os.chdir("../")
>>> os.getcwd()
'/home/oldboy'
>>> import os
>>> os.getcwd()
'/home/oldboy'
>>> os.makedirs('./newdir')
>>> os.listdir("/home/oldboy/")
['.bash_logout', '.bashrc', '.bash_history', 'tools', '.ssh', 'scripts', 'polysh', '.vimrc', '.bash_profile', 'newdir', 'hostlist', '.python_history', '.rnd', 'pyscripts', '.cache', '.local', '.pki', '.pyenv', 'iplist', 'perl5', '.viminfo', 'myvenv']
>>> os.removedirs("./newdir")
>>> os.listdir(".")
['.bash_logout', '.bashrc', '.bash_history', 'tools', '.ssh', 'scripts', 'polysh', '.vimrc', '.bash_profile', 'hostlist', '.python_history', '.rnd', 'pyscripts', '.cache', '.local', '.pki', '.pyenv', 'iplist', 'perl5', '.viminfo', 'myvenv']
>>> os.rename("tools","testfile")
>>> os.listdir(".")
['.bash_logout', '.bashrc', '.bash_history', '.ssh', 'scripts', 'polysh', '.vimrc', '.bash_profile', 'hostlist', '.python_history', '.rnd', 'pyscripts', '.cache', '.local', '.pki', '.pyenv', 'testfile', 'iplist', 'perl5', '.viminfo', 'myvenv']
>>> os.rename("testfile","tools")
>>> os.listdir(".")
['.bash_logout', '.bashrc', '.bash_history', '.ssh', 'scripts', 'polysh', '.vimrc', '.bash_profile', 'tools', 'hostlist', '.python_history', '.rnd', 'pyscripts', '.cache', '.local', '.pki', '.pyenv', 'iplist', 'perl5', '.viminfo', 'myvenv']
- python交互环境使用linux命令行shell模式
[oldboy@node3 ~]$ ls
hostlist  iplist  myvenv  perl5  polysh  pyscripts  scripts  tools
[oldboy@node3 ~]$ python3
Python 3.7.4 (default, Mar 29 2020, 02:42:02)
[GCC 7.3.1 20180303 (Red Hat 7.3.1-5)] on linux
Type "help", "copyright", "credits" or "license" for more information.
>>> cmd = "ls " + os.getcwd() >>> cmd 'ls /home/oldboy' >>> os.system(cmd) hostlist iplist myvenv perl5 polysh pyscripts scripts tools 0
sys模块常用方法
- argv:实现从程序外部向程序传递参数。
import os,sys

print("hello world!")
print("current directory has abbove files:\n",os.listdir("./")
#执行结果:
PS F:\PyProject\pyscripts\project1\mymodule> python .\os_test_sys.py
hello world!
The directory has files:
 ['.idea', 'bar.py', 'foo.py', 'os_test_sys.py', '__pycache__']
PS F:\PyProject\pyscripts\project1\mymodule> python .\os_test_sys.py
file name: .\os_test_sys.py
length of argument 1
argument arg: ['.\\os_test_sys.py']
PS F:\PyProject\pyscripts\project1\mymodule> python .\os_test_sys.py -q 345 op
file name: .\os_test_sys.py
length of argument 4
argument are: ['.\\os_test_sys.py', '-q', '345', 'op']

#获取命令参数的作
import os,sys

lam = lambda x,y: x + y

x = float(sys.argv[1])
y = float(sys.argv[2])
print("x + y = ",lam(x,y))

#执行结果
PS F:\PyProject\pyscripts\project1\mymodule> python .\os_test_sys.py 3 5
x + y = 8.0
PS F:\PyProject\pyscripts\project1\mymodule> python .\os_test_sys.py 6 10
x + y = 16.0
- exit:程序中间的退出,arg=0为正常退出。
>>> cmd = "ls " + os.getcwd()
>>> cmd
'ls /home/oldboy'
>>> os.system(cmd)
hostlist  iplist  myvenv  perl5  polysh  pyscripts  scripts  tools
0
>>>
>>> import sys
>>> sys.exit("leave python environment")
leave python environment

# exit()举例
n = 10
while n > 10:
    n -= 1
    if n == 5:
        sys.exit()
    else:
        print(n)
- path:返回模块的搜索路径,初始化时使用PYTHONPATH环境变量的值
- stdout:错误输出
import os,sys

class Redirect():
    def __init__(self,stdout):
        self.stdout = stdout
    def write(self,s):
        self.stdout.write(s.lower())

old_stdout = sys.stdout
sys.stdout = Redirect(sys.stdout)#sys.stdout为sys模块的标准化输出作为Redirect的参数
#sys.stdout变量与sys模块的方法重名,则覆盖
print("LEARN python with laoqi")

#以下两行为恢复sys标准化输出
sys.stdout = old_stdout
print("YOU RAISE ME UP")

#执行结果
PS F:\PyProject\pyscripts\project1\mymodule> python .\os_test_sys.py
learn python  with laoqi
YOU RAISE ME UP
- stdin:标准输入
# stdin举例
while True:
    try:
        # reading from sys.stdin (stop with Ctrl-D)
        number = input('Enter a number:')
        # number = sys.stdin.realine()[:-1]
    except EOFError:
        print('\nEND')
        break
    else:
        try:
            number = int(number)
            if number == 0:
                print('0 has no inverse')
            else:
                print('inverse of {0} is {1}'.format(number, 1.0/number))
        except ValueError:
            print('\nEnd')
            break
- 参考资料
- https://www.jianshu.com/p/c1831232c391
- https://www.cnblogs.com/korol7/p/12831559.html
- https://www.cnblogs.com/zhangxinqi/p/7826872.html
- https://blog.csdn.net/swinfans/article/details/85780302
sys.argv    #获取命令行参数列表,第一个元素是程序本身
sys.exit(n) #退出Python程序,exit(0)表示正常退出。当参数非0时,会引发一个SystemExit异常,可以在程序中捕获该异常
sys.version #获取Python解释程器的版本信息
sys.maxsize #最大的Int值,64位平台是2**63 - 1
sys.path    #返回模块的搜索路径,初始化时使用PYTHONPATH环境变量的值
sys.platform    #返回操作系统平台名称
sys.stdin   #输入相关
sys.stdout  #输出相关
sys.stderr  #错误相关
sys.exc_info()  #返回异常信息三元元组
sys.getdefaultencoding()    #获取系统当前编码,默认为utf-8
sys.setdefaultencoding()    #设置系统的默认编码
sys.getfilesystemencoding() #获取文件系统使用编码方式,默认是utf-8
sys.modules #以字典的形式返回所有当前Python环境中已经导入的模块
sys.builtin_module_names    #返回一个列表,包含所有已经编译到Python解释器里的模块的名字
sys.copyright   #当前Python的版权信息
sys.flags   #命令行标识状态信息列表。只读。
sys.getrefcount(object) #返回对象的引用数量
sys.getrecursionlimit() #返回Python最大递归深度,默认1000
sys.getsizeof(object[, default])    #返回对象的大小
sys.getswitchinterval() #返回线程切换时间间隔,默认0.005秒
sys.setswitchinterval(interval) #设置线程切换的时间间隔,单位秒
sys.getwindowsversion() #返回当前windwos系统的版本信息
sys.hash_info   #返回Python默认的哈希方法的参数
sys.implementation  #当前正在运行的Python解释器的具体实现,比如CPython
sys.thread_info #当前线程信息
正则表达式和re模块
正则表达式
- (regular expression,简写regexp,re),又称“规则运算式”,是描述某种规则的表达式;re模块使python语言拥有全部的正则表达式功能
- python中的正则表达式大致分为以下几部分
- 元字符
- 模式
- 函数
- re 内置对象用法
- 分组用法
- 环视用法
- 官方文档:https://docs.python.org/zh-cn/3/library/re.html
参考资料
https://www.cnblogs.com/huxi/archive/2010/07/04/1771073.html
https://www.cnblogs.com/tina-python/p/5508402.html
https://www.cnblogs.com/misswangxing/p/10736310.html
https://www.runoob.com/python/python-reg-expressions.html
基本语法
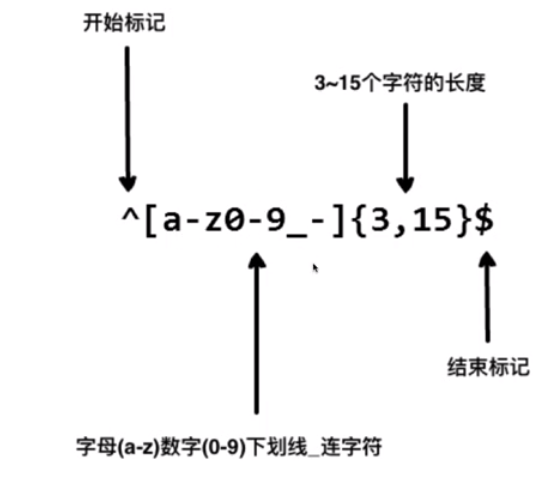
- 特殊字符:一些有特殊含义的字符,如runoo*b的*,表示任何字符串;若要匹配这些特殊字符,可使用反斜杠\放在前面进行转义。
- 限定符:指定正则表达式的一个给定组件必须达到多少次才满足匹配条件
- 定位符:将正则表达式固定在行首或行尾,定位符用来描述字符串或单词的边界,如^、$分别指字符串的开始与结束,\b描述单词的前或后边界,\B表示非单词边界。

- 正则表达式模式

re模块常用函数
- match:尝试从字符串的起始位置匹配
- search:扫描整个字符串并返回第一个成功的匹配
[oldboy@node3 ~]$ python3
Python 3.7.4 (default, Mar 29 2020, 02:42:02)
[GCC 7.3.1 20180303 (Red Hat 7.3.1-5)] on linux
Type "help", "copyright", "credits" or "license" for more information.
>>> import re
>>> re.match('w*','www.google.com')
<re.Match object; span=(0, 3), match='www'>
>>> r = re.match('w*','www.google.com')
>>> r.group()
'www'
>>> re.match('com','www.google.com')
>>> re.search('com','www.google.com')
<re.Match object; span=(11, 14), match='com'>
>>> s = 'It is 2020-02-04'
>>> regx = '\d{4}-\d{1,2}-\d{1,2}'
>>> re.search(regx,s)
<re.Match object; span=(6, 16), match='2020-02-04'>
>>> import re
>>> lst = ["dog dot","do don't","dumb-dumb","no match"]
>>> for ele in lst:
...     m = re.match('(d\w+)\W(d\w+)',ele)
#dog和dot之间有空字符,dumb和dumb之间有-,所以w表示字母,+表示多个,W(大写)表示非字母
...     if m:
...         print(m.groups())
...
('dog', 'dot')
('do', 'don')
('dumb', 'dumb')

#group与groups比较
>>> m = re.match(r'(\w+)@(\w+)\.(\w+)','username@hackerrank.com')
>>> m.group()
'username@hackerrank.com'
>>> m.groups()
('username', 'hackerrank', 'com')
>>> m.group(0)
'username@hackerrank.com'
>>> m.group(1)
'username'
>>> m.group(2)
'hackerrank'
>>> m.group(3)
'com'
>>> m.group(1,2,3)
('username', 'hackerrank', 'com')
>>> m = re.match(r'(?P<user>\w+)@(?P<website>\w+)\.(?P<extension>\w+)','myname@hackerrank.com')
>>> m.groupdict()
{'user': 'myname', 'website': 'hackerrank', 'extension': 'com'}
- sub:用于替换字符串中的匹配项
>>> import re
>>> n = '2019-11-11'
>>> re.sub(r'\D','',n)
'20191111'
>>> s = 'It is 2020-11-11'
>>> re.sub('\d{4}-\d{1,2}-\d{1,2}','2021-02-01',s)
'It is 2021-02-01'
- compile:用于编译正则表达式,生成一个正则表达式(pattern)对象,供match()和search()函数使用
- findall:在字符串中找到正则表达式匹配的所有子窜,并返回一个列表;若没有找到匹配的,则返回空列表
>>> s = 'sdfjal2325jsdab-td908,700daog'
#查找数字
>>> re.findall('\d+',s)
['2325', '908', '700']
#查找非数字
>>> re.findall('\D+',s)
['sdfjal', 'jsdab-td', ',', 'daog']
#查找非数字和字母
>>> re.findall('\W+',s)
['-', ',']
#查找数字和字母
>>> re.findall('\w+',s)
['sdfjal2325jsdab', 'td908', '700daog']
- split:按照能够匹配的子串将字符串分割后返回列表
#split分割
>>> 'you need python'.split()
['you', 'need', 'python']
>>> value = 'one 1 two 2 three 3'
>>> result = re.split('\D+',value)#大写D表示已非数字作为分隔符
>>> result
['', '1', '2', '3']
>>> lang = 'life is short,you need python.'
>>> lang.split()
['life', 'is', 'short,you', 'need', 'python.']
>>> re.split('\W+',lang)#大写W表示非字母
['life', 'is', 'short', 'you', 'need', 'python', '']
>>> re.findall('\w+',lang)#小写w表示字母
['life', 'is', 'short', 'you', 'need', 'python']
日志模块logging
- 参考资料
- https://blog.csdn.net/pansaky/article/details/90710751
- https://www.cnblogs.com/xianyulouie/p/11041777.html
- https://www.cnblogs.com/liujiacai/p/7804848.html
- 日志是一种可以追踪某些软件运行时所发生时间的方法,部署项目时不可能直接将所有信息输出到屏幕,而是记录到日志文件中,方便追踪程序运行状况和故障排查
- logging模块默认的日志级别
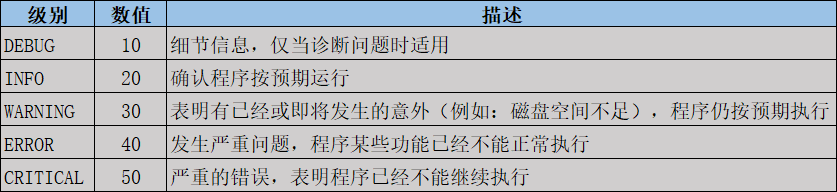
- 日志级别大小关系:CRITICAL > ERROR > WARNING > INFO > DEBUG > NOTSET
- logging日志常用函数
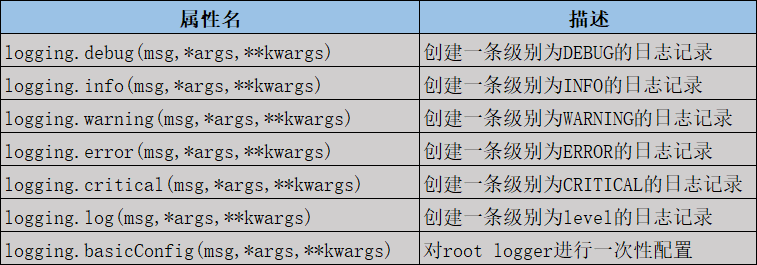
>>> import logging
>>> logging.warning("watch out!")
#warning级别,有自定义输出
WARNING:root:watch out!
>>> logging.info("I told you so.")
#info级别比warning级别低,故不输出
>>> logging.error("a big error")
ERROR:root:a big error
#只有级别是warning或以上的,才会输出;root是日志记录器的名称
示例1:使用logging提供的模块级别函数完成简单的日志记录
提示:只有级别大于或等于日志记录器指定级别的日志记录才会输出,小于该级别的日志记录将被丢弃
#!/usr/bin/env python
# -*- coding=utf-8 -*-
import logging

# logging.info("This is a info log.")
# logging.debug("This is a debug log.")
# logging.warning("This is a warning log.")
# logging.error("This is a error log.")
# logging.critical("This is a critical log.")
#等价于以下命令输出
logging.log(logging.DEBUG,"This is a info log.")#调用logging.log函数,参数内指定日志级别
logging.log(logging.INFO,"This is a debug log.")
logging.log(logging.WARNING,"This is a warning log.")
logging.log(logging.ERROR,"This is a error log.")
logging.log(logging.CRITICAL,"This is a critical log.")
#输出结果2
PS F:\PyProject\pyscripts\project1\mymodule> python .\logging_level.py
WARNING:root:This is a warning log.
ERROR:root:This is a error log.
CRITICAL:root:This is a critical log.
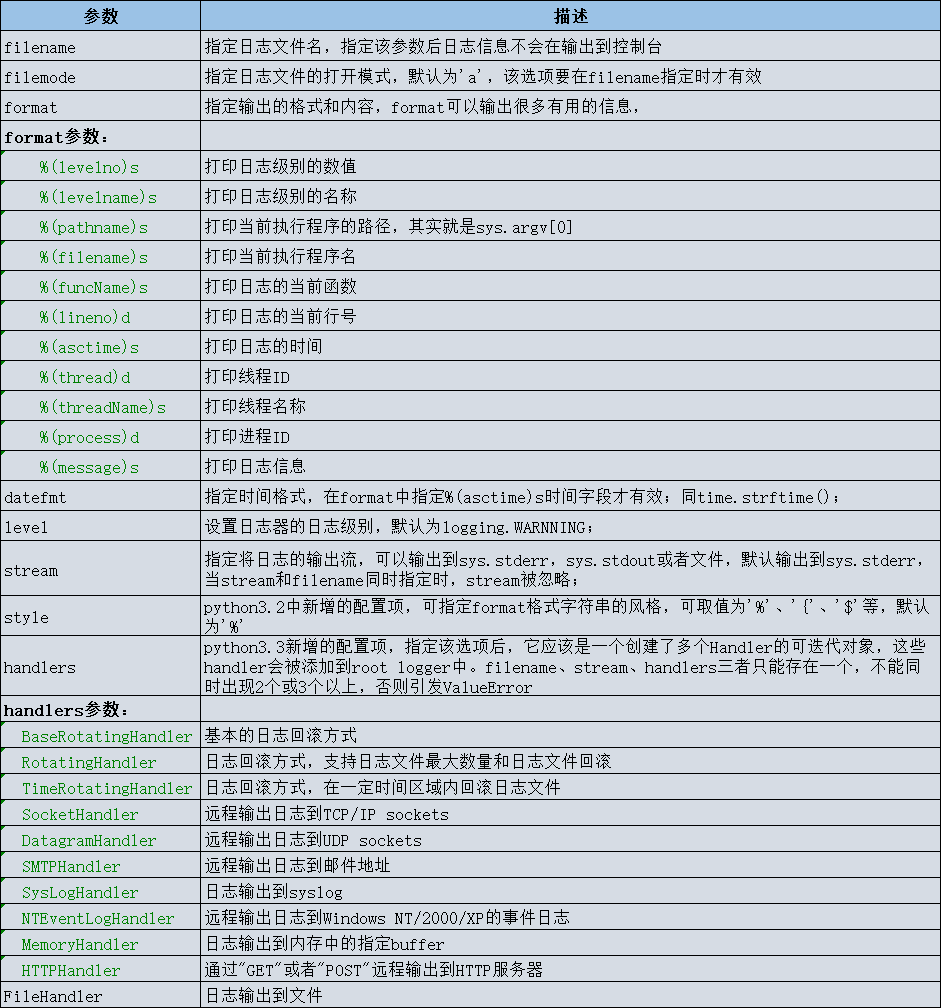
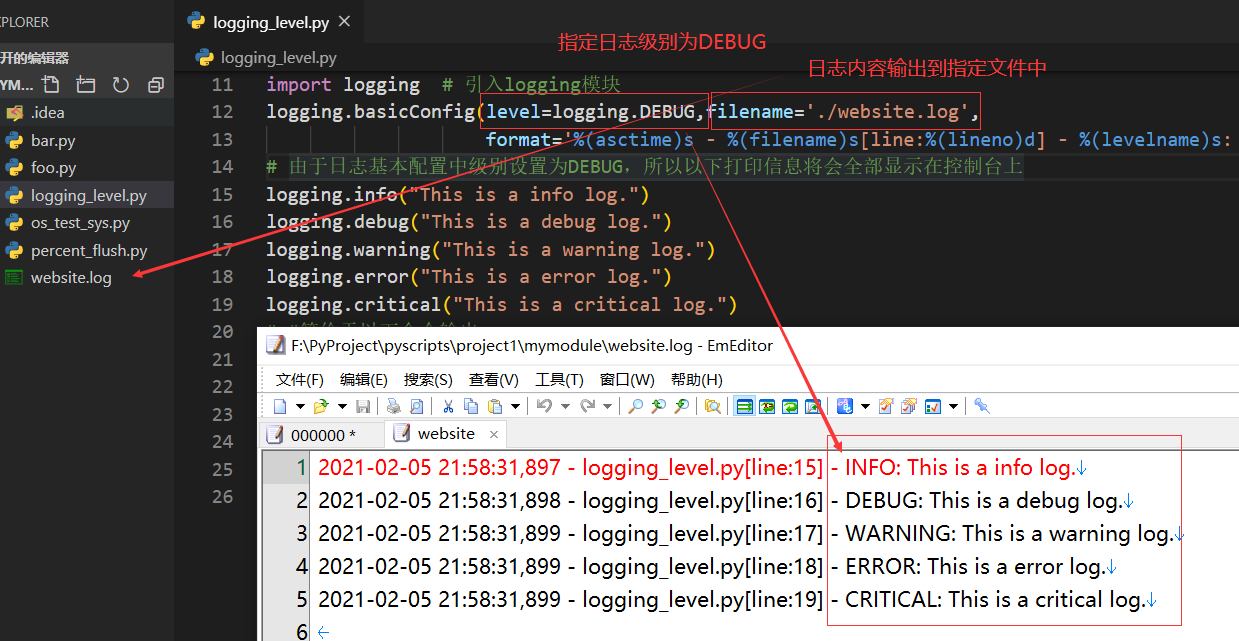
- 自定义输出日志格式
import logging  # 引入logging模块
logging.basicConfig(level=logging.DEBUG,
                    format='%(asctime)s - %(filename)s[line:%(lineno)d] - %(levelname)s: %(message)s')
# logging.basicConfig函数对日志的输出格式及方式做相关配置
# 由于日志基本配置中级别设置为DEBUG,所以一下打印信息将会全部显示在控制台上
logging.info("This is a info log.")
logging.debug("This is a debug log.")
logging.warning("This is a warning log.")
logging.error("This is a error log.")
logging.critical("This is a critical log.")

#输出结果
S F:\PyProject\pyscripts\project1\mymodule> python .\logging_level.py
2021-02-05 16:35:16,392 - logging_level.py[line:15] - INFO: This is a info log.
2021-02-05 16:35:16,397 - logging_level.py[line:16] - DEBUG: This is a debug log.
2021-02-05 16:35:16,397 - logging_level.py[line:17] - WARNING: This is a warning log.
2021-02-05 16:35:16,398 - logging_level.py[line:18] - ERROR: This is a error log.
2021-02-05 16:35:16,398 - logging_level.py[line:19] - CRITICAL: This is a critical log.
- 日志系统的基本配置
- logging.basicConfig(**kwargs)
- logging模块的四类组件

- Logger(日志器/记录器)
- 向程序代码提供了几种方法,以便程序在运行时可以记录消息
- 根据严重性(默认过滤工具)或过滤对象,确定要处理的日志消息
- 将相关的日志消息传递给所有感兴趣的日志处理程序
- 常用方法:
- 配置方法
- 消息发生方法
- Logger实例对象常用的配置方法
- 通过logger类实例化
- 常用logging.getLogger()

- Handler(处理器)
- (基于日志消息的level)将消息分发到handler指定的位置(文件、网络、邮件等)
- Logger对象可以通过addHandler()方法添加0个或多个handler对象
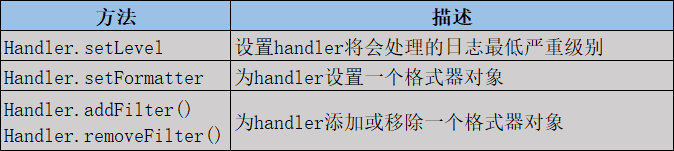
- Formatter(格式器)
- 用于配置日志信息的最终顺序、结构和内容
- Formatter类的初始化方法定义如下:
- logging.Formatter.__init__(fmt=None,datefmt=None,style='%')
- fmt:指定消息格式化字符串,默认为message的原始值
- datefmt:指定日期格式化字符串,默认为"%Y-%m%-d %H:%M:%S"。
- style:可取值为'%','{'和'$',默认你'%'。
- logging.Formatter.__init__(fmt=None,datefmt=None,style='%')
示例2:自定义日志对象,并灵活设置不同日志器的等级
官方文档:https://docs.python.org/zh-cn/3/howto/logging.html
import logging
import logging.handlers

# 创建一个日志器/记录器
logger = logging.getLogger('logger')

# 创建两个处理器
handler1 = logging.StreamHandler() # 将日志消息发送到输出到Stream,如标准输出
handler2 = logging.FileHandler(filename='./test.log') # 将日志消息发送到文件

# 设置日志器处理的日志信息的最低级别
logger.setLevel(logging.DEBUG)
# 设置处理器的日志信息的最低级别
handler1.setLevel(logging.WARNING)
handler2.setLevel(logging.DEBUG)

# 输出格式
formatter = logging.Formatter('%(asctime)s %(name)s %(levelname)s %(message)s')
handler1.setFormatter(formatter) # 不同处理器的输出格式
handler2.setFormatter(formatter)

# 设置日志器所使用的处理器,将同一条日志输出到不同位置
logger.addHandler(handler1)#按标准输出,显示到屏幕上
logger.addHandler(handler2)#输出到文件test.log中

# 注意,这里使用自定义的logger的输出方法,不要使用logging.debug()
logger.debug('This is a customer debug message')
logger.info('This is a customer info message')
logger.warning('This is a customer warning message')
logger.error('This is a customer error message')
logger.critical('This is a customer critical message')

#屏幕输出结果
PS F:\PyProject\pyscripts\project1\mymodule> python .\custom_log_output.py
2021-02-05 23:59:38,794 logger WARNING This is a customer warning message
2021-02-05 23:59:38,795 logger ERROR This is a customer error message
2021-02-05 23:59:38,795 logger CRITICAL This is a customer critical message
#文件输出结果

- 显示更复杂的日志格式
import logging

FORMAT = '%(asctime)-15s %(clientip)s %(user)-8s %(message)s'
logging.basicConfig(format=FORMAT)
d = {'clientip': '192.168.0.1', 'user': 'laoqi'}

logging.debug('This is a debug log.', extra=d)
logging.info('This is a info log.', extra=d)
logging.warning('This is a warning log.', extra=d)
logging.error('This is a error log.', extra=d)
logging.critical('This is a critical log.', extra=d)
#屏幕输出
PS F:\PyProject\pyscripts\project1\mymodule> python .\custom_log_output.py
2021-02-06 07:28:35,647 192.168.0.1 laoqi This is a warning log.
2021-02-06 07:28:35,647 192.168.0.1 laoqi This is a error log.
2021-02-06 07:28:35,648 192.168.0.1 laoqi This is a critical log.

 浙公网安备 33010602011771号