(GoRails )使用Vue.js制作拖拉list功能(v5-8)
视频5
改进视觉效果,让list看起来更舒服。新增横向滚动功能。
参考我的trello:https://trello.com/b/BYvCBpyZ/%E6%AF%8F%E6%97%A5%E8%AE%B0%E5%BD%95
board的CSS设计参考,内部list的设计参考。
不是很精通css:直接抄袭。
.board {
  white-space: nowrap;
  overflow-x: auto;
  overflow-y: hidden;
  margin-bottom: 8px;
  padding-bottom: 8px;
}

.list {
  background-color: #dfe3e6;
  border-radius: 3px;
  display:inline-block;
  vertical-align: top;
  width: 270px;
  padding: 10px;
  margin-right: 10px;
  height: 100%;
}

一个问题:✅。
新建的list,因为是空的,所以不能拖拉。
在list-card类上加一个min-height: 5px;
拖拉的时候需要把card拖动到空list最上方才行。不能是任意位置。
这是这个插件的局限,官方示例也是这样。
导致排列有些问题,可以用HTML5原生拖拽代替sortable。
网上一篇相关文章https://segmentfault.com/a/1190000010078042 讲到了这个矛盾
一个错误,箭头函数带{}的话,不要省略return:
const index = this.lists.findIndex((list) => {list.id == list_id})
这是❌的不能省略return
正确的写法:
const index = this.lists.findIndex((list) => {
    return list.id == list_id
})
或者
const index = this.lists.findIndex( list => list.id == list_id)
视频6
最重要的一章:重构--子组件subcomponents.
This is basically what you're doing with Vuex, but we're going to be building it from scratch so you can see how all of that works and why you want to sort this stuff like so.
a global data store 。
window object代表了在一个浏览器内打开的窗口。

所有的全局JavaScript对象,函数,变量自动的成为这个window object的members.

1.全局变量是properties特性
2.全局函数是methods
3.甚至document对象是一个window对象的特性,
  平时写的document.getElementById('xxx'),其实省略了前面的window

既然是全局对象,所以可以添加key/value对儿。

比如: window.store = {} ,这是全局变量,用于全局数据存储。
目的:是拆分出子组件
第一步:改变数据接收方式:用全局变量,替代data选项中的lists
1. 用window.store = {} 存储从DOM中"#boards"根元素的的data-lists数据。
window.store.lists = JSON.parse(element.dataset.lists)
初始化vue中的data选项,被改为全局对象window中的变量store。
data: window.store就是:data: {lists: Array(4)}
也可以这么写data: {lists: window.store.lists} 基本是一样的。
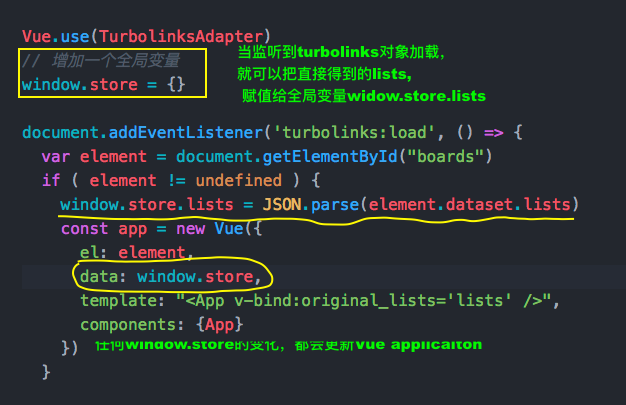
因为初始化的data都是响应方式的,Vue.js可以监听它的变化。
所以在控制台:widow.store.lists.push({name: '再加一列'}),会直接渲染页面增加这列。
利用控制台,可以debugger,或者其他都是响应方式的,非常方便。
之后我们的子组件,也可以响应window.store中的数据,因为它是全局对象。
2. 新建list.vue单文件组件,作为一个子组件使用。
mkdiar app/javascript/component
touch app/javascript/component/list.vue
然后把app.vue的代码粘贴过去。
- 首先:粘贴<template>,
- 然后对<script>进行修改。
- 最后把<style>从父组件移动到子组件(建议)
1.移动template:
app.vue中,需要在<script>内 import list from 'component/list', 然后在 export default { components: { ..., list }, ...}
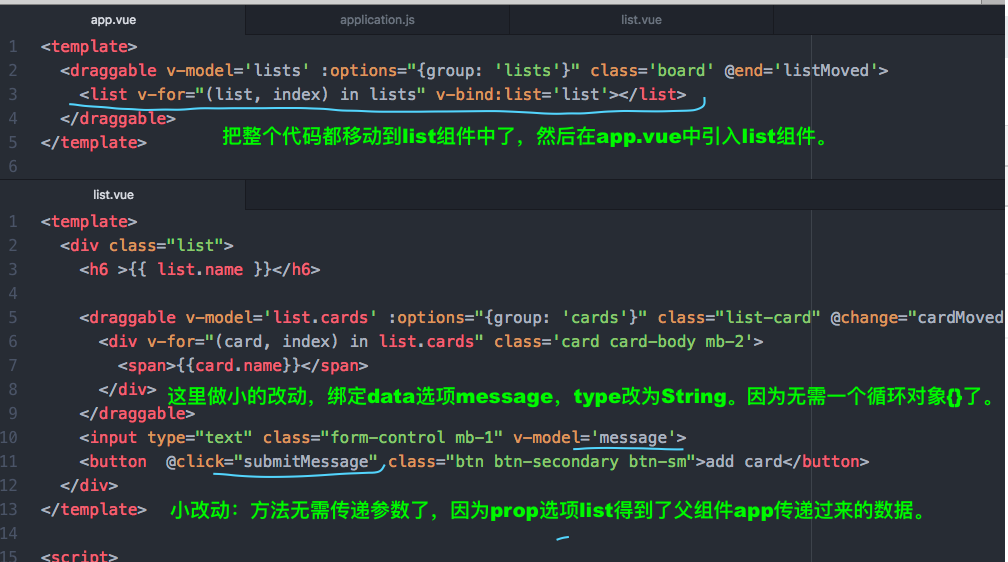
2.<script>修改:

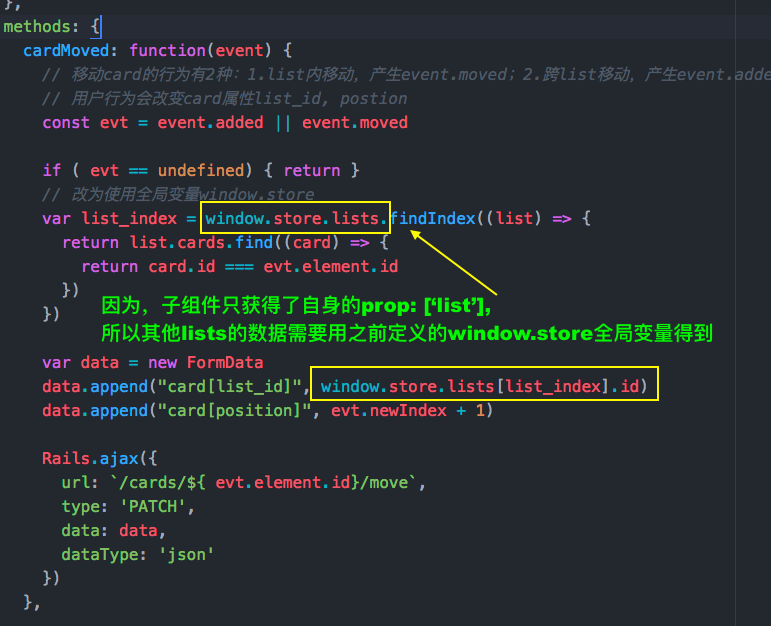
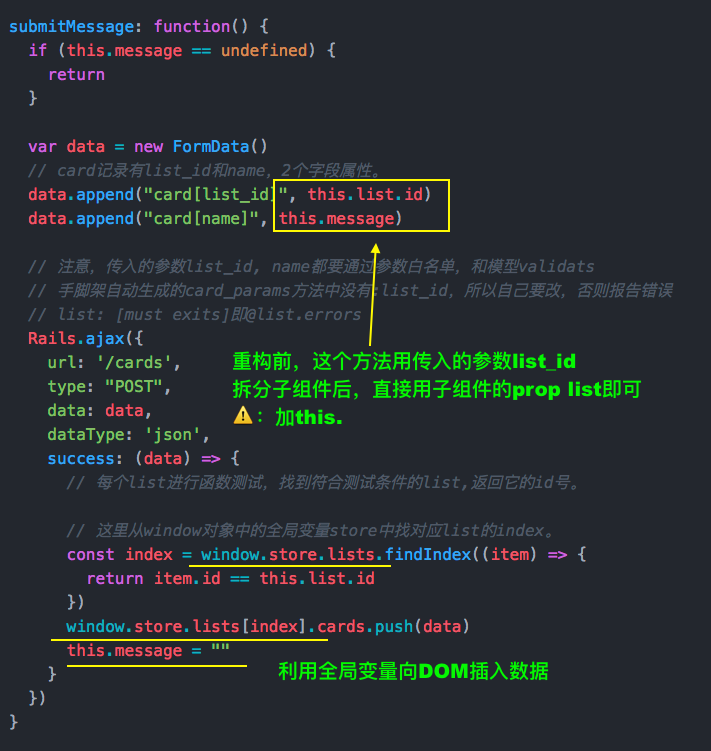
3.method: 方法内的数据来源需要变更。
- 重构前,在app.vue中,可以直接使用data选项中的lists
- 拆分子组件后, 使用全局变量window.store.lists获得相应的数据。
4. 增加一个功能:显示/隐藏 输入框
- 点击add a card 链接,
- 显示输入框和add card按钮以及cancel按钮,
- 同时自动聚焦到输入框。

<template>
<a v-if="!editable" @click="inputMessage">add a card</a>
    <div v-if="editable">
      <input type="text" class="form-control mb-1" v-model='message' ref='input'>
      <button  @click="submitMessage" class="btn btn-secondary btn-sm">add card</button>
      <span @click="editable = false">cancel</span>
    </div>
<script>
    data: function() {
      return {
        message:"",
        editable: false
      }
    },
    methods: {
      inputMessage: function() {
        this.editable = true,
        this.$nextTick(function() {
          this.$refs.input.focus()
        })
      },
特性ref, 可以为子组件实例/元素生成一个id引用。这个id引用储存在父组件的$refs上。
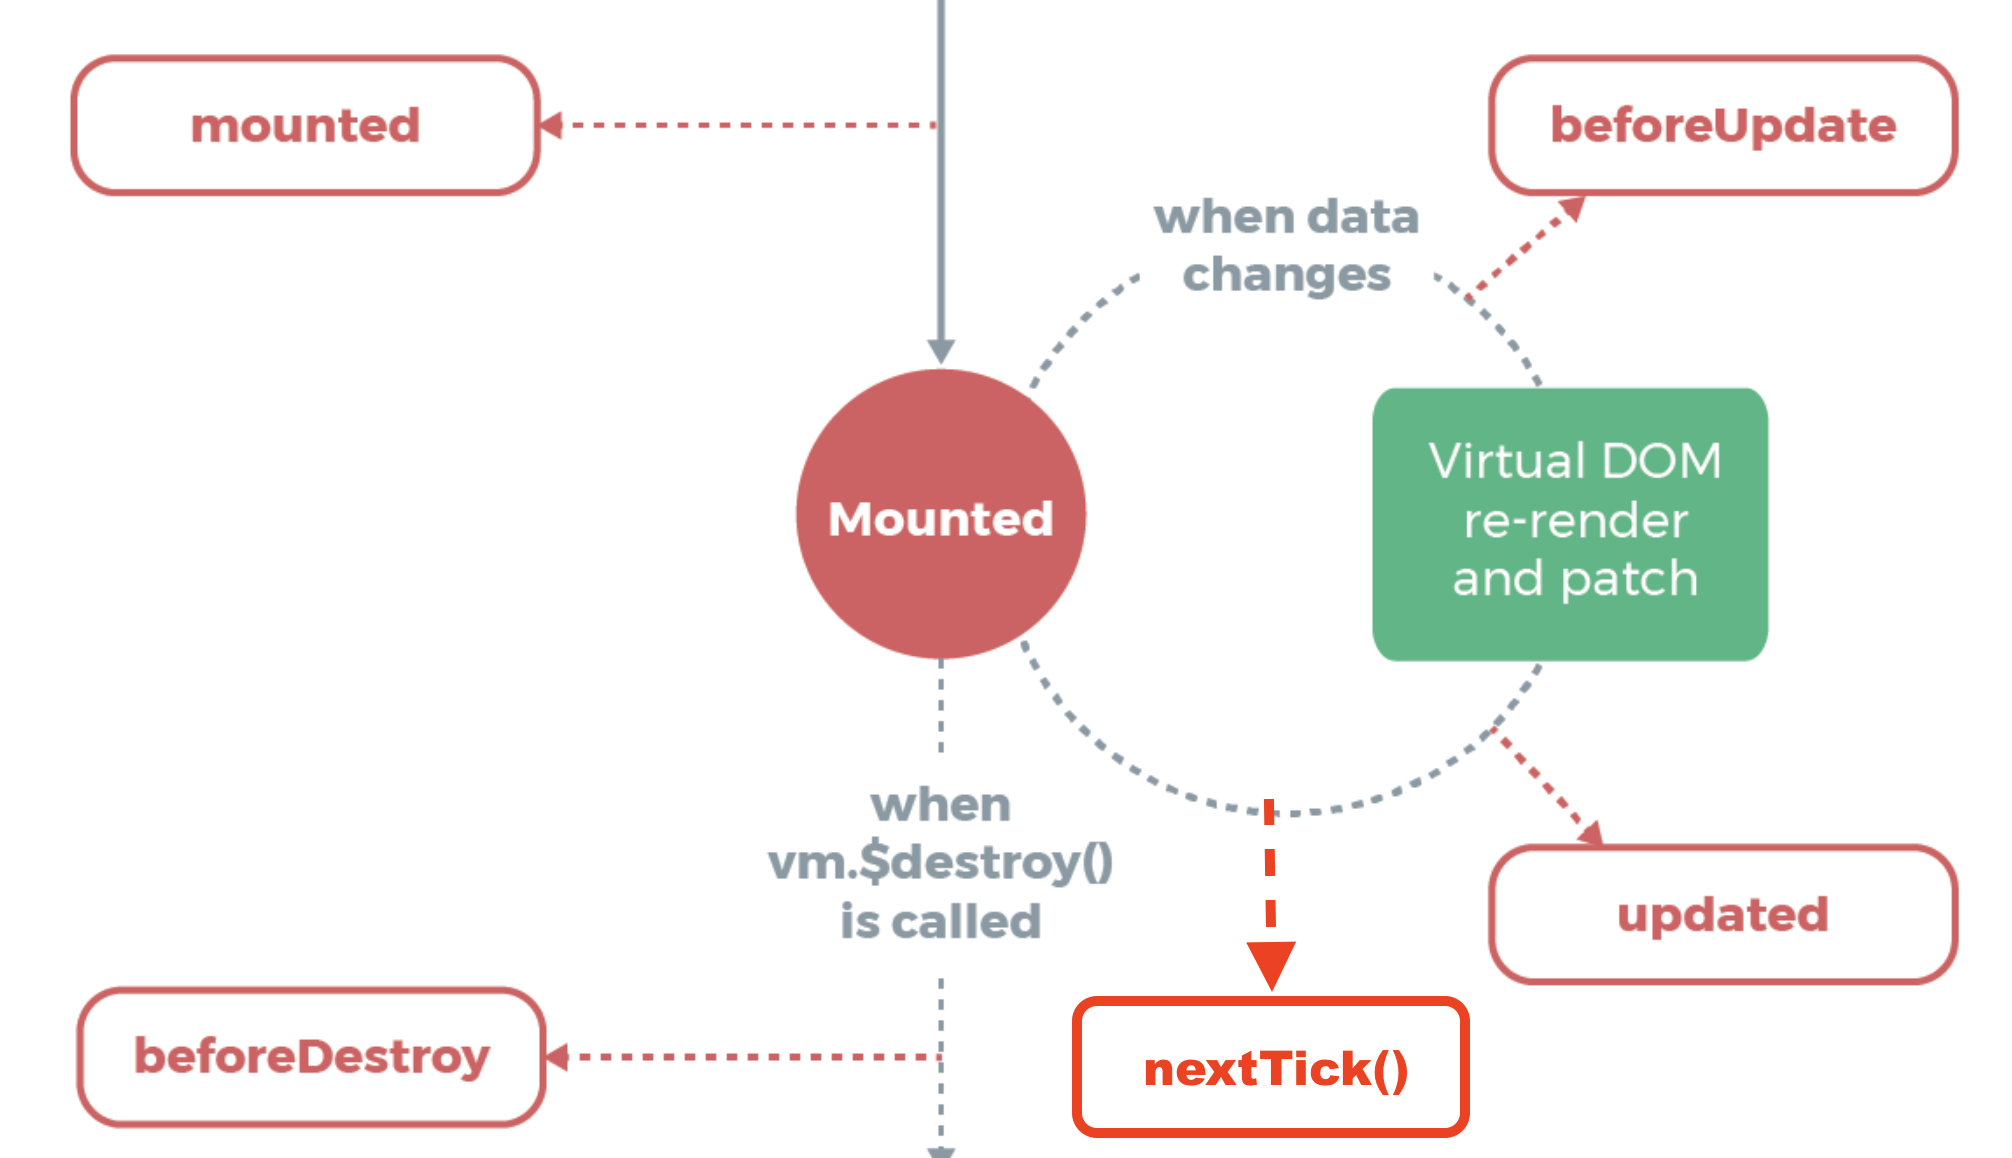
实例方法/生命周期:vm.$nextTick([callback])
参数是:function回调函数
将回调函数延迟到下次DOM更新♻️之后执行。
在修改数据之后立刻使用它,然后等待DOM更新。DOM更新后,执行回调函数。
和全局方法Vue.nextTick用法一样
// 修改数据
vm.msg = 'Hello'
// DOM 还没有更新
Vue.nextTick(function () {
  // DOM 更新了
})

// 作为一个 Promise 使用 (2.1.0 起新增,详见接下来的提示)
Vue.nextTick()
  .then(function () {
    // DOM 更新了
  })
区别: 实例方法的回调的this自动绑定到使用它的实例上。
关键字“this"一般指向当前代码运行时的对象(the current object the code is being written inside).
new Vue({
  // ...
  methods: {
    // ...
    example: function () {
      // 修改数据
      this.message = 'changed'
      // DOM 还没有更新
      this.$nextTick(function () {
        // DOM 现在更新了
        // `this` 绑定到当前实例
        this.doSomethingElse()
      })
    }
  }
})
![]()
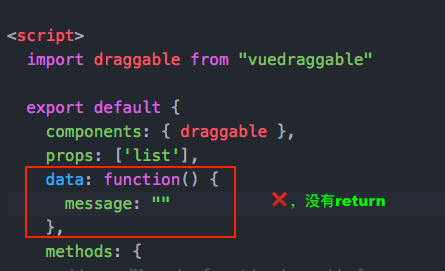
一个错误❌

组件中的data选项,必须使用函数。⚠️需要加上return {xxx}
![]()
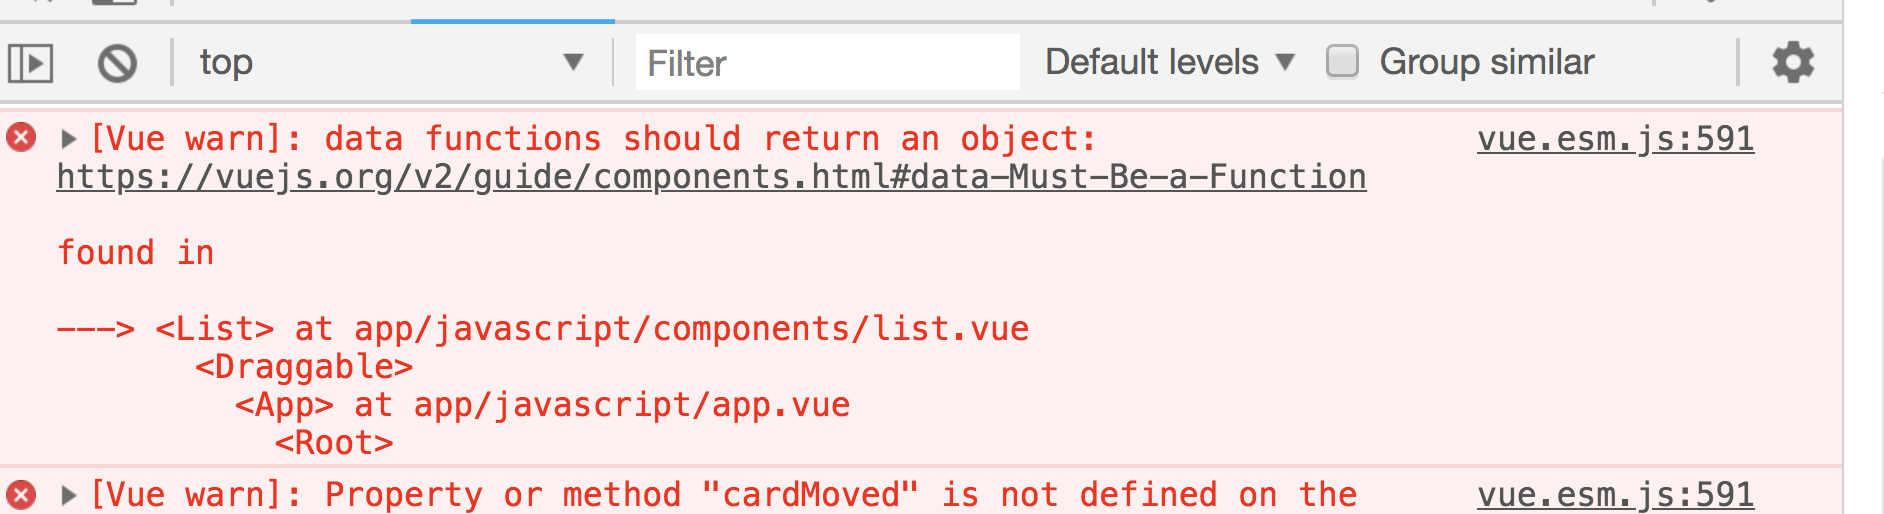
data functions should return an object
![]()
视频7
- 增加card组件,新增modal弹窗。
- 更新cards(save changes)。
- 创建新的lists. add a list
- 最后是❌的备注, 忘记了this,箭头函数作用域问题。
- 知识点: classList.contain()方法。
点击一个card, 打开这个模式窗口来更新card内容。可以打开和关闭这个窗口。
1. 改list.vue的模版
    <draggable v-model='list.cards' :options="{group: 'cards'}" class="list-card" @change="cardMoved">
       //改成 使用card 组件。无需使用index了, 增加prop card,数据绑定为遍历循环的card
    <card v-for="card in list.cards" v-bind:card='card'></card>
      //删除:👇
      <div v-for="(card, index) in list.cards" class='card card-body mb-2'>
        <span>{{card.name}}</span>
      </div>
2.在list.vue的 <scritp>中
import card from 'components/card'

export default {
    components: { draggable, card },
3. 新增components/card.vue
<template>
  <div class="card card-body mb-3">
    {{ card.name }}
  </div>
</template>

<script>
  export default {
    props: ["card"],
    data: function() {
      return {
        editing: false   #用于打开/关闭 card界面窗口,以及class特效。
      }
    }
  }
</script>
4. 加上bootstrap4的modal组件
使用data选项中的 editing属性来显示/隐藏 modal,需要熟悉这个bootstrap组件。
增加2个方法:
- closeModal()用于点击modal周边,关闭modal。
- save(),保存modal中的修改。
1.closeModal方法:
closeModal的触发效果是根据event目标元素,是否有某个class来决策。
这里用到event.target.classList.contain("modal")
2. save方法:
返回响应的数据,要放入window.store中,Vue实例会自动监听到数据的变化。
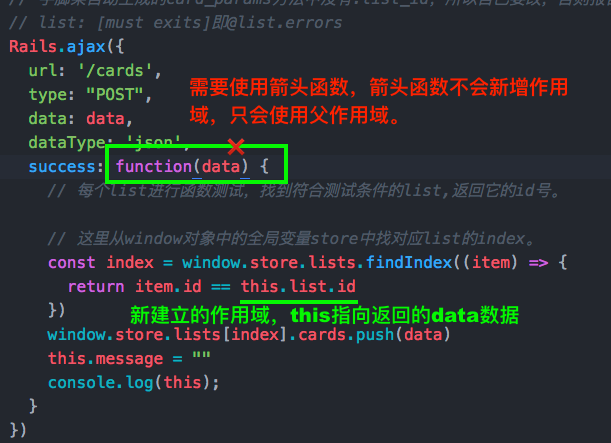
如果不使用箭头函数的话,this不会指向父作用域,这样就很麻烦,见⬇️:
      save: function() {
1. 确定要上传数据库的数据。
        var data = new FormData
        data.append("card[name]", this.name)
        const list_id = this.list.id
        const card_id = this.card.id

2. 进行请求:
        Rails.ajax({
          url:`/cards/${card_id}`,
          type: "PATCH",
          data: data,
          dataType: 'json',
          success: function(data) {
3. 设计响应,修改DOM。这里没有使用箭头函数,所以没有使用this.
            // console.log(this); 这里的this指当前函数本身,不是父作用域,this代表本身。
            // 要使用父作用域this,需要使用fat arrow函数。
            const list_index = window.store.lists.findIndex((item) => {
              return item.id === list_id
            })
            const cardIndex = window.store.lists[list_index].cards.findIndex((item) => {
              return item.id === card_id
            })
            window.store.lists[list_index].cards.splice(cardIndex, 1, data)
          }
        })
        this.editing = false
      },
<template>
<div>
<div v-on:click='editing = true' class="card card-body mb-3">
{{ card.name }}
</div>
<!-- 通过editing,来决定是否加载这个div,连带2个类, -->
<div v-if='editing' class="modal-backdrop show"></div>
<div v-if='editing' @click='closeModal' class="modal show" style="display: block">
<div class="modal-dialog modal-dialog-centered ">
<div class="modal-content">
<div class="modal-header">
<h4 class="modal-title">{{ card.name }}</h4>
</div>
<div class="modal-body">
<input v-bind:value='name' @input="name = $event.target.value" class="form-control"></input>
</div>
<div class="modal-footer">
<button @click="save" type="button" class="btn btn-primary">Save changes</button>
</div>
</div>
</div>
</div>
</div>
</template>
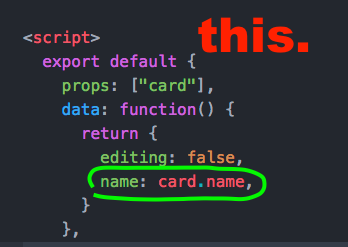
<script>
export default {
props: ["card"],
data: function() {
return {
editing: false,
name: this.card.name,
}
},
methods: {
// classList 属性, 得到元素的类的列表,一个对象DOMTokenList(2)
closeModal: function(event) {
if (event.target.classList.contains("modal")) {
this.editing = false
}
},
save: function() {},
}
}
</script>
5. 新增一个add a list 放置在右边栏。
和添加一个card的代码相同。直接复制到app.vue的模版中:
    <a v-if="!editable" @click="inputMessage">add a card</a>
    <div v-if="editable">
      <input type="text" class="form-control mb-1" v-model='message' ref='input'>
      <button @click="submitMessage" class="btn btn-secondary btn-sm">add card</button>
      <a @click="editable = false">cancel</a>
    </div>
然后,把card改为list。并把list.vue中的.list类放到app.vue中。为<div>元素添加一个.list。
再后,添加方法,也是直接复制粘贴过来,并做一些简单修改。
⚠️:需要测试,发现不能添加card:
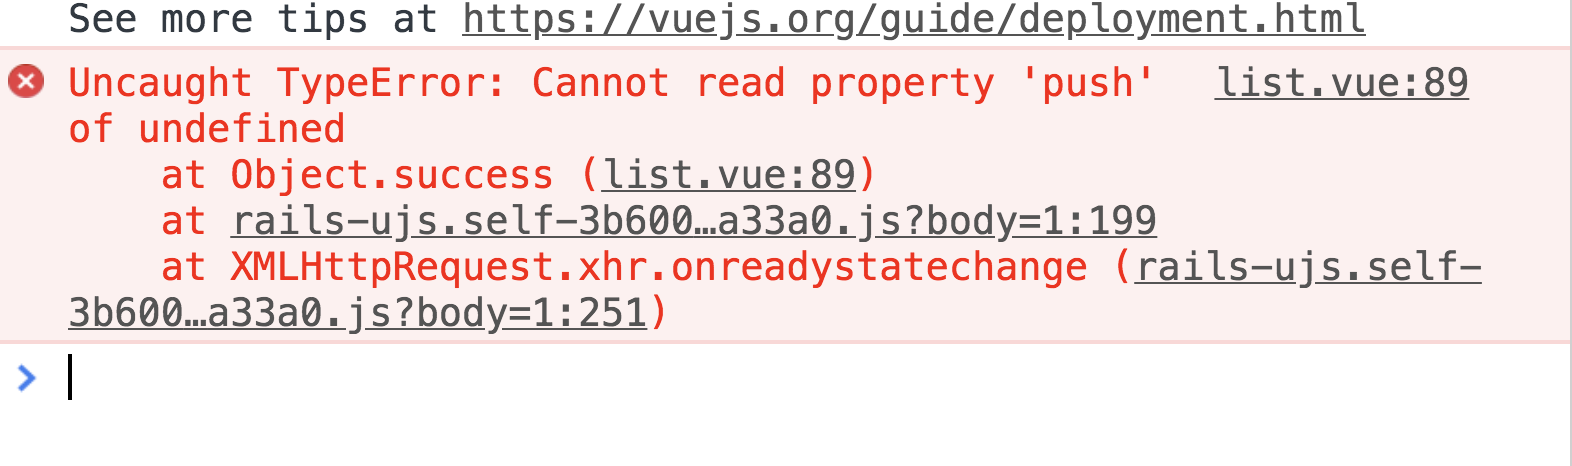
这是因为响应返回的JSON对象没有包括cards,我们需要编辑JSON模版,把cards数组加进去。
he JSON object that we get back from rails doesn't actually include the cards by default, so we need to go and edit that JSON template to include the cards array
可以通过在检查器上输入window.store.lists查看最后添加的list,并没有cards数组!
在_list.json.jbuilder中加上:cards
json.extract! list, :id, :name, :position, :created_at, :updated_at, :cards
在浏览器输入http://localhost:3000/lists/22.json可以看到返回的JSON数据。
视频8,最后使用vuex进行状态管理
1. 安装yarn add vuex
2. 把插件加入到application.js。提示:用import Vuex from 'vuex'和Vue.use(vuex)
很简单,这就安装好了。
使用Vuex.Store实例对lists进行状态管理
 1 window.store = new Vuex.Store({
 2    state: {
 3      lists: []
 4    },
 5
 6    mutations: {
 7      addList(state, data){},
 8      addCard(state, data){},
 9      editCard(state, data){}
10    }
11 })
组件不使用props得到list数据,改用computed属性中的lists:
  computed: {
    lists() {
      return this.$store.state.lists;
    }
  },
对list的增加,card的增加|修改,使用mutations:
window.store = new Vuex.Store({
  state: {
    lists: []
  },

  mutations: {
    addList(state, data) {
      state.lists.push(data)
    },
    addCard(state, data) {
      const index = state.lists.findIndex((item) => {
        return item.id == data.list.id
      })
      state.lists[index].cards.push(data)
    },
    editCard(state, data) {
      const list_index = state.lists.findIndex((item) => {
        return item.id === data.list.id
      });
      const cardIndex = state.lists[list_index].cards.findIndex((item) => {
        return item.id === data.id
      });
      state.lists[list_index].cards.splice(cardIndex, 1, data);
    }
  }
})

同时修改各个methods属性中的函数。
新功能:为card添加了一个属性text:
在card.vue上添加:
          <div class="modal-body">
            <label>{{ text }}</label>  //这是响应式的属性text.
            <textarea v-bind:value='text' @input="text = $event.target.value" class="form-control"></textarea>
          </div>
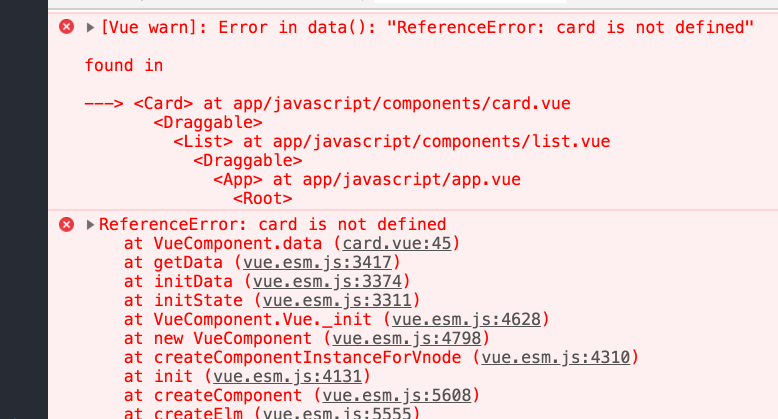
报告❌

谷歌了一下,猛然想起来text必须是响应方式的,需要在data属性中加上text: this.card.text
一个问题,弹出的对话框是可以被拖动的!?
New list标签:使用draggable: false可以让标签不能被拖动,(默认img,a都可以被拖动。)
<%= link_to('New List', new_list_path, html_options = {draggable:"false"} )%>
解决:
Vue.draggable中的options选项有相关的设置。用filter: '.ignore-element'过滤掉不想被拖动的元素。
视频9.23:增加一个channel。
开多个窗口,可以同步behavior带来的内容改变。
1. rails g channel Board
2. 在board_channel.rb中:
  def subscribed
    stream_from "board"
  end

  def unsubscribed
    stop_all_streams
  end
3.在connection.rb中:
如果使用了devise, 则可以使用env['warden']
  class Connection < ActionCable::Connection::Base
    identified_by :current_user

    def connect
      self.current_user = find_verified_user
      logger.add_tags "ActionCable", "User #{current_user.id}"
    end

    protected

    def find_verified_user
      if current_user = env['warden'].user
        current_user
      else
        reject_unauthorized_connection
      end
    end
  end
4. board.coffee:添加对接受的数据的处理:
store.commit("名字", 数据对象)
  received: (data) ->if data.commit
      window.store.commit(data.commit, JSON.parse(data.payload))
5.在lists_controller.rb中,create方法内:
添加频道“board”, 发送的数据是一个对象{commit: 'XXX', payload: ...}.
通过commit属性的值来决定vuex中要提交的方法是什么。
    respond_to do |format|
      if @list.save
        ActionCable.server.broadcast "board",
      { commit: 'addList', payload: render_to_string(:show, format: :json)}
6. 删除app.vue文件中的对应的store.commit语句
this.$store.commit('addList', data)
7. Vuex.Store实例中的mutations属性中的方法addCard, editCard,对应list.vue和card.vue中的方法。和改app.vue中的方法一样。略。
8. 让移动list/card,也是跨浏览器响应的,直接在controller#move上修改:
(❌,不管用!)
移动list时:遇到错误❌
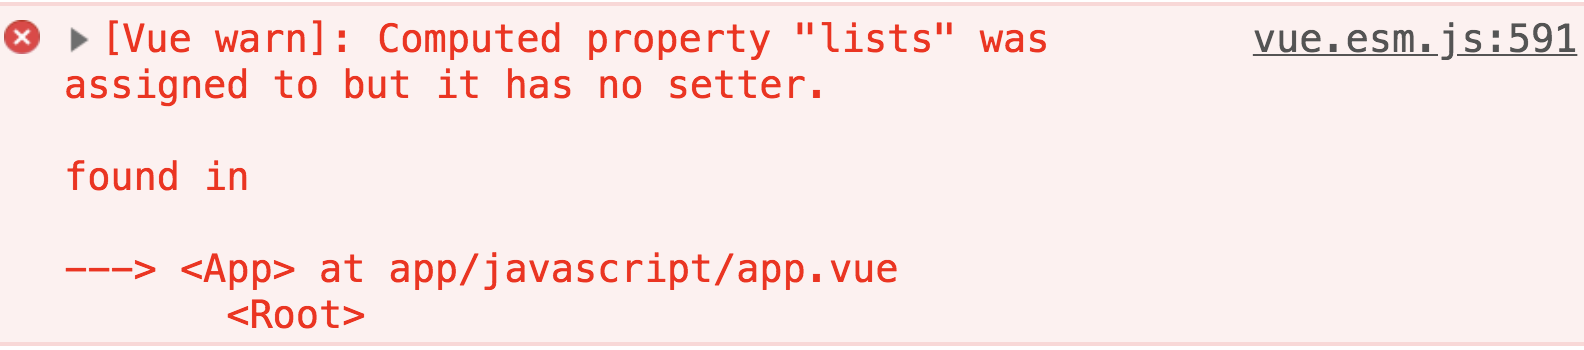
修改computed
1. getter和setter是数据对象的一种存取方式,必须成对儿出现
2. { [key: string]: Function | { get: Function, set: Function } }
  computed: {
    lists: {
      get() {
        return this.$store.state.lists
      },
      set(value) {
        return this.$store.state.lists = value
      }
    }
  },
移动card时,遇到❌:
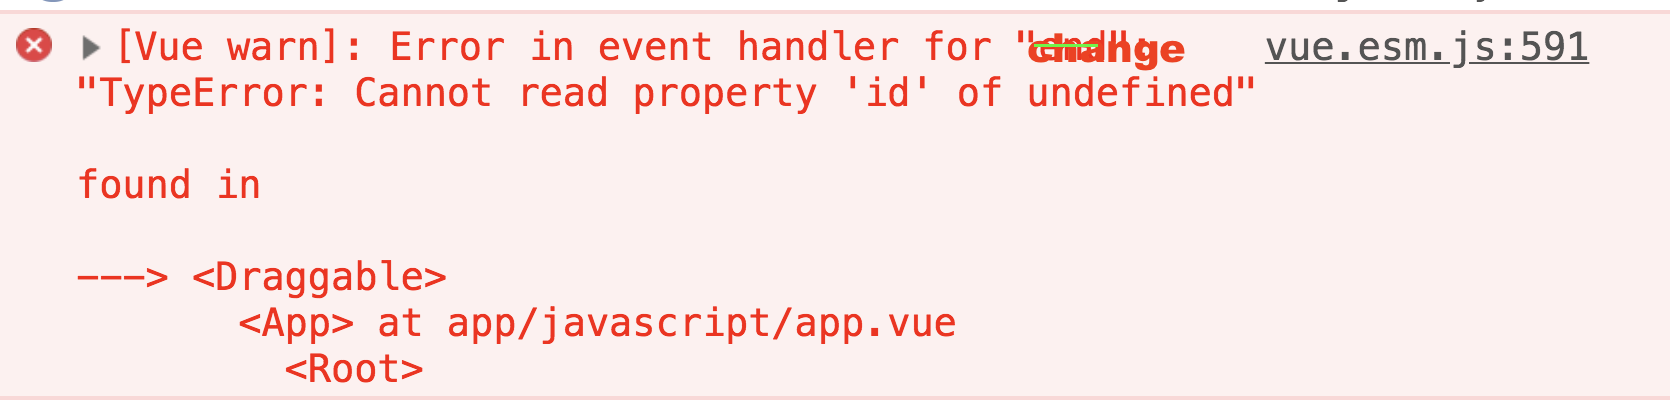
Error in event handler for change
其实是改用vuex后,新增的bug。需要在window.store.lists中的store后面插入.state

一个错误,没有加上this. this指当前对象。
另一个错误❌,箭头fat arrow函数和传统函数的区别:
使用箭头函数,不会绑定当前作用域,会继承父作用域。所以this是父作用域。
而传统函数function() {},this就是引用这个函数的对象,或本身。
比如创建一个新函数,就会创建一个新的作用域。
知识点:HTML DOM classList Property (点击看api)
返回元素的class names, 返回的是一个DOMTokenList 对象。
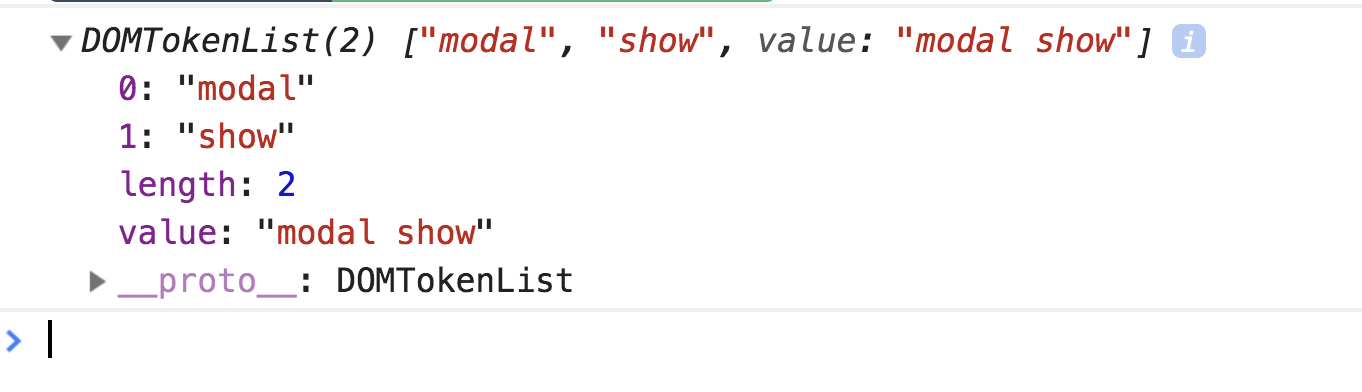
用途: 在一个元素上,add(), remove(), toggle(class, true|false) CSS类
方法:
contains("class name"): 返回一个布林值。判断是否有一个class类。
早期版本可以使用className属性代替,返回字符串。
增加一个class :
document.getElementById("myDIV").className += "newClassName";

 浙公网安备 33010602011771号