【译】Spring 4 自动装配、自动检测、组件扫描示例
前言
在本篇文章我们会看到Spring是如何通过component-scanning配置,在没有使用@Bean和自动检测到程序中配置的bean,并且自动装配这些bean。@Configuration声明bean,也没有使用XML配置声明bean的情况下,
对于component-scanning的配置,本文将使用,当然,我们也会提供一份对应的XML配置来作为比较。@ComponentScan注解
我们将创建一个典型的企业级应用示例,涉及不同的层(Service、DAO)。
涉及的技术及开发工具
- Spring 4.0.6.RELEASE
- Joda-time 2.3
- Maven 3
- JDK 1.6
- Eclipse JUNO Service Release 2
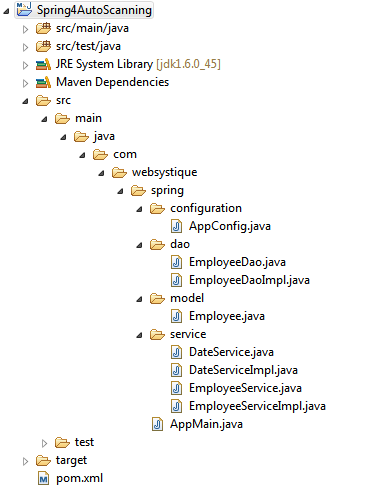
工程结构目录
如下是本工程的目录结构
接下来开始往上面添加具体内容。
步骤一:往pom.xml添加Spring依赖
<project xmlns="http://maven.apache.org/POM/4.0.0" xmlns:xsi="http://www.w3.org/2001/XMLSchema-instance"
  xsi:schemaLocation="http://maven.apache.org/POM/4.0.0 http://maven.apache.org/xsd/maven-4.0.0.xsd">
  <modelVersion>4.0.0</modelVersion>

  <groupId>com.websystique.spring</groupId>
  <artifactId>Spring4AutoScanning</artifactId>
  <version>1.0.0</version>
  <packaging>jar</packaging>

  <name>Spring4AutoScanning</name>
    <properties>
        <springframework.version>4.0.6.RELEASE</springframework.version>
        <joda-time.version>2.3</joda-time.version>
    </properties>

    <dependencies>
        <!--  Spring -->
        <dependency>
            <groupId>org.springframework</groupId>
            <artifactId>spring-core</artifactId>
            <version>${springframework.version}</version>
        </dependency>
        <dependency>
            <groupId>org.springframework</groupId>
            <artifactId>spring-context</artifactId>
            <version>${springframework.version}</version>
        </dependency>

        <!-- Joda-Time -->
        <dependency>
            <groupId>joda-time</groupId>
            <artifactId>joda-time</artifactId>
            <version>${joda-time.version}</version>
        </dependency>

    </dependencies>
    <build>
        <pluginManagement>
            <plugins>
                <plugin>
                    <groupId>org.apache.maven.plugins</groupId>
                    <artifactId>maven-compiler-plugin</artifactId>
                    <version>3.2</version>
                    <configuration>
                        <source>1.6</source>
                        <target>1.6</target>
                    </configuration>
                </plugin>
            </plugins>
        </pluginManagement>
    </build>

</project>
这个示例,我们使用了Spring-core和Spring-context依赖,另外,还使用了JodaTime的LocalDate类来做一些日期计算,所以引入了joda-time依赖。
步骤二:创建Spring配置类
Spring配置类是用@Configuration注解标注的,这些类包含了用@Bean注解标注的方法,这些方法生成bean会交给Spring容器来管理。
package com.websystique.spring.configuration;

import org.springframework.context.annotation.ComponentScan;
import org.springframework.context.annotation.Configuration;

@Configuration
@ComponentScan(basePackages = "com.websystique.spring")
public class AppConfig {

}
你可能注意到上面的类是空的,没有使用@Bean标注的方法,那么bean从哪里产生呢?
事实上,我们使用了@ComponentScan注解,来帮助我们自动检测bean
@ComponentScan(basePackages = "com.websystique.spring")
@ComponentScan注解的basePackages属性是一个包名,配置好后,将会在该包下查找所有使用特定注解标注的类,作为bean。
如下是一些常见的注解,被这些注解标注的类是一个bean,将会被自动检测
@Repository - 作为持久层的DAO组件.
@Service - 作为业务层的Service组件.
@Controller - 作为展现层的Controller组件.
@Configuration - Configuration组件.
@Component - 通用注解, 可以作为以上注解的替代.
注意上面的注解内部都是用@Component标注的,所以实际上你可以在任何地方使用@Component, 但是为了表达更加清晰的设计意图,强烈建议根据不同情况使用不同的注解。
注意:在我们这里例子,你甚至可以直接删除配置类因为它并没有包含任何@Bean注解标注的方法,在后面的main方法里我们将会看到在这种情况下是如何扫描这些Bean。
另外,看下使用XML配置的情况,结果如下(命名为app-config.xml)
<beans xmlns="http://www.springframework.org/schema/beans"
    xmlns:xsi="http://www.w3.org/2001/XMLSchema-instance"
    xmlns:context="http://www.springframework.org/schema/context"
    xsi:schemaLocation="http://www.springframework.org/schema/beans http://www.springframework.org/schema/beans/spring-beans-4.0.xsd
    http://www.springframework.org/schema/context http://www.springframework.org/schema/context/spring-context-4.0.xsd">

    <context:component-scan base-package="com.websystique.spring" />

</beans>
步骤三:创建DAO层的类
package com.websystique.spring.dao;

import com.websystique.spring.model.Employee;

public interface EmployeeDao {

    void saveInDatabase(Employee employee);
}
package com.websystique.spring.dao;

import org.springframework.stereotype.Repository;

import com.websystique.spring.model.Employee;

@Repository("employeeDao")
public class EmployeeDaoImpl implements EmployeeDao{

    public void saveInDatabase(Employee employee) {

        /*
         * Logic to save in DB goes here
         */
        System.out.println("Employee "+employee.getName()+" is registered for assessment on "+ employee.getAssessmentDate());

    }

}
@Repository注解标注该类作为一个持久层自动检测的bean,参数employeeDao为bean提供了一个名字,我们将会在主服务Bean里注入该bean。
步骤四:创建Service层类
package com.websystique.spring.service;

import org.joda.time.LocalDate;

public interface DateService {

    LocalDate getNextAssessmentDate();
}
package com.websystique.spring.service;

import org.joda.time.LocalDate;
import org.springframework.stereotype.Service;

@Service("dateService")
public class DateServiceImpl implements DateService{

    public LocalDate getNextAssessmentDate() {
        return new LocalDate(2015,10,10);
    }

}
@Service注解标注这个类为业务层自动检测的bean,后续我们会将其注入到主服务bean中。
package com.websystique.spring.service;

import com.websystique.spring.model.Employee;

public interface EmployeeService {

    void registerEmployee(Employee employee);
}
package com.websystique.spring.service;

import org.springframework.beans.factory.annotation.Autowired;
import org.springframework.stereotype.Service;

import com.websystique.spring.dao.EmployeeDao;
import com.websystique.spring.model.Employee;

@Service("employeeService")
public class EmployeeServiceImpl implements EmployeeService{

    @Autowired
    private DateService dateService;

    @Autowired
    private EmployeeDao employeeDao;


    public void registerEmployee(Employee employee) {
        employee.setAssessmentDate(dateService.getNextAssessmentDate());
        employeeDao.saveInDatabase(employee);
    }

}
EmployeeService是我们的主服务类,可以看到,我们往这个类注入了DateService和EmployeeDao。被@Autowired注解标注的dateService属性,会被Spring的依赖注入自动装配合适的Bean,由于我们已经使用@Service声明了一个DateService Bean,所以该Bean将会被注入到这里。类似的,被@Repository标注的EmployeeDao也会被注入到employeeDao属性中。
如下是我们的实体类Employee
package com.websystique.spring.model;

import org.joda.time.LocalDate;

public class Employee {

    private int id;

    private String name;

    private LocalDate assessmentDate;

    public int getId() {
        return id;
    }

    public void setId(int id) {
        this.id = id;
    }

    public String getName() {
        return name;
    }

    public void setName(String name) {
        this.name = name;
    }

    public LocalDate getAssessmentDate() {
        return assessmentDate;
    }

    public void setAssessmentDate(LocalDate assessmentDate) {
        this.assessmentDate = assessmentDate;
    }

    @Override
    public String toString() {
        return "Employee [id=" + id + ", name=" + name + ", assessmentDate="
                + assessmentDate + "]";
    }

}
步骤五:创建main方法运行该程序
package com.websystique.spring;

import org.springframework.context.annotation.AnnotationConfigApplicationContext;
import org.springframework.context.support.AbstractApplicationContext;

import com.websystique.spring.configuration.AppConfig;
import com.websystique.spring.model.Employee;
import com.websystique.spring.service.EmployeeService;

public class AppMain {

    public static void main(String args[]){
        AbstractApplicationContext  context = new AnnotationConfigApplicationContext(AppConfig.class);

        EmployeeService service = (EmployeeService) context.getBean("employeeService");

        /*
         * Register employee using service
         */
        Employee employee = new Employee();
        employee.setName("Danny Theys");
        service.registerEmployee(employee);

        context.close();
    }
}
运行上面的程序,会看到如下结果:
Employee Danny Theys is registered for assessment on 2016-12-22
另外,假如你想不使用配置类AppConfig,那么还可以这样做:
package com.websystique.spring;

import org.springframework.context.annotation.AnnotationConfigApplicationContext;

import com.websystique.spring.model.Employee;
import com.websystique.spring.service.EmployeeService;

public class AppMain {

    public static void main(String args[]){
        //AbstractApplicationContext  context = new AnnotationConfigApplicationContext(AppConfig.class);
        AnnotationConfigApplicationContext  context = new AnnotationConfigApplicationContext();
        context.scan("com.websystique.spring");
        context.refresh();

        EmployeeService service = (EmployeeService) context.getBean("employeeService");

        /*
         * Register employee using service
         */
        Employee employee = new Employee();
        employee.setName("Danny Theys");
        service.registerEmployee(employee);

        context.close();
    }
}
AnnotationConfigApplicationContext.scan方法会扫描指定包下的所有类,注册所有被@Component标注的bean(实际上@configuration本身内部也是使用@component注解)到应用的上下文环境中;
另外要注意,在完成扫描操作后,refresh方法必须被调用,能保证完整的处理这些注册类。
运行以上程序,你会看到同样的输出。
最后,如果使用XML配置的话,在main方法里替换
AbstractApplicationContext context = new AnnotationConfigApplicationContext(AppConfig.class);
为
AbstractApplicationContext context = new ClassPathXmlApplicationContext("app-config.xml");
会看到同样的输出。
本例源码
http://websystique.com/?smd_process_download=1&download_id=793

 浙公网安备 33010602011771号