
初步搭建Springboot工程
初步搭建Springboot工程
1.通过SpringIO创建骨架工程
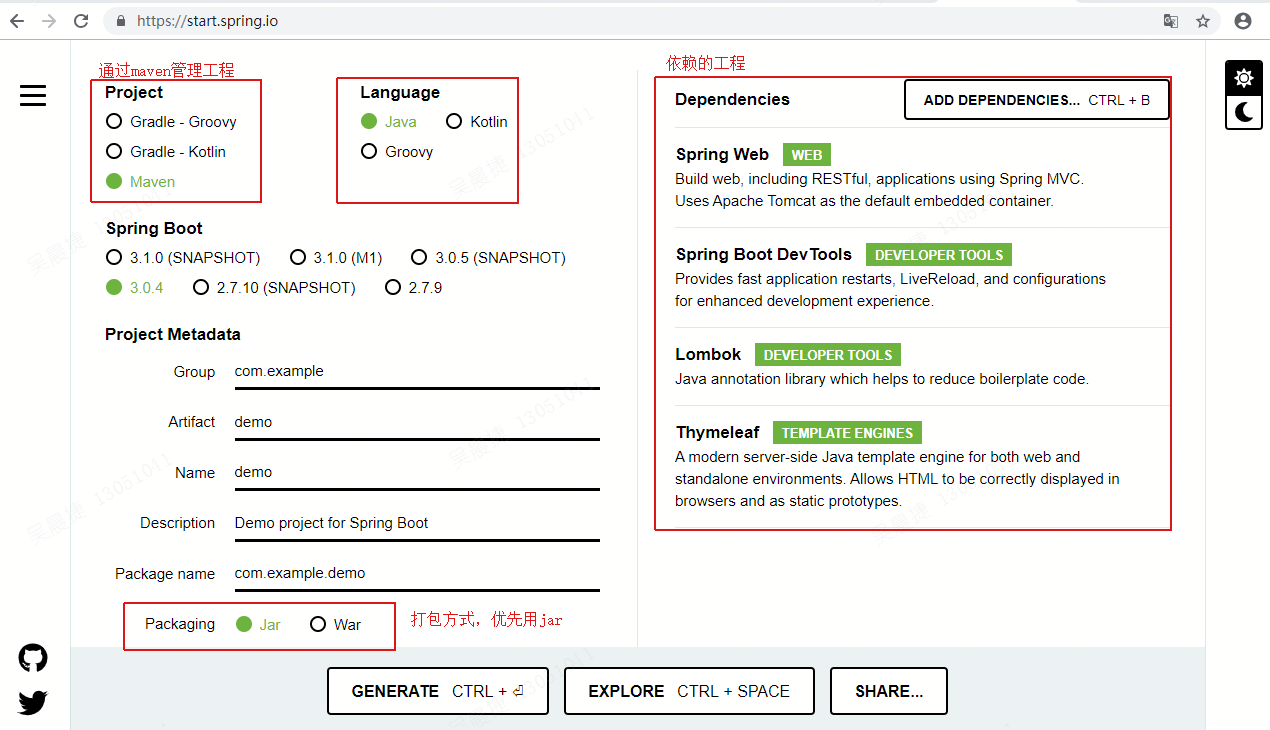
生成骨架工程的在线工具:https://start.spring.io/
通过勾选配置可以生成demo工程。
勾选的4个依赖分别功能是:
-
Spring Web WEB
Build web, including RESTful, applications using Spring MVC. Uses Apache Tomcat as the default embedded container. -
Spring Boot DevTools DEVELOPER TOOLS
Provides fast application restarts, LiveReload, and configurations for enhanced development experience. -
Lombok DEVELOPER TOOLS
Java annotation library which helps to reduce boilerplate code. -
Thymeleaf TEMPLATE ENGINES
A modern server-side Java template engine for both web and standalone environments. Allows HTML to be correctly displayed in browsers and as static prototypes.
demo.zip
2.在IDEA中打开demo工程
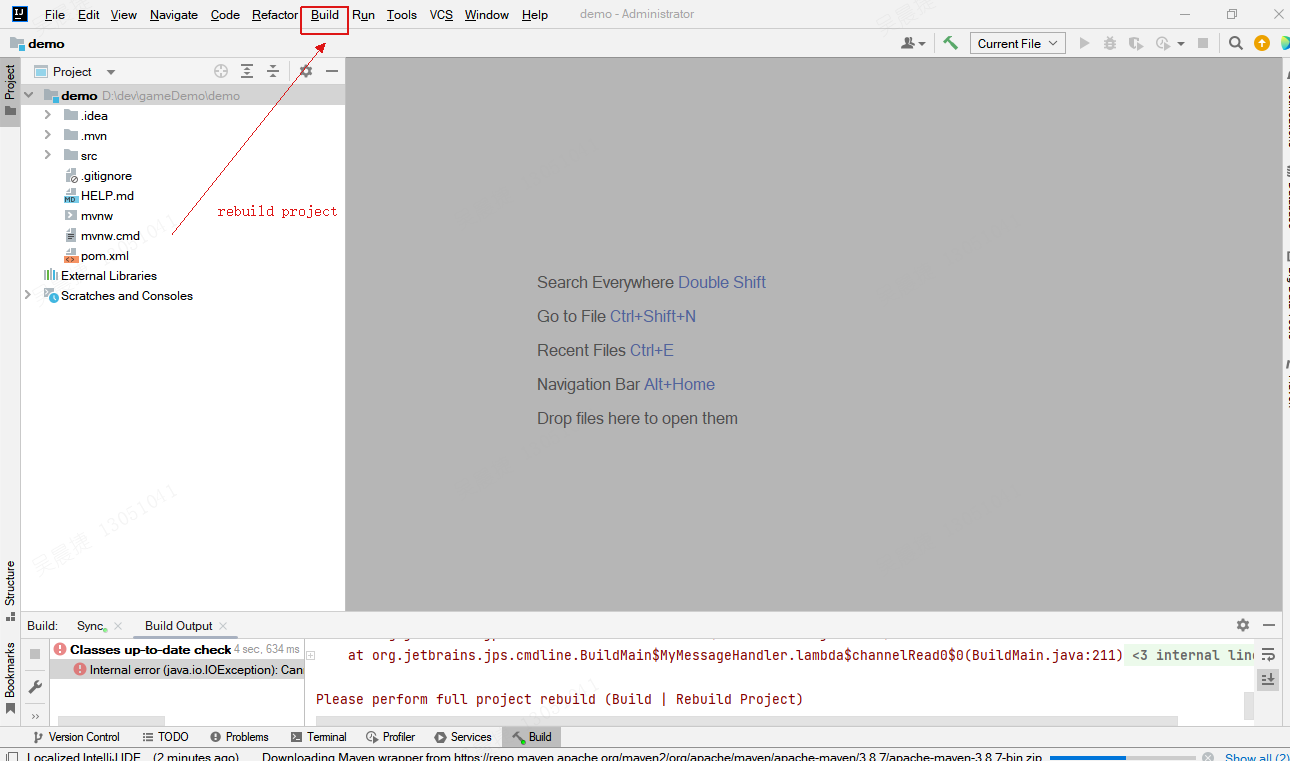
springIO生成的demo并不是idea工程,第一次打开的时候会报错,按照报错的提示(Build | Rebuild Project)。在菜单栏中操作Build -> Rebuild Project,即可正常构建idea工程。
3.添加Controller和相关注解
1.创建4个常用的包,如下
| 包名 | 具体的职责 |
|---|---|
| entity | 实体类,建模相关 |
| controller | Controller层负责具体的业务模块流程的控制,controller层主要调用Service层里面的接口控制具体的业务流程 |
| service | Service层用于业务操作的具体方法 |
| dao | 持久层,数据访问层。负责与数据库的数据进行交互 |
2.在entity中创建user类
package com.example.demo.entity;

import lombok.Getter;
import lombok.Setter;

@Setter
@Getter
@NoArgsConstructor
@AllArgsConstructor
public class User {
    private Integer userId;
    private String password;
    private String userName;//登录名

    @Override
    public String toString() {
        return "User{" +
                "userId=" + userId +
                ", password='" + password + '\'' +
                ", userName='" + userName + '\'' +
                '}';
    }
}
注意点:
- 使用了lombok中的@NoArgsConstructor、@AllArgsConstructor注解,作用类似于实现了无参构造法和有参构造法。
- 使用了lombok中的@Setter、@Getter注解,作用类似于增加了每个属性的set和get方法;
- 实现了toString方法,便于后续打日志。
3.在Controller中添加UserController
package com.example.demo.controller;

import com.example.demo.entity.User;
import org.springframework.web.bind.annotation.GetMapping;
import org.springframework.web.bind.annotation.RequestMapping;
import org.springframework.web.bind.annotation.RestController;

@RestController
@RequestMapping(path="/user")
public class UserController {

    @GetMapping(path="/info")
    public String getUserInfo(){
        User user = new User(1,"jim","123456");
        return user.toString();
    }
}
注意点:
- 使用了lombok中的@RestController、@RequestMapping(path="/user")注解,用于标记这是一个RestController和这个类所有请求的前置path路径。
- @GetMapping注解,用于实现getUserInfo方法,返回User信息。
4.启动服务器
直接启动服务器,在浏览器上输入 http://localhost:8080/user/info ,即可收到返回报文:User{userId=1, password='123456', userName='jim'}。就是代码中user.toString()得到的数据。
5.阶段总结
区区几行代码就可以实现一个服务器,但是此服务器中没有数据库操作,也没有复杂的前端界面交互。我们可以按照基本的架构逻辑,把数据下移到service层。
4.添加Service类和相关注解
package com.example.demo.controller;

import com.example.demo.entity.User;
import com.example.demo.service.UserService;
import org.springframework.beans.factory.annotation.Autowired;
import org.springframework.web.bind.annotation.GetMapping;
import org.springframework.web.bind.annotation.RequestMapping;
import org.springframework.web.bind.annotation.RestController;

@RestController
@RequestMapping(path="/user")
public class UserController {
    @Autowired
    private UserService mUserService;

    @GetMapping(path="/info")
    public String getUserInfo(){
        User user = mUserService.getUserInfo(1);
        return user.toString();
    }
}
在UserController中注入UserService Bean,通过Service提供的方法,获取业务数据,在Controller层只负责业务模块流程的控制。Service层主要负责业务逻辑,这样Controller层到底是api还是页面,是https还是RSF接口,都能灵活的控制。
package com.example.demo.service;

import com.example.demo.entity.User;
import org.springframework.stereotype.Service;

import java.util.HashMap;

@Service
public class UserService {
    private static HashMap<Integer, User> mUserData = new HashMap<>();

    public UserService(){
        User user = new User(1,"jim","123456");
        mUserData.put(user.getUserId(),user);
    }

    public User getUserInfo(Integer userId){
        User user = mUserData.get(userId);
        return user;
    }

}
可以看到在Service层的数据,获取自HashMap<Integer, User> mUserData,这里只是一个举例的写法。正常的数据来源于DAO层,DAO屏蔽了原始的数据库操作。
5.添加DAO类和相关注解
5.1增加mysql和mybatis依赖
      <!--mysql驱动-->
      <dependency>
         <groupId>mysql</groupId>
         <artifactId>mysql-connector-java</artifactId>
         <version>5.1.9</version>
         <scope>runtime</scope>
      </dependency>

      <!--Mybatis-->
      <dependency>
         <groupId>org.mybatis.spring.boot</groupId>
         <artifactId>mybatis-spring-boot-starter</artifactId>
         <version>2.2.1</version>
      </dependency>
在pom文件中的
5.2添加对应文件
5.2.1Application中添加扫描DAO包位置
package com.example.demo;

import org.mybatis.spring.annotation.MapperScan;
import org.springframework.boot.SpringApplication;
import org.springframework.boot.autoconfigure.SpringBootApplication;

@SpringBootApplication
@MapperScan("com.example.demo.dao")
public class DemoApplication {

	public static void main(String[] args) {
		SpringApplication.run(DemoApplication.class, args);
	}

}
可以看到,在DemoApplication上添加了MapperScan注解,申明了DAO文件的包位置。
5.2.2在com.example.demo.dao中添加对应UserDAO文件
package com.example.demo.dao;

import com.example.demo.entity.User;

@Mapper
public interface UserDAO {
    /**
     * 根据用户名查询用户数据
     * @param userId
     * @return 如果找到对应的用户则返回这个用户的数据,没有找到返回null值
     */
    User getUserByUserId(Integer userId);
}
在com.example.demo.dao位置下,添加一个UserDao接口,UserDao中申明一个getUserByUserId方法。并在类头上增加@Mapper注解。
5.2.3在Resources/mapper文件夹下添加映射xml
<!DOCTYPE mapper PUBLIC
        "-//mybatis.org//DTD Mapper 3.0//EN"
        "http://mybatis.org/dtd/mybatis-3-mapper.dtd">
<!--namespace属性指定当前映射文件和哪个接口进行映射,需要标注包的完整路径接口-->
<mapper namespace="com.example.demo.dao.UserDAO">
    <!--自定义映射规则-->
    <resultMap id="DifUser" type="com.example.demo.entity.User">
        <id column="user_id" property="userId"></id>
        <result column="user_name" property="userName"></result>
        <result column="phone_num" property="phoneNum"></result>
    </resultMap>


    <!--当表的字段和类的对象的属性不一致时,来自定义查询结果集的映射规则-->
    <select id="getUserByUserId" resultMap="DifUser">
        SELECT * FROM user WHERE user_id=#{userId}
    </select>


</mapper>
mapper文件中申明了namespace、resultMap各个属性映射关系和getUserByUserId的实现sql代码。
5.2.4在application.yml文件添加数据库相关配置
server:
  port: 8080
spring:
  datasource:
    driver-class-name: com.mysql.cj.jdbc.Driver
    username: root
    password: 1234
    url: jdbc:mysql://localhost:3306/gameserverdb?serverTimezone=GMT%2b8

mybatis:
  mapper-locations: classpath:mapper/*.xml #扫描所有mybatis的xml文件
  configuration:
    log-impl: org.apache.ibatis.logging.stdout.StdOutImpl #打印sql
注意datasource中配置的是我的本地数据库,username、password、url都要做出相关的修改。
5.2.5修改Service和Controller中的代码
package com.example.demo.service;

import com.example.demo.dao.UserDAO;
import com.example.demo.entity.User;
import org.springframework.stereotype.Service;

import javax.annotation.Resource;

@Service
public class UserService {
    @Resource
    private UserDAO mUserDao;

    public UserService(){
    }

    public User getUserInfo(Integer userId){
        User user = mUserDao.getUserByUserId(userId);
        return user;
    }

}
import javax.annotation.Resource;

@RestController
@RequestMapping(path="/user")
public class UserController {
    @Resource
    private UserService mUserService;

    public UserController(UserService mUserService) {
        this.mUserService = mUserService;
    }

    @GetMapping(path="/info")
    public String getUserInfo(){
        User user = mUserService.getUserInfo(14);
        return user.toString();
    }
}
mapper文件中申明了namespace、resultMap各个属性映射关系和getUserByUserId的实现sql代码。
运行和总结
修改完毕之后,点击运行。此时数据源就是通过本地数据库提供的了。

 浙公网安备 33010602011771号