
Linux下mysql5.7离线安装说明
这是以centos操作系统 , mysql5.7.26为例:
1.从mysql官网下载二进制安装包(https://dev.mysql.com/downloads/mysql/)
2.检查是否已经安装了mysql或者是MariaDB,如果已经安装,则先把安装的卸载
[root@localhost software]# rpm -qa | grep mysql

[root@localhost software]# rpm -qa | grep mariadb

mariadb-libs-5.5.56-2.el7.x86_64

[root@localhost software]# yum remove mariadb-libs-5.5.56-2.el7.x86_64
                  或  rpm -e mariadb-libs-5.5.56-2.el7.x86_64
注:如果显示有依赖库,需要先卸载依赖库    实在不行就 强制卸载:  rpm --nodeps -e  mariadb-libs-5.5.56-2.el7.x86_64
3.通过ssh等工具将安装包上传到CentOS上,并解压
tar -xvf mysql-5.7.26-linux-glibc2.12-x86_64.tar.gz
4.重命名mysql安装目录
[root@localhost chnsys]# mv mysql-5.7.26-linux-glibc2.12-x86_64 mysql
[root@localhost chnsys]# ll
total 629760
drwxr-xr-x. 10 root mysql      4096 Jul 15 10:53 mysql
-rw-r--r--.  1 root root  644869837 Jul 15 14:39 mysql-5.7.26-linux-glibc2.12-x86_64.tar.gz
5.添加新的用户组和新的用户,用来管理mysql,提高安全性(非必要的,不过mysql官网安装步骤推荐这样做,这个步骤可以省略)
[root@localhost chnsys]# groupadd mysql
[root@localhost chnsys]# useradd -r -g mysql -s /bin/false mysql
[root@localhost chnsys]#
6.新建mysql的data目录
[root@localhost chnsys]# cd mysql/
[root@localhost mysql]# mkdir data
[root@localhost mysql]# ll
total 60
drwxr-xr-x.  2 root  mysql  4096 Jul 12 16:48 bin
-rw-r--r--.  1 root  mysql 17987 Apr 13 09:32 COPYING
drwxr-xr-x.  5 mysql mysql  4096 Jul 15 10:51 data
drwxr-xr-x.  2 root  mysql    52 Jul 12 16:48 docs
drwxr-xr-x.  3 root  mysql  4096 Jul 12 16:47 include
drwxr-xr-x.  5 root  mysql  4096 Jul 12 16:48 lib
drwxr-xr-x.  4 root  mysql    28 Jul 12 16:47 man
-rw-r--r--.  1 root  root    505 Jul 15 10:53 my.cnf
-rwxr-xr-x.  1 root  root  10629 Jul 15 10:51 mysql.server
-rw-r--r--.  1 root  mysql  2478 Apr 13 09:32 README
drwxr-xr-x. 28 root  mysql  4096 Jul 12 16:48 share
drwxr-xr-x.  2 root  mysql    86 Jul 12 16:48 support-files
7.修改mysql目录用户为刚刚新建的mysql组中的mysql用户
[root@localhost mysql]# chown -R mysql:mysql ./
8.初始化安装mysql数据库,记住初始密码
注意: 不要在mysql用户权限不允许的目录下执行(例如 其他用户组目录下:chnsys;如果非要在该目录下,需要设置该目录允许其他用户访问,若没有严格要求可以 赋予最大权限:chmod 777 目录名,)
[root@localhost mysql]#  ./bin/mysqld --user=root --basedir=/home/chnsys/mysql5.7.26 --datadir=/home/chnsys/mysql5.7.26/data --initialize
2018-12-25T09:00:17.116437Z 0 [Warning] TIMESTAMP with implicit DEFAULT value is deprecated. Please use --explicit_defaults_for_timestamp server option (see documentation for more details).
2018-12-25T09:00:21.961838Z 0 [Warning] InnoDB: New log files created, LSN=45790
2018-12-25T09:00:22.747386Z 0 [Warning] InnoDB: Creating foreign key constraint system tables.
2018-12-25T09:00:22.860663Z 0 [Warning] No existing UUID has been found, so we assume that this is the first time that this server has been started. Generating a new UUID: 8324a8be-0823-11e9-b13d-000c29ca91c6.

2018-12-25T09:00:22.862806Z 0 [Warning] Gtid table is not ready to be used. Table 'mysql.gtid_executed' cannot be opened.
2018-12-25T09:00:22.867377Z 1 [Note] A temporary password is generated for root@localhost: Q&ZsMY#sV3du
9.修改my.cnf配置文件,通过mysql官网可以知道,从版本5.7.18开始,mysql免安装版二进制包中就不包含该文件了,即不需要my.cnf文件也可以正常运行;my.conf文件中配置的选项会在命令行启动mysql的时候作为参数进行启动,为了后面搭建mysql主从环境方便,下面可以添加了一个简单的my.conf文件作为实例(如果只是单纯的搭建一个mysql实例,可以直接忽略此步骤),使用vim /etc/my.cnf命令,如果在该目录上不存在则会新建
[mysqld]
character_set_server=utf8
init_connect='SET NAMES utf8'
basedir=/home/chnsys/mysql
datadir=/home/chnsys/mysql/data
#设置忽略大小写(简单来说就是sql语句是否严格),默认库名表名保存为小写, 不区分大小写
lower_case_table_names = 1
#skip-grant-tables
# 开启ip绑定
bind-address = 0.0.0.0
[mysqld_safe]
pid-file=/home/chnsys/mysql/data/mysqld.pid
#指定客户端连接mysql时的socket通信文件路径
[client]
socket=/tmp/mysql.sock
default-character-set=utf8
10.将mysql添加至开机启动
[root@localhost mysql]# cp ./support-files/mysql.server /etc/init.d/mysql.server
修改mysqld,使用vim /etc/init.d/mysql.server 命令 修改以下代码部分
basedir=/home/chnsys/mysql
datadir=/home/chnsys/mysql/data
设置开机启动
[root@localhost mysql]# systemctl enable /etc/init.d/mysql.server

[root@localhost mysql]# chkconfig --add mysql.server
11.到这一步,mysql已经算是安装完毕了,接下来使用以下命令启动mysql
[root@localhost mysql]#/etc/init.d/mysql.server start

start Starting MySQL. SUCCESS!
如果执行报错:Failed to execute operation: Access denied
是没有关闭selinux,关于selinux我也不清楚,只是知道:如果对一个文件没有正确安全上下文配置, 甚至你是root用户,你也不能启动某服务
可以先执行: setenforce 0    关闭selinux
这一步启动可能会失败,将步骤9中创建的my.cnf 删除,重启mysql,再关闭,之后再创建my.cnf文件,重启mysql即可
12.为了可以在任意目录上都可以使用mysql命令登录mysql,将mysql安装目录配置到环境变量中,在/etc/profile文件的末尾添加以下代
export PATH=$PATH:/home/chnsys/mysql/bin
使配置文件的配置立即生效
[root@localhost mysql]# source /etc/profile
13.重启mysql服务,并且使用mysql的root用户登录mysql,密码在第8步最后一行有
[root@localhost mysql]# service mysqld restart
Shutting down MySQL.. SUCCESS!
Starting MySQL. SUCCESS!
 # 后台使用localhost: ./bin/mysql -u root -p123456 -S /home/tmp/mysql.sock
[root@localhost mysql]#  mysql -u root -p123456
Welcome to the MariaDB monitor. Commands end with ; or \g.
Your MySQL connection id is 3
Server version: 5.7.26 MySQL Community Server (GPL)

Copyright (c) 2000, 2014, Oracle, MariaDB Corporation Ab and others.

Type 'help;' or '\h' for help. Type '\c' to clear the current input statement.
14.修改root用户的密码为root,并且刷新
(1)5.7以前的版本
MySQL [(none)]> use mysql;
Reading table information for completion of table and column names
You can turn off this feature to get a quicker startup with -A

Database changed
mysql> alter user 'root'@'localhost' identified by 'root';
Query OK, 0 rows affected (0.00 sec)
mysql> flush privileges;
Query OK, 0 rows affected (0.00 sec)

或者使用:update user set password=password("root") where user="root";
(2)5.7以后的版本
mysql> SET PASSWORD = PASSWORD('admin');
Query OK, 0 rows affected, 1 warning (0.00 sec)

mysql> ALTER USER 'root'@'localhost' PASSWORD EXPIRE NEVER;
Query OK, 0 rows affected (0.00 sec)

mysql> flush privileges;
Query OK, 0 rows affected (0.00 sec)
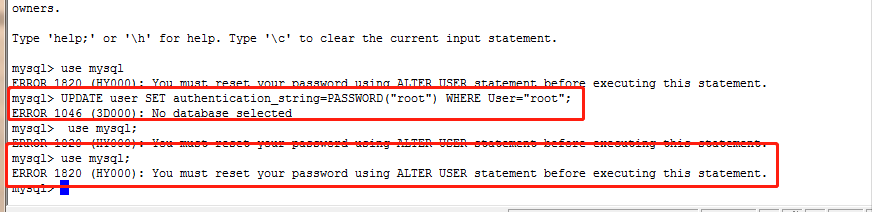
MySQL [(none)]> use mysql;
Reading table information for completion of table and column names
You can turn off this feature to get a quicker startup with -A

Database changed
mysql> UPDATE user SET authentication_string=PASSWORD("root") WHERE User="root";
Query OK, 0 rows affected (0.00 sec)
mysql> flush privileges;
Query OK, 0 rows affected (0.00 sec)
如果忘记密码,打开my.cnf文件,在[mysqld]下添加这么一行 skip-grant-tables
跳过密码校验,这样登陆mysql就不需要密码了,然后使用sql语句修改root用户的密码
重启mysql服务
15 再授权所有其他主机都可访问
mysql> use mysql;

Reading table information for completion of table and column names

You can turn off this feature to get a quicker startup with -A

Database changed
方法:1:
mysql> update user set user.Host='%' where user.User='root';
Query OK, 1 row affected (0.01 sec)
Rows matched: 1  Changed: 1  Warnings: 0
mysql> flush privileges;
Query OK, 0 rows affected (0.00 sec)
mysql> exit
Bye
方法2:
mysql>grant all on *.* to root@'%' identified by '123456';

mysql>flush privileges;
常见问题:
如果遇到ERROR 1820 (HY000): You must reset your password using ALTER USER statement before executing this statement
解决方案:
安装完mysql 之后,登陆以后,不管运行任何命令,总是提示这个
step 1: SET PASSWORD = PASSWORD('your new password');
step 2: ALTER USER 'root'@'localhost' PASSWORD EXPIRE NEVER;
step 3: flush privileges;
16.此时mysql数据库只能在本机上使用mysql命令进行登录,还无法使用navicat等数据库可视化工具进行远程登录,下面设置允许root用户远程连接数据库
为了方便试验,此处已事先使用 systemctl stop firewalld 命令将防火墙关闭,在实际使用中,只需要开放数据库运行的3306端口即可,结果如下:
如果需要打包,直接tar 压缩就可以,注意保留 my.cnf文件,和mysql.server文件,以及路径修改

 浙公网安备 33010602011771号