php 模板框架之smarty 的下载和安装
-
Smarty 官网:
http://www.smarty.net/
-
Smarty 下载:
    https://github.com/smarty-php/smarty/releases/tag/v3.1.30
    // 下载 tar.gz 放到你的网站服务器中,和 jQuery和 Bootstrap 配合使用。
-
Smarty 使用例程
    // 假设 Smarty 框架已经解压在 /var/www 目录下,此目录是apache2 的家目录
    //  现在,先写一个main.php
    // main.php
    <?php
    include "smarty-3.1.30/libs/Smarty.class.php";
    define ("__SITE_ROOT", "/var/www");
    require_once('includes/include.php');
    require_once('includes/functions.php');

    $tpl = new Smarty();
    $tpl->template_dir = __SITE_ROOT . "/templates/";    // 指定模板目录
    $tpl->compile_dir = __SITE_ROOT . "/templates_c/";   // 指定临时生成的网站目录
    $tpl->config_dir = __SITE_ROOT . "/configs/";        // 指定配置文件目录
    $tpl->cache_dir = __SITE_ROOT . "/cache/";           // 指定缓存目录,这个目录里面放着最终显示的网站php 文件
    $tpl->left_delimiter = '<{';
    $tpl->right_delimiter = '}>';
    ?>
    // 创建一些文件夹
    mkdir  templates  templates_c  configs cache
    // 编写模板
    //  vim templates/test.htm
    <html>
    <head>
    <meta http-equiv="Content-Type" content="text/html; charset=big5">
    <title><{$title}></title>
    </head>
    <body>
    <{$content}>
    </body>
    </html>
    // index.php  调用该模板
    // vim index.php
    <!DOCTYPE html>
    <html>
    <head>
    </head>

    <body>

    <?php
    require "main.php";
    $tpl->assign("title", "test");
    $tpl->assign("content", "test_1");
    // 上面两行也可以用这行代替
    // $tpl->assign(array("title" => "测试用的网页标题", "content" => "测试用的网页内容"));
    $tpl->display('test.htm');    // 调用模板
    ?>
-
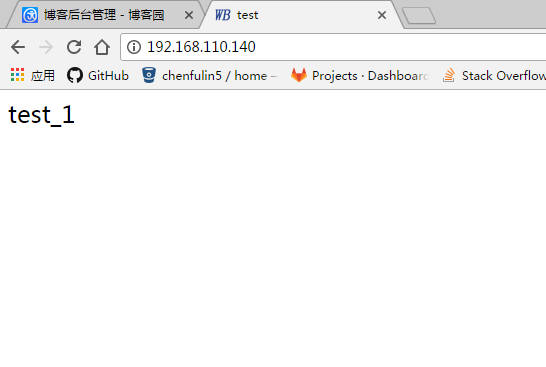
显示效果:
Read The Fucking Source Code

 浙公网安备 33010602011771号