

sps2013安装错误
SharePoint 2013 Standalone模式安装时的问题
昨晚试着装了一台SharePoint 2013的虚机:Windows Server 2012 RC + SharePoint Server 2013。图方便选择了Standalone方式,结果还是出了一些错。
在运行SharePoint Products Configuration Wizard到了第二步的时候,报错说“Service running under Network Service account in workgroup environment is not supported.”,如图:

于是检查Appfaric和Sql Server服务的运行账户,统统改成Local System。
继续运行SharePoint Products Configuration Wizard,那个错误还在老地方不见不散。搜索一番,发现得在SharePoint 2013 Management Shell中运行一段命令:
PSCONFIG.EXE -cmd Configdb create SkipRegisterAsDistributedCacheHost
然后耐心等待三步操作完成,如图:

接着再启动GUI版的SharePoint Products Configuration Wizard,它会从第四步开始接着进行,后面就没啥大问题了。之所以这么说是因为我还遇到一些问题,不过都是跟我的环境有关联的特定问题,没有普遍性,不提不提。
好吧,这是新的管理中心,你习惯么?

再补充一个新遇到的问题,是在DC上安装Prerequisites时遇到的,Prerequisites安装向导会在安装配置IIS时失败,就连手工添加IIS角色也会失败。这是因为找不到安装源所致,解决方法是把Windows Server 2012的安装盘插入,在添加IIS角色的最后一步“确认”时,点击配置备用安装路径,然后输入“X:\sources\sxs”(X是你的光驱盘符),如此一来IIS就能顺利安装成功,接着在安装Prerequisites就可以了。
sample data的问题
下载:http://go.microsoft.com/fwlink/?LinkID=166231 KB976462. Download it here...
或者掠过此问题。貌似不会影响系统。 http://www.ekeepo.com/1/post/2012/10/sharepoint-2013-preview-stand-alone-work-around.html
Installing SharePoint 2013 on a single machine (workgroup/non-domain) is not technically supported, but if you try it, you'll get the following error:
ErrorCode:SubStatus:
Service running under Network Service account in workgroup environment is not supported.
The intertubes save me again. Found http://tomblog.insomniacminds.com/2012/07/17/sharepoint-2013-standalone-installation-issue/ which describes how to skip the AppFabric component through running step 2 of the wizard through PowerShell.
UPDATE: I also ran into the "Failed to create sample data" error after re-running the wizard. No sample sample data, no worries! :)
或者:
http://www.deepakkapoor.net/sharepoint-installation-failed-to-create-sample-data/
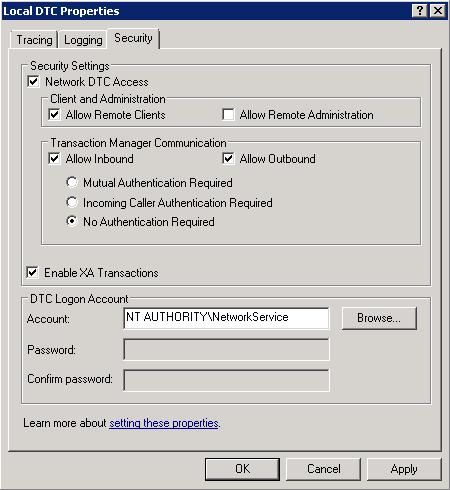
This one always gets me off guard so I’m posting this here for more than anything else to remind me. The issue occurs when you configure your MOSS environment which is normally done after installing MOSS. The issue is that while inserting sample data the wizard throws an error which says “Failed to create sample data”. The reason this occurs is because you’ve not configured MSDTC properly. Here are the steps to resolve the problem picked up from this link.
To resolve this issue, configure the security settings for the Microsoft Distributed Transaction Coordinator (DTC) to use the Allow Remote Clients setting. To do this, follow these steps:
- Click Start, point to Administrative Tools, and then click Component Services.
- In the left pane of the Component Services snap-in, expand Component Services, and then expand Computers.
- Right-click My Computer, and then click Properties.
- Click the MSDTC tab, and then click Security Configuration under Transaction Configuration.
- Under Security Settings, click to select the Network DTC Access check box, if it is not already selected. Then, click to select the Allow Remote Clients check box
- Click OK.
- When you receive the message that states that the DTC service will be stopped and restarted, click Yes to confirm that you want to continue.
- Click OK when you receive the message that the DTC service was restarted.
- Click OK.
如果没有上述选项则:
http://technet.microsoft.com/en-us/library/cc753620(v=ws.10).aspx
-
Open the Component Services snap-in.
To open Component Services, click Start. In the search box, type dcomcnfg, and then press ENTER.
-
Expand the console tree to locate the DTC (for example, Local DTC) for which you want to enable Network MS DTC Access.
-
On the Action menu, click Properties.
-
Click the Security tab and make the following changes:
- In Security Settings, select the Network DTC Access check box.
- In Transaction Manager Communication, select the Allow Inbound and Allow Outbound check boxes.
- In Security Settings, select the Network DTC Access check box.
-
Click OK.
http://itknowledgeexchange.techtarget.com/sql-server/how-to-configure-dtc-on-windows-2008/
This post is specifically about setting up DTC on Windows 2008. If you are looking for the post about setting up DTC on Windows 2003 you’ll want to go to the post “How to configure DTC on Windows 2003“.
The basic idea behind DTC setup in Windows 2008 is very similar to Windows 2003. DTC needs to be installed and then configured. To install DTC open the Control Panel, then Programs and Features. Click on the link to the right which says  . Eventually the Server Manager will open and finish querying the system for the list of features and roles which are setup. Click on Add Feature button and select Application Server from the Feature list (you may need to click next to get past the welcome to the wizard screen. On the screen which tells you about the Application Server click next. On the next page you can select the services which you be installed as part of this role. Select the Incoming and/or Outgoing Remote Transactions depending on which one you need. If SOAP will be used you may need the WS-Atomic Transactions installed. If so select that as well. (In this example I’ll check them all.)
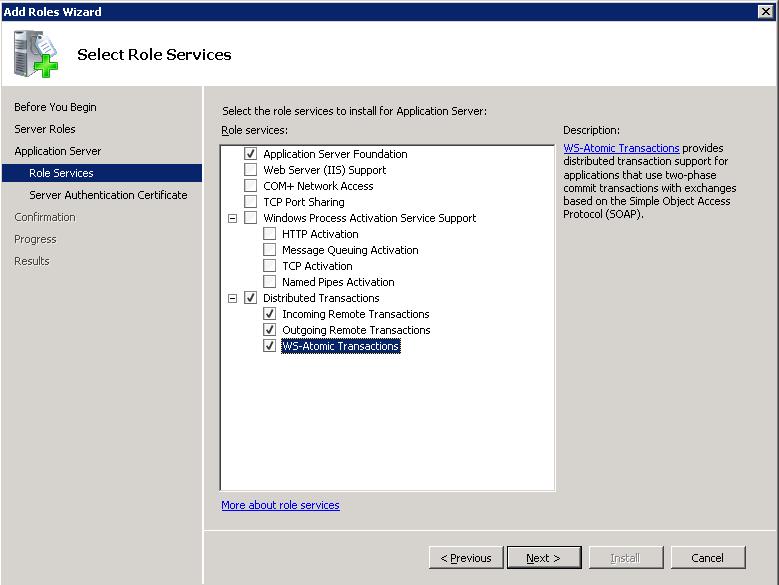
Then click next. If you have selected the WS-Atomic Transactions you’ll be presented with a page to select an SSL cert. You can either select one, of create a self signed cert, or request one later from a CA. I selected a self signed cert as I didn’t have one already installed. Click next, then install. If you didn’t install WS-Atomic Transactions the next screen will simply have the summary and install button.
It will take a while as Windows is going to install .NET 3.0 as part of this install. Now is a good time for coffee or a smoke.
After installation is complete click close.
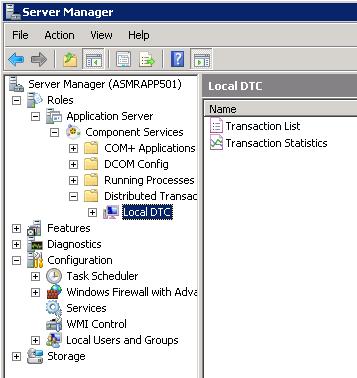
If you click the plus sign next to Roles in the right hand menu you can navigate down to Roles > Application Server > Component Services > Distributed Transaction Coordinator > Local DTC.
Right click on Local DTC and select properties, then select the security tab. This tab looks very similar to theWindows 2003 one.
Check which ever boxes you need to in order to get the DTC setup to match the other servers in your environment. Be sure to enable “Allow Remote Clients” or client machines won’t be able to access the DTC on this machine. If you want to be able to remotely enable DTC from another machine you’ll need to check the “Allow Remote Administration”. It’s been my experience that once DTC is setup and working remove administration probably isn’t that important so I’d say leave that unchecked and simply RDP into the server if it needs to be worked on. Your screen will look something like this.
When you click OK DTC will prompt you to restart it. Click yes (unless you want to schedule the restart for another time) and DTC will restart. You can see the DTC events in the log by selecting the “Application Server” option from the menu on the left. You are going to want the most recent event to look something like this.
MSDTC started with the following settings:
Security Configuration (OFF = 0 and ON = 1):
Allow Remote Administrator = 0,
Network Clients = 1,
Trasaction Manager Communication:
Allow Inbound Transactions = 1,
Allow Outbound Transactions = 1,
Transaction Internet Protocol (TIP) = 0,
Enable XA Transactions = 1,
MSDTC Communications Security = No Authentication Required,
Account = NT AUTHORITY\NetworkService,
Firewall Exclusion Detected = 0
Transaction Bridge Installed = 1
Filtering Duplicate Events = 1
(Yes, I’m aware of the spelling issues in the error message. That’s a straight copy and paste from Windows 2008′s event log.)When configuring DTC on a cluster you only need to configure one node. This is because DTC is a cluster aware service so when you install DTC after setup clustering (or you setup clustering after installing DTC) the DTC service will already be setup as a clustered resource within the first cluster resource group created. When you configure DTC for network access on a cluster the settings are written to the Quorum drive as well as the system registry which allows both nodes to share the settings. If you have a cluster and you have to go through a firewall with DTC and have followed KB Article 250367 (I’m sure there is a Windows 2008 version of this KB article somewhere, I just haven’t run across it yet) you will need to have more than 20 ports available to DTC. This is because when you configure the DCOM protocols to use specific ports you are configuring all of RPC to use those specific ports. This means that the cluster administrator needs to use these ports as does the Component Services window which monitors for distributed transactions. When dealing with a cluster it is recommended that you have at least 100 ports open between the machines within the transaction. If you need to setup MS DTC to talk to another DTC coordinator then you will probably need to use the No Authentication Required setting unless they support the other options. Check with the vendor of the other coordinator to find out.
(These are the settings which you need no matter which version or edition of SQL Server you have installed.)
Denny
转自:http://coding.windstyle.cn/2012/07/19/sharepoint-2013-standalone-installation-issue/
Exception: System.ArgumentException: The SDDL string contains an invalid sid or a sid that cannot be translated.
Yeah! More errors. This one you will see when trying to work with the Search Service most likely.
To fix this error, login with your Administrator account and create a search service user and add them to theWSS_ADMIN_WPG group. Following, flip open the SharePoint Management Shell, first you need to get a credential object based on a user name and password by using Get-Credential so that a new managed account can be built. To do this, replace your [Your Search Account] with the one just specified.
Paste the following into PowerShell.
CODE:
-
$SearchServ = Get-Credential [Your Search Account]
-
New-SPManagedAccount -Credential $SearchServ
New-SPManagedAccount, as the name implies, simply registers a new managed account for the specifiedCredential or Username, and Password. Then we have to assign this account to the search service, so just open up WCAM, click on Security, and then Service Accounts. Once in the Service Accounts screen, you can change the Search Service to use the new account. Following, run the configuration wizard again, and you should be good to go!
System.ArgumentException: The SDDL string contains an invalid sid or a sid that cannot be translated.
Parameter name: sddlForm
at System.Security.AccessControl.RawSecurityDescriptor.BinaryFormFromSddlForm(String sddlForm)
at System.Security.AccessControl.RawSecurityDescriptor..ctor(String sddlForm)
at Microsoft.SharePoint.Win32.SPNetApi32.CreateShareSecurityDescriptor(String[] readNames, String[] changeNames, String[] fullControlNames, String& sddl)
at Microsoft.SharePoint.Win32.SPNetApi32.CreateFileShare(String name, String description, String path)
at Microsoft.Office.Server.Search.Administration.AnalyticsAdministration.CreateAnalyticsUNCShare(String dirParentLocation, String shareName)
at Microsoft.Office.Server.Search.Administration.AnalyticsAdministration.ProvisionAnalyticsShare(SearchServiceApplication serviceApplication)
though Central admin and web application was working fine but after going service applications list I saw there were issues specially Search service application status was showing – Error
Now if you just read through the error while configuration
1
2
Microsoft.SharePoint.Win32.SPNetApi32.CreateFileShare(String name, String description, String path)
at Microsoft.Office.Server.Search.Administration.AnalyticsAdministration.CreateAnalyticsUNCShare(String dirParentLocation, String shareName)
It looks like the error occurred while trying to create analytics UNCShare. So I tried going to
“C:\Program Files\Microsoft Office Servers\15.0\Data\Office Server\”
there I found one folder “Analytics_”+ guid. So i tried doing the same i.e. share the folder . Gave permissions to Everyone (do this at your own risk ![]() my best guess is WSS_Admin_WPG and the account which is running the search service should do but then I didn’t bother trying added those and I gave permission to Everyone
my best guess is WSS_Admin_WPG and the account which is running the search service should do but then I didn’t bother trying added those and I gave permission to Everyone

 浙公网安备 33010602011771号