ubuntu20.04下配置深度学习环境GPU
卸载子系统
C:\Users\thzn>wsl --list
适用于 Linux 的 Windows 子系统分发版:
docker-desktop (默认)
docker-desktop-data
Ubuntu-18.04
Ubuntu-22.04
Ubuntu-20.04
C:\Users\thzn>wsl --unregister Ubuntu-18.04
ubuntu 换源 https://www.cnblogs.com/Horizon-asd/p/12595723.html
sudo cp /etc/apt/sources.list /etc/apt/sources.list.old
sudo vim /etc/apt/sources.list
deb http://mirrors.aliyun.com/ubuntu/ focal main restricted universe multiverse
deb-src http://mirrors.aliyun.com/ubuntu/ focal main restricted universe multiverse
deb http://mirrors.aliyun.com/ubuntu/ focal-security main restricted universe multiverse
deb-src http://mirrors.aliyun.com/ubuntu/ focal-security main restricted universe multiverse
deb http://mirrors.aliyun.com/ubuntu/ focal-updates main restricted universe multiverse
deb-src http://mirrors.aliyun.com/ubuntu/ focal-updates main restricted universe multiverse
deb http://mirrors.aliyun.com/ubuntu/ focal-proposed main restricted universe multiverse
deb-src http://mirrors.aliyun.com/ubuntu/ focal-proposed main restricted universe multiverse
deb http://mirrors.aliyun.com/ubuntu/ focal-backports main restricted universe multiverse
deb-src http://mirrors.aliyun.com/ubuntu/ focal-backports main restricted universe multiverse
更新源:sudo apt update 如果出现依赖问题-->sudo apt -f install
更新软件:sudo apt upgrade
参考网址:https://www.jianshu.com/p/be669d9359e2
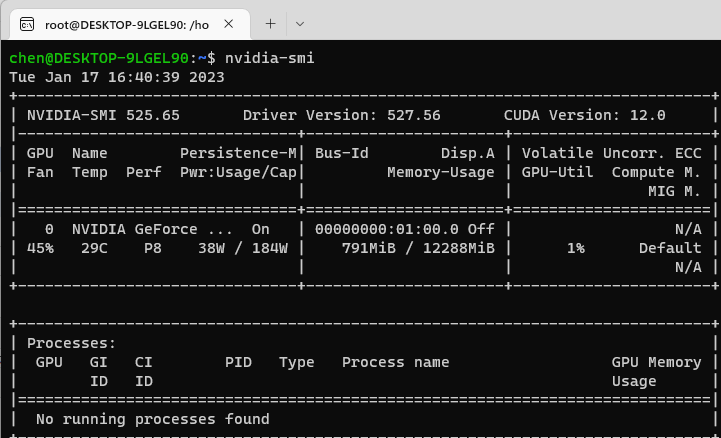
0. nvidia-smi确认驱动是否正常
1. NVIDIA更新CUDA驱动 https://developer.nvidia.com/cuda-toolkit-archive
11.6.2
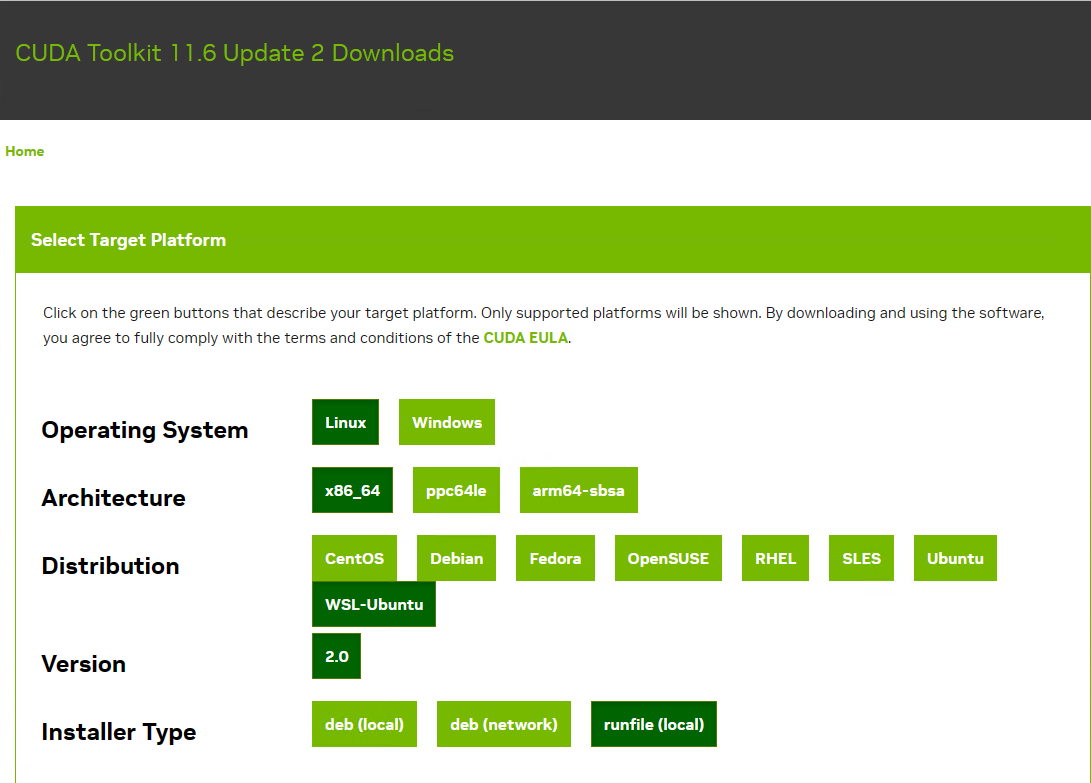
wget https://developer.download.nvidia.com/compute/cuda/11.6.2/local_installers/cuda_11.6.2_510.47.03_linux.run
sudo sh cuda_11.6.2_510.47.03_linux.run
($PATH:, 多个路径用:分割,查看指令 echo $PATH)
vim ~/.bashrc
export PATH=$PATH:/usr/local/cuda-11.6/bin/
export LD_LIBRARY_PATH=/usr/local/cuda-11.6/lib64${LD_LIBRARY_PATH:+:${LD_LIBRARY_PATH}}
更新环境变量:source ~/.bashrc
检查是否成功:nvcc --version
问题1:
root@DESKTOP-9LGEL90:/home/chen# sudo sh cuda_11.6.0_510.39.01_linux.run
Failed to verify gcc version. See log at /var/log/cuda-installer.log for details.
root@DESKTOP-9LGEL90:/home/chen# sudo apt install build-essential
问题2:如果出现环境变量编辑错误导致的问题
root@DESKTOP-9LGEL90:/home/chen# ls
Command 'ls' is available in the following places
* /bin/ls
* /usr/bin/ls
The command could not be located because '/bin:/usr/bin' is not included in the PATH environment variable.
ls: command not found
root@DESKTOP-9LGEL90:/home/chen# export PATH=/usr/bin:/bin
2. cudnn下载配置 https://developer.nvidia.com/zh-cn/cudnn
其他版本下载:https://developer.nvidia.com/rdp/cudnn-archive

将cudnn-linux-x86_64-8.4.0.27_cuda11.6-archive.tar.xz拷贝到D盘
root@DESKTOP-9LGEL90:/mnt/d# cp /mnt/d/cudnn-linux-x86_64-8.4.0.27_cuda11.6-archive.tar.xz /home/chen/
root@DESKTOP-9LGEL90:/mnt/d# cd /home/chen/
root@DESKTOP-9LGEL90:/home/chen# tar -xvf cudnn-linux-x86_64-8.4.0.27_cuda11.6-archive.tar.xz
root@DESKTOP-9LGEL90:/home/chen# sudo cp cudnn-linux-x86_64-8.4.0.27_cuda11.6-archive/include/* /usr/local/cuda-11.6/include/
root@DESKTOP-9LGEL90:/home/chen# sudo cp cudnn-linux-x86_64-8.4.0.27_cuda11.6-archive/lib/* /usr/local/cuda-11.6/lib64/
sudo chmod a+r /usr/local/cuda-11.6/include/cudnn.h
sudo chmod a+r /usr/local/cuda-11.6/lib64/libcudnn*
是否安装成功:cat /usr/local/cuda/include/cudnn_version.h | grep CUDNN_MAJOR -A 2

3. Anaconda下载安装 https://www.anaconda.com/download
将Anaconda3-2022.10-Linux-x86_64.sh拷贝到D盘
root@DESKTOP-9LGEL90:/home/chen# cp /mnt/d/Anaconda3-2022.10-Linux-x86_64.sh /home/chen
root@DESKTOP-9LGEL90:/home/chen# ./Anaconda3-2022.10-Linux-x86_64.sh
安装日志输出
eval "$(/root/anaconda3/bin/conda shell.YOUR_SHELL_NAME hook)"
To install conda's shell functions for easier access, first activate, then:
conda init
If you'd prefer that conda's base environment not be activated on startup,
set the auto_activate_base parameter to false:
conda config --set auto_activate_base false
Thank you for installing Anaconda3!
添加到环境变量在($PATH:, 多个路径用:分割)
sudo vim ~/.bashrc
export PATH=$PATH:/usr/local/cuda-11.6/bin/:/root/anaconda3/bin
export LD_LIBRARY_PATH=/usr/local/cuda-11.6/lib64${LD_LIBRARY_PATH:+:${LD_LIBRARY_PATH}}
source ~/.bashrc
检查是否成功:conda list 或 conda env list 或 conda list:查看安装了哪些包 或 conda env list 或 conda deactivate 或 conda remove -n testGPU --all 或
4. 配置源
pip 配置清华源
常见的国内源有以下几种:
清华:https://pypi.tuna.tsinghua.edu.cn/simple/
阿里云:http://mirrors.aliyun.com/pypi/simple/
豆瓣:http://pypi.douban.com/simple/
中国科学技术大学 :https://pypi.mirrors.ustc.edu.cn/simple/
C:\Users\thzn>pip config list # 查看
global.index-url='https://pypi.tuna.tsinghua.edu.cn/simple'
C:\Users\thzn>pip config set global.index-url https://pypi.tuna.tsinghua.edu.cn/simple/ # 配置
Writing to C:\Users\thzn\AppData\Roaming\pip\pip.ini
C:\Users\thzn>pip config list
global.index-url='http://mirrors.aliyun.com/pypi/simple/'
C:\Users\thzn>python -m pip install --upgrade pip # 升级
换回默认源:pip config unset global.index-url
conda 配置清华源
conda config --add channels https://mirrors.tuna.tsinghua.edu.cn/anaconda/pkgs/free/
conda config --add channels https://mirrors.tuna.tsinghua.edu.cn/anaconda/pkgs/main/
conda config --add channels https://mirrors.tuna.tsinghua.edu.cn/anaconda/cloud//pytorch/
conda config --add channels https://mirrors.tuna.tsinghua.edu.cn/anaconda/cloud/conda-forge/
conda config --set show_channel_urls yes
conda remove -n yolov5GPU --all
5. 安装pytorch https://pytorch.org/get-started/locally
conda create -n mmlabGPU python=3.7 -y
conda activate mmlabGPU
GPU:pip install torch torchvision torchaudio --extra-index-url https://download.pytorch.org/whl/cu116
CPU:pip3 install torch torchvision torchaudio
测试
python
>>> import torch
>>> torch.__version__
'1.13.1+cu116'
>>> torch.version.cuda
'11.6'
>> torch.cuda.is_available() #检查cuda是否可以使用 True
>> torch.cuda.current_device() #查看当前gpu索引号
>> torch.cuda.current_stream(device=0)#查看当前cuda流
>> torch.cuda.device(1) #选择device
>> torch.cuda.device_count() #查看有多少个GPU设备
>> torch.cuda.get_device_capability(device=0) #查看gpu的容量

 浙公网安备 33010602011771号