

一、爬虫基本操作
有些网站和其他网站是有关系(链接),全球的网站就相当于一个蜘蛛网,我们放一只蜘蛛在上面爬,一定能够把网爬个遍。那么如果我们要爬取互联网上内容我们就相当于放一只蜘蛛在上面。
爬虫分为
- 定向爬虫:只爬这一类网站,有针对性(基本上做的都是定向的)
- 非定向爬虫:没有目的性,没有针对性,所有链接都爬取
爬虫:就是去某个URL获取指定的内容
- 发送http请求:http://www.baidu.com
- 基于正则表达式获取内容
Python实现:(爬取汽车之家的小实例,获取一个新闻的标题)
 1 import requests
 2 from bs4 import BeautifulSoup
 3
 4 response = requests.get("https://www.autohome.com.cn/news/")
 5 # print(response.content)#拿到的是字节信息
 6 response.encoding='gbk' #设置文本的编码
 7 # print(response.text)#拿到的是文本信息
 8 soup = BeautifulSoup(response.text,'html.parser') #html.parser表示html解析器
 9 tag = soup.find(id='auto-channel-lazyload-article')
10 h3 = tag.find(name="h3")#name表示的是标签名
11 print(h3)
效果图:

爬取汽车之家的小实例,找到所有的新闻(标题,简介,url,图片)
 1 import requests
 2 from bs4 import BeautifulSoup
 3
 4 #爬取汽车之家的小实例,找到所有的新闻(标题,简介,url,图片)
 5
 6 response = requests.get("https://www.autohome.com.cn/news/")
 7 response.encoding='gbk' #设置文本的编码
 8 soup = BeautifulSoup(response.text,'html.parser') #html.parser表示html解析器
 9 li_list = soup.find(id='auto-channel-lazyload-article').find_all('li')
10 for li in li_list:
11     title = li.find('h3')
12     if not title:
13         continue
14     summary = li.find('p').text
15     # li.find('a').attrs#获取到的是一个字典
16     url = li.find('a').get('href')
17     img_url = li.find('img').get('src')
18     img_url = 'http:'+img_url
19     print(title.text)#title是一个HTML对象,text可以拿到标签里的文本
20     print(summary)
21     print(url)
22     print(img_url)
23     print("==============")
24     #下载图片
25     res = requests.get(img_url)
26     file_name = "%s.jpg" %(title.text,)
27     with open(file_name,'wb') as f:
28         f.write(res.content)
requests模块:
- obj = requests.get('url') 发送请求
- obj.content 得到字节内容
- obj.text 得到HTML内容
- obj.encoding = 'gbk' 设置内容的编码(显示中文)
- obj.apparent_encoding 自动检测内容编码 那上面的就可以换成obj.encoding = obj.apparent_encoding
Beautifulsoup模块:
- soup = BeautifulSoup(obj.text,'html.parser')
- 标签 = soup.find(name="标签名",id="i1",_class="dd")
- [标签,] = soup.find_all()
- 标签.text 获取内容
- 标签.attrs 获取属性,这里获取的是一个字典,如果想要获得特定的属性,则需要在里面写
- 标签.get('href.....')获取指定属性的标签内容
Python代码登录github:(requset的Post方法)
1.登录页面发送请求GET,获取csrf_token和cookie(各个网站登录模式不一样)
2.发送POST请求,包含用户名,密码,csrf_token和cookie,如果登录成果可能会返回一个cookie,以后想要登录,只要带着这个cookie就可以了


 1 import requests
 2 from bs4 import BeautifulSoup
 3 r1 = requests.get('https://github.com/login')
 4 s1 = BeautifulSoup(r1.text,'html.parser')
 5 #获得登录要发送的token
 6 token = s1.find(name='input',attrs={'name':'authenticity_token'}).get('value')
 7 r1_cookie_dict = r1.cookies.get_dict()
 8 #将用户名和密码发送到客户端
 9 '''
10 commit: Sign in
11 utf8: ✓
12 authenticity_token: AVkRqH1wYmS6BsmnR4FS1d+ng19SHJLgZhaY9SemGiHVIzZvKvzmLIIhQ6j5nsisaIXI+A9KLAslu7JoIvdxOg==
13 login: asdf
14 password: asdf
15 '''
16
17 r2 = requests.post('https://github.com/session',
18                    data={
19                     'commit': 'Sign in',
20                     'utf8': '✓',
21                     'authenticity_token': token,
22                     'login': '729330778@qq.com',
23                     'password': 'wjxm08250920',
24                    },
25                    cookies = r1_cookie_dict
26                    )
27
28 r2_cookie_dict = r2.cookies.get_dict()
29 cookie_dic = dict()
30 cookie_dic.update(r1_cookie_dict)
31 cookie_dic.update(r2_cookie_dict)
32 r3 = requests.get(
33     url='https://github.com/settings/emails',
34     cookies=cookie_dic,
35 )
36 print(r3.text)
requests模块:
- obj.cookies.get_dict() 拿到一个字典的cookies
下面对requests模块中的参数方法进行详细的介绍:
requests.get(url, params=None, **kwargs)
requests.post(url, data=None, json=None, **kwargs)
requests.put(url, data=None, **kwargs)
requests.head(url, **kwargs)
requests.delete(url, **kwargs)
requests.patch(url, data=None, **kwargs)
requests.options(url, **kwargs)

# 以上方法均是在此方法的基础上构建
requests.request(method, url, **kwargs)
Python代码登录抽屉网:(requset的Post方法)
有的时候我们需要爬取的网站做了一些防爬虫措施,按照正常的流程走的话就会出错,爬不到我们想要的数据,得到下面的结果:
我们分析一下,为什么浏览器访问的时候可以得到请求结果,我们发过去的请求过不去呢?还是我们伪造的不够像:

上图是我们正常用浏览器访问之后可以看到的请求结果,我们可以看到请求头中有很多的内容,那我们也可以通过设置请求头的方法,让他们认为我们是通过浏览器进行请求的:
import requests

response = requests.post(
    url="https://dig.chouti.com/login",
    data = {
        'phone':'86xxxxxxxxxxx',
        'password' : 'xxxxxxxxxx',
        'oneMonth': 1,
    },
    headers = {
        'User-Agent':'Mozilla/5.0 (Windows NT 10.0; Win64; x64) AppleWebKit/537.36 (KHTML, like Gecko) Chrome/67.0.3396.87 Safari/537.36'
    }
)
print(response.text)
这样我们就能够登录成功,进行下一步的操作。
所以总结一句话,如果遇到发爬虫的,我们要看看请求头。
下面我们要对抽屉的新闻进行点赞
首先我们先看一下抽屉点赞需要的操作:首先要登录,然后要发送点赞请求。
也就是说我们获得了这个url,下面我们同样的要设置请求头,避免被拦截。按照往常的思路来说要先登录,request.post,然后在进行点赞post,这样就可以了,但是如果真的这么做了,点赞的操作是完成不了的。
因为这里我们还要考虑cookie,你再提交之后会返回一个cookie,然后通过这个cookie进行验证身份,看看你是否登录了。所以我们要加上这个cookie
但是还有一个问题就是,我们加上了登录之后返回的cookie,可是还是没有办法进行点赞,这个是为什么?有的网站是可以这样进行操作的,但是有的网站他在一开始get到页面的时候先给你发送了一个cookie,这个cookie是后台随机生成的,但是还没有进行授权,只有在你登录了之后该cookie值才会被打上授权了标记,然后使用这个cookie值进行操作的时候就会一帆风顺,所以我们还要在登录之前得到这个后台随机生成的cookie值
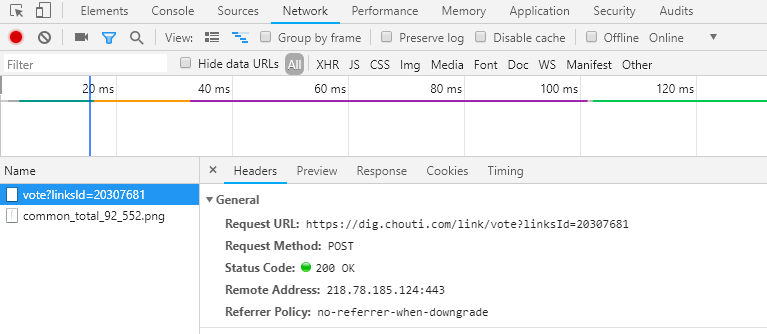
 1 import requests
 2 #1.先访问浏览器,得到一开始的cookie值(未授权的),
 3 r1 = requests.get(
 4     url = "https://dig.chouti.com/all/hot/recent/1",
 5     headers = {
 6         'User-Agent':'Mozilla/5.0 (Windows NT 10.0; Win64; x64) AppleWebKit/537.36 (KHTML, like Gecko) Chrome/67.0.3396.87 Safari/537.36'
 7     }
 8 )
 9 r1_cookie_dict = r1.cookies.get_dict()
10
11 #2.发送用户名和密码,带上之前未授权的cookies
12 response_login = requests.post(
13     url="https://dig.chouti.com/login",
14     data = {
15         'phone':'86xxxxxxxxxxx',
16         'password' : 'xxxxxxxxxxxx',
17         'oneMonth': 1,
18     },
19     headers = {
20         'User-Agent':'Mozilla/5.0 (Windows NT 10.0; Win64; x64) AppleWebKit/537.36 (KHTML, like Gecko) Chrome/67.0.3396.87 Safari/537.36'
21     },
22     cookies = r1_cookie_dict
23 )
24
25 #点赞
26 r1 = requests.post(
27     url = 'https://dig.chouti.com/link/vote?linksId=20307681',
28     headers = {
29         'User-Agent':'Mozilla/5.0 (Windows NT 10.0; Win64; x64) AppleWebKit/537.36 (KHTML, like Gecko) Chrome/67.0.3396.87 Safari/537.36'
30     },
31     cookies = r1_cookie_dict
32 )
33 print(r1.text)
通过上面的3个操作,我们就能够实现点赞功能个,当然不同的网站,虽然有差异,但是总体是相似的。

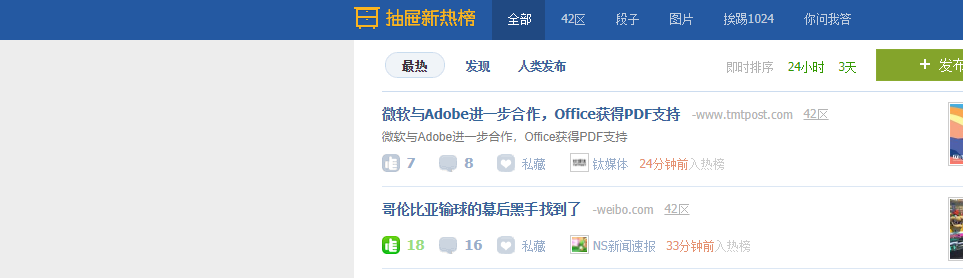
我们刷新一下页面,也就能够看到,点赞成功
上面是只对一个新闻进行点赞,如果我们想要对多个新闻进行点赞,那我们应该怎么操作呢?
那我们就需要获取每个新闻的id,然后进行url拼接就好了:
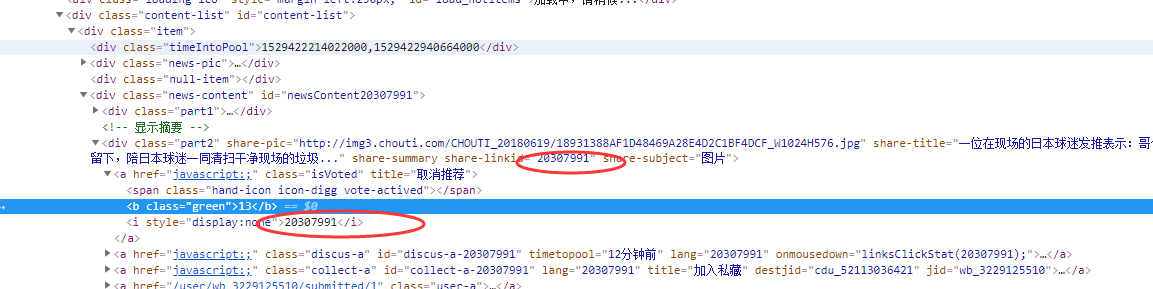
 1 import requests
 2 from bs4 import BeautifulSoup
 3 #1.先访问浏览器,得到一开始的cookie值(未授权的),
 4 r1 = requests.get(
 5     url = "https://dig.chouti.com/all/hot/recent/1",
 6     headers = {
 7         'User-Agent':'Mozilla/5.0 (Windows NT 10.0; Win64; x64) AppleWebKit/537.36 (KHTML, like Gecko) Chrome/67.0.3396.87 Safari/537.36'
 8     }
 9 )
10 r1_cookie_dict = r1.cookies.get_dict()
11
12 #2.发送用户名和密码,带上之前未授权的cookies
13 response_login = requests.post(
14     url="https://dig.chouti.com/login",
15     data = {
16         'phone':'86xxxxxxxxxxx',
17         'password' : 'xxxxxxxxxx',
18         'oneMonth': 1,
19     },
20     headers = {
21         'User-Agent':'Mozilla/5.0 (Windows NT 10.0; Win64; x64) AppleWebKit/537.36 (KHTML, like Gecko) Chrome/67.0.3396.87 Safari/537.36'
22     },
23     cookies = r1_cookie_dict
24 )
25
26 response_index = requests.get(
27     url = 'https://dig.chouti.com/',
28     headers = {
29         'User-Agent':'Mozilla/5.0 (Windows NT 10.0; Win64; x64) AppleWebKit/537.36 (KHTML, like Gecko) Chrome/67.0.3396.87 Safari/537.36'
30     }
31 )
32
33 soup = BeautifulSoup(response_index.text,'html.parser')
34 div = soup.find(attrs={'id':'content-list'})
35 item_list = div.find_all(attrs={'class':'item'})
36 for item in item_list:
37     tag = item.find(attrs={'class':'part2'})
38     if not tag:
39         continue
40     nid = tag.get('share-linkid')
41     # 点赞
42     r1 = requests.post(
43         url='https://dig.chouti.com/link/vote?linksId=%s' % nid,
44         headers={
45             'User-Agent': 'Mozilla/5.0 (Windows NT 10.0; Win64; x64) AppleWebKit/537.36 (KHTML, like Gecko) Chrome/67.0.3396.87 Safari/537.36'
46         },
47         cookies=r1_cookie_dict
48     )
49     print(r1.text)
这里我们就需要用到beautifulsoup,对HTML进行分析,然后获得相应的 div的id
requests模块相关内容
requests中的参数:(红色的参数必须掌握,牢记)
def request(method, url, **kwargs):
    """Constructs and sends a :class:`Request <Request>`.
    :param method: 请求方式,post或者get
    :param url: 爬取的url
    :param params: get方式传递参数 http://www.baidu.com?k1=v2&nid=888   那这个参数就是一字典的形式表示后面的参数 params={'k1':'v1','mid':888}
    :param data: 提供的数据
    :param json: 在内部帮助我们进行序列化,如果设置了这个参数,自动把请求头变成了application/json
    :param headers: 定义请求头:headers = {'content-type':'application/json'},不同网站请求头不一定相同,有可能是json或者是x-www-form-urlencoded等
    :param cookies: 请求之后得到的cookies值


    :param files: 可以进行上传文件(optional) Dictionary of ``'name': file-like-objects`` (or ``{'name': file-tuple}``) for multipart encoding upload.
        ``file-tuple`` can be a 2-tuple ``('filename', fileobj)``, 3-tuple ``('filename', fileobj, 'content_type')``
        or a 4-tuple ``('filename', fileobj, 'content_type', custom_headers)``, where ``'content-type'`` is a string
        defining the content type of the given file and ``custom_headers`` a dict-like object containing additional headers
        to add for the file.
    :param auth: 定制请求头,验证api规则,把用户名密码弄成请求头(获取不到HTML的form,如路由器登录)(optional) Auth tuple to enable Basic/Digest/Custom HTTP Auth.
    :param timeout: (optional) How long to wait for the server to send data
        before giving up, as a float, or a :ref:`(connect timeout, read
        timeout) <timeouts>` tuple.
    :type timeout: float or tuple
    :param allow_redirects: 是否允许重定向(optional) Boolean. Set to True if POST/PUT/DELETE redirect following is allowed.如果允许,拿到的就是重定向之后的结果
    :type allow_redirects: bool
    :param proxies: ip代理,使用不同的ip爬取数据(optional) Dictionary mapping protocol to the URL of the proxy.
    :param verify: 有些网站需要证书,基于https,需要确认是不是要往下走,就好像yum安装时要输入y/N,(optional) whether the SSL cert will be verified. A CA_BUNDLE path can also be provided. Defaults to ``True``.
    :param stream:发文件的时候边发边取,不是一次性放入内存 (optional) if ``False``, the response content will be immediately downloaded.
    :param cert: 证书,特殊的网站有(optional) if String, path to ssl client cert file (.pem). If Tuple, ('cert', 'key') pair.
    :return: :class:`Response <Response>` object
    :rtype: requests.Response

    Usage::

      >>> import requests
      >>> req = requests.request('GET', 'http://httpbin.org/get')
      <Response [200]>
    """
使用方法展示:
def param_method_url():
    # requests.request(method='get', url='http://127.0.0.1:8000/test/')
    # requests.request(method='post', url='http://127.0.0.1:8000/test/')
    pass


def param_param():
    # - 可以是字典
    # - 可以是字符串
    # - 可以是字节(ascii编码以内)

    # requests.request(method='get',
    # url='http://127.0.0.1:8000/test/',
    # params={'k1': 'v1', 'k2': '水电费'})

    # requests.request(method='get',
    # url='http://127.0.0.1:8000/test/',
    # params="k1=v1&k2=水电费&k3=v3&k3=vv3")

    # requests.request(method='get',
    # url='http://127.0.0.1:8000/test/',
    # params=bytes("k1=v1&k2=k2&k3=v3&k3=vv3", encoding='utf8'))

    # 错误
    # requests.request(method='get',
    # url='http://127.0.0.1:8000/test/',
    # params=bytes("k1=v1&k2=水电费&k3=v3&k3=vv3", encoding='utf8'))
    pass


def param_data():
    # 可以是字典
    # 可以是字符串
    # 可以是字节
    # 可以是文件对象

    # requests.request(method='POST',
    # url='http://127.0.0.1:8000/test/',
    # data={'k1': 'v1', 'k2': '水电费'})

    # requests.request(method='POST',
    # url='http://127.0.0.1:8000/test/',
    # data="k1=v1; k2=v2; k3=v3; k3=v4"
    # )

    # requests.request(method='POST',
    # url='http://127.0.0.1:8000/test/',
    # data="k1=v1;k2=v2;k3=v3;k3=v4",
    # headers={'Content-Type': 'application/x-www-form-urlencoded'}
    # )

    # requests.request(method='POST',
    # url='http://127.0.0.1:8000/test/',
    # data=open('data_file.py', mode='r', encoding='utf-8'), # 文件内容是:k1=v1;k2=v2;k3=v3;k3=v4
    # headers={'Content-Type': 'application/x-www-form-urlencoded'}
    # )
    pass


def param_json():
    # 将json中对应的数据进行序列化成一个字符串,json.dumps(...)
    # 然后发送到服务器端的body中,并且Content-Type是 {'Content-Type': 'application/json'}
    requests.request(method='POST',
                     url='http://127.0.0.1:8000/test/',
                     json={'k1': 'v1', 'k2': '水电费'})


def param_headers():
    # 发送请求头到服务器端
    requests.request(method='POST',
                     url='http://127.0.0.1:8000/test/',
                     json={'k1': 'v1', 'k2': '水电费'},
                     headers={'Content-Type': 'application/x-www-form-urlencoded'}
                     )


def param_cookies():
    # 发送Cookie到服务器端
    requests.request(method='POST',
                     url='http://127.0.0.1:8000/test/',
                     data={'k1': 'v1', 'k2': 'v2'},
                     cookies={'cook1': 'value1'},
                     )
    # 也可以使用CookieJar(字典形式就是在此基础上封装)
    from http.cookiejar import CookieJar
    from http.cookiejar import Cookie

    obj = CookieJar()
    obj.set_cookie(Cookie(version=0, name='c1', value='v1', port=None, domain='', path='/', secure=False, expires=None,
                          discard=True, comment=None, comment_url=None, rest={'HttpOnly': None}, rfc2109=False,
                          port_specified=False, domain_specified=False, domain_initial_dot=False, path_specified=False)
                   )
    requests.request(method='POST',
                     url='http://127.0.0.1:8000/test/',
                     data={'k1': 'v1', 'k2': 'v2'},
                     cookies=obj)


def param_files():
    # 发送文件
    # file_dict = {
    # 'f1': open('readme', 'rb')
    # }
    # requests.request(method='POST',
    # url='http://127.0.0.1:8000/test/',
    # files=file_dict)

    # 发送文件,定制文件名
    # file_dict = {
    # 'f1': ('test.txt', open('readme', 'rb'))
    # }
    # requests.request(method='POST',
    # url='http://127.0.0.1:8000/test/',
    # files=file_dict)

    # 发送文件,定制文件名
    # file_dict = {
    # 'f1': ('test.txt', "hahsfaksfa9kasdjflaksdjf")
    # }
    # requests.request(method='POST',
    # url='http://127.0.0.1:8000/test/',
    # files=file_dict)

    # 发送文件,定制文件名
    # file_dict = {
    #     'f1': ('test.txt', "hahsfaksfa9kasdjflaksdjf", 'application/text', {'k1': '0'})
    # }
    # requests.request(method='POST',
    #                  url='http://127.0.0.1:8000/test/',
    #                  files=file_dict)

    pass


def param_auth():
    from requests.auth import HTTPBasicAuth, HTTPDigestAuth

    ret = requests.get('https://api.github.com/user', auth=HTTPBasicAuth('wupeiqi', 'sdfasdfasdf'))
    print(ret.text)

    # ret = requests.get('http://192.168.1.1',
    # auth=HTTPBasicAuth('admin', 'admin'))
    # ret.encoding = 'gbk'
    # print(ret.text)

    # ret = requests.get('http://httpbin.org/digest-auth/auth/user/pass', auth=HTTPDigestAuth('user', 'pass'))
    # print(ret)
    #


def param_timeout():
    # ret = requests.get('http://google.com/', timeout=1)
    # print(ret)

    # ret = requests.get('http://google.com/', timeout=(5, 1))
    # print(ret)
    pass


def param_allow_redirects():
    ret = requests.get('http://127.0.0.1:8000/test/', allow_redirects=False)
    print(ret.text)


def param_proxies():
    # proxies = {
    # "http": "61.172.249.96:80",
    # "https": "http://61.185.219.126:3128",
    # }

    # proxies = {'http://10.20.1.128': 'http://10.10.1.10:5323'}

    # ret = requests.get("http://www.proxy360.cn/Proxy", proxies=proxies)
    # print(ret.headers)


    # from requests.auth import HTTPProxyAuth
    #
    # proxyDict = {
    # 'http': '77.75.105.165',
    # 'https': '77.75.105.165'
    # }
    # auth = HTTPProxyAuth('username', 'mypassword')
    #
    # r = requests.get("http://www.google.com", proxies=proxyDict, auth=auth)#代理的时候把用户名和密码一起带上
    # print(r.text)

    pass


def param_stream():
    ret = requests.get('http://127.0.0.1:8000/test/', stream=True)
    print(ret.content)
    ret.close()

    # from contextlib import closing
    # with closing(requests.get('http://httpbin.org/get', stream=True)) as r:
    # # 在此处理响应。
    # for i in r.iter_content():
    # print(i)


def requests_session():
    import requests

    session = requests.Session()

    ### 1、首先登陆任何页面,获取cookie

    i1 = session.get(url="http://dig.chouti.com/help/service")

    ### 2、用户登陆,携带上一次的cookie,后台对cookie中的 gpsd 进行授权
    i2 = session.post(
        url="http://dig.chouti.com/login",
        data={
            'phone': "8615131255089",
            'password': "xxxxxx",
            'oneMonth': ""
        }
    )

    i3 = session.post(
        url="http://dig.chouti.com/link/vote?linksId=8589623",
    )
    print(i3.text)
关于数据传送的形式:
对于数据是以data形式还是以json格式发送过去,这个我们第一可以看调试:

如果是Form Data 的形式的话那么我们就可以用data,如果是payload字样的时候就使用json形式发送相关数据。
当然,如果你认为这个还是比较麻烦的,我们可以就使用data:
data = json.dumps({
        'phone':'86xxxxxx',
        'password' : xxxxxx',
        'oneMonth': 1,
    }),
一旦使用了json.dumps就会把数据变成字符串,也就相当于变成了json格式的数据。
