
Ajax
原生ajax
Ajax主要就是使用 【XmlHttpRequest】对象来完成请求的操作,该对象在主流浏览器中均存在(除早起的IE),Ajax首次出现IE5.5中存在(ActiveX控件)。
XmlHttpRequest对象的主要方法:
a. void open(String method,String url,Boolen async)
   用于创建请求

   参数:
       method: 请求方式(字符串类型),如:POST、GET、DELETE...
       url:    要请求的地址(字符串类型)
       async:  是否异步(布尔类型)

b. void send(String body)
    用于发送请求

    参数:
        body: 要发送的数据(字符串类型)

c. void setRequestHeader(String header,String value)
    用于设置请求头,可以用在做csrf验证上main

    参数:
        header: 请求头的key(字符串类型)
        vlaue:  请求头的value(字符串类型)

d. String getAllResponseHeaders()
    获取所有响应头

    返回值:
        响应头数据(字符串类型)

e. String getResponseHeader(String header)
    获取响应头中指定header的值

    参数:
        header: 响应头的key(字符串类型)

    返回值:
        响应头中指定的header对应的值

f. void abort()

    终止请求
XmlHttpRequest对象的主要属性:
a. Number readyState
   状态值(整数)

   详细:
      0-未初始化,尚未调用open()方法;
      1-启动,调用了open()方法,未调用send()方法;
      2-发送,已经调用了send()方法,未接收到响应;
      3-接收,已经接收到部分响应数据;
      4-完成,已经接收到全部响应数据;

b. Function onreadystatechange
   当readyState的值改变时自动触发执行其对应的函数(回调函数)

c. String responseText
   服务器返回的数据(字符串类型)

d. XmlDocument responseXML
   服务器返回的数据(Xml对象)

e. Number states
   服务端返回的状态码(整数),如:200、404...

f. String statesText
   状态码对应的状态文本(字符串),如:OK、NotFound...
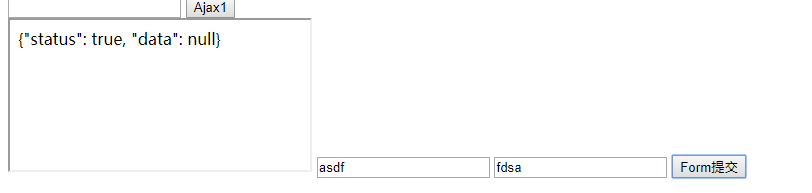
xmlhttpresponse发送原生的ajax案例:(GET方式)
views.py:
def ajax(request):
    return render(request,'ajax.html')
def ajax_json(request):
    import json
    ret = {'status':True,'data':None}
    return HttpResponse(json.dumps(ret))
ajax.html:
<input type="text">
    <input type="button" value="Ajax1" onclick="Ajax1();">
    <script>
        function Ajax1(){
            var xhr = new XMLHttpRequest();
            xhr.open('GET','/ajax_json/',true);
            xhr.onreadystatechange = function(){
                if(xhr.readyState == 4){
                    //执行完毕
                    console.log(xhr.responseText);
                }
            }
            xhr.send("name=root;pwd=123");
        }

    </script>
之后我们点击按钮,在console上就可以看到返回的数据
xmlhttpresponse发送原生的ajax案例:(POST方式)
那如果用上述方法发送的话肯定是收不到post数据的,需要给它加上一个请求头:
<script>
        function Ajax1(){
            var xhr = new XMLHttpRequest();
            xhr.open('POST','/ajax_json/',true);
            xhr.onreadystatechange = function(){
                if(xhr.readyState == 4){
                    //执行完毕
                    console.log(xhr.responseText);
                }
            }
            //设置请求头
            xhr.setRequestHeader('Content-type','application/x-www-form-urlencoded; charset-UTF-8');
            xhr.send("name=root;pwd=123");
        }
解决兼容性问题:
function getXHR(){
            var xhr = null;
            if(XMLHttpRequest){
                xhr = new XMLHttpRequest();
            }else{
                xhr = new ActiveXObject("Microsoft.XMLHTTP");
            }
            return xhr;

        }
jquery ajax:
jQuery Ajax本质 XMLHttpRequest 或 ActiveXObject
<p>
   <input type="button" onclick="XmlSendRequest();" value='Ajax请求' />
</p>
    <script type="text/javascript" src="jquery-1.12.4.js"></script>
    <script>

        function JqSendRequest(){
            $.ajax({
                url: "http://c2.com:8000/test/",
                type: 'GET',
                dataType: 'text',
                success: function(data, statusText, xmlHttpRequest){
                    console.log(data);
                }
            })
        }
“伪”AJAX
首先我们来看一个例子:
<input type="text" id="url">
<input type="button" value="发送iframe请求" onclick="iframeRequest();">
<iframe id="ifm" src="http://www.baidu.com"></iframe>
    <script src="/static/jquery-1.12.4.js"></script>
    <script>

        function iframeRequest() {
            var url = $('#url').val()
            $('#ifm').attr('src',url)
        }

当我们在text框中输入地址,点击按钮的时候,就会跳转到相应的网址。但是此时当我们提交网址的时候我们的页面是不会刷新的。我们就可以用iframe的这个特点实现一个伪‘ajax’
<form action="/ajax_json/" method="post" target="ifm1">
        <iframe name="ifm1"></iframe>
        <input type="text" name="username">
        <input type="text" name="email">
        <input type="submit" value="Form提交">
</form>

平常的form提交的时候都需要刷新页面提交数据,如果我们想要用iframe伪造提交,就可以用到form的一个参数target,设置为iframe的id选择器名称就可以了。此时我们的数据就可以发送给后台
那我们看到返回的数据在iframe中了,我们怎么把这个数据取出来呢?
这里我们可以看到iframe中其实是一个上下文的形式
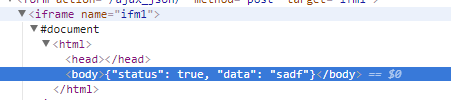
我们就没有办法用jQuery中的innerhtml或者children等进行获取,那我们还可以知道的是这个数据是在服务端返回的时候才会被传到iframe中的。对于iframe来说如果有东西返回了,这里面就会有一个onload事件
<form action="/ajax_json/" method="post" target="ifm1">
        <iframe id="ifm1" name="ifm1"></iframe>
        <input type="text" name="username">
        <input type="text" name="email">
        <input type="submit" onclick="submitForm();" value="Form提交">
</form>

js代码:
function submitForm() {
            $('#ifm1').load(function () {
                var text = $('#ifm1').contents().find('body').text()
                var obj = JSON.parse(text)
            })
}
3种方式的选择时机
如果发送的是普通的数据,比如用户填入的值等,直接用jQuery-》XMLHttpRequest-》iframe
ajax文件上传
基于原生的ajax:
upload.html:
 1 <!DOCTYPE html>
 2 <html lang="en">
 3 <head>
 4     <meta charset="UTF-8">
 5     <title>Title</title>
 6     <style>
 7         .upload{
 8             display: inline-block;
 9             padding: 10px;
10             background-color: coral;
11             position: absolute;
12             top:0;
13             bottom: 0;
14             left: 0;
15             right: 0;
16             z-index: 9;
17             border-radius: 8px;
18             text-align: center;
19         }
20         #f1{
21             width: 75px;
22             height:40px;
23             position: absolute;
24             top:0;
25             bottom: 0;
26             left: 0;
27             right: 0;
28             opacity: 0;
29             z-index: 10;
30
31         }
32     </style>
33 </head>
34 <body>
35     <div style="position: relative;width: 75px;height:40px;">
36         <input type="file" id="f1" name="uploadFile">
37         <a class="upload">上传</a>
38     </div>
39     <input type="submit" value="提交XHR" onclick="xhrSubmit();">
40     <script src="/static/jquery-1.12.4.js"></script>
41     <script>
42         function xhrSubmit(){
43             var file_obj=document.getElementById('f1').files[0];
44             var fd = new FormData();
45             fd.append('username','root');
46             fd.append('uploadFile',file_obj);
47
48             var xhr = new XMLHttpRequest();
49             xhr.open('POST','/upload_file/',true);
50             xhr.onreadystatechange=function(){
51                 if(xhr.readyState == 4){
52                     var obj = JSON.parse(xhr.responseText);
53                     console.log(obj)
54                 }
55             };
56             xhr.send(fd)
57         }
58     </script>
59 </body>
60 </html>
views.py
def upload(request):
    return render(request,'upload.html')
def upload_file(request):
    username = request.POST.get('username')
    fileName = request.FILES.get('uploadFile')
    print(username,fileName)
    with open(fileName.name,'wb') as f:
        for item in fileName.chunks():
            f.write(item)
    import json
    ret = {'status': True, 'data': username}
    return HttpResponse(json.dumps(ret))
这里要基于FormData类来进行存储文件,低版本不支持
基于jQuery:
    function jqSubmit(){
            var file_obj=document.getElementById('f1').files[0];
            var fd = new FormData();
            fd.append('username','root');
            fd.append('uploadFile',file_obj);

            $.ajax({
                url:'/upload_file/',
                type: 'POST',
                data: fd,
                processData: false, //tell jQuery not to process the data
                contentType: false, //tell jQuery not to set contenttype
                success:function(data,s1,s2){
                    console.log(data);
                    console.log(s1);
                    console.log(s2);
                }
            })
        }
在这里我们因为要上传文件,所以要加上参数processData,contentType这两个参数。这样才能运行成功
基于iframe:(这个兼容性很强)
  <form action="/upload_file/" method="post" enctype="multipart/form-data" target="ifm1">
        <iframe id="ifm1" name="ifm1" style="display: none"></iframe>
        <input type="file" name="uploadFile">
        <input type="submit" onclick="iframeSubmit();" value="Form提交">
    </form>
    <script src="/static/jquery-1.12.4.js"></script>
    <script>
        function iframeSubmit() {
            $('#ifm1').load(function () {
                var text = $('#ifm1').contents().find('body').text()
                var obj = JSON.parse(text)
                console.log(obj)
            })
        }
文件预览:
我们在接受文件的时候,我们可以把文件的url路径返回去,然后在添加一个div,在里面插入图片即可:
view.py:
def upload_file(request):
    username = request.POST.get('username')
    fileName = request.FILES.get('uploadFile')
    import os
    img_path = os.path.join('static/imgs/',fileName.name)
    with open(img_path,'wb') as f:
        for item in fileName.chunks():
            f.write(item)
    import json
    ret = {'status': True, 'data': img_path}
    return HttpResponse(json.dumps(ret))
upload.html:
<form action="/upload_file/" method="post" enctype="multipart/form-data" target="ifm1">
        <iframe id="ifm1" name="ifm1" style="display: none"></iframe>
        <input type="file" name="uploadFile" onchange="changeUpload();">
        <input type="submit" onclick="iframeSubmit();" value="Form提交">
    </form>
    <div id ="preview" style="width:100px;height:300px;">

    </div>
    <script src="/static/jquery-1.12.4.js"></script>
    <script>

        function iframeSubmit() {
            $('#ifm1').load(function () {
                var text = $('#ifm1').contents().find('body').text()
                var obj = JSON.parse(text)

                $('#preview').empty()
                var imgTag = document.createElement('img')
                imgTag.src = '/'+obj.data;
                $('#preview').append(imgTag);
            })
        }
