Mybatis教程
Mybatis教程-实战看这一篇就够了
推荐SpringCloud教程:https://blog.csdn.net/hellozpc/article/details/83692496
文章目录
- 1.从JDBC谈起
- 2.MyBatis介绍
- 3.Mybaits整体架构
- 4.快速入门(quick start)
- 4.1.引入依赖(pom.xml)
- 4.2.全局配置文件(mybatis-config.xml)
- 4.3.配置Map.xml(MyMapper.xml)
- 4.4.修改全局配置文件(mybatis-config.xml)
- 4.5.构建sqlSessionFactory(MybatisTest.java)
- 4.6.打开sqlSession会话,并执行sql(MybatisTest.java)
- 4.7.目录结构
- 5.分析
- 6.完整的CRUD操作
- 6.1.创建UserDao接口
- 6.2.创建UserDaoImpl
- 6.3.编写UserDao对应的UserDaoMapper.xml
- 6.4.添加UserDao的测试用例
- 6.5.编写UserDao的测试用例
- 6.6.目录结构
- 6.7.解决数据库字段名和实体类属性名不一致的问题
- 7. 动态代理Mapper实现类
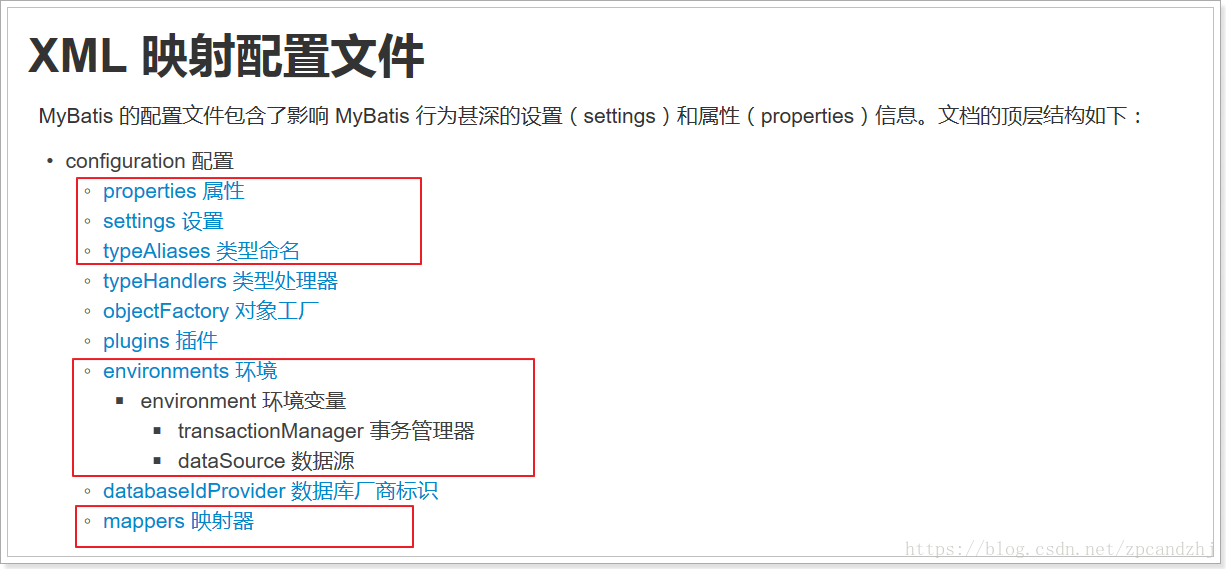
- 8.mybatis-config.xml详解
- 8.1.properties属性读取外部资源
- 8.2.settings设置
- 8.3.typeAliases
- 8.4.typeHandlers(类型处理器)
- 8.5.plugins(插件)拦截器
- 8.6.environments(环境)
- 8.7.mappers
- 9.Mapper XML文件详解
- 10.动态sql
- 11.缓存
- 12.高级查询
- 13.延迟加载
- 14.如果sql语句中出现’<’的解决方案
- 15.Spring 集成Mybatis
- 16.SpringBoot 集成Mybatis
- 17.Mybatis Generator的使用
- 18.MyBatis整合分页插件 pageHelper
1.从JDBC谈起
1.1.使用IDEA创建maven工程


1.2.引入mysql依赖包
<dependency>
    <groupId>mysql</groupId>
    <artifactId>mysql-connector-java</artifactId>
    <version>5.1.32</version>
</dependency>- 1
- 2
- 3
- 4
- 5

1.3.准备数据
-
创建数据库:
CREATE DATABASE ssmdemo; -
创建表:
DROP TABLE IF EXISTStb_user;
CREATE TABLEtb_user(
idchar(32) NOT NULL,
user_namevarchar(32) DEFAULT NULL,
passwordvarchar(32) DEFAULT NULL,
namevarchar(32) DEFAULT NULL,
ageint(10) DEFAULT NULL,
sexint(2) DEFAULT NULL,
birthdaydate DEFAULT NULL,
createddatetime DEFAULT NULL,
updateddatetime DEFAULT NULL,
PRIMARY KEY (id)
) ENGINE=InnoDB DEFAULT CHARSET=utf8; -
插入数据:
INSERT INTOssmdemo.tb_user(userName,password,name,age,sex,birthday,created,updated) VALUES ( ‘zpc’, ‘123456’, ‘鹏程’, ‘22’, ‘1’, ‘1990-09-02’, sysdate(), sysdate());
INSERT INTOssmdemo.tb_user(userName,password,name,age,sex,birthday,created,updated) VALUES ( ‘hj’, ‘123456’, ‘静静’, ‘22’, ‘1’, ‘1993-09-05’, sysdate(), sysdate());
1.4.JDBC基础代码回顾
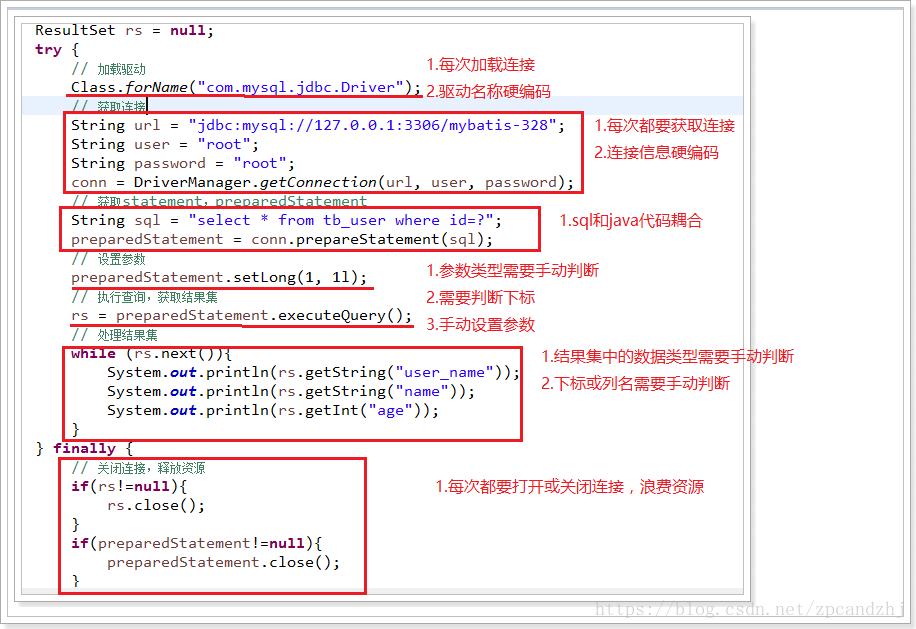
- JDBCTest.java
import java.sql.Connection;
import java.sql.DriverManager;
import java.sql.PreparedStatement;
import java.sql.ResultSet;

/**
 * @author Evan
 */
public class JDBCTest {
    public static void main(String[] args) throws Exception {
        Connection connection = null;
        PreparedStatement prepareStatement = null;
        ResultSet rs = null;

        try {
            // 加载驱动
            Class.forName("com.mysql.jdbc.Driver");
            // 获取连接
            String url = "jdbc:mysql://127.0.0.1:3306/ssmdemo";
            String user = "root";
            String password = "123456";
            connection = DriverManager.getConnection(url, user, password);
            // 获取statement,preparedStatement
            String sql = "select * from tb_user where id=?";
            prepareStatement = connection.prepareStatement(sql);
            // 设置参数
            prepareStatement.setLong(1, 1l);
            // 执行查询
            rs = prepareStatement.executeQuery();
            // 处理结果集
            while (rs.next()) {
                System.out.println(rs.getString("userName"));
                System.out.println(rs.getString("name"));
                System.out.println(rs.getInt("age"));
                System.out.println(rs.getDate("birthday"));
            }
        } finally {
            // 关闭连接,释放资源
            if (rs != null) {
                rs.close();
            }
            if (prepareStatement != null) {
                prepareStatement.close();
            }
            if (connection != null) {
                connection.close();
            }
        }
    }
}- 1
- 2
- 3
- 4
- 5
- 6
- 7
- 8
- 9
- 10
- 11
- 12
- 13
- 14
- 15
- 16
- 17
- 18
- 19
- 20
- 21
- 22
- 23
- 24
- 25
- 26
- 27
- 28
- 29
- 30
- 31
- 32
- 33
- 34
- 35
- 36
- 37
- 38
- 39
- 40
- 41
- 42
- 43
- 44
- 45
- 46
- 47
- 48
- 49
- 50
1.5.JDBC缺点分析
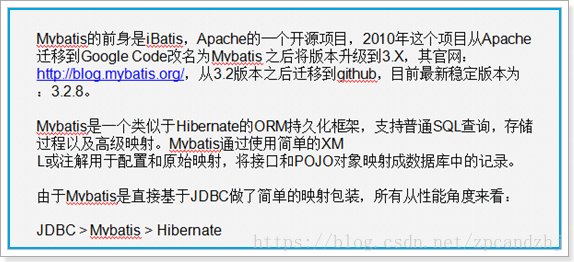
2.MyBatis介绍
官方文档 http://www.mybatis.org/mybatis-3/getting-started.html
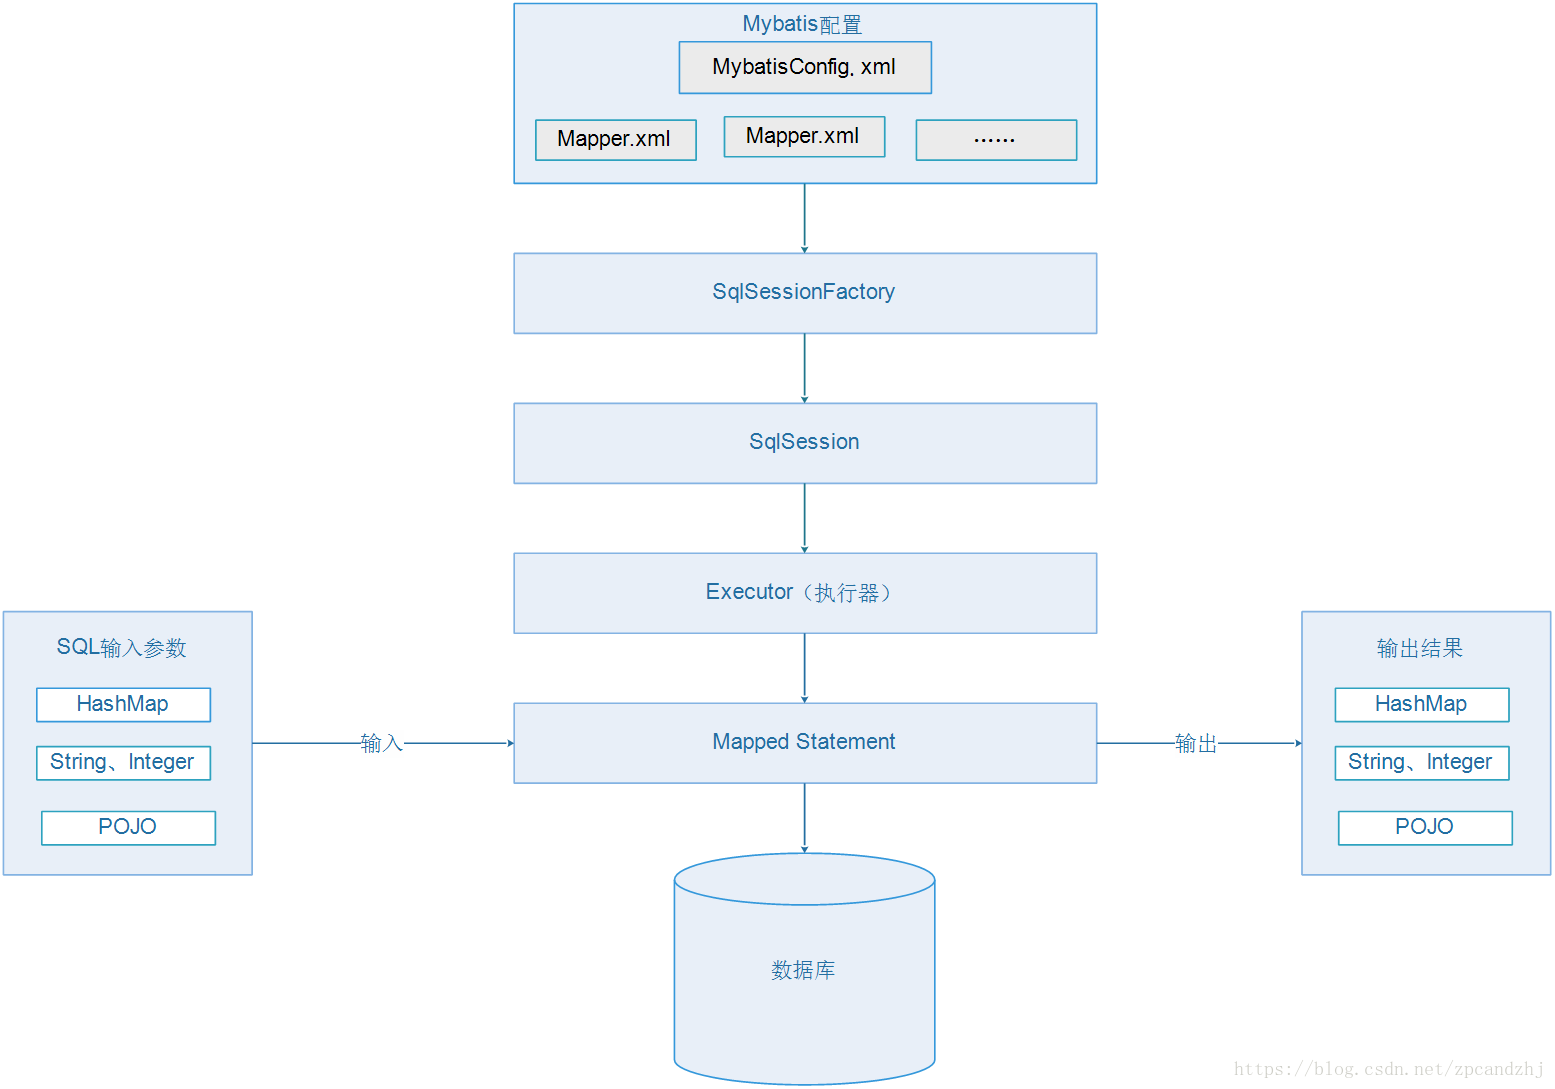
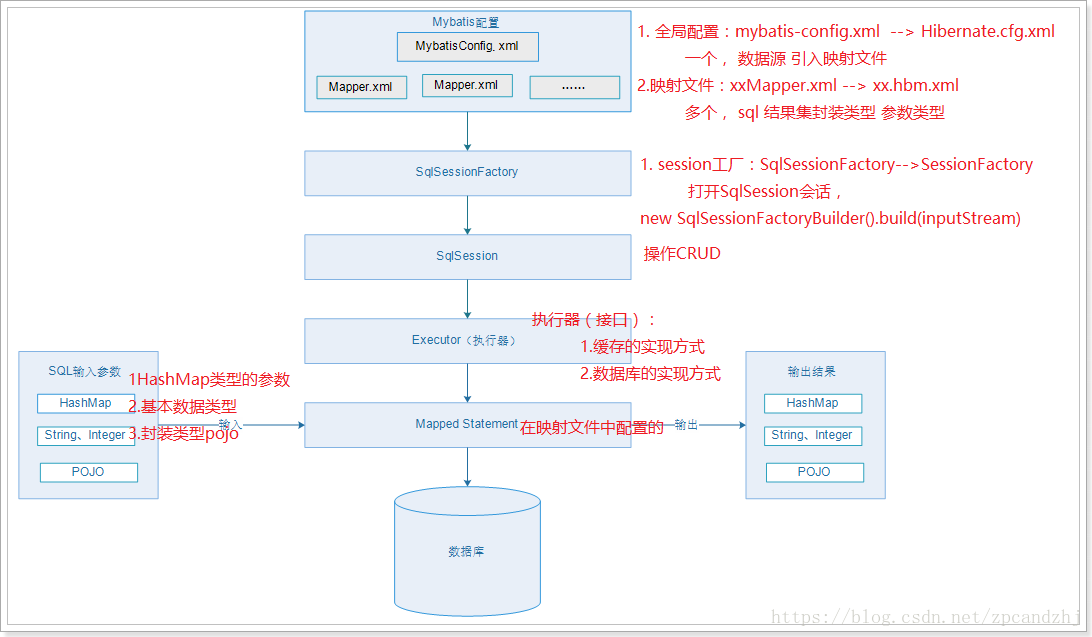
3.Mybaits整体架构
4.快速入门(quick start)
4.1.引入依赖(pom.xml)
<dependency>
    <groupId>org.mybatis</groupId>
    <artifactId>mybatis</artifactId>
    <version>3.2.8</version>
</dependency>- 1
- 2
- 3
- 4
- 5
4.2.全局配置文件(mybatis-config.xml)
<?xml version="1.0" encoding="UTF-8" ?>
<!DOCTYPE configuration
PUBLIC "-//mybatis.org//DTD Config 3.0//EN"
"http://mybatis.org/dtd/mybatis-3-config.dtd">
<!-- 根标签 -->
<configuration>
<properties>
<property name="driver" value="com.mysql.jdbc.Driver"/>
<property name="url" value="jdbc:mysql://127.0.0.1:3306/mybatis-110?useUnicode=true&characterEncoding=utf-8&allowMultiQueries=true"/>
<property name="username" value="root"/>
<property name="password" value="123456"/>
</properties>
<!-- 环境,可以配置多个,default:指定采用哪个环境 -->
<environments default="test">
<!-- id:唯一标识 -->
<environment id="test">
<!-- 事务管理器,JDBC类型的事务管理器 -->
<transactionManager type="JDBC" />
<!-- 数据源,池类型的数据源 -->
<dataSource type="POOLED">
<property name="driver" value="com.mysql.jdbc.Driver" />
<property name="url" value="jdbc:mysql://127.0.0.1:3306/mybatis-110" />
<property name="username" value="root" />
<property name="password" value="123456" />
</dataSource>
</environment>
<environment id="development">
<!-- 事务管理器,JDBC类型的事务管理器 -->
<transactionManager type="JDBC" />
<!-- 数据源,池类型的数据源 -->
<dataSource type="POOLED">
<property name="driver" value="${driver}" /> <!-- 配置了properties,所以可以直接引用 -->
<property name="url" value="${url}" />
<property name="username" value="${username}" />
<property name="password" value="${password}" />
</dataSource>
</environment>
</environments>
</configuration>- 1
- 2
- 3
- 4
- 5
- 6
- 7
- 8
- 9
- 10
- 11
- 12
- 13
- 14
- 15
- 16
- 17
- 18
- 19
- 20
- 21
- 22
- 23
- 24
- 25
- 26
- 27
- 28
- 29
- 30
- 31
- 32
- 33
- 34
- 35
- 36
- 37
- 38
- 39
- 40
4.3.配置Map.xml(MyMapper.xml)
<?xml version="1.0" encoding="UTF-8" ?>
<!DOCTYPE mapper
  PUBLIC "-//mybatis.org//DTD Mapper 3.0//EN"
  "http://mybatis.org/dtd/mybatis-3-mapper.dtd">
<!-- mapper:根标签,namespace:命名空间,随便写,一般保证命名空间唯一 -->
<mapper namespace="MyMapper">
   <!-- statement,内容:sql语句。id:唯一标识,随便写,在同一个命名空间下保持唯一
      resultType:sql语句查询结果集的封装类型,tb_user即为数据库中的表
    -->
   <select id="selectUser" resultType="com.zpc.mybatis.User">
      select * from tb_user where id = #{id}
   </select>
</mapper>- 1
- 2
- 3
- 4
- 5
- 6
- 7
- 8
- 9
- 10
- 11
- 12
- 13
4.4.修改全局配置文件(mybatis-config.xml)
配上MyMapper.xml
<?xml version="1.0" encoding="UTF-8" ?>
<!DOCTYPE configuration
  PUBLIC "-//mybatis.org//DTD Config 3.0//EN"
  "http://mybatis.org/dtd/mybatis-3-config.dtd">
<!-- 根标签 -->
<configuration>
   <!-- 环境,可以配置多个,default:指定采用哪个环境 -->
   <environments default="test">
      <!-- id:唯一标识 -->
      <environment id="test">
         <!-- 事务管理器,JDBC类型的事务管理器 -->
         <transactionManager type="JDBC" />
         <!-- 数据源,池类型的数据源 -->
         <dataSource type="POOLED">
            <property name="driver" value="com.mysql.jdbc.Driver" />
            <property name="url" value="jdbc:mysql://127.0.0.1:3306/ssmdemo" />
            <property name="username" value="root" />
            <property name="password" value="123456" />
         </dataSource>
      </environment>
   </environments>
   <mappers>
     <mapper resource="mappers/MyMapper.xml" />
   </mappers>
</configuration>- 1
- 2
- 3
- 4
- 5
- 6
- 7
- 8
- 9
- 10
- 11
- 12
- 13
- 14
- 15
- 16
- 17
- 18
- 19
- 20
- 21
- 22
- 23
- 24
- 25
4.5.构建sqlSessionFactory(MybatisTest.java)
		// 指定全局配置文件
        String resource = "mybatis-config.xml";
        // 读取配置文件
        InputStream inputStream = Resources.getResourceAsStream(resource);
        // 构建sqlSessionFactory
SqlSessionFactory sqlSessionFactory = new SqlSessionFactoryBuilder().build(inputStream);- 1
- 2
- 3
- 4
- 5
- 6
4.6.打开sqlSession会话,并执行sql(MybatisTest.java)
	    // 获取sqlSession
        SqlSession sqlSession = sqlSessionFactory.openSession();
        // 操作CRUD,第一个参数:指定statement,规则:命名空间+“.”+statementId
        // 第二个参数:指定传入sql的参数:这里是用户id
        User user = sqlSession.selectOne("MyMapper.selectUser", 1);
System.out.println(user);- 1
- 2
- 3
- 4
- 5
- 6
- 完整代码:
MybatisTest.java
mport com.zpc.test.pojo.User;
import org.apache.ibatis.io.Resources;
import org.apache.ibatis.session.SqlSession;
import org.apache.ibatis.session.SqlSessionFactory;
import org.apache.ibatis.session.SqlSessionFactoryBuilder;

import java.io.InputStream;

public class MybatisTest {
   public static void main(String[] args) throws Exception {
      // 指定全局配置文件
      String resource = "mybatis-config.xml";
      // 读取配置文件
      InputStream inputStream = Resources.getResourceAsStream(resource);
      // 构建sqlSessionFactory
      SqlSessionFactory sqlSessionFactory = new SqlSessionFactoryBuilder().build(inputStream);
      // 获取sqlSession
      SqlSession sqlSession = sqlSessionFactory.openSession();
      try {
         // 操作CRUD,第一个参数:指定statement,规则:命名空间+“.”+statementId
         // 第二个参数:指定传入sql的参数:这里是用户id
         User user = sqlSession.selectOne("MyMapper.selectUser", 1);
         System.out.println(user);
      } finally {
         sqlSession.close();
      }
   }
}- 1
- 2
- 3
- 4
- 5
- 6
- 7
- 8
- 9
- 10
- 11
- 12
- 13
- 14
- 15
- 16
- 17
- 18
- 19
- 20
- 21
- 22
- 23
- 24
- 25
- 26
- 27
- 28
- 29
User.java
import java.text.SimpleDateFormat;
import java.util.Date;

public class User {
    private String id;
    private String userName;
    private String password;
    private String name;
    private Integer age;
    private Integer sex;
    private Date birthday;
    private String created;
    private String updated;

    public String getId() {
        return id;
    }

    public void setId(String id) {
        this.id = id;
    }

    public String getUserName() {
        return userName;
    }

    public void setUserName(String userName) {
        this.userName = userName;
    }

    public String getPassword() {
        return password;
    }

    public void setPassword(String password) {
        this.password = password;
    }

    public String getName() {
        return name;
    }

    public void setName(String name) {
        this.name = name;
    }

    public Integer getAge() {
        return age;
    }

    public void setAge(Integer age) {
        this.age = age;
    }

    public Integer getSex() {
        return sex;
    }

    public void setSex(Integer sex) {
        this.sex = sex;
    }

    public Date getBirthday() {
        return birthday;
    }

    public void setBirthday(Date birthday) {
        this.birthday = birthday;
    }

    public String getCreated() {
        return created;
    }

    public void setCreated(String created) {
        this.created = created;
    }

    public String getUpdated() {
        return updated;
    }

    public void setUpdated(String updated) {
        this.updated = updated;
    }

    @Override
    public String toString() {
        return "User{" +
                "id='" + id + '\'' +
                ", userName='" + userName + '\'' +
                ", password='" + password + '\'' +
                ", name='" + name + '\'' +
                ", age=" + age +
                ", sex=" + sex +
                ", birthday='" + new SimpleDateFormat("yyyy-MM-dd").format(birthday) + '\'' +
                ", created='" + created + '\'' +
                ", updated='" + updated + '\'' +
                '}';
    }
}- 1
- 2
- 3
- 4
- 5
- 6
- 7
- 8
- 9
- 10
- 11
- 12
- 13
- 14
- 15
- 16
- 17
- 18
- 19
- 20
- 21
- 22
- 23
- 24
- 25
- 26
- 27
- 28
- 29
- 30
- 31
- 32
- 33
- 34
- 35
- 36
- 37
- 38
- 39
- 40
- 41
- 42
- 43
- 44
- 45
- 46
- 47
- 48
- 49
- 50
- 51
- 52
- 53
- 54
- 55
- 56
- 57
- 58
- 59
- 60
- 61
- 62
- 63
- 64
- 65
- 66
- 67
- 68
- 69
- 70
- 71
- 72
- 73
- 74
- 75
- 76
- 77
- 78
- 79
- 80
- 81
- 82
- 83
- 84
- 85
- 86
- 87
- 88
- 89
- 90
- 91
- 92
- 93
- 94
- 95
- 96
- 97
- 98
- 99
- 100
- 101
4.7.目录结构

5.分析
5.1.引入日志依赖包(pom.xml)
会自动引入log4j以及slf4j-api
<dependency>
    <groupId>org.slf4j</groupId>
    <artifactId>slf4j-log4j12</artifactId>
    <version>1.7.5</version>
</dependency>- 1
- 2
- 3
- 4
- 5
5.2.添加log4j.properties
log4j.rootLogger=DEBUG,A1
log4j.logger.org.apache=DEBUG
log4j.appender.A1=org.apache.log4j.ConsoleAppender
log4j.appender.A1.layout=org.apache.log4j.PatternLayout
log4j.appender.A1.layout.ConversionPattern=%-d{yyyy-MM-dd HH:mm:ss,SSS} [%t] [%c]-[%p] %m%n- 1
- 2
- 3
- 4
- 5
再次运行程序会打印日志:
2018-06-30 19:53:37,554 [main] [org.apache.ibatis.transaction.jdbc.JdbcTransaction]-[DEBUG] Opening JDBC Connection
2018-06-30 19:53:37,818 [main] [org.apache.ibatis.datasource.pooled.PooledDataSource]-[DEBUG] Created connection 2094411587.
2018-06-30 19:53:37,818 [main] [org.apache.ibatis.transaction.jdbc.JdbcTransaction]-[DEBUG] Setting autocommit to false on JDBC Connection [com.mysql.jdbc.JDBC4Connection@7cd62f43]
2018-06-30 19:53:37,863 [main] [MyMapper.selectUser]-[DEBUG] ==>  Preparing: select * from tb_user where id = ?
2018-06-30 19:53:37,931 [main] [MyMapper.selectUser]-[DEBUG] ==> Parameters: 1(Integer)
2018-06-30 19:53:37,953 [main] [MyMapper.selectUser]-[DEBUG] <==      Total: 1
User{id='1', userName='zpc', password='123456', name='鹏程', age=25, sex=1, birthday='1990-09-02', created='2018-06-30 18:20:18.0', updated='2018-06-30 18:20:18.0'}
2018-06-30 19:53:37,954 [main] [org.apache.ibatis.transaction.jdbc.JdbcTransaction]-[DEBUG] Resetting autocommit to true on JDBC Connection [com.mysql.jdbc.JDBC4Connection@7cd62f43]
2018-06-30 19:53:37,954 [main] [org.apache.ibatis.transaction.jdbc.JdbcTransaction]-[DEBUG] Closing JDBC Connection [com.mysql.jdbc.JDBC4Connection@7cd62f43]
2018-06-30 19:53:37,955 [main] [org.apache.ibatis.datasource.pooled.PooledDataSource]-[DEBUG] Returned connection 2094411587 to pool.- 1
- 2
- 3
- 4
- 5
- 6
- 7
- 8
- 9
- 10
5.3.MyBatis使用步骤总结
1)配置mybatis-config.xml 全局的配置文件 (1、数据源,2、外部的mapper)
2)创建SqlSessionFactory
3)通过SqlSessionFactory创建SqlSession对象
4)通过SqlSession操作数据库 CRUD
5)调用session.commit()提交事务
6)调用session.close()关闭会话
6.完整的CRUD操作
6.1.创建UserDao接口
import com.zpc.mybatis.pojo.User;
import java.util.List;

public interface UserDao {

    /**
     * 根据id查询用户信息
     *
     * @param id
     * @return
     */
    public User queryUserById(String id);

    /**
     * 查询所有用户信息
     *
     * @return
     */
    public List<User> queryUserAll();

    /**
     * 新增用户
     *
     * @param user
     */
    public void insertUser(User user);

    /**
     * 更新用户信息
     *
     * @param user
     */
    public void updateUser(User user);

    /**
     * 根据id删除用户信息
     *
     * @param id
     */
    public void deleteUser(String id);
}- 1
- 2
- 3
- 4
- 5
- 6
- 7
- 8
- 9
- 10
- 11
- 12
- 13
- 14
- 15
- 16
- 17
- 18
- 19
- 20
- 21
- 22
- 23
- 24
- 25
- 26
- 27
- 28
- 29
- 30
- 31
- 32
- 33
- 34
- 35
- 36
- 37
- 38
- 39
- 40
- 41
6.2.创建UserDaoImpl
import com.zpc.mybatis.dao.UserDao;
import com.zpc.mybatis.pojo.User;
import org.apache.ibatis.session.SqlSession;
import java.util.List;

public class UserDaoImpl implements UserDao {
    public SqlSession sqlSession;

    public UserDaoImpl(SqlSession sqlSession) {
        this.sqlSession = sqlSession;
    }

    @Override
    public User queryUserById(String id) {
        return this.sqlSession.selectOne("UserDao.queryUserById", id);
    }

    @Override
    public List<User> queryUserAll() {
        return this.sqlSession.selectList("UserDao.queryUserAll");
    }

    @Override
    public void insertUser(User user) {
        this.sqlSession.insert("UserDao.insertUser", user);
    }

    @Override
    public void updateUser(User user) {
        this.sqlSession.update("UserDao.updateUser", user);
    }

    @Override
    public void deleteUser(String id) {
        this.sqlSession.delete("UserDao.deleteUser", id);
    }

}- 1
- 2
- 3
- 4
- 5
- 6
- 7
- 8
- 9
- 10
- 11
- 12
- 13
- 14
- 15
- 16
- 17
- 18
- 19
- 20
- 21
- 22
- 23
- 24
- 25
- 26
- 27
- 28
- 29
- 30
- 31
- 32
- 33
- 34
- 35
- 36
- 37
- 38
6.3.编写UserDao对应的UserDaoMapper.xml
<?xml version="1.0" encoding="UTF-8" ?>
<!DOCTYPE mapper
        PUBLIC "-//mybatis.org//DTD Mapper 3.0//EN"
        "http://mybatis.org/dtd/mybatis-3-mapper.dtd">
<!-- mapper:根标签,namespace:命名空间,随便写,一般保证命名空间唯一 -->
<mapper namespace="UserDao">
    <!-- statement,内容:sql语句。id:唯一标识,随便写,在同一个命名空间下保持唯一
       resultType:sql语句查询结果集的封装类型,tb_user即为数据库中的表
     -->
    <!--<select id="queryUserById" resultType="com.zpc.mybatis.pojo.User">-->
    <!--select * from tb_user where id = #{id}-->
    <!--</select>-->

    <!--使用别名-->
    <select id="queryUserById" resultType="com.zpc.mybatis.pojo.User">
      select
       tuser.id as id,
       tuser.user_name as userName,
       tuser.password as password,
       tuser.name as name,
       tuser.age as age,
       tuser.birthday as birthday,
       tuser.sex as sex,
       tuser.created as created,
       tuser.updated as updated
       from
       tb_user tuser
       where tuser.id = #{id};
   </select>

    <select id="queryUserAll" resultType="com.zpc.mybatis.pojo.User">
        select * from tb_user;
    </select>

    <!--插入数据-->
    <insert id="insertUser" parameterType="com.zpc.mybatis.pojo.User">
        INSERT INTO tb_user (
        user_name,
        password,
        name,
        age,
        sex,
        birthday,
        created,
        updated
        )
        VALUES
        (
        #{userName},
        #{password},
        #{name},
        #{age},
        #{sex},
        #{birthday},
        now(),
        now()
        );
    </insert>

    <update id="updateUser" parameterType="com.zpc.mybatis.pojo.User">
        UPDATE tb_user
        <trim prefix="set" suffixOverrides=",">
            <if test="userName!=null">user_name = #{userName},</if>
            <if test="password!=null">password = #{password},</if>
            <if test="name!=null">name = #{name},</if>
            <if test="age!=null">age = #{age},</if>
            <if test="sex!=null">sex = #{sex},</if>
            <if test="birthday!=null">birthday = #{birthday},</if>
            updated = now(),
        </trim>
        WHERE
        (id = #{id});
    </update>

    <delete id="deleteUser">
        delete from tb_user where id=#{id}
    </delete>
</mapper>- 1
- 2
- 3
- 4
- 5
- 6
- 7
- 8
- 9
- 10
- 11
- 12
- 13
- 14
- 15
- 16
- 17
- 18
- 19
- 20
- 21
- 22
- 23
- 24
- 25
- 26
- 27
- 28
- 29
- 30
- 31
- 32
- 33
- 34
- 35
- 36
- 37
- 38
- 39
- 40
- 41
- 42
- 43
- 44
- 45
- 46
- 47
- 48
- 49
- 50
- 51
- 52
- 53
- 54
- 55
- 56
- 57
- 58
- 59
- 60
- 61
- 62
- 63
- 64
- 65
- 66
- 67
- 68
- 69
- 70
- 71
- 72
- 73
- 74
- 75
- 76
- 77
- 78
- 79
在mybatis-config.xml中添加配置:
<mappers>
    <mapper resource="mappers/MyMapper.xml"/>
    <mapper resource="mappers/UserDaoMapper.xml"/>
</mappers>- 1
- 2
- 3
- 4
6.4.添加UserDao的测试用例
Pom文件中添加junit依赖
<dependency>
    <groupId>junit</groupId>
    <artifactId>junit</artifactId>
    <version>4.12</version>
</dependency>- 1
- 2
- 3
- 4
- 5
按住Alt+Enter,选择create test


6.5.编写UserDao的测试用例
import com.zpc.mybatis.dao.UserDao;
import com.zpc.mybatis.dao.impl.UserDaoImpl;
import com.zpc.mybatis.pojo.User;
import org.apache.ibatis.io.Resources;
import org.apache.ibatis.session.SqlSession;
import org.apache.ibatis.session.SqlSessionFactory;
import org.apache.ibatis.session.SqlSessionFactoryBuilder;
import org.junit.Before;
import org.junit.Test;
import java.io.InputStream;
import java.util.Date;
import java.util.List;

public class UserDaoTest {

    public UserDao userDao;
    public SqlSession sqlSession;

    @Before
    public void setUp() throws Exception {
        // mybatis-config.xml
        String resource = "mybatis-config.xml";
        // 读取配置文件
        InputStream is = Resources.getResourceAsStream(resource);
        // 构建SqlSessionFactory
        SqlSessionFactory sqlSessionFactory = new SqlSessionFactoryBuilder().build(is);
        // 获取sqlSession
        sqlSession = sqlSessionFactory.openSession();
        this.userDao = new UserDaoImpl(sqlSession);
    }

    @Test
    public void queryUserById() throws Exception {
        System.out.println(this.userDao.queryUserById("1"));
    }

    @Test
    public void queryUserAll() throws Exception {
        List<User> userList = this.userDao.queryUserAll();
        for (User user : userList) {
            System.out.println(user);
        }
    }

    @Test
    public void insertUser() throws Exception {
        User user = new User();
        user.setAge(16);
        user.setBirthday(new Date("1990/09/02"));
        user.setName("大鹏");
        user.setPassword("123456");
        user.setSex(1);
        user.setUserName("evan");
        this.userDao.insertUser(user);
        this.sqlSession.commit();
    }

    @Test
    public void updateUser() throws Exception {
        User user = new User();
        user.setBirthday(new Date());
        user.setName("静鹏");
        user.setPassword("654321");
        user.setSex(1);
        user.setUserName("evanjin");
        user.setId("1");
        this.userDao.updateUser(user);
        this.sqlSession.commit();
    }

    @Test
    public void deleteUser() throws Exception {
        this.userDao.deleteUser("4");
        this.sqlSession.commit();
    }

}- 1
- 2
- 3
- 4
- 5
- 6
- 7
- 8
- 9
- 10
- 11
- 12
- 13
- 14
- 15
- 16
- 17
- 18
- 19
- 20
- 21
- 22
- 23
- 24
- 25
- 26
- 27
- 28
- 29
- 30
- 31
- 32
- 33
- 34
- 35
- 36
- 37
- 38
- 39
- 40
- 41
- 42
- 43
- 44
- 45
- 46
- 47
- 48
- 49
- 50
- 51
- 52
- 53
- 54
- 55
- 56
- 57
- 58
- 59
- 60
- 61
- 62
- 63
- 64
- 65
- 66
- 67
- 68
- 69
- 70
- 71
- 72
- 73
- 74
- 75
- 76
- 77
- 78
6.6.目录结构

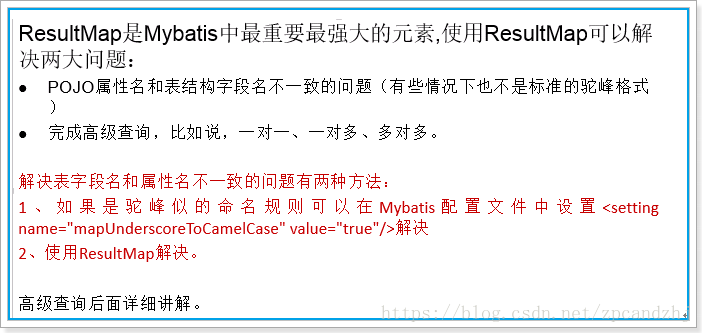
6.7.解决数据库字段名和实体类属性名不一致的问题
查询数据的时候,发现查不到userName的信息,
User{id=‘2’, userName=‘null’, password=‘123456’, name=‘静静’, age=22, sex=0, birthday=‘1993-09-05’, created=‘2018-06-30 18:22:28.0’, updated=‘2018-06-30 18:22:28.0’}
原因:数据库的字段名是user_name,POJO中的属性名字是userName
两端不一致,造成mybatis无法填充对应的字段信息。修改方法:在sql语句中使用别名。
解决方案1:在sql语句中使用别名:
<select id="queryUserById" resultType="com.zpc.mybatis.pojo.User">
   select
    tuser.id as id,
    tuser.user_name as userName,
    tuser.password as password,
    tuser.name as name,
    tuser.age as age,
    tuser.birthday as birthday,
    tuser.sex as sex,
    tuser.created as created,
    tuser.updated as updated
    from
    tb_user tuser
    where tuser.id = #{id};
</select>- 1
- 2
- 3
- 4
- 5
- 6
- 7
- 8
- 9
- 10
- 11
- 12
- 13
- 14
- 15
解决方案2: 参考后面的resultMap –mapper具体的配置的时候
解决方案3:参考驼峰匹配 — mybatis-config.xml 的时候
7. 动态代理Mapper实现类
7.1.思考上述CRUD中的问题
1、接口->实现类->mapper.xml
2、实现类中,使用mybatis的方式非常类似
3、xml中的sql statement 硬编码到java代码中。
思考:能否只写接口,不写实现类。只编写接口和Mapper.xml即可?
因为在dao(mapper)的实现类中对sqlsession的使用方式很类似。因此mybatis提供了接口的动态代理。
7.2.使用动态代理改造CRUD
- 修改测试用例的setUp方法
- 执行queryUserAll()方法
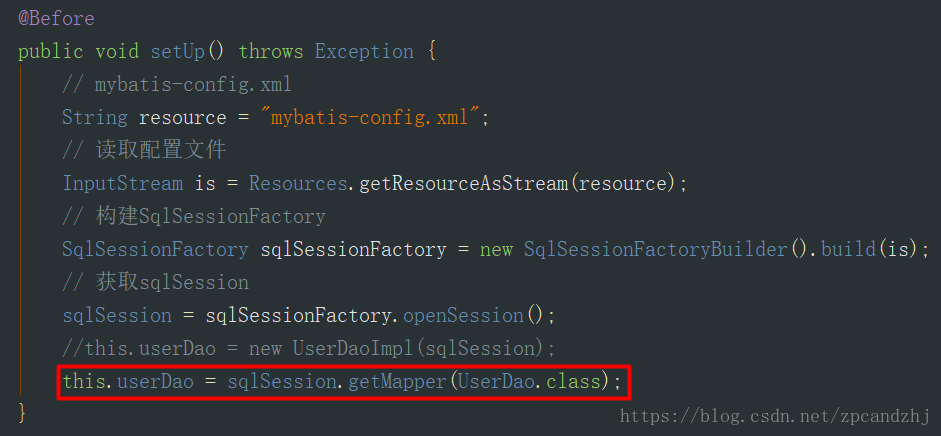
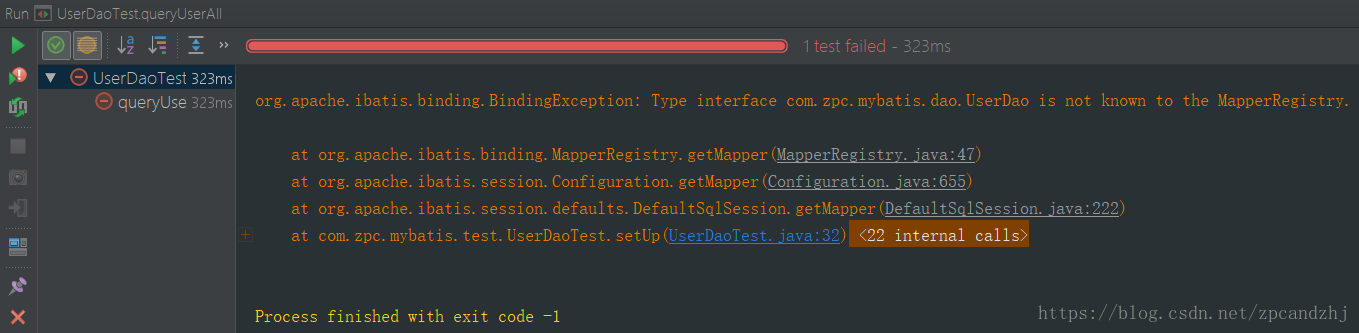
org.apache.ibatis.binding.BindingException: Type interface com.zpc.mybatis.dao.UserDao is not known to the MapperRegistry.
	at org.apache.ibatis.binding.MapperRegistry.getMapper(MapperRegistry.java:47)
	at org.apache.ibatis.session.Configuration.getMapper(Configuration.java:655)
	at org.apache.ibatis.session.defaults.DefaultSqlSession.getMapper(DefaultSqlSession.java:222)
at com.zpc.mybatis.test.UserDaoTest.setUp(UserDaoTest.java:32)- 1
- 2
- 3
- 4
- 5
- 分析原因,在UserMapper.xml中配置接口的全路径
mapper.xml namespace
如果希望使用mybatis通过的动态代理的接口,就需要namespace中的值,和需要对应的Mapper(dao)接口的全路径一致。Mapper中Namespace的定义本身是没有限制的,只要不重复即可,但如果使用Mybatis的DAO接口动态代理,则namespace必须为DAO接口的全路径,例如:com.zpc.mybatis.dao.UserDao
<mapper namespace="com.zpc.mybatis.dao.UserDao">- 1
7.3.完整的例子
1、创建UserMapper接口(对应原UserDao)
public interface UserMapper {

   /**
    * 登录(直接使用注解指定传入参数名称)
    * @param userName
    * @param password
    * @return
    */
   public User login(@Param("userName") String userName, @Param("password") String password);

   /**
    * 根据表名查询用户信息(直接使用注解指定传入参数名称)
    * @param tableName
    * @return
    */
   public List<User> queryUserByTableName(@Param("tableName") String tableName);

   /**
    * 根据Id查询用户信息
    * @param id
    * @return
    */
   public User queryUserById(Long id);

   /**
    * 查询所有用户信息
    * @return
    */
   public List<User> queryUserAll();

   /**
    * 新增用户信息
    * @param user
    */
   public void insertUser(User user);

   /**
    * 根据id更新用户信息
    * @param user
    */
   public void updateUser(User user);

   /**
    * 根据id删除用户信息
    * @param id
    */
   public void deleteUserById(Long id);
}- 1
- 2
- 3
- 4
- 5
- 6
- 7
- 8
- 9
- 10
- 11
- 12
- 13
- 14
- 15
- 16
- 17
- 18
- 19
- 20
- 21
- 22
- 23
- 24
- 25
- 26
- 27
- 28
- 29
- 30
- 31
- 32
- 33
- 34
- 35
- 36
- 37
- 38
- 39
- 40
- 41
- 42
- 43
- 44
- 45
- 46
- 47
- 48
- 49
2、创建UserMapper.xml
<?xml version="1.0" encoding="UTF-8" ?>
<!DOCTYPE mapper
        PUBLIC "-//mybatis.org//DTD Mapper 3.0//EN"
        "http://mybatis.org/dtd/mybatis-3-mapper.dtd">
<!-- mapper:根标签,namespace:命名空间,随便写,一般保证命名空间唯一 ,为了使用接口动态代理,这里必须是接口的全路径名-->
<mapper namespace="com.zpc.mybatis.dao.UserMapper">
    <!--
       1.#{},预编译的方式preparedstatement,使用占位符替换,防止sql注入,一个参数的时候,任意参数名可以接收
       2.${},普通的Statement,字符串直接拼接,不可以防止sql注入,一个参数的时候,必须使用${value}接收参数
     -->
    <select id="queryUserByTableName" resultType="com.zpc.mybatis.pojo.User">
        select * from ${tableName}
    </select>

    <select id="login" resultType="com.zpc.mybatis.pojo.User">
        select * from tb_user where user_name = #{userName} and password = #{password}
    </select>

    <!-- statement,内容:sql语句。
       id:唯一标识,随便写,在同一个命名空间下保持唯一,使用动态代理之后要求和方法名保持一致
       resultType:sql语句查询结果集的封装类型,使用动态代理之后和方法的返回类型一致;resultMap:二选一
       parameterType:参数的类型,使用动态代理之后和方法的参数类型一致
     -->
    <select id="queryUserById" resultType="com.zpc.mybatis.pojo.User">
        select * from tb_user where id = #{id}
    </select>
    <select id="queryUserAll" resultType="com.zpc.mybatis.pojo.User">
        select * from tb_user
    </select>
    <!-- 新增的Statement
       id:唯一标识,随便写,在同一个命名空间下保持唯一,使用动态代理之后要求和方法名保持一致
       parameterType:参数的类型,使用动态代理之后和方法的参数类型一致
       useGeneratedKeys:开启主键回写
       keyColumn:指定数据库的主键
       keyProperty:主键对应的pojo属性名
     -->
    <insert id="insertUser" useGeneratedKeys="true" keyColumn="id" keyProperty="id"
            parameterType="com.zpc.mybatis.pojo.User">
        INSERT INTO tb_user (
        id,
        user_name,
        password,
        name,
        age,
        sex,
        birthday,
        created,
        updated
        )
        VALUES
        (
        null,
        #{userName},
        #{password},
        #{name},
        #{age},
        #{sex},
        #{birthday},
        NOW(),
        NOW()
        );
    </insert>
    <!--
       更新的statement
       id:唯一标识,随便写,在同一个命名空间下保持唯一,使用动态代理之后要求和方法名保持一致
       parameterType:参数的类型,使用动态代理之后和方法的参数类型一致
     -->
    <update id="updateUser" parameterType="com.zpc.mybatis.pojo.User">
        UPDATE tb_user
        <trim prefix="set" suffixOverrides=",">
            <if test="userName!=null">user_name = #{userName},</if>
            <if test="password!=null">password = #{password},</if>
            <if test="name!=null">name = #{name},</if>
            <if test="age!=null">age = #{age},</if>
            <if test="sex!=null">sex = #{sex},</if>
            <if test="birthday!=null">birthday = #{birthday},</if>
            updated = now(),
        </trim>
        WHERE
        (id = #{id});
    </update>
    <!--
       删除的statement
       id:唯一标识,随便写,在同一个命名空间下保持唯一,使用动态代理之后要求和方法名保持一致
       parameterType:参数的类型,使用动态代理之后和方法的参数类型一致
     -->
    <delete id="deleteUserById" parameterType="java.lang.String">
        delete from tb_user where id=#{id}
    </delete>
</mapper>- 1
- 2
- 3
- 4
- 5
- 6
- 7
- 8
- 9
- 10
- 11
- 12
- 13
- 14
- 15
- 16
- 17
- 18
- 19
- 20
- 21
- 22
- 23
- 24
- 25
- 26
- 27
- 28
- 29
- 30
- 31
- 32
- 33
- 34
- 35
- 36
- 37
- 38
- 39
- 40
- 41
- 42
- 43
- 44
- 45
- 46
- 47
- 48
- 49
- 50
- 51
- 52
- 53
- 54
- 55
- 56
- 57
- 58
- 59
- 60
- 61
- 62
- 63
- 64
- 65
- 66
- 67
- 68
- 69
- 70
- 71
- 72
- 73
- 74
- 75
- 76
- 77
- 78
- 79
- 80
- 81
- 82
- 83
- 84
- 85
- 86
- 87
- 88
- 89
- 90
- 91
3、全局配置文件mybatis-config.xml引入UserMapper.xml
<mappers>
    <mapper resource="mappers/MyMapper.xml"/>
    <mapper resource="mappers/UserDaoMapper.xml"/>
    <mapper resource="mappers/UserMapper.xml"/>
</mappers>- 1
- 2
- 3
- 4
- 5
- 6
4、创建UserMapper测试用例
import com.zpc.mybatis.dao.UserMapper;
import com.zpc.mybatis.pojo.User;
import org.apache.ibatis.io.Resources;
import org.apache.ibatis.session.SqlSession;
import org.apache.ibatis.session.SqlSessionFactory;
import org.apache.ibatis.session.SqlSessionFactoryBuilder;
import org.junit.Before;
import org.junit.Test;
import java.io.InputStream;
import java.util.Date;
import java.util.List;
public class UserMapperTest {
public UserMapper userMapper;
@Before
public void setUp() throws Exception {
// 指定配置文件
String resource = "mybatis-config.xml";
// 读取配置文件
InputStream inputStream = Resources.getResourceAsStream(resource);
// 构建sqlSessionFactory
SqlSessionFactory sqlSessionFactory = new SqlSessionFactoryBuilder().build(inputStream);
// 获取sqlSession
SqlSession sqlSession = sqlSessionFactory.openSession(true);
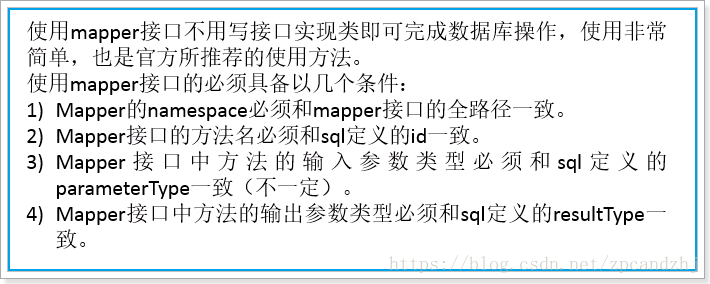
// 1. 映射文件的命名空间(namespace)必须是mapper接口的全路径
// 2. 映射文件的statement的id必须和mapper接口的方法名保持一致
// 3. Statement的resultType必须和mapper接口方法的返回类型一致
// 4. statement的parameterType必须和mapper接口方法的参数类型一致(不一定)
this.userMapper = sqlSession.getMapper(UserMapper.class);
}
@Test
public void testQueryUserByTableName() {
List<User> userList = this.userMapper.queryUserByTableName("tb_user");
for (User user : userList) {
System.out.println(user);
}
}
@Test
public void testLogin() {
System.out.println(this.userMapper.login("hj", "123456"));
}
@Test
public void testQueryUserById() {
System.out.println(this.userMapper.queryUserById("1"));
}
@Test
public void testQueryUserAll() {
List<User> userList = this.userMapper.queryUserAll();
for (User user : userList) {
System.out.println(user);
}
}
@Test
public void testInsertUser() {
User user = new User();
user.setAge(20);
user.setBirthday(new Date());
user.setName("大神");
user.setPassword("123456");
user.setSex(2);
user.setUserName("bigGod222");
this.userMapper.insertUser(user);
System.out.println(user.getId());
}
@Test
public void testUpdateUser() {
User user = new User();
user.setBirthday(new Date());
user.setName("静静");
user.setPassword("123456");
user.setSex(0);
user.setUserName("Jinjin");
user.setId("1");
this.userMapper.updateUser(user);
}
@Test
public void testDeleteUserById() {
this.userMapper.deleteUserById("1");
}
}- 1
- 2
- 3
- 4
- 5
- 6
- 7
- 8
- 9
- 10
- 11
- 12
- 13
- 14
- 15
- 16
- 17
- 18
- 19
- 20
- 21
- 22
- 23
- 24
- 25
- 26
- 27
- 28
- 29
- 30
- 31
- 32
- 33
- 34
- 35
- 36
- 37
- 38
- 39
- 40
- 41
- 42
- 43
- 44
- 45
- 46
- 47
- 48
- 49
- 50
- 51
- 52
- 53
- 54
- 55
- 56
- 57
- 58
- 59
- 60
- 61
- 62
- 63
- 64
- 65
- 66
- 67
- 68
- 69
- 70
- 71
- 72
- 73
- 74
- 75
- 76
- 77
- 78
- 79
- 80
- 81
- 82
- 83
- 84
- 85
- 86
- 87
- 88
- 89
- 90
- 91
- 92
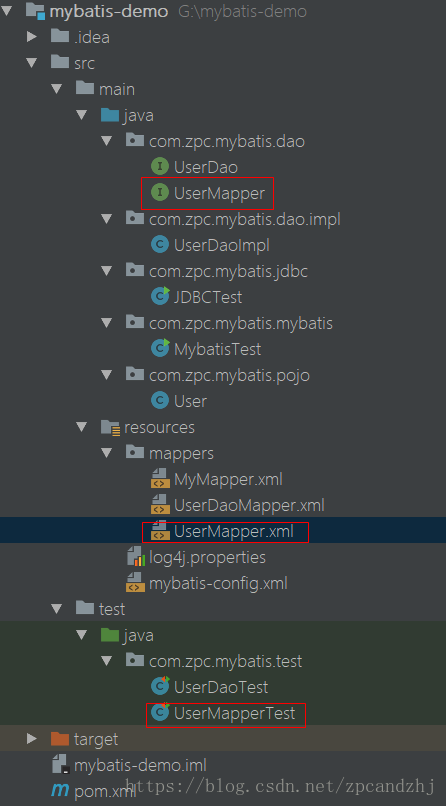
目录结构:
7.4.动态代理总结
8.mybatis-config.xml详解
mybatis-config.xml讲究严格的顺序,具体顺序遵循文档的顺序
8.1.properties属性读取外部资源
properties配置的属性都是可外部配置且可动态替换的,既可以在典型的 Java 属性文件中配置,亦可通过 properties 元素的子元素来传递。例如:
<properties resource="org/mybatis/example/config.properties">
  <property name="username" value="dev_user"/>
  <property name="password" value="F2Fa3!33TYyg"/>
</properties>- 1
- 2
- 3
- 4
然后其中的属性就可以在整个配置文件中被用来替换需要动态配置的属性值。比如:
<dataSource type="POOLED">
  <property name="driver" value="${driver}"/>
  <property name="url" value="${url}"/>
  <property name="username" value="${username}"/>
  <property name="password" value="${password}"/>
</dataSource>- 1
- 2
- 3
- 4
- 5
- 6
这个例子中的 username 和 password 将会由 properties 元素中设置的相应值来替换。 driver 和 url 属性将会由 config.properties 文件中对应的值来替换。这样就为配置提供了诸多灵活选择。
属性也可以被传递到 SqlSessionFactoryBuilder.build()方法中。例如:
SqlSessionFactory factory = new SqlSessionFactoryBuilder().build(reader, props);
// ... or ...
SqlSessionFactory factory = new SqlSessionFactoryBuilder().build(reader, environment, props);- 1
- 2
- 3
如果属性在不只一个地方进行了配置,那么 MyBatis 将按照下面的顺序来加载:
1)在 properties 元素体内指定的属性首先被读取。
2)然后根据 properties 元素中的 resource 属性读取类路径下属性文件或根据 url 属性指定的路径读取属性文件,并覆盖已读取的同名属性。
3)最后读取作为方法参数传递的属性,并覆盖已读取的同名属性。
因此,通过方法参数传递的属性具有最高优先级,resource/url 属性中指定的配置文件次之,最低优先级的是 properties 属性中指定的属性。
8.2.settings设置
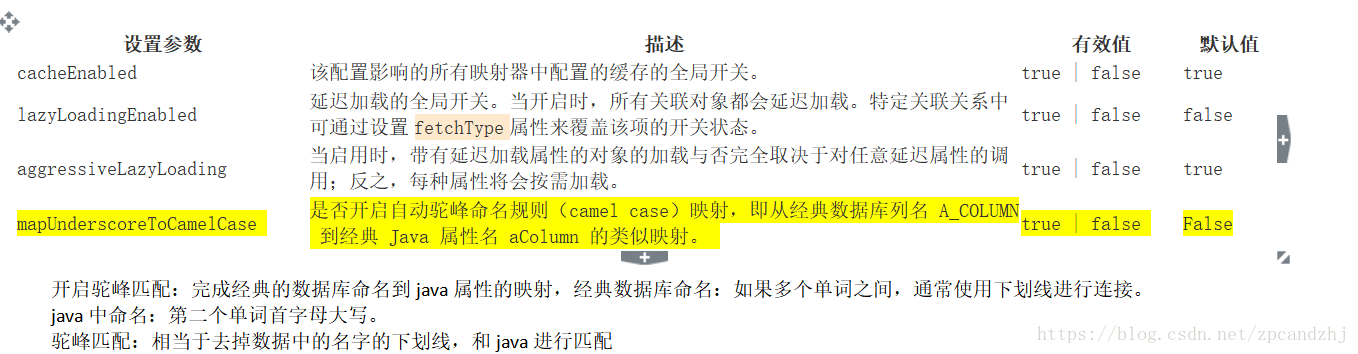
<settings>
    <setting name="mapUnderscoreToCamelCase" value="true"/>
</settings>- 1
- 2
- 3
测试:
没有开启驼峰匹配:
2018-07-01 13:57:56,486 [main] [com.zpc.mybatis.dao.UserMapper.queryUserById]-[DEBUG] ==>  Preparing: select * from tb_user where id = ?
2018-07-01 13:57:56,524 [main] [com.zpc.mybatis.dao.UserMapper.queryUserById]-[DEBUG] ==> Parameters: 1(String)
2018-07-01 13:57:56,568 [main] [com.zpc.mybatis.dao.UserMapper.queryUserById]-[DEBUG] <==      Total: 1
User{id='1', userName='null', password='123456', name='大神', age=20, sex=2, birthday='2018-07-01', created='2018-07-01 13:36:09.0', updated='2018-07-01 13:36:09.0'}- 1
- 2
- 3
- 4
开启驼峰匹配:
2018-07-01 13:58:40,599 [main] [com.zpc.mybatis.dao.UserMapper.queryUserById]-[DEBUG] ==>  Preparing: select * from tb_user where id = ?
2018-07-01 13:58:40,642 [main] [com.zpc.mybatis.dao.UserMapper.queryUserById]-[DEBUG] ==> Parameters: 1(String)
2018-07-01 13:58:40,661 [main] [com.zpc.mybatis.dao.UserMapper.queryUserById]-[DEBUG] <==      Total: 1
User{id='1', userName='bigGod222', password='123456', name='大神', age=20, sex=2, birthday='2018-07-01', created='2018-07-01 13:36:09.0', updated='2018-07-01 13:36:09.0'}- 1
- 2
- 3
- 4
- 5
8.3.typeAliases
类型别名是为 Java 类型命名的一个短的名字。它只和 XML 配置有关,存在的意义仅在于用来减少类完全限定名的冗余。
<typeAliases>
    <typeAlias type="com.zpc.mybatis.pojo.User" alias="User"/>
</typeAliases>- 1
- 2
- 3
缺点:每个pojo类都要去配置。
解决方案:使用扫描包,扫描指定包下的所有类,扫描之后的别名就是类名(不区分大小写),建议使用的时候和类名一致。
<typeAliases>
    <!--type:实体类的全路径。alias:别名,通常首字母大写-->
    <!--<typeAlias type="com.zpc.mybatis.pojo.User" alias="User"/>-->
    <package name="com.zpc.mybatis.pojo"/>
</typeAliases>- 1
- 2
- 3
- 4
- 5
Mybatis已经为普通的 Java 类型内建了许多相应的类型别名。它们都是大小写不敏感的.
8.4.typeHandlers(类型处理器)
无论是 MyBatis 在预处理语句(PreparedStatement)中设置一个参数时,还是从结果集中取出一个值时, 都会用类型处理器将获取的值以合适的方式转换成 Java 类型。可以重写类型处理器或创建你自己的类型处理器来处理不支持的或非标准的类型。
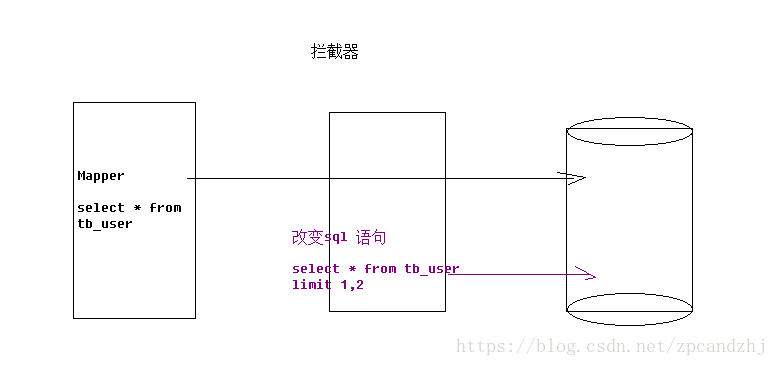
8.5.plugins(插件)拦截器
MyBatis 允许你在已映射语句执行过程中的某一点进行拦截调用。默认情况下,MyBatis 允许使用插件来拦截的方法调用包括:
Executor (update, query, flushStatements, commit, rollback, getTransaction, close, isClosed)
ParameterHandler (getParameterObject, setParameters)
ResultSetHandler (handleResultSets, handleOutputParameters)
StatementHandler (prepare, parameterize, batch, update, query)
现在一些MyBatis 插件比如PageHelper都是基于这个原理,有时为了监控sql执行效率,也可以使用插件机制
原理:
自定义拦截器:
// ExamplePlugin.java
@Intercepts({@Signature(
  type= Executor.class,
  method = "update",
  args = {MappedStatement.class,Object.class})})
public class ExamplePlugin implements Interceptor {
  public Object intercept(Invocation invocation) throws Throwable {
    return invocation.proceed();
  }
  public Object plugin(Object target) {
    return Plugin.wrap(target, this);
  }
  public void setProperties(Properties properties) {
  }
}- 1
- 2
- 3
- 4
- 5
- 6
- 7
- 8
- 9
- 10
- 11
- 12
- 13
- 14
- 15
配置:
<!-- mybatis-config.xml -->
<plugins>
  <plugin interceptor="org.mybatis.example.ExamplePlugin">
    <property name="someProperty" value="100"/>
  </plugin>
</plugins>- 1
- 2
- 3
- 4
- 5
- 6
上面的插件将会拦截在 Executor 实例中所有的 “update” 方法调用, 这里的 Executor 是负责执行低层映射语句的内部对象。
8.6.environments(环境)
MyBatis 可以配置成适应多种环境,例如,开发、测试和生产环境需要有不同的配置;
尽管可以配置多个环境,每个 SqlSessionFactory 实例只能选择其一。
虽然,这种方式也可以做到很方便的分离多个环境,但是实际使用场景下,我们更多的是选择使用spring来管理数据源,来做到环境的分离。
8.7.mappers
需要告诉 MyBatis 到哪里去找到 SQL 映射语句。即告诉 MyBatis 到哪里去找映射文件。你可以使用相对于类路径的资源引用, 或完全限定资源定位符(包括 file:/// 的 URL),或类名和包名等。例如:
<!-- 使用相对于类路径的资源引用 -->
<mappers>
  <mapper resource="org/mybatis/builder/AuthorMapper.xml"/>
  <mapper resource="org/mybatis/builder/BlogMapper.xml"/>
  <mapper resource="org/mybatis/builder/PostMapper.xml"/>
</mappers>

<!-- 使用映射器接口实现类的完全限定类名 -->
<mappers>
  <mapper class="org.mybatis.builder.AuthorMapper"/>
  <mapper class="org.mybatis.builder.BlogMapper"/>
  <mapper class="org.mybatis.builder.PostMapper"/>
</mappers>- 1
- 2
- 3
- 4
- 5
- 6
- 7
- 8
- 9
- 10
- 11
- 12
- 13
这里所谓的mapper接口路径。实际上就是dao的接口路径。在mybatis中,通常把dao的包叫做mapper。类名,也叫做mapper
1、定义一个接口。
2、在接口所在的包中定义mapper.xml,并且要求xml文件和interface的名称要相同。
3、在mybatis-config.xml 中通过class路径,引入mapper(注解方式)。要求mapper.xml 中的名称空间是类的接口的全路径。
注解方式:
<mappers>
    <mapper resource="mappers/MyMapper.xml"/>
    <mapper resource="mappers/UserDaoMapper.xml"/>
    <!--注解方式可以使用如下配置方式-->
    <mapper class="com.zpc.mybatis.dao.UserMapper"/>
</mappers>- 1
- 2
- 3
- 4
- 5
- 6
问题:
1、mapper.xml 和 java文件没有分离。 之后的教程讲述和spring整合之后解决。
2、需要一个一个的去加载mapper。
当然也可以使用包扫描(必须使用注解方式,即在接口方法上使用注解,如@Select("select * from tb_user ")):
缺点:
1、如果包的路径有很多?
2、mapper.xml和mapper.java没有分离。
spring整合的时候解决。
9.Mapper XML文件详解
9.1.CRUD标签
9.1.1.select
select – 书写查询sql语句
select中的几个属性说明:
id属性:当前名称空间下的statement的唯一标识。必须。要求id和mapper接口中的方法的名字一致。
resultType:将结果集映射为java的对象类型。必须(和 resultMap 二选一)
parameterType:传入参数类型。可以省略
9.1.2.insert
insert 的几个属性说明:
id:唯一标识,随便写,在同一个命名空间下保持唯一,使用动态代理之后要求和方法名保持一致
parameterType:参数的类型,使用动态代理之后和方法的参数类型一致
useGeneratedKeys:开启主键回写
keyColumn:指定数据库的主键
keyProperty:主键对应的pojo属性名
标签内部:具体的sql语句。
9.1.3.update
id属性:当前名称空间下的statement的唯一标识(必须属性);
parameterType:传入的参数类型,可以省略。
标签内部:具体的sql语句。
9.1.4.delete
delete 的几个属性说明:
id属性:当前名称空间下的statement的唯一标识(必须属性);
parameterType:传入的参数类型,可以省略。
标签内部:具体的sql语句。
9.2.#{}和${}
场景:数据库有两个一模一样的表。历史表,当前表
查询表中的信息,有时候从历史表中去查询数据,有时候需要去新的表去查询数据。
希望使用1个方法来完成操作。
<select id="queryUserByTableName" resultType="com.zpc.mybatis.pojo.User">
    select * from #{tableName}
</select>

/**
 * 根据表名查询用户信息(直接使用注解指定传入参数名称)
 *
 * @param tableName
 * @return
 */
public List<User> queryUserByTableName(String tableName);- 1
- 2
- 3
- 4
- 5
- 6
- 7
- 8
- 9
- 10
- 11
测试输出:
有问题,报语法错误:相当于执行了这样一条sql:
select * from “tb_user”;
显然表名多了引号。

改正:
<select id="queryUserByTableName" resultType="com.zpc.mybatis.pojo.User">
    select * from ${tableName}
</select>- 1
- 2
- 3
注意:
#{} 只是替换?,相当于PreparedStatement使用占位符去替换参数,可以防止sql注入。
${} 是进行字符串拼接,相当于sql语句中的Statement,使用字符串去拼接sql;$可以是sql中的任一部分传入到Statement中,不能防止sql注入。
使用${} 去取出参数值信息,需要使用${value}
#{} 只是表示占位,与参数的名字无关,如果只有一个参数,会自动对应。
推荐:
/**
 * 根据表名查询用户信息(直接使用注解指定传入参数名称)
 *
 * @param tableName
 * @return
 */
public List<User> queryUserByTableName(@Param("tableName") String tableName);

<select id="queryUserByTableName" resultType="com.zpc.mybatis.pojo.User">
    select * from ${tableName}
</select>- 1
- 2
- 3
- 4
- 5
- 6
- 7
- 8
- 9
- 10
- 11
#{}多个参数时:
/**
 * 登录(直接使用注解指定传入参数名称)
 *
 * @param userName
 * @param password
 * @return
 */
public User login( String userName, String password);

<select id="login" resultType="com.zpc.mybatis.pojo.User">
    select * from tb_user where user_name = #{userName} and password = #{password}
</select>- 1
- 2
- 3
- 4
- 5
- 6
- 7
- 8
- 9
- 10
- 11
- 12
报错:
org.apache.ibatis.exceptions.PersistenceException:
### Error querying database.  Cause: org.apache.ibatis.binding.BindingException: Parameter 'userName' not found. Available parameters are [0, 1, param1, param2]
### Cause: org.apache.ibatis.binding.BindingException: Parameter 'userName' not found. Available parameters are [0, 1, param1, param2]- 1
- 2
- 3
解决方案一:
<select id="login" resultType="com.zpc.mybatis.pojo.User">
    select * from tb_user where user_name = #{0} and password = #{1}
</select>- 1
- 2
- 3
解决方案二:
<select id="login" resultType="com.zpc.mybatis.pojo.User">
    select * from tb_user where user_name = #{param1} and password = #{param2}
</select>- 1
- 2
- 3
最终解决方案:
/**
 * 登录(直接使用注解指定传入参数名称)
 *
 * @param userName
 * @param password
 * @return
 */
public User login(@Param("userName") String userName, @Param("password") String password);

<select id="login" resultType="com.zpc.mybatis.pojo.User">
    select * from tb_user where user_name = #{userName} and password = #{password}
</select>- 1
- 2
- 3
- 4
- 5
- 6
- 7
- 8
- 9
- 10
- 11
- 12
通常在方法的参数列表上加上一个注释@Param(“xxxx”) 显式指定参数的名字,然后通过${“xxxx”}或#{“xxxx”}
sql语句动态生成的时候,使用${};
sql语句中某个参数进行占位的时候#{}
9.3.面试题(#、$区别)
/**
 * #号
 * @param username1
 * @return
 */
User queryUserListByName1(@Param("username1") String username1);

/**
 * $号
 * @param username2
 * @return
 */
User queryUserListByName2(@Param("username2") String username2);

<select id="queryUserListByName1" resultType="com.zpc.mybatis.pojo.User">
    select * from tb_user WHERE user_name=#{username1}
</select>

<select id="queryUserListByName2" resultType="com.zpc.mybatis.pojo.User">
    select * from tb_user WHERE user_name='${username2}'//手动加了引号
</select>- 1
- 2
- 3
- 4
- 5
- 6
- 7
- 8
- 9
- 10
- 11
- 12
- 13
- 14
- 15
- 16
- 17
- 18
- 19
- 20
- 21
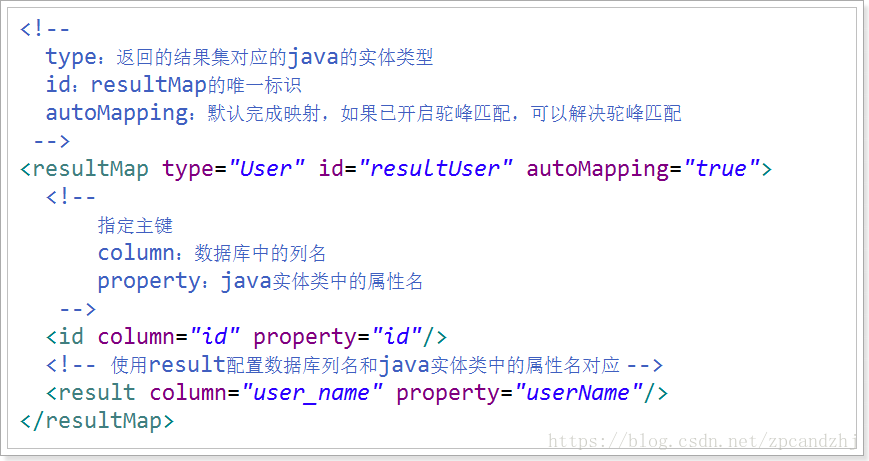
9.4.resultMap
使用:

9.5.sql片段
<sql id=””></sql>
<include refId=”” />- 1
- 2
例如在UserMapper.xml中定义如下片段:
<sql id="commonSql">
		id,
			user_name,
			password,
			name,
			age,
			sex,
			birthday,
			created,
			updated
</sql>- 1
- 2
- 3
- 4
- 5
- 6
- 7
- 8
- 9
- 10
- 11
则可以在UserMapper.xml中使用它:
<select id="queryUserById" resultMap="userResultMap">
	select <include refid="commonSql"></include> from tb_user where id = #{id}
</select>

<select id="queryUsersLikeUserName" resultType="User">
	select <include refid="commonSql"></include> from tb_user where user_name like "%"#{userName}"%"
</select>- 1
- 2
- 3
- 4
- 5
- 6
- 7
Sql片段也可以定义在单独的.xml文件中如:
定义CommonSQL.xml:
<?xml version="1.0" encoding="UTF-8" ?>
<!DOCTYPE mapper
  PUBLIC "-//mybatis.org//DTD Mapper 3.0//EN"
  "http://mybatis.org/dtd/mybatis-3-mapper.dtd">
<mapper namespace="CommonSQL">
	<sql id="commonSql">
		id,
			user_name,
			password,
			name,
			age,
			sex,
			birthday,
			created,
			updated
	</sql>
</mapper>- 1
- 2
- 3
- 4
- 5
- 6
- 7
- 8
- 9
- 10
- 11
- 12
- 13
- 14
- 15
- 16
- 17
使用:
	<select id="queryUserById" resultMap="userResultMap">
		select <include refid="CommonSQL.commonSql"></include> from tb_user where id = #{id}
	</select>

	<select id="queryUsersLikeUserName" resultType="User">
		select <include refid="CommonSQL.commonSql"></include> from tb_user where user_name like "%"#{userName}"%"
</select>- 1
- 2
- 3
- 4
- 5
- 6
- 7
当然要完成这个功能还需要在全局配置文件mybatis-config.xml中引入该外部配置文件:
<mappers>
		<mapper resource="CommonSQL.xml"/>
		<!-- 开启mapper接口的包扫描,基于class的配置方式 -->
		<package name="com.zpc.mybatis.mapper"/>
</mappers>- 1
- 2
- 3
- 4
- 5
- 6
10.动态sql
场景:查询男性用户,如果输入了姓名,按姓名模糊查询
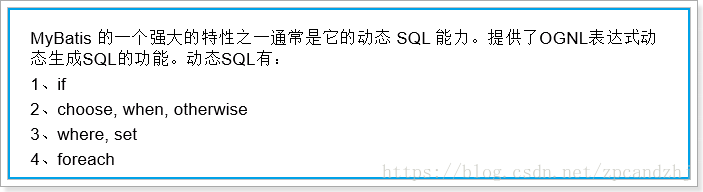
10.1.if
场景:查询男性用户,如果输入了姓名,则按姓名查询
定义接口:
/**
 * 查询男性用户,如果输入了姓名,则按姓名查询
 * @param name
 * @return
 */
List<User> queryUserList(@Param("name") String name);- 1
- 2
- 3
- 4
- 5
- 6
编写mapper
<select id="queryUserList" resultType="com.zpc.mybatis.pojo.User">
    select * from tb_user WHERE sex=1
    <if test="name!=null and name.trim()!=''">
      and name like '%${name}%'
    </if>
</select>- 1
- 2
- 3
- 4
- 5
- 6
测试
@Test
public void testqueryUserList() {
    List<User> users = this.userMapper.queryUserList(null);
    for (User user : users) {
        System.out.println(user);
    }
}- 1
- 2
- 3
- 4
- 5
- 6
- 7
10.2.choose when otherwise
场景:查询男性用户,如果输入了姓名则按照姓名模糊查找,否则如果输入了年龄则按照年龄查找,否则查找姓名为“鹏程”的用户。
定义接口:
/**
 * 查询男性用户,如果输入了姓名则按照姓名模糊查找,否则如果输入了年龄则按照年龄查找,否则查找姓名为“鹏程”的用户。
 * @param name
 * @param age
 * @return
 */
List<User> queryUserListByNameOrAge(@Param("name") String name,@Param("age") Integer age);- 1
- 2
- 3
- 4
- 5
- 6
- 7
编写mapper配置:
<select id="queryUserListByNameOrAge" resultType="com.zpc.mybatis.pojo.User">
    select * from tb_user WHERE sex=1
    <!--
    1.一旦有条件成立的when,后续的when则不会执行
    2.当所有的when都不执行时,才会执行otherwise
    -->
    <choose>
        <when test="name!=null and name.trim()!=''">
            and name like '%${name}%'
        </when>
        <when test="age!=null">
            and age = #{age}
        </when>
        <otherwise>
            and name='鹏程'
        </otherwise>
    </choose>
</select>- 1
- 2
- 3
- 4
- 5
- 6
- 7
- 8
- 9
- 10
- 11
- 12
- 13
- 14
- 15
- 16
- 17
- 18
测试:
@Test
public void queryUserListByNameOrAge() throws Exception {
    List<User> users = this.userMapper.queryUserListByNameOrAge(null, 16);
    for (User user : users) {
        System.out.println(user);
    }
}- 1
- 2
- 3
- 4
- 5
- 6
- 7
10.3.where 和set
场景一:查询所有用户,如果输入了姓名按照姓名进行模糊查询,如果输入年龄,按照年龄进行查询,如果两者都输入,两个条件都要成立。
接口:
/**
 * 查询所有用户,如果输入了姓名按照姓名进行模糊查询,如果输入年龄,按照年龄进行查询,如果两者都输入,两个条件都要成立
 * @param name
 * @param age
 * @return
 */
List<User> queryUserListByNameAndAge(@Param("name") String name,@Param("age") Integer age);- 1
- 2
- 3
- 4
- 5
- 6
- 7
配置:
<select id="queryUserListByNameAndAge" resultType="com.zpc.mybatis.pojo.User">
    select * from tb_user
    <!--如果多出一个and,会自动去除,如果缺少and或者多出多个and则会报错-->
    <where>
        <if test="name!=null and name.trim()!=''">
            and name like '%${name}%'
        </if>
        <if test="age!=null">
            and age = #{age}
        </if>
    </where>
</select>- 1
- 2
- 3
- 4
- 5
- 6
- 7
- 8
- 9
- 10
- 11
- 12
测试:
@Test
public void queryUserListByNameAndAge() throws Exception {
    List<User> users = this.userMapper.queryUserListByNameAndAge("鹏程", 20);
    for (User user : users) {
        System.out.println(user);
    }
}- 1
- 2
- 3
- 4
- 5
- 6
- 7
场景二:修改用户信息,如果参数user中的某个属性为null,则不修改。
接口:
/**
 * 根据id更新用户信息
 *
 * @param user
 */
public void updateUser(User user);- 1
- 2
- 3
- 4
- 5
- 6
配置:
<update id="updateUser" parameterType="com.zpc.mybatis.pojo.User">
    UPDATE tb_user
    <trim prefix="set" suffixOverrides=",">
        <if test="userName!=null">user_name = #{userName},</if>
        <if test="password!=null">password = #{password},</if>
        <if test="name!=null">name = #{name},</if>
        <if test="age!=null">age = #{age},</if>
        <if test="sex!=null">sex = #{sex},</if>
        <if test="birthday!=null">birthday = #{birthday},</if>
        updated = now(),
    </trim>
    WHERE
    (id = #{id});
</update>- 1
- 2
- 3
- 4
- 5
- 6
- 7
- 8
- 9
- 10
- 11
- 12
- 13
- 14
测试:
@Test
public void testUpdateUser() {
    User user = new User();
    user.setBirthday(new Date());
    user.setName("静静");
    user.setPassword("123456");
    user.setSex(0);
    user.setUserName("Jinjin");
    user.setId("1");
    this.userMapper.updateUser(user);
}- 1
- 2
- 3
- 4
- 5
- 6
- 7
- 8
- 9
- 10
- 11
10.4.foreach
场景:按照多个id查询用户信息
接口:
/**
 * 按多个Id查询
 * @param ids
 * @return
 */
List<User> queryUserListByIds(@Param("ids") String[] ids);- 1
- 2
- 3
- 4
- 5
- 6
配置:
<select id="queryUserListByIds" resultType="com.zpc.mybatis.pojo.User">
    select * from tb_user where id in
    <foreach collection="ids" item="id" open="(" close=")" separator=",">
        #{id}
    </foreach>
</select>- 1
- 2
- 3
- 4
- 5
- 6
测试:
@Test
public void queryUserListByIds() throws Exception {
    List<User> users = this.userMapper.queryUserListByIds(new String[]{"1","2"});
    for (User user : users) {
        System.out.println(user);
    }
}- 1
- 2
- 3
- 4
- 5
- 6
- 7
If:testognl表达式或者简单java代码
Choose when otherwise—>相当于if else if else
When test参考if
Where set 都有一定的纠错功能
Trim:prefix suffix prefixOverrides suffixOverrides
Foreach:collection item saparator open close
11.缓存
11.1.一级缓存
在mybatis中,一级缓存默认是开启的,并且一直无法关闭
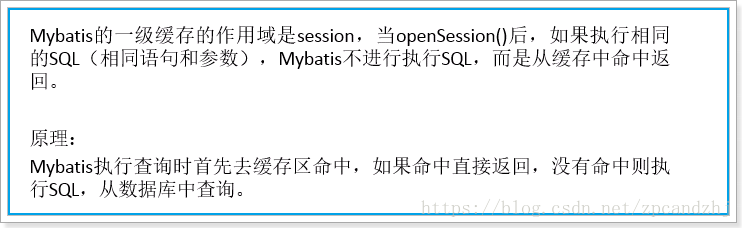
一级缓存满足条件:
1、同一个session中
2、相同的SQL和参数
测试:
@Test
public void testQueryUserById() {
    System.out.println(this.userMapper.queryUserById("1"));
    System.out.println(this.userMapper.queryUserById("1"));
}- 1
- 2
- 3
- 4
- 5
2018-07-01 17:08:50,156 [main] [org.apache.ibatis.transaction.jdbc.JdbcTransaction]-[DEBUG] Opening JDBC Connection
2018-07-01 17:08:50,421 [main] [org.apache.ibatis.datasource.pooled.PooledDataSource]-[DEBUG] Created connection 242355057.
2018-07-01 17:08:50,423 [main] [com.zpc.mybatis.dao.UserMapper.queryUserById]-[DEBUG] ==>  Preparing: select * from tb_user where id = ?
2018-07-01 17:08:50,476 [main] [com.zpc.mybatis.dao.UserMapper.queryUserById]-[DEBUG] ==> Parameters: 1(String)
2018-07-01 17:08:50,509 [main] [com.zpc.mybatis.dao.UserMapper.queryUserById]-[DEBUG] <==      Total: 1
User{id='1', userName='bigGod222', password='123456', name='鹏程', age=20, sex=1, birthday='2018-07-01', created='2018-07-01 13:35:40.0', updated='2018-07-01 13:35:40.0'}
User{id='1', userName='bigGod222', password='123456', name='鹏程', age=20, sex=1, birthday='2018-07-01', created='2018-07-01 13:35:40.0', updated='2018-07-01 13:35:40.0'}- 1
- 2
- 3
- 4
- 5
- 6
- 7
使用:sqlSession.clearCache();可以强制清除缓存
测试:
@Test
public void testQueryUserById() {
    System.out.println(this.userMapper.queryUserById("1"));
    sqlSession.clearCache();
    System.out.println(this.userMapper.queryUserById("1"));
}- 1
- 2
- 3
- 4
- 5
- 6
日志:
2018-07-01 17:10:51,065 [main] [org.apache.ibatis.transaction.jdbc.JdbcTransaction]-[DEBUG] Opening JDBC Connection
2018-07-01 17:10:51,359 [main] [org.apache.ibatis.datasource.pooled.PooledDataSource]-[DEBUG] Created connection 242355057.
2018-07-01 17:10:51,360 [main] [com.zpc.mybatis.dao.UserMapper.queryUserById]-[DEBUG] ==>  Preparing: select * from tb_user where id = ?
2018-07-01 17:10:51,408 [main] [com.zpc.mybatis.dao.UserMapper.queryUserById]-[DEBUG] ==> Parameters: 1(String)
2018-07-01 17:10:51,437 [main] [com.zpc.mybatis.dao.UserMapper.queryUserById]-[DEBUG] <==      Total: 1
User{id='1', userName='bigGod222', password='123456', name='鹏程', age=20, sex=1, birthday='2018-07-01', created='2018-07-01 13:35:40.0', updated='2018-07-01 13:35:40.0'}
2018-07-01 17:10:51,438 [main] [com.zpc.mybatis.dao.UserMapper.queryUserById]-[DEBUG] ==>  Preparing: select * from tb_user where id = ?
2018-07-01 17:10:51,438 [main] [com.zpc.mybatis.dao.UserMapper.queryUserById]-[DEBUG] ==> Parameters: 1(String)
2018-07-01 17:10:51,440 [main] [com.zpc.mybatis.dao.UserMapper.queryUserById]-[DEBUG] <==      Total: 1
User{id='1', userName='bigGod222', password='123456', name='鹏程', age=20, sex=1, birthday='2018-07-01', created='2018-07-01 13:35:40.0', updated='2018-07-01 13:35:40.0'}- 1
- 2
- 3
- 4
- 5
- 6
- 7
- 8
- 9
- 10
执行update、insert、delete的时候,会清空缓存
测试:
@Test
public void testQueryUserById() {
    System.out.println(this.userMapper.queryUserById("1"));
    //sqlSession.clearCache();

    User user=new User();
    user.setName("美女");
    user.setId("1");
    userMapper.updateUser(user);

    System.out.println(this.userMapper.queryUserById("1"));
}- 1
- 2
- 3
- 4
- 5
- 6
- 7
- 8
- 9
- 10
- 11
- 12
日志:
2018-07-01 17:18:15,128 [main] [org.apache.ibatis.transaction.jdbc.JdbcTransaction]-[DEBUG] Opening JDBC Connection
2018-07-01 17:18:15,399 [main] [org.apache.ibatis.datasource.pooled.PooledDataSource]-[DEBUG] Created connection 242355057.
2018-07-01 17:18:15,401 [main] [com.zpc.mybatis.dao.UserMapper.queryUserById]-[DEBUG] ==>  Preparing: select * from tb_user where id = ?
2018-07-01 17:18:15,466 [main] [com.zpc.mybatis.dao.UserMapper.queryUserById]-[DEBUG] ==> Parameters: 1(String)
2018-07-01 17:18:15,492 [main] [com.zpc.mybatis.dao.UserMapper.queryUserById]-[DEBUG] <==      Total: 1
User{id='1', userName='bigGod222', password='123456', name='鹏程', age=20, sex=1, birthday='2018-07-01', created='2018-07-01 13:35:40.0', updated='2018-07-01 13:35:40.0'}
2018-07-01 17:18:15,527 [main] [com.zpc.mybatis.dao.UserMapper.updateUser]-[DEBUG] ==>  Preparing: UPDATE tb_user set name = ?, updated = now() WHERE (id = ?);
2018-07-01 17:18:15,529 [main] [com.zpc.mybatis.dao.UserMapper.updateUser]-[DEBUG] ==> Parameters: 美女(String), 1(String)
2018-07-01 17:18:15,532 [main] [com.zpc.mybatis.dao.UserMapper.updateUser]-[DEBUG] <==    Updates: 1
2018-07-01 17:18:15,532 [main] [com.zpc.mybatis.dao.UserMapper.queryUserById]-[DEBUG] ==>  Preparing: select * from tb_user where id = ?
2018-07-01 17:18:15,533 [main] [com.zpc.mybatis.dao.UserMapper.queryUserById]-[DEBUG] ==> Parameters: 1(String)
2018-07-01 17:18:15,538 [main] [com.zpc.mybatis.dao.UserMapper.queryUserById]-[DEBUG] <==      Total: 1
User{id='1', userName='bigGod222', password='123456', name='美女', age=20, sex=1, birthday='2018-07-01', created='2018-07-01 13:35:40.0', updated='2018-07-01 17:18:15.0'}- 1
- 2
- 3
- 4
- 5
- 6
- 7
- 8
- 9
- 10
- 11
- 12
- 13
11.2.二级缓存
mybatis 的二级缓存的作用域是一个mapper的namespace ,同一个namespace中查询sql可以从缓存中命中。
开启二级缓存:
<mapper namespace="com.zpc.mybatis.dao.UserMapper">
    <cache/>
</mapper>- 1
- 2
- 3
测试:
@Test
public void testCache() {
    System.out.println(this.userMapper.queryUserById("1"));

    sqlSession.close();
    SqlSession sqlSession = sqlSessionFactory.openSession();
    UserMapper mapper = sqlSession.getMapper(UserMapper.class);

    System.out.println(mapper.queryUserById("1"));
}- 1
- 2
- 3
- 4
- 5
- 6
- 7
- 8
- 9
- 10
开启二级缓存,必须序列化:
public class User implements Serializable{
private static final long serialVersionUID = -3330851033429007657L;- 1
- 2
日志:
2018-07-01 17:23:39,335 [main] [org.apache.ibatis.transaction.jdbc.JdbcTransaction]-[DEBUG] Opening JDBC Connection
2018-07-01 17:23:39,664 [main] [org.apache.ibatis.datasource.pooled.PooledDataSource]-[DEBUG] Created connection 2092769598.
2018-07-01 17:23:39,665 [main] [com.zpc.mybatis.dao.UserMapper.queryUserById]-[DEBUG] ==>  Preparing: select * from tb_user where id = ?
2018-07-01 17:23:39,712 [main] [com.zpc.mybatis.dao.UserMapper.queryUserById]-[DEBUG] ==> Parameters: 1(String)
2018-07-01 17:23:39,734 [main] [com.zpc.mybatis.dao.UserMapper.queryUserById]-[DEBUG] <==      Total: 1
User{id='1', userName='bigGod222', password='123456', name='美女', age=20, sex=1, birthday='2018-07-01', created='2018-07-01 13:35:40.0', updated='2018-07-01 17:18:15.0'}
2018-07-01 17:23:39,743 [main] [org.apache.ibatis.transaction.jdbc.JdbcTransaction]-[DEBUG] Closing JDBC Connection [com.mysql.jdbc.JDBC4Connection@7cbd213e]
2018-07-01 17:23:39,744 [main] [org.apache.ibatis.datasource.pooled.PooledDataSource]-[DEBUG] Returned connection 2092769598 to pool.
2018-07-01 17:23:39,746 [main] [com.zpc.mybatis.dao.UserMapper]-[DEBUG] Cache Hit Ratio [com.zpc.mybatis.dao.UserMapper]: 0.5
User{id='1', userName='bigGod222', password='123456', name='美女', age=20, sex=1, birthday='2018-07-01', created='2018-07-01 13:35:40.0', updated='2018-07-01 17:18:15.0'}- 1
- 2
- 3
- 4
- 5
- 6
- 7
- 8
- 9
- 10
关闭二级缓存:
不开启,或者在全局的mybatis-config.xml 中去关闭二级缓存

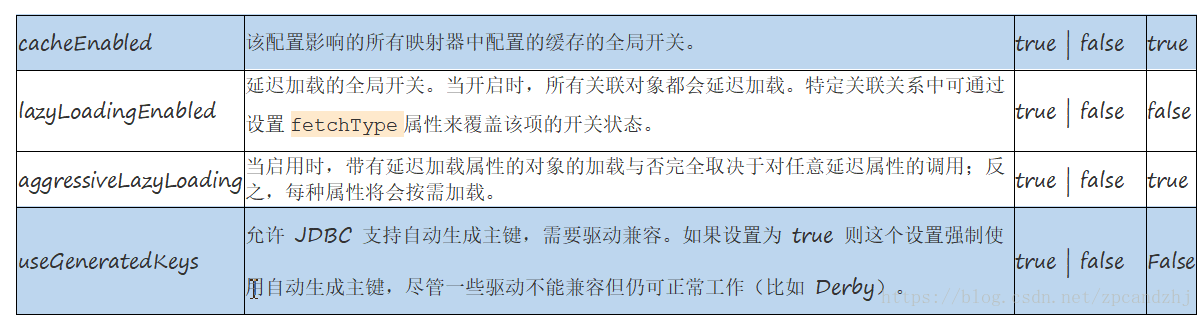
<settings>
    <!--开启驼峰匹配-->
    <setting name="mapUnderscoreToCamelCase" value="true"/>
    <!--开启二级缓存,全局总开关,这里关闭,mapper中开启了也没用-->
    <setting name="cacheEnabled" value="false"/>
</settings>- 1
- 2
- 3
- 4
- 5
- 6

12.高级查询
12.1.表关系说明
创建order表:
CREATE TABLE tb_order (
id int(11) NOT NULL AUTO_INCREMENT,
user_id int(11) DEFAULT NULL,
order_number varchar(255) DEFAULT NULL,
create datetime DEFAULT NULL,
updated datetime DEFAULT NULL,
PRIMARY KEY (id)
) ENGINE=InnoDB AUTO_INCREMENT=2 DEFAULT CHARSET=utf8;

public class Order {
    private Integer id;
    private Long userId;
    private String orderNumber;
    private Date created;
    private Date updated;
}- 1
- 2
- 3
- 4
- 5
- 6
- 7
需求说明:

12.2.一对一查询
方法一:核心思想扩展Order对象,来完成映射
新建OrderUser实体类继承Order:
public class OrderUser extends Order {
    private String userName;
    private String password;
    private String name;
    private Integer age;
    private Integer sex;
    private Date birthday;
    private Date created;
    private Date updated;
}- 1
- 2
- 3
- 4
- 5
- 6
- 7
- 8
- 9
- 10
OrderMapper接口:
public interface OrderMapper {
     OrderUser queryOrderUserByOrderNumber(@Param("number") String number);
}- 1
- 2
- 3
配置OrderMapper:
 <mapper namespace="com.zpc.mybatis.dao.OrderMapper">
    <select id="queryOrderUserByOrderNumber" resultType="com.zpc.mybatis.pojo.OrderUser">
      select * from tb_order o left join tb_user u on o.user_id=u.id where o.order_number = #{number}
   </select>
</mapper>- 1
- 2
- 3
- 4
- 5
测试:
@Test
public void queryOrderUserByOrderNumber() throws Exception {
    OrderUser orderUser = orderMapper.queryOrderUserByOrderNumber("201807010001");
    System.out.println(orderUser);
}- 1
- 2
- 3
- 4
- 5
方法二:面向对象的思想,在Order对象中添加User对象。
在Order对象中添加User属性:
public class Order {
    private Integer id;
    private Long userId;
    private String orderNumber;
    private Date created;
    private Date updated;
    private User user;
}- 1
- 2
- 3
- 4
- 5
- 6
- 7
- 8
接口:
/**
 * 根据订单号查询订单用户的信息
 * @param number
 * @return
 */
Order queryOrderWithUserByOrderNumber(@Param("number") String number);- 1
- 2
- 3
- 4
- 5
- 6
使用resultType不能完成自动映射,需要手动完成结果集映射resultMap:
 <resultMap id="OrderUserResultMap" type="com.zpc.mybatis.pojo.Order" autoMapping="true">
     <id column="id" property="id"/>
     <!--association:完成子对象的映射-->
     <!--property:子对象在父对象中的属性名-->
     <!--javaType:子对象的java类型-->
     <!--autoMapping:完成子对象的自动映射,若开启驼峰,则按驼峰匹配-->
     <association property="user" javaType="com.zpc.mybatis.pojo.User" autoMapping="true">
         <id column="user_id" property="id"/>
     </association>
 </resultMap>

 <select id="queryOrderWithUserByOrderNumber" resultMap="OrderUserResultMap">
   select * from tb_order o left join tb_user u on o.user_id=u.id where o.order_number = #{number}
</select>- 1
- 2
- 3
- 4
- 5
- 6
- 7
- 8
- 9
- 10
- 11
- 12
- 13
- 14
测试:
@Test
public void queryOrderWithUserByOrderNumber() throws Exception {
    Order order = orderMapper.queryOrderWithUserByOrderNumber("201807010001");
    System.out.println(order.getUser());
}- 1
- 2
- 3
- 4
- 5
12.3.一对多查询
一对多查询:查询订单,查询出下单人信息并且查询出订单详情。
Order类:
public class Order {
    private Integer id;
    private Long userId;
    private String orderNumber;
    private Date created;
    private Date updated;
    private User user;
    private List<OrderDetail> detailList;
}- 1
- 2
- 3
- 4
- 5
- 6
- 7
- 8
- 9
public class OrderDetail {
    private Integer id;
    private Integer orderId;
    private Double totalPrice;
    private Integer status;
}- 1
- 2
- 3
- 4
- 5
- 6
接口:
/**
 * 根据订单号查询订单用户的信息及订单详情
 * @param number
 * @return
 */
Order queryOrderWithUserAndDetailByOrderNumber(@Param("number") String number);- 1
- 2
- 3
- 4
- 5
- 6
Mapper映射:
<resultMap id="OrderUserDetailResultMap" type="com.zpc.mybatis.pojo.Order" autoMapping="true">
    <id column="id" property="id"/>
    <!--collection:定义子对象集合映射-->
    <!--association:完成子对象的映射-->
    <!--property:子对象在父对象中的属性名-->
    <!--javaType:子对象的java类型-->
    <!--autoMapping:完成子对象的自动映射,若开启驼峰,则按驼峰匹配-->
    <association property="user" javaType="com.zpc.mybatis.pojo.User" autoMapping="true">
        <id column="user_id" property="id"/>
    </association>
    <collection property="detailList" javaType="List" ofType="com.zpc.mybatis.pojo.OrderDetail" autoMapping="true">
        <id column="id" property="id"/>
    </collection>
</resultMap>

 <select id="queryOrderWithUserAndDetailByOrderNumber" resultMap="OrderUserDetailResultMap">
   select * from tb_order o
   left join tb_user u on o.user_id=u.id
   left join tb_orderdetail od on o.id=od.order_id
   where o.order_number = #{number}
</select>- 1
- 2
- 3
- 4
- 5
- 6
- 7
- 8
- 9
- 10
- 11
- 12
- 13
- 14
- 15
- 16
- 17
- 18
- 19
- 20
- 21
测试:
@Test
public void queryOrderWithUserAndDetailByOrderNumber() throws Exception {
    Order order = orderMapper.queryOrderWithUserAndDetailByOrderNumber("201807010001");
    System.out.println(order.getUser());
    System.out.println(order.getDetailList());
}- 1
- 2
- 3
- 4
- 5
- 6
12.4.多对多查询
多对多查询:查询订单,查询出下单人信息并且查询出订单详情中的商品数据。
OrderDetail类
public class OrderDetail {
    private Integer id;
    private Integer orderId;
    private Double totalPrice;
    private Integer status;
    private Item item;
}

public class Item {
    private Integer id;
    private String itemName;
    private Float itemPrice;
    private String itemDetail;
}- 1
- 2
- 3
- 4
- 5
- 6
- 7
- 8
- 9
- 10
- 11
- 12
- 13
- 14
接口:
/**
 * 根据订单号查询订单用户的信息及订单详情及订单详情对应的商品信息
 * @param number
 * @return
 */
Order queryOrderWithUserAndDetailItemByOrderNumber(@Param("number") String number);- 1
- 2
- 3
- 4
- 5
- 6
Mapper配置:
<resultMap id="OrderUserDetailItemResultMap" type="com.zpc.mybatis.pojo.Order" autoMapping="true">
    <id column="id" property="id"/>
    <association property="user" javaType="com.zpc.mybatis.pojo.User" autoMapping="true">
        <id column="user_id" property="id"/>
    </association>
    <collection property="detailList" javaType="List" ofType="com.zpc.mybatis.pojo.OrderDetail" autoMapping="true">
        <id column="detail_id" property="id"/>
        <association property="item" javaType="com.zpc.mybatis.pojo.Item" autoMapping="true">
            <id column="item_id" property="id"/>
        </association>
    </collection>
</resultMap>

 <select id="queryOrderWithUserAndDetailItemByOrderNumber" resultMap="OrderUserDetailItemResultMap">
   select * ,od.id as detail_id from tb_order o
   left join tb_user u on o.user_id=u.id
   left join tb_orderdetail od on o.id=od.order_id
   left join tb_item i on od.item_id=i.id
   where o.order_number = #{number}
</select>- 1
- 2
- 3
- 4
- 5
- 6
- 7
- 8
- 9
- 10
- 11
- 12
- 13
- 14
- 15
- 16
- 17
- 18
- 19
- 20
测试:
@Test
public void queryOrderWithUserAndDetailItemByOrderNumber() throws Exception {
    Order order = orderMapper.queryOrderWithUserAndDetailItemByOrderNumber("201807010001");
    System.out.println(order);
    System.out.println(order.getUser());
    System.out.println(order.getDetailList());
}- 1
- 2
- 3
- 4
- 5
- 6
- 7
至此,目录结构如下:
数据库脚本:
CREATE TABLE tb_order (
id int(11) NOT NULL AUTO_INCREMENT,
user_id int(11) DEFAULT NULL,
order_number varchar(255) DEFAULT NULL,
create datetime DEFAULT NULL,
updated datetime DEFAULT NULL,
PRIMARY KEY (id)
) ENGINE=InnoDB AUTO_INCREMENT=2 DEFAULT CHARSET=utf8;
INSERT INTO tb_order VALUES (‘1’, ‘2’, ‘201807010001’, ‘2018-07-01 19:38:35’, ‘2018-07-01 19:38:40’);

CREATE TABLE tb_item (
id int(11) NOT NULL,
itemName varchar(255) DEFAULT NULL,
itemPrice decimal(10,2) DEFAULT NULL,
itemDetail varchar(255) DEFAULT NULL,
PRIMARY KEY (id)
) ENGINE=InnoDB DEFAULT CHARSET=utf8;
INSERT INTO tb_item VALUES (‘1’, ‘袜子’, ‘29.90’, ‘香香的袜子’);
INSERT INTO tb_item VALUES (‘2’, ‘套子’, ‘99.99’, ‘冈本001’);
CREATE TABLE tb_orderdetail (
id int(11) NOT NULL AUTO_INCREMENT,
order_id int(11) DEFAULT NULL,
total_price decimal(10,0) DEFAULT NULL,
item_id int(11) DEFAULT NULL,
status int(10) unsigned zerofill DEFAULT NULL COMMENT ‘0成功非0失败’,
PRIMARY KEY (id)
) ENGINE=InnoDB AUTO_INCREMENT=3 DEFAULT CHARSET=utf8;
INSERT INTO tb_orderdetail VALUES (‘1’, ‘1’, ‘10000’, ‘1’, ‘0000000001’);
INSERT INTO tb_orderdetail VALUES (‘2’, ‘1’, ‘2000’, ‘2’, ‘0000000000’);
12.5.resultMap的继承

12.6.高级查询的整理
resutlType无法帮助我们自动的去完成映射,所以只有使用resultMap手动的进行映射
type 结果集对应的数据类型 id 唯一标识,被引用的时候,进行指定
<resultMap type="Order" id="orderUserLazyResultMap">
<!—定义pojo中的单个对象的 property 定义对象的属性名, javaType 属性的类型,
		<association property="user" javaType="User" autoMapping="true">
			<id />
		</association>
<!—如果属性是集合使用collection ,javaType 集合的类型,ofType 表示集中的存储的元素类型
		<collection property="details" javaType="List" ofType="OrderDetail" autoMapping="true">
			<id />
</resultMap>- 1
- 2
- 3
- 4
- 5
- 6
- 7
- 8
- 9
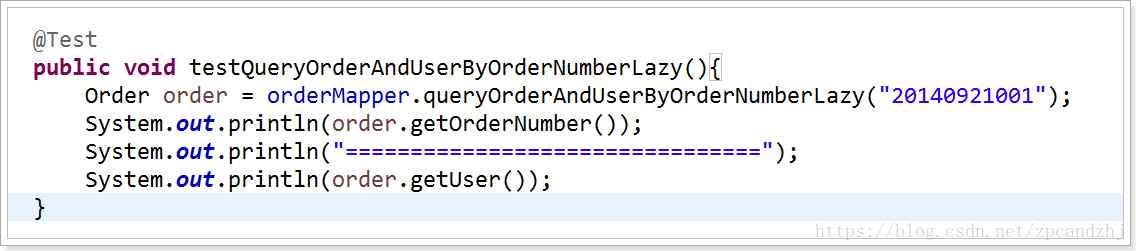
13.延迟加载
编写接口:
Mapper配置:
测试:
结果:
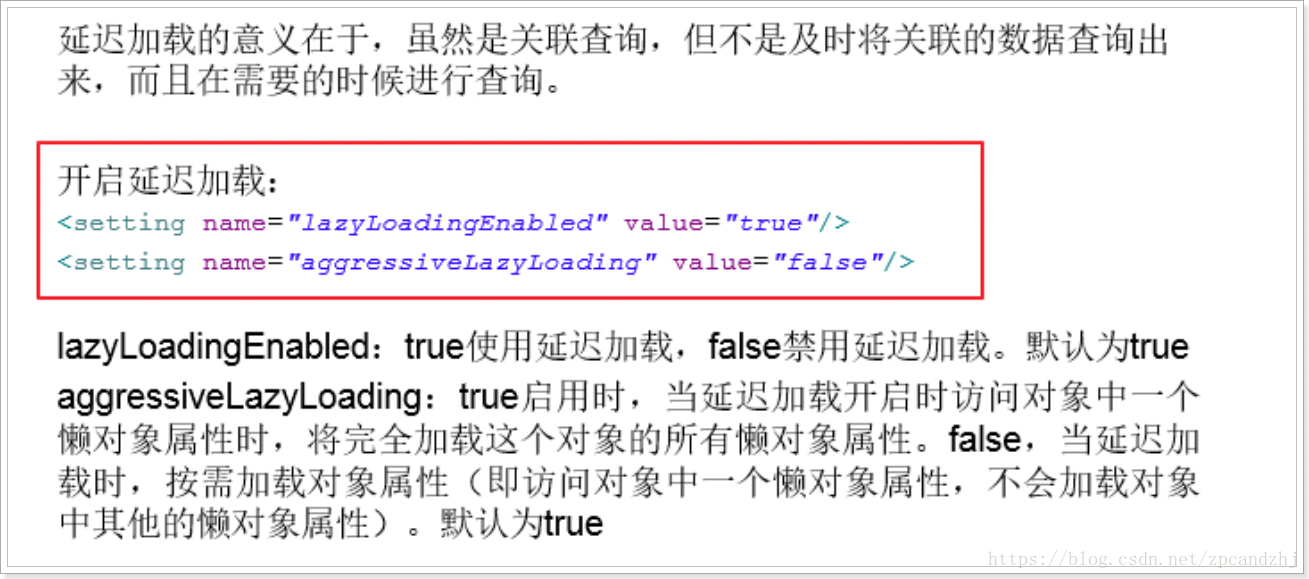


开启延迟加载:
修改测试用例:
执行,报错:
添加cglib:


<dependency>
		<groupId>cglib</groupId>
		<artifactId>cglib</artifactId>
		<version>3.1</version>
</dependency>- 1
- 2
- 3
- 4
- 5
执行:

14.如果sql语句中出现’<’的解决方案
1、使用xml中的字符实体
因为业务,需要在mybatis中,使用到大于号,小于号,所以就在SQL中直接使用了。
SELECT * FROM test WHERE 1 = 1 AND start_date <= CURRENT_DATE AND end_date >= CURRENT_DATE
可是,在执行时,总报错误:
```Error creating document instance. Cause: org.xml.sax.SAXParseException; lineNumber: 74; columnNumber: 17; ``元素内容必须由格式正确的字符数据或标记组成。
把AND start_date >= CURRENT_DATE AND end_date <= CURRENT_DATE去掉,就没有问题,所以确定是因为大于号,小于号引起的问题。

于是就想到了特殊符号,于是用了转义字符把>和<替换掉,然后就没有问题了。
SELECT * FROM test WHERE 1 = 1 AND start_date <= CURRENT_DATE AND end_date >= CURRENT_DATE
案例:
1.<if test="startDateTime!=null"> and mm.ttime > to_date(#{startDateTime},'yyyy-mm-dd hh24:mi:ss')</if>
2.<if test="endDateTime!=null"> and mm.ttime <= to_date(#{endDateTime},'yyyy-mm-dd hh24:mi:ss')</if>- 1
- 2
2、使用<![CDATA[ < ]]>
案例1:
1.<![CDATA[
2.       and mm.ttime > to_date(#{startDateTime},'yyyy-mm-dd hh24:mi:ss')
3.       and mm.ttime <= to_date(#{endDateTime},'yyyy-mm-dd hh24:mi:ss')
4.]]>- 1
- 2
- 3
- 4
案例2:
mapper文件示例代码 :
and (t1.status <![CDATA[ >= ]]> 1  and  t1.status <![CDATA[ <= ]]> 2)
上述代码其实对应的sql:
and (t1.status > =1 andt1.status <= 2)- 1
- 2
- 3
注意:
使用<![CDATA[ ]]>标记的sql语句中的<where> <if>等标签不会被解析。- 1
15.Spring 集成Mybatis
15.1引入spring和Mybatis相关依赖
pom.xml
<!--数据库连接池-->
<dependency>
    <groupId>com.alibaba</groupId>
    <artifactId>druid</artifactId>
    <version>1.1.8</version>
</dependency>
<dependency>
    <groupId>org.mybatis</groupId>
    <artifactId>mybatis-spring</artifactId>
    <version>1.2.2</version>
</dependency>
<dependency>
    <groupId>org.springframework</groupId>
    <artifactId>spring-jdbc</artifactId>
    <version>4.1.3.RELEASE</version>
</dependency>
<!--spring集成Junit测试-->
<dependency>
    <groupId>org.springframework</groupId>
    <artifactId>spring-test</artifactId>
    <version>4.1.3.RELEASE</version>
    <scope>test</scope>
</dependency>
<!--spring容器-->
<dependency>
    <groupId>org.springframework</groupId>
    <artifactId>spring-context</artifactId>
    <version>4.1.3.RELEASE</version>
</dependency>- 1
- 2
- 3
- 4
- 5
- 6
- 7
- 8
- 9
- 10
- 11
- 12
- 13
- 14
- 15
- 16
- 17
- 18
- 19
- 20
- 21
- 22
- 23
- 24
- 25
- 26
- 27
- 28
- 29
- 30
15.2配置spring配置文件
applicationContext-dao.xml
<beans xmlns="http://www.springframework.org/schema/beans"
xmlns:context="http://www.springframework.org/schema/context" xmlns:p="http://www.springframework.org/schema/p"
xmlns:aop="http://www.springframework.org/schema/aop" xmlns:tx="http://www.springframework.org/schema/tx"
xmlns:xsi="http://www.w3.org/2001/XMLSchema-instance"
xsi:schemaLocation="http://www.springframework.org/schema/beans http://www.springframework.org/schema/beans/spring-beans-4.0.xsd
http://www.springframework.org/schema/context http://www.springframework.org/schema/context/spring-context-4.0.xsd
http://www.springframework.org/schema/aop http://www.springframework.org/schema/aop/spring-aop-4.0.xsd http://www.springframework.org/schema/tx http://www.springframework.org/schema/tx/spring-tx-4.0.xsd
http://www.springframework.org/schema/util http://www.springframework.org/schema/util/spring-util-4.0.xsd">
<!-- 加载配置文件 -->
<context:property-placeholder location="classpath:properties/*.properties"/>
<!-- 数据库连接池 -->
<bean id="dataSource" class="com.alibaba.druid.pool.DruidDataSource"
destroy-method="close">
<property name="driverClassName" value="${jdbc.driver}"/>
<property name="url"
value="jdbc:mysql://${jdbc.host}:3306/${jdbc.database}?useUnicode=true&characterEncoding=utf-8&zeroDateTimeBehavior=convertToNull"/>
<property name="username" value="${jdbc.userName}"/>
<property name="password" value="${jdbc.passWord}"/>
<!-- 初始化连接大小 -->
<property name="initialSize" value="${jdbc.initialSize}"></property>
<!-- 连接池最大数据库连接数 0 为没有限制 -->
<property name="maxActive" value="${jdbc.maxActive}"></property>
<!-- 连接池最大的空闲连接数,这里取值为20,表示即使没有数据库连接时依然可以保持20空闲的连接,而不被清除,随时处于待命状态 0 为没有限制 -->
<property name="maxIdle" value="${jdbc.maxIdle}"></property>
<!-- 连接池最小空闲 -->
<property name="minIdle" value="${jdbc.minIdle}"></property>
<!--最大建立连接等待时间。如果超过此时间将接到异常。设为-1表示无限制-->
<property name="maxWait" value="${jdbc.maxWait}"></property>
</bean>
<!-- spring和MyBatis完美整合 -->
<bean id="sqlSessionFactory" class="org.mybatis.spring.SqlSessionFactoryBean">
<property name="dataSource" ref="dataSource"/>
<!-- 自动扫描mapping.xml文件 -->
<property name="mapperLocations" value="classpath:mappers/*.xml"></property>
<!--如果mybatis-config.xml没有特殊配置也可以不需要下面的配置-->
<property name="configLocation" value="classpath:mybatis-config.xml" />
</bean>
<!-- DAO接口所在包名,Spring会自动查找其下的类 -->
<bean class="org.mybatis.spring.mapper.MapperScannerConfigurer">
<property name="basePackage" value="com.zpc.mybatis.dao"/>
<property name="sqlSessionFactoryBeanName" value="sqlSessionFactory"></property>
</bean>
<!-- (事务管理)transaction manager -->
<bean id="transactionManager"
class="org.springframework.jdbc.datasource.DataSourceTransactionManager">
<property name="dataSource" ref="dataSource"/>
</bean>
</beans>- 1
- 2
- 3
- 4
- 5
- 6
- 7
- 8
- 9
- 10
- 11
- 12
- 13
- 14
- 15
- 16
- 17
- 18
- 19
- 20
- 21
- 22
- 23
- 24
- 25
- 26
- 27
- 28
- 29
- 30
- 31
- 32
- 33
- 34
- 35
- 36
- 37
- 38
- 39
- 40
- 41
- 42
- 43
- 44
- 45
- 46
- 47
- 48
- 49
- 50
- 51
- 52
- 53
db.properties
jdbc.driver=com.mysql.jdbc.Driver
jdbc.host=localhost
jdbc.database=ssmdemo
jdbc.userName=root
jdbc.passWord=123456
jdbc.initialSize=0
jdbc.maxActive=20
jdbc.maxIdle=20
jdbc.minIdle=1
jdbc.maxWait=1000- 1
- 2
- 3
- 4
- 5
- 6
- 7
- 8
- 9
- 10
由于applicationContext-dao.xml中配置了Mapper接口扫描,所以删除mybatis-config.xml中的配置,否则报已映射错误:
Caused by: org.apache.ibatis.builder.BuilderException: Error parsing Mapper XML. Cause: java.lang.IllegalArgumentException: Mapped Statements collection already contains value for MyMapper.selectUser
删除mybatis-config.xml中的映射配置:
<!--<mappers>-->
    <!--<mapper resource="mappers/MyMapper.xml"/>-->
    <!--<mapper resource="mappers/UserDaoMapper.xml"/>-->
    <!--<mapper resource="mappers/UserMapper.xml"/>-->
    <!--<mapper resource="mappers/OrderMapper.xml"/>-->
<!--</mappers>-->- 1
- 2
- 3
- 4
- 5
- 6
或者在构建sqlSessionFactory时不配置mybatis-config.xml也行:
<!-- spring和MyBatis完美整合 -->
<bean id="sqlSessionFactory" class="org.mybatis.spring.SqlSessionFactoryBean">
    <property name="dataSource" ref="dataSource"/>
    <!-- 自动扫描mapping.xml文件 -->
    <property name="mapperLocations" value="classpath:mappers/*.xml"></property>
    <!--如果mybatis-config.xml没有特殊配置也可以不需要下面的配置-->
    <!--<property name="configLocation" value="classpath:mybatis-config.xml" />-->
</bean>- 1
- 2
- 3
- 4
- 5
- 6
- 7
- 8
15.3 测试
UserMapperSpringTest.java
import com.zpc.mybatis.dao.UserMapper;
import com.zpc.mybatis.pojo.User;
import org.apache.ibatis.io.Resources;
import org.apache.ibatis.session.SqlSession;
import org.apache.ibatis.session.SqlSessionFactory;
import org.apache.ibatis.session.SqlSessionFactoryBuilder;
import org.junit.Before;
import org.junit.Test;
import org.junit.runner.RunWith;
import org.springframework.beans.factory.annotation.Autowired;
import org.springframework.test.context.ContextConfiguration;
import org.springframework.test.context.junit4.SpringJUnit4ClassRunner;
import java.io.InputStream;
import java.util.Date;
import java.util.List;

//目标:测试一下spring的bean的某些功能
@RunWith(SpringJUnit4ClassRunner.class)//junit整合spring的测试//立马开启了spring的注解
@ContextConfiguration(locations="classpath:spring/applicationContext-*.xml")//加载核心配置文件,自动构建spring容器
public class UserMapperSpringTest {

    @Autowired
    private UserMapper userMapper;

    @Test
    public void testQueryUserByTableName() {
        List<User> userList = this.userMapper.queryUserByTableName("tb_user");
        for (User user : userList) {
            System.out.println(user);
        }
    }

    @Test
    public void testLogin() {
        System.out.println(this.userMapper.login("hj", "123456"));
    }

    @Test
    public void testQueryUserById() {
        System.out.println(this.userMapper.queryUserById("1"));
        User user = new User();
        user.setName("美女");
        user.setId("1");
        userMapper.updateUser(user);

        System.out.println(this.userMapper.queryUserById("1"));
    }

    @Test
    public void testQueryUserAll() {
        List<User> userList = this.userMapper.queryUserAll();
        for (User user : userList) {
            System.out.println(user);
        }
    }

    @Test
    public void testInsertUser() {
        User user = new User();
        user.setAge(20);
        user.setBirthday(new Date());
        user.setName("大神");
        user.setPassword("123456");
        user.setSex(2);
        user.setUserName("bigGod222");
        this.userMapper.insertUser(user);
        System.out.println(user.getId());
    }

    @Test
    public void testUpdateUser() {
        User user = new User();
        user.setBirthday(new Date());
        user.setName("静静");
        user.setPassword("123456");
        user.setSex(0);
        user.setUserName("Jinjin");
        user.setId("1");
        this.userMapper.updateUser(user);
    }

    @Test
    public void testDeleteUserById() {
        this.userMapper.deleteUserById("1");
    }

    @Test
    public void testqueryUserList() {
        List<User> users = this.userMapper.queryUserList(null);
        for (User user : users) {
            System.out.println(user);
        }
    }

    @Test
    public void queryUserListByNameAndAge() throws Exception {
        List<User> users = this.userMapper.queryUserListByNameAndAge("鹏程", 20);
        for (User user : users) {
            System.out.println(user);
        }
    }

    @Test
    public void queryUserListByNameOrAge() throws Exception {
        List<User> users = this.userMapper.queryUserListByNameOrAge(null, 16);
        for (User user : users) {
            System.out.println(user);
        }
    }

    @Test
    public void queryUserListByIds() throws Exception {
        List<User> users = this.userMapper.queryUserListByIds(new String[]{"5", "2"});
        for (User user : users) {
            System.out.println(user);
        }
}- 1
- 2
- 3
- 4
- 5
- 6
- 7
- 8
- 9
- 10
- 11
- 12
- 13
- 14
- 15
- 16
- 17
- 18
- 19
- 20
- 21
- 22
- 23
- 24
- 25
- 26
- 27
- 28
- 29
- 30
- 31
- 32
- 33
- 34
- 35
- 36
- 37
- 38
- 39
- 40
- 41
- 42
- 43
- 44
- 45
- 46
- 47
- 48
- 49
- 50
- 51
- 52
- 53
- 54
- 55
- 56
- 57
- 58
- 59
- 60
- 61
- 62
- 63
- 64
- 65
- 66
- 67
- 68
- 69
- 70
- 71
- 72
- 73
- 74
- 75
- 76
- 77
- 78
- 79
- 80
- 81
- 82
- 83
- 84
- 85
- 86
- 87
- 88
- 89
- 90
- 91
- 92
- 93
- 94
- 95
- 96
- 97
- 98
- 99
- 100
- 101
- 102
- 103
- 104
- 105
- 106
- 107
- 108
- 109
- 110
- 111
- 112
- 113
- 114
- 115
- 116
- 117
- 118
目录结构:
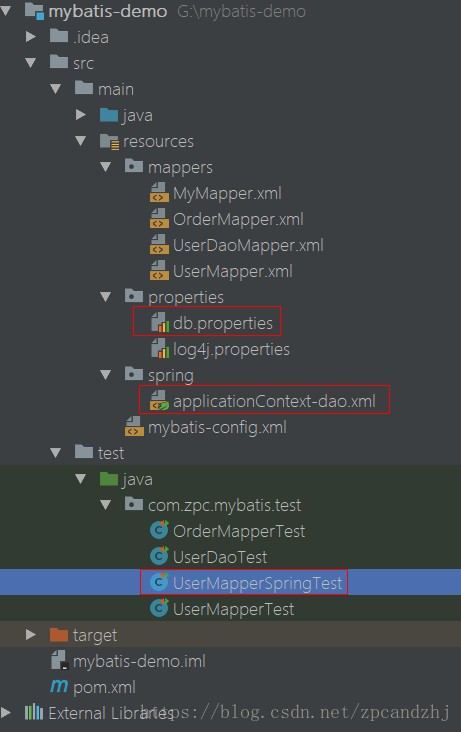
16.SpringBoot 集成Mybatis
请参见博文:https://blog.csdn.net/hellozpc/article/details/82531834
17.Mybatis Generator的使用
- MyBatis Generator(MBG)是MyBatis 和iBATIS的代码生成器。可以生成简单CRUD操作的XML配置文件、Mapper文件(DAO接口)、实体类。实际开发中能够有效减少程序员的工作量,甚至不用程序员手动写sql。
mybatis-generator有多种用法:命令行、maven插件等。命令行方式通常要把相关jar包下载到本地,再使用java -jar 运行。方便起见,本文演示使用maven插件的方式。
1.新建一个Maven项目(可以直接建立一个初始的springboot项目)
pom文件引入mybatis-generator-maven-plugin
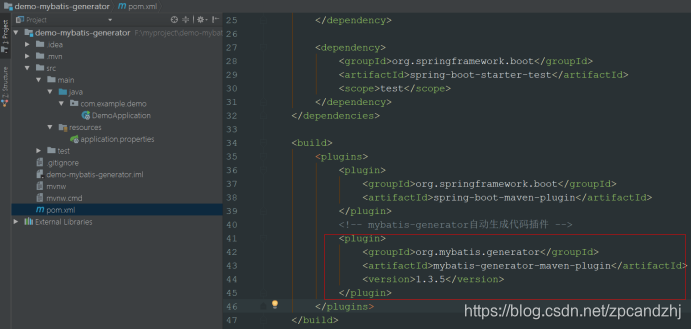
<!-- mybatis-generator自动生成代码插件 -->
<plugin>
   <groupId>org.mybatis.generator</groupId>
   <artifactId>mybatis-generator-maven-plugin</artifactId>
   <version>1.3.5</version>
</plugin>- 1
- 2
- 3
- 4
- 5
- 6
2.将插件需要的配置文件拷入到resource目录下,并做配置
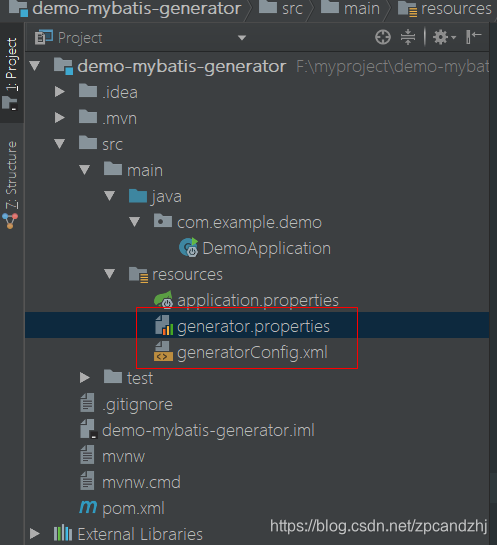
generator.properties:配置数据库信息,在generatorConfig.xml使用:
#generatorConfig Info
generator.location=D:\\software\\maven\\apache-maven-3.3.9\\repository\\mysql\\mysql-connector-java\\5.1.32\\mysql-connector-java-5.1.32.jar
generator.targetPackage=com.zpc.videoshow.generated
#gererator.schema=oracle-schema
gererator.tableName=video_info
gererator.domainObjectName=VideoInfo

jdbc.driver=com.mysql.jdbc.Driver
jdbc.host=jdbc:mysql://localhost:3306/videoshow
jdbc.userName=root
jdbc.passWord=123456
jdbc.initialSize=0
jdbc.maxActive=20
jdbc.maxIdle=20
jdbc.minIdle=1
jdbc.maxWait=1000- 1
- 2
- 3
- 4
- 5
- 6
- 7
- 8
- 9
- 10
- 11
- 12
- 13
- 14
- 15
- 16
generatorConfig.xml:配置generator插件运行需要的参数信息
<?xml version="1.0" encoding="UTF-8"?>
<!DOCTYPE generatorConfiguration PUBLIC "-//mybatis.org//DTD MyBatis Generator Configuration 1.0//EN"
        "http://mybatis.org/dtd/mybatis-generator-config_1_0.dtd">
<generatorConfiguration>
    <!-- 引入配置文件 -->
    <properties resource="generator.properties"/>
    <!-- 数据库驱动包位置,路径请不要有中文-->
    <!-- <classPathEntry location="D:\software\lib\mysql-connector-java-5.1.21.jar" /> -->
    <classPathEntry location="${generator.location}"/>
    <!-- 一个数据库一个context-->
    <context id="DB2Tables" targetRuntime="MyBatis3">
        <!-- 生成的pojo,将implements Serializable -->
        <plugin type="org.mybatis.generator.plugins.SerializablePlugin"></plugin>

        <!-- 注释 -->
        <commentGenerator>
            <property name="suppressAllComments" value="true"/><!-- 是否取消注释 -->
            <!-- <property name="suppressDate" value="true" />  是否生成注释代时间戳 -->
        </commentGenerator>

        <!-- 数据库链接URL、用户名、密码 -->
        <!-- <jdbcConnection driverClass="com.mysql.jdbc.Driver" connectionURL="jdbc:mysql://localhost:3306/sy" userId="sypro" password="sypro"> -->
        <jdbcConnection driverClass="${jdbc.driver}" connectionURL="${jdbc.host}" userId="${jdbc.userName}"
                        password="${jdbc.passWord}">
        </jdbcConnection>

        <!-- 类型转换 -->
        <javaTypeResolver>
            <!-- 默认false,把JDBC DECIMAL 和 NUMERIC 类型解析为 Integer true,把JDBC DECIMAL
                和 NUMERIC 类型解析为java.math.BigDecimal -->
            <property name="forceBigDecimals" value="false"/>
        </javaTypeResolver>

        <!-- 生成model模型,设置对应的包名(targetPackage)和存放路径(targetProject)。targetProject可以指定具体的路径,如./src/main/java,也可以使用MAVEN来自动生成,这样生成的代码会在target/generatord-source目录下 -->
        <javaModelGenerator targetPackage="${generator.targetPackage}" targetProject="./src/main/java">
            <!-- 是否在当前路径下新加一层schema,eg:false路径com.oop.eksp.user.model 而true:com.oop.eksp.user.model.[schemaName] -->
            <property name="enableSubPackages" value="false"/>
            <!-- 从数据库返回的值被清理前后的空格 -->
            <property name="trimStrings" value="true"/>
        </javaModelGenerator>

        <!--对应的mapper.xml文件 -->
        <sqlMapGenerator targetPackage="${generator.targetPackage}" targetProject="./src/main/java">
            <property name="enableSubPackages" value="true"/>
        </sqlMapGenerator>

        <!-- 对应的Mapper接口类文件 -->
        <javaClientGenerator type="XMLMAPPER" targetPackage="${generator.targetPackage}"
                             targetProject="./src/main/java">
            <property name="enableSubPackages" value="true"/>
        </javaClientGenerator>

        <!-- 列出要生成代码的所有表,这里配置的是不生成Example文件 -->
        <!-- schema即为数据库名tableName为对应的数据库表 domainObjectName是要生成的实体类 enable*ByExample是否生成 example类   -->
        <table tableName="${gererator.tableName}" domainObjectName="${gererator.domainObjectName}"
               schema="${gererator.schema}"
               enableCountByExample="false" enableUpdateByExample="false"
               enableDeleteByExample="false" enableSelectByExample="false"
               selectByExampleQueryId="false">
            <!-- 忽略列,不生成bean 字段
            <ignoreColumn column="FRED" />-->
            <!-- 指定列的java数据类型
            <columnOverride column="LONG_VARCHAR_FIELD" jdbcType="VARCHAR" />  -->
            <!-- 用于指定生成实体类时是否使用实际的列名作为实体类的属性名。false是 Camel Case风格-->
            <property name="useActualColumnNames" value="false"/>
        </table>
    </context>
</generatorConfiguration>- 1
- 2
- 3
- 4
- 5
- 6
- 7
- 8
- 9
- 10
- 11
- 12
- 13
- 14
- 15
- 16
- 17
- 18
- 19
- 20
- 21
- 22
- 23
- 24
- 25
- 26
- 27
- 28
- 29
- 30
- 31
- 32
- 33
- 34
- 35
- 36
- 37
- 38
- 39
- 40
- 41
- 42
- 43
- 44
- 45
- 46
- 47
- 48
- 49
- 50
- 51
- 52
- 53
- 54
- 55
- 56
- 57
- 58
- 59
- 60
- 61
- 62
- 63
- 64
- 65
- 66
- 67
- 68
3.运行generator插件(确保数据库已经运行)
方法1:直接找到mybatis-generator的插件,右击运行。
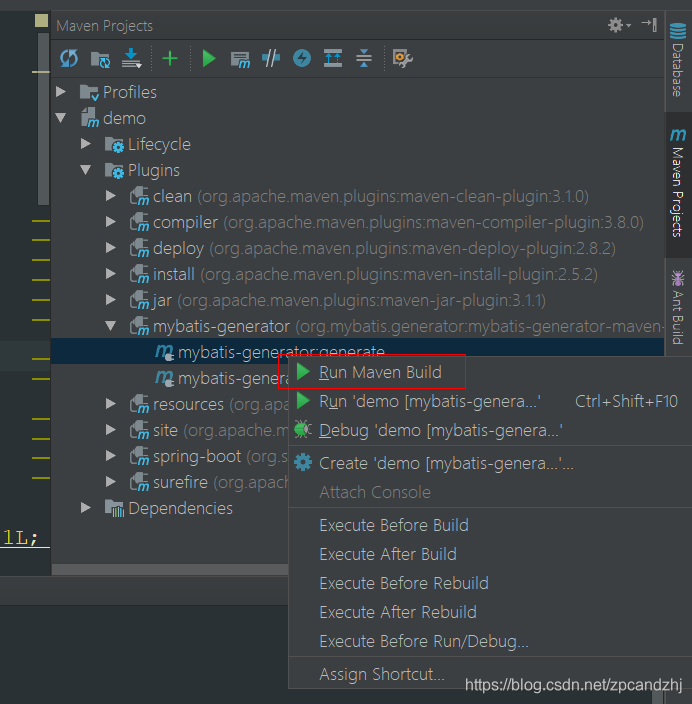
方法2:在运行配置里面添加maven命令
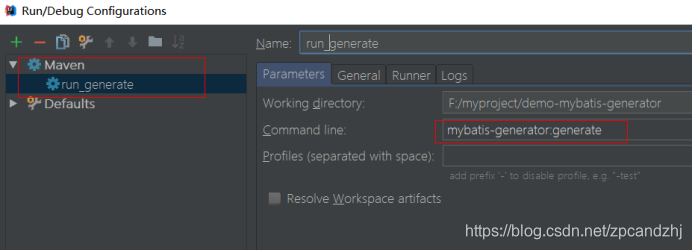

4.查看生成的文件
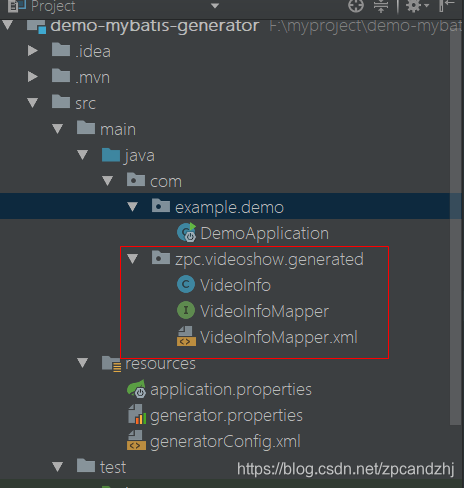
5.一些小技巧
a) 建表时,字段名称建议用"_"分隔多个单词,比如:AWB_NO、REC_ID…,这样生成的entity,属性名称就会变成漂亮的驼峰命名,即:awbNo、recId
b)oracle中,数值形的字段,如果指定精度,比如Number(16,2),默认生成entity属性是BigDecimal型 ,如果不指定精度,比如:Number(8),指默认生成的是Long型
c)oracle中的nvarchar/nvarchar2,mybatis-generator会识别成Object型,建议不要用nvarchar2,改用varchar2
6.Example文件的使用
用过Hibernate的同学一定感叹于其完全不用手动写sql的强大功能,其实Mybatis也可以配置生成Example,省去一些简单的sql编写,实际开发中也会带来方便。
a.修改generatorConfig.xml的配置:
 enableCountByExample="true" enableUpdateByExample="true"
 enableDeleteByExample="true" enableSelectByExample="true"
selectByExampleQueryId="true"- 1
- 2
- 3
b.pom中引入mybatis的依赖:
<dependency>
   <groupId>org.mybatis</groupId>
   <artifactId>mybatis</artifactId>
   <version>3.4.1</version>
</dependency>- 1
- 2
- 3
- 4
- 5
c.运行generator
这种情况下多生成了一个Example的文件,Mapper文件的内容也会多很多example相关的:
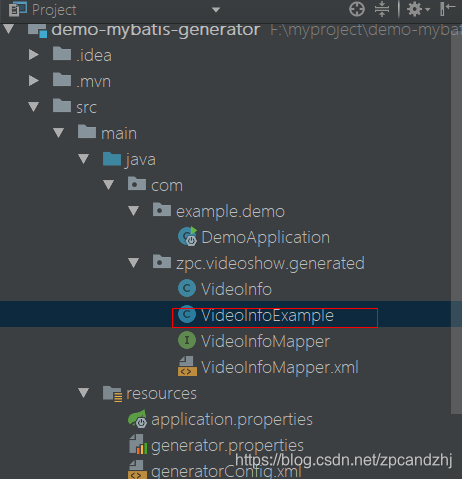
Example的详细使用百度之,参见:
https://blog.csdn.net/m0_37795198/article/details/78848045
18.MyBatis整合分页插件 pageHelper
请参见博文:https://blog.csdn.net/hellozpc/article/details/82531834

 浙公网安备 33010602011771号