响应链和UIKit框架
Event Delivery: The Responder Chain
When you design your app, it’s likely that you want to respond to events dynamically. For example, a touch can occur in many different objects onscreen, and you have to decide which object you want to respond to a given event and understand how that object receives the event.
When a user-generated event occurs, UIKit creates an event object containing the information needed to process the event. Then it places the event object in the active app’s event queue. For touch events, that object is a set of touches packaged in a UIEvent object. For motion events, the event object varies depending on which framework you use and what type of motion event you are interested in.
An event travels along a specific path until it is delivered to an object that can handle it. First, the singleton UIApplication object takes an event from the top of the queue and dispatches it for handling. Typically, it sends the event to the app’s key window object, which passes the event to an initial object for handling. The initial object depends on the type of event.
-
Touch events. For touch events, the window object first tries to deliver the event to the view where the touch occurred. That view is known as the hit-test view. The process of finding the hit-test view is called hit-testing, which is described in Hit-Testing Returns the View Where a Touch Occurred.
-
Motion and remote control events. With these events, the window object sends the shaking-motion or remote control event to the first responder for handling. The first responder is described in The Responder Chain Is Made Up of Responder Objects.
The ultimate goal of these event paths is to find an object that can handle and respond to an event. Therefore, UIKit first sends the event to the object that is best suited to handle the event. For touch events, that object is the hit-test view, and for other events, that object is the first responder. The following sections explain in more detail how the hit-test view and first responder objects are determined.
Hit-Testing Returns the View Where a Touch Occurred
iOS uses hit-testing to find the view that is under a touch. Hit-testing involves checking whether a touch is within the bounds of any relevant view objects. If it is, it recursively checks all of that view’s subviews. The lowest view in the view hierarchy that contains the touch point becomes the hit-test view. After iOS determines the hit-test view, it passes the touch event to that view for handling.
To illustrate, suppose that the user touches view E in Figure 2-1. iOS finds the hit-test view by checking the subviews in this order:
-
The touch is within the bounds of view A, so it checks subviews B and C.
-
The touch is not within the bounds of view B, but it’s within the bounds of view C, so it checks subviews D and E.
-
The touch is not within the bounds of view D, but it’s within the bounds of view E.
View E is the lowest view in the view hierarchy that contains the touch, so it becomes the hit-test view.
Figure 2-1 Hit-testing returns the subview that was touched
The hitTest:withEvent: method returns the hit test view for a given CGPoint and UIEvent. The hitTest:withEvent: method begins by calling the pointInside:withEvent: method on itself. If the point passed into hitTest:withEvent: is inside the bounds of the view, pointInside:withEvent: returns YES. Then, the method recursively calls hitTest:withEvent: on every subview that returns YES.
If the point passed into hitTest:withEvent: is not inside the bounds of the view, the first call to the pointInside:withEvent: method returns NO, the point is ignored, and hitTest:withEvent: returns nil. If a subview returns NO, that whole branch of the view hierarchy is ignored, because if the touch did not occur in that subview, it also did not occur in any of that subview’s subviews. This means that any point in a subview that is outside of its superview can’t receive touch events because the touch point has to be within the bounds of the superview and the subview. This can occur if the subview’s clipsToBounds property is set to NO.
Note: A touch object is associated with its hit-test view for its lifetime, even if the touch later moves outside the view.
The hit-test view is given the first opportunity to handle a touch event. If the hit-test view cannot handle an event, the event travels up that view’s chain of responders as described in The Responder Chain Is Made Up of Responder Objects until the system finds an object that can handle it.
The Responder Chain Is Made Up of Responder Objects
Many types of events rely on a responder chain for event delivery. The responder chain is a series of linked responder objects. It starts with the first responder and ends with the application object. If the first responder cannot handle an event, it forwards the event to the next responder in the responder chain.
A responder object is an object that can respond to and handle events. The UIResponder class is the base class for all responder objects, and it defines the programmatic interface not only for event handling but also for common responder behavior. Instances of the UIApplication, UIViewController, and UIViewclasses are responders, which means that all views and most key controller objects are responders. Note that Core Animation layers are not responders.
The first responder is designated to receive events first. Typically, the first responder is a view object. An object becomes the first responder by doing two things:
-
Overriding the
canBecomeFirstRespondermethod to returnYES. -
Receiving a
becomeFirstRespondermessage. If necessary, an object can send itself this message.
Note: Make sure that your app has established its object graph before assigning an object to be the first responder. For example, you typically call the becomeFirstResponder method in an override of the viewDidAppear: method. If you try to assign the first responder in viewWillAppear:, your object graph is not yet established, so the becomeFirstResponder method returns NO.
Events are not the only objects that rely on the responder chain. The responder chain is used in all of the following:
-
Touch events. If the hit-test view cannot handle a touch event, the event is passed up a chain of responders that starts with the hit-test view.
-
Motion events. To handle shake-motion events with UIKit, the first responder must implement either the
motionBegan:withEvent:ormotionEnded:withEvent:method of theUIResponderclass, as described in Detecting Shake-Motion Events with UIEvent. -
Remote control events. To handle remote control events, the first responder must implement the
remoteControlReceivedWithEvent:method of theUIResponderclass. -
Action messages. When the user manipulates a control, such as a button or switch, and the target for the action method is
nil, the message is sent through a chain of responders starting with the control view. -
Editing-menu messages. When a user taps the commands of the editing menu, iOS uses a responder chain to find an object that implements the necessary methods (such as
cut:,copy:, andpaste:). For more information, see Displaying and Managing the Edit Menu and the sample code project, CopyPasteTile. -
Text editing. When a user taps a text field or a text view, that view automatically becomes the first responder. By default, the virtual keyboard appears and the text field or text view becomes the focus of editing. You can display a custom input view instead of the keyboard if it’s appropriate for your app. You can also add a custom input view to any responder object. For more information, see Custom Views for Data Input.
UIKit automatically sets the text field or text view that a user taps to be the first responder; Apps must explicitly set all other first responder objects with the becomeFirstResponder method.
The Responder Chain Follows a Specific Delivery Path
If the initial object—either the hit-test view or the first responder—doesn’t handle an event, UIKit passes the event to the next responder in the chain. Each responder decides whether it wants to handle the event or pass it along to its own next responder by calling the nextResponder method.This process continues until a responder object either handles the event or there are no more responders.
The responder chain sequence begins when iOS detects an event and passes it to an initial object, which is typically a view. The initial view has the first opportunity to handle an event. Figure 2-2 shows two different event delivery paths for two app configurations. An app’s event delivery path depends on its specific construction, but all event delivery paths adhere to the same heuristics.
Figure 2-2 The responder chain on iOS
For the app on the left, the event follows this path:
-
The initial view attempts to handle the event or message. If it can’t handle the event, it passes the event to its superview, because the initial view is not the top most view in its view controller’s view hierarchy.
-
The superview attempts to handle the event. If the superview can’t handle the event, it passes the event to its superview, because it is still not the top most view in the view hierarchy.
-
The topmost view in the view controller’s view hierarchy attempts to handle the event. If the topmost view can’t handle the event, it passes the event to its view controller.
-
The view controller attempts to handle the event, and if it can’t, passes the event to the window.
-
If the window object can’t handle the event, it passes the event to the singleton app object.
-
If the app object can’t handle the event, it discards the event.
The app on the right follows a slightly different path, but all event delivery paths follow these heuristics:
-
A view passes an event up its view controller’s view hierarchy until it reaches the topmost view.
-
The topmost view passes the event to its view controller.
-
The view controller passes the event to its topmost view’s superview.
Steps 1-3 repeat until the event reaches the root view controller.
-
The root view controller passes the event to the window object.
-
The window passes the event to the app object.
1、寻找响应消息视图的过程可以用一张图来说明。

处理原理如下:
• 当用户点击屏幕时,会产生一个触摸事件,系统会将该事件加入到一个由UIApplication管理的事件队列中
• UIApplication会从事件队列中取出最前面的事件进行分发以便处理,通常,先发送事件给应用程序的主窗口(UIWindow)
• 主窗口会调用hitTest:withEvent:方法在视图(UIView)层次结构中找到一个最合适的UIView来处理触摸事件
(hitTest:withEvent:其实是UIView的一个方法,UIWindow继承自UIView,因此主窗口UIWindow也是属于视图的一种)
• hitTest:withEvent:方法大致处理流程是这样的:
首先调用当前视图的pointInside:withEvent:方法判断触摸点是否在当前视图内:
▶ 若pointInside:withEvent:方法返回NO,说明触摸点不在当前视图内,则当前视图的hitTest:withEvent:返回nil
▶ 若pointInside:withEvent:方法返回YES,说明触摸点在当前视图内,则遍历当前视图的所有子视图(subviews),调用子视图的hitTest:withEvent:方法重复前面的步骤,子视图的遍历顺序是从top到bottom,即从subviews数组的末尾向前遍历,直到有子视图的hitTest:withEvent:方法返回非空对象或者全部子视图遍历完毕:
▷ 若第一次有子视图的hitTest:withEvent:方法返回非空对象,则当前视图的hitTest:withEvent:方法就返回此对象,处理结束
▷ 若所有子视图的hitTest:withEvent:方法都返回nil,则当前视图的hitTest:withEvent:方法返回当前视图自身(self)
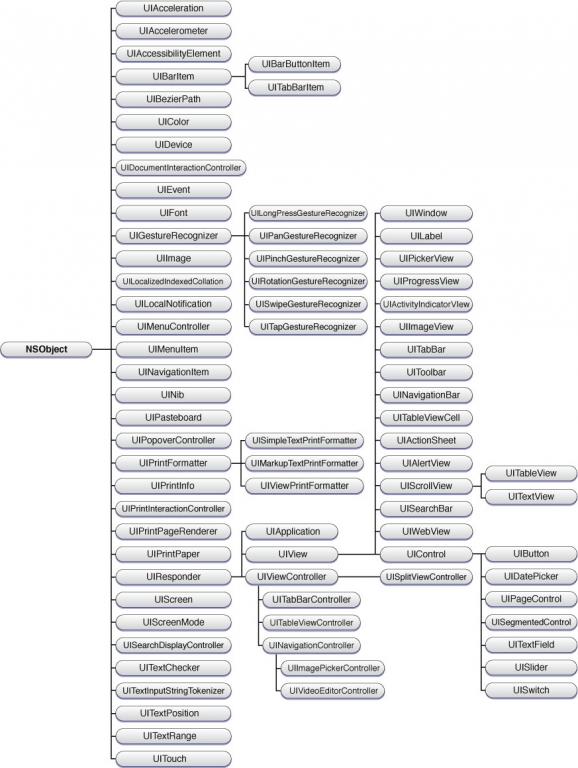
UIKit/框架的类继承图:
一.responder对象
在iOS系统中,能够响应并处理事件的对象称之为responder object, UIResponder是所有responder对象的基类,在UIResponder类中定义了处理各种事件,包括触摸事件(Touch Event)、运动事件(Motion Event)和远程控制事件(Remote-Control Events)的编程接口,其中处理触摸事件(Touch Event)的编程接口如下:
– touchesBegan:withEvent:
– touchesMoved:withEvent:
– touchesEnded:withEvent:
– touchesCancelled:withEvent:
这四个方法分别处理触摸开始事件,触摸移动事件,触摸终止事件,以及触摸跟踪取消事件。
UIApplication, UIViewController,UIView和所有继承自UIView的UIKit类(包括UIWindow,继承自UIView)都直接或间接的继承自UIResponder,所以它们的实例都是responder object对象,都实现了上述4个方法。UIResponder中的默认实现是什么都不做,但UIKit中UIResponder的直接子类(UIView,UIViewController…)的默认实现是将事件沿着responder chain继续向上传递到下一个responder,即nextResponder。所以在定制UIView子类的上述事件处理方法时,如果需要将事件传递给next responder,可以直接调用super的对应事件处理方法,super的对应方法将事件传递给next responder,即使用
[super touchesBegan:touches withEvent:event];不建议直接向nextResponder发送消息,这样可能会漏掉父类对这一事件的其他处理。
[self.nextResponder touchesBegan:touches withEvent:event];
另外,在定制UIView子类的事件处理方法时,如果其中一个方法没有调用super的对应方法,则其他方法也需要重写,不使用super的方法,否则事件处理流程会很混乱。

 浙公网安备 33010602011771号