
ansible 介绍
Ansible的与节点有关的重要术语包括控制节点,受管节点,清单和主机文件:
控制节点(Control node):指安装了Ansible的主机,也叫Ansible服务器端,管理机。
Ansible控制节点主要用于发布运行任务,执行控制命令。
Ansible的程序都安装在控制节点上,控制节点需要安装Python和Ansible所需的各种依赖库。注意:目前Ansible还不能安装在Windows下。
受控节点(Managed nodes):也叫客户机,就是想用Ansible执行任务的客户服务器。
清单(Inventory):受控节点的列表,就是所有要管理的主机列表。
host文件:清单列表通常保存在一个名为host文件中。默认是/etc/ansible/hosts文件
在host文件中,可以使用IP地址或者主机名来表示具体的管理主机和认证信息,并可以根据主机的用户进行分组。
缺省文件:/etc/ansible/hosts,可以通过-i指定自定义的host文件。
模块(Modules):模块是Ansible执行特定任务的代码块。
比如:添加用户,上传文件和对客户机执行ping操作等。Ansible现在默认自带450多个模块,
Ansible Galaxy公共存储库则包含大约1600个模块。
任务(Task):是Ansible客户机上执行的操作。可以使用ad-hoc单行命令执行一个任务。
剧本(Playbook):是利用YAML标记语言编写的可重复执行的任务的列表,
playbook实现任务的更便捷的读写和贡献。比如,在Github上有大量的Ansible playbooks共享,
你要你有一双善于发现的眼睛你就能找到大量的宝藏。
角色(roles):角色是Ansible 1.2版本引入的新特性,用于层次性、结构化地组织playbook。
roles能够根据层次型结构自动装载变量文件、tasks以及handlers等。
安装:
yum install ansible 或者dnf install ansible
1.Ansible Inventory文件
1.1基于密码连接
[root@ansible ~]# vim /etc/ansible/hosts
# 方法一 主机+端口+用户名+密码
[webserver]
192.168.1.31 ansible_ssh_port=22 ansible_ssh_user=root ansible_ssh_pass="123456"
192.168.1.32 ansible_ssh_port=22 ansible_ssh_user=root ansible_ssh_pass="123456"
192.168.1.33 ansible_ssh_port=22 ansible_ssh_user=root ansible_ssh_pass="123456"
192.168.1.36 ansible_ssh_port=22 ansible_ssh_user=root ansible_ssh_pass="123456"


# 方法二 主机+用户名+密码
[webserver]
192.168.1.3[1:3] ansible_ssh_user=root ansible_ssh_pass="123456"


# 方法二 主机+端口+密码
[webserver]
192.168.1.3[1:3]
[webserver:vars]
ansible_ssh_pass="123456"
1.2基于秘钥连接
首先配置公私钥,私钥拷贝到客户端服务器

[root@ansible ~]# vim /etc/ansible/hosts
# 方法一 主机+(端口)
[webserver]
192.168.1.31:22
192.168.1.32
192.168.1.33
192.168.1.36

# 方法二 别名主机+地址+端口
[webserver]
node1 ansible_ssh_host=192.168.1.31 ansible_ssh_port=22
node2 ansible_ssh_host=192.168.1.32 ansible_ssh_port=22
node3 ansible_ssh_host=192.168.1.33 ansible_ssh_port=22
node6 ansible_ssh_host=192.168.1.36 ansible_ssh_port=22
1.3主机组的使用
# 主机组变量名+主机+密码
[apache]
192.168.1.36
192.168.1.33
[apache.vars]
ansible_ssh_pass='123456'

# 主机组变量名+主机+密钥
[nginx]
192.168.1.3[1:2]

# 定义多个组,把一个组当另外一个组的组员
[webserver:children]  #webserver组包括两个子组:apache nginx
apache
nginx
1.4.临时指定inventory
1)先编辑一个主机定义清单
[root@ansible ~]# vim /etc/dock
[dock]
192.168.1.31 ansible_ssh_pass='123456'
192.168.1.32
192.168.1.33
2)在执行命令是指定inventory
[root@ansible ~]# ansible -i /etc/dock all -m ping
1.5 指定组中的一台机器
只对web组中192.168.1.2主机操作,通过—limit参数限定主机的变更。
# ansible web -m command -a "systemctl status httpd" --limit "192.168.100.20"

通过IP限定主机
# ansible 192.168.100.20 -m command -a "systemctl status httpd"

使用到通配符来限定主机
# ansible 192.168.1.* -m command -a "systemctl status httpd"
2.Ansible Ad-Hoc
ad-hoc —— 临时的,在ansible中是指需要快速执行,并且不需要保存的命令。
说白了就是执行 一条命令。
对于复杂的命令则为playbook,类似于saltstack的state sls状态文件。
[root@ansible ~]# ansible -h
Usage: ansible <host-pattern> [options]

-a MODULE_ARGS   #模块参数
-C, --check  #检查语法
-f FORKS #并发
--list-hosts #列出主机列表
-m MODULE_NAME #模块名字
-o 使用精简的输出
[root@ansible ~]# ansible webserver -m shell -a 'uptime' -o
192.168.1.36 | CHANGED | rc=0 | (stdout)  13:46:14 up 1 day,  9:20,  4 users,  load average: 0.00, 0.00, 0.00
192.168.1.33 | CHANGED | rc=0 | (stdout)  21:26:33 up 1 day,  8:51,  3 users,  load average: 0.00, 0.01, 0.05
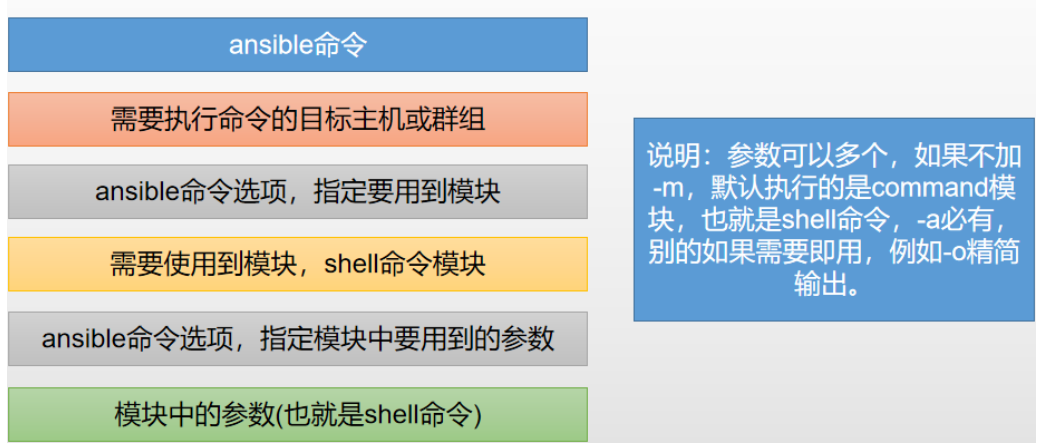
命令说明
![]()
![]()
ansible webserver -m shell -a "ls -a"
#  一台目标主机
[root@ansible ~]# ansible 192.168.1.31 -m ping

# 多台目标主机
[root@ansible ~]# ansible 192.168.1.31,192.168.1.32 -m ping

# 所有目标主机
[root@ansible ~]# ansible all -m ping
 组的配置信息如下:这里定义了一个nginx组和一个apache组
[root@ansible ~]# ansible nginx --list
  hosts (2):
    192.168.1.31
    192.168.1.32
[root@ansible ~]# ansible apache --list
  hosts (3):
    192.168.1.36
    192.168.1.33
    192.168.1.32

# 一个组的所有主机匹配
[root@ansible ~]# ansible apache -m ping

# 匹配apache组中有,但是nginx组中没有  的所有主机
[root@ansible ~]# ansible 'apache:!nginx' -m ping -o
192.168.1.36 | SUCCESS => {"ansible_facts": {"discovered_interpreter_python": "/usr/bin/python"}, "changed": false, "ping": "pong"}
192.168.1.33 | SUCCESS => {"ansible_facts": {"discovered_interpreter_python": "/usr/bin/python"}, "changed": false, "ping": "pong"}

# 匹配apache组和nginx组中都有  的机器(并集)
[root@ansible ~]# ansible 'apache:&nginx' -m ping -o
192.168.1.32 | SUCCESS => {"ansible_facts": {"discovered_interpreter_python": "/usr/bin/python"}, "changed": false, "ping": "pong"}

# 匹配apache组nginx组两个组所有  的机器(并集);等于ansible apache,nginx -m ping
[root@ansible ~]# ansible 'apache:nginx' -m ping -o
192.168.1.32 | SUCCESS => {"ansible_facts": {"discovered_interpreter_python": "/usr/bin/python"}, "changed": false, "ping": "pong"}
192.168.1.31 | SUCCESS => {"ansible_facts": {"discovered_interpreter_python": "/usr/bin/python"}, "changed": false, "ping": "pong"}
192.168.1.33 | SUCCESS => {"ansible_facts": {"discovered_interpreter_python": "/usr/bin/python"}, "changed": false, "ping": "pong"}
192.168.1.36 | SUCCESS => {"ansible_facts": {"discovered_interpreter_python": "/usr/bin/python"}, "changed": false, "ping": "pong"}

 浙公网安备 33010602011771号