MongoDB
常用命令
选择切换数据库:user articledb
插入数据:db.comment.insert({bson数据})
查询所有数据:db.comment.find()
条件查询数据:db.comment.find({条件})
查询符合条件的第一条记录:db.comment.findOne({条件})
查询符合条件的前几条记录:db.comment.find({条件}).limit(条数)
查询符合条件的跳过的记录:db.comment.find({条件}).skip(条数)
修改数据:db.comment.update({条件},{修改后的数据})或db.comment.update({条件},{$set:{要修改部分的字段:数据}})
修改数据并自增某字段值:db.comment.update({条件},{$inc:{自增的字段:步进值}})
删除数据:db.comment.remove({条件})
统计数据:db.comment.count({条件})
模糊查询:db.comment.find({字段名:/正则表达式/})
条件比较运算:db.comment.find({字段名:{$gt:值}})
包含查询:db.comment.find({字段名:{$in:[值1,值2]}})或db.comment.find({字段名:{$nin:[值1,值2]}})
条件连接查询:db.comment.find({$and:[{条件1},{条件2}]})或db.comment.find({$or:[{条件1},{条件2}]})
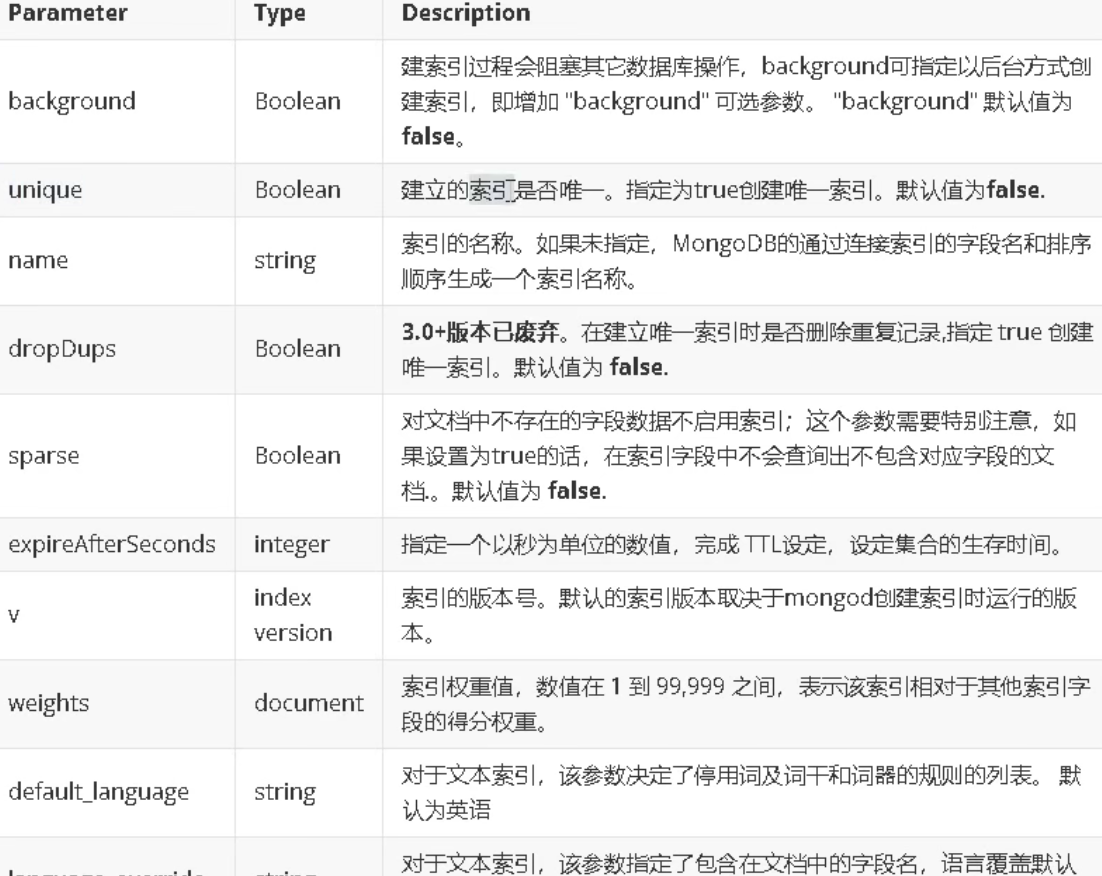
索引
索引的类型
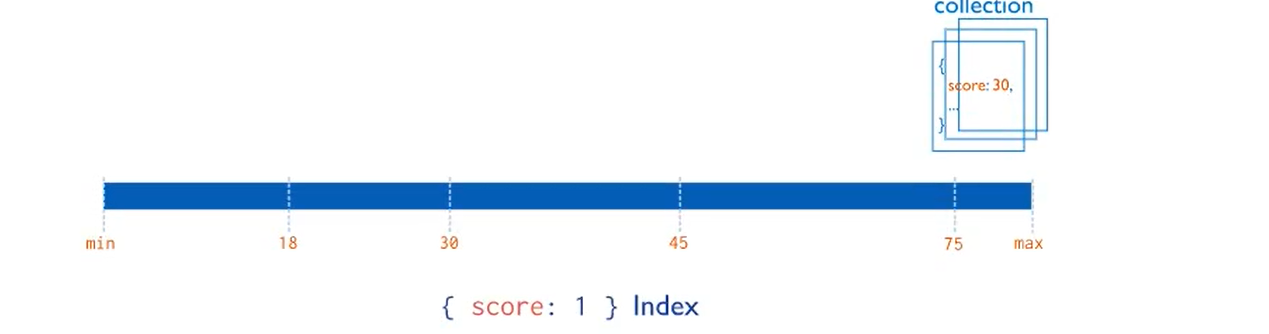
单字段索引
MongoDB支持在文档的单个字段上创建用户定义的升序/降序索引,称为单字段索引(Single Field Index)。
对于单个字段的索引和排序操作,升序或降序并不重要,MongoDB可以在任何方向上遍历索引
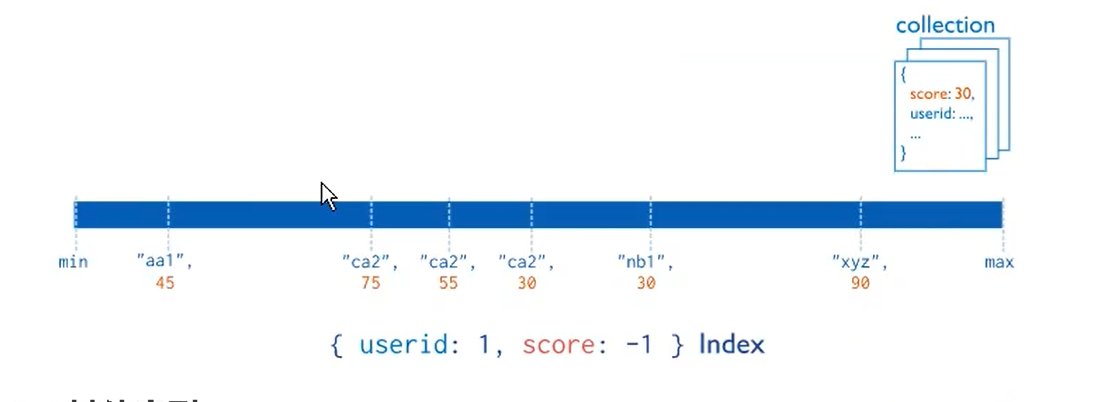
复合索引
MongoDB还支持多个字段的用户定义索引,即复合索引(Compound Index)
复合索引中列出的字段顺序具有重要意义。例如,如果复合索引由{userid:1,score:-1}组成,则索引首先按userid正序排序,然后在每个userid的值内,再在按score倒序排序
索引的管理操作
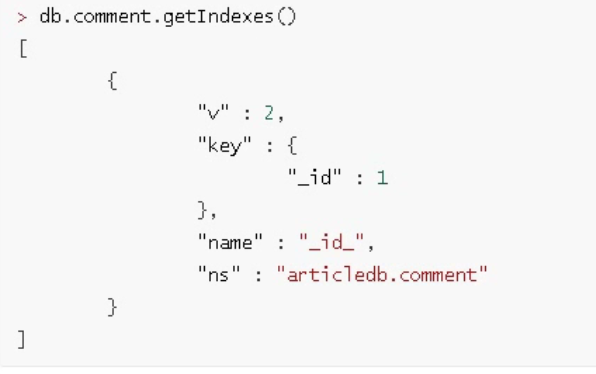
索引的查看
返回一个集合中的所有索引的数组
db.collection.getIndexes()
索引的移除
可以移除指定的索引,或移除所有索引
移除指定索引
db.collection.dropIndex(index)

示例:
删除comment集合中的userid字段上的升序索引

索引的创建
在集合上创建索引
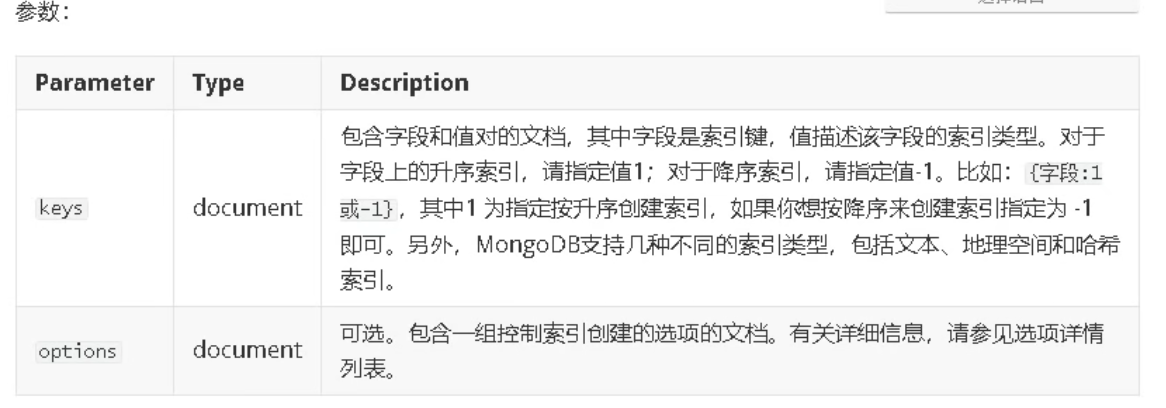
db.collection.createIndex(keys,options)
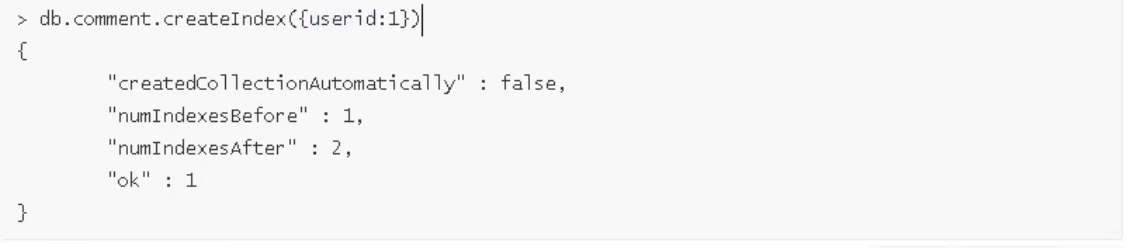
1)单字段索引实例:对userid字段建立索引
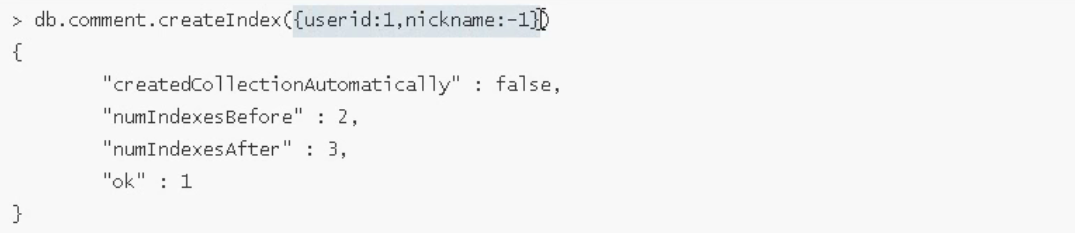
2)复合索引:对userid和nickname同时建立复合索引:
索引的移除
可以移除指定的索引,或者移除所有索引
移除指定索引
db.collection.dropIndex(index)

示例
删除comment集合中的userid字段上的升序索引

所有索引的移除
db.collection.dropIndexs()
示例
删除spit集合中的索引
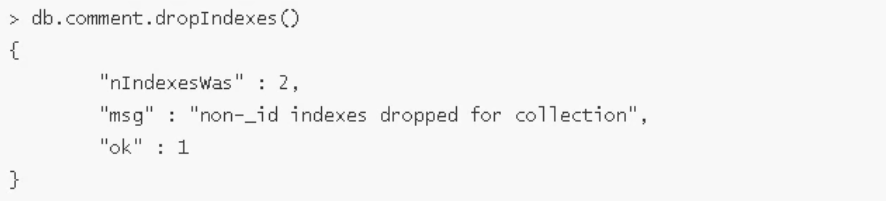
_id的字段的索引是无法删除的,只能删除非id字段的索引
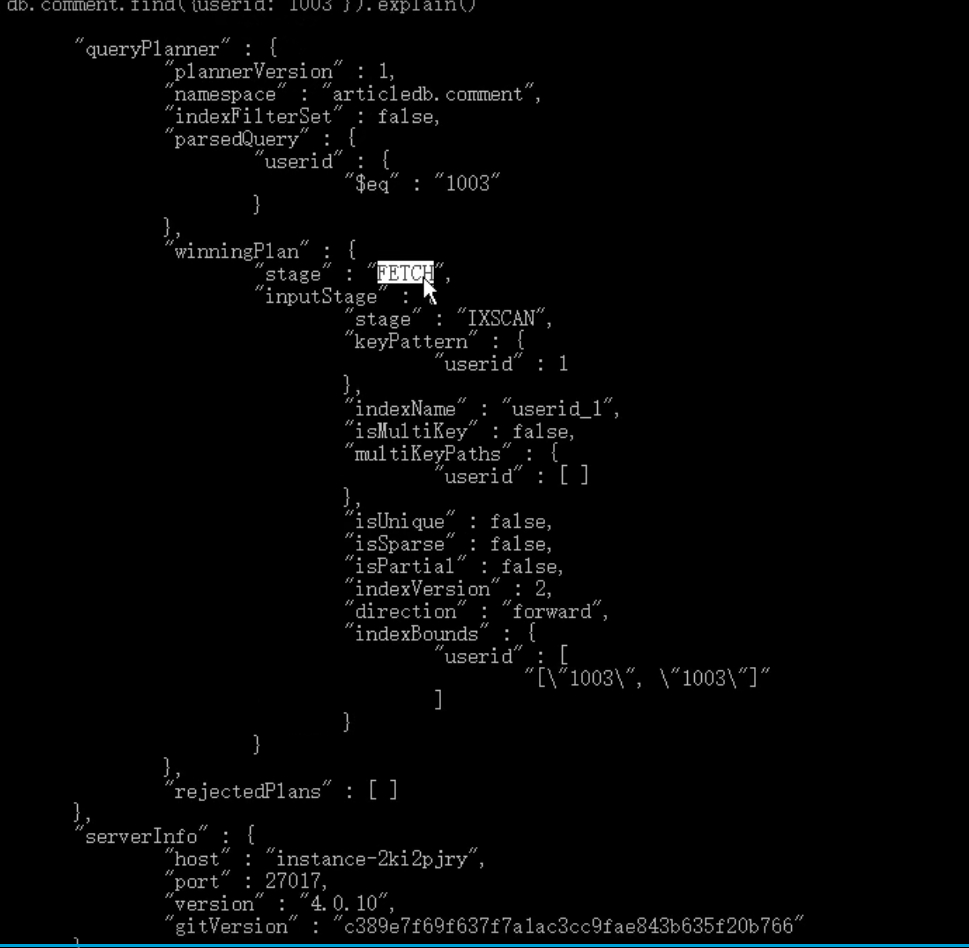
执行计划
分析查询性能
db.collection.find(query,options).explain(options)
示例
查看根据userid查询数据的情况
文章评论
    <dependencies>
        <dependency>
            <groupId>org.springframework.boot</groupId>
            <artifactId>spring-boot-starter-test</artifactId>
            <scope>test</scope>
        </dependency>
        <dependency>
            <groupId>org.springframework.boot</groupId>
            <artifactId>spring-boot-starter-data-mongodb</artifactId>
        </dependency>
    </dependencies>
spiring:
	#数据源配置
	data:
		mongodb:
			#主机地址
			host: locahost
			#数据库
			database: test
			#默认端口时27017
			port:	27017
			#也可以使用url连接
			#url:mongodb://localhost:27017/test
package com.cedric.article.service;

import com.cedric.article.dao.CommentRepository;
import com.cedric.article.po.Comment;
import org.springframework.beans.factory.annotation.Autowired;
import org.springframework.data.domain.Page;
import org.springframework.data.domain.PageRequest;
import org.springframework.data.mongodb.core.MongoTemplate;
import org.springframework.data.mongodb.core.query.Criteria;
import org.springframework.data.mongodb.core.query.Query;
import org.springframework.data.mongodb.core.query.Update;
import org.springframework.stereotype.Service;

import java.util.List;

@Service
public class CommentService {

    @Autowired
    private CommentRepository commentRepository;
    @Autowired
    private MongoTemplate mongoTemplate;

    /**
     * 保存一个评论
     */
    public void saveComment(Comment comment){
        // 如果需要自定义主键,可以在这里指定主键;如果不指定,MongoDB会自动生成主键
        // 设置一些默认初始值
        // 调用dao
        commentRepository.save(comment);
    }

    /**
     * 更新评论
     * @param comment
     */
    public void updateComment(Comment comment){
        // 调用dao
        commentRepository.save(comment);
    }

    /**
     * 查询所有评论
     * @return
     */
    public List<Comment> findCommentList(){
        // 调用dao
        return commentRepository.findAll();
    }

    /**
     * 根据id查询评论
     * @param id
     * @return
     */
    public Comment findCommentById(String id){
        return commentRepository.findById(id).get();
    }

    public Page<Comment> findCommentListByParentid(String parentid,int page,int size){
        return commentRepository.findByParentid(parentid, PageRequest.of(page-1,size));
    }

    public void updateCommentLikenum(String id){

        // 查询条件
        Query query = Query.query(Criteria.where("_id").is(id));

        // 更新条件
        Update update = new Update();
        update.inc("likenum");

        mongoTemplate.updateFirst(query,update,Comment.class);
    }

}
测试代码
javapackage com.cedric.article.service;

import com.cedric.article.po.Comment;
import org.junit.Test;
import org.junit.runner.RunWith;
import org.springframework.beans.factory.annotation.Autowired;
import org.springframework.boot.test.context.SpringBootTest;
import org.springframework.data.domain.Page;
import org.springframework.test.context.junit4.SpringRunner;

import java.time.LocalDateTime;
import java.util.List;

@RunWith(SpringRunner.class)
@SpringBootTest
public class CommentServiceTest {

    @Autowired
    private CommentService commentService;

    @Test
    public void testFindCommentList(){
        List<Comment> commentList = commentService.findCommentList();
        System.out.println(commentList);
    }

    @Test
    public void testFindCommentById(){
        Comment commentById = commentService.findCommentById("1");
        System.out.println(commentById);
    }

    @Test
    public void testSaveComment(){
        Comment comment = new Comment();
        comment.setArticleid("10000");
        comment.setContent("测试数据");
        comment.setCreatedatetime(LocalDateTime.now());
        comment.setUserid("1006");
        comment.setNickname("轩辕");
        comment.setState("1");
        comment.setUserid("1");
        comment.setLikenum(0);
        comment.setReplynum(0);

        commentService.saveComment(comment);
    }

    @Test
    public void testFindCommentListByParentid(){
        Page<Comment> commentListByParentid = commentService.findCommentListByParentid("3", 1, 2);
        System.out.println(commentListByParentid.getTotalElements());
        System.out.println(commentListByParentid.getContent());
    }

    @Test
    public void testUpdateCommentLikenum(){
        commentService.updateCommentLikenum("9");
    }

}
MongoDB集群和安全
副本集
是一组维护相同数据集的Mongod服务,副本集可以提供冗余和高可用性,是所有生产部署的基础。
同时也是类似于有自动故障恢复功能的主从集群。用多台机器进行同一数据的异步和同步,从而使得多台机器拥有同一数据的多个副本。并且当主库宕机时不需要用户敢于的情况下自动切换其他备份服务器做主库。还可以利用副本服务器做只读服务器,实现读写分离,提高负载。
(1)冗余和数据可用性
复制提供冗余并提高数据可用性。通过在不同数据库服务器上提供多个数据副本,复制可提高一定级别的容错功能,以防止丢失单个数据库服务器。
某些情况下,复制可以提供增加的读取性能,因为客户端可以将读取操作发送到不同的服务上,在不同数据中心维护数据副本可以增加分布式应用程序的数据位置和可以性。还可以用于维护其他副本,灾难恢复,报告或者备份。
(2)复制
副本集时一组维护相同数据集的mongod实例。包含多个数据承载节点和可选的一个仲裁节点。在承载数据的节点中,一个且仅有一个成为被视为主节点,其他节点被视为次要节点。
主节点接收所有写操作,副本集只有一个主要能够确认具有{w:"most"}写入关注的写日;虽然某些情况下,另一个mongod实例可能暂时认为自己也是主要的。主要记录其操作日志中的数据集的所有更改,即oplog。
(3)主从复制和副本集区别
主从集群和副本集最大区别就是副本集没有固定的"主节点";整个集群会选出一个"主节点",当其挂掉后,又在剩下的从节点中选中其他节点为"主节点",副本集总有一个活跃点{主、primary}和一个或多个备份节点{从、secondary}.
副本集的三个角色
副本集有两种数据类型三个角色
两种类型:
主节点(primary)类型:数据操作的主要连接点,可读写。
次要(辅助、从)节点类型:数据冗余备份节点,可以读或选举。
三种角色:
主要成员(primary):主要接收所有写操作。就是主节点。
副本成员(Replicate):从主节点通过复制操作以维护相同的数据集,即数据备份,不可写操作,但可以读操作(但需要配置)。是默认的一种从节点类型。
仲裁者(Arbiter):不保留任何数据的副本,只具有投票选举作用。当然也可以将仲裁服务器维护为副本集的一部分,即副本成员同时也可以是仲裁者。也是一种从节点类型。
搭建副本集
一主一从一仲裁
主节点
建立存放数据和日志的目录
#---------myrs
#主节点
mkdir -p /Users/didi/xzy/replica_sets/myrs_27017/log
mkdir -p /Users/didi/xzy/replica_sets/myrs_27017/data/db
新建或修改配置文件:
vim /Users/didi/xzy/replica_sets/myrs_27017/mongod.conf
myrs_27017
systemLog:
  #MongoDB发送所有日志输出的目标指定为文件
  destination: file
  #mongod或mongos应向其发送所有诊断日志记录信息的日志文件的路径
  path: "/Users/didi/xzy/replica_sets/myrs_27017/log/mongod.log"
  #当mongos或mongod实例重新启动时,mongos或mongod会将新条目附加到现有日志文件的末尾。
  logAppend: true
storage:
  #mongod实例存储其数据的目录,storage.dbPath设置仅适用于mongod。
  dbPath: "/Users/didi/xzy/replica_sets/myrs_27017/data/db"
  journal:
    #启用或禁用持久性日志以确保数据文件保持有效和可恢复。
    enabled: true
processManagement:
  #启用在后台运行mongos或mongod进程的守护进程模式
  fork: true
  #指定用于保存mongos或mongod进程的进程ID的文件位置,其中mongos或mongod将写入其PID
  pidFilePath: "/Users/didi/xzy/replica_sets/myrs_27017/log/mongod.pid"
net:
  #服务实例绑定所有IP,有副作用,副本集初始化的时候,节点名字会自动设置为本地域名,而不是ip
  #bindIpAll:true
  #服务实例绑定的IP
  bindIp: localhost
  #bindIp
  #绑定的端口
  port: 27017
replication:
  #副本集的名称
  replSetName: myrs
启动节点服务:
mongod -f /Users/didi/xzy/replica_sets/myrs_27017/mongod.conf

mongod --dbpath /Users/didi/xzy/replica_sets/myrs_27017/data/db --logpath /Users/didi/xzy/replica_sets/myrs_27017/log/mongod.log --fork
从节点
建立存放数据和日志的目录
#---------myrs
#从节点
mkdir -p /Users/didi/xzy/replica_sets/myrs_27018/log
mkdir -p /Users/didi/xzy/replica_sets/myrs_27018/data/db
新建或修改配置文件:
vim /Users/didi/xzy/replica_sets/myrs_27018/mongod.conf
myrs_27018:
systemLog:
  #MongoDB发送所有日志输出的目标指定为文件
  destination: file
  #mongod或mongos应向其发送所有诊断日志记录信息的日志文件的路径
  path: "/Users/didi/xzy/replica_sets/myrs_27018/log/mongod.log"
  #当mongos或mongod实例重新启动时,mongos或mongod会将新条目附加到现有日志文件的末尾。
  logAppend: true
storage:
  #mongod实例存储其数据的目录,storage.dbPath设置仅适用于mongod。
  dbPath: "/Users/didi/xzy/replica_sets/myrs_27018/data/db"
  journal:
    #启用或禁用持久性日志以确保数据文件保持有效和可恢复。
    enabled: true
processManagement:
  #启用在后台运行mongos或mongod进程的守护进程模式
  fork: true
  #指定用于保存mongos或mongod进程的进程ID的文件位置,其中mongos或mongod将写入其PID
  pidFilePath: "/Users/didi/xzy/replica_sets/myrs_27018/log/mongod.pid"
net:
  #服务实例绑定所有IP,有副作用,副本集初始化的时候,节点名字会自动设置为本地域名,而不是ip
  #bindIpAll:true
  #服务实例绑定的IP
  bindIp: localhost
  #bindIp
  #绑定的端口
  port: 27018
replication:
  #副本集的名称
  replSetName: myrs
启动服务
mongod -f /Users/didi/xzy/replica_sets/myrs_27018/mongod.conf

mongod --dbpath /Users/didi/xzy/replica_sets/myrs_27018/data/db --logpath /Users/didi/xzy/replica_sets/myrs_27018/log/mongod.log --
仲裁节点
建立存放数据和日志的目录
#---------myrs
#从节点
mkdir -p /Users/didi/xzy/replica_sets/myrs_27019/log
mkdir -p /Users/didi/xzy/replica_sets/myrs_27019/data/db
新建或修改配置文件:
vim /Users/didi/xzy/replica_sets/myrs_27019/mongod.conf
myrs_27019:
systemLog:
  #MongoDB发送所有日志输出的目标指定为文件
  destination: file
  #mongod或mongos应向其发送所有诊断日志记录信息的日志文件的路径
  path: "/Users/didi/xzy/replica_sets/myrs_27019/log/mongod.log"
  #当mongos或mongod实例重新启动时,mongos或mongod会将新条目附加到现有日志文件的末尾。
  logAppend: true
storage:
  #mongod实例存储其数据的目录,storage.dbPath设置仅适用于mongod。
  dbPath: "/Users/didi/xzy/replica_sets/myrs_27019/data/db"
  journal:
    #启用或禁用持久性日志以确保数据文件保持有效和可恢复。
    enabled: true
processManagement:
  #启用在后台运行mongos或mongod进程的守护进程模式
  fork: true
  #指定用于保存mongos或mongod进程的进程ID的文件位置,其中mongos或mongod将写入其PID
  pidFilePath: "/Users/didi/xzy/replica_sets/myrs_27019/log/mongod.pid"
net:
  #服务实例绑定所有IP,有副作用,副本集初始化的时候,节点名字会自动设置为本地域名,而不是ip
  #bindIpAll:true
  #服务实例绑定的IP
  bindIp: localhost
  #bindIp
  #绑定的端口
  port: 27019
replication:
  #副本集的名称
  replSetName: myrs
启动服务
mongod -f /Users/didi/xzy/replica_sets/myrs_27019/mongod.conf

mongod --dbpath /Users/didi/xzy/replica_sets/myrs_27019/data/db --logpath /Users/didi/xzy/replica_sets/myrs_27019/log/mongod.log --fork
连接节点
使用客户端命令连接任意一个节点,但这里尽量要连接主节点(27017节点)使之成为主节点:
mongo --host=localhost --port=27017
连入后必须初始化副本才行
rs.initiate() #可加参数configuration
初始化之后按一下回车从secondary变为primary
之后可以使用
rs.conf()和rs.status()来查看相应的信息
添加副本节点
在主节点添加从节点,将其他成员加入到副本集中
rs.add(host,arbiterOnly)
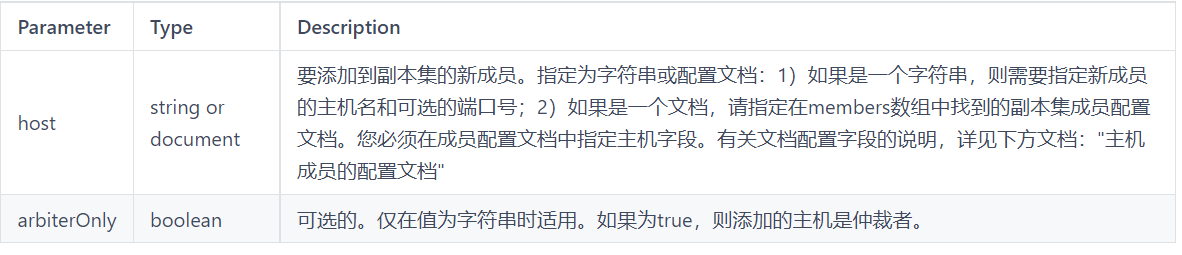
主机成员的配置文档:
{
  _id:int,
  host:string>,
  arbiterOnly:boolean>,
  buildIndexes:boolean>,
  hidden:boolean>,
  priority:number>,
  tags:document>,
  slaveDelay:int>,
  votes:number>
}
示例:
将27018的副本节点加添加到副本集汇总:
rs.add("localhost:27018")
添加仲裁者节点
rs.add(host,arbiterOnly)
或
rs.addArb(host)

例子:
rs.addArb("localhost:27019")
副本集的读写操作
登陆主节点27017,写入和读取数据:
mongo --host localhost --port 27017
use test
db.comment.insert({"articleid":"100000","content":"今天天气真好,阳光明媚","userid":"1001","nickname":"Aoi","createdatetime":new Date()})
登陆从节点:
mongo --host localhost --port 27018
#此时进入时会发现无法读取任何数据,要先将当前节点变为从节点
rs.slaveOk()
或
rs.slaveOk(true)

若要取消从节点
rs.slaveOk(false)
仲裁者节点
该节点不存放任何数据信息,只用于查看配置信息
主节点的选取原则
MongoDB在副本集中,会自动进行主节点的选举,主节点选举的触发条件:
主节点故障
主节点网络不可达(默认心跳信息为10秒)
人工干预(rs.stepDown(600))
一旦触发选举,就要根据一定的规则来选主节点
选举规则是根据票数来决定谁获胜:
票数最高,且获得了"大多数"成员的投票支持的节点获胜
"大多数"的定义为:假设复制集内投票成员数量为N,则大多数为N/2+1。例如:3个投票成员,则大多数的值是2.当复制集内存活的数量不足大多数时,整个复制集将无法选举出Primary,复制集将无法提供写服务,处于只读状态。
若票数相同,且都获得了"大多数"成员的投票支持的,数据新的节点获胜。
数据的新旧是通过操作日志oplog来对比的。

 浙公网安备 33010602011771号