
How to install, create and run tests.
Installing GHUnit
1.Installing in iOS (Xcode 4)
To use GHUnit in your project, you’ll need to create and configure a test target.
Create Test Target
- You’ll want to create a separate Test target. Select the project file for your app in the Project Navigator. From there, select the Add Target + symbol at the bottom of the window.
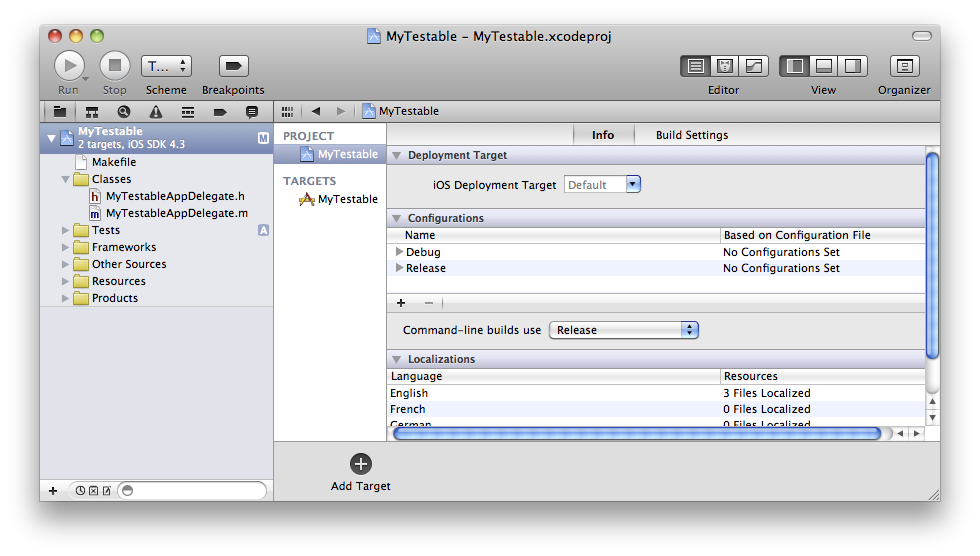
- Select iOS, Application, Window-based Application. Select Next.
- Name it Tests or something similar. Select Finish.
Configure the Test Target
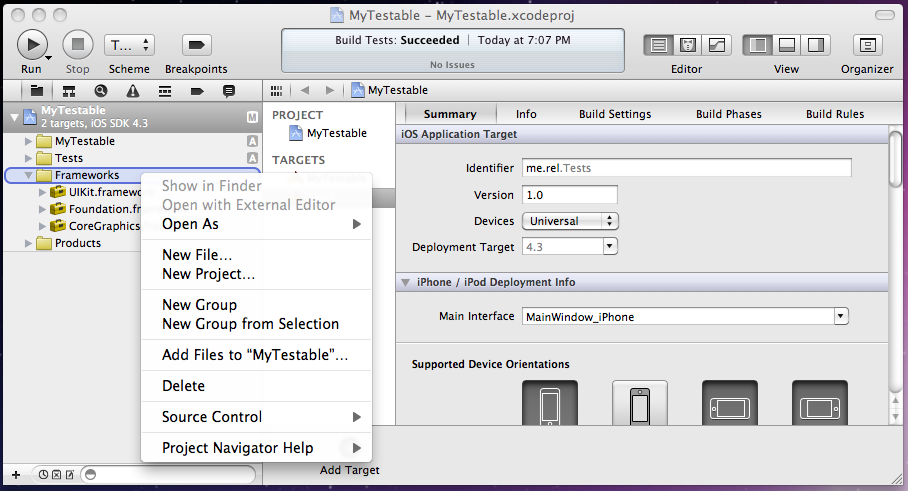
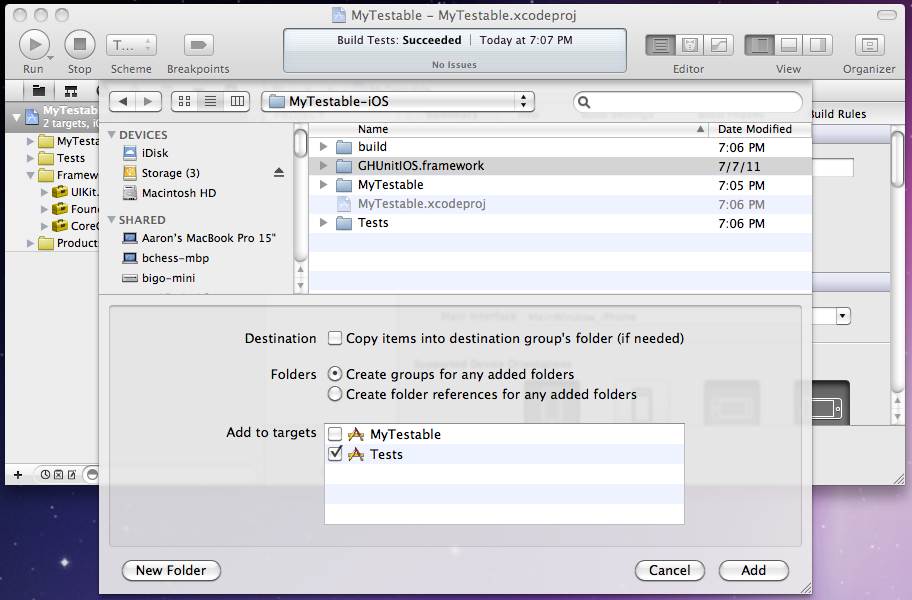
- Download and copy the GHUnitIOS.framework to your project. Command click on Frameworks in the Project Navigator and select: Add Files to “MyTestable”. (This should automatically add GHUnitIOS.framework to your Link Binary With Libraries Build Phase for the Tests target.)
- Select GHUnitIOS.framework and make sure the only the Tests target is selected.
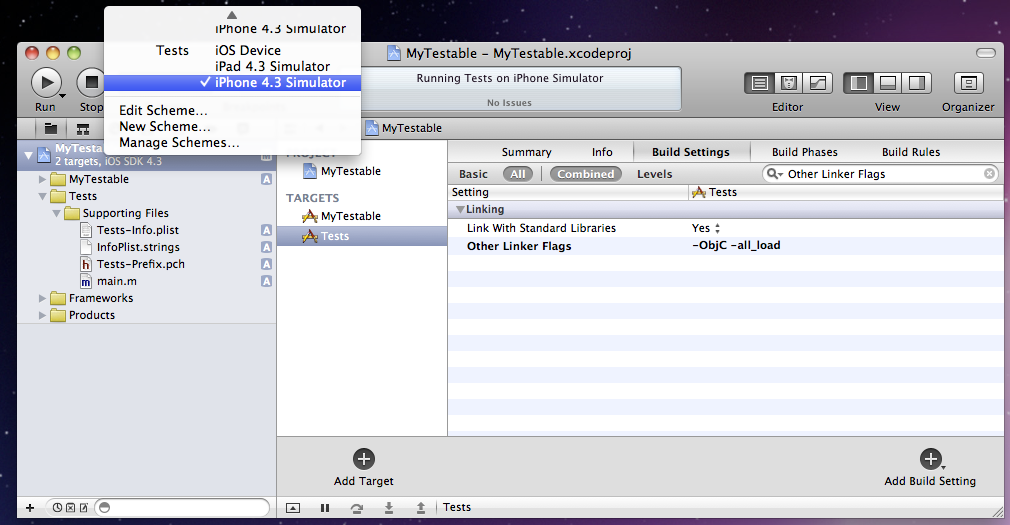
- We want to enable use of Objective-C categories, which isn’t enabled for static libraries by default. In the Tests target, Build Settings, under Other Linker Flags, add -ObjC and -all_load.

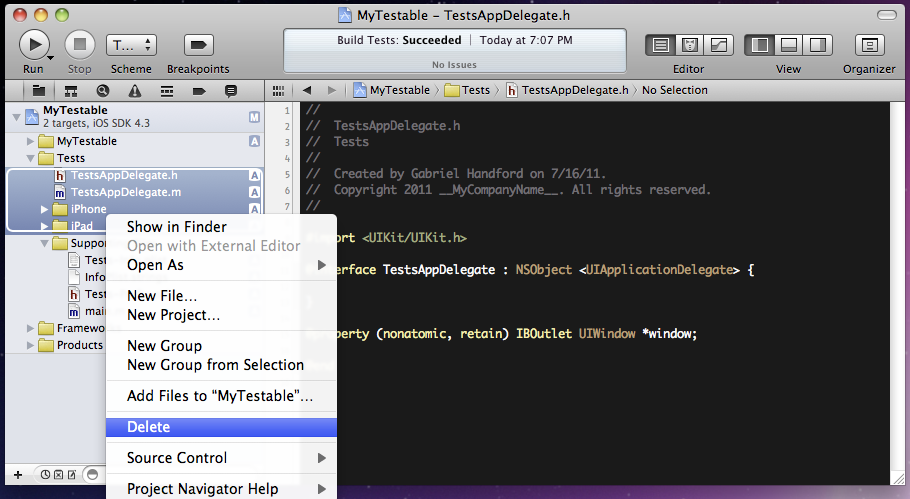
- Select and delete the files from the existing Tests folder. Leave the Supporting Files folder. GHUnit will provide the application delegate below.
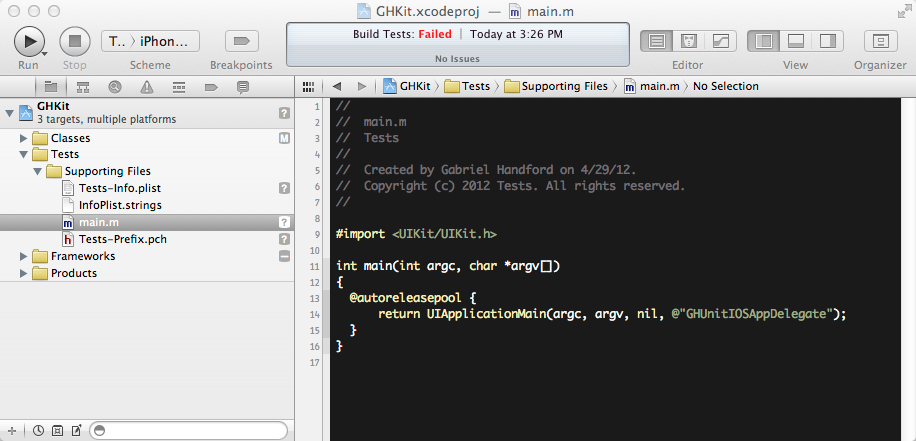
- In Tests folder, in Supporting Files, main.m, replace the last argument of UIApplicationMain with
@"GHUnitIOSAppDelegate". Remove the #import “AppDelegate.h” if present.
- Select the Tests target, iPhone Simulator configuration:
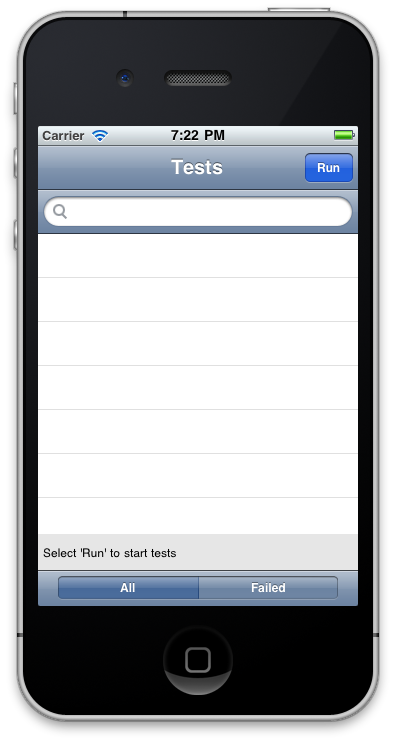
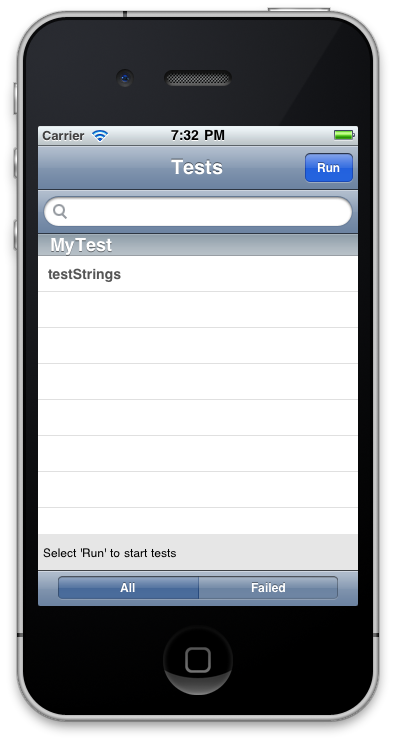
- Hit Run, and you’ll hopefully see the test application running (but without any tests).
Create a Test
- Command click on the Tests folder and select: New File…
- Select Objective-C class (iOS, Cocoa Touch or Mac OS X, Cocoa) and select Next. Leave the default subclass and select Next again.
- Name the file MyTest.m and make sure its enabled only for the “Tests” target.
-
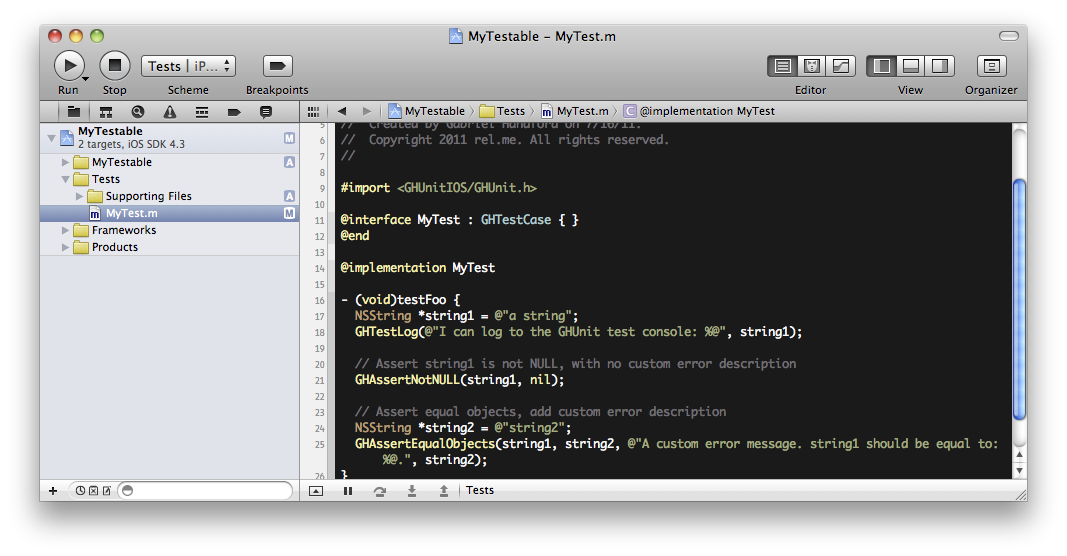
Delete the MyTest.h file and update the MyTest.m file.
 #import <GHUnitIOS/GHUnit.h>

  @interface MyTest : GHTestCase { }
  @end

  @implementation MyTest

  - (void)testStrings {
    NSString *string1 = @"a string";
    GHTestLog(@"I can log to the GHUnit test console: %@", string1);

    // Assert string1 is not NULL, with no custom error description
    GHAssertNotNULL(string1, nil);

    // Assert equal objects, add custom error description
    NSString *string2 = @"a string";
    GHAssertEqualObjects(string1, string2, @"A custom error message. string1 should be equal to: %@.", string2);
  }

  @end
- Now run the “Tests” target. Hit the Run button in the top right.
Examples
ExampleTest.m:
// For iOS
#import <GHUnitIOS/GHUnit.h>
// For Mac OS X
//#import <GHUnit/GHUnit.h>

@interface ExampleTest : GHTestCase { }
@end

@implementation ExampleTest

- (BOOL)shouldRunOnMainThread {
  // By default NO, but if you have a UI test or test dependent on running on the main thread return YES.
  // Also an async test that calls back on the main thread, you'll probably want to return YES.
  return NO;
}

- (void)setUpClass {
  // Run at start of all tests in the class
}

- (void)tearDownClass {
  // Run at end of all tests in the class
}

- (void)setUp {
  // Run before each test method
}

- (void)tearDown {
  // Run after each test method
}

- (void)testFoo {
  NSString *a = @"foo";
  GHTestLog(@"I can log to the GHUnit test console: %@", a);

  // Assert a is not NULL, with no custom error description
  GHAssertNotNULL(a, nil);

  // Assert equal objects, add custom error description
  NSString *b = @"bar";
  GHAssertEqualObjects(a, b, @"A custom error message. a should be equal to: %@.", b);
}

- (void)testBar {
  // Another test
}

@end
ExampleAsyncTest.m:
// For iOS
#import <GHUnitIOS/GHUnit.h>
// For Mac OS X
//#import <GHUnit/GHUnit.h>

@interface ExampleAsyncTest : GHAsyncTestCase { }
@end

@implementation ExampleAsyncTest

- (void)testURLConnection {

  // Call prepare to setup the asynchronous action.
  // This helps in cases where the action is synchronous and the
  // action occurs before the wait is actually called.
  [self prepare];

  NSURLRequest *request = [NSURLRequest requestWithURL:[NSURL URLWithString:@"http://www.google.com"]]http://www.google.com"]];
  NSURLConnection *connection = [[NSURLConnection alloc] initWithRequest:request delegate:self startImmediately:YES];

  // Wait until notify called for timeout (seconds); If notify is not called with kGHUnitWaitStatusSuccess then
  // we will throw an error.
  [self waitForStatus:kGHUnitWaitStatusSuccess timeout:10.0];

  [connection release];
}

- (void)connectionDidFinishLoading:(NSURLConnection *)connection {
  // Notify of success, specifying the method where wait is called.
  // This prevents stray notifies from affecting other tests.
  [self notify:kGHUnitWaitStatusSuccess forSelector:@selector(testURLConnection)];
}

- (void)connection:(NSURLConnection *)connection didFailWithError:(NSError *)error {
  // Notify of connection failure
  [self notify:kGHUnitWaitStatusFailure forSelector:@selector(testURLConnection)];
}

- (void)connection:(NSURLConnection *)connection didReceiveData:(NSData *)data {
  GHTestLog(@"%@", [[[NSString alloc] initWithData:data encoding:NSUTF8StringEncoding] autorelease]);
}

@end
Example projects can be found at: http://github.com/gabriel/gh-unit/tree/master/Examples/
Assert Macros
The following test macros are included.
These macros are directly from: GTMSenTestCase.h prefixed with GH so as not to conflict with the GTM macros if you are using those in your project.
The description argument appends extra information for when the assert fails; though most of the time you might leave it as nil.
GHAssertNoErr(a1, description, ...)
GHAssertErr(a1, a2, description, ...)
GHAssertNotNULL(a1, description, ...)
GHAssertNULL(a1, description, ...)
GHAssertNotEquals(a1, a2, description, ...)
GHAssertNotEqualObjects(a1, a2, desc, ...)
GHAssertOperation(a1, a2, op, description, ...)
GHAssertGreaterThan(a1, a2, description, ...)
GHAssertGreaterThanOrEqual(a1, a2, description, ...)
GHAssertLessThan(a1, a2, description, ...)
GHAssertLessThanOrEqual(a1, a2, description, ...)
GHAssertEqualStrings(a1, a2, description, ...)
GHAssertNotEqualStrings(a1, a2, description, ...)
GHAssertEqualCStrings(a1, a2, description, ...)
GHAssertNotEqualCStrings(a1, a2, description, ...)
GHAssertEqualObjects(a1, a2, description, ...)
GHAssertEquals(a1, a2, description, ...)
GHAbsoluteDifference(left,right) (MAX(left,right)-MIN(left,right))
GHAssertEqualsWithAccuracy(a1, a2, accuracy, description, ...)
GHFail(description, ...)
GHAssertNil(a1, description, ...)
GHAssertNotNil(a1, description, ...)
GHAssertTrue(expr, description, ...)
GHAssertTrueNoThrow(expr, description, ...)
GHAssertFalse(expr, description, ...)
GHAssertFalseNoThrow(expr, description, ...)
GHAssertThrows(expr, description, ...)
GHAssertThrowsSpecific(expr, specificException, description, ...)
GHAssertThrowsSpecificNamed(expr, specificException, aName, description, ...)
GHAssertNoThrow(expr, description, ...)
GHAssertNoThrowSpecific(expr, specificException, description, ...)
GHAssertNoThrowSpecificNamed(expr, specificException, aName, description, ...)
Custom Test Case Classes
You can register additional classes at runtime; if you have your own. For example:
[[GHTesting sharedInstance] registerClassName:@"MySpecialTestCase"];
Using an Alternate (Test) iOS Application Delegate
If you want to use a custom application delegate in your test environment, you should subclass GHUnitIOSAppDelegate:
 @interface MyTestApplicationDelegate : GHUnitIOSAppDelegate { }
 @end
Then in main.m (or GHUnitIOSTestMain.m):
int retVal = UIApplicationMain(argc, argv, nil, @"MyTestApplicationDelegate");
Using SenTestingKit
You can also use GHUnit with SenTestCase, for example:
#import <SenTestingKit/SenTestingKit.h>

@interface MyTest : SenTestCase { }
@end

@implementation MyTest

- (void)setUp {
 // Run before each test method
}

- (void)tearDown {
 // Run after each test method
}

- (void)testFoo {
 // Assert a is not NULL, with no custom error description
 STAssertNotNULL(a, nil);

 // Assert equal objects, add custom error description
 STAssertEqualObjects(a, b, @"Foo should be equal to: %@. Something bad happened", bar);
}

- (void)testBar {
 // Another test
}

@end
Running from the Command Line
To run the tests from the command line:
-
Copy RunTests.sh and RunIPhoneSecurityd.sh into your project in the same directory as the xcodeproj file.
-
In the Tests target, Build Phases, Select Add Build Phase + button, and select Add Run Script.

- For the script enter:
sh RunTests.sh
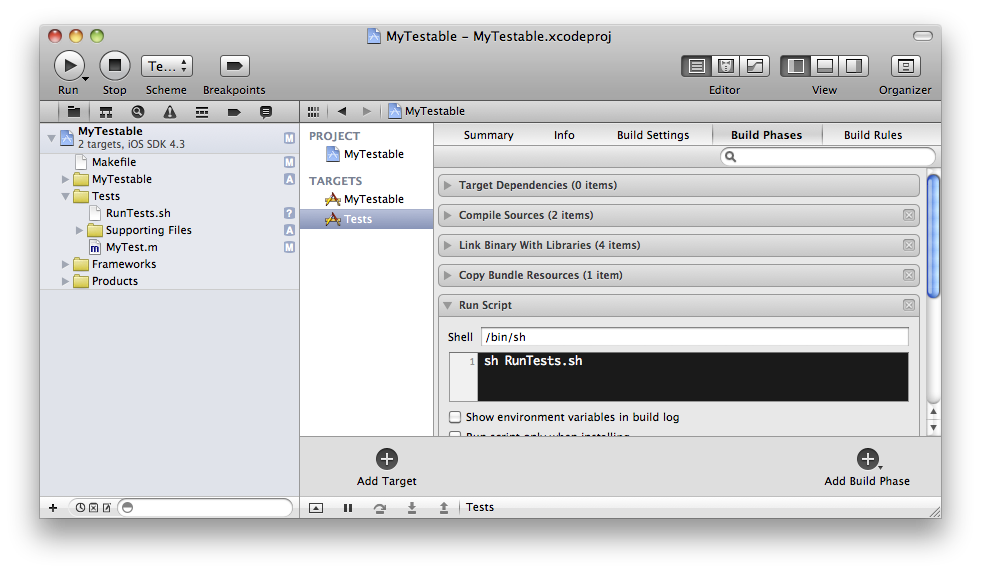
The path to RunTests.sh should be relative to the xcode project file (.xcodeproj). You can uncheck ‘Show environment variables in build log’ if you want.
Now run the tests From the command line:
// For iOS app
GHUNIT_CLI=1 xcodebuild -target Tests -configuration Debug -sdk iphonesimulator build

// For mac app
GHUNIT_CLI=1 xcodebuild -target Tests -configuration Debug -sdk macosx build
If you get and error like: Couldn't register Tests with the bootstrap server. it means an iPhone simulator is running and you need to close it.
GHUNIT_CLI
The RunTests.sh script will only run the tests if the env variable GHUNIT_CLI is set. This is why this RunScript phase is ignored when running the test GUI. This is how we use a single Test target for both the GUI and command line testing.
This may seem strange that we run via xcodebuild with a RunScript phase in order to work on the command line, but otherwise we may not have the environment settings or other Xcode specific configuration right.
Running a Test Case
The TEST environment variable can be used to run a single test or test case.
// Run all tests in GHSlowTest
make test TEST="GHSlowTest"

// Run the method testSlowA in GHSlowTest
make test TEST="GHSlowTest/testSlowA"
GHUnit Environment Variables
TEST: To run a specific test (from the command line). UseTEST="GHSlowTest/testSlowA"for a specific test orTEST="GHSlowTest"for a test case.GHUNIT_RERAISE: Default NO; If an exception is encountered it re-raises it allowing you to crash into the debuggerGHUNIT_AUTORUN: Default NO; If YES, tests will start automaticallyGHUNIT_AUTOEXIT: Default NO; If YES, will exit upon test completion (no matter what). For command line MacOSX testingGHUNIT_CLI: Default NO; Specifies that the tests are being run from the command line. For command line MacOSX testingWRITE_JUNIT_XML: Default NO; Whether to write out JUnit XML output. For Jenkins CI integrationJUNIT_XML_DIR: Default to temporary directory. Specify to have files written to a different directory. For Jenkins CI integration.
Using Jenkins with GHUnit
Jenkins (http://jenkins-ci.org/)) is a continuous integration server that has a broad set of support and plugins, and is easy to set up. You can use Jenkins to run your GHUnit tests after every checkin, and report the results to your development group in a variety of ways (by email, to Campfire, and so on).
Here’s how to set up Jenkins with GHUnit.
-
Follow the instructions to set up a Makefile for your GHUnit project.
-
Download
jenkins.warfrom http://jenkins-ci.org/. Run it withjava -jar jenkins.war. It will start up on http://localhost:8080/ -
Go to
Manage Jenkins -> Manage Pluginsand install whatever plugins you need for your project. For instance, you might want to install the Git and GitHub plugins if you host your code on GitHub (http://www.github.com) -
Create a new job for your project and click on
Configure. Most of the options are self-explanatory or can be figured out with the online help. You probably want to configureSource Code Management, and then underBuild TriggerscheckPoll SCMand add a schedule of* * * * *(which checks your source control system for new changes once a minute). -
Under
Build, enter the following command:make clean && WRITE_JUNIT_XML=YES JUNIT_XML_DIR=tmp/test-results make test -
Under
Post-build Actions, checkPublish JUnit test result reportand enter the following inTest report XMLs:tmp/test-results/*.xml
That’s all it takes. Check in a change that breaks one of your tests. Hudson should detect the change, run a build and test, and then report the failure. Fix the test, check in again, and you should see a successful build report.
Troubleshooting
If your Xcode build fails with a set of font-related errors, you may be running Hudson headless (e.g., via an SSH session). Launch Hudson via Terminal.app on the build machine (or otherwise attach a DISPLAY to the session) in order to address this.
Reference
Other Links
Install (Docset)
- Open Xcode, Preferences and select the Documentation tab.
- Select the plus icon (bottom left) and specify:
http://gabriel.github.com/gh-unit/publish/me.rel.GHUnit.atom
Programming Guides
Class References
- GHAsyncTestCase
- GHMockNSURLConnection
- GHTest
- GHTestCase
- GHTestGroup
- GHTestOperation
- GHTestRunner
- GHTestSuite
- GHTestViewController
- GHTestViewModel
- GHTesting
- GHUnitIOSAppDelegate
- GHUnitIOSViewController
- GHViewTestCase
Class Hierarchy
- NSObject
- NSOperation
- NSViewController
- UIViewController
Protocol References
Category References

 浙公网安备 33010602011771号