


在使用vue过程中的一些笔记吧,以前都是记doc,偶尔写在git,不过感觉还是放在博客,易于浏览一些。随时根据看到的东西更新……
1.模板编译原理
https://segmentfault.com/a/1190000006990480
https://mp.weixin.qq.com/s/OPQ5Nh_f3rp1mAkqsj6oDg
https://juejin.im/post/5ab2ff496fb9a028c06ab78f
1.1:html中的节点类型:
https://developer.mozilla.org/zh-CN/docs/Web/API/Node/nodeType
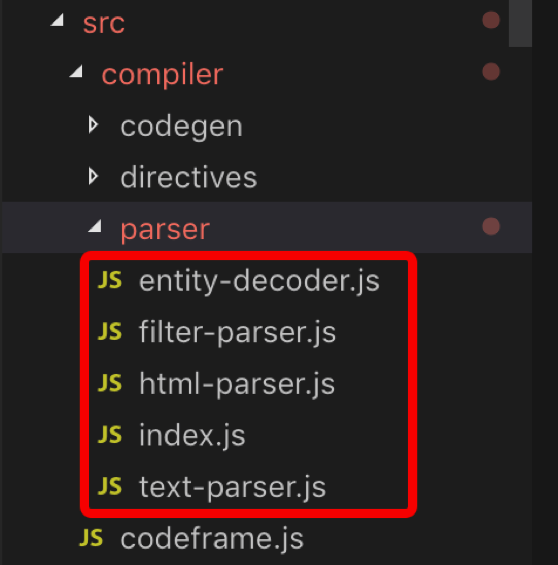
基于vue2的源码:
1.2:vue中的解析器类型:
解析AST节点过程中主要用到了HTML解析器,主要过程如下:
parseHTML(
    template,
    // 开始标签钩子函数
    start (tag, attrs, unary, start, end){
        // let element = createASTElement(tag, attrs, currentParent);
        let element = (function (tag, attrs, parent) {
            return {
                type: 1,
                tag,
                attrsList: attrs,
                children: [],
                parent,
            }
        })();
    }
    // 文本标签钩子函数
    chars (text, start, end) {
        // 文本节点的钩子函数,会忽略空格。同时会在模板中将这些空格截取掉。
        return {
            type: 3,
            text
        }
    }
    // 注释钩子函数
    comment (text, start, end) {
        return {
            type: 3, // Node.COMMENT_NODE是8,为什么这里要写成type 3
            text,
            isComment: true
        }
    }
    // 结束标签钩子函数
    end (tag, start, end) {
        // 将当前构建节点从AST层级关系栈中弹出来
    }
)
解析开始标签时,比如<div>和<input />,可通过解析标签结尾得到该标签是不是自闭合标签,自闭合标签没有子节点,所以一定是ast树的尾结点,解析时不必入栈。
怎么存储ast树的呢?
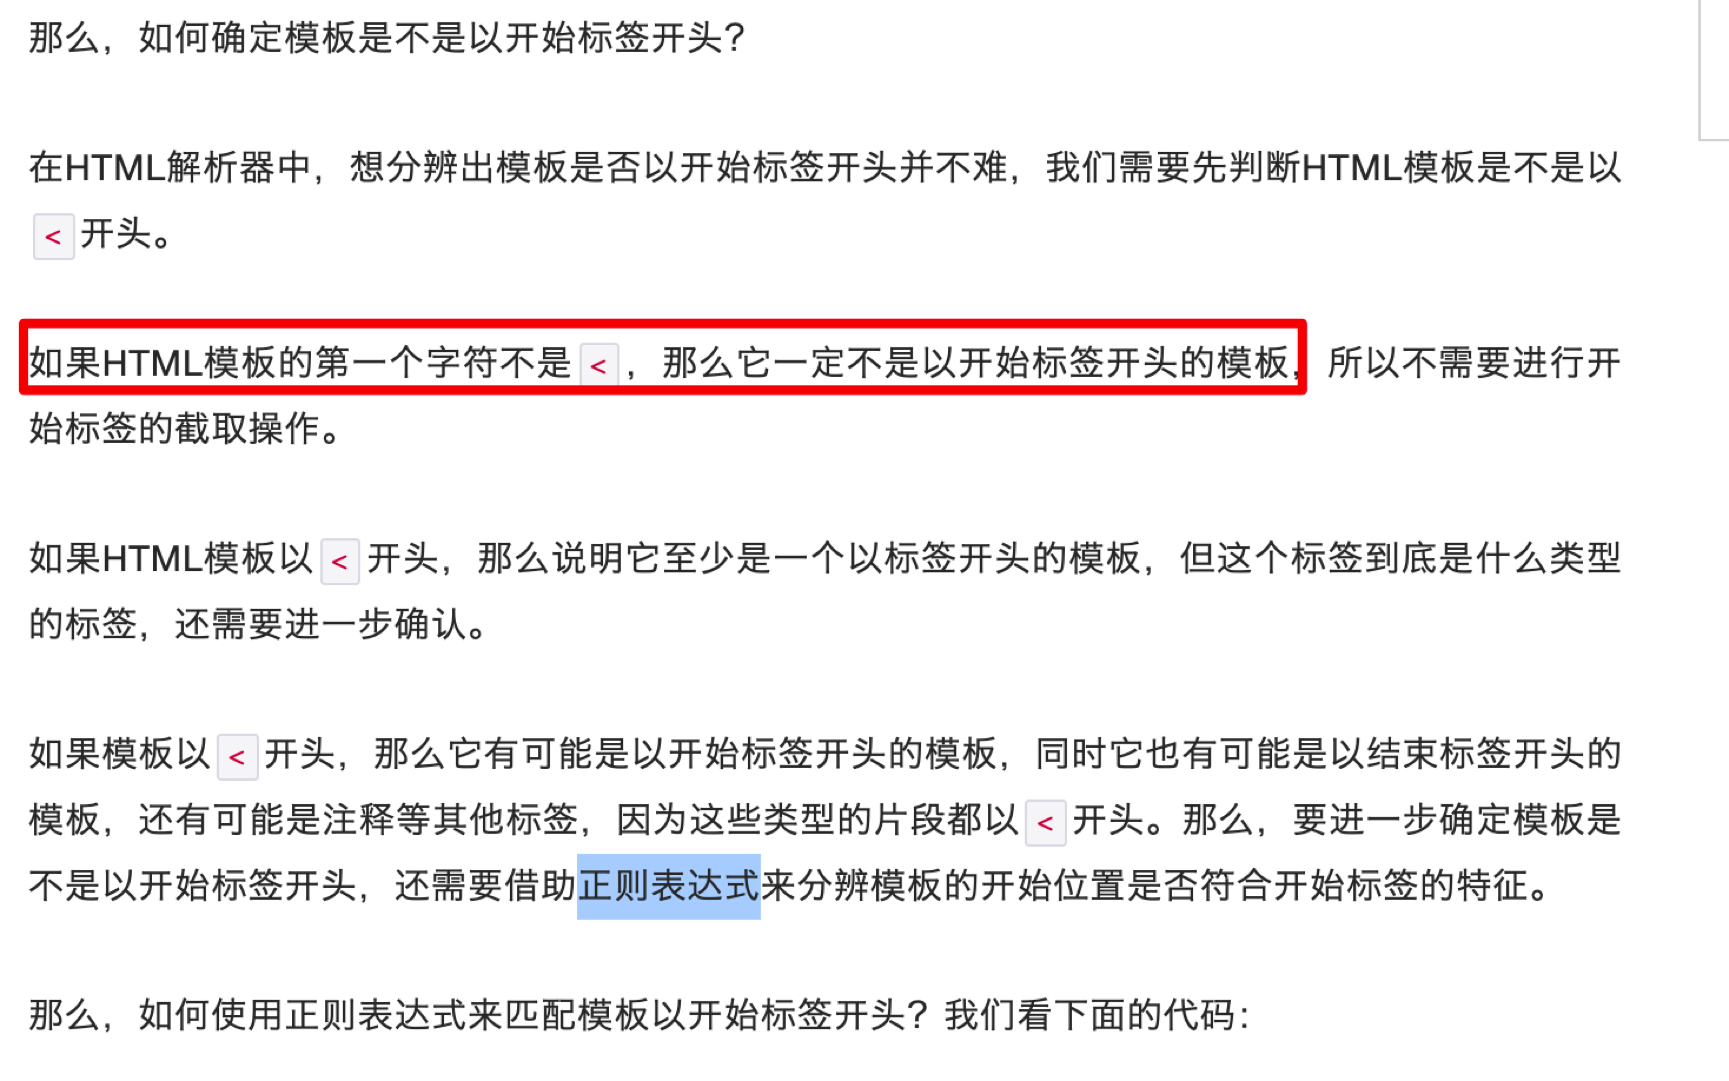
在start之前如何解析得到tag、attrs、unary?
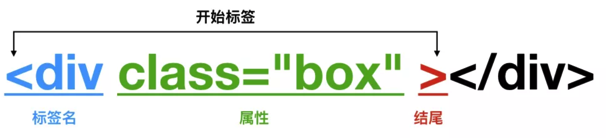
<div class="temp" id="test"></div>
在解析上述模板时,利用正则表达式判断整段template是否有开始标签,如果有,得到标签名,然后截断,剩下class="temp" id="test"></div>,继续利用正则解析属性,得到class,截断,剩下id="test"></div>,继续解析属性得到id,截断,剩下></div>,再解析时发现是标签结尾,结束。得到了tag、attrs。
1.3:构建AST层级关系树
用栈来记录AST的dom层级关系,类似于dom的深度。(原理很像c语言编译时候)
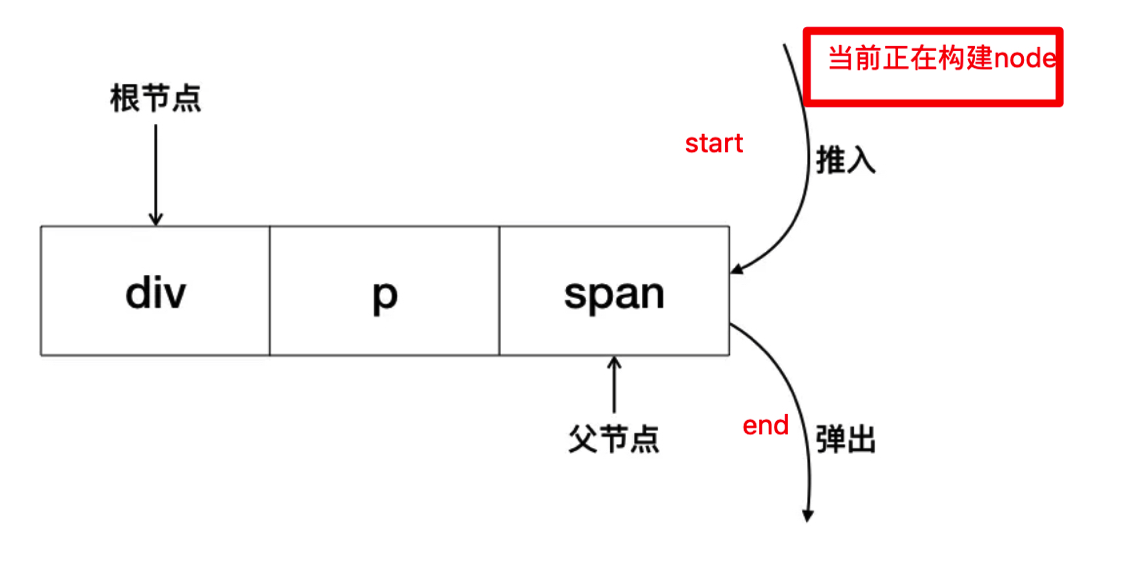
解析过程是一个循环递归的过程,不断的截取开始或者结束标签,入栈出栈,这个栈可以帮助元素获取父元素,还能判断html标签元素是否正确闭合。。
纯文本内容元素,script、style、texteara,不需要被解析到ast中,直接当做文本advance即可。
1.4:文本解析器
文本分两种类型,不带变量的纯文本和带变量的文本,后者需要使用文本解析器进行二次加工。
2.vDom和Dom-diff
https://mp.weixin.qq.com/s/3G3VrG5VzOEBU5EcyCK7gg
https://www.cnblogs.com/wind-lanyan/p/9061684.html
创建虚拟DOM
createElement(type, props, children) 用来创建虚拟dom
• type: 指定元素的标签类型,如'li', 'div', 'a'等
• props: 表示指定元素身上的属性,如class, style, 自定义属性等
• children: 表示指定元素是否有子节点,参数以数组的形式传入
渲染DOM
render(就是vue的h)方法可以将虚拟DOM转化成真实DOM
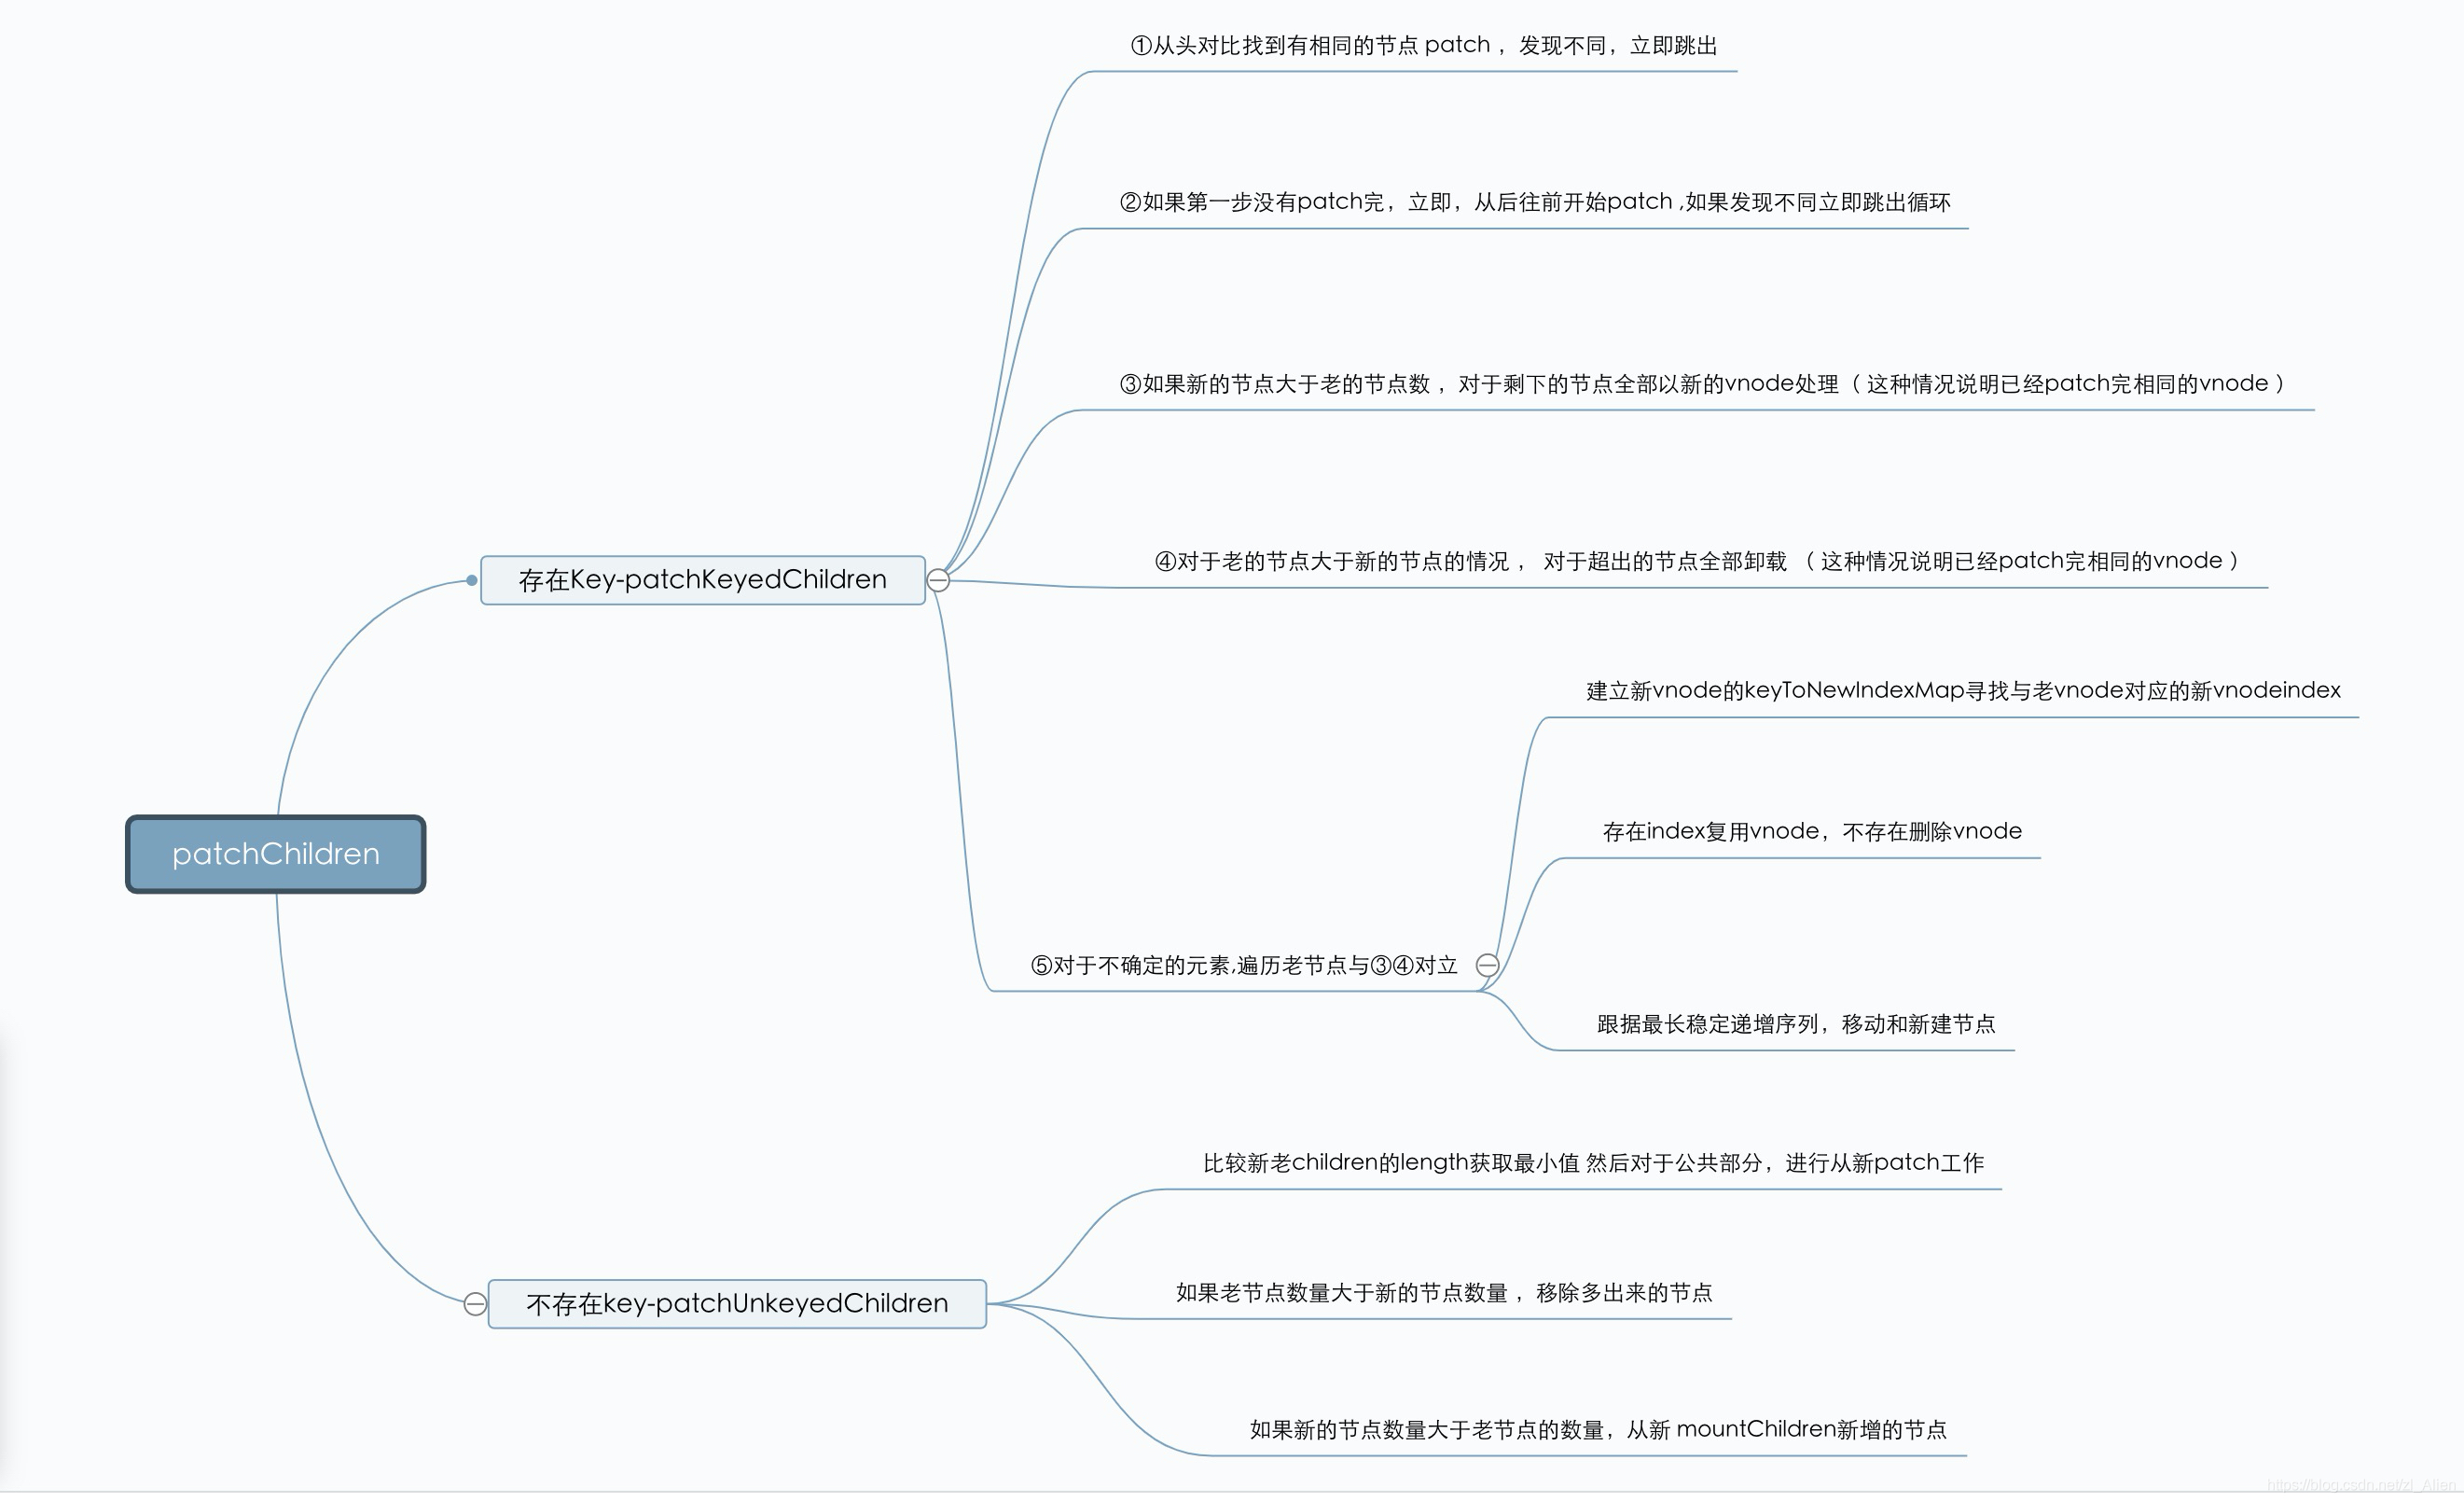
DOM-diff比较两个虚拟DOM的区别

diff-patch算法: https://github.com/aooy/blog/issues/2
patch 方法本身,它接收 4个参数:
- oldVnode 表示旧的 VNode 节点,它也可以不存在或者是一个 DOM 对象;
- vnode 表示执行 _render 后返回的 VNode 的节点;
- hydrating 表示是否是服务端渲染;
- removeOnly 是给 transition-group 用的。
当sameVnode(oldVnode , Vnode )为false时,说明oldVnode被Vnode取代,这时候:
const oldElm = oldVnode.elm
const parentElm = nodeOps.parentNode(oldElm)
// create new node
createElm(
  vnode,
  insertedVnodeQueue,
  // extremely rare edge case: do not insert if old element is in a
  // leaving transition. Only happens when combining transition +
  // keep-alive + HOCs. (#4590)
  oldElm._leaveCb ? null : parentElm,
  nodeOps.nextSibling(oldElm)
)
- 取得
oldvnode.el的父节点parentElm,parentElm是真实dom createElm(vnode)会为vnode创建它的真实dom,令vnode.el=真实domparentElm将新的dom插入,移除旧的dom
当sameVnode(oldVnode , Vnode )为true时,说明oldVnode和Vnode是相同的节点,这时候需要调用patchVnode比较并且打补丁:
vnode.el引用到现在的真实dom,当el修改时,vnode.el会同步变化。if (oldVnode === vnode),他们的引用一致,可以认为没有变化。if(),文本节点的比较,需要修改,则会调用Node.textContent = vnode.text。if( oldCh && ch && oldCh !== ch ), 两个节点都有子节点,而且它们不一样,这样我们会调用updateChildren函数比较子节点,这是diff的核心。else if (ch),只有新的节点有子节点,调用 addVnodes(elm, null, ch, 0, ch.length - 1, insertedVnodeQueue);vnode.el已经引用了老的dom节点,现在需要遍历ch的节点,并逐个调用createElm函数在老dom节点上添加子节点。else if (oldCh),新节点没有子节点,老节点有子节点,调用 removeVnodes(oldCh, 0, oldCh.length - 1) 直接删除老节点。
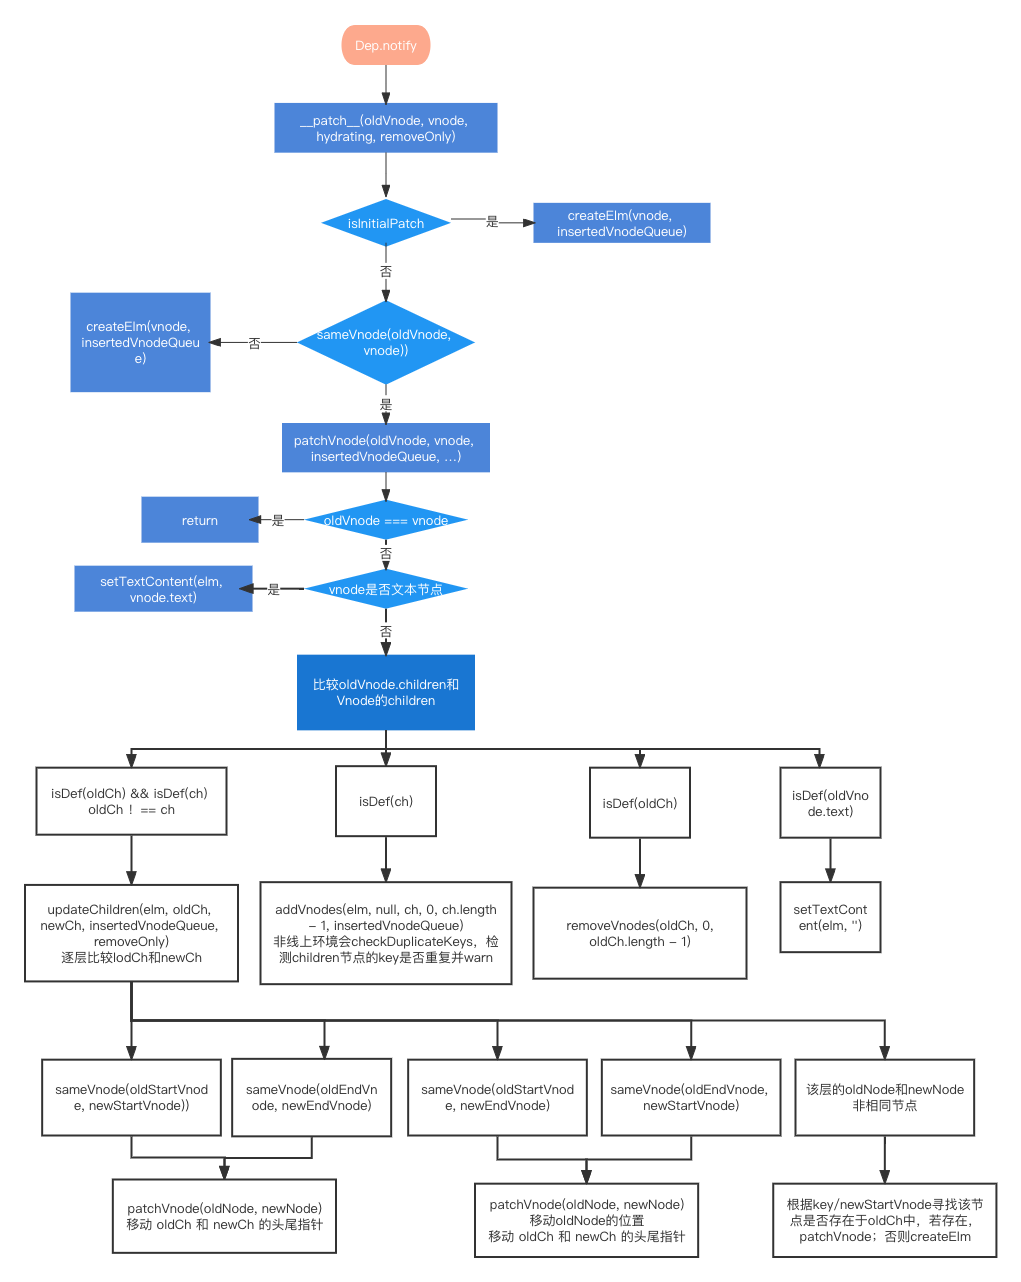
//createElm的作用是通过虚拟节点创建真实的 DOM 并插入到它的父节点中
function createElm ( vnode, insertedVnodeQueue, parentElm, refElm, nested, ownerArray, index ) { //判断元素是否是组件,如果是,执行完createComponent方法返回true就return不执行下面,如果不是组件,继续执行调用createChildren方法 if (createComponent(vnode, insertedVnodeQueue, parentElm, refElm)) { return } // createChildren会递归创建儿子组件 createChildren(vnode, children, insertedVnodeQueue)
}
patch 最后一步,是 invokeInsertHook,里面会循环通过insert方法依次调用收集的hook,在insert方法中就会触发mounted。因为是递归调用,子元素会优先调用 insert,所以整个 vnode 树节点的插入顺序是先子后父
 // 首先 insertedVnodeQueue 存储的是整个 patch 过程中所有的组件 VNode。
  // 因为整个 patch 过程就是一个递归过程,通过树的深度遍历,在这个遍历过程,
  // 子组件的 VNode 会优先于父组件 VNode 插入到这个队列,
  // 然后再遍历完成之后会通过 invokeInsertHook 去执行 mounted 钩子函数,所以顺序也是先子后父。
  function invokeInsertHook (vnode, queue, initial) {
    // delay insert hooks for component root nodes, invoke them after the
    // element is really inserted
    if (isTrue(initial) && isDef(vnode.parent)) { // 第一次patch
      vnode.parent.data.pendingInsert = queue
    } else {
      for (let i = 0; i < queue.length; ++i) {
        queue[i].data.hook.insert(queue[i])
      }
    }
  }
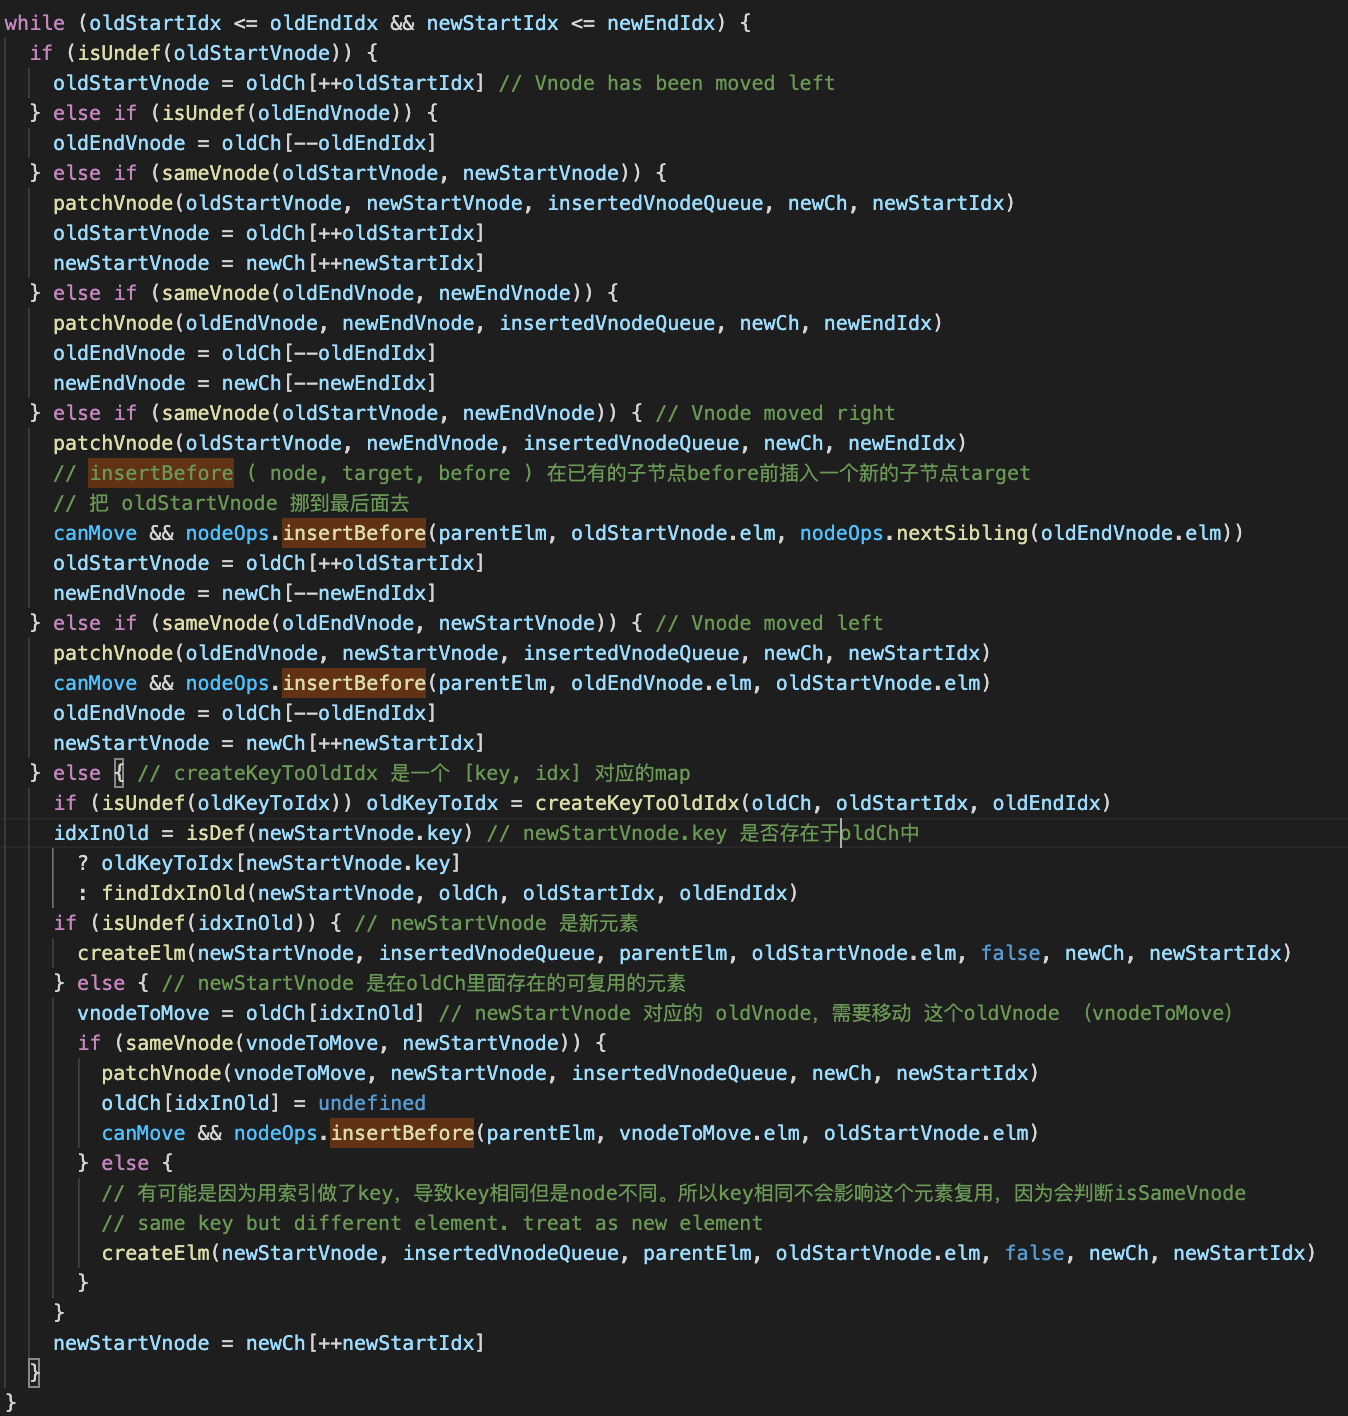
获取 oldCh 的key 和 idx 映射的逻辑:
// oldKeyToIdx = createKeyToOldIdx(oldCh, oldStartIdx, oldEndIdx)
function createKeyToOldIdx (children, beginIdx, endIdx) {
  let i, key
  const map = {}
  for (i = beginIdx; i <= endIdx; ++i) {
    key = children[i].key // 获取vnode的key
    if (isDef(key)) map[key] = i // 如果没显式设置了key,map[key] = i
  }
  return map
}
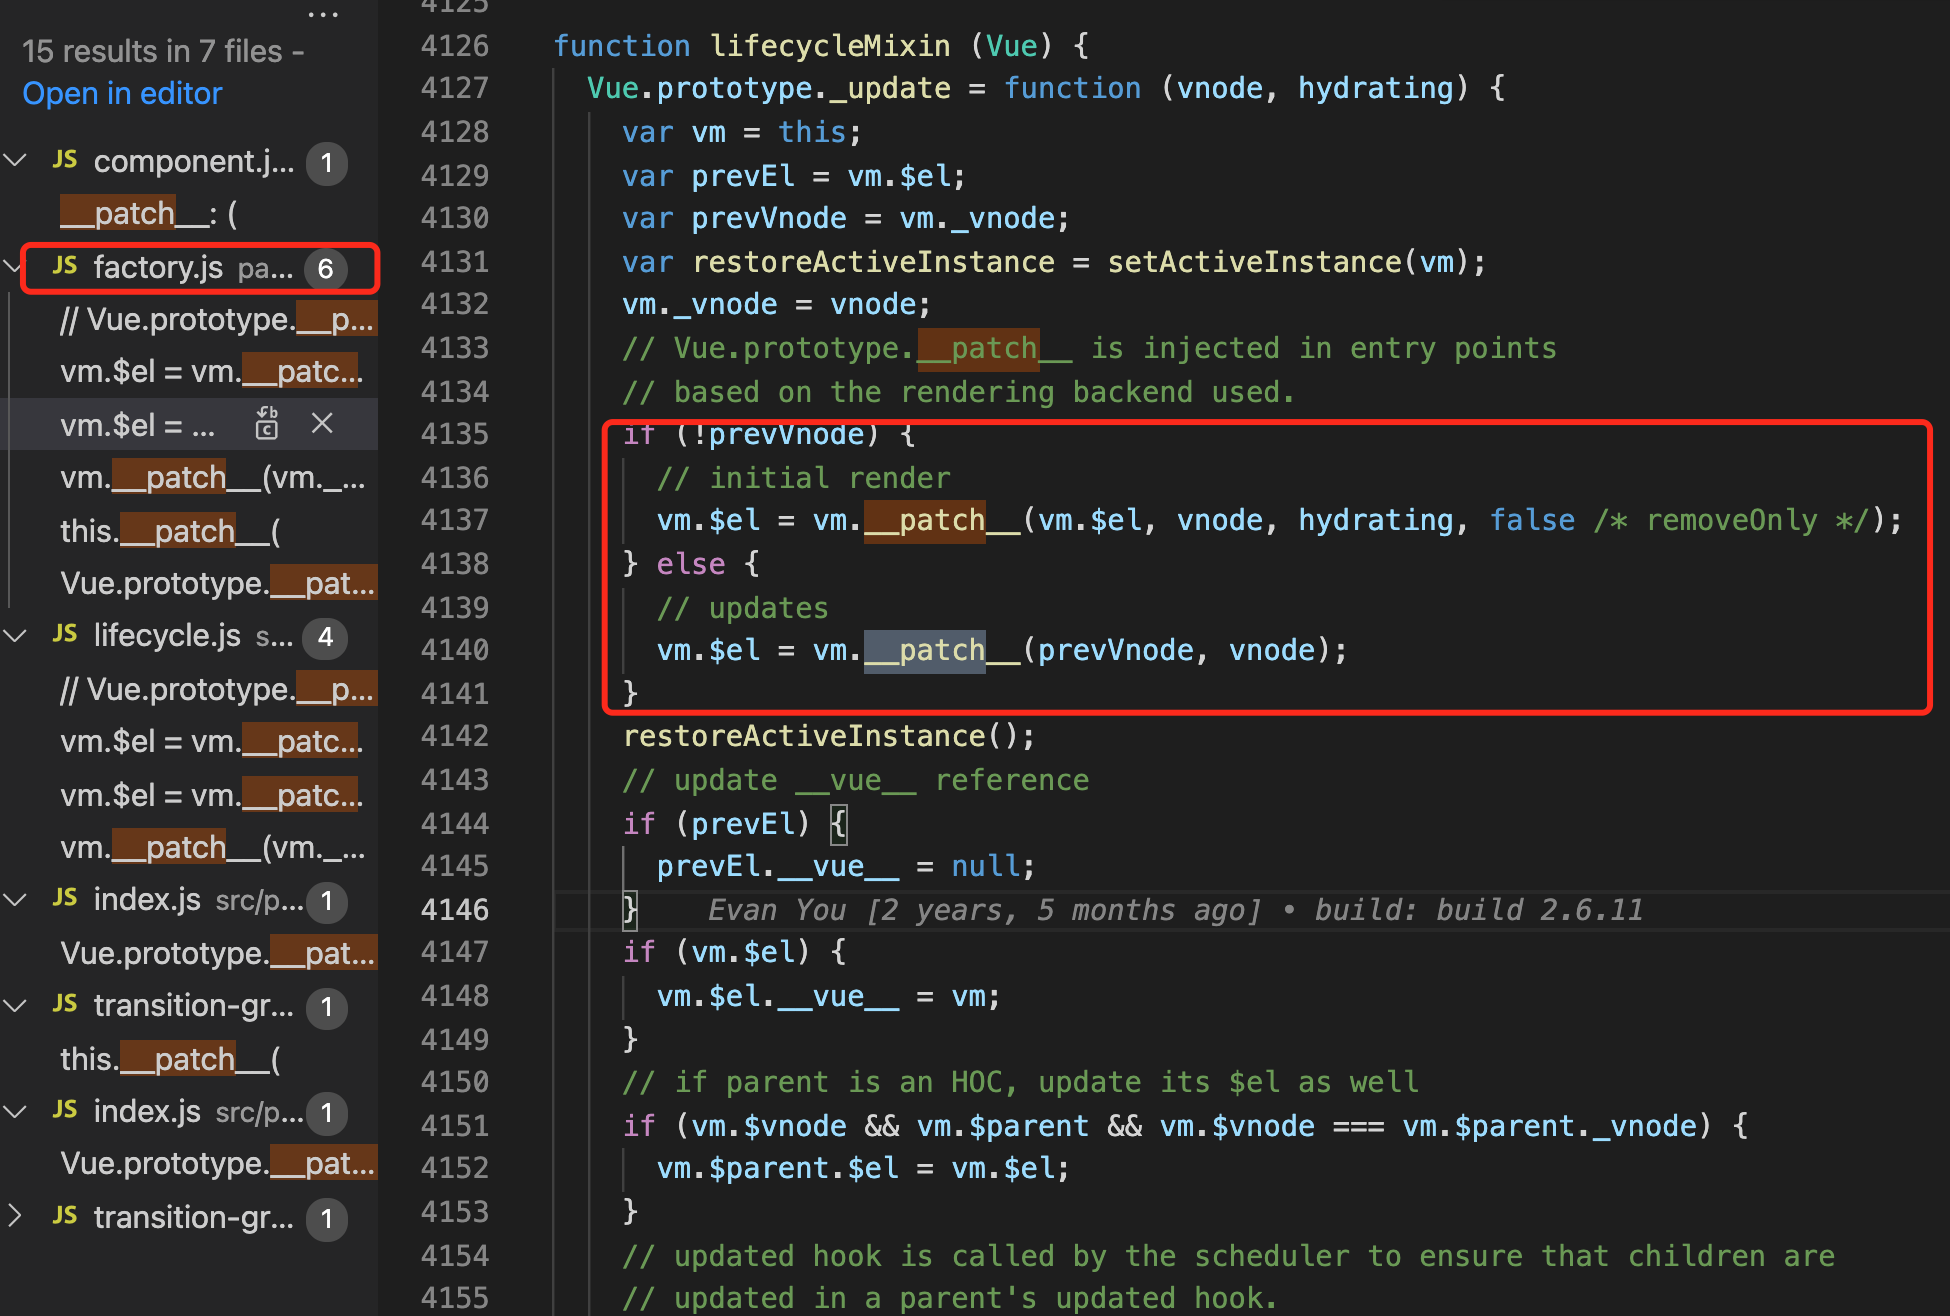
patch最后会 return vnode.elm ,vnode和进入patch之前的不同在哪呢?唯一的改变就是之前vnode.el = null, 而现在它引用的是对应的真实dom
最后把patch得到的vnode的elm赋值给vm.$el
设置key和不设置key的区别:
设key后,除了头尾的比较外,还会从用key生成的对象 oldKeyToIdx 这个 map 中查找匹配的newVnode节点,可以更高效的利用dom。如果不设置,就直接会调用 findIdxInOld 去查询 newVnode 在 oldCh 中的位置,多了一次遍历 oldCh 的操作。
Vue3的patch过程
3.composition api的一些用法
因为我一直记不住这种写法,所以……搞个备份,哈哈哈哈哈
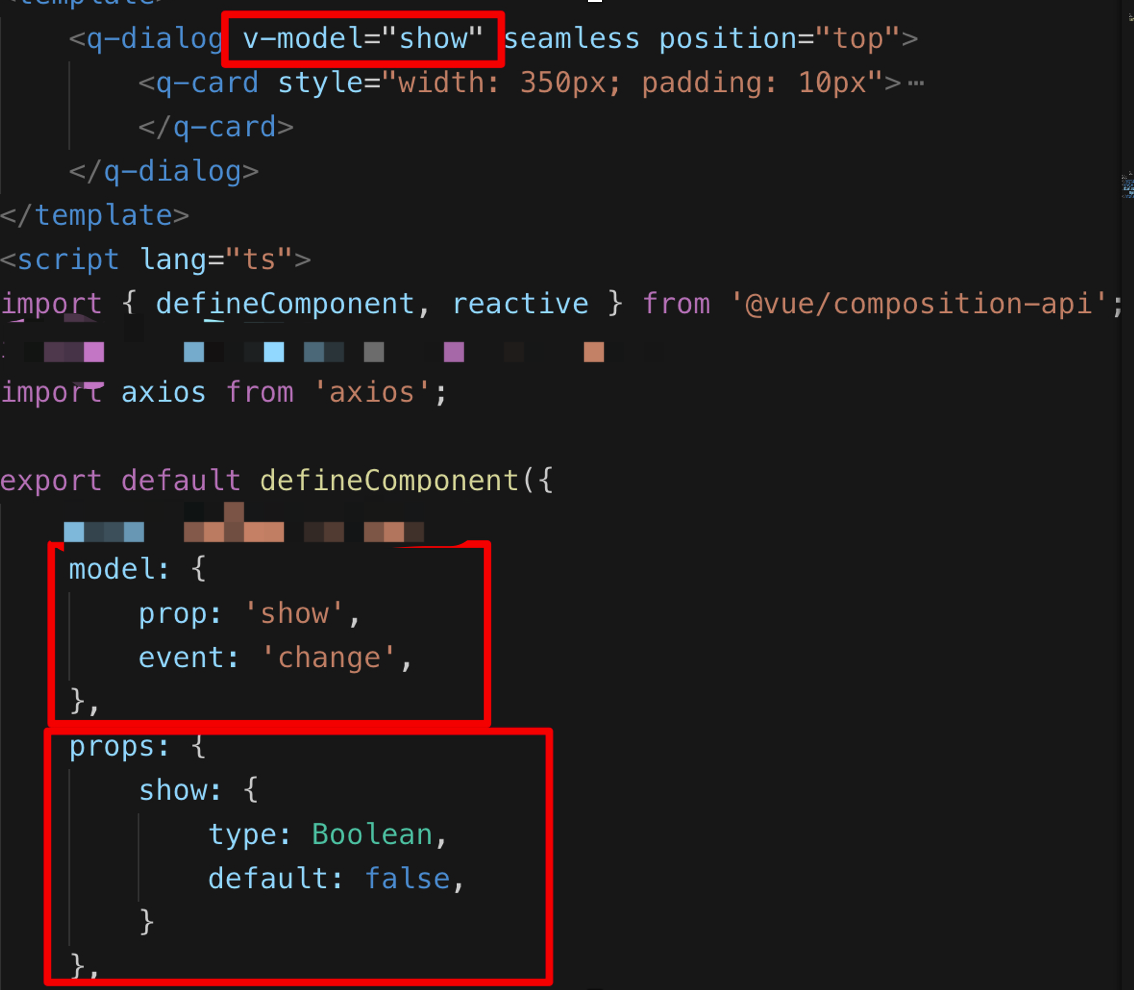
3.1 v-model
3.2 Hook
官方示例-逻辑提取与复用:https://composition-api.vuejs.org/zh/#%E9%80%BB%E8%BE%91%E6%8F%90%E5%8F%96%E4%B8%8E%E5%A4%8D%E7%94%A8
提取公用的一些自定义的hook
4.vue中怎么这么配置路径别名,如@/src
4.1.模板template中的路径别名处理规则,默认是:
https://cli.vuejs.org/zh/guide/html-and-static-assets.html#从相对路径导入
https://vue-loader.vuejs.org/zh/guide/asset-url.html#转换规则

vue-loader提供路径重定向转换能力。
4.2 vue.config.js中可配置
chainWebpack: config => {
       // 默认就是src,所以下面这一句不用写,源码地址:vue-cli/packages/@vue/cli-service/lib/config/base.js
       // config.resolve.alias.set('@', path.resolve(__dirname, 'src'));
        config.resolve.alias.set('@assets', path.resolve(__dirname, './src/assets'));
}
4.3 tsconfig.json中可配置
https://www.tslang.cn/docs/handbook/module-resolution.html 指定映射的路径
{
  "compilerOptions": {
    "target": "esnext",
    "baseUrl": ".",
    "paths": {
        "@/*": ["src/*"],
    },
    "lib": [
      "esnext",
    ]
  },
  "include": [],
  "exclude": []
}
5.plop.js初始化组件和页面
高效的复制粘贴工程师
6.createElement创建VNode(方便以后复制粘贴)
示例是在vue3给elementUI的Notification组件传message VNode,顺便解决elementUI的Notification个数动态变化时候,重叠或者间距太大的问题。
        const noticeNode: Array<any> = []; // 记录notice的虚拟节点
        const noticeIds: number[] = []; // 当前notice的noticeId们

        function closeNotice(e: MouseEvent) {
            // 通过noticfication的某个自定义按钮关闭通知
            const noticeId = Number(e.target.id.split('-')[3]);
            noticeNode[noticeId].close();
        }

        async function handleNoticeRead(e: any) {
            // 点击某个通知,将该noticeId的通知设为已读,并从noticeIds中删去
            const noticeId = Number(e.customClass.split('-')[2]);
            await noticeHasRead(noticeId);
            const notice: NoticeType = model.noticeInfo.find(item => item.noticeId === noticeId)!;
            e.close();
            if (noticeIds.indexOf(noticeId) > -1) {
                noticeIds.splice(noticeIds.indexOf(noticeId), 1);
            }
            if (notice.content.btnInfo[0].redirectUri) {
                window.location.href = notice.content.btnInfo[0].redirectUri;
            }
        }

        function showUnreadNotices() {
            if (noticeInfos.length) {
                return;
            }
            noticeInfos.forEach((notice, index) => {
                if (notice.noticeId && !noticeIds.includes(notice.noticeId)) {
                    const h = context.root.$createElement;
                    const content = notice.content;
                    noticeNode[notice.noticeId] = context.root.$notify({
                        title: notice.title,
                        duration: 0,
                        iconClass: 'notice-icon',
                        dangerouslyUseHTMLString: true,
                        customClass: `notice-signal-${notice.noticeId}`, // 通过这种方式传noticeId
                        message: h(
                            'div',
                            {},
                            [
                                h('div', notice.content.textInfo),
                                h('button', {
                                    class: {
                                        'btn-text-small': true,
                                        'notice-btn': true,
                                    },
                                    attrs: {
                                        id: `notice-btn-signal-${notice.noticeId}`, // 主要用来传递noticeId
                                    },
                                    domProps: {
                                        innerHTML: notice.content.btnInfo[0].btnText,
                                    },
                                    on: {
                                        click: closeNotice,
                                    },
                                }),
                            ],
                        ),
                        onClose: handleNoticeRead,
                    });
                    noticeNode[notice.noticeId].verticalOffset = 128 + noticeIds.length * 144; // 通过改变verticalOffset设置通知的高度,防止重叠或者间距过大
                    noticeIds.push(notice.noticeId);
                }
            });
        }
7.vueLoader的源码和流程 // todo
图解vueLoader: https://mp.weixin.qq.com/s/KstgDNd_VVt7C3ws3D6E7Q
怎么把SFC中每一部分都提取出来放到对应的loader?
SFC里面的customBlock是什么?从来没用过
8.vue官方风格指南
https://cn.vuejs.org/v2/style-guide/
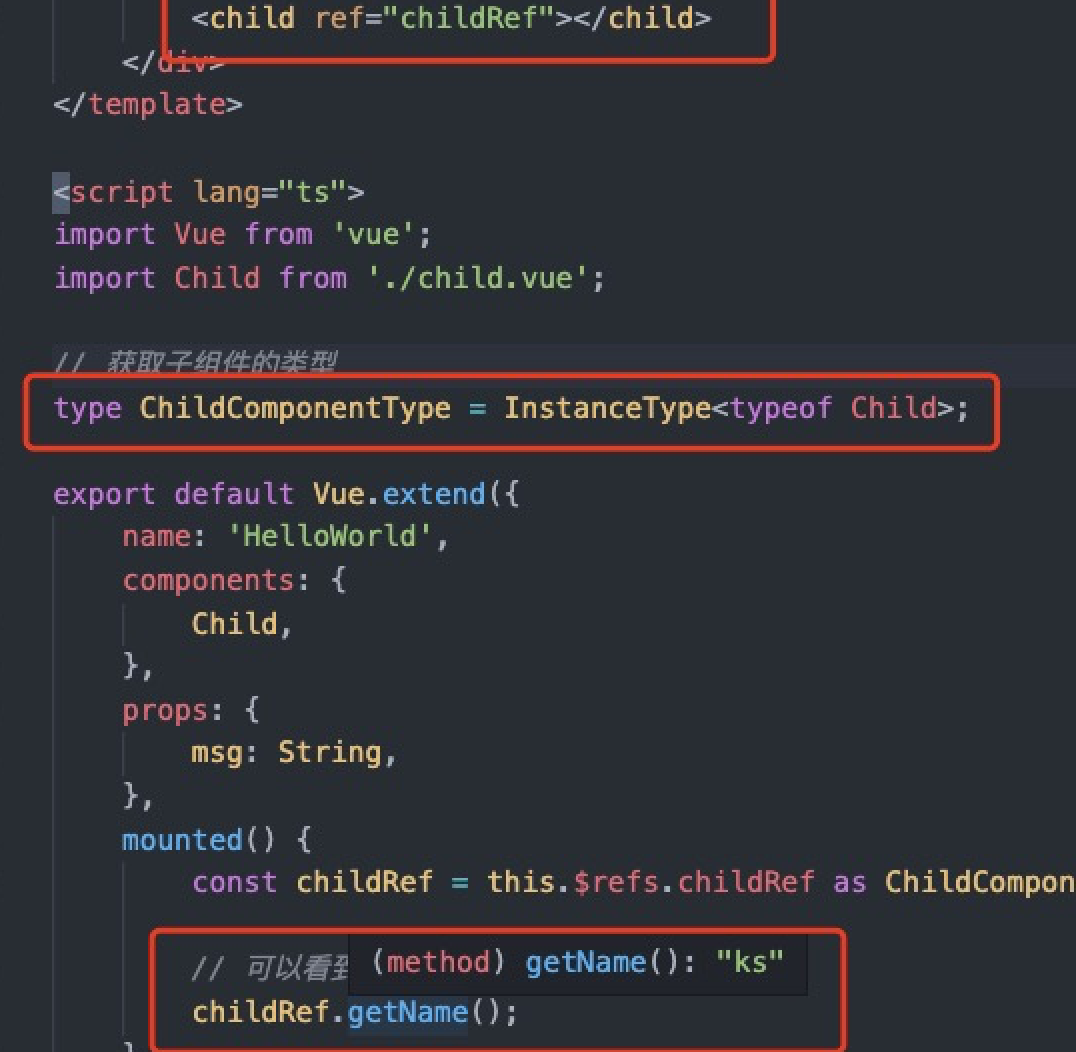
9.vue项目中获取子组件的类型
用到的是 ts 自带的一个方法 InstanceType 。
InstanceType<T> -- 获取构造函数类型的实例类型。
10.vue3的一些用法
watchEffect比watch好用些;
-
与 watchEffect 相比,
watch允许我们:- 惰性地执行副作用;
- 更具体地说明应触发侦听器重新运行的状态;
- 访问被侦听状态的先前值和当前值。
style module:https://v3.cn.vuejs.org/api/sfc-style.html#style-scoped
可以尝试使用 插槽选择器 slotted(div)、全局选择器: global(.a)、状态驱动的动态css v-bind等

开发时候,遇到问题,先升级版本试试。
defineProps 和 defineEmits
在 <script setup> 中必须使用 defineProps 和 defineEmits API 来声明 props 和 emits ,它们具备完整的类型推断并且在 <script setup> 中是直接可用的,无需引用。
vitesse的css优化方案:https://mp.weixin.qq.com/s/Kbp4mda-teyrVAvY-Qv7IQ ,作者一直致力于提供更快的更轻量开发和生产体验,减小产物体积,生产原子化的css。
11.强化hooks意识和理解
https://juejin.cn/post/7033750813986324510
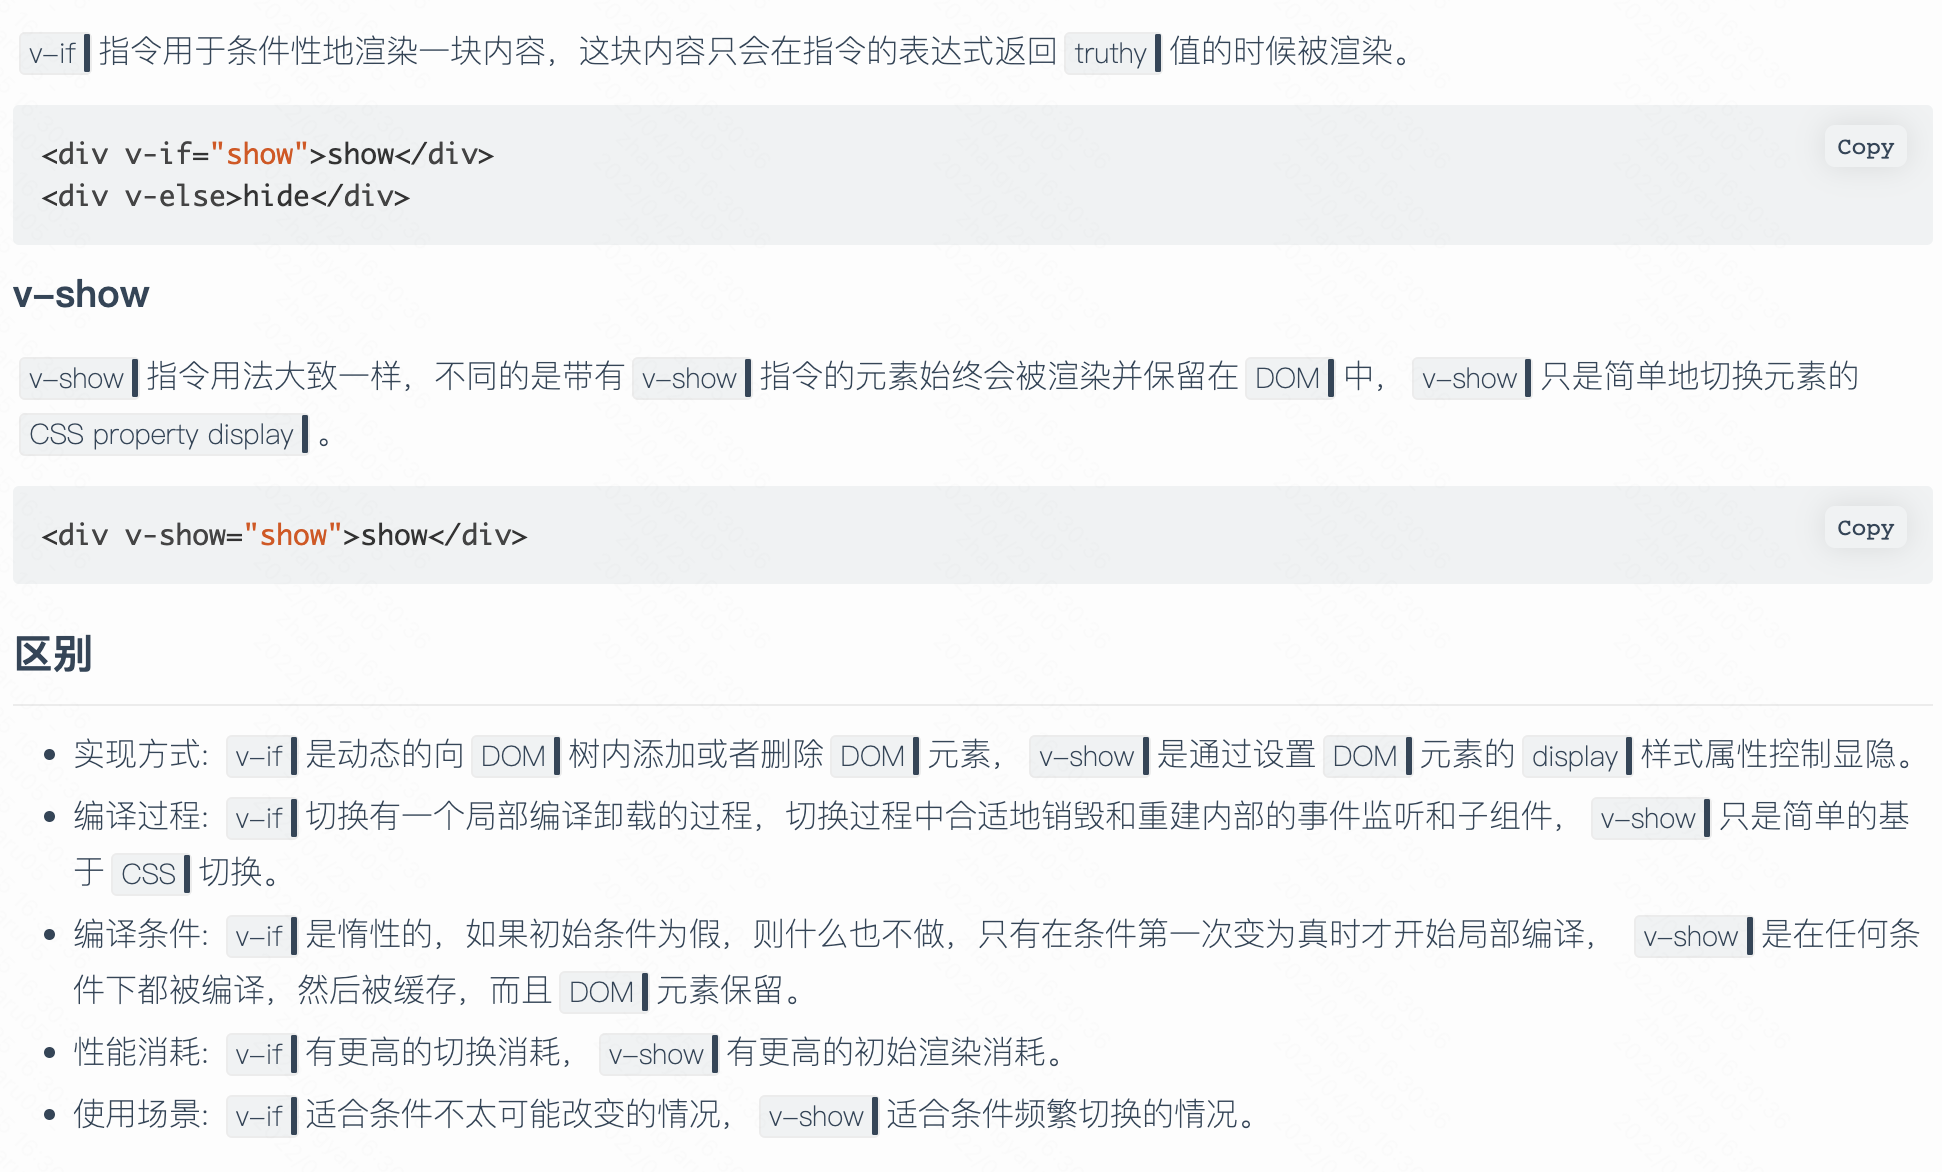
12.v-if 和 v-show的区别
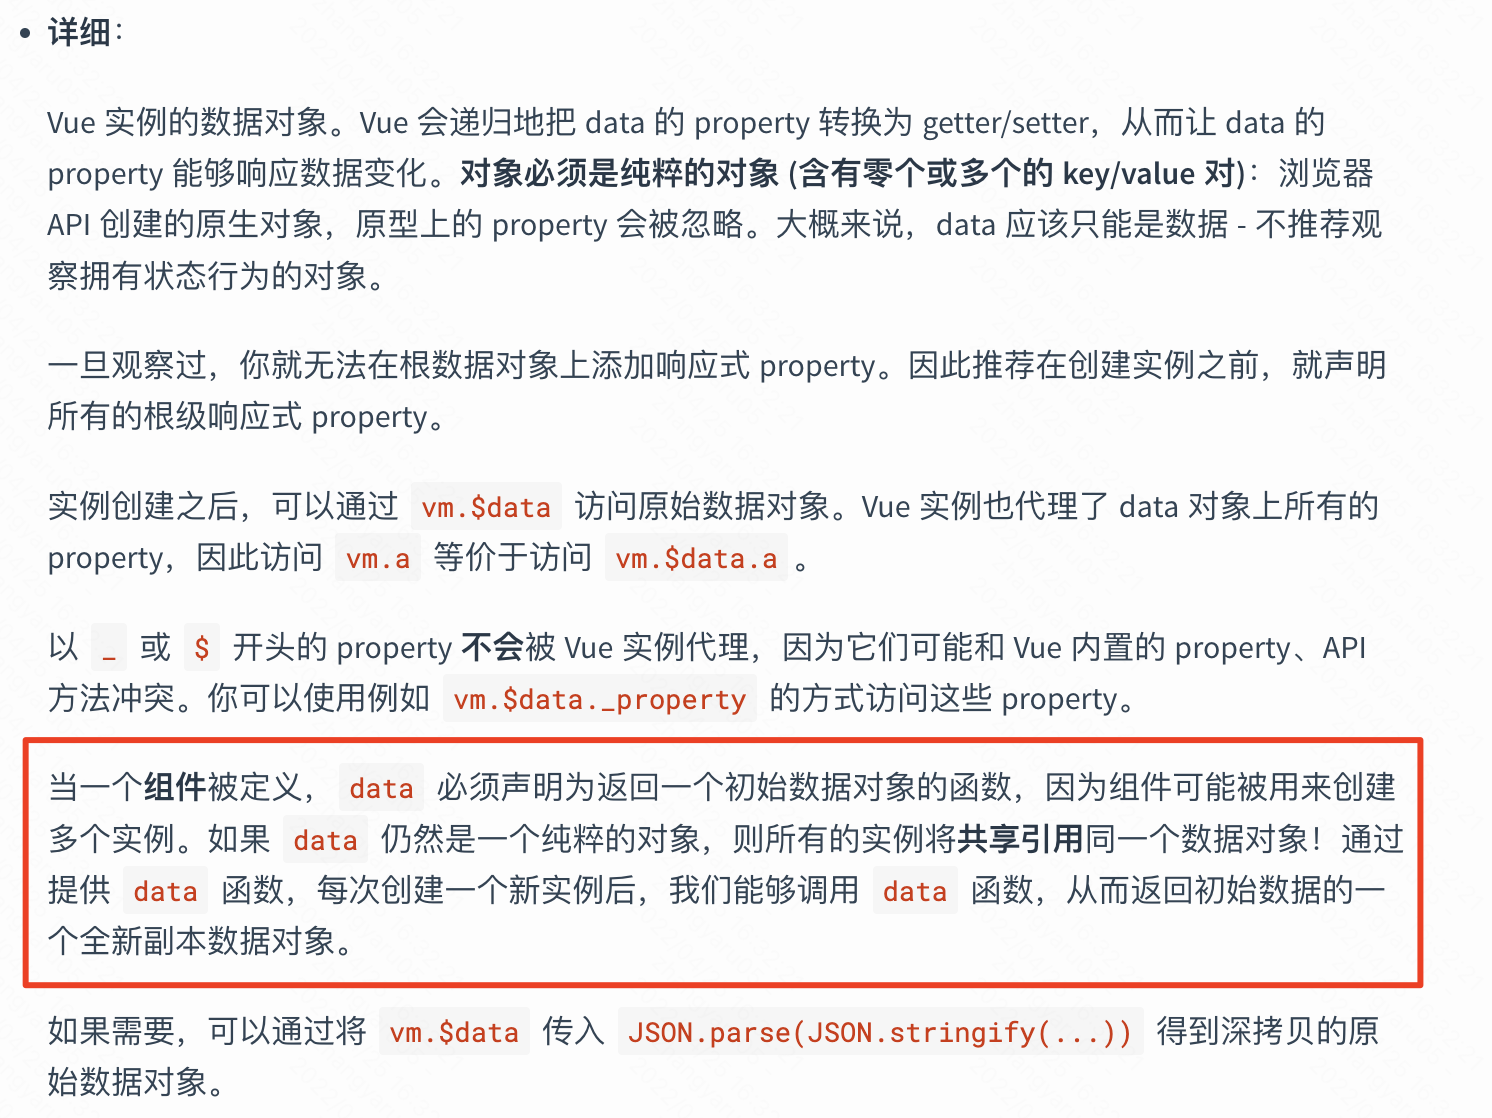
13.vue中data为啥要用function?
14. vue的组件加载更新渲染顺序
- 加载渲染过程:父beforeCreate->父created->父beforeMount->子beforeCreate->子created->子beforeMount- >子mounted->父mounted
- 子组件更新过程:父beforeUpdate->子beforeUpdate->子updated->父updated
- 父组件更新过程:父beforeUpdate->父updated
- 销毁过程:父beforeDestroy->子beforeDestroy->子destroyed->父destroyed
组件的调用顺序都是先父后子,渲染完成的顺序肯定是先子后父。
组件的销毁操作是先父后子,销毁完成的顺序是先子后父。
具体见:Vue生命周期
// override Vue.prototype._init function initVirtualComponent (options) { if ( options === void 0 ) options = {}; var vm = this; var componentId = options.componentId; // virtual component uid vm._uid = "virtual-component-" + (uid$1++); // a flag to avoid this being observed vm._isVue = true; // merge options if (options && options._isComponent) { // optimize internal component instantiation // since dynamic options merging is pretty slow, and none of the // internal component options needs special treatment. initInternalComponent(vm, options); } else { vm.$options = mergeOptions( resolveConstructorOptions(vm.constructor), options || {}, vm ); } /* istanbul ignore else */ if (process.env.NODE_ENV !== 'production') { initProxy(vm); } else { vm._renderProxy = vm; } vm._self = vm; initLifecycle(vm); initEvents(vm); initRender(vm); callHook(vm, 'beforeCreate'); // 这之前init Events & LifeCycle initInjections(vm); // resolve injections before data/props initState(vm); initProvide(vm); // resolve provide after data/props callHook(vm, 'created');// 这之前 init Injections & Provides & Reactivity // send initial data to native var data = vm.$options.data; var params = typeof data === 'function' ? getData(data, vm) : data || {}; if (isPlainObject(params)) { updateComponentData(componentId, params); } registerComponentHook(componentId, 'lifecycle', 'attach', function () { callHook(vm, 'beforeMount'); // 这时候 有 data 了 var updateComponent = function () {
//_update方法的作用是把 VNode 渲染成真实的 DOM vm._update(vm._vnode, false); // 会执行 patch ,vnode 存在 insertedVnodeQueue,vm.$el 有了 }; new Watcher(vm, updateComponent, noop, null, true); // 收集依赖 vm._isMounted = true; callHook(vm, 'mounted'); }); registerComponentHook(componentId, 'lifecycle', 'detach', function () { vm.$destroy(); }); }
15.Vue 中涉及的设计模式
代理模式:比如 Object.defineProperty
函数柯里化:比如 createPatchFunction
依赖注入:provide/inject
单例模式:Vue.XXX
工厂模式:用函数来封装以特定接口创建对象的细节,比如 createElement、createComponent、createComponentInstanceForVnode、createFunctionalComponent、createWatcher
原型模式:对象实例共享属性和方法,比如 Vue.prototype.$watch、Vue.prototype.$set = set、Vue.prototype.$delete = del、Vue.prototype.$destroy、Vue.prototype.$nextTick、Vue.prototype._update
发布-订阅模式:Watcher(收集依赖 deps ),Watcher.prototype.get、Watcher.prototype.addDep、Watcher.prototype.update……
命令模式:命令模式的由来,其实是回调(callback)函数的一个面向对象的替代品。
享元模式:享元(flyweight)模式是一种用于性能优化的模式,核心是运用共享技术来有效支持大量细粒度的对象。享元模式要求将对象的属性划分为内部状态与外部状态(状态在这里通常指属性)。享元模式的目标是尽量减少共享对象的数量,比如vue的全局config。
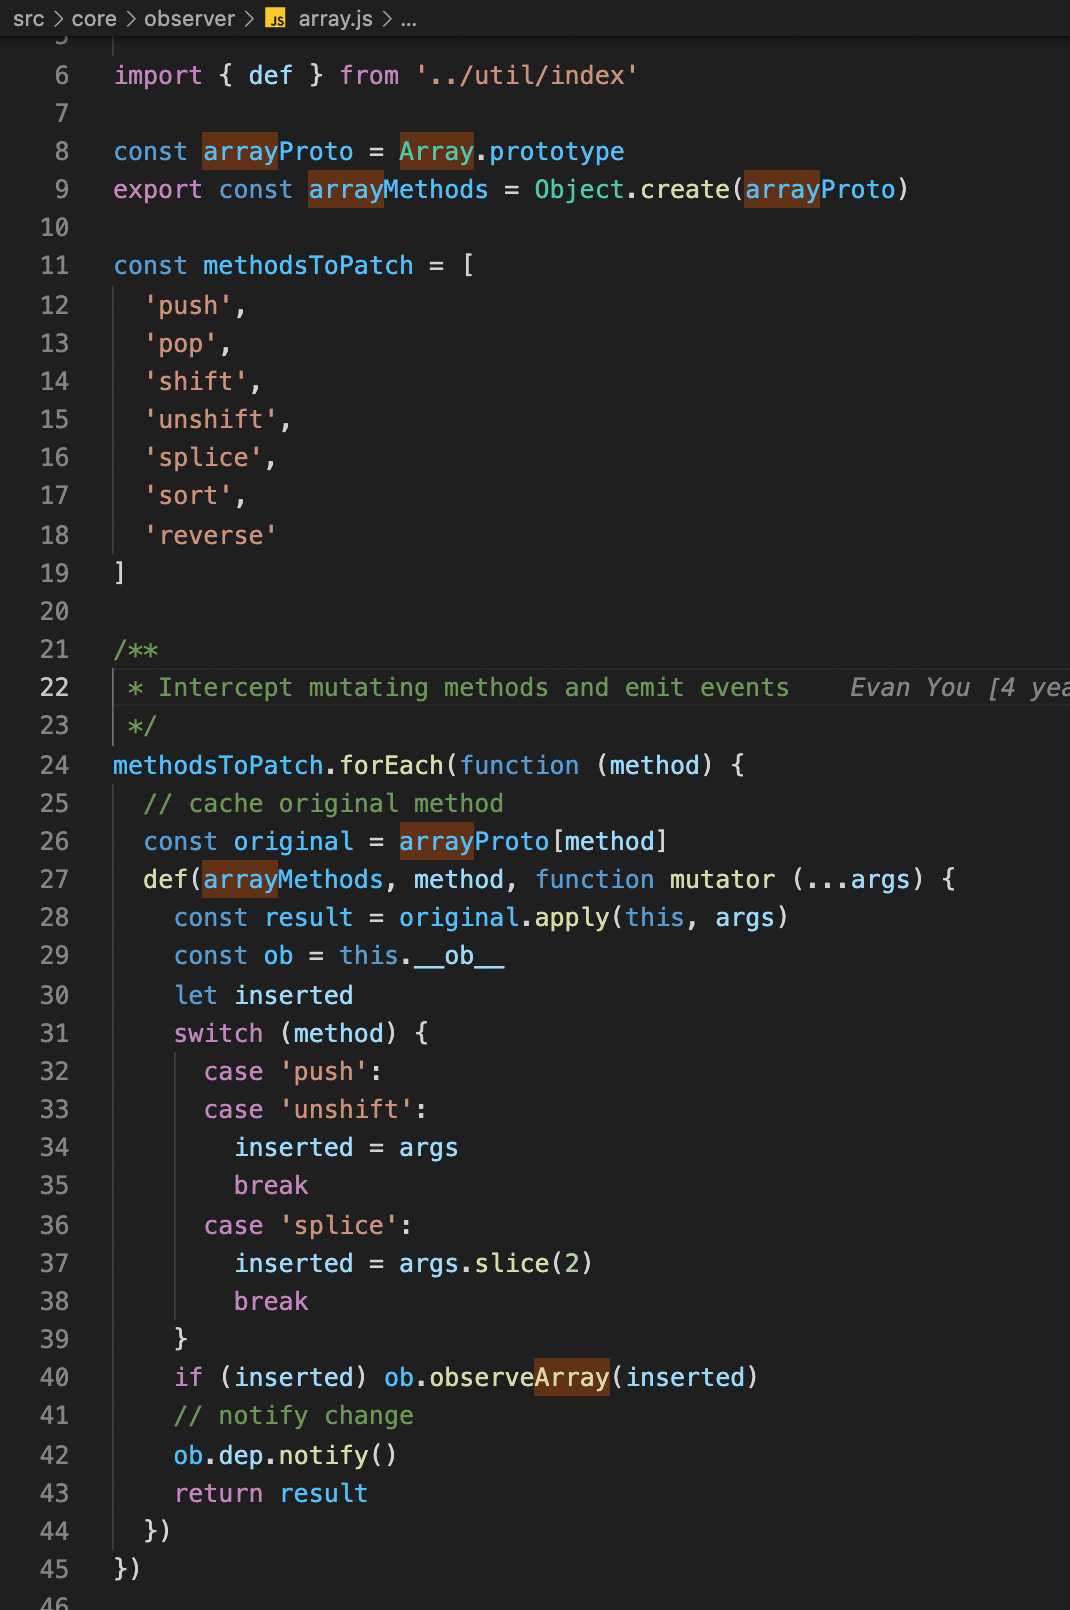
装饰者模式:vue 中利用 defineProperty 可以监听对象,对于数组,是对数组的方法,包装扩展了一层notify的能力。
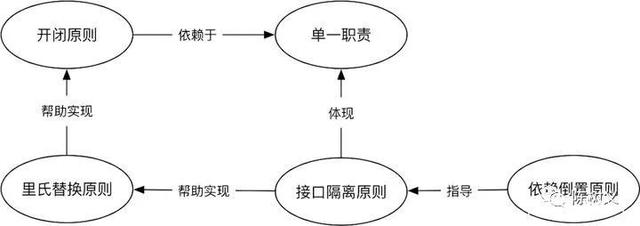
16.设计原则 SOLID
单一职责原则(SRP:Single Responsibility Principle):一个对象(方法)只做一件事情,把对象划分成较小的粒度,这可以提高对象的可复用性。
开放-封闭原则(OCP:Open Closed Principle):当需要改变一个程序的功能或者给这个程序增加新功 能的时候,可以使用增加代码的方式,但是不允许改动程序的源代码。对扩展开放,对修改封闭。
里氏替换原则(LSP):能够使用父类的地方,一定可以使用其子类,并且预期结果是一致的。
接口隔离原则(ISP:Interface Segregation Principle):不要将一个大而全的接口扔给使用者,而是将每个使用者关注的接口进行隔离。
依赖倒置原则(DIP:Dependence Inversion Principle):使用者依赖一个抽象的服务接口,而不是去依赖一个具体的服务执行者,从依赖具体实现转向到依赖抽象接口,倒置过来。要针对抽象(接口)编程,而不是针对实现细节编程。
17.父子组件通信方法总结
父子组件始终要保持单向数据流动。
父组件调用子组件方法:
- 通过给子组件加ref,然后父组件通过ref直接调用子组件的方法, this.$refs.child
- 父组件通过调用子组件的$emit方法,然后子组件用$on方法进行监听
- 依赖注入 provide/inject,跨组件传递
- eventBus,跨组件传递
- this.$attrs,跨组件传递
子组件调用父组件方法:
- 父组件把方法通过props传入子组件中,在子组件里直接调用这个方法
- 在子组件中调用$emit方法,向父组件触发一个事件,然后父组件监听对应的方法
- 子组件中通过this.$parent / this.$root 来调用父组件的方法
- 依赖注入 provide/inject(非响应式),跨组件传递
- eventBus,跨组件传递
localStorage 、 sessionStorage
VueX
18.watcher
https://ustbhuangyi.github.io/vue-analysis/v2/reactive/reactive-object.html#initstate
19.vue2是怎么实现数组的响应式的?

 浙公网安备 33010602011771号