Android开发系列(四) TabView 选项卡控件的使用
最近学习Android开发的时候,发现网上对于设计选项卡的教程很乱,因此结合Mars老师的视频,在这里做一下总结以备参考。
这里创建三个Activity,一个是TabActivity ,另外两个分别是两个选项卡对应的Activity。
第一步 创建三个Activity并在AndroidManifest文件中进行注册;
        <activity
            android:name="com.example.android_tabname.MainActivity">
            <intent-filter >
                <action android:name="android.intent.action.MAIN"/>
                <category android:name="android.intent.category.LAUNCHER"/>
            </intent-filter>
        </activity>
        <activity
            android:name="com.example.android_tabname.TabOne">

        </activity>
        <activity
            android:name="com.example.android_tabname.TabTwo">

        </activity>
然后设置MainActivity 的布局:
<?xml version="1.0" encoding="utf-8"?>
<TabHost xmlns:android="http://schemas.android.com/apk/res/android"
    android:id="@android:id/tabhost"
    android:layout_width="match_parent"
    android:layout_height="match_parent" >
    <!-- 最外层是一个TabHost控件,对应了MianActivity,注意这里的id需要用系统自带的id -->

    <LinearLayout
        android:layout_width="match_parent"
        android:layout_height="match_parent"
        android:orientation="vertical">

        <!--不要忘记设置方向  -->

        <TabWidget
            android:id="@android:id/tabs"
            android:layout_width="match_parent"
            android:layout_height="wrap_content"/>
        <FrameLayout
            android:id="@android:id/tabcontent"
            android:layout_width="match_parent"
            android:layout_height="match_parent"/>


    </LinearLayout>


</TabHost>
然后是TabOne和TabTwo的布局:二者是一样的,所以只贴了一个
<?xml version="1.0" encoding="utf-8"?>
<LinearLayout xmlns:android="http://schemas.android.com/apk/res/android"
    android:layout_width="match_parent"
    android:layout_height="match_parent"
    android:orientation="vertical" >

    <TextView
        android:layout_width="wrap_content"
        android:layout_height="wrap_content"
        android:layout_gravity="center"
        android:text="This is TabTwo"
        android:textSize="50dip"/>


</LinearLayout>
第二步 在MainActivity中创建TabHost和TabHost.TabSpec对象,然后调用setIndicator() 和setContent() 方法,最后再调用TabHost的addTab()方法,将选项卡添加到选项卡控件中,程序如下:
package com.example.android_tabname;
import android.app.TabActivity;
import android.content.Intent;
import android.os.Bundle;
import android.widget.*;

public class MainActivity extends TabActivity{

    TabHost tabHost=null;      //选项卡控制器
    TabHost.TabSpec tabSpecA,tabSpecB=null;   //选项卡,这里选项卡最好不用混用,有几个选项卡就设置几个对象

    @Override
    protected void onCreate(Bundle savedInstanceState) {
        // TODO Auto-generated method stub
        super.onCreate(savedInstanceState);
        setContentView(R.layout.main);
        //获得TabHost实例;
        tabHost=getTabHost();
        //获得TabHost.TabSpec对象实例;
        tabSpecA=tabHost.newTabSpec("One");
        //为TabSpec对象设置指示器
        tabSpecA.setIndicator("TabA",getResources().getDrawable(android.R.drawable.ic_media_play));
        //为选项卡设置内容,这里需要创建一个intent对象
        Intent intentA=new Intent();
        intentA.setClass(this, TabOne.class);
        tabSpecA.setContent(intentA);

        //然后创建第二个选项卡:
        tabSpecB=tabHost.newTabSpec("Two");
        tabSpecB.setIndicator("TabB",getResources().getDrawable(android.R.drawable.ic_media_next));
        Intent intentB=new Intent();
        intentB.setClass(this, TabTwo.class);
        tabSpecB.setContent(intentB);

        //最后一步,把两个选项卡TabSpec添加到选项卡控件TabHost中
        tabHost.addTab(tabSpecA);
        tabHost.addTab(tabSpecB);


    }


}
另外两个Activity只是设置了一下布局文件,后续可以根据不同需要进行扩展。代码如下:
package com.example.android_tabname;
import android.app.Activity;
import android.os.Bundle;


public class TabOne extends Activity{

    @Override
    protected void onCreate(Bundle savedInstanceState) {
        // TODO Auto-generated method stub
        super.onCreate(savedInstanceState);
        setContentView(R.layout.layout_tabone);
    }


}
package com.example.android_tabname;

import android.app.Activity;
import android.os.Bundle;

public class TabTwo extends Activity{

    @Override
    protected void onCreate(Bundle savedInstanceState) {
        // TODO Auto-generated method stub
        super.onCreate(savedInstanceState);
        setContentView(R.layout.layout_tabtwo);
    }


}
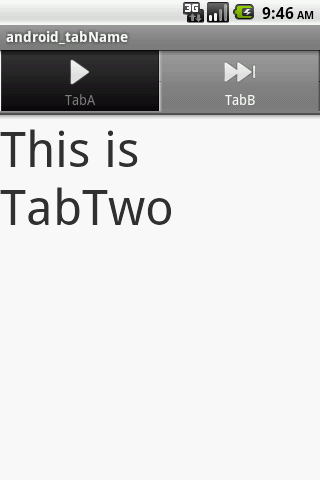
以上步骤就可以设置一个简单的选项卡:最终结果如下:

 浙公网安备 33010602011771号