【UGUI源码分析】Mask的底层原理
Masking is implemented using the stencil buffer of the GPU.
Mask是通过GPU的模板缓冲实现的,关键代码只有一行,它的作用是为Mask对象生成一个特殊的材质,这个材质会将StencilBuffer的值置为1。
var maskMaterial = StencilMaterial.Add(baseMaterial, 1, StencilOp.Replace, CompareFunction.Always);
同样,在Image,Text和RawImage的基类 MaskableGraphic 中,有一行代码,它的作用是为MaskableGraphic生成一个特殊的材质,这个材质在渲染时会取出StencilBuffer的值,判断是否为1,如果是才进行渲染。
public virtual Material GetModifiedMaterial(Material baseMaterial){
    var toUse = baseMaterial;

    if (m_ShouldRecalculateStencil)
    {
        var rootCanvas = MaskUtilities.FindRootSortOverrideCanvas(transform);
        m_StencilValue = maskable ? MaskUtilities.GetStencilDepth(transform, rootCanvas) : 0;
        m_ShouldRecalculateStencil = false;
    }

    // if we have a enabled Mask component then it will
    // generate the mask material. This is an optimization
    // it adds some coupling between components though :(
    Mask maskComponent = GetComponent<Mask>();
    if (m_StencilValue > 0 && (maskComponent == null || !maskComponent.IsActive()))
    {
        // 核心代码是这一句
        var maskMat = StencilMaterial.Add(toUse, (1 << m_StencilValue) - 1, StencilOp.Keep, CompareFunction.Equal, ColorWriteMask.All, (1 << m_StencilValue) - 1, 0);
        StencilMaterial.Remove(m_MaskMaterial);
        m_MaskMaterial = maskMat;
        toUse = m_MaskMaterial;
    }
    return toUse;
}
理解了原理,来看一下stencil test里的语法
Stencil
{
    Ref [Value] //表示要比较的值
    Comp [CompFunction] // 表示比较方法(等于/不等于/大于/小于等
    Pass [PassOp] // 表示当比较通过时对stencil buffer做什么操作(保留/替换/置0/增加/减少等
    Fail [FailOp] // 对buffer的操作,如果比较失败的话
    ReadMask [Value] // 表示取stencil buffer的值时用的mask
    WriteMask [Value]
}
简单的来说,是将stencil buffer的值与ReadMask与运算,然后与Ref值进行Comp比较,结果为true时进行Pass操作,否则进行Fail操作,操作值写入stencil buffer前先与WriteMask与运算。
我们再来看下前面的StencilMaterial.Add()的方法,从源代码里可以看出,它主要是帮助我们生成了一个材质并填充了Stencil相关的参数,
public static Material Add(Material baseMat, int stencilID, StencilOp operation, CompareFunction compareFunction, ColorWriteMask colorWriteMask, int readMask, int writeMask)
{
    var newEnt = new MatEntry();
    newEnt.count = 1;
    newEnt.baseMat = baseMat;
    newEnt.customMat = new Material(baseMat);

    // 省略

    newEnt.customMat.SetInt("_Stencil", stencilID);
    newEnt.customMat.SetInt("_StencilOp", (int)operation);
    newEnt.customMat.SetInt("_StencilComp", (int)compareFunction);
    newEnt.customMat.SetInt("_StencilReadMask", readMask);
    newEnt.customMat.SetInt("_StencilWriteMask", writeMask);
    newEnt.customMat.SetInt("_ColorMask", (int)colorWriteMask);
    newEnt.customMat.SetInt("_UseAlphaClip", newEnt.useAlphaClip ? 1 : 0);
    m_List.Add(newEnt);
    return newEnt.customMat;
}
事实上我们可以用通过修改stencil buffer的属性来制造自定义材质,比如把上面例子中的CompareFunction.Equal 改为 CompareFunction.NotEqual 可实现遮罩的反效果,挖孔效果。
整个mask的实现流程可以看下这个flowchart,算是比较清楚了
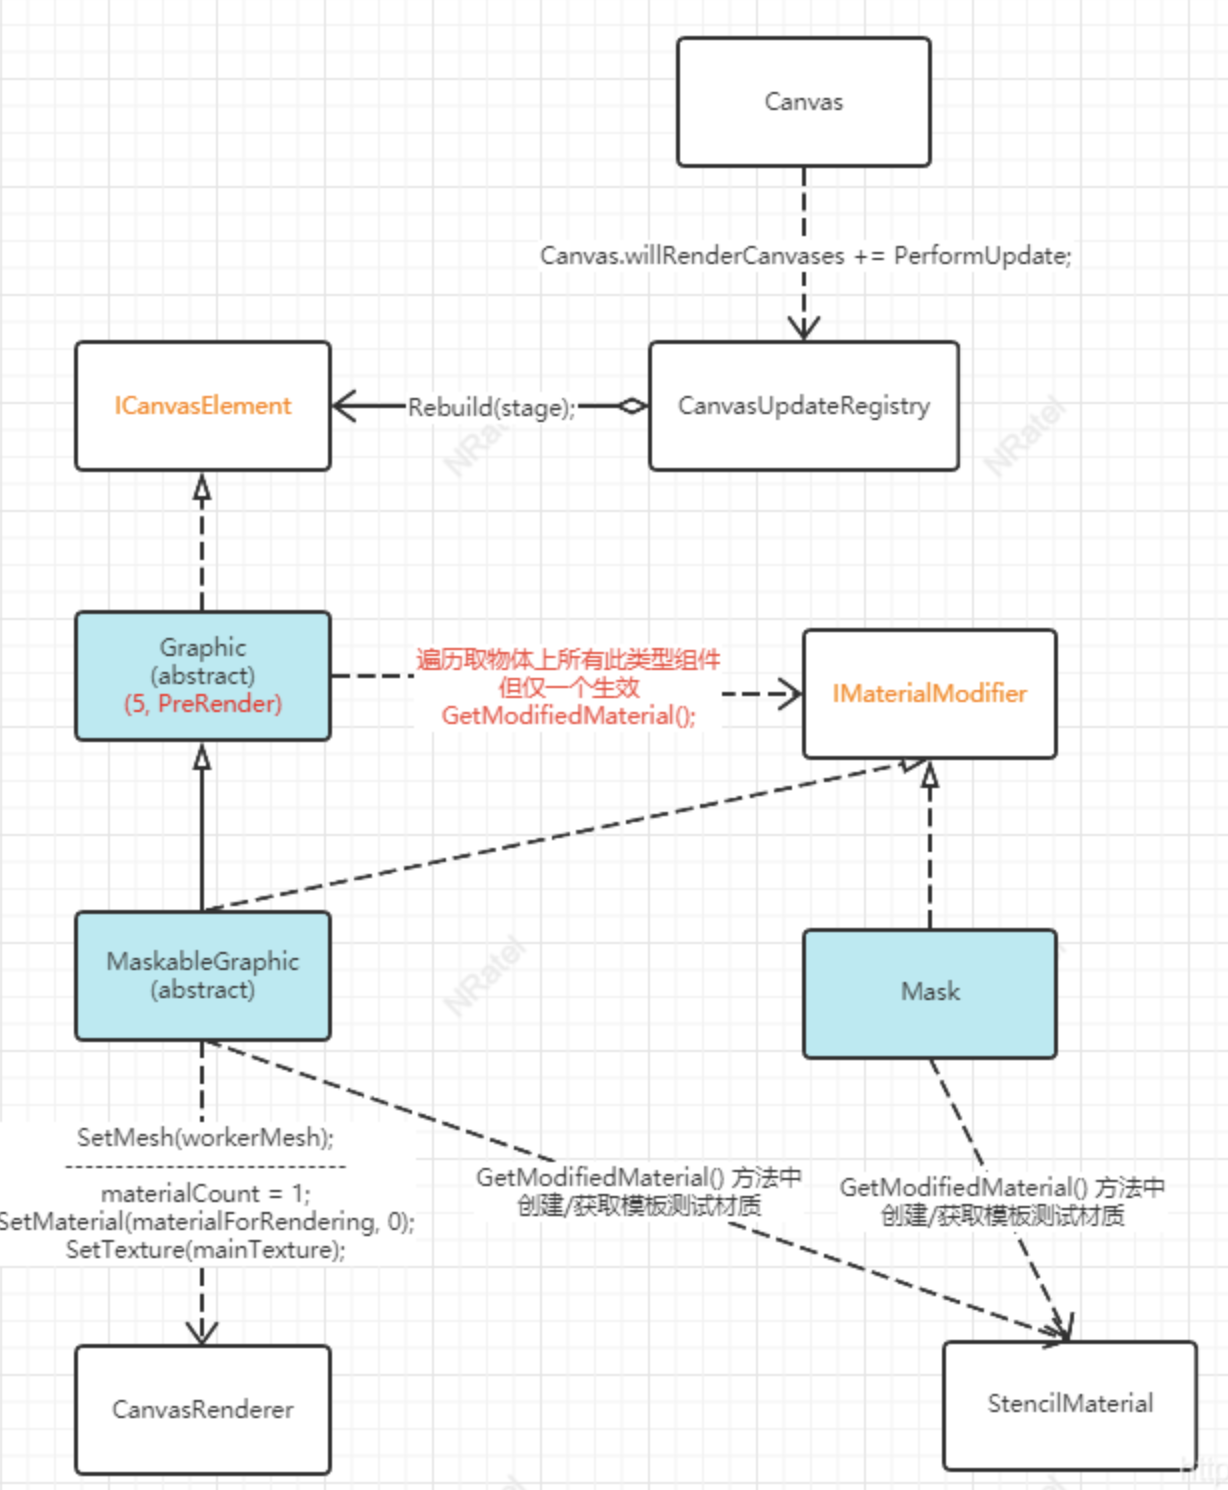
这个博主总结的很不错,来自https://blog.csdn.net/NRatel/article/details/118252513
这里总结一下mask的实现原理:
- mask会给image一个特殊的材质,这个材质会给image的每个像素点进行标记,将标记的结果放在一个缓存里(stencil buffer)
- 当子级UI进行渲染的时候会去检查这个stencil buffer内的标记,如果当前覆盖的区域存在标记,就会进行渲染,otherwise不渲染
Reference:
- https://rugbbyli.gitlab.io/blog/post/2017-12-07-unity-stencil/
- https://www.daimajiaoliu.com/daima/479aedb9d900403
- https://blog.csdn.net/NRatel/article/details/118252513

 浙公网安备 33010602011771号