django1
django 安装
pip install django
django 特点
- 重量级框架,齐全
- 快速开发
- 强大的后台,数据库接口,模板,路由映射,缓存
django MTV
- MTV分别表示models、templates和views。
- models文件主要定义数据库的连接。
- templates文件可以放一些html的模版。
- views文件主要定义处理请求的函数。
创建应用
创建django项目django-admin startproject djangoone
创建django app django-admin startapp mysite/python manage.py startapp mysite
简单的请求
Views:
from django.http import HttpResponse
# Create your views here.
def shows(request):
    return HttpResponse('hi')
urls:
from django.urls import path,include,re_path
from mysite import views
urlpatterns = [

    path('admin/', admin.site.urls),
    path('index/', views.shows, name="shows"),

]
命令行启动:
python manage.py runserver
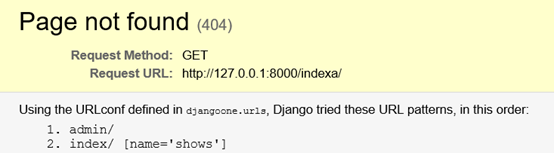
服务端默认会监听8000端口,通过浏览器请求 http://localhost:8000/index即可获得'hi'字符串。如果故意输错会出现可访问路由地址提示
Django路由分发url
路由即将不同url的请求转发给处理该请求的函数,Django中的路由表定义在urls文件中。
(1)动态url
urls文件的配置
url和re_path支持正则,如(\d+)表示获取匹配到的数字。
urlpatterns = [
url(r'^index/(\d+)/',views.shows),
]
(2)变量付值
(?P<n1>\d+)表示将匹配到的值(数字)付给形参n1,然后获取n1的值。小括号代表分组
Views:
from django.http import HttpResponse

def showsyear(request,year):
    return HttpResponse(r'hi,{}'.format(year))
urls:
from django.contrib import admin
from django.conf.urls import url
from django.urls import path,include,re_path
from mysite import views
urlpatterns = [

    path('admin/', admin.site.urls),
    re_path('^index/(?P<year>\d+)/$', views.showsyear, name="showsyear"),
    # 等同于url('^index/(?P<year>\d+)/$', views.showsyear, name="showsyear"),
]
通过浏览器请求 http://localhost:8000/index/1996即可获得'hi,1996'字符串
(3)二级路由(将project的urls接收到的请求转发到其它app的urls中)
先再建一个app,需要使用命令行
cd /当前mangage所在目录
python manage.py mysitea,现在的目录
project中urls文件配置
from django.contrib import admin
from django.conf.urls import url
from django.urls import path,include,re_path
urlpatterns = [

    path('admin/', admin.site.urls),
    re_path('^mysite/',include('mysite.urls')),
    re_path('^mysitea/',include('mysitea.urls')),
]
mysitea中urls文件的配置
from django.conf.urls import url
from django.urls import path,include,re_path
from mysitea import views
urlpatterns = [

    re_path('^(?P<year>\d+)/$', views.showmysiteayear, name="showmysiteayear"),
]
mysitea中views文件的配置
from django.http import HttpResponse
# Create your views here.

def showmysiteayear(request,year):
    return HttpResponse(r'hi,{}'.format(year))
mysite中urls文件的配置
from django.urls import path,include,re_path
from mysite import views
urlpatterns = [

    re_path('^(?P<year>\d+)/$', views.showmysiteyear, name="showmysiteyear"),
]
mysite中views文件的配置
from django.http import HttpResponse
# Create your views here.
def showmysiteyear(request,year):
    return HttpResponse(r'hi,{}'.format(year))
django sqllite3
数据库创建
(1)注册
Django中数据库的配置文件为settings,默认的数据库引擎为 sqlite3。
Django中是在models文件中创建数据库,通过类创建数据库。创建数据库之前,需要在settings文件中注册一下app。
如下:
settings.py中注册test1
INSTALLED_APPS = [
    'django.contrib.admin',
    'django.contrib.auth',
    'django.contrib.contenttypes',
    'django.contrib.sessions',
    'django.contrib.messages',
    'django.contrib.staticfiles',
    'mysite',
    'mysitea',
]
(2)models.py中使用models.Model子类创建数据库
from django.db import models

# Create your models here.

class BirdayInfo(models.Model):

    name=models.CharField(max_length=32)

    relationship=models.CharField(max_length=32)

    birthday=models.DateField()

    def __str__(self):

         return self.name
(3)配置
不需要对设置改动,默认使用sqlite数据库,该数据库不需要配置
(4)生成数据库配置文件
生成创建数据库的配置文件
python manage.py makemigrations
此时在mysite的migrations目录下会生成一个0001_initial.py 生成数据库的配置文件
(5)迁移
根据生成的配置文件创建数据库
python manage.py migrate
这样,就创建好了数据库。
因为用到了dateField字段,所以要到settings中改默认时区
TIME_ZONE是设置时区,如果想获取中国的当前,可以设置 TIME_ZONE = ‘Asia/Shanghai‘。
同时把USE_TZ设置为False,要不然数据库的实际和当前系统时间不一致,还要改默认的语言为'zh-hans'
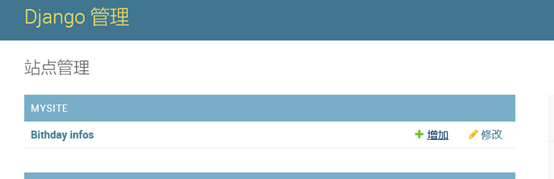
django admin
(1) 使用admin进行增、删、改、查
创建超级管理员,就可以直接使用账户密码登入/admin/后台中
python manage.py createsuperuser
输入名字,邮箱和密码
Admin是英文的,在settings中可改成中文,
LANGUAGE_CODE = 'zh-hans'
在admin中注册该表
from django.contrib import admin
from mysite import models
# Register your models here.

admin.site.register(models.BithdayInfo)
增加和修改

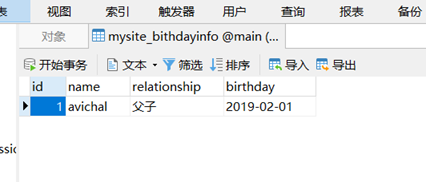
在navicat中查询表
(2)自定义简单接口
- 数据库增、删、改、查
Mysite的urls
from django.contrib import admin
from django.conf.urls import url
from django.urls import path,include,re_path
from mysite import views
urlpatterns = [

    re_path('^(?P<name>\w+)/(?P<relationship>\w+)/(?P<y>\d+)/(?P<m>\d+)/(?P<d>\d+)/$', views.insertbirthday, name="insertbirthday"),
    re_path('^showbirthday/$', views.showbirthday, name="showbirthday"),
    re_path('^updatebirthday/$', views.updatebirthday, name="updatebirthday"),
    re_path('^delbirthday/$', views.delbirthday, name="delbirthday"),
]
新增数据
Mysite的views
from django.http import HttpResponse
from mysite import models
import datetime
# Create your views here.
def insertbirthday(request,name,relationship,y,m,d):

    models.BithdayInfo.objects.create(name=r'{}'.format(name), relationship=r'{}'.format(relationship), birthday=datetime.date(int(y),int(m),int(d)))

    return HttpResponse(r'hi,{}|{}|{}|{}|{}'.format(name,relationship,y,m,d))
#用户在访问http://127.0.0.1:8000/mysite/名字/关系/年/月/日/时就会新增一条数据
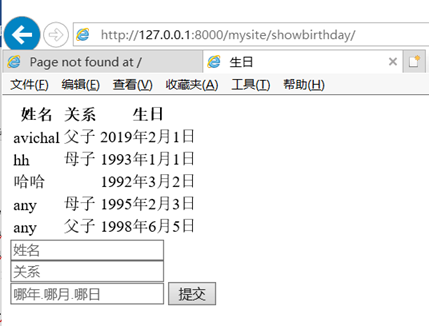
展示数据,删除数据,更新数据
Mysite的views
def showbirthday(request):
    res = models.BithdayInfo.objects.all()
    return render(request,'showbirday.html',{'res': res})

def delbirthday(request):
    models.BithdayInfo.objects.filter(name__contains='hh').delete()
    return redirect('http://127.0.0.1:8000/mysite/showbirthday/')

def updatebirthday(request):
    models.BithdayInfo.objects.filter(name__iexact='hh').update(relationship='母子')
    return redirect('http://127.0.0.1:8000/mysite/showbirthday/')
showbirthday.html
<!DOCTYPE html>
<html lang="en">
<head>
    <meta charset="UTF-8">
    <title>生日</title>
</head>
<body>
<table>
<tr>
    <th>姓名</th>
    <th>关系</th>
    <th>生日</th>
</tr>
{% for re in res %}
<tr>
    <td>{{ re.name }}</td>
    <td>{{ re.relationship }}</td>
    <td>{{ re.birthday }}</td>
</tr>
{% endfor %}
</table>

</body>
</html>
(3)使用python request增删改
新增
<!DOCTYPE html>
<html lang="en">
<head>
    <meta charset="UTF-8">
    <title>生日</title>
</head>
<body>
<table>
<thead>
<tr>
    <th>姓名</th>
    <th>关系</th>
    <th>生日</th>
</tr>
</thead>
<tbody>
{% for re in res %}
<tr>
    <td>{{ re.name }}</td>
    <td>{{ re.relationship }}</td>
    <td>{{ re.birthday }}</td>
</tr>
{% endfor %}
</tbody>
</table>

    <form action="{% url 'showbirthday' %}">{% csrf_token %}
        <input type="text" name="name" placeholder="姓名"><br/>
        <input type="text" name="relationship" placeholder="关系"><br/>
        <input type="datetime" name="birthday" placeholder="哪年.哪月.哪日">

        <input type="submit" value="提交" formmethod="post">

    </form>
</body>
</html>
Views:
def showbirthday(request):
    if request.method == 'POST':
        name = request.POST.get("name","")
        relationship = request.POST.get("relationship","")
        birthday = request.POST.get("birthday","")
        y,m,d = birthday.split(".")
        birth = datetime.date(int(y),int(m),int(d))
        models.BithdayInfo.objects.create(name=name,relationship=relationship,birthday=birth)
        print("ok")
    res = models.BithdayInfo.objects.filter(is_delect=False)
    return render(request,'showbirday.html',{'res': res})
这样就实现了新增生日记录的效果,如图:
删除和修改
修改前端:
<!DOCTYPE html>

<html lang="en">

<head>

    <meta charset="UTF-8">

    <title>生日</title>

</head>

<body>

<table>

<thead>

<tr>

    <th>姓名</th>

    <th>关系</th>

    <th>生日</th>

</tr>

</thead>

<tbody>

{% for re in res %}

<tr>

    <td>{{ re.name }}</td>

    <td>{{ re.relationship }}</td>

    <td>{{ re.birthday }}</td>

</tr>

{% endfor %}

</tbody>

</table>

    <form action="{% url 'showbirthday' %}">{% csrf_token %}

        <input type="text" name="name" placeholder="姓名">

        <input type="text" name="relationship" placeholder="关系">

        <input type="datetime" name="birthday" placeholder="哪年.哪月.哪日"><br/>

        <input type="radio" name="action" id="insert" value="insert"/>新增

      <input type="radio" name="action" id="delete" value="delete"/>根据姓名删除

      <input type="radio" name="action" id="update" value="update"/>根据姓名更新

        <input type="submit" value="执行操作" formmethod="post">

    </form>
</body>

</html>
url.py
urlpatterns = [
    re_path('^showbirthday/', views.showbirthday, name="showbirthday"),
]
views.py
from django.shortcuts import render,redirect
from django.http import HttpResponse
from mysite import models
import datetime
# Create your views here.

def showbirthday(request):
    if request.method == 'POST':
        _action = request.POST.get("action")
        name = request.POST.get("name", "")
        if _action == "insert" or _action == "update":
            relationship = request.POST.get("relationship", "")
            birthday = request.POST.get("birthday", "")
            y, m, d = birthday.split(".")
            birth = datetime.date(int(y), int(m), int(d))
            if _action == "insert":
                models.BithdayInfo.objects.create(name=name,relationship=relationship,birthday=birth)
                print("insert action ok")
            elif _action == "update":
                models.BithdayInfo.objects.filter(name__iexact=name).update(relationship=relationship,birthday=birth)
                print("update action ok")
        elif _action == "delete":
            models.BithdayInfo.objects.filter(name__iexact=name).delete()
            print("delete action ok")
        else:
            pass

    res = models.BithdayInfo.objects.all()
    return render(request,'showbirday.html',{'res': res})
结果


 浙公网安备 33010602011771号