

vue从入门到女装??:从零开始搭建后台管理系统(一)安装框架
一个系统开发完成了总要有操作说明手册,接口文档之类的东西吧?这种要全部纯手写就很麻烦了,可以借助一些插件,比如:
vue-docute
vue的官方文档就是用这个生成的呢~
官方文档==》docute
demo源码==》code
下面进入正题,开始学习使用这个好用的插件吧~
1.安装
方法1 npm 安装
npm:
npm i -g docute-cli
docute init ./docsdocute ./docs
然后打开 http://localhost:8080 查看运行结果yarn:
yarn global add docute-cli方法2 直接script标签导入
<!DOCTYPE html>
<html>
<head>
  <meta charset="utf-8" />
  <meta http-equiv="X-UA-Compatible" content="IE=edge">
  <meta name="viewport" content="width=device-width, initial-scale=1, maximum-scale=1, user-scalable=0" />
  <title>My Awesome Doc</title>
  <!-- the docute client styles -->
  <link rel="stylesheet" href="https://unpkg.com/docute/dist/docute.css">
</head>
<body>
  <div id="app"></div>
  <!-- load the docute client library -->
  <script src="https://unpkg.com/docute/dist/docute.js"></script>
  <!-- bootstrap your docute app! -->
  <script>
    docute.init()
  </script>
</body>
</html>
2.设置配置
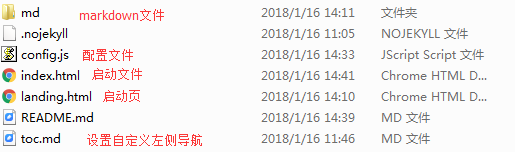
一个文档系统只需要markdown文件们和index.html启动文件页和config.js配置代码就实现了
接下来可以按需配置成最终想要的结果
docute.init({
  // ...config goes here
})
可以在index.html里的docute.init({})里直接票配置,当然也可以单独存放在别的js里
详细配置查看官网文档 ==》
讲几个常用的:
2.1 加载页,也就是最初展现在你面前的页面
docute.init({
  // or custom path
  landing: '_my-landing.html',
  // or even markdown file
  landing: 'landing.md',
  // or inline markdown
  landing: '# this is landing page'
})
可以通过加载页设置链接跳转至文档页面
    <a class="landing-button" router-link="/home">
      Docs
   </a>
2.2 设置nav导航
效果:
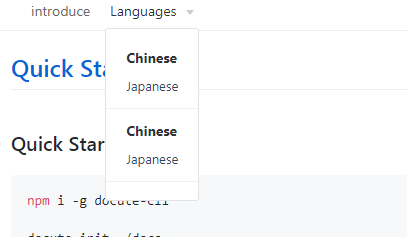
示例代码:
docute.init({
nav: [{
  path: '/',
  markdown: '## counter\n {{ count }}',
  component: {
  data() {
    return { count: 0 }
      }
    }
  },{
    title: "introduce",
    path: "/md/introduce",
    source: '/md/introduce.md',
   },{
    title: 'Languages',
    type: 'dropdown',
    items: [
      {title: 'Chinese',type: 'label', path: '/language/chinese'},
      {title: 'Japanese', path: '/language/japanese'},
      {type: 'sep'},
      {title: 'Chinese',type: 'label', path: '/language/chinese'},
      {title: 'Japanese', path: '/language/japanese'},
      {type: 'sep'}
      ]}]
}) 2.3 设置自定义侧边栏导航
侧边栏的导航是根据markdown文件中的标题自动提取出的
// markdown.md
## 一级标题
### 二级标题
如何自定义侧边栏呢?
docute.init({
  toc: `
- [Install](/install)
- [Guide](/guide)
  - [How to do A](/guide/how-to-do-a)
  - [How to do B](/guide/how-to-do-b)
`
})
一定要注意对齐哦,不然是不会被渲染的,也可以单独写文件
docute.init({
  toc: './toc.md'
})
2.4 头部自定义链接
效果图:
实现代码:
docute.init({
icons: [{
icon: 'github',
label: 'Fork me on GitHub',
link: 'https://github.com/calamus0427'
},{
icon: "twitter",
label: "calamus",
link:"https://github.com/calamus0427"
},{
icon: "edit",
label: "calamus",
link:"https://github.com/calamus0427"
},{
label: 'Hovered!',
svgId: 'my-icon',
link: 'http://blah.blah'
}],

})
也可以用自定义的图标
<body>
  <div id="app"></div>
  <!-- you can add it everywhere outside #app -->
  <svg xmlns="http://www.w3.org/2000/svg" style="display:none">
    <symbol id="my-icon"  viewBox="0 0 22 22">
      <!-- all shapes like `<path>` go here -->
    </symbol>
    <!-- ... other symbols -->
  </svg>

docute.init({
  icons: [
    {
      label: 'Hovered!', // the text for tooltip
      svgId: 'my-icon', // the id of symbol
      link: 'http://blah.blah'
    }
  ]
})
</body>
3.更改主题
link引入css文件更改主题即可
==》查看更多主题
4.语法高亮:python语法高亮支持
<script src="https://unpkg.com/prismjs/components/prism-python.js"></script>
docute和gitbook的区别:docute不需要把markdown文件转换成html;而gitbook是转换成html发布的。
本文首发于Calamus的博客。


 浙公网安备 33010602011771号