
看了vue3的文档 .sync 貌似被抛弃了,无情,所以再来看一遍文档。
非 Prop 的 Attribute
一个非 prop 的 attribute 是指传向一个组件,但是该组件并没有相应 props 或 emits 定义的 attribute。常见的示例包括 class、style 和 id 属性。
Attribute继承
app.component('date-picker', {
  template: `
    <div>
      <input type="datetime" />
    </div>
  `
})


<date-picker data-status="activated" style="color:red;" class="comm"></date-picker>

// 渲染
<div data-status="activated" style="color:red;" class="comm">
  <input type="datetime" />
</div>
同样的规则适用于事件监听器
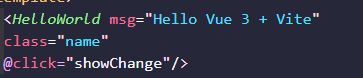
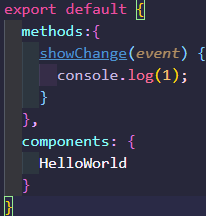
<date-select @change="showChange"></date-select>


let app = Vue.createApp({
  methods: {
    showChange(event) {
      console.log("event", event)
      console.log(event.target.value)
    }
  }
})

app.component('date-select', {
  template: `
    <select>
      <option value="1">Yesterday</option>
      <option value="2">Today</option>
      <option value="3">Tomorrow</option>
    </select>
  `
})
当组件 date-select 中触发 onChange 事件时,则会调用 showChange 函数。
实战测试:

v3 可以直接传非 prop 的值, 也可以是style和class, 也可以传事件
禁用Attribute继承
app.component('date-picker', {
  inheritAttrs: false,
  template: `
    <div class="date-picker">
      <input type="datetime" v-bind="$attrs" />
    </div>
  `
})

<date-picker data-status="activated"></date-picker>

// 渲染
<div class="date-picker">
  <input type="datetime"  data-status="activated" />
</div>
多个根节点上的Attribute继承
与单个根节点组件不同,具有多个根节点的组件不具有自动attribute回退行为。如果未显式绑定$attrs,将发生运行时警告。
<custom-layout id="custom-layout" @click="changeValue"></custom-layout>

// 警告
app.component('custom-layout', {
  template: `
    <div class="one">one</div>
    <div class="two">two</div>
    <div class="three">three</div>
  `
})

// 没有警告,$attrs被传递到two元素
app.component('custom-layout', {
  template: `
    <div class="one">one</div>
    <div class="two" v-bind="$attrs">two</div>
    <div class="three">three</div>
  `
})
自定义事件
事件名
官方推荐:始终使用kebab-case的事件名。
定义自定义事件
通过emits选项在组件上定义已发出的事件
app.component('custom-form', {
    emits: ['in-focus', 'sumit']
})
如果在emits选项中定义了原生事件(如: click),则它将被组件中的事件覆盖,而不是被视为原生侦听器。
建议:定义所有发出的事件,以便更好地记录组件应该如何工作。
验证抛出的事件
app.component('custom-form', {
  emits: {
    click: null, // 没有验证
    // 验证submit事件
    submit: ({email, password}) => {
      if (email && password) {
        return true
      } else {
        return false
      }
    }
  },
  methods: {
    submitForm() {
      this.$emit('submit', { email, password })
    }
  }
})
v-model 参数
默认情况下,组件上的v-model使用modelValue作为prop和update:modelValue作为事件。我们可以通过向V-model传递参数来修改这些名称
<my-comp v-model:sos="par"></my-comp>


app.component('my-comp', {
  props: {
    sos: String,
  },
  template: `
    <input
      type="text"
      :value="sos"
      @input="$emit('update:sos', $event.target.value)">
  `
})
这个用法很像v2.3的 .sync 的语法
多个v-model绑定
单个组件实例上创建多个v-model绑定
 <user-name v-model:first-name="firstName" v-model:last-name="lastName"></user-name>

app.component('user-name', {
  props: {
    firstName: String,
    lastName: String
  },
  template: `
    <input
      type="text"
      :value="firstName"
      placeholder="请输入你的姓"
      @input="$emit('update:firstName', $event.target.value)">
    <input
      type="text"
      :value="lastName"
      placeholder="请输入你的名字"
      @input="$emit('update:lastName', $event.target.value)">
  `
})
人生很漫长,或许我只是你人生中微不足道的一小段,只是你人生中的惊鸿一瞥。

 浙公网安备 33010602011771号