

WPF 3D模型结构
1、模型结构:
MeshGemetry3D:网格3D几何图形,每个顶点通过属性Positions点来添加,建立三角形列域Traianglelndices,
Positions、Traianglelndices、这两个搞定了,基本模型就确立了
还有材质Material
三者就创建模型
2、相机
透视相机:近大远小,远方聚焦到一个点的,常用
正交相机 :等宽等长的
3、光源:
环境光: 房间里漫反射,不是阳光直射,是整体亮度
平行光:阳光 光线直射,有方向的
点光源:向四面去发散
聚光灯:向一个方向放大的,射灯
4、对象容器:ViewPort3D
根节点,存放多有3D对象
代码实现
一、模型
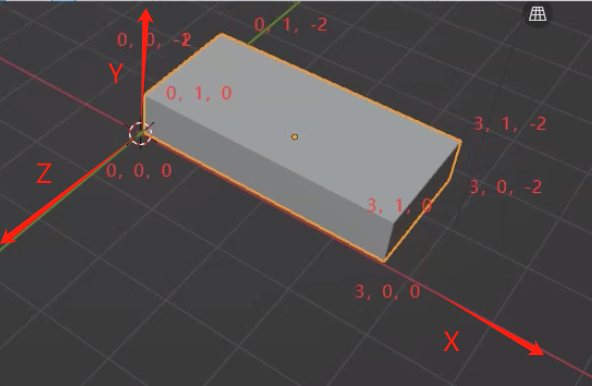
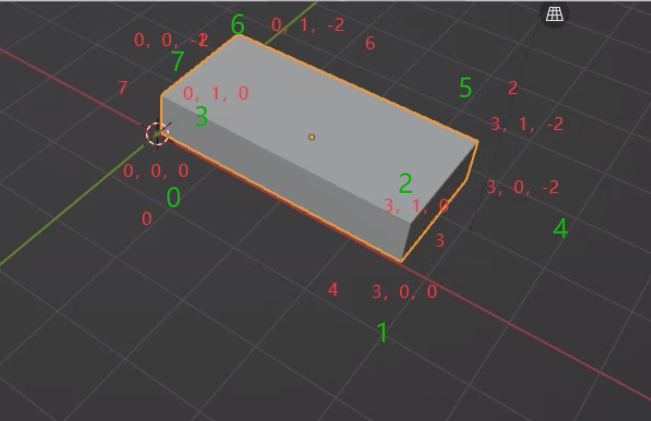
1、点:Positions
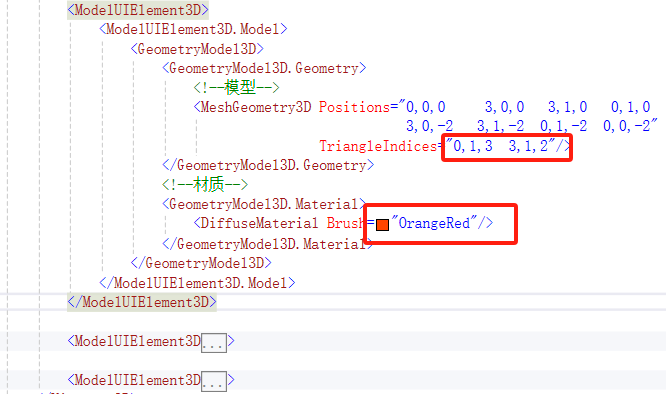
<MeshGeometry3D Positions="0,0,0     3,0,0   3,1,0   0,1,0
                           3,0,-2   3,1,-2  0,1,-2  0,0,-2"/>
可以无顺序,只要8个点就可以
2、三角形列域:TriangleIndices
逆时针是正面,顺时针是反面
TriangleIndices="0,1,4 4,1,2"
3、材质
Brush画刷,不单单只是显示颜色,还可以对象、图片,还可以画很多
贴图后面再说,点对点
<GeometryModel3D.Material>
    <DiffuseMaterial Brush="Orange"/>
</GeometryModel3D.Material>
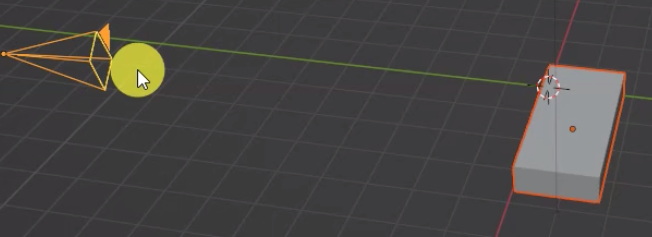
二、相机
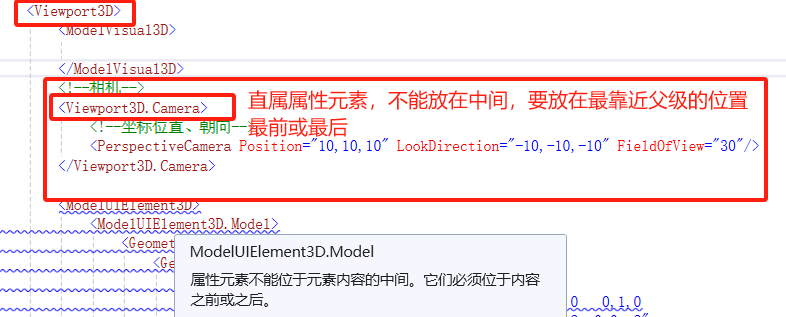
Viewport3D.Camera是Viewport3D的属性元素,必须放在最前面,不能放在中间

否则报错
透视相机:PerspectiveCamera
1、坐标位置:Position
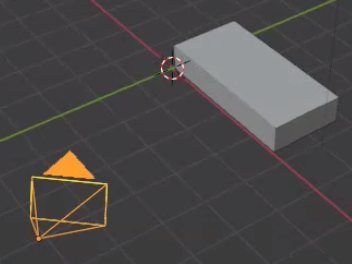
2、朝向:LookDirection
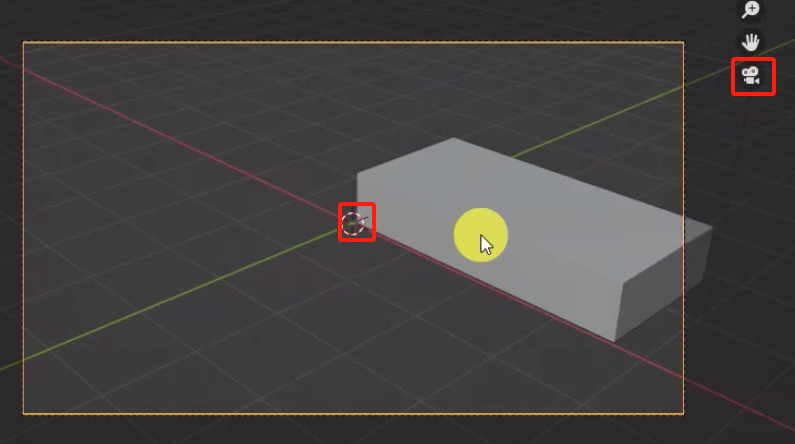
圆点-去相机的位置坐标,负数
            <Viewport3D.Camera>
                <!--坐标位置、朝向-->
                <PerspectiveCamera Position="10,10,10" LookDirection="-10,-10,-10"/>
            </Viewport3D.Camera>
设置好之后
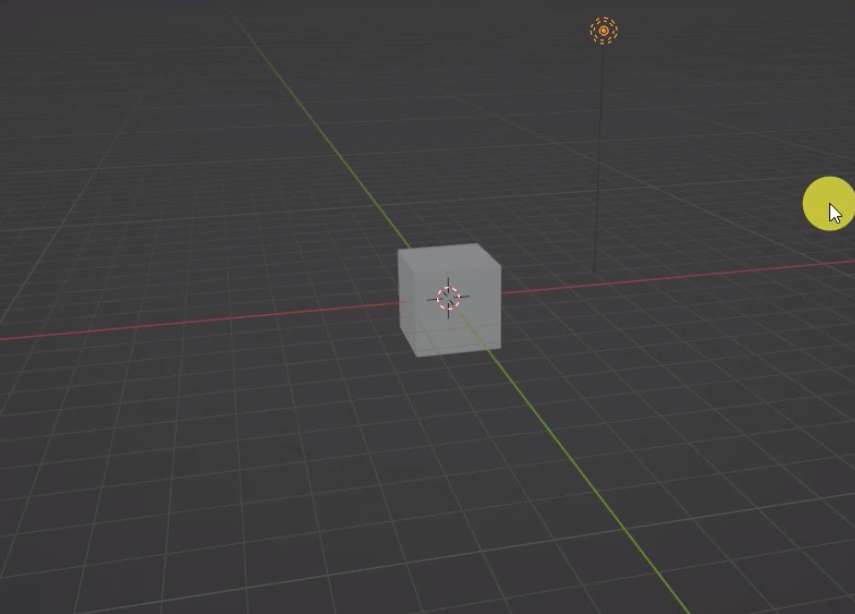
就出现了一个黑色的面
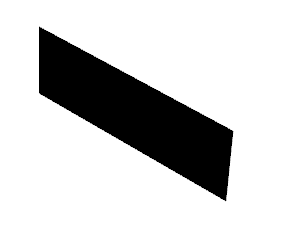
没有光源就是会显示黑色
向上方向
3、视野FieldOfView
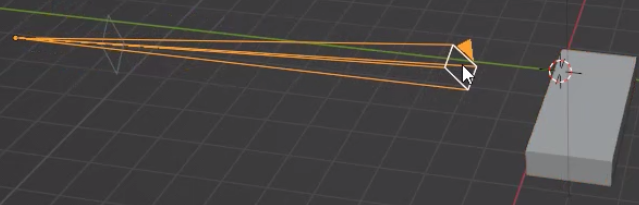
长了近了,观察只有一点点
远了,可以看到全面,看到的东西越来越多
FieldOfView 数字越小看到的就越近距离,数字越大看的就越远
三个常用属性够用
三、光源
点亮光源,
光源是和模型融合一起的,要用ModelVisual3D
环境光、白色
            <ModelVisual3D>
                <ModelVisual3D.Content>
                    <AmbientLight Color="White"/>
                </ModelVisual3D.Content>
            </ModelVisual3D>
修改模型颜色,会随着变化
从长方形到长方体,添加三坐标域
3,2,5 3,5,6

1,4,2 2,4,5

区分颜色
可以每个面建立不同的ModelUIElement3D
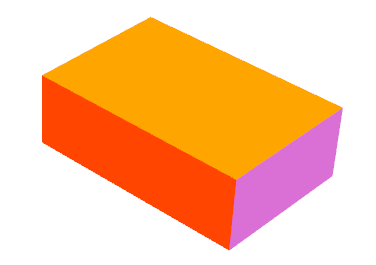
每个面不同的颜色
代码
<Window x:Class="WpfLayoutControl.Cube3D"
        xmlns="http://schemas.microsoft.com/winfx/2006/xaml/presentation"
        xmlns:x="http://schemas.microsoft.com/winfx/2006/xaml"
        xmlns:d="http://schemas.microsoft.com/expression/blend/2008"
        xmlns:mc="http://schemas.openxmlformats.org/markup-compatibility/2006"
        xmlns:local="clr-namespace:WpfLayoutControl"
        mc:Ignorable="d"
      Title="3D长方体" Height="600" Width="800">
    <Grid>
        <Viewport3D>
            <!--相机-->
            <Viewport3D.Camera>
                <!--坐标位置、朝向-->
                <PerspectiveCamera Position="10,10,10" LookDirection="-10,-10,-10" FieldOfView="30"/>
            </Viewport3D.Camera>
            <!--光源:环境光,白色-->
            <ModelVisual3D>
                <ModelVisual3D.Content>
                    <AmbientLight Color="White"/>
                </ModelVisual3D.Content>
            </ModelVisual3D>

            <ModelUIElement3D>
                <ModelUIElement3D.Model>
                    <GeometryModel3D>
                        <GeometryModel3D.Geometry>
                            <!--模型-->
                            <MeshGeometry3D Positions="0,0,0     3,0,0   3,1,0   0,1,0
                                                       3,0,-2   3,1,-2  0,1,-2  0,0,-2"
                                            TriangleIndices="0,1,3  3,1,2"/>
                        </GeometryModel3D.Geometry>
                        <!--材质-->
                        <GeometryModel3D.Material>
                            <DiffuseMaterial Brush="OrangeRed"/>
                        </GeometryModel3D.Material>
                    </GeometryModel3D>
                </ModelUIElement3D.Model>
            </ModelUIElement3D>

            <ModelUIElement3D>
                <ModelUIElement3D.Model>
                    <GeometryModel3D>
                        <GeometryModel3D.Geometry>
                            <!--模型-->
                            <MeshGeometry3D Positions="0,0,0     3,0,0   3,1,0   0,1,0
                                                       3,0,-2   3,1,-2  0,1,-2  0,0,-2"
                                            TriangleIndices="3,2,6  6,2,5
                                                             1,4,2 2,4,5 "/>
                        </GeometryModel3D.Geometry>
                        <!--材质-->
                        <GeometryModel3D.Material>
                            <DiffuseMaterial Brush="Orange"/>
                        </GeometryModel3D.Material>
                    </GeometryModel3D>
                </ModelUIElement3D.Model>
            </ModelUIElement3D>

            <ModelUIElement3D>
                <ModelUIElement3D.Model>
                    <GeometryModel3D>
                        <GeometryModel3D.Geometry>
                            <!--模型-->
                            <MeshGeometry3D Positions="0,0,0     3,0,0   3,1,0   0,1,0
                                                       3,0,-2   3,1,-2  0,1,-2  0,0,-2"
                                            TriangleIndices="1,4,2 2,4,5 "/>
                        </GeometryModel3D.Geometry>
                        <!--材质-->
                        <GeometryModel3D.Material>
                            <DiffuseMaterial Brush="Orchid"/>
                        </GeometryModel3D.Material>
                    </GeometryModel3D>
                </ModelUIElement3D.Model>
            </ModelUIElement3D>
        </Viewport3D>
    </Grid>
</Window>

 浙公网安备 33010602011771号