elasticsearch 和Ik 以及 logstash 同步数据库数据
前文章有提到如何安装es
ik是默认的中文分词是将每个字看成一个词,这显然是不符合要求的,所以我们需要安装中
文分词器来解决这个问题。
IK分词是一款国人开发的相对简单的中文分词器。虽然开发者自2012年之后就不在维护
了,但在工程应用中IK算是比较流行的一款!我们今天就介绍一下IK中文分词器的使用。
下面介绍安装ik插件和使用
下载ik压缩包地址https://files.cnblogs.com/files/blackCatFish/elasticsearch-analysis-ik-5.6.8(1).zip
(1)先将其解压,将解压后的elasticsearch文件夹重命名文件夹为ik
(2)将ik文件夹拷贝到elasticsearch/plugins 目录下。
(3)重新启动,即可加载IK分词器
IK提供了两个分词算法ik_smart 和 ik_max_word
其中 ik_smart 为最少切分,ik_max_word为最细粒度划分
我们分别来试一下
(1)最小切分:在浏览器地址栏输入地址http://99.47.133.165:9200/_analyze?analyzer=ik_smart&pretty=true&text=我是程序员
结果如下:
{
  "tokens" : [
    {
      "token" : "我",
      "start_offset" : 0,
      "end_offset" : 1,
      "type" : "CN_CHAR",
      "position" : 0
    },
    {
      "token" : "是",
      "start_offset" : 1,
      "end_offset" : 2,
      "type" : "CN_CHAR",
      "position" : 1
    },
    {
      "token" : "程序员",
      "start_offset" : 2,
      "end_offset" : 5,
      "type" : "CN_WORD",
      "position" : 2
    }
  ]
}
(2)最细切输入:http://99.47.133.165:9200/_analyze?analyzer=ikmax_word&pretty=true&text=我是程序员
结果:
{
  "tokens" : [
    {
      "token" : "我",
      "start_offset" : 0,
      "end_offset" : 1,
      "type" : "CN_CHAR",
      "position" : 0
    },
    {
      "token" : "是",
      "start_offset" : 1,
      "end_offset" : 2,
      "type" : "CN_CHAR",
      "position" : 1
    },
    {
      "token" : "程序员",
      "start_offset" : 2,
      "end_offset" : 5,
      "type" : "CN_WORD",
      "position" : 2
    },
    {
      "token" : "程序",
      "start_offset" : 2,
      "end_offset" : 4,
      "type" : "CN_WORD",
      "position" : 3
    },
    {
      "token" : "员",
      "start_offset" : 4,
      "end_offset" : 5,
      "type" : "CN_CHAR",
      "position" : 4
    }
  ]
}
可以自定义分词
默认的分词并没有识别“博客园”是一个词。如果我们想让系统识别“博客园”是一个
词,需要编辑自定义词库。
步骤:
(1)进入elasticsearch/plugins/ik/config目录
(2)新建一个my.dic文件,编辑内容:博客园
修改IKAnalyzer.cfg.xml(在ik/config目录下)
<properties>
<comment>IK Analyzer 扩展配置</comment>
<!‐‐用户可以在这里配置自己的扩展字典 ‐‐>
<entry key="ext_dict">my.dic</entry>
<!‐‐用户可以在这里配置自己的扩展停止词字典‐‐>
<entry key="ext_stopwords"></entry>
</properties>
重启测试分词即可
logstash同步数据库:
步骤下载logstash https://www.elastic.co/cn/downloads/logstash
2. 解压logstash
tar -zxvf logstash-6.6.0.tar.gz
3. 在logstash 目录创建 mysql 文件夹
[root@VM_0_17_centos logstash-6.6.0]# mkdir mysql
将数据库驱动放入这个文件夹下面
5. 在config 目录下创建 mysql.conf 文件
6. mysqltoes.conf 配置
input {
jdbc {
# mysql jdbc connection string to our backup databse 后面的test对应mysql中的test数据库
jdbc_connection_string =>"jdbc:mysql://99.47.133.166:3306/pmap?characterEncoding=UTF8"
# the user we wish to excute our statement as
jdbc_user => "root"
jdbc_password => "3edc$RFV5tgb"
# the path to our downloaded jdbc driver
jdbc_driver_library => "/usr/local/logstash-6.6.0/mysql/mysql-connector-java-5.1.44.jar"
# the name of the driver class for mysql
jdbc_driver_class => "com.mysql.jdbc.Driver"
jdbc_paging_enabled => "true"
jdbc_page_size => "50000"
#以下对应着要执行的sql的绝对路径。
statement => "SELECT id,title,comment,digest,cover,issueTime,isPublic,pubStatus FROM asset_article"
#定时字段 各字段含义(由左至右)分、时、天、月、年,全部为*默认含义为
#每分钟都更新
schedule => "* * * * *"
}
}
output {
elasticsearch {
#ESIP地址与端口
hosts => "99.47.133.165:9200"
#ES索引名称(自己定义的)
index => "asset_article"
#自增ID编号
document_id => "%{id}"
document_type => "article"
}
stdout {
#以JSON格式输出
codec => json_lines
}
}
7. 启动 logstash
前台启动:
[root@VM_0_17_centos bin]# ./logstash -f ../config/mysqltoes.conf
后台启动:
[root@VM_0_17_centos bin]# nohup ./logstash -f ../config/mysqltoes.conf >logstash.log &
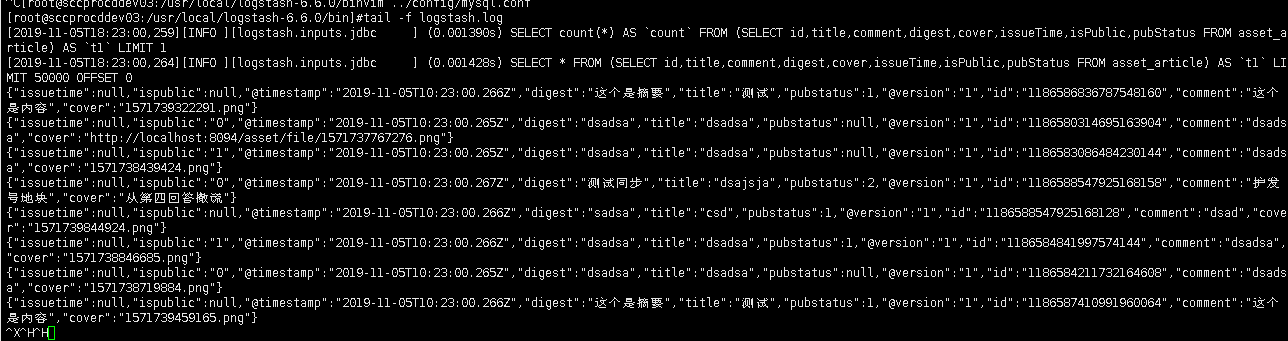
启动成功:
可以通过head chrome 插件查看数据是否是一分钟同步 插件如果不能直接拖入将cxr后缀改zip解压选择加载已解压的扩展程序即可


 浙公网安备 33010602011771号