
Openstack中keystone与外部LDAP Server的集成
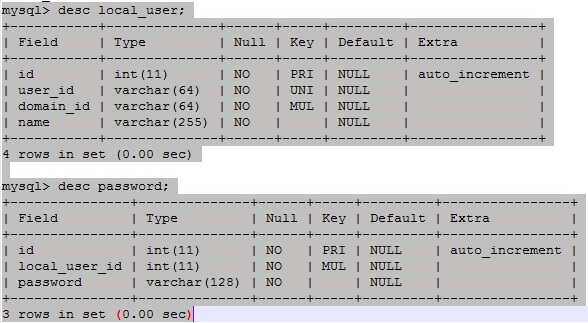
openstack中keystone鉴权的用户user和password信息,通常保存在mysql数据库的keystone库:
表local_user和表password:
keystone也支持外部LDAP Server提供用户鉴权信息,也就是所谓的domain-specific Identity:
Keystone supports the option (disabled by default) to specify identity driver (domain-specific Identity drivers) configurations on a domain by domain basis, allowing, for example, a specific domain to have its own LDAP or SQL server.
Domain-specific Identity configuration options can be stored in domain-specific configuration files, or in the Identity SQL database using API REST calls.
详情参见官网:
https://docs.openstack.org/keystone/rocky/admin/identity-domain-specific-config.html
https://docs.openstack.org/keystone/rocky/configuration.html (Configuring Keystone)
下面提供一个简单的例子,描述相关步骤和openstack的配置。
(参见https://docs.openstack.org/keystone/rocky/admin/identity-integrate-with-ldap.html [Integrate Identity with LDAP])
1)安装LDAP Server,如windows的活动目录服务(Active Directory) (可参考相关文档):
安装完后,创建一个用户和密码,提供相关信息以供openstack集成用:
++ url信息,例如ldap://10.168.120.120:389
++ user信息,例如CN=administrator,CN=users,DC=star,DC=com,以及密码
++ BaseDN信息,例如DC=star,DC=com
2)在openstack控制器中运行LDAP指令以验证与LDAP Server的连接,例如:
ldapsearch -x -h 10.168.120.120 -p 389 -D "CN=administrator,CN=users,DC=star,DC=com" -w password123 -b "DC=star,DC=com"
有正常的查询结果返回则说明openstack与LDAP Server连接成功了。
3)在openstack控制器上进行domain-specific configuration:
>> 3.1) 开启domain-specific drivers配置:
To enable domain-specific drivers, set these options in the /etc/keystone/keystone.conf file:
[identity]
domain_specific_drivers_enabled = True
domain_config_dir = /etc/keystone/domains
注:配置文件将保存在domain_config_dir指定的目录中,而且文件命名方式是keystone.<domain_name>.conf (<domain_name>将由openstack指令创建)
同时修改[assignment]的backend driver为sql:
[assignment]
driver = sql
(注:不知道是否与这段话相关:
Although keystone supports multiple LDAP backends via the above domain-specific configuration methods, it currently only supports one SQL backend. This could be either the default driver or a single domain-specific backend, perhaps for storing service users in a predominantly LDAP installation.)
>> 3.2) 创建保存config文件的目录:
root@server1:~# mkdir -p /etc/keystone/domains
root@server1:~# chown keystone /etc/keystone/domains
>> 3.3) openstack指令创建domain:
root@server1:~# openstack domain create star
+-------------+----------------------------------+
| Field | Value |
+-------------+----------------------------------+
| description | |
| enabled | True |
| id | 012df6be871c4b33949c50dc461a0751 |
| name | star |
+-------------+----------------------------------+
root@server1:~# openstack domain list
+----------------------------------+-------------+---------+--------------------+
| ID | Name | Enabled | Description |
+----------------------------------+------------+---------+--------------------+
| 012df6be871c4b33949c50dc461a0751 | star | True | |
| default | Default | True | The default domain |
+----------------------------------+---------+---------+--------------------+
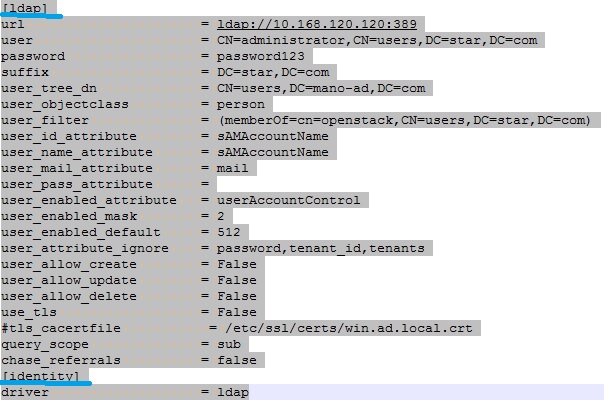
>> 3.4) 创建相应的domain driver文件:(内容可参考上面提及的"Integrate Identity with LDAP",或者keystone.conf的【ldap】, 文件名里的domain即是上一步创建的domain)
root@server1:/etc/keystone/domains# vi keystone.star.conf
例如:
4) 重启keystone服务,之后可以用指令看到新加的
5) 接下来可以进行验证:
>> 5.1) 在LDAP Server新加用户,并加入group openstack,例如test_user (密码password321);
>> 5.2) 该用户现在可以在openstack控制器中显示了:
root@server1:# openstack user list --domain star
+------------------------------------------------------------------+----------------------------------------------+
| ID | Name |
+------------------------------------------------------------------+-------------------------------------------------+
| f730d57dc79553aa5cf99b0c15b70283787f930d5b599c2385c5712cbcc11c46 | test_user |
+------------------------------------------------------------------+----------------------------------------------------+
>> 5.3) 给该user配置具有管理权限的role:
root@server1:~# openstack role add --project admin --user f730d57dc79553aa5cf99b0c15b70283787f930d5b599c2385c5712cbcc11c46 admin
>> 5.4) 建立一个该用户的source环境文件,包含如下关键信息:
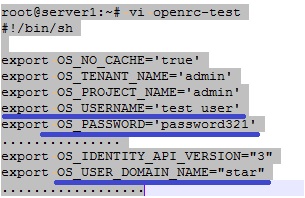
>> 5.5) 进入test_user的环境文件,可以正常运行openstack指令:
root@server1:~# source openrc-test
root@server1:~# nova list
注:一个相关的问题是id mapping,参见“Configuring Keystone”:
https://docs.openstack.org/keystone/rocky/configuration.html
Due to the need for user and group IDs to be unique across an OpenStack installation and for keystone to be able to deduce which domain and backend to use from just a user or group ID, it dynamically builds a persistent identity mapping table from a public ID to the actual domain, local ID (within that backend) and entity type.
相关数据保存在mysql的keystone库的id_mapping表里:
mysql> select* from id_mapping;
+-----------------------------------------------------------------------------------------------------------+-----------------------------------------------+----------+-------------+
| public_id | domain_id | local_id | entity_type |
+------------------------------------------------------------------------------------------------------------+-----------------------------------------------+----------+-------------+
| f730d57dc79553aa5cf99b0c15b70283787f930d5b599c2385c5712cbcc11c46 | 012df6be871c4b33949c50dc461a0751 | test_user | user |
| 967ecd62f1987b626476221d3beb051a72ed45c84324327ea82c58b887ce8953 | 012df6be871c4b33949c50dc461a0751 | test-ldap | user |
+------------------------------------------------------------------------------------------------------------+----------------------------------------------+----------+-------------+

 浙公网安备 33010602011771号