[译]Vulkan教程(31)加载模型
[译]Vulkan教程(31)加载模型
Loading models 加载模型
Introduction 入门
Your program is now ready to render textured 3D meshes, but the current geometry in the vertices and indices arrays is not very interesting yet. In this chapter we're going to extend the program to load the vertices and indices from an actual model file to make the graphics card actually do some work.
你的程序现在可以渲染有纹理的3D网格了,但是现在的几何体-在vertices 和indices数组中-不怎么有趣。本章里我们要扩展这个程序to加载顶点和索引-从一个实际的模型文件to让图形卡实际地做点工作。
Many graphics API tutorials have the reader write their own OBJ loader in a chapter like this. The problem with this is that any remotely interesting 3D application will soon require features that are not supported by this file format, like skeletal animation. We will load mesh data from an OBJ model in this chapter, but we'll focus more on integrating the mesh data with the program itself rather than the details of loading it from a file.
很多图形API教程让读者写自己的OBJECT加载器-在一章里-像本章这样。问题是,任何有趣的3D应用程序都会要求这个文件格式不支持的特性,例如骨骼动画。本章我们将从OBJECT模型加载网格数据,但是我们更多关注于集成网格数据到程序,而不是从文件加载数据的细节问题。
Library 库
We will use the tinyobjloader library to load vertices and faces from an OBJ file. It's fast and it's easy to integrate because it's a single file library like stb_image. Go to the repository linked above and download the tiny_obj_loader.h file to a folder in your library directory. Make sure to use the version of the file from the master branch because the latest official release is outdated.
我们将使用tinyobjloader 库to加载顶点和面-从OBJ文件。它很快,易于集成,因为它是个单文件库,像stb_image一样。打开上述链接,下载tiny_obj_loader.h 文件,保存到你的库文件夹。确保使用分支上的版本,因为最新的官方发布版已经过时了。
Visual Studio
Add the directory with tiny_obj_loader.h in it to the Additional Include Directories paths.
添加tiny_obj_loader.h 所在文件夹到Additional Include Directories 路径。

Makefile
Add the directory with tiny_obj_loader.h to the include directories for GCC:
添加tiny_obj_loader.h 所在文件夹到GCC的include文件夹:
VULKAN_SDK_PATH = /home/user/VulkanSDK/x.x.x.x/x86_64
STB_INCLUDE_PATH = /home/user/libraries/stb
TINYOBJ_INCLUDE_PATH = /home/user/libraries/tinyobjloader

...

CFLAGS = -std=c++17 -I$(VULKAN_SDK_PATH)/include -I$(STB_INCLUDE_PATH) -I$(TINYOBJ_INCLUDE_PATH)
Sample mesh
In this chapter we won't be enabling lighting yet, so it helps to use a sample model that has lighting baked into the texture. An easy way to find such models is to look for 3D scans on Sketchfab. Many of the models on that site are available in OBJ format with a permissive license.
本章里我们不会启用光照,所以使用一个sample模型that将光照烘培到纹理-是有益的。找这种模型的一个简单方式是在Sketchfab上查找3D模型。这个网站上许多模型都是Object格式的,且license比较宽松。
For this tutorial I've decided to go with the Chalet Hippolyte Chassande Baroz model by Escadrone. I tweaked the size and orientation of the model to use it as a drop in replacement for the current geometry:
本教程中我觉得使用Escadrone的模型Chalet Hippolyte Chassande Baroz。我修改了它的大小和朝向to使用它代替当前的几何体:
It has half a million triangles, so it's a nice benchmark for our application. Feel free to use your own model, but make sure that it only consists of one material and that is has dimensions of about 1.5 x 1.5 x 1.5 units. If it is larger than that, then you'll have to change the view matrix. Put the model file in a new models directory next to shaders and textures, and put the texture image in the textures directory.
它有50万个三角形,所以是个很好的测试平台。你可以随意使用你自己的模型,但确保它只包含1个材质,它的维度大概是1.5 x 1.5 x 1.5单位。如果太大,那么你就必须修改view矩阵。将模型文件放到新的models 文件夹,与shaders 和textures并列,将纹理图片放到textures 文件夹里。
Put two new configuration variables in your program to define the model and texture paths:
添加2个新的配置变量到你的程序to定义模型及其纹理路径:
const int WIDTH = 800;
const int HEIGHT = 600;

const std::string MODEL_PATH = "models/chalet.obj";
const std::string TEXTURE_PATH = "textures/chalet.jpg";
And update createTextureImage to use this path variable:
更新createTextureImage to使用这个变量:
stbi_uc* pixels = stbi_load(TEXTURE_PATH.c_str(), &texWidth, &texHeight, &texChannels, STBI_rgb_alpha);
Loading vertices and indices 加载顶点和索引
We're going to load the vertices and indices from the model file now, so you should remove the global vertices and indices arrays now. Replace them with non-const containers as class members:
我们要加载顶点和索引-从文件文件,所以你应当去掉全局的vertices和indices 数组了。用非常量容器的类成员替换它们:
std::vector<Vertex> vertices;
std::vector<uint32_t> indices;
VkBuffer vertexBuffer;
VkDeviceMemory vertexBufferMemory;
You should change the type of the indices from uint16_t to uint32_t, because there are going to be a lot more vertices than 65535. Remember to also change the vkCmdBindIndexBuffer parameter:
你应当修改索引的类型为uint32_t -从uint16_t ,因为顶点数会远超过65535。记住,也修改vkCmdBindIndexBuffer 参数:
vkCmdBindIndexBuffer(commandBuffers[i], indexBuffer, 0, VK_INDEX_TYPE_UINT32);
The tinyobjloader library is included in the same way as STB libraries. Include the tiny_obj_loader.h file and make sure to define TINYOBJLOADER_IMPLEMENTATION in one source file to include the function bodies and avoid linker errors:
tinyobjloader库的包含方式与STB库相同。包含tiny_obj_loader.h 文件,确保定义在一个源文件中定义TINYOBJLOADER_IMPLEMENTATION to包含函数体,避免链接错误:
#define TINYOBJLOADER_IMPLEMENTATION
#include <tiny_obj_loader.h>
We're now going to write a loadModel function that uses this library to populate the vertices and indices containers with the vertex data from the mesh. It should be called somewhere before the vertex and index buffers are created:
现在我们要写一个函数that使用这个库来用网格数据填入vertices 和indices容器。它应当在顶点和索引buffer被创建之前被调用:
void initVulkan() {
    ...
    loadModel();
    createVertexBuffer();
    createIndexBuffer();
    ...
}

...

void loadModel() {

}
A model is loaded into the library's data structures by calling the tinyobj::LoadObj function:
模型被加载到库的数据结构by调用tinyobj::LoadObj 函数:
void loadModel() {
    tinyobj::attrib_t attrib;
    std::vector<tinyobj::shape_t> shapes;
    std::vector<tinyobj::material_t> materials;
    std::string warn, err;

    if (!tinyobj::LoadObj(&attrib, &shapes, &materials, &warn, &err, MODEL_PATH.c_str())) {
        throw std::runtime_error(warn + err);
    }
}
An OBJ file consists of positions, normals, texture coordinates and faces. Faces consist of an arbitrary amount of vertices, where each vertex refers to a position, normal and/or texture coordinate by index. This makes it possible to not just reuse entire vertices, but also individual attributes.
一个OBJECT文件由位置、法线、纹理坐标和面组成。面由任意数量的顶点组成,where每个顶点指向一个位置、法线和/或纹理坐标by索引。这使得(不仅复用整个顶点,而且使用其独立的属性)成为可能。
The attrib container holds all of the positions, normals and texture coordinates in its attrib.vertices, attrib.normals and attrib.texcoords vectors. The shapes container contains all of the separate objects and their faces. Each face consists of an array of vertices, and each vertex contains the indices of the position, normal and texture coordinate attributes. OBJ models can also define a material and texture per face, but we will be ignoring those.
attrib 容器记录所有的位置、法线和文理坐标到attrib.vertices、attrib.normals 和attrib.texcoords 向量。shapes 容器包含所有的对象及其面。每个面由一组顶点组成,每个订单包含其位置、法线和文理坐标属性的索引。OBJ模型也可以为每个面定义一个材质和纹理,但我们会忽略这些。
The err string contains errors and the warn string contains warnings that occurred while loading the file, like a missing material definition. Loading only really failed if the LoadObj function returns false. As mentioned above, faces in OBJ files can actually contain an arbitrary number of vertices, whereas our application can only render triangles. Luckily the LoadObj has an optional parameter to automatically triangulate such faces, which is enabled by default.
err 字符串包含错误,warn 字符串包含警告that在加载文件时发生,例如丢失材质定义。只有在LoadObj 函数返回false的时候,加载才是真的失败了。如前所述,OBJ文件中的面可以包含任意数量的顶点,而我们的程序只能渲染三角形。幸运的是LoadObj 有个可选参数to自动地将面转换为三角形,默认是被启用的。
We're going to combine all of the faces in the file into a single model, so just iterate over all of the shapes:
我们要将文件中所有的面组合为一个单独的模型,所以枚举所有的形状:
for (const auto& shape : shapes) {

}
The triangulation feature has already made sure that there are three vertices per face, so we can now directly iterate over the vertices and dump them straight into our vertices vector:
三角化特性已经确保了每个面由3个顶点,所以我们现在可以直接每个每个顶点,将它们写入vertices 我们的向量:
for (const auto& shape : shapes) {
    for (const auto& index : shape.mesh.indices) {
        Vertex vertex = {};

        vertices.push_back(vertex);
        indices.push_back(indices.size());
    }
}
For simplicity, we will assume that every vertex is unique for now, hence the simple auto-increment indices. The index variable is of type tinyobj::index_t, which contains the vertex_index, normal_index and texcoord_index members. We need to use these indices to look up the actual vertex attributes in the attrib arrays:
为简单起见,我们假设各个顶点都是互不相同的,因此就简单地增长索引。index 变量是tinyobj::index_t类型,它包含vertex_index、normal_index 和texcoord_index 成员。我们需要使用这些索引来查询attrib数组中真正的顶点属性。
vertex.pos = {
    attrib.vertices[3 * index.vertex_index + 0],
    attrib.vertices[3 * index.vertex_index + 1],
    attrib.vertices[3 * index.vertex_index + 2]
};

vertex.texCoord = {
    attrib.texcoords[2 * index.texcoord_index + 0],
    attrib.texcoords[2 * index.texcoord_index + 1]
};

vertex.color = {1.0f, 1.0f, 1.0f};
Unfortunately the attrib.vertices array is an array of float values instead of something like glm::vec3, so you need to multiply the index by 3. Similarly, there are two texture coordinate components per entry. The offsets of 0, 1 and 2 are used to access the X, Y and Z components, or the U and V components in the case of texture coordinates.
不幸的是,attrib.vertices 数组是float 值,不是glm::vec3,所以你需要将索引乘以3。类似的,每个项有2个纹理坐标成员。0、1和2偏移量用于存取XYZ成员,或UV成员(当是纹理坐标的时候)。
Run your program now with optimization enabled (e.g. Release mode in Visual Studio and with the -O3compiler flag for GCC`). This is necessary, because otherwise loading the model will be very slow. You should see something like the following:
运行你的程序现在,启用优化(Visual Studio里使用Release 模式,GCC里使用-O3编译器标志)。这是有必要的,因为否则的话加载模型会很慢。你应当会看到如下图所示的内容:
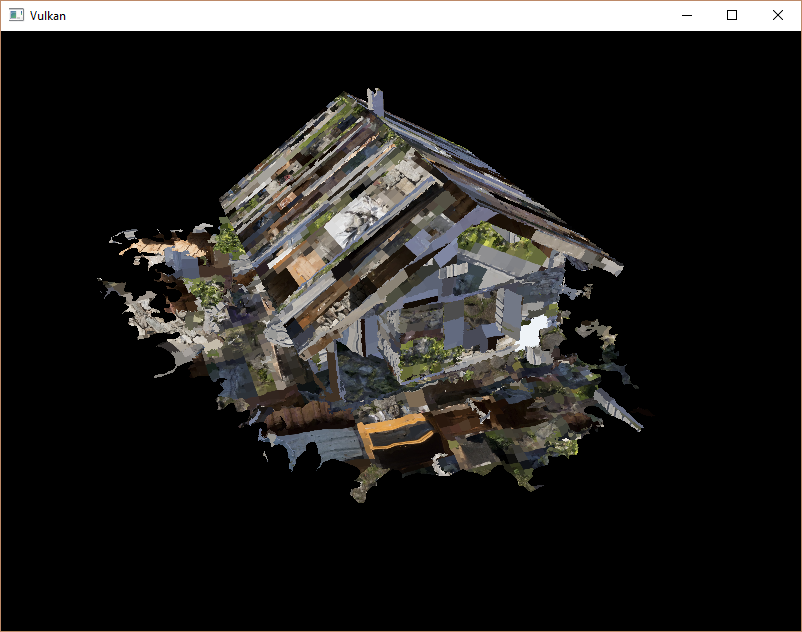
Great, the geometry looks correct, but what's going on with the texture? The OBJ format assumes a coordinate system where a vertical coordinate of 0 means the bottom of the image, however we've uploaded our image into Vulkan in a top to bottom orientation where 0 means the top of the image. Solve this by flipping the vertical component of the texture coordinates:
好棒,几何体看起来是对的,但是纹理在搞什么鬼?OBJ格式假设坐标系统的竖直坐标的0表示image的底部,但是我们加载image到Vulkan的时候是按从顶到底的顺序的,这样0就指的是image的顶部。通过翻转纹理坐标的竖直成员来解决这个问题:
vertex.texCoord = {
    attrib.texcoords[2 * index.texcoord_index + 0],
    1.0f - attrib.texcoords[2 * index.texcoord_index + 1]
};
When you run your program again, you should now see the correct result:
再次运行你的程序的时候,你就应当看到下图所示的正确结果了:

All that hard work is finally beginning to pay off with a demo like this!
有了这样的demo,所有的艰辛努力终于值了!
Vertex deduplication 顶点去重
Unfortunately we're not really taking advantage of the index buffer yet. The vertices vector contains a lot of duplicated vertex data, because many vertices are included in multiple triangles. We should keep only the unique vertices and use the index buffer to reuse them whenever they come up. A straightforward way to implement this is to use a map or unordered_map to keep track of the unique vertices and respective indices:
不幸的是,我们还没有利用起索引buffer来。vertices 向量包含很多重复的顶点数据,因为许多顶点都被包含在多个三角形中。我们应当只保留一个顶点,在它出现的时候用索引buffer复用它。一个直接的实现方式是,用map 或unordered_map 跟踪独立顶点及其索引:
 1 #include <unordered_map>
 2
 3 ...
 4
 5 std::unordered_map<Vertex, uint32_t> uniqueVertices = {};
 6
 7 for (const auto& shape : shapes) {
 8     for (const auto& index : shape.mesh.indices) {
 9         Vertex vertex = {};
10
11         ...
12
13         if (uniqueVertices.count(vertex) == 0) {
14             uniqueVertices[vertex] = static_cast<uint32_t>(vertices.size());
15             vertices.push_back(vertex);
16         }
17
18         indices.push_back(uniqueVertices[vertex]);
19     }
20 }
Every time we read a vertex from the OBJ file, we check if we've already seen a vertex with the exact same position and texture coordinates before. If not, we add it to vertices and store its index in the uniqueVertices container. After that we add the index of the new vertex to indices. If we've seen the exact same vertex before, then we look up its index in uniqueVertices and store that index in indices.
每次从OBJ文件读取一个顶点,我们检查是否已经有与它完全相同的位置和纹理坐标的顶点了。如果没有,我们添加它到vertices ,保存它的索引到uniqueVertices容器。之后,我们将新顶点的索引添加到indices。如果我们已经见过完全相同的顶点了,那么我们在uniqueVertices 中查询它的索引,将其保存到indices。
The program will fail to compile right now, because using a user-defined type like our Vertex struct as key in a hash table requires us to implement two functions: equality test and hash calculation. The former is easy to implement by overriding the == operator in the Vertex struct:
现在程序编译会失败,因为使用了一个用户定义的类型-像我们的Vertex 结构体一样-作为哈希表的key,这要求我们实现2个函数:相等测试和哈希计算。前者容易实现,只需覆盖Vertex 结构体的== 操作符:
bool operator==(const Vertex& other) const {
    return pos == other.pos && color == other.color && texCoord == other.texCoord;
}
A hash function for Vertex is implemented by specifying a template specialization for std::hash<T>. Hash functions are a complex topic, but cppreference.com recommends the following approach combining the fields of a struct to create a decent quality hash function:
Vertex 的哈希函数通过指定std::hash<T>模版的特例来实现。哈希函数是个复杂的话题但是cppreference.com推荐下述方法——组合结构体的字段to创建质量不错的哈希函数:
namespace std {
    template<> struct hash<Vertex> {
        size_t operator()(Vertex const& vertex) const {
            return ((hash<glm::vec3>()(vertex.pos) ^
                   (hash<glm::vec3>()(vertex.color) << 1)) >> 1) ^
                   (hash<glm::vec2>()(vertex.texCoord) << 1);
        }
    };
}
This code should be placed outside the Vertex struct. The hash functions for the GLM types need to be included using the following header:
这个代码应当置于Vertex 结构体外面。GLM类型的哈希函数需要通过下述宏定义包含进来:
#define GLM_ENABLE_EXPERIMENTAL
#include <glm/gtx/hash.hpp>
The hash functions are defined in the gtx folder, which means that it is technically still an experimental extension to GLM. Therefore you need to define GLM_ENABLE_EXPERIMENTAL to use it. It means that the API could change with a new version of GLM in the future, but in practice the API is very stable.
哈希函数在gtx 文件夹里定义,这意味着它仍旧是GLM的一个试验性扩展。因此你需要定义GLM_ENABLE_EXPERIMENTAL 来使用它。这意味着这个API可能随着新版本的GLM发生改变,但是一般这个API非常稳定。
You should now be able to successfully compile and run your program. If you check the size of vertices, then you'll see that it has shrunk down from 1,500,000 to 265,645! That means that each vertex is reused in an average number of ~6 triangles. This definitely saves us a lot of GPU memory.
你现在应该能成功地编译运行你的程序了。如果你检查vertices的大小,你会看到它从1,500,000缩减到265,645了!这意味着平均每个顶点被复用到了6个三角形上。这绝对节省了很多GPU内存。
C++ code / Vertex shader / Fragment shader

|
微信扫码,自愿捐赠。四海同道,共谱新篇。
微信捐赠不显示捐赠者个人信息,如需要,请注明联系方式。 |

 浙公网安备 33010602011771号