[译]Vulkan教程(30)深度缓存
[译]Vulkan教程(30)深度缓存
Depth buffering 深度缓存
Introduction 入门
The geometry we've worked with so far is projected into 3D, but it's still completely flat. In this chapter we're going to add a Z coordinate to the position to prepare for 3D meshes. We'll use this third coordinate to place a square over the current square to see a problem that arises when geometry is not sorted by depth.
我们使用的几何体是投影为三维图像的,但是它还是彻底平的。本章里我们要添加Z坐标到位置里,好使用3D网格。我们要用这第3个坐标来放置一个四边形到另一个四边形之上to看看当几何体不是按深度排序时出现的问题。
3D geometry 3D几何体
Change the Vertex struct to use a 3D vector for the position, and update the format in the corresponding VkVertexInputAttributeDescription:
修改Vertex 结构体to使用3D向量作位置,更新对应的VkVertexInputAttributeDescription中的format :
 1 struct Vertex {
 2     glm::vec3 pos;
 3     glm::vec3 color;
 4     glm::vec2 texCoord;
 5
 6     ...
 7
 8     static std::array<VkVertexInputAttributeDescription, 3> getAttributeDescriptions() {
 9         std::array<VkVertexInputAttributeDescription, 3> attributeDescriptions = {};
10
11         attributeDescriptions[0].binding = 0;
12         attributeDescriptions[0].location = 0;
13         attributeDescriptions[0].format = VK_FORMAT_R32G32B32_SFLOAT;
14         attributeDescriptions[0].offset = offsetof(Vertex, pos);
15
16         ...
17     }
18 };
Next, update the vertex shader to accept and transform 3D coordinates as input. Don't forget to recompile it afterwards!
接下来,更新顶点shader,接收和变换3D坐标作为输入。别忘了之后重新编译它!
layout(location = 0) in vec3 inPosition;

...

void main() {
    gl_Position = ubo.proj * ubo.view * ubo.model * vec4(inPosition, 1.0);
    fragColor = inColor;
    fragTexCoord = inTexCoord;
}
Lastly, update the vertices container to include Z coordinates:
最后,更新vertices 容器to包含Z坐标:
const std::vector<Vertex> vertices = {
    {{-0.5f, -0.5f, 0.0f}, {1.0f, 0.0f, 0.0f}, {0.0f, 0.0f}},
    {{0.5f, -0.5f, 0.0f}, {0.0f, 1.0f, 0.0f}, {1.0f, 0.0f}},
    {{0.5f, 0.5f, 0.0f}, {0.0f, 0.0f, 1.0f}, {1.0f, 1.0f}},
    {{-0.5f, 0.5f, 0.0f}, {1.0f, 1.0f, 1.0f}, {0.0f, 1.0f}}
};
If you run your application now, then you should see exactly the same result as before. It's time to add some extra geometry to make the scene more interesting, and to demonstrate the problem that we're going to tackle in this chapter. Duplicate the vertices to define positions for a square right under the current one like this:
如果你现在运行程序,那么你会看到和之前完全相同的结果。是时候添加额外的几何体to让场景更有趣了,而且也可以演示我们本章要解决的问题。复制顶点to定义位置for当前四边形正下方的四边形,像这样:

Use Z coordinates of -0.5f and add the appropriate indices for the extra square:
使Z坐标为-0.5f,添加合适的索引for新四边形:
const std::vector<Vertex> vertices = {
    {{-0.5f, -0.5f, 0.0f}, {1.0f, 0.0f, 0.0f}, {0.0f, 0.0f}},
    {{0.5f, -0.5f, 0.0f}, {0.0f, 1.0f, 0.0f}, {1.0f, 0.0f}},
    {{0.5f, 0.5f, 0.0f}, {0.0f, 0.0f, 1.0f}, {1.0f, 1.0f}},
    {{-0.5f, 0.5f, 0.0f}, {1.0f, 1.0f, 1.0f}, {0.0f, 1.0f}},

    {{-0.5f, -0.5f, -0.5f}, {1.0f, 0.0f, 0.0f}, {0.0f, 0.0f}},
    {{0.5f, -0.5f, -0.5f}, {0.0f, 1.0f, 0.0f}, {1.0f, 0.0f}},
    {{0.5f, 0.5f, -0.5f}, {0.0f, 0.0f, 1.0f}, {1.0f, 1.0f}},
    {{-0.5f, 0.5f, -0.5f}, {1.0f, 1.0f, 1.0f}, {0.0f, 1.0f}}
};

const std::vector<uint16_t> indices = {
    0, 1, 2, 2, 3, 0,
    4, 5, 6, 6, 7, 4
};
Run your program now and you'll see something resembling an Escher illustration:
运行你的程序现在,你会看到一幅埃舍尔插画:
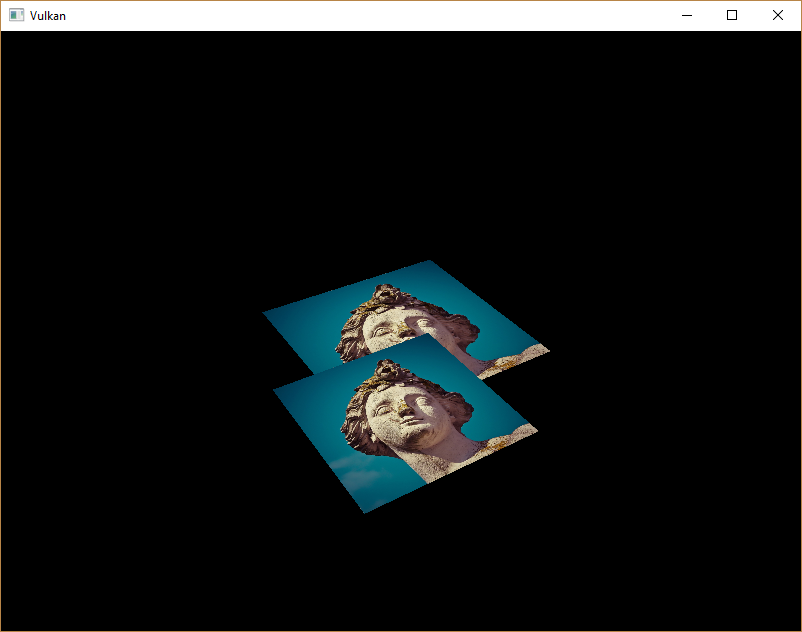
The problem is that the fragments of the lower square are drawn over the fragments of the upper square, simply because it comes later in the index array. There are two ways to solve this:
问题是,比较低的Fragment覆盖了比较靠上的四边形的片段,而这仅仅是因为它在索引数组中的位置靠后。有2个解决办法:
- Sort all of the draw calls by depth from back to front 根据深度值排列draw call
- Use depth testing with a depth buffer 用深度缓存作深度测试
The first approach is commonly used for drawing transparent objects, because order-independent transparency is a difficult challenge to solve. However, the problem of ordering fragments by depth is much more commonly solved using a depth buffer. A depth buffer is an additional attachment that stores the depth for every position, just like the color attachment stores the color of every position. Every time the rasterizer produces a fragment, the depth test will check if the new fragment is closer than the previous one. If it isn't, then the new fragment is discarded. A fragment that passes the depth test writes its own depth to the depth buffer. It is possible to manipulate this value from the fragment shader, just like you can manipulate the color output.
第1个方式常用语绘制透明物体,因为顺序无关的透明是个很艰巨的挑战。但是解决片段排序问题的更场景方法是使用深度缓存。深度缓存是一个额外的附件,它保持每个位置的深度,就像颜色附件保存每个位置的颜色一样。光栅化每次删除一个Fragment时,深度测试就会检查,十分新Fragment比之前的更接近摄像机。如果不是,那么新Fragment就会被忽略。通过了深度测试的Fragment会将自己的深度值写入深度缓存中。可以在Fragment shader中操纵这个值,就像你操作颜色输出一样。
#define GLM_FORCE_RADIANS
#define GLM_FORCE_DEPTH_ZERO_TO_ONE
#include <glm/glm.hpp>
#include <glm/gtc/matrix_transform.hpp>
The perspective projection matrix generated by GLM will use the OpenGL depth range of -1.0 to 1.0 by default. We need to configure it to use the Vulkan range of 0.0 to 1.0 using the GLM_FORCE_DEPTH_ZERO_TO_ONE definition.
GLM生成的透视矩阵默认会使用OpenGL深度范围-1.0到1.0。我们需要让它使用Vulkan的范围0.0到1.0 -通过GLM_FORCE_DEPTH_ZERO_TO_ONE 定义。
Depth image and view 深度image和视图
A depth attachment is based on an image, just like the color attachment. The difference is that the swap chain will not automatically create depth images for us. We only need a single depth image, because only one draw operation is running at once. The depth image will again require the trifecta of resources: image, memory and image view.
深度附件是基于image的,就像颜色附件一样。区别是,交换链不会自动为我们创建深度image。我们只需1个深度image,因为一次只会有1个绘制操作在运行。深度image会再次请求三连式资源:image、内存和image视图。
VkImage depthImage;
VkDeviceMemory depthImageMemory;
VkImageView depthImageView;
Create a new function createDepthResources to set up these resources:
创建新函数createDepthResources to设置这些资源:
void initVulkan() {
    ...
    createCommandPool();
    createDepthResources();
    createTextureImage();
    ...
}

...

void createDepthResources() {

}
Creating a depth image is fairly straightforward. It should have the same resolution as the color attachment, defined by the swap chain extent, an image usage appropriate for a depth attachment, optimal tiling and device local memory. The only question is: what is the right format for a depth image? The format must contain a depth component, indicated by _D??_ in the VK_FORMAT_.
创建深度image相当直观。它应当有:和颜色附件有相同的解析-由交换链extent定义,一个适合深度附件的image用法,和优化的tiling和设备逻辑内存。唯一的问题是:深度image的正确格式是什么?这个格式必须包含一个深度元素,由VK_FORMAT_中的_D??_表示。
Unlike the texture image, we don't necessarily need a specific format, because we won't be directly accessing the texels from the program. It just needs to have a reasonable accuracy, at least 24 bits is common in real-world applications. There are several formats that fit this requirement:
不像纹理image,我们不需要一个特定的格式,因为我们不会直接在程序中存取纹素。它只需有个合理的精确度,至少24位是实际应用程序的常见值。有这么几种格式适合这个需求:
VK_FORMAT_D32_SFLOAT: 32-bit float for depth 32位浮点数for深度VK_FORMAT_D32_SFLOAT_S8_UINT: 32-bit signed float for depth and 8 bit stencil component 32位有符号辐射度for深度,8位for模版VK_FORMAT_D24_UNORM_S8_UINT: 24-bit float for depth and 8 bit stencil component 24位浮点数for深度,8位for模版
The stencil component is used for stencil tests, which is an additional test that can be combined with depth testing. We'll look at this in a future chapter.
模版组件用于stencil tests,它是个额外的测试that可与深度测试组合使用。我们将在后续章节讨论它。
We could simply go for the VK_FORMAT_D32_SFLOAT format, because support for it is extremely common (see the hardware database), but it's nice to add some extra flexibility to our application where possible. We're going to write a function findSupportedFormat that takes a list of candidate formats in order from most desirable to least desirable, and checks which is the first one that is supported:
我们可以简单地使用VK_FORMAT_D32_SFLOAT 格式,因为对它的支持非常常见(参考硬件数据库),但是在可能的地方添加额外的扩展性到我们的app,是个好事。我们要写个函数findSupportedFormat that接收一系列候选格式-按从最需要的到最不需要的顺序排序,检查哪个是第一个受支持的:
VkFormat findSupportedFormat(const std::vector<VkFormat>& candidates, VkImageTiling tiling, VkFormatFeatureFlags features) {

}
The support of a format depends on the tiling mode and usage, so we must also include these as parameters. The support of a format can be queried using the vkGetPhysicalDeviceFormatProperties function:
对格式的支持取决于tiling模式和哟昂法,所以我们必须也包含进这些作为参数。对一个格式的支持可以通过vkGetPhysicalDeviceFormatProperties 函数查询:
for (VkFormat format : candidates) {
    VkFormatProperties props;
    vkGetPhysicalDeviceFormatProperties(physicalDevice, format, &props);
}
The VkFormatProperties struct contains three fields:
VkFormatProperties 结构体有3个字段:
linearTilingFeatures: Use cases that are supported with linear tiling 支持线性tilingoptimalTilingFeatures: Use cases that are supported with optimal tiling 支持最优tilingbufferFeatures: Use cases that are supported for buffers 支持buffer
Only the first two are relevant here, and the one we check depends on the tiling parameter of the function:
这里只有前2个有关系,我们基于函数的这2个tiling 参数进行检查:
if (tiling == VK_IMAGE_TILING_LINEAR && (props.linearTilingFeatures & features) == features) {
    return format;
} else if (tiling == VK_IMAGE_TILING_OPTIMAL && (props.optimalTilingFeatures & features) == features) {
    return format;
}
If none of the candidate formats support the desired usage, then we can either return a special value or simply throw an exception:
如果候选格式都不支持需要的用法,那么我们可以返回一个特殊值或简单地抛出异常:
VkFormat findSupportedFormat(const std::vector<VkFormat>& candidates, VkImageTiling tiling, VkFormatFeatureFlags features) {
    for (VkFormat format : candidates) {
        VkFormatProperties props;
        vkGetPhysicalDeviceFormatProperties(physicalDevice, format, &props);

        if (tiling == VK_IMAGE_TILING_LINEAR && (props.linearTilingFeatures & features) == features) {
            return format;
        } else if (tiling == VK_IMAGE_TILING_OPTIMAL && (props.optimalTilingFeatures & features) == features) {
            return format;
        }
    }

    throw std::runtime_error("failed to find supported format!");
}
We'll use this function now to create a findDepthFormat helper function to select a format with a depth component that supports usage as depth attachment:
我们现在要用这个函数创建一个辅助函数findDepthFormat 来选择格式with深度组件that支持用作深度附件的用法:
VkFormat findDepthFormat() {
    return findSupportedFormat(
        {VK_FORMAT_D32_SFLOAT, VK_FORMAT_D32_SFLOAT_S8_UINT, VK_FORMAT_D24_UNORM_S8_UINT},
        VK_IMAGE_TILING_OPTIMAL,
        VK_FORMAT_FEATURE_DEPTH_STENCIL_ATTACHMENT_BIT
    );
}
Make sure to use the VK_FORMAT_FEATURE_ flag instead of VK_IMAGE_USAGE_ in this case. All of these candidate formats contain a depth component, but the latter two also contain a stencil component. We won't be using that yet, but we do need to take that into account when performing layout transitions on images with these formats. Add a simple helper function that tells us if the chosen depth format contains a stencil component:
确保这里使用VK_FORMAT_FEATURE_ 标志,而不是VK_IMAGE_USAGE_ 。所有这些候选格式都包含深度成分,但是后2个也包含模版成分。我们暂时不会用它,但是我们需要在对image实施布局转换时考虑它们的存在。添加简单的辅助函数that告诉我们选择的深度格式是否包含模版成分:
bool hasStencilComponent(VkFormat format) {
    return format == VK_FORMAT_D32_SFLOAT_S8_UINT || format == VK_FORMAT_D24_UNORM_S8_UINT;
}
Call the function to find a depth format from createDepthResources:
调用这个函数to从createDepthResources找到一个深度格式:
VkFormat depthFormat = findDepthFormat();
We now have all the required information to invoke our createImage and createImageView helper functions:
我们现在有了所有需要的信息to调用我们的createImage 和createImageView 辅助函数:
createImage(swapChainExtent.width, swapChainExtent.height, depthFormat, VK_IMAGE_TILING_OPTIMAL, VK_IMAGE_USAGE_DEPTH_STENCIL_ATTACHMENT_BIT, VK_MEMORY_PROPERTY_DEVICE_LOCAL_BIT, depthImage, depthImageMemory);
depthImageView = createImageView(depthImage, depthFormat);
However, the createImageView function currently assumes that the subresource is always the VK_IMAGE_ASPECT_COLOR_BIT, so we will need to turn that field into a parameter:
但是,现在的createImageView 函数假设子资源总是VK_IMAGE_ASPECT_COLOR_BIT,所以我们需要将那个字段转换为参数:
VkImageView createImageView(VkImage image, VkFormat format, VkImageAspectFlags aspectFlags) {
    ...
    viewInfo.subresourceRange.aspectMask = aspectFlags;
    ...
}
Update all calls to this function to use the right aspect:
更新所有对此函数的调用:
swapChainImageViews[i] = createImageView(swapChainImages[i], swapChainImageFormat, VK_IMAGE_ASPECT_COLOR_BIT);
...
depthImageView = createImageView(depthImage, depthFormat, VK_IMAGE_ASPECT_DEPTH_BIT);
...
textureImageView = createImageView(textureImage, VK_FORMAT_R8G8B8A8_UNORM, VK_IMAGE_ASPECT_COLOR_BIT);
That's it for creating the depth image. We don't need to map it or copy another image to it, because we're going to clear it at the start of the render pass like the color attachment. However, it still needs to be transitioned to a layout that is suitable for depth attachment usage. We could do this in the render pass like the color attachment, but here I've chosen to use a pipeline barrier because the transition only needs to happen once:
创建深度image就这样完成了。我们不需要映射它或复制另一个image给它,因为我们要在render pass开始时清空它-像颜色附件一样。但是,它还是需要被转换到一个适合深度附件用法的布局。我们可以像颜色附件那样在render pass做这件事,但是这里我们选择用一个管道屏障,因为转换只需发生一次:
transitionImageLayout(depthImage, depthFormat, VK_IMAGE_LAYOUT_UNDEFINED, VK_IMAGE_LAYOUT_DEPTH_STENCIL_ATTACHMENT_OPTIMAL);
The undefined layout can be used as initial layout, because there are no existing depth image contents that matter. We need to update some of the logic in transitionImageLayout to use the right subresource aspect:
未定义的布局可以用作出师布局,因为没有有用的深度image内容。我们需要更新transitionImageLayout 中的一些逻辑to使用正确的子资源aspect:
if (newLayout == VK_IMAGE_LAYOUT_DEPTH_STENCIL_ATTACHMENT_OPTIMAL) {
    barrier.subresourceRange.aspectMask = VK_IMAGE_ASPECT_DEPTH_BIT;

    if (hasStencilComponent(format)) {
        barrier.subresourceRange.aspectMask |= VK_IMAGE_ASPECT_STENCIL_BIT;
    }
} else {
    barrier.subresourceRange.aspectMask = VK_IMAGE_ASPECT_COLOR_BIT;
}
Although we're not using the stencil component, we do need to include it in the layout transitions of the depth image.
尽管我们不使用模版成分,我们还是需要将它包含到深度image的布局变换中。
Finally, add the correct access masks and pipeline stages:
最后,添加正确的存取mask和管道阶段:
 1 if (oldLayout == VK_IMAGE_LAYOUT_UNDEFINED && newLayout == VK_IMAGE_LAYOUT_TRANSFER_DST_OPTIMAL) {
 2     barrier.srcAccessMask = 0;
 3     barrier.dstAccessMask = VK_ACCESS_TRANSFER_WRITE_BIT;
 4
 5     sourceStage = VK_PIPELINE_STAGE_TOP_OF_PIPE_BIT;
 6     destinationStage = VK_PIPELINE_STAGE_TRANSFER_BIT;
 7 } else if (oldLayout == VK_IMAGE_LAYOUT_TRANSFER_DST_OPTIMAL && newLayout == VK_IMAGE_LAYOUT_SHADER_READ_ONLY_OPTIMAL) {
 8     barrier.srcAccessMask = VK_ACCESS_TRANSFER_WRITE_BIT;
 9     barrier.dstAccessMask = VK_ACCESS_SHADER_READ_BIT;
10
11     sourceStage = VK_PIPELINE_STAGE_TRANSFER_BIT;
12     destinationStage = VK_PIPELINE_STAGE_FRAGMENT_SHADER_BIT;
13 } else if (oldLayout == VK_IMAGE_LAYOUT_UNDEFINED && newLayout == VK_IMAGE_LAYOUT_DEPTH_STENCIL_ATTACHMENT_OPTIMAL) {
14     barrier.srcAccessMask = 0;
15     barrier.dstAccessMask = VK_ACCESS_DEPTH_STENCIL_ATTACHMENT_READ_BIT | VK_ACCESS_DEPTH_STENCIL_ATTACHMENT_WRITE_BIT;
16
17     sourceStage = VK_PIPELINE_STAGE_TOP_OF_PIPE_BIT;
18     destinationStage = VK_PIPELINE_STAGE_EARLY_FRAGMENT_TESTS_BIT;
19 } else {
20     throw std::invalid_argument("unsupported layout transition!");
21 }
The depth buffer will be read from to perform depth tests to see if a fragment is visible, and will be written to when a new fragment is drawn. The reading happens in the VK_PIPELINE_STAGE_EARLY_FRAGMENT_TESTS_BIT stage and the writing in the VK_PIPELINE_STAGE_LATE_FRAGMENT_TESTS_BIT. You should pick the earliest pipeline stage that matches the specified operations, so that it is ready for usage as depth attachment when it needs to be.
深度缓存会被读取,以实施深度测试to看看Fragment是否可见,当新Fragment被绘制的时候,深度缓存也会被写入新值。读取发生在VK_PIPELINE_STAGE_EARLY_FRAGMENT_TESTS_BIT 阶段,写入发生在VK_PIPELINE_STAGE_LATE_FRAGMENT_TESTS_BIT阶段。你应当捡最早的管道阶段that匹配指定的操作,这样当需要的时候,它就准备好当作深度附件用了。
Render pass
We're now going to modify createRenderPass to include a depth attachment. First specify the VkAttachmentDescription:
我们现在要修改createRenderPass to包含深度附件。
VkAttachmentDescription depthAttachment = {};
depthAttachment.format = findDepthFormat();
depthAttachment.samples = VK_SAMPLE_COUNT_1_BIT;
depthAttachment.loadOp = VK_ATTACHMENT_LOAD_OP_CLEAR;
depthAttachment.storeOp = VK_ATTACHMENT_STORE_OP_DONT_CARE;
depthAttachment.stencilLoadOp = VK_ATTACHMENT_LOAD_OP_DONT_CARE;
depthAttachment.stencilStoreOp = VK_ATTACHMENT_STORE_OP_DONT_CARE;
depthAttachment.initialLayout = VK_IMAGE_LAYOUT_UNDEFINED;
depthAttachment.finalLayout = VK_IMAGE_LAYOUT_DEPTH_STENCIL_ATTACHMENT_OPTIMAL;
The format should be the same as the depth image itself. This time we don't care about storing the depth data (storeOp), because it will not be used after drawing has finished. This may allow the hardware to perform additional optimizations. Just like the color buffer, we don't care about the previous depth contents, so we can use VK_IMAGE_LAYOUT_UNDEFINED as initialLayout.
format 应当与深度image自己相同。这次我们不关心高层深度数据(storeOp),因为它不会在绘制结束后被使用。这可能允许硬件实施额外的优化。就像颜色buffer,WN不关心上一个深度内容,所以我们可以用VK_IMAGE_LAYOUT_UNDEFINED 作为initialLayout。
VkAttachmentReference depthAttachmentRef = {};
depthAttachmentRef.attachment = 1;
depthAttachmentRef.layout = VK_IMAGE_LAYOUT_DEPTH_STENCIL_ATTACHMENT_OPTIMAL;
Add a reference to the attachment for the first (and only) subpass:
添加对附件的引用for第一个(也是唯一一个)子pass:
VkSubpassDescription subpass = {};
subpass.pipelineBindPoint = VK_PIPELINE_BIND_POINT_GRAPHICS;
subpass.colorAttachmentCount = 1;
subpass.pColorAttachments = &colorAttachmentRef;
subpass.pDepthStencilAttachment = &depthAttachmentRef;
Unlike color attachments, a subpass can only use a single depth (+stencil) attachment. It wouldn't really make any sense to do depth tests on multiple buffers.
不像颜色附件,一个子pass只能使用一个深度(+模版)附件。在多个buffer上做深度测试是没有道理的。
std::array<VkAttachmentDescription, 2> attachments = {colorAttachment, depthAttachment};
VkRenderPassCreateInfo renderPassInfo = {};
renderPassInfo.sType = VK_STRUCTURE_TYPE_RENDER_PASS_CREATE_INFO;
renderPassInfo.attachmentCount = static_cast<uint32_t>(attachments.size());
renderPassInfo.pAttachments = attachments.data();
renderPassInfo.subpassCount = 1;
renderPassInfo.pSubpasses = &subpass;
renderPassInfo.dependencyCount = 1;
renderPassInfo.pDependencies = &dependency;
Finally, update the VkRenderPassCreateInfo struct to refer to both attachments.
最后,更新VkRenderPassCreateInfo 结构体to引用两个附件。
Framebuffer 帧缓存
The next step is to modify the framebuffer creation to bind the depth image to the depth attachment. Go to createFramebuffers and specify the depth image view as second attachment:
下一步是修改帧缓存创建过程to绑定深度image到深度附件。找到createFramebuffers ,指定深度image视图作为第二个附件。
std::array<VkImageView, 2> attachments = {
    swapChainImageViews[i],
    depthImageView
};

VkFramebufferCreateInfo framebufferInfo = {};
framebufferInfo.sType = VK_STRUCTURE_TYPE_FRAMEBUFFER_CREATE_INFO;
framebufferInfo.renderPass = renderPass;
framebufferInfo.attachmentCount = static_cast<uint32_t>(attachments.size());
framebufferInfo.pAttachments = attachments.data();
framebufferInfo.width = swapChainExtent.width;
framebufferInfo.height = swapChainExtent.height;
framebufferInfo.layers = 1;
The color attachment differs for every swap chain image, but the same depth image can be used by all of them because only a single subpass is running at the same time due to our semaphores.
颜色附件在交换链的每个image上都不同,但是同一个深度image可被它们共用,因为同一时间里只有1个子pass在运行-根据我们的信号。
You'll also need to move the call to createFramebuffers to make sure that it is called after the depth image view has actually been created:
你也需要去掉对createFramebuffers 的调用to确保它在深度image视图确实被创建后才被调用:
void initVulkan() {
    ...
    createDepthResources();
    createFramebuffers();
    ...
}
Clear values 清空值
Because we now have multiple attachments with VK_ATTACHMENT_LOAD_OP_CLEAR, we also need to specify multiple clear values. Go to createCommandBuffers and create an array of VkClearValue structs:
因为我们现在有多个VK_ATTACHMENT_LOAD_OP_CLEAR附件,我们也需要指定多个清空值。找到createCommandBuffers ,创建VkClearValue 结构体数组:
std::array<VkClearValue, 2> clearValues = {};
clearValues[0].color = {0.0f, 0.0f, 0.0f, 1.0f};
clearValues[1].depthStencil = {1.0f, 0};

renderPassInfo.clearValueCount = static_cast<uint32_t>(clearValues.size());
renderPassInfo.pClearValues = clearValues.data();
The range of depths in the depth buffer is 0.0 to 1.0 in Vulkan, where 1.0 lies at the far view plane and 0.0at the near view plane. The initial value at each point in the depth buffer should be the furthest possible depth, which is 1.0.
Vulkan中的深度buffer中的深度范围是0.0到1.0,其中1.0位于远平面,0.0位于近平面。深度buffer每个点上的初始值应当是可能的最远值,即1.0。
Note that the order of clearValues should be identical to the order of your attachments.
注意,的顺序应当与你的附件的顺序相同。
Depth and stencil state 深度和模版状态
The depth attachment is ready to be used now, but depth testing still needs to be enabled in the graphics pipeline. It is configured through the VkPipelineDepthStencilStateCreateInfo struct:
深度附件已经准备好被使用了,但是深度测试还需要在图形管道中启用。它通过VkPipelineDepthStencilStateCreateInfo 结构体配置:
VkPipelineDepthStencilStateCreateInfo depthStencil = {};
depthStencil.sType = VK_STRUCTURE_TYPE_PIPELINE_DEPTH_STENCIL_STATE_CREATE_INFO;
depthStencil.depthTestEnable = VK_TRUE;
depthStencil.depthWriteEnable = VK_TRUE;
The depthTestEnable field specifies if the depth of new fragments should be compared to the depth buffer to see if they should be discarded. The depthWriteEnable field specifies if the new depth of fragments that pass the depth test should actually be written to the depth buffer. This is useful for drawing transparent objects. They should be compared to the previously rendered opaque objects, but not cause further away transparent objects to not be drawn.
depthTestEnable 字段指定了新Fragment的深度应当与深度buffer比较to看看它是否应当被忽略。depthWriteEnable 字段指定了通过了深度测试的新Fragment的深度是否应当被写入深度buffer。这对于绘制透明物体是有用的。它们应当与已渲染的不透明物体比较,但是不应让更远处的对象不不会绘制。
depthStencil.depthCompareOp = VK_COMPARE_OP_LESS;
The depthCompareOp field specifies the comparison that is performed to keep or discard fragments. We're sticking to the convention of lower depth = closer, so the depth of new fragments should be less.
depthCompareOp 字段指定了要实施的比较方法to保持或忽略Fragment。我们使用习惯上的低深度=更近,所以新Fragment的深度应当是更小。
depthStencil.depthBoundsTestEnable = VK_FALSE;
depthStencil.minDepthBounds = 0.0f; // Optional
depthStencil.maxDepthBounds = 1.0f; // Optional
The depthBoundsTestEnable, minDepthBounds and maxDepthBounds fields are used for the optional depth bound test. Basically, this allows you to only keep fragments that fall within the specified depth range. We won't be using this functionality.
depthBoundsTestEnable、minDepthBounds 和maxDepthBounds 字段用于可选的深度边界测试。基本上,这允许你值保持落入指定深度范围的Fragment。我们不会使用这个功能。
depthStencil.stencilTestEnable = VK_FALSE;
depthStencil.front = {}; // Optional
depthStencil.back = {}; // Optional
The last three fields configure stencil buffer operations, which we also won't be using in this tutorial. If you want to use these operations, then you will have to make sure that the format of the depth/stencil image contains a stencil component.
最后3个字段配置模版buffer操作,本教程中我们不会使用这个功能。如果你想使用这些操作,那么你必须确保深度/模版image的格式包含一个模版成分。
pipelineInfo.pDepthStencilState = &depthStencil;
Update the VkGraphicsPipelineCreateInfo struct to reference the depth stencil state we just filled in. A depth stencil state must always be specified if the render pass contains a depth stencil attachment.
更新VkGraphicsPipelineCreateInfo 结构体to引用我们刚刚填入的深度模版状态。一个深度模版状态必须总数被指定-如果render pass包含一个深度模版附件。
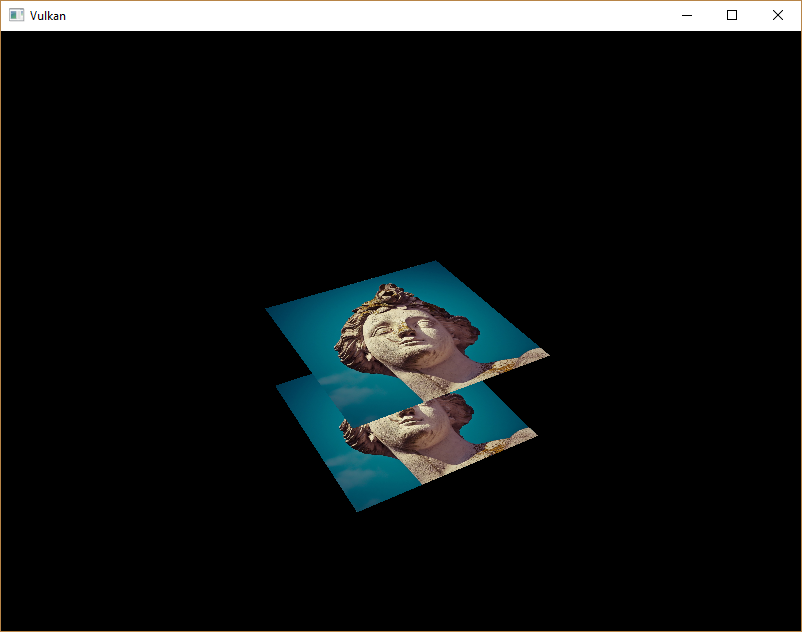
If you run your program now, then you should see that the fragments of the geometry are now correctly ordered:
如果现在你运行你的程序,那么你会看到几何体的Fragment现在正确地排序了:
Handling window resize 处理窗口resize
The resolution of the depth buffer should change when the window is resized to match the new color attachment resolution. Extend the recreateSwapChain function to recreate the depth resources in that case:
深度缓存的解析度应当改变when窗口resize了,以便与新颜色附件的解析度匹配。扩展recreateSwapChain 函数to重建深度资源:
void recreateSwapChain() {
    int width = 0, height = 0;
    while (width == 0 || height == 0) {
        glfwGetFramebufferSize(window, &width, &height);
        glfwWaitEvents();
    }

    vkDeviceWaitIdle(device);

    cleanupSwapChain();

    createSwapChain();
    createImageViews();
    createRenderPass();
    createGraphicsPipeline();
    createDepthResources();
    createFramebuffers();
    createUniformBuffers();
    createDescriptorPool();
    createDescriptorSets();
    createCommandBuffers();
}
The cleanup operations should happen in the swap chain cleanup function:
清理操作应当在交换链清理函数里发生:
void cleanupSwapChain() {
    vkDestroyImageView(device, depthImageView, nullptr);
    vkDestroyImage(device, depthImage, nullptr);
    vkFreeMemory(device, depthImageMemory, nullptr);

    ...
}
Congratulations, your application is now finally ready to render arbitrary 3D geometry and have it look right. We're going to try this out in the next chapter by drawing a textured model!
恭喜,你的app现在终于准备好渲染任何3D几何体并且看起来正确了。我们将在下一章试试绘制一个贴图的模型!
C++ code / Vertex shader / Fragment shader

|
微信扫码,自愿捐赠。四海同道,共谱新篇。
微信捐赠不显示捐赠者个人信息,如需要,请注明联系方式。 |

 浙公网安备 33010602011771号