[译]Vulkan教程(03)开发环境
[译]Vulkan教程(03)开发环境
这是我翻译(https://vulkan-tutorial.com)上的Vulkan教程的第3篇。
In this chapter we'll set up your environment for developing Vulkan applications and install some useful libraries. All of the tools we'll use, with the exception of the compiler, are compatible with Windows, Linux and MacOS, but the steps for installing them differ a bit, which is why they're described separately here.
本章我们将配置Vulkan开发环境,安装一些有用的库。我们使用的所有工具(编译器除外)都是在Windows、Linux和MacOS上兼容的,但是安装它们的步骤有点不同,所以我们分别描述之。
Windows
If you're developing for Windows, then I will assume that you are using Visual Studio 2017 to compile your code. You may also use Visual Studio 2013 or 2015, but the steps may be a bit different.
如果你在Windows上开发,那么我假设你在使用Visual studio 2017编译代码。你也可以用Visual Studio 2013或2015,只是步骤可能稍微有点不同。
Vulkan SDK
The most important component you'll need for developing Vulkan applications is the SDK. It includes the headers, standard validation layers, debugging tools and a loader for the Vulkan functions. The loader looks up the functions in the driver at runtime, similarly to GLEW for OpenGL - if you're familiar with that.
开发Vulkan应用程序所需的最重要的组件是SDK。它包含头文件,标准验证层,调试工具和Vulkan函数的加载器。加载器在在运行时查询driver中的函数,这与OpenGL的GLEW类似——如果你熟悉它的话。
The SDK can be downloaded from the LunarG website using the buttons at the bottom of the page. You don't have to create an account, but it will give you access to some additional documentation that may be useful to you.
SDK可以从LunarG 网站下载,按钮就在页面下边。你不用创建账户,但有了账户你可以得到一些对你有用的额外文档。

Proceed through the installation and pay attention to the install location of the SDK. The first thing we'll do is verify that your graphics card and driver properly support Vulkan. Go to the directory where you installed the SDK, open the Bin directory and run the cube.exe demo. You should see the following:
安装SDK,注意一下安装的位置。首先我们要验证你的图形卡和driver是否支持Vulkan。进入你安装SDK的文件夹,打开Bin 文件夹,运行cube.exe 示例。你应该会看到如下内容:
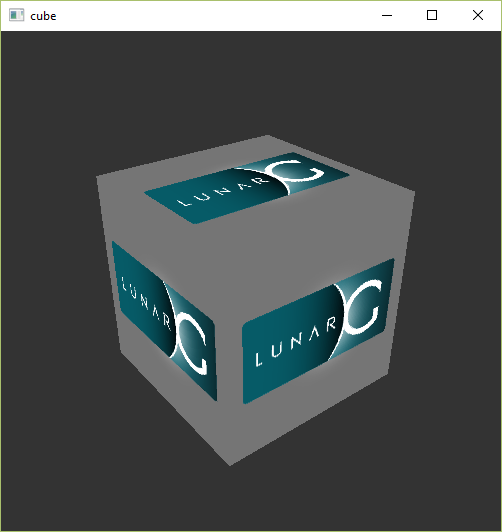
If you receive an error message then ensure that your drivers are up-to-date, include the Vulkan runtime and that your graphics card is supported. See the introduction chapter for links to drivers from the major vendors.
如果你看到错误信息,那么确保你的driver已经更新到最新版本,有Vulkan运行时,且你的图形卡被Vulkan支持。在introduction chapter入门章节有链接,可以查看主要厂商的driver。
There is another program in this directory that will be useful for development. The glslangValidator.exeprogram will be used to compile shaders from the human-readable GLSL to bytecode. We'll cover this in depth in the shader modules chapter. The Bin directory also contains the binaries of the Vulkan loader and the validation layers, while the Lib directory contains the libraries.
这个目录里还有一个有用的程序。程序glslangValidator.exe会被用于编译shader,将人类可读的GLSL 转换为字节码。我们将在shader modules 章节细说。文件夹Bin 还有Vulkan加载器和验证层的二进制文件,而文件夹Lib 包含一些库。
The Doc directory contains useful information about the Vulkan SDK and an offline version of the entire Vulkan specification. Lastly, there's the Include directory that contains the Vulkan headers. Feel free to explore the other files, but we won't need them for this tutorial.
文件夹Doc 包含Vulkan SDK的有用信息,还有一个离线版本的Vulkan说明书。文件夹Include 包含Vulkan头文件。你可以自由探索这些文件,但是本教程中就不谈它们了。
GLFW
As mentioned before, Vulkan by itself is a platform agnostic API and does not include tools for creating a window to display the rendered results. To benefit from the cross-platform advantages of Vulkan and to avoid the horrors of Win32, we'll use the GLFW library to create a window, which supports Windows, Linux and MacOS. There are other libraries available for this purpose, like SDL, but the advantage of GLFW is that it also abstracts away some of the other platform-specific things in Vulkan besides just window creation.
如前所述,Vulkan是个平台不可知论的API,它没有创建窗口的工具。为了享受Vulkan的好处,也为了避免Win32的恐怖,我们将使用GLFW library来创建窗口,它支持Windows、Linux和MacOS。还有其他的库也能做到这一点,例如SDL,但是GLFW的优势是,它也抽象了Vulkan中一些除创建窗口外的其它跨平台的东西。
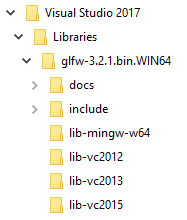
You can find the latest release of GLFW on the official website. In this tutorial we'll be using the 64-bit binaries, but you can of course also choose to build in 32 bit mode. In that case make sure to link with the Vulkan SDK binaries in the Lib32 directory instead of Lib. After downloading it, extract the archive to a convenient location. I've chosen to create a Libraries directory in the Visual Studio directory under documents. Don't worry about there not being a libvc-2017 folder, the libvc-2015 one is compatible.
你可以在官网official website上找到最新的GLFW。本教程中我们将使用64位二进制文件,但是你当然可以选择构建一个32位的。如果那样,确保链接到Vulkan SDK的文件夹Lib32 ,而不是Lib。下载之后,将其解压缩到一个合适的位置。我选择了在Visual Studio文件夹下创建一个Libraries 文件夹。如果没有文件夹libvc-2017 ,别担心,文件夹libvc-2015 也是与之兼容的。
GLM
Unlike DirectX 12, Vulkan does not include a library for linear algebra operations, so we'll have to download one. GLM is a nice library that is designed for use with graphics APIs and is also commonly used with OpenGL.
不像DirectX 12,Vulkan没有用于线性代数操作的库,所以我们不得不下载一个。GLM 是一个为图形API设计的库,广泛用于OpenGL中。
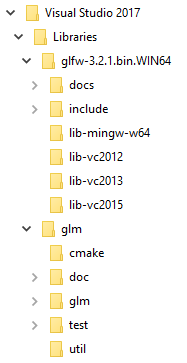
GLM is a header-only library, so just download the latest version and store it in a convenient location. You should have a directory structure similar to the following now:
GLM是个只有头文件的库,所以下载最新版保存到合适的位置上。你应该会看到类似这样的目录结构:
Setting up Visual Studio 配置VS
Now that you've installed all of the dependencies we can set up a basic Visual Studio project for Vulkan and write a little bit of code to make sure that everything works.
既然你已经安装了所有的依赖库,我们可以为Vulkan配置Visual Studio项目了。我们还将写一点点代码来确保一切能正常工作。
Start Visual Studio and create a new Windows Desktop Wizard project by entering a name and pressing OK.
启动Visual Studio,创建新Windows Desktop Wizard 项目,输入项目名,点击OK。

Make sure that Console Application (.exe) is selected as application type so that we have a place to print debug messages to, and check Empty Project to prevent Visual Studio from adding boilerplate code.
确保选中Console Application (.exe)为应用程序类型,这样我们就有一个地方可以打印调试信息,勾选Empty Project 以避免Visual Studio添加样板代码。

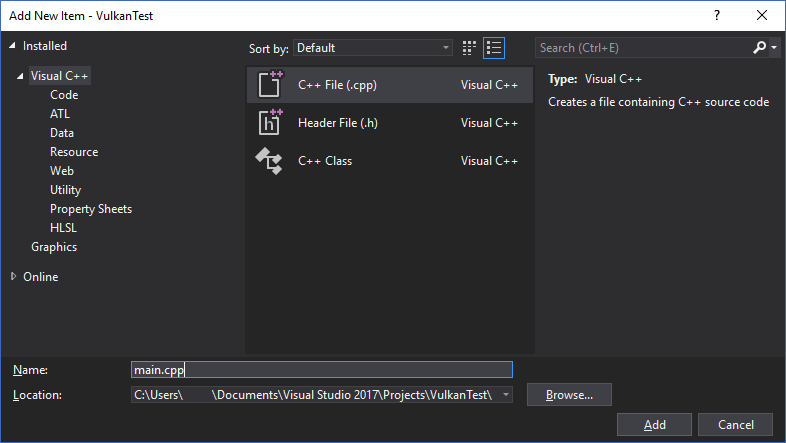
Press OK to create the project and add a C++ source file. You should already know how to do that, but the steps are included here for completeness.
点击OK ,创建项目和一个C++源代码文件。你应该已经知道如何做了,但这里为了完整起见,都陈列出来了。

Now add the following code to the file. Don't worry about trying to understand it right now; we're just making sure that you can compile and run Vulkan applications. We'll start from scratch in the next chapter.
现在在文件中添加下述代码。别担心,现在不理解代码也没关系,我们只是为了确保你能编译和运行Vulkan应用程序。下一章我们将从零开始(写代码)。
 1 #define GLFW_INCLUDE_VULKAN
 2 #include <GLFW/glfw3.h>
 3
 4 #define GLM_FORCE_RADIANS
 5 #define GLM_FORCE_DEPTH_ZERO_TO_ONE
 6 #include <glm/vec4.hpp>
 7 #include <glm/mat4x4.hpp>
 8
 9 #include <iostream>
10
11 int main() {
12     glfwInit();
13
14     glfwWindowHint(GLFW_CLIENT_API, GLFW_NO_API);
15     GLFWwindow* window = glfwCreateWindow(800, 600, "Vulkan window", nullptr, nullptr);
16
17     uint32_t extensionCount = 0;
18     vkEnumerateInstanceExtensionProperties(nullptr, &extensionCount, nullptr);
19
20     std::cout << extensionCount << " extensions supported" << std::endl;
21
22     glm::mat4 matrix;
23     glm::vec4 vec;
24     auto test = matrix * vec;
25
26     while(!glfwWindowShouldClose(window)) {
27         glfwPollEvents();
28     }
29
30     glfwDestroyWindow(window);
31
32     glfwTerminate();
33
34     return 0;
35 }
Let's now configure the project to get rid of the errors. Open the project properties dialog and ensure that All Configurations is selected, because most of the settings apply to both Debug and Release mode.
现在我们来配置项目,以搞定这些错误。打开项目属性对话框,确保选中All Configurations ,因为大部分配置都同时应用到Debug 和Release 模式。


Go to C++ -> General -> Additional Include Directories and press <Edit...> in the dropdown box.
选择C++ -> General -> Additional Include Directories ,点击下拉框的<Edit...>。
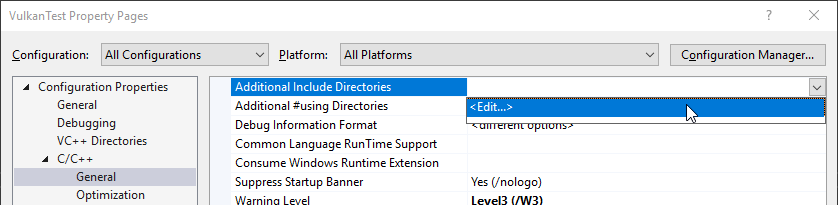
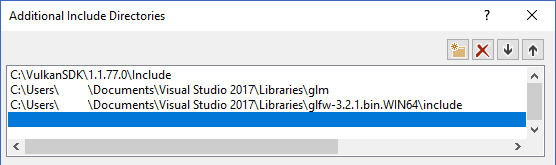
Add the header directories for Vulkan, GLFW and GLM:
添加头文件夹(Vulkan、GLFW和GLM):
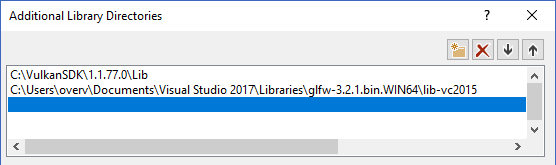
Next, open the editor for library directories under Linker -> General:
下一步,打开Linker -> General下的库文件夹编辑器:

And add the locations of the object files for Vulkan and GLFW:
添加Vulkan和GLFW的对象文件的位置:
Go to Linker -> Input and press <Edit...> in the Additional Dependencies dropdown box.
选择Linker -> Input ,点击Additional Dependencies 下拉框的<Edit...>:
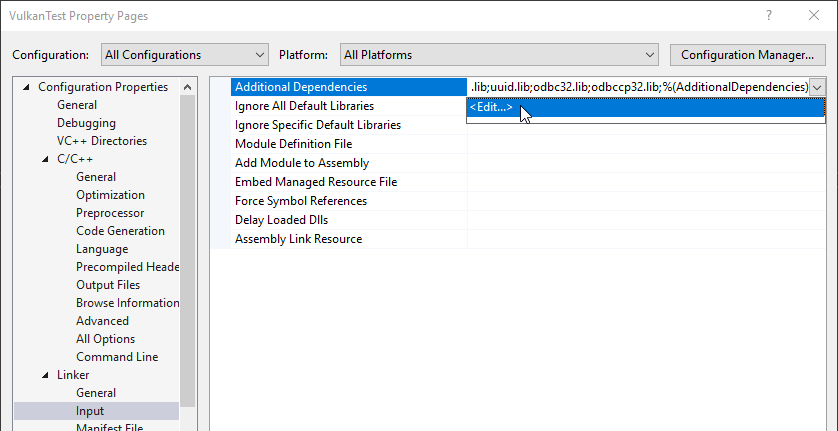
Enter the names of the Vulkan and GLFW object files:
输入Vulkan和GLFW对象文件的名字:

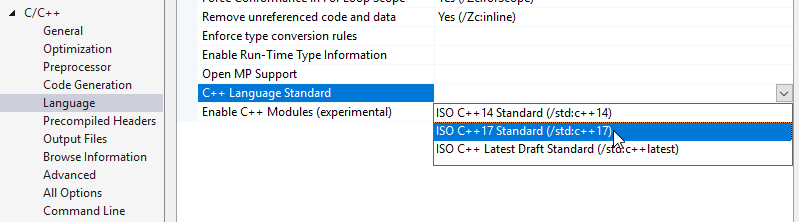
And finally change the compiler to support C++17 features:
最后修改编译器以支持C++17特性:
You can now close the project properties dialog. If you did everything right then you should no longer see any more errors being highlighted in the code.
现在你可以关闭项目属性对话框。如果你一切都做对了,那么你应该不会再看到代码中有高亮的错误。
Finally, ensure that you are actually compiling in 64 bit mode:
最后,确保你在64位模式下编译:

Press F5 to compile and run the project and you should see a command prompt and a window pop up like this:
点击F5 来编译和运行项目,你应该会看到一个命令行和一个窗口弹出来:

The number of extensions should be non-zero. Congratulations, you're all set for playing with Vulkan!
扩展数量应该为非零数字。恭喜,你已经准备好玩Vulkan了!
Linux
These instructions will be aimed at Ubuntu users, but you may be able to follow along by compiling the LunarG SDK yourself and changing the apt commands to the package manager commands that are appropriate for you. You should already have a version of GCC installed that supports modern C++ (4.8 or later). You also need both CMake and make.
下述教程是给Ubuntu用户的,但是你可以自己编译LunarG SDK,从apt命令跳转到适合你的包管理器命令,这样也可以使用下面的教程。你应该已经有一版支持C++(4.8或更高)的GCC安装好了。你还需要CMake和make。
Vulkan SDK
The most important component you'll need for developing Vulkan applications is the SDK. It includes the headers, standard validation layers, debugging tools and a loader for the Vulkan functions. The loader looks up the functions in the driver at runtime, similarly to GLEW for OpenGL - if you're familiar with that.
开发Vulkan应用程序所需的最重要的组件是SDK。它包含头文件,标准验证层,调试工具和Vulkan函数的加载器。加载器在在运行时查询driver中的函数,这与OpenGL的GLEW类似——如果你熟悉它的话。
The SDK can be downloaded from the LunarG website using the buttons at the bottom of the page. You don't have to create an account, but it will give you access to some additional documentation that may be useful to you.
SDK可以从LunarG 网站下载,按钮就在页面下边。你不用创建账户,但有了账户你可以得到一些对你有用的额外文档。

Open a terminal in the directory where you've downloaded the .tar.gz archive and extract it:
打开终端,跳到你下载.tar.gz 压缩包的文件夹下,解压缩它:
tar -xzf vulkansdk-linux-x86_64-xxx.tar.gz
It will extract all of the files in the SDK to a subdirectory with the SDK version as name in the working directory. Move the directory to a convenient place and take note of its path. Open a terminal in the root directory of the SDK, which will contain files like build_examples.sh.
它会将SDK的所有文件解压到子文件夹下,以SDK版本为文件夹名。将这个文件夹移动到方便的地方,注意它的路径。打开终端,在SDK的根文件夹下,会包含文件build_examples.sh。
The samples in the SDK and one of the libraries that you will later use for your program depend on the XCB library. This is a C library that is used to interface with the X Window System. It can be installed in Ubuntu from the libxcb1-dev package. You also need the generic X development files that come with the xorg-dev package.
SDK中的示例,和你稍后会用到的一个库,依赖于XCB库。这是一个用于与X窗口系统交互的C库。在Ubuntu中它可以用libxcb1-dev 包下载。你还需要随xorg-dev 包的通用X开发文件。
sudo apt install libxcb1-dev xorg-dev
You can now build the Vulkan examples in the SDK by running:
现在你可以编译SDK中的Vulkan示例了:
./build_examples.sh
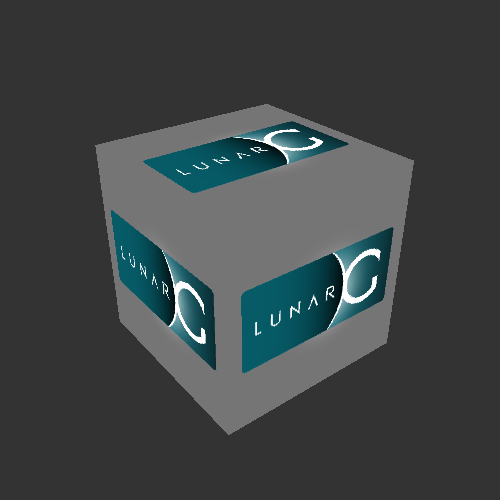
If compilation was successful, then you should now have a ./examples/build/vkcube executable. Run it from the examples/build directory with ./vkcube and ensure that you see the following pop up in a window:
如果编译成功,那么你现在应该有一个可执行的./examples/build/vkcube 文件。从examples/build 文件夹,用./vkcube运行它,确保你看到下述弹出窗口:
If you receive an error message then ensure that your drivers are up-to-date, include the Vulkan runtime and that your graphics card is supported. See the introduction chapter for links to drivers from the major vendors.
如果你看到错误信息,那么确保你的driver已经更新到最新版本,有Vulkan运行时,且你的图形卡被Vulkan支持。在introduction chapter入门章节有链接,可以查看主要厂商的driver。
GLFW
As mentioned before, Vulkan by itself is a platform agnostic API and does not include tools for creation a window to display the rendered results. To benefit from the cross-platform advantages of Vulkan and to avoid the horrors of X11, we'll use the GLFW library to create a window, which supports Windows, Linux and MacOS. There are other libraries available for this purpose, like SDL, but the advantage of GLFW is that it also abstracts away some of the other platform-specific things in Vulkan besides just window creation.
如前所述,Vulkan是个平台不可知论的API,它没有创建窗口的工具。为了享受Vulkan的好处,也为了避免X11的恐怖,我们将使用GLFW library来创建窗口,它支持Windows、Linux和MacOS。还有其他的库也能做到这一点,例如SDL,但是GLFW的优势是,它也抽象了Vulkan中一些除创建窗口外的其它跨平台的东西。
We'll be installing GLFW from source instead of using a package, because the Vulkan support requires a recent version. You can find the sources on the official website. Extract the source code to a convenient directory and open a terminal in the directory with files like CMakeLists.txt.
我们不用包来安装GLWF,而是从源代码安装它,因为Vulkan需要最近的版本。你可以在官网official website上找到源代码。解压缩源代码到方便的文件夹,打开终端,找到有CMakeLists.txt的文件夹。
Run the following commands to generate a makefile and compile GLFW:
运行下述命令,生成makefile,编译GLFW:
1 cmake .
2 make
You may see a warning stating Could NOT find Vulkan, but you can safely ignore this message. If compilation was successful, then you can install GLFW into the system libraries by running:
你可能看到一个警告说“Could NOT find Vulkan”(无法找到Vulkan),但是你可以安全地忽略这个消息。如果编译成功,那么你可以安装GLFW到系统库:
sudo make install
GLM
Unlike DirectX 12, Vulkan does not include a library for linear algebra operations, so we'll have to download one. GLM is a nice library that is designed for use with graphics APIs and is also commonly used with OpenGL.
不像DirectX 12,Vulkan没有用于线性代数操作的库,所以我们不得不下载一个。GLM 是一个为图形API设计的库,广泛用于OpenGL中。
It is a header-only library that can be installed from the libglm-dev package:
它是只有头文件的库,可以从libglm-dev 包安装:
sudo apt install libglm-dev
Setting up a makefile project 配置makefile项目
Now that you have installed all of the dependencies, we can set up a basic makefile project for Vulkan and write a little bit of code to make sure that everything works.
既然你已经安装了所有的依赖,我们可以设置一个基础的Vulkan的makefile项目,写一小点代码来确保一切能顺利工作。
Create a new directory at a convenient location with a name like VulkanTest. Create a source file called main.cppand insert the following code. Don't worry about trying to understand it right now; we're just making sure that you can compile and run Vulkan applications. We'll start from scratch in the next chapter.
在合适的位置创建一个新文件夹,起名VulkanTest之类的都可以。创建一个源代码文件,命名为main.cpp,插入下述代码。别担心,现在不用理解这些代码,我们只是要确保你能编译和运行Vulkan应用程序。下一章我们将从零开始(写代码)。
 1 #define GLFW_INCLUDE_VULKAN
 2 #include <GLFW/glfw3.h>
 3
 4 #define GLM_FORCE_RADIANS
 5 #define GLM_FORCE_DEPTH_ZERO_TO_ONE
 6 #include <glm/vec4.hpp>
 7 #include <glm/mat4x4.hpp>
 8
 9 #include <iostream>
10
11 int main() {
12     glfwInit();
13
14     glfwWindowHint(GLFW_CLIENT_API, GLFW_NO_API);
15     GLFWwindow* window = glfwCreateWindow(800, 600, "Vulkan window", nullptr, nullptr);
16
17     uint32_t extensionCount = 0;
18     vkEnumerateInstanceExtensionProperties(nullptr, &extensionCount, nullptr);
19
20     std::cout << extensionCount << " extensions supported" << std::endl;
21
22     glm::mat4 matrix;
23     glm::vec4 vec;
24     auto test = matrix * vec;
25
26     while(!glfwWindowShouldClose(window)) {
27         glfwPollEvents();
28     }
29
30     glfwDestroyWindow(window);
31
32     glfwTerminate();
33
34     return 0;
35 }
Next, we'll write a makefile to compile and run this basic Vulkan code. Create a new empty file called Makefile. I will assume that you already have some basic experience with makefiles, like how variables and rules work. If not, you can get up to speed very quickly with this tutorial.
下一步,我们将写一个makefile来编译和运行这个基础的Vulkan代码。创建一个新的空文件,命名为Makefile。我假设你已经对makefile有一些了解,例如变量和规则是如何工作的。如果没有,这个教程可以让你很快上手。
We'll first define a couple of variables to simplify the remainder of the file. Define a VULKAN_SDK_PATH variable that refers to the location of the x86_64 directory in the LunarG SDK, for example:
我们先来定义几个变量来简化文件。例如,定义VULKAN_SDK_PATH 变量,指向LunarG SDK的x86_64 文件夹的位置:
VULKAN_SDK_PATH = /home/user/VulkanSDK/x.x.x.x/x86_64
Make sure to replace user with your own username and x.x.x.x with the right version. Next, define a CFLAGSvariable that will specify the basic compiler flags:
确保替换user 为你自己的用户名,替换x.x.x.x为正确的版本号。下一步,定义CFLAGS变量,标识基础编译器标志:
CFLAGS = -std=c++17 -I$(VULKAN_SDK_PATH)/include
We're going to use modern C++ (-std=c++17), and we need to be able to locate vulkan.h in the LunarG SDK.
我们计划使用现代C++(-std=c++17),我们需要能够定位LunarG SDK中的vulkan.h文件。
Similarly, define the linker flags in a LDFLAGS variable:
相似的,定义LDFLAGS 变量,表示链接标志:
LDFLAGS = -L$(VULKAN_SDK_PATH)/lib `pkg-config --static --libs glfw3` -lvulkan
The first flag specifies that we want to be able to find libraries like libvulkan.so in the LunarG SDK's x86_64/libdirectory. The second component invokes pkg-config to automatically retrieve all of the linker flags necessary to build an application with GLFW. Finally, -lvulkan links with the Vulkan function loader that comes with the LunarG SDK.
第一个标志说明,我们想要在LunarG SDK的x86_64/lib文件夹下找到libvulkan.so 这样的库。第二个组件调用pkg-config ,来自动地检索所有需要用于和GLFW一起编译成应用程序的链接标志。
Specifying the rule to compile VulkanTest is straightforward now. Make sure to use tabs for indentation instead of spaces.
编写编译VulkanTest 的规则就很直截了当了。确保使用tab键来缩进,不要用空格。
1 VulkanTest: main.cpp
2     g++ $(CFLAGS) -o VulkanTest main.cpp $(LDFLAGS)
Verify that this rule works by saving the makefile and running make in the directory with main.cpp and Makefile. This should result in a VulkanTest executable.
保存这个makefile文件,在此文件夹下,配合main.cpp 和Makefile,运行make命令,以验证这个规则是否正常工作。这应该会产生一个VulkanTest 可执行文件。
We'll now define two more rules, test and clean, where the former will run the executable and the latter will remove a built executable:
现在我们再定义2个规则,test 和clean。前者会运行可执行文件,后者会清除已编译的可执行文件。
1 .PHONY: test clean
2
3 test: VulkanTest
4     ./VulkanTest
5
6 clean:
7     rm -f VulkanTest
You will find that make clean works perfectly fine, but make test will most likely fail with the following error message:
你将发现make clean 工作得很好,但是make test 很可能失败,并提供下述错误消息:
./VulkanTest: error while loading shared libraries: libvulkan.so.1: cannot open shared object file: No such file or directory
That's because libvulkan.so is not installed as system library. To alleviate this problem, explicitly specify the library loading path using the LD_LIBRARY_PATH environment variable:
这是因为libvulkan.so没有被安装为系统库。为缓解这个问题,用环境变量LD_LIBRARY_PATH显式地声明这个库的加载路径:
1 test: VulkanTest
2     LD_LIBRARY_PATH=$(VULKAN_SDK_PATH)/lib ./VulkanTest
The program should now run successfully, and display the number of Vulkan extensions. The application should exit with the success return code (0) when you close the empty window. However, there is one more variable that you need to set. We will start using validation layers in Vulkan and you need to tell the Vulkan library where to load these from using the VK_LAYER_PATH variable:
现在程序应该能成功运行了,显示出Vulkan扩展的数量。当你关闭空窗口时,这个应用程序应该退出并返回代码(0)。但是,你还需要设置一个变量。我们将开始在Vulkan中使用验证层,你需要用VK_LAYER_PATH变量告诉Vulkan库去哪儿加载这些:
1 test: VulkanTest
2     LD_LIBRARY_PATH=$(VULKAN_SDK_PATH)/lib VK_LAYER_PATH=$(VULKAN_SDK_PATH)/etc/vulkan/explicit_layer.d ./VulkanTest
You should now have a complete makefile that resembles the following:
现在你应该有一个完整的makefile了,其内容如下:
 1 VULKAN_SDK_PATH = /home/user/VulkanSDK/x.x.x.x/x86_64
 2
 3 CFLAGS = -std=c++17 -I$(VULKAN_SDK_PATH)/include
 4 LDFLAGS = -L$(VULKAN_SDK_PATH)/lib `pkg-config --static --libs glfw3` -lvulkan
 5
 6 VulkanTest: main.cpp
 7     g++ $(CFLAGS) -o VulkanTest main.cpp $(LDFLAGS)
 8
 9 .PHONY: test clean
10
11 test: VulkanTest
12     LD_LIBRARY_PATH=$(VULKAN_SDK_PATH)/lib VK_LAYER_PATH=$(VULKAN_SDK_PATH)/etc/vulkan/explicit_layer.d ./VulkanTest
13
14 clean:
15     rm -f VulkanTest
You can now use this directory as a template for your Vulkan projects. Make a copy, rename it to something like HelloTriangle and remove all of the code in main.cpp.
现在你可以将此文件夹作为你的Vulkan项目的模板了。复制一份,重命名为HelloTriangle 之类,删掉main.cpp中所有代码。
Before we move on, let's explore the Vulkan SDK a bit more. There is another program in it that will be very useful for development. The x86_64/bin/glslangValidator program will be used to compile shaders from the human-readable GLSL to bytecode. We'll cover this in depth in the shader modules chapter.
继续之前,我们来探索一下Vulkan SDK。有一个程序会很有用。程序x86_64/bin/glslangValidator 会被用于将shader从人类可读的GLSL 编译为字节码。我们将在shader modules 章节细说。
The Doc directory contains useful information about the Vulkan SDK and an offline version of the entire Vulkan specification. Feel free to explore the other files, but we won't need them for this tutorial.
文件夹Doc 包含Vulkan SDK的有用信息,还有一个离线版本的Vulkan说明书。你可以自由探索这些文件,但是本教程中就不谈它们了。
You are now all set for the real adventure.
你已经准备好开启真正的探险了。
MacOS
These instructions will assume you are using Xcode and the Homebrew package manager. Also, keep in mind that you will need at least MacOS version 10.11, and your device needs to support the Metal API.
本段教程将假设你在使用Xcode和Homebrew package manager。另外,记住你将需要最新的MacOS版本10.11,且你的设备需要支持Metal API。
Vulkan SDK
The most important component you'll need for developing Vulkan applications is the SDK. It includes the headers, standard validation layers, debugging tools and a loader for the Vulkan functions. The loader looks up the functions in the driver at runtime, similarly to GLEW for OpenGL - if you're familiar with that.
开发Vulkan应用程序所需的最重要的组件是SDK。它包含头文件,标准验证层,调试工具和Vulkan函数的加载器。加载器在在运行时查询driver中的函数,这与OpenGL的GLEW类似——如果你熟悉它的话。
The SDK can be downloaded from the LunarG website using the buttons at the bottom of the page. You don't have to create an account, but it will give you access to some additional documentation that may be useful to you.
SDK可以从LunarG 网站下载,按钮就在页面下边。你不用创建账户,但有了账户你可以得到一些对你有用的额外文档。

The SDK version for MacOS internally uses MoltenVK. There is no native support for Vulkan on MacOS, so what MoltenVK does is actually act as a layer that translates Vulkan API calls to Apple's Metal graphics framework. With this you can take advantage of debugging and performance benefits of Apple's Metal framework.
实际上MacOS的SDK版本使用MoltenVK。MacOS没有对Vulkan的本地支持,所以MoltenVK实际上是在将Vulkan API调用翻译到Apple的Metal图形框架。藉此,你可以利用Apple的Metal框架的调试和性能优势。
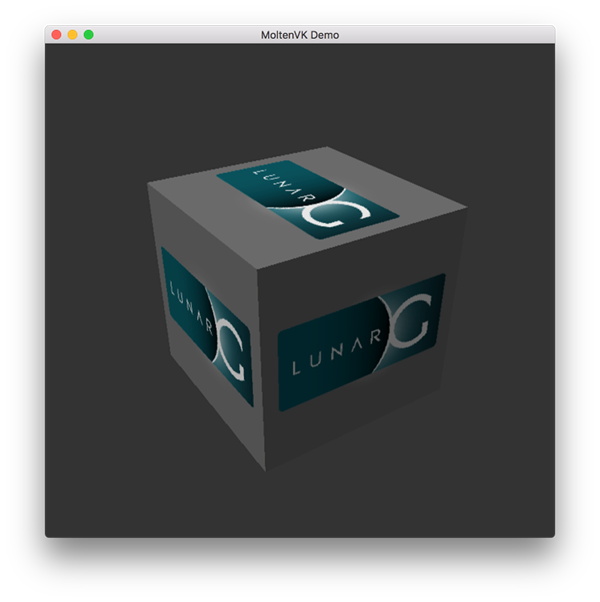
After downloading it, simply extract the contents to a folder of your choice (keep in mind you will need to reference it when creating your projects on Xcode). Inside the extracted folder, in the Applications folder you should have some executable files that will run a few demos using the SDK. Run the cube executable and you will see the following:
下载后,解压缩到一个合适的文件夹(记住你会在用Xcode创建项目的时候引用它)。在解压的文件夹内,在Applications 文件夹内,你应该有一些可执行文件,它们是使用SDK的示例。运行cube文件,你将看到如下画面:
GLFW
As mentioned before, Vulkan by itself is a platform agnostic API and does not include tools for creation a window to display the rendered results. We'll use the GLFW library to create a window, which supports Windows, Linux and MacOS. There are other libraries available for this purpose, like SDL, but the advantage of GLFW is that it also abstracts away some of the other platform-specific things in Vulkan besides just window creation.
如前所述,Vulkan是个平台不可知论的API,它没有创建窗口的工具。我们将使用GLFW library来创建窗口,它支持Windows、Linux和MacOS。还有其他的库也能做到这一点,例如SDL,但是GLFW的优势是,它也抽象了Vulkan中一些除创建窗口外的其它跨平台的东西。
To install GLFW on MacOS we will use the Homebrew package manager. Vulkan support for MacOS is still not fully available on the current (at the time of this writing) stable version 3.2.1. Therefore we will install the latest version of the glfw3 package using:
我们将用Homebrew包管理器来在MacOS上安装GLFW。Vulkan对MacOS的支持还不完全,写作本教程时的版本是3.2.1。因此我们将安装最新的glfw3 包:
brew install glfw3 --HEAD
GLM
Vulkan does not include a library for linear algebra operations, so we'll have to download one. GLM is a nice library that is designed for use with graphics APIs and is also commonly used with OpenGL.
Vulkan没有用于线性代数操作的库,所以我们不得不下载一个。GLM 是一个为图形API设计的库,广泛用于OpenGL中。
It is a header-only library that can be installed from the glm package:
它是只有头文件的库,可以从glm 包安装:
brew install glm
Setting up Xcode 配置Xcode
Now that all the dependencies are installed we can set up a basic Xcode project for Vulkan. Most of the instructions here are essentially a lot of "plumbing" so we can get all the dependencies linked to the project. Also, keep in mind that during the following instructions whenever we mention the folder vulkansdk we are refering to the folder where you extracted the Vulkan SDK.
既然你已经安装了所有的依赖,我们可以设置一个基础的Vulkan的Xcode项目。这里大多数指导本质上都是很多“管道”,所以我们可以让所有依赖链接到这个项目。另外,记住下述指导中,无论何时我们提到vulkansdk 文件夹,我们知道是你解压缩Vulkan SDK的文件夹。
Start Xcode and create a new Xcode project. On the window that will open select Application > Command Line Tool.
启动Xcode,创建一个新的Xcode项目。在窗口上选择Application > Command Line Tool。

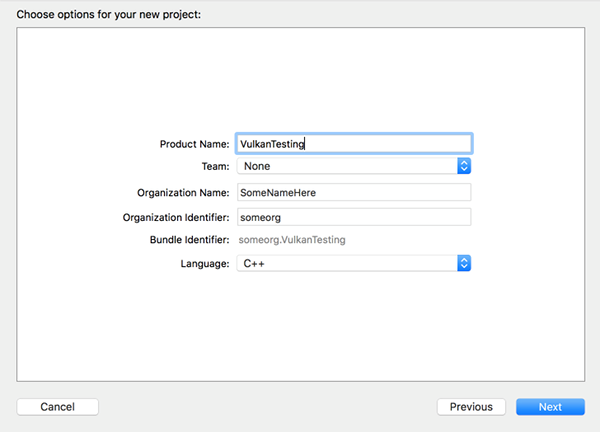
Select Next, write a name for the project and for Language select C++.
选择Next,输入一个项目名,Language 选择C++。
Press Next and the project should have been created. Now, let's change the code in the generated main.cpp file to the following code:
点击Next ,项目就应该创建出来了。现在,让我们在生成的main.cpp 文件中修改代码为如下所示:
 1 #define GLFW_INCLUDE_VULKAN
 2 #include <GLFW/glfw3.h>
 3
 4 #define GLM_FORCE_RADIANS
 5 #define GLM_FORCE_DEPTH_ZERO_TO_ONE
 6 #include <glm/vec4.hpp>
 7 #include <glm/mat4x4.hpp>
 8
 9 #include <iostream>
10
11 int main() {
12     glfwInit();
13
14     glfwWindowHint(GLFW_CLIENT_API, GLFW_NO_API);
15     GLFWwindow* window = glfwCreateWindow(800, 600, "Vulkan window", nullptr, nullptr);
16
17     uint32_t extensionCount = 0;
18     vkEnumerateInstanceExtensionProperties(nullptr, &extensionCount, nullptr);
19
20     std::cout << extensionCount << " extensions supported" << std::endl;
21
22     glm::mat4 matrix;
23     glm::vec4 vec;
24     auto test = matrix * vec;
25
26     while(!glfwWindowShouldClose(window)) {
27         glfwPollEvents();
28     }
29
30     glfwDestroyWindow(window);
31
32     glfwTerminate();
33
34     return 0;
35 }
Keep in mind you are not required to understand all this code is doing yet, we are just setting up some API calls to make sure everything is working.
记住,你现在还不需要理解这些代码,我们只是要设置一些API调用来确保一切工作正常。
Xcode should already be showing some errors such as libraries it cannot find. We will now start configuring the project to get rid of those errors. On the Project Navigator panel select your project. Open the Build Settings tab and then:
- Find the Header Search Paths field and add a link to
/usr/local/include(this is where Homebrew installs headers, so the glm and glfw3 header files should be there) and a link tovulkansdk/macOS/includefor the Vulkan headers. - Find the Library Search Paths field and add a link to
/usr/local/lib(again, this is where Homebrew installs libraries, so the glm and glfw3 lib files should be there) and a link tovulkansdk/macOS/lib.
Xcode应该已经显示一些错误,例如库没有找到。我们现在将开始配置项目来搞定这些错误。在Project Navigator 面板选择你的项目,打开Build Settings 选项卡,然后:
- 找到字段Header Search Paths ,添加链接到/usr/local/include(这是Homebrew安装头文件的位置,所以glm和glfw3的头文件应该在这里)和vulkansdk/macOS/include(这是关于Vulkan头文件的)。
- 找到字段Library Search Paths ,添加链接到/usr/local/lib(这是Homebrew安装库的位置,所以glm和glfw3的lib文件应该在这里)和vulkansdk/macOS/lib。
It should look like so (obviously, paths will be different depending on where you placed on your files):
这应该看起来是这样的(显然,基于你放置文件的位置,路径会有所不同):

Now, in the Build Phases tab, on Link Binary With Libraries we will add both the glfw3 and the vulkanframeworks. To make things easier we will be adding he dynamic libraries in the project (you can check the documentation of these libraries if you want to use the static frameworks).
- For glfw open the folder
/usr/local/liband there you will find a file name likelibglfw.3.x.dylib("x" is the library's version number, it might be different depending on when you downloaded the package from Homebrew). Simply drag that file to the Linked Frameworks and Libraries tab on Xcode. - For vulkan, go to
vulkansdk/macOS/lib. Do the same for the file both fileslibvulkan.1.dylibandlibvulkan.1.x.xx.dylib(where "x" will be the version number of the the SDK you downloaded).
现在,在Build Phases 选项卡,在Link Binary With Libraries 上,我们添加glfw3 和vulkan框架。为了让事情简单点,我们将动态库添加到项目里(如果你想用静态框架,你可以查看这些库的文档)。
- 对于glfw,打开文件夹/usr/local/lib,你会发现一个文件libglfw.3.x.dylib("x"是库的版本号,基于你从Homebrew下载的包,这个版本号可能不同)。拖拽这个文件到Xcode的Linked Frameworks和Libraries选项卡。
- 对于Vulkan,打开文件夹vulkansdk/macOS/lib。对文件libvulkan.1.dylib 和libvulkan.1.x.xx.dylib (其中"x"是你下载的SDK的版本号)做上述相同的拖拽操作。
After adding those libraries, in the same tab on Copy Files change Destination to "Frameworks", clear the subpath and deselect "Copy only when installing". Click on the "+" sign and add all those three frameworks here as well.
添加了这些库后,在这个tab选项卡里的Copy Files 上,将Destination 修改为"Frameworks",清空subpath,取消选择"Copy only when installing"。点击"+"符号,添加所有这3个框架。
Your Xcode configuration should look like:
你的Xcode配置应该如下图所示:

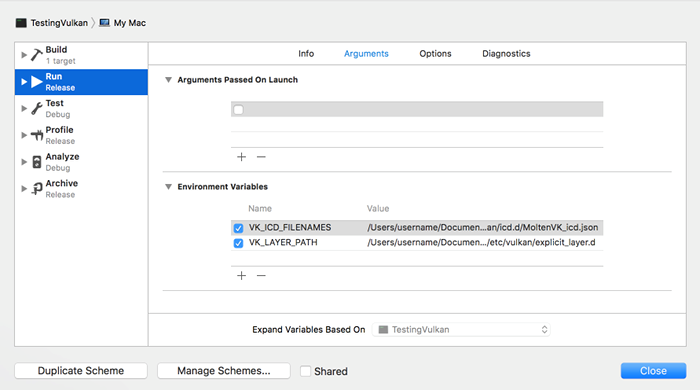
The last thing you need to setup are a couple of environment variables. On Xcode toolbar go to Product > Scheme> Edit Scheme..., and in the Arguments tab add the two following environment variables:
- VK_ICD_FILENAMES =
vulkansdk/macOS/etc/vulkan/icd.d/MoltenVK_icd.json - VK_LAYER_PATH =
vulkansdk/macOS/etc/vulkan/explicit_layer.d
最后一件事,你要设置几个环境变量。在Xcode工具栏,选择Product > Scheme> Edit Scheme...,,在Arguments 选项卡添加2个环境变量,如下所示:
- VK_ICD_FILENAMES = vulkansdk/macOS/etc/vulkan/icd.d/MoltenVK_icd.json
- VK_LAYER_PATH = vulkansdk/macOS/etc/vulkan/explicit_layer.d
It should look like so:
这应该如下图所示:
Finally, you should be all set! Now if you run the project (remembering to setting the build configuration to Debug or Release depending on the configuration you chose) you should see the following:
最后,大功告成!现在如果你运行项目(记得根据你选择配置来选择Debug或Release),你应该看到下图所示的画面:
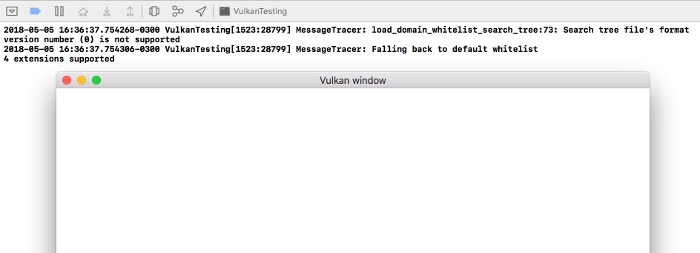
The number of extensions should be non-zero. The other logs are from the libraries, you might get different messages from those depending on your configuration.
扩展的数目应该是非零的。其他的日志来自库,根据你的配置不同,你可能得到不同的消息。
You are now all set for the real thing.
你已准备就绪,可以开始真家伙了。
- Previous上一章
- Next下一章

|
微信扫码,自愿捐赠。四海同道,共谱新篇。
微信捐赠不显示捐赠者个人信息,如需要,请注明联系方式。 |

 浙公网安备 33010602011771号