CSharpGL(39)GLSL光照示例:鼠标拖动太阳(光源)观察平行光的漫反射和镜面反射效果
CSharpGL(39)GLSL光照示例:鼠标拖动太阳(光源)观察平行光的漫反射和镜面反射效果
开始
一图抵千言。首先来看鼠标拖动太阳(光源)的情形。

然后是鼠标拖拽旋转模型的情形。
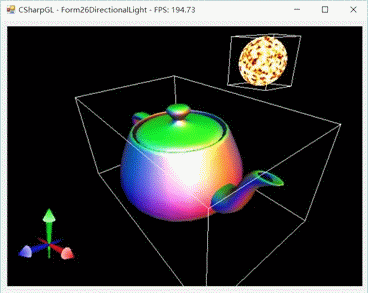
然后我们移动摄像机来从不同的角度看看。

现在太阳(光源)跑到比较远的位置去了,我们再移动它试试看。

本文就介绍平行光下是如何实现漫反射和镜面反射的。
本文shader核心部分来自红宝书第八版。
光照
只需记住一点,用GLSL实现光照效果时,都是根据顶点的位置、法线方向、光源位置(方向)、摄像机位置等等这些数据,根据物理学的反射规则计算出来的。当然,为了兼顾效果和效率,可能会对物理规则做一些简化处理。
Vertex shader
先看vertex shader。除了传递顶点的位置、颜色外,这里新增了传递法线(normal)的代码。顶点的变换可以通过mvp矩阵完成,而法线的变换则有所不同(说来话长,这里不要深究),所以单独提供一个normalMatrix供法线使用。
 1 #version 330 core
 2
 3 uniform mat4 mvpMatrix;
 4 uniform mat3 normalMatrix;// normal matrix is transpose(inverse(model matrix))
 5
 6 in vec3 inPosition;
 7 in vec3 inColor;
 8 in vec3 inNormal;
 9
10 out vec3 passNormal;
11 out vec3 passColor;
12
13 void main()
14 {
15     passNormal = normalize(normalMatrix * inNormal);
16     passColor = inColor;
17     gl_Position = mvpMatrix * vec4(inPosition, 1.0);
18 }
Fragment shader
这里是计算光照的地方。详情见注释。
 1 #version 330 core
 2
 3 uniform vec3 ambientLight;// 环境光
 4 uniform vec3 directionalLightColor;
 5 uniform vec3 directionalLightDirection;
 6 uniform vec3 halfVector;
 7 uniform float shininess;
 8 uniform float strength;
 9
10 in vec3 passNormal;
11 in vec3 passColor;
12
13 out vec4 outColor;
14
15 void main()
16 {
17     // 根据光源方向与法线方向的夹角计算此处的漫反射的强度
18     float diffuse = max(0.0, dot(passNormal, directionalLightDirection));
19     // 计算此处的镜面反射的强度
20     float specular = max(0.0, dot(passNormal, halfVector));
21
22     if (diffuse == 0.0) { specular = 0.0; }// 若光源没有照射到此处,自然也不应该有镜面反射效果
23     else { specular = pow(specular, shininess); }// 指数式的剧烈变化,就是产生镜面高光的原理
24
25     vec3 scatteredLight = ambientLight + directionalLightColor * diffuse;// 漫反射光+环境光
26     vec3 reflectedLight = directionalLightColor * specular * strength;// 镜面反射光
27
28     vec3 rgb = min(passColor * scatteredLight + reflectedLight, vec3(1.0));// 最后的颜色
29     outColor = vec4(rgb, 1.0);// 搞定
30 }
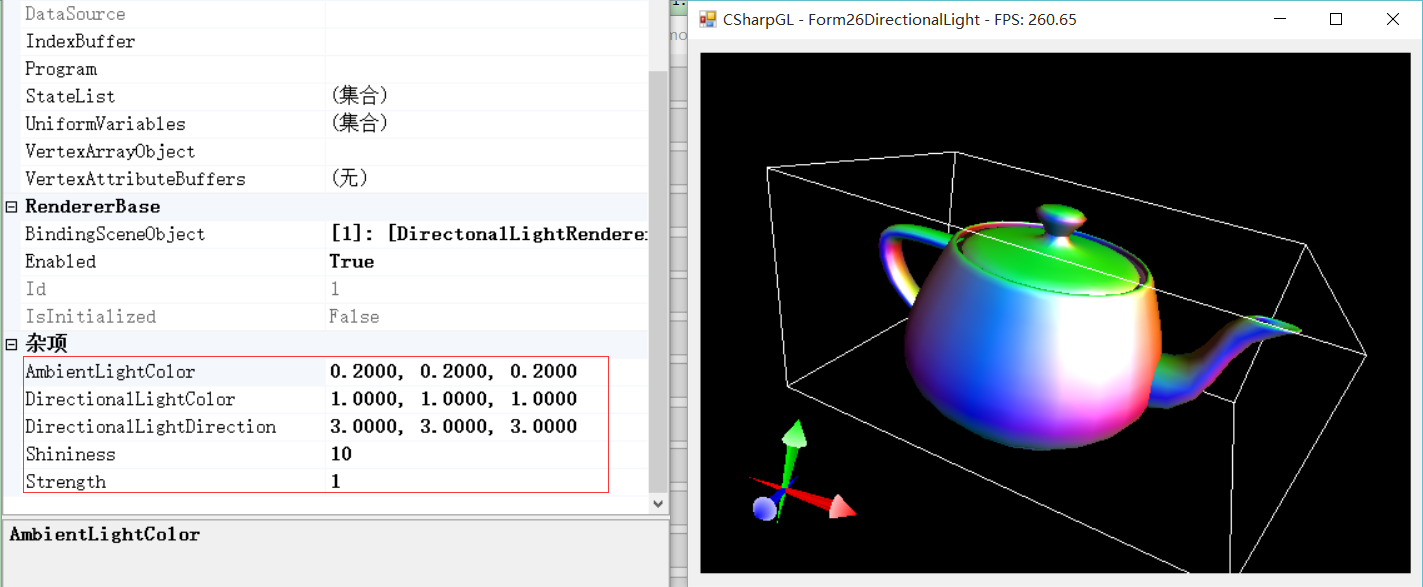
渲染器
shader做好了,下面写一个渲染器。关于渲染器的详细介绍可参看(CSharpGL(34)以从零编写一个KleinBottle渲染器为例学习如何使用CSharpGL)由于制作光照效果需要模型自带法线值,而我手里的模型只有这个Teapot是有法线值的,又仅仅是个例子,就写死了用Teapot了。


 1     class DirectonalLightRenderer : PickableRenderer
 2     {
 3         public vec3 AmbientLightColor { get; set; }
 4         public vec3 DirectionalLightDirection { get; set; }
 5         public vec3 DirectionalLightColor { get; set; }
 6         //public vec3 HalfVector { get; set; }
 7         public float Shininess { get; set; }
 8         public float Strength { get; set; }
 9
10         public static DirectonalLightRenderer Create()
11         {
12             var model = new Teapot();
13             var shaderCodes = new ShaderCode[2];
14             shaderCodes[0] = new ShaderCode(File.ReadAllText(@"shaders\DirectionalLight.vert"), ShaderType.VertexShader);
15             shaderCodes[1] = new ShaderCode(File.ReadAllText(@"shaders\DirectionalLight.frag"), ShaderType.FragmentShader);
16             var map = new AttributeMap();
17             map.Add("inPosition", Teapot.strPosition);
18             map.Add("inColor", Teapot.strColor);
19             map.Add("inNormal", Teapot.strNormal);
20
21             var renderer = new DirectonalLightRenderer(model, shaderCodes, map, Teapot.strPosition);
22             renderer.ModelSize = model.Size;
23             return renderer;
24         }
25
26         private DirectonalLightRenderer(IBufferable model, ShaderCode[] shaderCodes,
27             AttributeMap attributeMap, string positionNameInIBufferable,
28             params GLState[] switches)
29             : base(model, shaderCodes, attributeMap, positionNameInIBufferable, switches)
30         {
31             this.AmbientLightColor = new vec3(0.2f);
32             this.DirectionalLightDirection = new vec3(1);
33             this.DirectionalLightColor = new vec3(1);
34             //this.HalfVector = new vec3(1);
35             this.Shininess = 10.0f;
36             this.Strength = 1.0f;
37         }
38
39         protected override void DoRender(RenderEventArgs arg)
40         {
41             this.SetUniform("ambientLight", this.AmbientLightColor);
42             this.SetUniform("directionalLightColor", this.DirectionalLightColor);
43             this.SetUniform("directionalLightDirection", this.DirectionalLightDirection.normalize());
44             this.SetUniform("halfVector", this.DirectionalLightDirection.normalize());
45             //this.SetUniform("halfVector", this.HalfVector.normalize());
46             this.SetUniform("shininess", this.Shininess);
47             this.SetUniform("strength", this.Strength);
48
49             mat4 projection = arg.Camera.GetProjectionMatrix();
50             mat4 view = arg.Camera.GetViewMatrix();
51             mat4 model = this.GetModelMatrix().Value;
52             this.SetUniform("mvpMatrix", projection * view * model);
53             this.SetUniform("normalMatrix", glm.transpose(glm.inverse(model)).to_mat3());
54
55             base.DoRender(arg);
56         }
57     }
这样其实就可以看到效果了,还可以通过属性面板控制光源的参数。
但是手动输入数值很不爽啊,没有一点点随心所欲的顺畅。于是后续的折腾就开始了。让我来画一个真正的太阳,然后通过鼠标拖动太阳,实时更新光源的位置(方向),看到本文开始的效果。
太阳(光源)
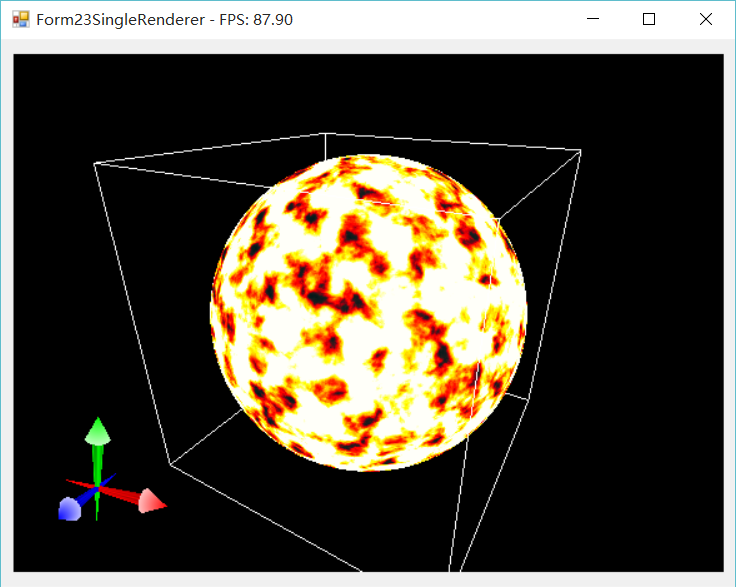
画太阳
其实太阳模型早就做过了,本质上就是利用一个noise方法模拟太阳表面的活动。外围辐射效果什么的,我先拉倒吧。
拖动太阳
把太阳放在那里很容易,如何用鼠标移动呢?
原理在(CSharpGL(20)用unProject和Project实现鼠标拖拽图元)已经整理出来了。只不过当时是单独修改模型内部的顶点位置,而现在需要整体移动模型,即修改模型的(RendererBase.WorldPosition)属性。
我的思路如下:假设有一个点在原点position = new vec3(0,0,0),我们像之前一样计算它在平移之后的位置newPosition,这是模型本身的变化,然后只需分别通过RendererBase.GetModelMatrix()的变换,就变成了在World Space里的变化,这个差别就是模型的位移。代码如下。
 1         void IMouseHandler.canvas_MouseMove(object sender, MouseEventArgs e)
 2         {
 3             if (mouseDownFlag && ((e.Button & this.lastBindingMouseButtons) != MouseButtons.None))
 4             {
 5                 Point location = new Point(e.X, this.canvas.ClientRectangle.Height - e.Y - 1);
 6                 Point differenceOnScreen = new Point(location.X - this._lastPosition.X, location.Y - this._lastPosition.Y);
 7                 mat4 model = this.renderer.GetModelMatrix().Value;
 8                 mat4 view = this.camera.GetViewMatrix();
 9                 mat4 projection = this.camera.GetProjectionMatrix();
10                 vec4 viewport;
11                 {
12                     int[] result = OpenGL.GetViewport();
13                     viewport = new vec4(result[0], result[1], result[2], result[3]);
14                 }
15                 var position = new vec3(0.0f);// imangine we have a point at (0, 0, 0).
16                 vec3 windowPos = glm.project(position, view * model, projection, viewport);
17                 var newWindowPos = new vec3(windowPos.x + differenceOnScreen.X, windowPos.y + differenceOnScreen.Y, windowPos.z);
18                 vec3 newPosition = glm.unProject(newWindowPos, view * model, projection, viewport);
19                 var worldPosition = new vec3(model * new vec4(position, 1.0f));
20                 var newWorldPosition = new vec3(model * new vec4(newPosition, 1.0f));
21                 this.renderer.WorldPosition += newWorldPosition - worldPosition;
22
23                 this._lastPosition = location;
24             }
25         }
这样说似乎也不能彻底解释清楚,因为还需要先理解OpenGL里坐标变换的问题,这个问题可以参看(CSharpGL(27)讲讲清楚OpenGL坐标变换)
总结
整完收工。

|
微信扫码,自愿捐赠。四海同道,共谱新篇。
微信捐赠不显示捐赠者个人信息,如需要,请注明联系方式。 |

 浙公网安备 33010602011771号