Keepalive + Haproxy + Nginx 实战高可用
网络拓扑
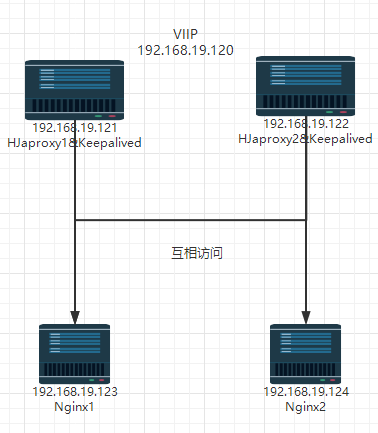
| haproxy1 | 192.168.19.121 | haproxy、keepalived |
| haproxy2 | 192.168.19.122 | haproxy、keepalived |
| nginx1 | 192.168.19.123 | nginx |
| nginx2 | 192.168.19.124 | nginx |
| VIP | 192.168.19.120 | keepalived VIP |
(一)、配置主机hosts文件-每台都要配置
[root@haproxy1 ~]# cat /etc/hosts
127.0.0.1   localhost localhost.localdomain localhost4 localhost4.localdomain4
::1         localhost localhost.localdomain localhost6 localhost6.localdomain6
192.168.19.121 haproxy1
192.168.19.122 haproxy2
192.168.19.123 nginx1
192.168.19.124 nginx2
(二)、Nginx安装
【192.168.19.121】
[root@nginx1 ~]# systemctl stop firewalld && setenforce 0
[root@nginx1 ~]# cd /etc/yum.repos.d/
[root@nginx1 yum.repos.d]# vim nginx.repo
[nginx-stable]
name=nginx stable repo
baseurl=http://nginx.org/packages/centos/$releasever/$basearch/
gpgcheck=0
enabled=1
[root@nginx1 yum.repos.d]# yum install yum-utils -y
[root@nginx1 yum.repos.d]# yum install nginx -y
[root@nginx1 yum.repos.d]# systemctl start nginx #启动
[root@nginx1 ~]# echo "real-server [Nginx 1]" > /usr/share/nginx/html/index.html #方便区分,看出效果
[root@nginx1 ~]# vim /etc/nginx/nginx.conf
keepalive_timeout 0; #设置长链接
[root@nginx1 ~]# nginx -s reload
【192.168.19.122】
[root@nginx2 ~]# systemctl stop firewalld && setenforce 0
[root@nginx2 ~]# cd /etc/yum.repos.d/
[root@nginx2 yum.repos.d]# vim nginx.repo
[nginx-stable]
name=nginx stable repo
baseurl=http://nginx.org/packages/centos/$releasever/$basearch/
gpgcheck=0
enabled=1
[root@nginx2 yum.repos.d]# yum install yum-utils -y
[root@nginx2 yum.repos.d]# yum install nginx -y
[root@nginx2 yum.repos.d]# systemctl start nginx #启动
[root@nginx2 ~]# echo "real-server [Nginx 2]"> /usr/share/nginx/html/index.html
[root@nginx2 ~]# vim /etc/nginx/nginx.conf
keepalive_timeout 0;#默认keepalive_timeout 65;
[root@nginx2 ~]# nginx -s reload
#修改后端nginx服务器的长连接是为了方便测试
**安装时报错:缺少 pcre2 解决办法:wget -O /etc/yum.repos.d/CentOS-Base.repo http://mirrors.aliyun.com/repo/Centos-7.repo 再进行安装


(三)、调度器配置Haproxy(主/备)
【192.168.19.121】
[root@haproxy1 ~]# yum -y install haproxy
[root@haproxy1 ~]# cp -rf /etc/haproxy/haproxy.cfg{,.bak}  #备份
[root@master ~]# sed -i -r '/^[ ]*#/d;/^$/d' /etc/haproxy/haproxy.cfg    #修改配置文件去掉注释
[root@haproxy1 ~]# vim /etc/haproxy/haproxy.cfg
global
    log         127.0.0.1 local2 info
    pidfile     /var/run/haproxy.pid
    maxconn     4000
    user        haproxy
    group       haproxy
    daemon
    nbproc 1
defaults
    mode                    http
    log                     global
    retries                 3
    option                  redispatch
    maxconn                 4000
    contimeout              5000
    clitimeout              50000
    srvtimeout              50000
listen stats
    mode                    http
    bind                    *:81
    stats                   enable
    stats uri               /haproxy-status
    stats auth              haadmin:sheca
frontend  web
    mode                    http
    bind                    *:80
    option                  httplog
    acl html url_reg  -i  \.html$
    use_backend httpservers if  html
    default_backend    httpservers
backend httpservers
    balance     roundrobin
    server  nginx1 192.168.19.123:80 maxconn 2000 weight 1  check inter 1s rise 2 fall 2
    server  nginx2 192.168.19.124:80 maxconn 2000 weight 1  check inter 1s rise 2 fall 2
    server  nginx3 192.168.19.125:80 maxconn 2000 weight 1  check inter 1s rise 2 fall 2   #这条是测试 没有这台服务器
【192.168.19.122】haproxy2
[root@haproxy2 ~]# yum -y install haproxy
[root@haproxy2 ~]# cp -rf /etc/haproxy/haproxy.cfg{,.bak}  #备份
[root@haproxy2 ~]# sed -i -r '/^[ ]*#/d;/^$/d' /etc/haproxy/haproxy.cfg    #修改配置文件去掉注释
[root@haproxy2 ~]# vim /etc/haproxy/haproxy.cfg
global
    log         127.0.0.1 local2 info
    pidfile     /var/run/haproxy.pid
    maxconn     4000
    user        haproxy
    group       haproxy
    daemon
    nbproc 1
defaults
    mode                    http
    log                     global
    retries                 3
    option                  redispatch
    maxconn                 4000
    contimeout              5000
    clitimeout              50000
    srvtimeout              50000
listen stats
    mode                    http
    bind                    *:81
    stats                   enable
    stats uri               /haproxy-status
    stats auth              haadmin:sheca
frontend  web
    mode                    http
    bind                    *:80
    option                  httplog
    acl html url_reg  -i  \.html$
    use_backend httpservers if  html
    default_backend    httpservers
backend httpservers
    balance     roundrobin
    server  nginx1 192.168.19.123:80 maxconn 2000 weight 1  check inter 1s rise 2 fall 2
    server  nginx2 192.168.19.124:80 maxconn 2000 weight 1  check inter 1s rise 2 fall 2
    server  nginx3 192.168.19.125:80 maxconn 2000 weight 1  check inter 1s rise 2 fall 2   #这条是测试 没有这台服务器

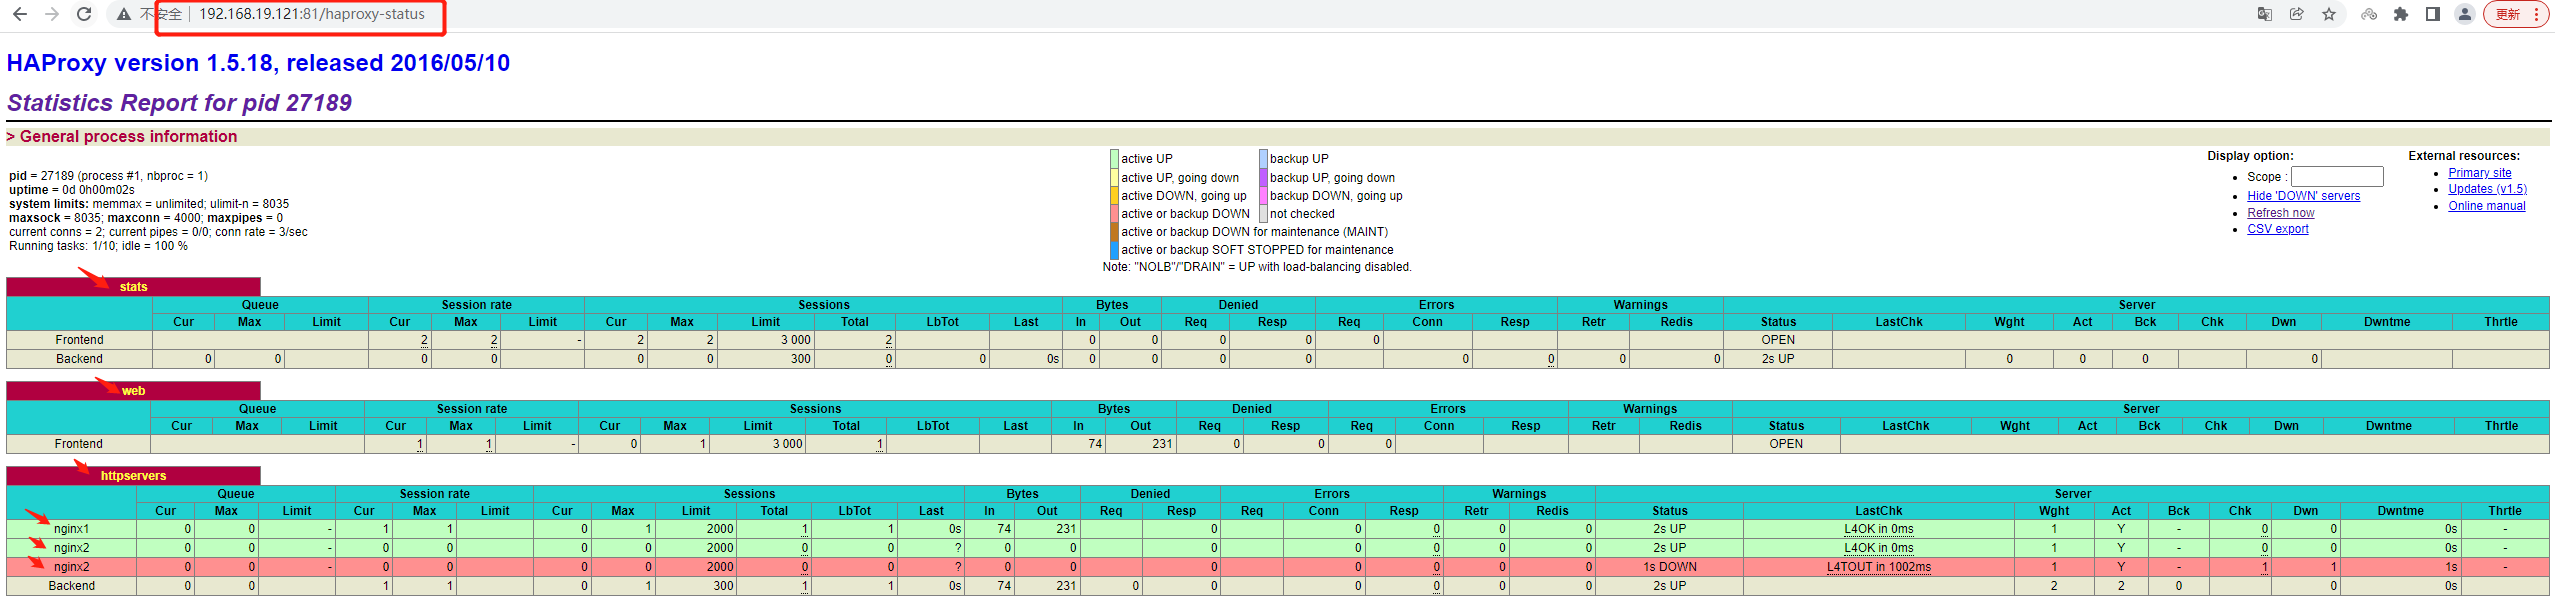
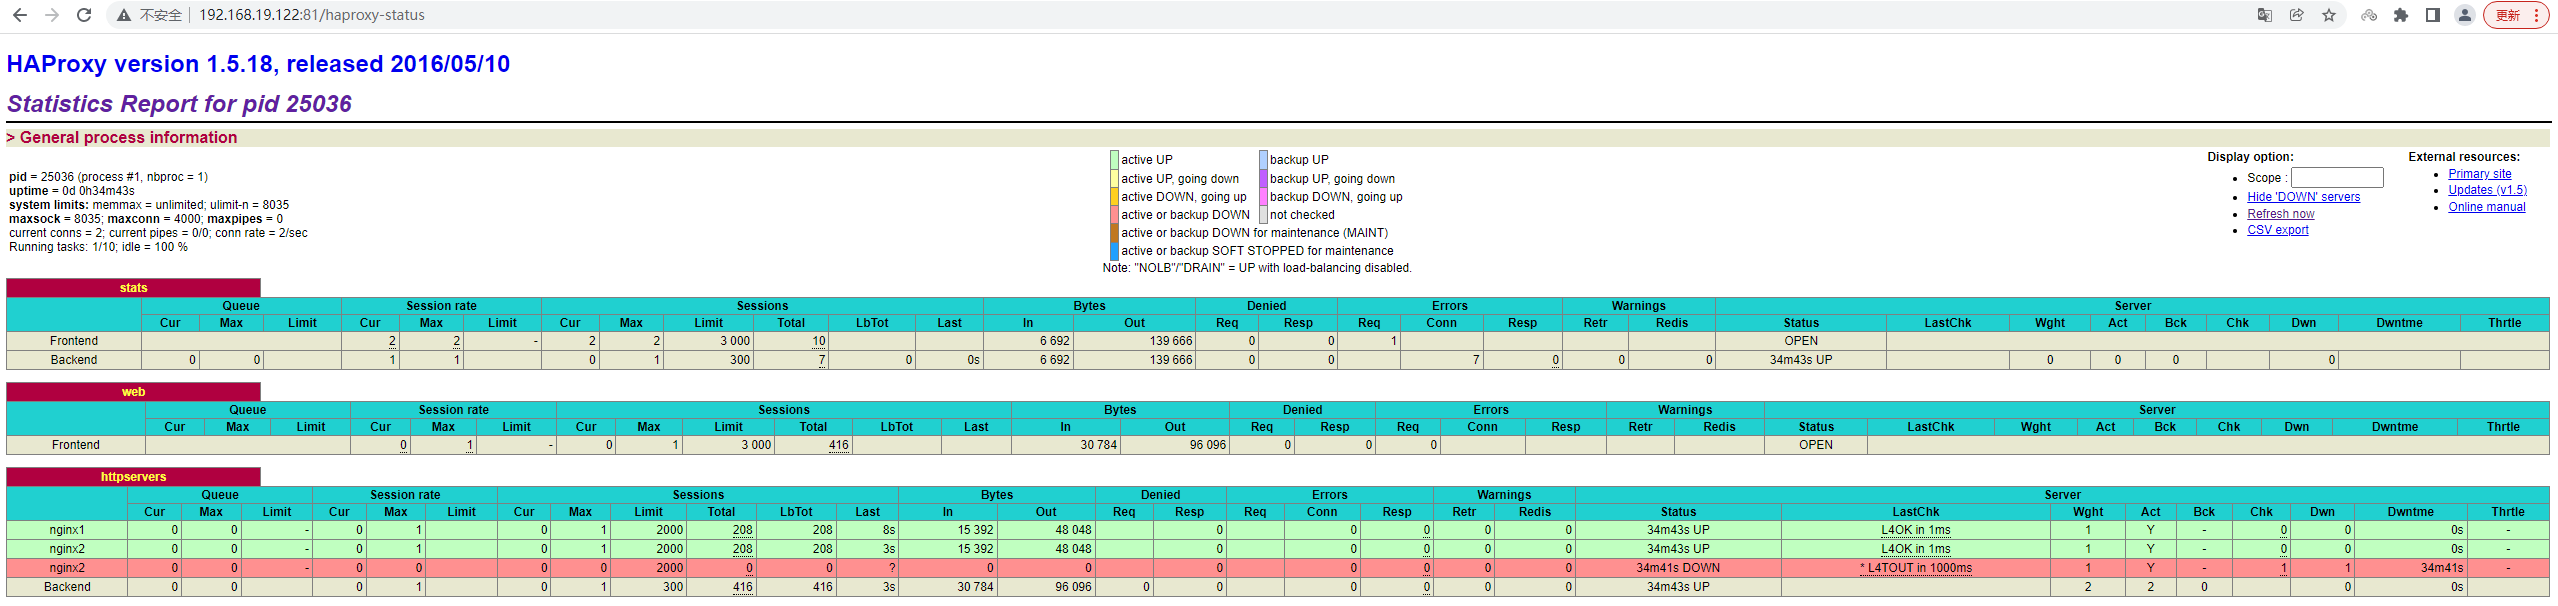
登陆Haproxy 检测页面
192.168.19.121:81/haproxy-status 账户密码 haadmin/sheca
192.168.19.122:81/haproxy-status 账户密码 haadmin/sheca
(四)、Keepalived实现调度器HA(两个节点都需要下载)
【192.168.19.121】 [root@haproxy1 ~]# yum install -y keepalived [root@haproxy1 ~]# cp /etc/keepalived/keepalived.conf /etc/keepalived/keepalived.conf.bak #备份 [root@haproxy1 ~]# vim /etc/keepalived/keepalived.conf ! Configuration File for keepalived global_defs { router_id directory1 #只是名字而已,辅节点改为directory2(两个名字一定不能一样) } vrrp_instance VI_1 { state MASTER #定义主还是备,备用的话写backup interface ens33 #VIP绑定接口 virtual_router_id 80 #整个集群的调度器一致(在同一个集群) priority 100 #(优先权)back改为50(50一间隔) advert_int 1 #发包 authentication { auth_type PASS #主备节点认证 auth_pass 1111 } virtual_ipaddress { 192.168.19.120/24 #VIP(自己网段的) } } 【192.168.19.122】 [root@haproxy2 ~]# yum install -y keepalived [root@haproxy2 ~]# mv /etc/keepalived/keepalived.conf /etc/keepalived/keepalived.conf.bak [root@haproxy2 ~]# vim /etc/keepalived/keepalived.conf ! Configuration File for keepalived global_defs { router_id directory2 } vrrp_instance VI_1 { state BACKUP interface ens33 nopreempt #设置到back上面,不抢占资源 virtual_router_id 80 priority 50 #辅助改为50 advert_int 1 #检测间隔1s authentication { auth_type PASS auth_pass 1111 #认证类型和密码主备一样,要不然无法互相认证 } virtual_ipaddress { 192.168.19.120/24 #抢占的VIP也一样 } }
[root@haproxy1~]# systemctl start keepalived
[root@haproxy2~]# systemctl start keepalived
[root@haproxy1~]# systemctl enable keepalived
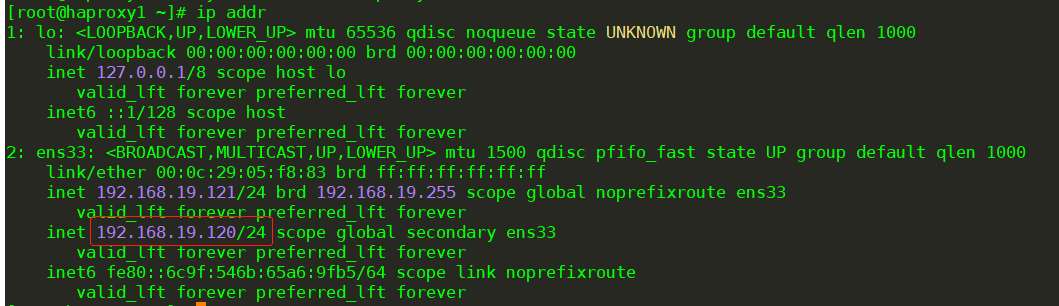
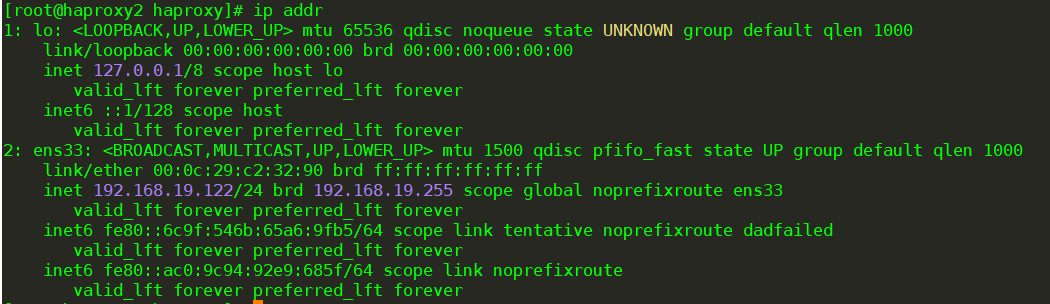
[root@haproxy2~]# systemctl enable keepalived测试访问 VIP地址 :192.168.19.120


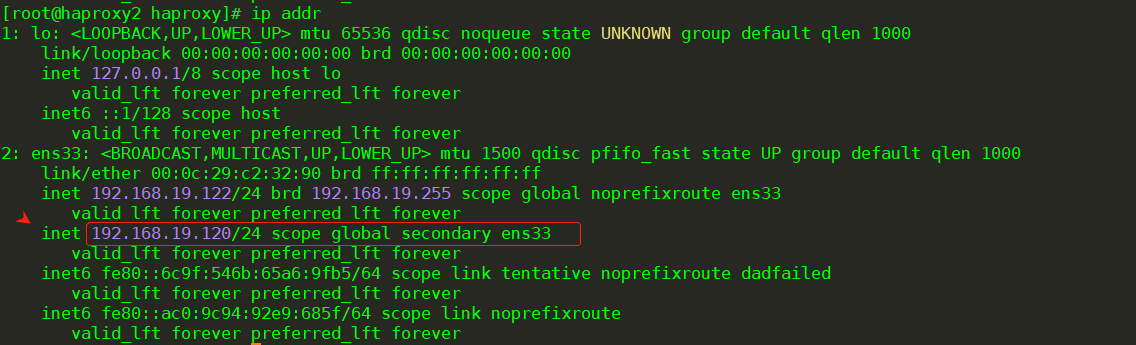
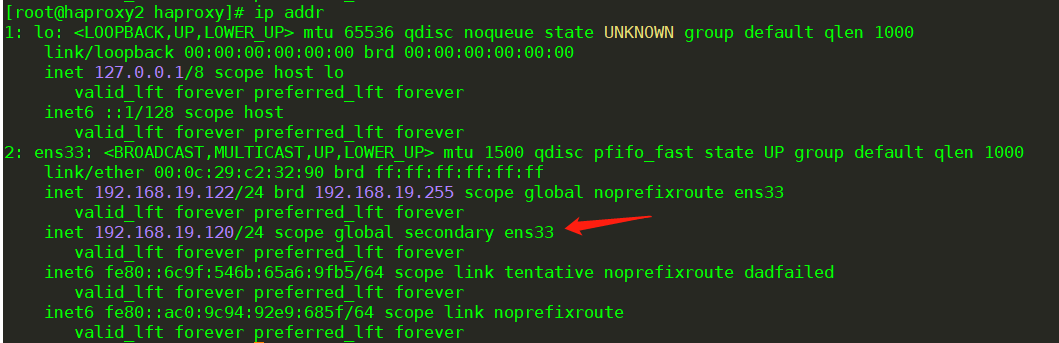
查看VIP地址在哪台服务器上:在haproxy1上
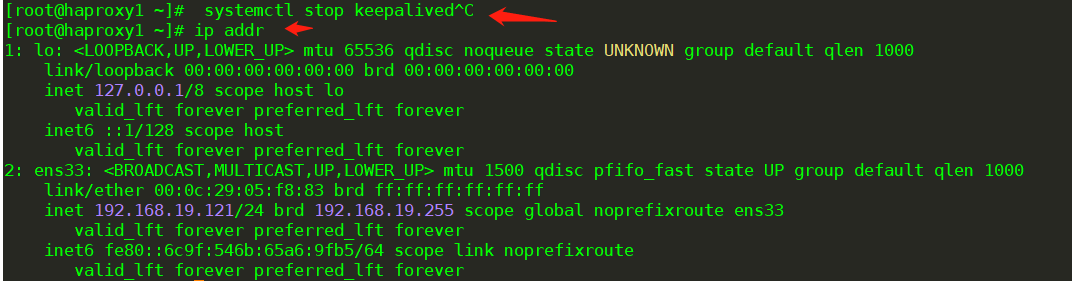
测试haproxy1宕机,VIP会自己漂移到备用节点haproxy2上.(采用停止keepalived),继续访问测试VIP地址 :192.168.19.120,实现了高可用性。
systemctl stop keepalived
(五)、Keepalived 检测 Haproxy 实现高可用
以上我们只是实现了高可用,基于Haproxy的前提是Haproxy服务是正常。如果有突发情况使得nginx服务不能启动,但是我们的keepalived服务是正常,这个时候用户是访问不到的,VIP也不会自动漂移到备用的节点服务器上。所以我们需要写一些代码来判断一下Haproxy服务是不是正常,如果不正常的话我们就将Haproxy服务关掉,然后实现VIP的漂移,这个时候用户就不会出现无法访问的情况了。
让Keepalived以一定时间间隔执行一个外部脚本,脚本的功能是当Haproxy失败,则关闭本机的Keepalived
[root@haproxy1 ~]# vim /etc/keepalived/check_haproxy_status.sh
#!/bin/bash
/usr/bin/curl -I http://localhost &>/dev/null
if [ $? -ne 0 ];then
#       /etc/init.d/keepalived stop
        systemctl stop keepalived
fi
[root@haproxy1 ~]# chmod a+x /etc/keepalived/check_haproxy_status.sh   #一定要加执行权限
keepalived使用script
[root@haproxy1 ~]# vim /etc/keepalived/keepalived.conf
! Configuration File for keepalived
global_defs {
   router_id directory1
}

vrrp_script check_haproxy {
   script "/etc/keepalived/check_haproxy_status.sh"
   interval 5
}

vrrp_instance VI_1 {
    state MASTER
    interface ens33
    virtual_router_id 80
    priority 100
    advert_int 1
    authentication {
        auth_type PASS
        auth_pass 1111
    }
    virtual_ipaddress {
        192.168.19.120/24
    }

    track_script {
        check_haproxy
    }
}
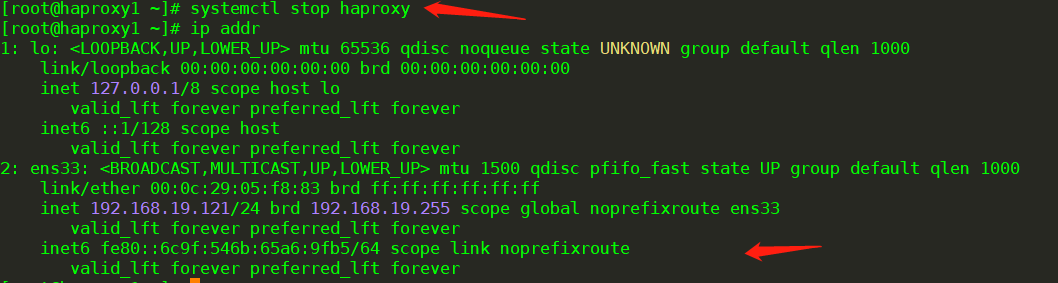
必须先启动Haproxy,再启动keepalived,建议haproxy2点也添加测试访问: 将haproxy停止,查看keepalived是否检测到haproxy1的应用是否杀掉 ,vip是否漂移。
systemctl stop haproxy
(六)、配置haproxy的日志
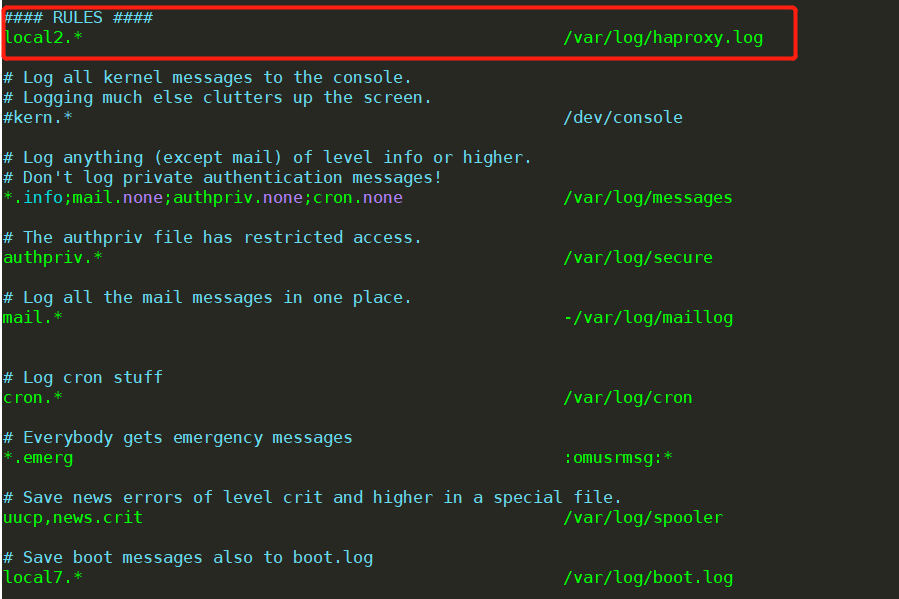
两台机器都配置haproxy的日志:需要打开注释并添加
[root@haproxy1~]# vim /etc/rsyslog.conf
# Provides UDP syslog reception  #由于haproxy的日志是用udp传输的,所以要启用rsyslog的udp监听
$ModLoad imudp
$UDPServerRun 514
找到  #### RULES ####   下面添加
local2.*                       /var/log/haproxy.log

[root@haproxy1 ~]# systemctl restart rsyslog
[root@haproxy1 ~]# systemctl restart haproxy
[root@haproxy1 ~]# tail -f /var/log/haproxy.log    #实时查看日志
Mar 19 12:53:27 localhost haproxy[73866]: Proxy stats started.
Mar 19 12:53:27 localhost haproxy[73866]: Proxy web started.
Mar 19 12:53:27 localhost haproxy[73866]: Proxy httpservers started.
补充:解析Haprpxy 配置文件
示例1:转发
global
    log 127.0.0.1 local3 info
    maxconn 4096
        uid nobody
#       uid 99
        gid nobody
#       gid 99
    daemon
    nbproc 1
    pidfile /run/haproxy.pid
defaults
    log           global
    mode       http
    maxconn 2048
    retries     3
    option    redispatch
    contimeout    5000
    clitimeout        50000
    srvtimeout        50000
#timeout connect 5000
#timeout client 50000
#timeout server 50000
    option abortonclose

    stats uri /admin?stats
    stats realm Private lands
    stats auth admin:password
    stats hide-version

frontend http-in
    bind 0.0.0.0:80
    mode http
    log global
    option httplog
    option httpclose
     acl html url_reg  -i  \.html$
     use_backend html-server if  html
     default_backend html-server

backend html-server
    mode http
    balance roundrobin
    option httpchk GET /index.html
    cookie SERVERID insert indirect nocache
    server html-A web1:80 weight 1 cookie 3 check inter 2000 rise 2 fall 5
    server html-B web2:80 weight 1 cookie 4 check inter 2000 rise 2 fall 5
gloab:全局配置
log:日志配置
maxconn:最大连接限制(优先级低)
uid:用户
gid:组用户
deamon:守护进程运行
nbproc :haproxy进程数,该值的设置应该和服务器的CPU核心数一致,比如设置为 16,即常见的2颗8核心CPU的服务器,即共有16核心,则可以将其值设置为:<=16 ,创建多个进程数,可以减少每个进程的任务队列,但是过多的进程数也可能会导致进程的崩溃。
pidfile /run/haproxy.pid :haproxy进程ID存储位置
defaults:针对(listen和backend块进行设置没如果块中没设置,则使用默认设置)默认配置
log:日志使用全局配置
mode:模式7层LB
maxconn:最大连接数(优先级中)
retries:健康检查。3次连接失败就认为服务不可用
option:服务不可用后的操作,重定向到其他健康服务器
contimeout    :(重传计时器)定义haproxy将客户端!!!请求!!!转发至后端服务器,所等待的超时时长
clitimeout:(向后长连接)haproxy作为客户,和后端服务器之间!!!空闲连接!!!的超时时间,到时候发送fin指令
srvtimeout    :(向前长连接)haproxy作为服务器,和用户之间空闲连接的超时时间,到时候发送fin指令
option abortonclose  :当服务器负载很高的时候,自动结束掉当前队列处理比较久的链接


stats uri /admin?stats:设置统计页面的uri为/admin?stats
stats realm Private lands:设置统计页面认证时的提示内容
stats auth admin:password:设置统计页面认证的用户和密码,如果要设置多个,另起一行写入即可
stats hide-version:隐藏统计页面上的haproxy版本信息

frontend:前端配置块。面对用户侧
bind:面对用户监听地址和端口
mode:http模式的LB
log:日志使用全局配置

option httplog:默认日志格式非常简陋,仅包括源地址、目标地址和实例名称,而“option httplog参数将会使得日志格式变得丰富许多,其通常包括但不限于HTTP请求、连接计时器、会话状态、连接数、捕获的首部及cookie、“frontend”、“backend”及服务器名称,当然也包括源地址和端口号等。

option http close: 每次请求完毕后,关闭http通道

 acl html url_reg  -i  \.html$  :1. 访问控制列表名称html。规则要求访问以html结尾的url时
 use_backend html-server if  html   :2.如果满足acl html规则,则推送给后端服务器 html-server
 default_backend html-server  3:默认的后端服务器是 html-server

backend html-server:后端服务器名称为  html-server
mode http:模式为7层代理
balance roundrobin:算法为轮训
option httpchk GET /index.html     :允许用http协议检查server 的健康
cookie SERVERID insert indirect nocache:轮询的同时,根据插入的cookie SERVERID  的值来做会话保持,将相同的用户请求,转发给相同的真实服务器。
server html-A web1:80 weight 1 cookie 3 check inter 2000 rise 2 fall 5:cookie 3 服务器ID,避免rr算法将客户机请求转发给其他服务器 ,对后端服务器的健康状况检查间隔为2000毫秒,连续2次健康检查成功,则认为是有效的,连续5次健康检查失败,则认为服务器宕机
server html-B web2:80 weight 1 cookie 4 check inter 2000 rise 2 fall 5
示例2:根据文件后缀名字进行转发
######## 全局配置信息 #########
######参数是进程级的,通常和操作系统相关#######

	global
		log 127.0.0.1 local3 info	   #日志服务器
		maxconn 4096				   #最大连接数
		uid nobody					   #用户身份
		gid nobody					   #组身份
		daemon						   #守护进程方式后台运行
		nbproc 1						   #工作进程数量

####### ###########默认设置 ###################
#####这些参数是配置 frontend,backend,listen 组的 ###########
	defaults                    #这些参数可以被利用配置到frontend,backend,listen组件
		log		   global
		mode	   http	    #工作模式 http ,tcp 是 4 层,http是 7 层
		maxconn 2048		#最大连接数
		retries 	3			    #3 次连接失败就认为服务器不可用
		option	redispatch	#如果 cookie 写入了 serverId 而客户端不会刷新 cookie,当serverId 对应的服务器挂掉后,强制定向到其他健康的服务器
		stats	uri  /haproxy	#使用浏览器访问 http://192.168.122.254/haproxy,可以看到服务器状态
		stats auth           wing:123     #用户认证,客户端使用elinks浏览器的时候不生效
		contimeout	5000          #连接超时时间,单位毫秒ms
		clitimeout	    50000        #客户端超时
		srvtimeout	    50000        #服务器超时


	frontend http-in
		bind 0.0.0.0:80                           #监听端口
		mode http
		log global
		option httplog			                 #日志类别 http 日志格式
		option httpclose		                 #打开支持主动关闭功能,每次请求完毕后主动关闭http通道	,ha-proxy不支持keep-alive,只能模拟这种模式的实现
	    acl php url_reg  -i  \.php$			 #acl <ACL名字>  <类型>  <大小写>  <规则>
	    acl html url_reg  -i  \.html$		  	 #use_backend  <服务器组>  if  <ACL名字>
	    use_backend php-server if  php
	    use_backend html-server if  html
	    default_backend html-server		 #默认使用的服务器组


	backend php-server
		mode http
		balance roundrobin			            #负载均衡的方式
		option httpchk GET /index.php		#健康检查
		cookie SERVERID insert indirect nocache	#客户端的 cookie 信息,允许插入serverid到cookie中,此处cookie号不同
		server php-A 192.168.122.30:80 weight 1 cookie 1 check inter 2000 rise 2 fall 5
		server php-B 192.168.122.40:80 weight 1 cookie 2 check inter 2000 rise 2 fall 5
		#cookie 1 标识 serverid 为 1
		#check inter 2000          检测心跳频率
		#rise 2     2 次正确认为服务器可用
		#fall 5      5 次失败认为服务器不可用

	backend html-server
		mode http
		balance roundrobin
		option httpchk GET /index.html
		cookie SERVERID insert indirect nocache
		server html-A 192.168.122.10:80 weight 1 cookie 3 check inter 2000 rise 2 fall 5
		server html-B 192.168.122.20:80 weight 1 cookie 4 check inter 2000 rise 2 fall 5

 浙公网安备 33010602011771号