
Shiro集成Spring
1、Shiro集成Spring,使用maven进行jar包的依赖与管理,pom.xml的配置文件,如下所示:
  1 <?xml version="1.0" encoding="UTF-8"?>
  2 <project xmlns="http://maven.apache.org/POM/4.0.0"
  3          xmlns:xsi="http://www.w3.org/2001/XMLSchema-instance"
  4          xsi:schemaLocation="http://maven.apache.org/POM/4.0.0
  5          http://maven.apache.org/xsd/maven-4.0.0.xsd">
  6     <parent>
  7         <artifactId>shiro</artifactId>
  8         <groupId>com.bie</groupId>
  9         <version>1.0-SNAPSHOT</version>
 10     </parent>
 11     <modelVersion>4.0.0</modelVersion>
 12
 13     <artifactId>spring-shiro</artifactId>
 14     <packaging>war</packaging>
 15
 16     <name>spring-shiro Maven Webapp</name>
 17     <!-- FIXME change it to the project's website -->
 18     <url>http://www.example.com</url>
 19
 20     <properties>
 21         <project.build.sourceEncoding>UTF-8</project.build.sourceEncoding>
 22         <maven.compiler.source>1.7</maven.compiler.source>
 23         <maven.compiler.target>1.7</maven.compiler.target>
 24     </properties>
 25
 26     <dependencies>
 27         <!-- junit单元测试 -->
 28         <dependency>
 29             <groupId>junit</groupId>
 30             <artifactId>junit</artifactId>
 31             <version>4.11</version>
 32             <scope>test</scope>
 33         </dependency>
 34         <!-- 引入spring的包 -->
 35         <dependency>
 36             <groupId>org.springframework</groupId>
 37             <artifactId>spring-context</artifactId>
 38             <version>4.3.12.RELEASE</version>
 39         </dependency>
 40         <dependency>
 41             <groupId>org.springframework</groupId>
 42             <artifactId>spring-core</artifactId>
 43             <version>4.3.12.RELEASE</version>
 44         </dependency>
 45         <dependency>
 46             <groupId>org.springframework</groupId>
 47             <artifactId>spring-web</artifactId>
 48             <version>4.3.12.RELEASE</version>
 49         </dependency>
 50         <!-- 引入spring-webmvc才可以使用mvc:resources配置 -->
 51         <dependency>
 52             <groupId>org.springframework</groupId>
 53             <artifactId>spring-webmvc</artifactId>
 54             <version>4.3.12.RELEASE</version>
 55         </dependency>
 56
 57         <!-- 引入shiro的包 -->
 58         <dependency>
 59             <groupId>org.apache.shiro</groupId>
 60             <artifactId>shiro-core</artifactId>
 61             <version>1.2.2</version>
 62         </dependency>
 63         <dependency>
 64             <groupId>org.apache.shiro</groupId>
 65             <artifactId>shiro-web</artifactId>
 66             <version>1.2.2</version>
 67         </dependency>
 68
 69         <!-- shiro集成spring的包 -->
 70         <dependency>
 71             <groupId>org.apache.shiro</groupId>
 72             <artifactId>shiro-spring</artifactId>
 73             <version>1.2.2</version>
 74         </dependency>
 75     </dependencies>
 76
 77     <build>
 78         <finalName>spring-shiro</finalName>
 79         <pluginManagement><!-- lock down plugins versions to avoid using Maven defaults (may be moved to parent pom) -->
 80             <plugins>
 81                 <plugin>
 82                     <artifactId>maven-clean-plugin</artifactId>
 83                     <version>3.1.0</version>
 84                 </plugin>
 85                 <!-- see http://maven.apache.org/ref/current/maven-core/default-bindings.html#Plugin_bindings_for_war_packaging -->
 86                 <plugin>
 87                     <artifactId>maven-resources-plugin</artifactId>
 88                     <version>3.0.2</version>
 89                 </plugin>
 90                 <plugin>
 91                     <artifactId>maven-compiler-plugin</artifactId>
 92                     <version>3.8.0</version>
 93                 </plugin>
 94                 <plugin>
 95                     <artifactId>maven-surefire-plugin</artifactId>
 96                     <version>2.22.1</version>
 97                 </plugin>
 98                 <plugin>
 99                     <artifactId>maven-war-plugin</artifactId>
100                     <version>3.2.2</version>
101                 </plugin>
102                 <plugin>
103                     <artifactId>maven-install-plugin</artifactId>
104                     <version>2.5.2</version>
105                 </plugin>
106                 <plugin>
107                     <artifactId>maven-deploy-plugin</artifactId>
108                     <version>2.8.2</version>
109                 </plugin>
110             </plugins>
111         </pluginManagement>
112     </build>
113
114 </project>
2、配置web.xml配置文件,里面需要指定shiro提供的过滤器、指定springmvc的配置文件、指定spring的配置文件。
 1 <!DOCTYPE web-app PUBLIC
 2         "-//Sun Microsystems, Inc.//DTD Web Application 2.3//EN"
 3         "http://java.sun.com/dtd/web-app_2_3.dtd" >
 4
 5 <web-app>
 6     <display-name>Archetype Created Web Application</display-name>
 7
 8     <!-- 加载Spring的bean.xml文件 -->
 9     <context-param>
10         <param-name>contextConfigLocation</param-name>
11         <param-value>
12             classpath:spring/spring.xml
13         </param-value>
14     </context-param>
15     <listener>
16         <listener-class>org.springframework.web.context.ContextLoaderListener</listener-class>
17     </listener>
18
19     <listener>
20         <listener-class>org.springframework.web.context.request.RequestContextListener</listener-class>
21     </listener>
22
23     <servlet>
24         <servlet-name>springmvc</servlet-name>
25         <servlet-class>org.springframework.web.servlet.DispatcherServlet</servlet-class>
26         <init-param>
27             <param-name>contextConfigLocation</param-name>
28             <param-value>classpath:spring/spring-mvc.xml</param-value>
29         </init-param>
30     </servlet>
31     <servlet-mapping>
32         <servlet-name>springmvc</servlet-name>
33         <!-- 拦截后缀为.action的文件,*.*,可以配置/来拦截 -->
34         <url-pattern>/</url-pattern>
35     </servlet-mapping>
36
37     <!-- shiro提供的filter过滤器 -->
38     <filter>
39         <filter-name>shiroFilter</filter-name>
40         <filter-class>org.springframework.web.filter.DelegatingFilterProxy</filter-class>
41     </filter>
42     <filter-mapping>
43         <filter-name>shiroFilter</filter-name>
44         <!-- 拦截所有的请求 -->
45         <url-pattern>/*</url-pattern>
46     </filter-mapping>
47
48     <welcome-file-list>
49         <welcome-file>login.html</welcome-file>
50     </welcome-file-list>
51 </web-app>
3、配置spring-mvc.xml配置,由于这里使用的是模拟数据库,所以配置较少,后续将新增读取数据库的数据。
 1 <?xml version="1.0" encoding="UTF-8"?>
 2 <beans xmlns="http://www.springframework.org/schema/beans"
 3        xmlns:xsi="http://www.w3.org/2001/XMLSchema-instance"
 4        xmlns:mvc="http://www.springframework.org/schema/mvc"
 5        xmlns:context="http://www.springframework.org/schema/context"
 6        xsi:schemaLocation="http://www.springframework.org/schema/beans
 7     http://www.springframework.org/schema/beans/spring-beans-3.2.xsd
 8     http://www.springframework.org/schema/context
 9     http://www.springframework.org/schema/context/spring-context-3.2.xsd
10
11
12     http://www.springframework.org/schema/mvc
13     http://www.springframework.org/schema/mvc/spring-mvc-3.2.xsd">
14
15     <!-- 扫描的路径包 -->
16     <context:component-scan base-package="com.bie.controller"></context:component-scan>
17
18     <!-- 开启注解 -->
19     <mvc:annotation-driven></mvc:annotation-driven>
20
21     <!-- 过滤静态资源 -->
22     <mvc:resources mapping="/*" location="/"/>
23
24     <!-- 过滤静态资源 -->
25     <!--<mvc:resources mapping="/**/*.html" location="/"/>-->
26
27 </beans>
配置spring.xml,将对象注入到spring容器中,让spring进行对象的管理,如下所示:
 1 <?xml version="1.0" encoding="UTF-8"?>
 2 <beans xmlns="http://www.springframework.org/schema/beans"
 3        xmlns:xsi="http://www.w3.org/2001/XMLSchema-instance"
 4        xsi:schemaLocation="http://www.springframework.org/schema/beans
 5        http://www.springframework.org/schema/beans/spring-beans.xsd">
 6
 7
 8     <!-- 将ShiroFilterFactoryBean注入到spring容器中 -->
 9     <bean id="shiroFilter" class="org.apache.shiro.spring.web.ShiroFilterFactoryBean">
10         <!-- 配置SecurityManager对象 -->
11         <property name="securityManager" ref="securityManager"></property>
12         <!-- 设置登陆页的url -->
13         <property name="loginUrl" value="login.html"></property>
14         <!-- 未认证的界面 -->
15         <property name="unauthorizedUrl" value="403.html"></property>
16         <!-- 过滤器链 -->
17         <!-- shiro给我们内置了很多Filter,这里设置过滤器链 -->
18         <property name="filterChainDefinitions">
19             <!-- authc经过认证之后才可以访问相应的路径、anon不需要任何验证就可以访问 -->
20             <!-- 过滤器链是有顺序的,从上到下,需要认证的放到下面 -->
21             <!-- 根路径下面的/subLogin也不需要进行认证 -->
22             <!-- authc表示需要经过认证之后才可以访问相应数据,anon表示不需要认证,直接可以访问 -->
23             <!-- 这个过滤器链是有顺序的,从上往下匹配,匹配到之后就直接返回了,所以匹配到login.jsp不需要认证,/*需要认证,所以放在下面 -->
24             <value>
25                 /login.html=anon
26                 /subLogin=anon
27                 /*=authc
28             </value>
29         </property>
30     </bean>
31
32     <!-- 第一步,创建SecurityManager对象 -->
33     <bean id="securityManager" class="org.apache.shiro.web.mgt.DefaultWebSecurityManager">
34         <!-- 将自定义的Realm设置到SecurityManager环境中 -->
35         <!-- 主体提交请求之后就交给我们自定义Realm来认证和授权 -->
36         <property name="realm" ref="customRealm"></property>
37     </bean>
38
39     <!-- 第二步,创建自定义Realm -->
40     <bean id="customRealm" class="com.bie.realm.CustomRealm">
41         <!-- 将加密的设置到自定义的Realm中 -->
42         <property name="credentialsMatcher" ref="credentialsMatcher"></property>
43     </bean>
44
45     <!-- 第三步,加密管理器对象 -->
46     <bean id="credentialsMatcher" class="org.apache.shiro.authc.credential.HashedCredentialsMatcher">
47         <!-- 设置加密的算法为md5 -->
48         <property name="hashAlgorithmName" value="md5"></property>
49         <!-- 设置加密次数 -->
50         <property name="hashIterations" value="1"></property>
51     </bean>
52
53 </beans>
4、创建一个用户实体类,主要是用户的账号字段、用户密码字段,如下所示:
 1 package com.bie.po;
 2
 3 /**
 4  * @ProjectName: shiro
 5  * @Package: com.bie.po
 6  * @ClassName: User
 7  * @Author: biehl
 8  * @Description: ${description}
 9  * @Date: 2020/8/6 16:40
10  * @Version: 1.0
11  */
12 public class User {
13
14     private String username;
15     private String password;
16
17     public String getUsername() {
18         return username;
19     }
20
21     public void setUsername(String username) {
22         this.username = username;
23     }
24
25     public String getPassword() {
26         return password;
27     }
28
29     public void setPassword(String password) {
30         this.password = password;
31     }
32
33     @Override
34     public String toString() {
35         return "User{" +
36                 "username='" + username + '\'' +
37                 ", password='" + password + '\'' +
38                 '}';
39     }
40 }
这里使用自定义Realm,这里使用的模拟数据库进行登陆操作,如下所示:
  1 package com.bie.realm;
  2
  3 import org.apache.shiro.authc.AuthenticationException;
  4 import org.apache.shiro.authc.AuthenticationInfo;
  5 import org.apache.shiro.authc.AuthenticationToken;
  6 import org.apache.shiro.authc.SimpleAuthenticationInfo;
  7 import org.apache.shiro.authz.AuthorizationInfo;
  8 import org.apache.shiro.authz.SimpleAuthorizationInfo;
  9 import org.apache.shiro.crypto.hash.Md5Hash;
 10 import org.apache.shiro.realm.AuthorizingRealm;
 11 import org.apache.shiro.subject.PrincipalCollection;
 12 import org.apache.shiro.util.ByteSource;
 13
 14 import java.util.HashMap;
 15 import java.util.HashSet;
 16 import java.util.Map;
 17 import java.util.Set;
 18
 19 /**
 20  * 自定义Realm
 21  *
 22  * @ProjectName: shiro
 23  * @Package: com.bie.shiro
 24  * @ClassName: CustomRealm
 25  * @Author: biehl
 26  * @Description: ${description}
 27  * @Date: 2020/8/6 14:58
 28  * @Version: 1.0
 29  */
 30 public class CustomRealm extends AuthorizingRealm {
 31
 32     // 模拟数据表的登陆
 33     private Map<String, String> userMap = new HashMap<String, String>();
 34
 35     {
 36         // userMap.put("admin", "123456");
 37         userMap.put("admin", "496edd8064892864b76c5fd3a732544b");
 38
 39         // 设置RealName名称
 40         super.setName("customRealm");
 41     }
 42
 43     /**
 44      * 授权使用
 45      *
 46      * @param principals
 47      * @return
 48      */
 49     protected AuthorizationInfo doGetAuthorizationInfo(PrincipalCollection principals) {
 50         // 1、第一步,从认证信息中获取到用户信息。
 51         String userName = (String) principals.getPrimaryPrincipal();
 52         // 2、第二步,从数据库中或者缓存中通过用户姓名获取到角色信息
 53         Set<String> roles = getRolesByUserName(userName);
 54         // 3、第三步,从数据库中或者缓存中通过用户姓名获取到权限信息
 55         Set<String> permissions = getPermissionsByUserName(userName);
 56         // 4、第四步,将获取到角色信息和权限信息返回
 57         SimpleAuthorizationInfo simpleAuthorizationInfo = new SimpleAuthorizationInfo();
 58         // 设置权限
 59         simpleAuthorizationInfo.setStringPermissions(permissions);
 60         // 设置角色
 61         simpleAuthorizationInfo.setRoles(roles);
 62         return simpleAuthorizationInfo;
 63     }
 64
 65     /**
 66      * 通过用户名获取到权限信息
 67      *
 68      * @param userName
 69      * @return
 70      */
 71     private Set<String> getPermissionsByUserName(String userName) {
 72         // 创建一个集合对象
 73         Set<String> sets = new HashSet<String>();
 74         // 设置权限名称
 75         sets.add("user:select");
 76         sets.add("user:insert");
 77         sets.add("user:delete");
 78         sets.add("user:update");
 79         return sets;
 80     }
 81
 82     /**
 83      * 模拟通过用户姓名获取到角色信息
 84      *
 85      * @param userName
 86      * @return
 87      */
 88     private Set<String> getRolesByUserName(String userName) {
 89         // 创建一个集合对象
 90         Set<String> sets = new HashSet<String>();
 91         // 设置角色名称
 92         sets.add("admin");
 93         sets.add("user");
 94         return sets;
 95     }
 96
 97     /**
 98      * 认证使用
 99      *
100      * @param token 主体传过来的认证信息
101      * @return
102      * @throws AuthenticationException
103      */
104     protected AuthenticationInfo doGetAuthenticationInfo(AuthenticationToken token) throws AuthenticationException {
105         // 1、第一步,通过主体传过来的认证信息获取用户名
106         String username = (String) token.getPrincipal();
107         // 2、通过用户名到数据库中获取凭证
108         // 如果使用了shiro的HashedCredentialsMatcher加密,那么这里保存的是加密后的密文
109         String password = getPasswordByUserName(username);
110         // 判断获取到的密码是否存在,不存在直接返回null
111         if (password == null) {
112             return null;
113         }
114         // 如果对象存在
115         SimpleAuthenticationInfo authenticationInfo = new SimpleAuthenticationInfo("admin", password, "customRealm");
116
117         // 如果加了盐salt,认证返回的时候需要见盐salt设置进去的
118         authenticationInfo.setCredentialsSalt(ByteSource.Util.bytes("654321"));
119         // 将加了盐的认证用户返回
120         return authenticationInfo;
121     }
122
123     /**
124      * 通过用户姓名获取到用户的密码
125      *
126      * @param username
127      * @return
128      */
129     private String getPasswordByUserName(String username) {
130         // 正常情况下,需要读取数据库,这里进行模拟
131         return this.userMap.get(username);
132     }
133
134     public static void main(String[] args) {
135         // 加盐salt让密码更加难以识破
136         Md5Hash md5Hash = new Md5Hash("123456", "654321");
137         System.out.println(md5Hash);
138     }
139
140 }
创建一个Controller进行测试,看看shiro整合的spring是否好使,如下所示:
 1 package com.bie.controller;
 2
 3 import org.apache.shiro.SecurityUtils;
 4 import org.apache.shiro.authc.AuthenticationException;
 5 import org.apache.shiro.authc.UsernamePasswordToken;
 6 import org.apache.shiro.subject.Subject;
 7 import org.springframework.stereotype.Controller;
 8 import org.springframework.web.bind.annotation.RequestMapping;
 9 import org.springframework.web.bind.annotation.RequestMethod;
10 import org.springframework.web.bind.annotation.RequestParam;
11 import org.springframework.web.bind.annotation.ResponseBody;
12
13 /**
14  * @ProjectName: shiro
15  * @Package: com.bie.controller
16  * @ClassName: UserController
17  * @Author: biehl
18  * @Description: ${description}
19  * @Date: 2020/8/6 16:36
20  * @Version: 1.0
21  */
22 @Controller
23 // @RequestMapping(value = "/user")
24 public class UserController {
25
26     @RequestMapping(value = "/subLogin", method = RequestMethod.POST)
27     @ResponseBody
28     public String subLogin(@RequestParam(value = "username") String username,
29                            @RequestParam(value = "password") String password) {
30         // 获取到主体信息
31         Subject subject = SecurityUtils.getSubject();
32         // 创建一个token
33         UsernamePasswordToken token = new UsernamePasswordToken(username, password);
34         // 主体登陆验证
35         try {
36             subject.login(token);
37         } catch (AuthenticationException e) {
38             e.printStackTrace();
39         }
40         return "login success!";
41     }
42
43 }
项目结构,如下所示:

项目测试,如下所示:

2020-08-08 14:29:48
1、Shiro集成Spring从数据库获取数据,首先需要引入mysql的jar包,如下所示:
 1 <!-- 引入mysql的jar包 -->
 2 <dependency>
 3     <groupId>mysql</groupId>
 4     <artifactId>mysql-connector-java</artifactId>
 5     <version>5.1.46</version>
 6 </dependency>
 7
 8 <!-- 引入druid数据源管理 -->
 9 <dependency>
10     <groupId>com.alibaba</groupId>
11     <artifactId>druid</artifactId>
12     <version>1.1.18</version>
13 </dependency>
14
15 <!-- 引入spring-jdbc -->
16 <dependency>
17     <groupId>org.springframework</groupId>
18     <artifactId>spring-jdbc</artifactId>
19     <version>4.3.12.RELEASE</version>
20 </dependency>
新建一个spring-dao.xml用来管理数据源信息,如下所示:
 1 <?xml version="1.0" encoding="UTF-8"?>
 2 <beans xmlns="http://www.springframework.org/schema/beans"
 3        xmlns:xsi="http://www.w3.org/2001/XMLSchema-instance"
 4        xsi:schemaLocation="http://www.springframework.org/schema/beans
 5        http://www.springframework.org/schema/beans/spring-beans.xsd">
 6
 7     <!-- 配置连接数据库的账号密码,数据库 -->
 8     <bean id="dataSource" class="com.alibaba.druid.pool.DruidDataSource">
 9         <property name="url" value="jdbc:mysql://127.0.0.1:3306/test"></property>
10         <property name="username" value="root"></property>
11         <property name="password" value="123456"></property>
12     </bean>
13
14     <!-- 使用spring的jdbcTemplate进行管理 -->
15     <bean class="org.springframework.jdbc.core.JdbcTemplate" id="jdbcTemplate">
16         <property name="dataSource" ref="dataSource"></property>
17     </bean>
18 </beans>
在spring.xml配置文件中引入spring-dao.xml配置文件,配置扫描的路径,如下所示:
 1 <?xml version="1.0" encoding="UTF-8"?>
 2 <beans xmlns="http://www.springframework.org/schema/beans"
 3        xmlns:xsi="http://www.w3.org/2001/XMLSchema-instance"
 4        xmlns:context="http://www.springframework.org/schema/context"
 5        xsi:schemaLocation="http://www.springframework.org/schema/beans
 6        http://www.springframework.org/schema/beans/spring-beans.xsd http://www.springframework.org/schema/context http://www.springframework.org/schema/context/spring-context.xsd">
 7
 8     <!-- 将新建的spring-dao.xml引入进来 -->
 9     <import resource="spring-dao.xml"></import>
10
11     <!-- 配置扫描的路径 -->
12     <context:component-scan base-package="com.bie"></context:component-scan>
13
14     <!-- 将ShiroFilterFactoryBean注入到spring容器中 -->
15     <bean id="shiroFilter" class="org.apache.shiro.spring.web.ShiroFilterFactoryBean">
16         <!-- 配置SecurityManager对象 -->
17         <property name="securityManager" ref="securityManager"></property>
18         <!-- 设置登陆页的url -->
19         <property name="loginUrl" value="login.html"></property>
20         <!-- 未认证的界面 -->
21         <property name="unauthorizedUrl" value="403.html"></property>
22         <!-- 过滤器链 -->
23         <!-- shiro给我们内置了很多Filter,这里设置过滤器链 -->
24         <property name="filterChainDefinitions">
25             <!-- authc经过认证之后才可以访问相应的路径、anon不需要任何验证就可以访问 -->
26             <!-- 过滤器链是有顺序的,从上到下,需要认证的放到下面 -->
27             <!-- 根路径下面的/subLogin也不需要进行认证 -->
28             <!-- authc表示需要经过认证之后才可以访问相应数据,anon表示不需要认证,直接可以访问 -->
29             <!-- 这个过滤器链是有顺序的,从上往下匹配,匹配到之后就直接返回了,所以匹配到login.jsp不需要认证,/*需要认证,所以放在下面 -->
30             <value>
31                 /login.html=anon
32                 /subLogin=anon
33                 /*=authc
34             </value>
35         </property>
36     </bean>
37
38     <!-- 第一步,创建SecurityManager对象 -->
39     <bean id="securityManager" class="org.apache.shiro.web.mgt.DefaultWebSecurityManager">
40         <!-- 将自定义的Realm设置到SecurityManager环境中 -->
41         <!-- 主体提交请求之后就交给我们自定义Realm来认证和授权 -->
42         <property name="realm" ref="customRealm"></property>
43     </bean>
44
45     <!-- 第二步,创建自定义Realm -->
46     <bean id="customRealm" class="com.bie.realm.CustomRealm">
47         <!-- 将加密的设置到自定义的Realm中 -->
48         <property name="credentialsMatcher" ref="credentialsMatcher"></property>
49     </bean>
50
51     <!-- 第三步,加密管理器对象 -->
52     <bean id="credentialsMatcher" class="org.apache.shiro.authc.credential.HashedCredentialsMatcher">
53         <!-- 设置加密的算法为md5 -->
54         <property name="hashAlgorithmName" value="md5"></property>
55         <!-- 设置加密次数 -->
56         <property name="hashIterations" value="1"></property>
57     </bean>
58
59 </beans>
创建用户实体类、角色实体类、权限实体类,如下所示:
 1 package com.bie.po;
 2
 3 /**
 4  * @ProjectName: shiro
 5  * @Package: com.bie.po
 6  * @ClassName: User
 7  * @Author: biehl
 8  * @Description: ${description}
 9  * @Date: 2020/8/6 16:40
10  * @Version: 1.0
11  */
12 public class User {
13
14     private String username;
15     private String password;
16
17     public String getUsername() {
18         return username;
19     }
20
21     public void setUsername(String username) {
22         this.username = username;
23     }
24
25     public String getPassword() {
26         return password;
27     }
28
29     public void setPassword(String password) {
30         this.password = password;
31     }
32
33     @Override
34     public String toString() {
35         return "User{" +
36                 "username='" + username + '\'' +
37                 ", password='" + password + '\'' +
38                 '}';
39     }
40 }
 1 package com.bie.po;
 2
 3 /**
 4  * @ProjectName: shiro
 5  * @Package: com.bie.po
 6  * @ClassName: Roles
 7  * @Author: biehl
 8  * @Description: ${description}
 9  * @Date: 2020/8/8 14:56
10  * @Version: 1.0
11  */
12 public class Roles {
13
14     private String userName;
15     private String roleName;
16
17     public String getUserName() {
18         return userName;
19     }
20
21     public void setUserName(String userName) {
22         this.userName = userName;
23     }
24
25     public String getRoleName() {
26         return roleName;
27     }
28
29     public void setRoleName(String roleName) {
30         this.roleName = roleName;
31     }
32
33     @Override
34     public String toString() {
35         return "Roles{" +
36                 "userName='" + userName + '\'' +
37                 ", roleName='" + roleName + '\'' +
38                 '}';
39     }
40 }
 1 package com.bie.po;
 2
 3 /**
 4  * @ProjectName: shiro
 5  * @Package: com.bie.po
 6  * @ClassName: Permissions
 7  * @Author: biehl
 8  * @Description: ${description}
 9  * @Date: 2020/8/8 16:57
10  * @Version: 1.0
11  */
12 public class Permissions {
13
14     private String roleName;
15     private String permission;
16
17     public String getRoleName() {
18         return roleName;
19     }
20
21     public void setRoleName(String roleName) {
22         this.roleName = roleName;
23     }
24
25     public String getPermission() {
26         return permission;
27     }
28
29     public void setPermission(String permission) {
30         this.permission = permission;
31     }
32
33     @Override
34     public String toString() {
35         return "Permissions{" +
36                 "roleName='" + roleName + '\'' +
37                 ", permission='" + permission + '\'' +
38                 '}';
39     }
40 }
创建用户Dao层、角色Dao层、权限Dao层,如下所示:
 1 package com.bie.dao;
 2
 3 import com.bie.po.User;
 4
 5 /**
 6  * @ProjectName: shiro
 7  * @Package: com.bie.dao
 8  * @ClassName: UserDao
 9  * @Author: biehl
10  * @Description: ${description}
11  * @Date: 2020/8/8 14:38
12  * @Version: 1.0
13  */
14 public interface UserDao {
15
16     User getUserByUserName(String username);
17 }
 1 package com.bie.dao;
 2
 3 import java.util.List;
 4
 5 /**
 6  * @ProjectName: shiro
 7  * @Package: com.bie.dao
 8  * @ClassName: RolesDao
 9  * @Author: biehl
10  * @Description: ${description}
11  * @Date: 2020/8/8 14:57
12  * @Version: 1.0
13  */
14 public interface RolesDao {
15
16     List<String> queryRolesByUserName(String userName);
17 }
 1 package com.bie.dao;
 2
 3 import java.util.List;
 4
 5 /**
 6  * @ProjectName: shiro
 7  * @Package: com.bie.dao
 8  * @ClassName: PermissionsDao
 9  * @Author: biehl
10  * @Description: ${description}
11  * @Date: 2020/8/8 16:58
12  * @Version: 1.0
13  */
14 public interface PermissionsDao {
15
16     List<String> getPermissionsByRoleName(String roleName);
17 }
创建用户Dao层实现类、角色Dao层实现类、权限Dao层实现类,如下所示:
 1 package com.bie.dao.impl;
 2
 3 import com.bie.dao.UserDao;
 4 import com.bie.po.User;
 5 import org.springframework.beans.factory.annotation.Autowired;
 6 import org.springframework.jdbc.core.JdbcTemplate;
 7 import org.springframework.jdbc.core.RowMapper;
 8 import org.springframework.stereotype.Component;
 9 import org.springframework.util.CollectionUtils;
10
11 import java.sql.ResultSet;
12 import java.sql.SQLException;
13 import java.util.List;
14
15 /**
16  * @ProjectName: shiro
17  * @Package: com.bie.dao.impl
18  * @ClassName: UserDaoImpl
19  * @Author: biehl
20  * @Description: ${description}
21  * @Date: 2020/8/8 14:38
22  * @Version: 1.0
23  */
24 @Component
25 public class UserDaoImpl implements UserDao {
26
27     // 注入spring的jdbcTemplate
28     @Autowired
29     private JdbcTemplate jdbcTemplate;
30
31     @Override
32     public User getUserByUserName(String username) {
33         String sql = "select username,password from users where username = ? ";
34
35         List<User> userList = jdbcTemplate.query(sql, new String[]{username}, new RowMapper<User>() {
36             @Override
37             public User mapRow(ResultSet resultSet, int i) throws SQLException {
38                 User user = new User();
39                 user.setUsername(resultSet.getString("username"));
40                 user.setPassword(resultSet.getString("password"));
41                 return user;
42             }
43         });
44         // 判断集合是否为空,如果为空就返回空
45         if (CollectionUtils.isEmpty(userList)) {
46             return null;
47         }
48         // 返回查询到的第一条数据
49         return userList.get(0);
50     }
51
52 }
 1 package com.bie.dao.impl;
 2
 3 import com.bie.dao.RolesDao;
 4 import com.bie.po.Roles;
 5 import org.springframework.beans.factory.annotation.Autowired;
 6 import org.springframework.jdbc.core.JdbcTemplate;
 7 import org.springframework.jdbc.core.RowMapper;
 8 import org.springframework.stereotype.Component;
 9
10 import java.sql.ResultSet;
11 import java.sql.SQLException;
12 import java.util.List;
13
14 /**
15  * @ProjectName: shiro
16  * @Package: com.bie.dao.impl
17  * @ClassName: RolesDaoImpl
18  * @Author: biehl
19  * @Description: ${description}
20  * @Date: 2020/8/8 14:57
21  * @Version: 1.0
22  */
23 @Component
24 public class RolesDaoImpl implements RolesDao {
25
26     // 注入spring的jdbcTemplate
27     @Autowired
28     private JdbcTemplate jdbcTemplate;
29
30     @Override
31     public List<String> queryRolesByUserName(String userName) {
32         String sql = "select role_name from user_roles where username = ? ";
33
34         List<String> roleNameList = jdbcTemplate.query(sql, new String[]{userName}, new RowMapper<String>() {
35             @Override
36             public String mapRow(ResultSet resultSet, int i) throws SQLException {
37                 return resultSet.getString("role_name");
38             }
39         });
40         return roleNameList;
41     }
42
43 }
 1 package com.bie.dao.impl;
 2
 3 import com.bie.dao.PermissionsDao;
 4 import org.springframework.beans.factory.annotation.Autowired;
 5 import org.springframework.jdbc.core.JdbcTemplate;
 6 import org.springframework.jdbc.core.RowMapper;
 7 import org.springframework.stereotype.Component;
 8
 9 import java.sql.ResultSet;
10 import java.sql.SQLException;
11 import java.util.List;
12
13 /**
14  * @ProjectName: shiro
15  * @Package: com.bie.dao.impl
16  * @ClassName: PermissionsDaoImpl
17  * @Author: biehl
18  * @Description: ${description}
19  * @Date: 2020/8/8 16:58
20  * @Version: 1.0
21  */
22 @Component
23 public class PermissionsDaoImpl implements PermissionsDao {
24
25     @Autowired
26     private JdbcTemplate jdbcTemplate;
27
28     @Override
29     public List<String> getPermissionsByRoleName(String roleName) {
30         String sql = "select permission from roles_permissions where role_name = ? ";
31
32         List<String> permissionsNameList = jdbcTemplate.query(sql, new String[]{roleName}, new RowMapper<String>() {
33             @Override
34             public String mapRow(ResultSet resultSet, int i) throws SQLException {
35                 return resultSet.getString("permission");
36             }
37         });
38         return permissionsNameList;
39     }
40
41
创建用户登陆的控制层,进行用户登陆,角色验证,权限验证,如下所示:
 1 package com.bie.controller;
 2
 3 import org.apache.shiro.SecurityUtils;
 4 import org.apache.shiro.authc.AuthenticationException;
 5 import org.apache.shiro.authc.UsernamePasswordToken;
 6 import org.apache.shiro.subject.Subject;
 7 import org.springframework.stereotype.Controller;
 8 import org.springframework.web.bind.annotation.RequestMapping;
 9 import org.springframework.web.bind.annotation.RequestMethod;
10 import org.springframework.web.bind.annotation.RequestParam;
11 import org.springframework.web.bind.annotation.ResponseBody;
12
13 /**
14  * @ProjectName: shiro
15  * @Package: com.bie.controller
16  * @ClassName: UserController
17  * @Author: biehl
18  * @Description: ${description}
19  * @Date: 2020/8/6 16:36
20  * @Version: 1.0
21  */
22 @Controller
23 // @RequestMapping(value = "/user")
24 public class UserController {
25
26     @RequestMapping(value = "/subLogin", method = RequestMethod.POST,produces = "application/json;charset=utf-8")
27     @ResponseBody
28     public String subLogin(@RequestParam(value = "username") String username,
29                            @RequestParam(value = "password") String password) {
30         // 获取到主体信息
31         Subject subject = SecurityUtils.getSubject();
32         // 创建一个token
33         UsernamePasswordToken token = new UsernamePasswordToken(username, password);
34         // 主体登陆验证
35         try {
36             subject.login(token);
37         } catch (AuthenticationException e) {
38             e.printStackTrace();
39         }
40
41         // 第四步,Realm验证
42         boolean authenticated = subject.isAuthenticated();
43         System.out.println("isAuthenticated是否进行了认证:" + authenticated);
44         if (authenticated) {
45             System.out.println("该账号通过了认证:" + authenticated);
46             // 检查角色,检查管理员的角色,给用户admin配备角色admin
47             subject.checkRole("admin");
48             System.out.println("开始检查管理员admin!");
49             if (subject.hasRole("admin")) {
50                 System.out.println(username + "拥有管理员admin角色!");
51                 // 检查权限,检查admin角色是否拥有用户删除的权限
52                 subject.checkPermission("admin:delete");
53                 System.out.println("检查管理员拥有用户删除admin:delete的权限!");
54
55                 subject.checkPermission("admin:update");
56                 subject.checkPermission("admin:select");
57                 subject.checkPermission("admin:insert");
58                 System.out.println("检查管理员拥有用户删除admin:delete,admin:update,admin:select,admin:insert的权限!");
59             }
60             if (subject.hasRole("user")) {
61                 System.out.println(username + "拥有普通账号user角色!");
62                 // 检查权限,检查admin角色是否拥有用户删除的权限
63                 subject.checkPermission("user:delete");
64                 System.out.println("检查普通账号拥有用户删除user:delete的权限!");
65
66                 subject.checkPermission("user:update");
67                 subject.checkPermission("user:select");
68                 subject.checkPermission("user:insert");
69                 System.out.println("检查普通账号拥有用户删除user:delete,user:update,user:select,user:insert的权限!");
70             }
71             return "该账号通过认证具备该角色且具备此权限";
72         }
73         return "login fail!";
74     }
75
76 }
自定义Realm,如下所示:
  1 package com.bie.realm;
  2
  3 import com.alibaba.druid.util.StringUtils;
  4 import com.bie.dao.PermissionsDao;
  5 import com.bie.dao.RolesDao;
  6 import com.bie.dao.UserDao;
  7 import com.bie.po.User;
  8 import org.apache.shiro.authc.AuthenticationException;
  9 import org.apache.shiro.authc.AuthenticationInfo;
 10 import org.apache.shiro.authc.AuthenticationToken;
 11 import org.apache.shiro.authc.SimpleAuthenticationInfo;
 12 import org.apache.shiro.authz.AuthorizationInfo;
 13 import org.apache.shiro.authz.SimpleAuthorizationInfo;
 14 import org.apache.shiro.crypto.hash.Md5Hash;
 15 import org.apache.shiro.realm.AuthorizingRealm;
 16 import org.apache.shiro.subject.PrincipalCollection;
 17 import org.apache.shiro.util.ByteSource;
 18 import org.springframework.beans.factory.annotation.Autowired;
 19
 20 import java.util.HashSet;
 21 import java.util.Iterator;
 22 import java.util.List;
 23 import java.util.Set;
 24
 25 /**
 26  * 自定义Realm
 27  *
 28  * @ProjectName: shiro
 29  * @Package: com.bie.shiro
 30  * @ClassName: CustomRealm
 31  * @Author: biehl
 32  * @Description: ${description}
 33  * @Date: 2020/8/6 14:58
 34  * @Version: 1.0
 35  */
 36 public class CustomRealm extends AuthorizingRealm {
 37
 38     // 将userDao注入进来
 39     @Autowired
 40     private UserDao userDao;
 41
 42     @Autowired
 43     private RolesDao rolesDao;
 44
 45     @Autowired
 46     private PermissionsDao permissionsDao;
 47
 48     /**
 49      * 授权使用
 50      *
 51      * @param principals
 52      * @return
 53      */
 54     public AuthorizationInfo doGetAuthorizationInfo(PrincipalCollection principals) {
 55         // 1、第一步,从认证信息中获取到用户信息。
 56         String userName = (String) principals.getPrimaryPrincipal();
 57         // 2、第二步,从数据库中或者缓存中通过用户姓名获取到角色信息
 58         Set<String> roles = getRolesByUserName(userName);
 59         // 3、第三步,从数据库中或者缓存中通过用户姓名获取到权限信息
 60         Set<String> permissions = getPermissionsByRoleName(roles);
 61         // 4、第四步,将获取到角色信息和权限信息返回
 62         SimpleAuthorizationInfo simpleAuthorizationInfo = new SimpleAuthorizationInfo();
 63         // 设置权限
 64         simpleAuthorizationInfo.setStringPermissions(permissions);
 65         // 设置角色
 66         simpleAuthorizationInfo.setRoles(roles);
 67         return simpleAuthorizationInfo;
 68     }
 69
 70     /**
 71      * 通过用户名获取到权限信息
 72      *
 73      * @param roles
 74      * @return
 75      */
 76     public Set<String> getPermissionsByRoleName(Set<String> roles) {
 77         Set<String> sets = new HashSet<String>();
 78         Iterator<String> iterator = roles.iterator();
 79         while (iterator.hasNext()) {
 80             String roleName = iterator.next();
 81             List<String> list = permissionsDao.getPermissionsByRoleName(roleName);
 82             sets.addAll(list);
 83         }
 84         return sets;
 85     }
 86
 87     /**
 88      * 模拟通过用户姓名获取到角色信息
 89      *
 90      * @param userName
 91      * @return
 92      */
 93     public Set<String> getRolesByUserName(String userName) {
 94         List<String> list = rolesDao.queryRolesByUserName(userName);
 95         Set<String> sets = new HashSet<String>(list);
 96         return sets;
 97     }
 98
 99     /**
100      * 认证使用
101      *
102      * @param token 主体传过来的认证信息
103      * @return
104      * @throws AuthenticationException
105      */
106     public AuthenticationInfo doGetAuthenticationInfo(AuthenticationToken token) throws AuthenticationException {
107         // 1、第一步,通过主体传过来的认证信息获取用户名
108         String username = (String) token.getPrincipal();
109         // 2、通过用户名到数据库中获取凭证
110         // 如果使用了shiro的HashedCredentialsMatcher加密,那么这里保存的是加密后的密文
111         String password = getPasswordByUserName(username);
112         // 判断获取到的密码是否存在,不存在直接返回null
113         if (StringUtils.isEmpty(password)) {
114             return null;
115         }
116         // 如果对象存在
117         SimpleAuthenticationInfo authenticationInfo = new SimpleAuthenticationInfo(username, password, "customRealm");
118
119         // 如果加了盐salt,认证返回的时候需要见盐salt设置进去的
120         authenticationInfo.setCredentialsSalt(ByteSource.Util.bytes("654321"));
121         // 将加了盐的认证用户返回
122         return authenticationInfo;
123     }
124
125     /**
126      * 通过用户姓名获取到用户的密码
127      *
128      * @param username
129      * @return
130      */
131     public String getPasswordByUserName(String username) {
132         // 正常情况下,需要读取数据库,这里进行模拟
133         User user = this.userDao.getUserByUserName(username);
134         return user != null ? user.getPassword() : null;
135     }
136
137     public static void main(String[] args) {
138         // 加盐salt让密码更加难以识破
139         Md5Hash md5Hash = new Md5Hash("123456", "654321");
140         System.out.println(md5Hash);
141     }
142
143 }
项目结构,如下所示:

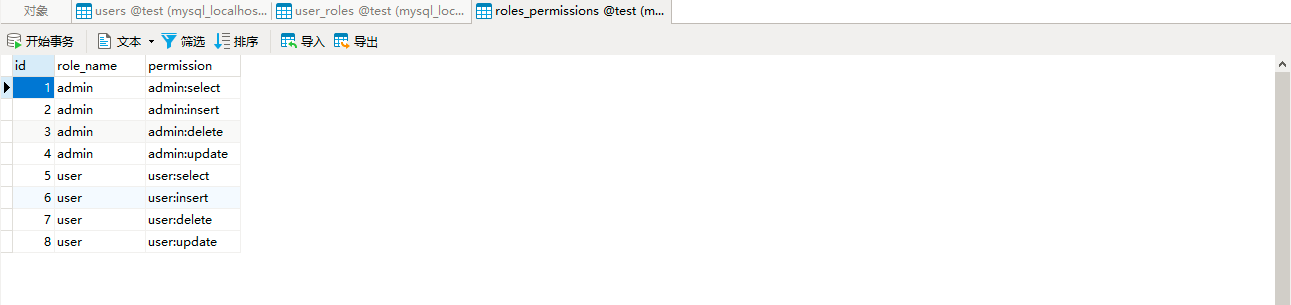
数据库测试数据,如下所示:


如果想要基于注解开发shiro和spring的整合,加上这个依赖,如下所示:
1 <!-- 基于注解开发shiro和spring整合 -->
2 <dependency>
3     <groupId>org.aspectj</groupId>
4     <artifactId>aspectjweaver</artifactId>
5     <version>1.8.9</version>
6 </dependency>
在spring-mvc.xml配置文件加上此配置,如下所示:
1  <!-- 开启aop -->
2 <aop:config proxy-target-class="true"></aop:config>
在spring.xml配置文件加上此配置,如下所示:
1 <!-- 注入securityManager -->
2     <bean id="attributeSourceAdvisor"
3           class="org.apache.shiro.spring.security.interceptor.AuthorizationAttributeSourceAdvisor">
4         <!-- 将securityManager注入 -->
5         <property name="securityManager" ref="securityManager"></property>
6     </bean>
7
8     <!-- 注入bean对象lifecycleBeanPostProcessor -->
9     <bean id="lifecycleBeanPostProcessor" class="org.apache.shiro.spring.LifecycleBeanPostProcessor"></bean>
在控制层可以加上注解进行测试,如下所示:
1 @RequiresPermissions({"admin:select","admin:insert","admin:delete","admin:update"})
2     @RequiresRoles(value = "admin")
3     @RequestMapping(value = "getRole",method = RequestMethod.GET)
4     @ResponseBody
5     public String getRoles(){
6         return "getRoles success!!!";
7     }
5、Shiro内置过滤器,和认证相关的过滤器。
1)、anon:不需要任何认证就可以进行访问。
2)、authBasic:就是http authBasic。
3)、authc:需要认证才可以进行访问。
4)、user:需要当前存在用户才可以进行访问。
5)、loout:退出。
6、Shiro内置过滤器,和授权相关的过滤器。
1)、perms:需要具备相关的权限才可以访问。
2)、roles:和perms类似。
3)、ssl:安全的协议。
4)、port:要求指定的端口号。
  1 package com.bie.controller;
  2
  3 import org.apache.shiro.SecurityUtils;
  4 import org.apache.shiro.authc.AuthenticationException;
  5 import org.apache.shiro.authc.UsernamePasswordToken;
  6 import org.apache.shiro.authz.annotation.RequiresPermissions;
  7 import org.apache.shiro.authz.annotation.RequiresRoles;
  8 import org.apache.shiro.subject.Subject;
  9 import org.springframework.stereotype.Controller;
 10 import org.springframework.web.bind.annotation.RequestMapping;
 11 import org.springframework.web.bind.annotation.RequestMethod;
 12 import org.springframework.web.bind.annotation.RequestParam;
 13 import org.springframework.web.bind.annotation.ResponseBody;
 14
 15 /**
 16  * @ProjectName: shiro
 17  * @Package: com.bie.controller
 18  * @ClassName: UserController
 19  * @Author: biehl
 20  * @Description: ${description}
 21  * @Date: 2020/8/6 16:36
 22  * @Version: 1.0
 23  */
 24 @Controller
 25 // @RequestMapping(value = "/user")
 26 public class UserController {
 27
 28     @RequestMapping(value = "/subLogin", method = RequestMethod.POST, produces = "application/json;charset=utf-8")
 29     @ResponseBody
 30     public String subLogin(@RequestParam(value = "username") String username,
 31                            @RequestParam(value = "password") String password) {
 32         // 获取到主体信息
 33         Subject subject = SecurityUtils.getSubject();
 34         // 创建一个token
 35         UsernamePasswordToken token = new UsernamePasswordToken(username, password);
 36         // 主体登陆验证
 37         try {
 38             subject.login(token);
 39         } catch (AuthenticationException e) {
 40             e.printStackTrace();
 41         }
 42
 43         // 第四步,Realm验证
 44         boolean authenticated = subject.isAuthenticated();
 45         System.out.println("isAuthenticated是否进行了认证:" + authenticated);
 46         if (authenticated) {
 47             System.out.println("该账号通过了认证:" + authenticated);
 48             // 检查角色,检查管理员的角色,给用户admin配备角色admin
 49             subject.checkRole("admin");
 50             System.out.println("开始检查管理员admin!");
 51             if (subject.hasRole("admin")) {
 52                 System.out.println(username + "拥有管理员admin角色!");
 53                 // 检查权限,检查admin角色是否拥有用户删除的权限
 54                 subject.checkPermission("admin:delete");
 55                 System.out.println("检查管理员拥有用户删除admin:delete的权限!");
 56
 57                 subject.checkPermission("admin:update");
 58                 subject.checkPermission("admin:select");
 59                 subject.checkPermission("admin:insert");
 60                 System.out.println("检查管理员拥有用户删除admin:delete,admin:update,admin:select,admin:insert的权限!");
 61             }
 62             if (subject.hasRole("user")) {
 63                 System.out.println(username + "拥有普通账号user角色!");
 64                 // 检查权限,检查admin角色是否拥有用户删除的权限
 65                 subject.checkPermission("user:delete");
 66                 System.out.println("检查普通账号拥有用户删除user:delete的权限!");
 67
 68                 subject.checkPermission("user:update");
 69                 subject.checkPermission("user:select");
 70                 subject.checkPermission("user:insert");
 71                 System.out.println("检查普通账号拥有用户删除user:delete,user:update,user:select,user:insert的权限!");
 72             }
 73             return "该账号通过认证具备该角色且具备此权限";
 74         }
 75         return "login fail!";
 76     }
 77
 78 //    @RequiresPermissions({"admin:select", "admin:insert", "admin:delete", "admin:update"})
 79 //    @RequiresRoles(value = "admin")
 80 //    @RequestMapping(value = "getRole", method = RequestMethod.GET)
 81 //    @ResponseBody
 82 //    public String getRoles() {
 83 //        return "getRoles success!!!";
 84 //    }
 85
 86
 87     @RequestMapping(value = "getRole", method = RequestMethod.GET)
 88     @ResponseBody
 89     public String getRole() {
 90         return "getRole success!!!";
 91     }
 92
 93     @RequestMapping(value = "getRole1", method = RequestMethod.GET)
 94     @ResponseBody
 95     public String getRole1() {
 96         return "getRole1 success!!!";
 97     }
 98
 99
100     @RequestMapping(value = "getPerms", method = RequestMethod.GET)
101     @ResponseBody
102     public String getPerms() {
103         return "getPerms success!!!";
104     }
105
106
107     @RequestMapping(value = "getPerms1", method = RequestMethod.GET)
108     @ResponseBody
109     public String getPerms1() {
110         return "getPerms1 success!!!";
111     }
112
113
114 }
 1 <?xml version="1.0" encoding="UTF-8"?>
 2 <beans xmlns="http://www.springframework.org/schema/beans"
 3        xmlns:xsi="http://www.w3.org/2001/XMLSchema-instance"
 4        xmlns:context="http://www.springframework.org/schema/context"
 5        xsi:schemaLocation="http://www.springframework.org/schema/beans
 6        http://www.springframework.org/schema/beans/spring-beans.xsd http://www.springframework.org/schema/context http://www.springframework.org/schema/context/spring-context.xsd">
 7
 8     <!-- 将新建的spring-dao.xml引入进来 -->
 9     <import resource="spring-dao.xml"></import>
10
11     <!-- 配置扫描的路径 -->
12     <context:component-scan base-package="com.bie"></context:component-scan>
13
14     <!-- 将ShiroFilterFactoryBean注入到spring容器中 -->
15     <bean id="shiroFilter" class="org.apache.shiro.spring.web.ShiroFilterFactoryBean">
16         <!-- 配置SecurityManager对象 -->
17         <property name="securityManager" ref="securityManager"></property>
18         <!-- 设置登陆页的url -->
19         <property name="loginUrl" value="login.html"></property>
20         <!-- 未认证的界面 -->
21         <property name="unauthorizedUrl" value="403.html"></property>
22         <!-- 过滤器链 -->
23         <!-- shiro给我们内置了很多Filter,这里设置过滤器链 -->
24         <property name="filterChainDefinitions">
25             <!-- authc经过认证之后才可以访问相应的路径、anon不需要任何验证就可以访问 -->
26             <!-- 过滤器链是有顺序的,从上到下,需要认证的放到下面 -->
27             <!-- 根路径下面的/subLogin也不需要进行认证 -->
28             <!-- authc表示需要经过认证之后才可以访问相应数据,anon表示不需要认证,直接可以访问 -->
29             <!-- 这个过滤器链是有顺序的,从上往下匹配,匹配到之后就直接返回了,所以匹配到login.jsp不需要认证,/*需要认证,所以放在下面 -->
30             <value>
31                 /login.html = anon
32                 /subLogin = anon
33                 /getRole = roles["admin"]
34                 /getRole1 = roles["admin","user"]
35                 /getPerms = perms["admin:delete"]
36                 /getPerms1 = perms["admin:select", "admin:insert", "admin:delete", "admin:update"]
37                 /* = authc
38             </value>
39         </property>
40     </bean>
41
42     <!-- 第一步,创建SecurityManager对象 -->
43     <bean id="securityManager" class="org.apache.shiro.web.mgt.DefaultWebSecurityManager">
44         <!-- 将自定义的Realm设置到SecurityManager环境中 -->
45         <!-- 主体提交请求之后就交给我们自定义Realm来认证和授权 -->
46         <property name="realm" ref="customRealm"></property>
47     </bean>
48
49     <!-- 第二步,创建自定义Realm -->
50     <bean id="customRealm" class="com.bie.realm.CustomRealm">
51         <!-- 将加密的设置到自定义的Realm中 -->
52         <property name="credentialsMatcher" ref="credentialsMatcher"></property>
53     </bean>
54
55     <!-- 第三步,加密管理器对象 -->
56     <bean id="credentialsMatcher" class="org.apache.shiro.authc.credential.HashedCredentialsMatcher">
57         <!-- 设置加密的算法为md5 -->
58         <property name="hashAlgorithmName" value="md5"></property>
59         <!-- 设置加密次数 -->
60         <property name="hashIterations" value="1"></property>
61     </bean>
62
63     <!-- 注入securityManager -->
64     <bean id="attributeSourceAdvisor"
65           class="org.apache.shiro.spring.security.interceptor.AuthorizationAttributeSourceAdvisor">
66         <!-- 将securityManager注入 -->
67         <property name="securityManager" ref="securityManager"></property>
68     </bean>
69
70     <!-- 注入bean对象lifecycleBeanPostProcessor -->
71     <bean id="lifecycleBeanPostProcessor" class="org.apache.shiro.spring.LifecycleBeanPostProcessor"></bean>
72
73 </beans>
7、Shiro自定义过滤器。
 1 package com.bie.filter;
 2
 3 import org.apache.shiro.subject.Subject;
 4 import org.apache.shiro.web.filter.authz.AuthorizationFilter;
 5
 6 import javax.servlet.ServletRequest;
 7 import javax.servlet.ServletResponse;
 8
 9 /**
10  * 满足任何一个角色就可以进行操作
11  * <p>
12  * AuthorizationFilter:此类是和授权相关的过滤器Filter
13  * <p>
14  * AuthenticatingFilter:此类是和认证相关的过滤器Filter
15  *
16  * @ProjectName: shiro
17  * @Package: com.bie.filter
18  * @ClassName: ShiroRolesFilter
19  * @Author: biehl
20  * @Description: ${description}
21  * @Date: 2020/8/11 16:23
22  * @Version: 1.0
23  */
24 public class ShiroRolesFilter extends AuthorizationFilter {
25
26     /**
27      * @param request
28      * @param response
29      * @param mappedValue
30      * @return
31      */
32     @Override
33     protected boolean isAccessAllowed(ServletRequest request, ServletResponse response, Object mappedValue) {
34         // 获取到相应的主体subject
35         Subject subject = getSubject(request, response);
36         // 获取到角色数据
37         String[] roles = (String[]) mappedValue;
38         // 判断如果数组为空,说明可以直接访问,不需要任何角色
39         if (roles == null || roles.length == 0) {
40             return true;
41         }
42         // 如果不为空,就开始进行遍历
43         for (String role : roles) {
44             // 如果包含当前的角色
45             if (subject.hasRole(role)) {
46                 // 直接返回为true
47                 return true;
48             }
49         }
50         return false;
51     }
52
53 }
自定义过滤器,需要进行配置才可以生效的,如下所示:
 1 <?xml version="1.0" encoding="UTF-8"?>
 2 <beans xmlns="http://www.springframework.org/schema/beans"
 3        xmlns:xsi="http://www.w3.org/2001/XMLSchema-instance"
 4        xmlns:context="http://www.springframework.org/schema/context"
 5        xmlns:util="http://www.springframework.org/schema/util"
 6        xsi:schemaLocation="http://www.springframework.org/schema/beans
 7        http://www.springframework.org/schema/beans/spring-beans.xsd
 8        http://www.springframework.org/schema/context
 9        http://www.springframework.org/schema/context/spring-context.xsd
10        http://www.springframework.org/schema/util
11        http://www.springframework.org/schema/util/spring-util.xsd">
12
13     <!-- 将新建的spring-dao.xml引入进来 -->
14     <import resource="spring-dao.xml"></import>
15
16     <!-- 配置扫描的路径 -->
17     <context:component-scan base-package="com.bie"></context:component-scan>
18
19     <!-- 将ShiroFilterFactoryBean注入到spring容器中 -->
20     <bean id="shiroFilter" class="org.apache.shiro.spring.web.ShiroFilterFactoryBean">
21         <!-- 配置SecurityManager对象 -->
22         <property name="securityManager" ref="securityManager"></property>
23         <!-- 设置登陆页的url -->
24         <property name="loginUrl" value="login.html"></property>
25         <!-- 未认证的界面 -->
26         <property name="unauthorizedUrl" value="403.html"></property>
27         <!-- 过滤器链 -->
28         <!-- shiro给我们内置了很多Filter,这里设置过滤器链 -->
29         <property name="filterChainDefinitions">
30             <!-- authc经过认证之后才可以访问相应的路径、anon不需要任何验证就可以访问 -->
31             <!-- 过滤器链是有顺序的,从上到下,需要认证的放到下面 -->
32             <!-- 根路径下面的/subLogin也不需要进行认证 -->
33             <!-- authc表示需要经过认证之后才可以访问相应数据,anon表示不需要认证,直接可以访问 -->
34             <!-- 这个过滤器链是有顺序的,从上往下匹配,匹配到之后就直接返回了,所以匹配到login.jsp不需要认证,/*需要认证,所以放在下面 -->
35             <value>
36                 /login.html = anon
37                 /subLogin = anon
38                 /getRole = rolesOr["admin","user"]
39                 /getRole1 = roles["admin","user"]
40                 /* = authc
41             </value>
42         </property>
43         <!-- 引入自定义的授权过滤器 -->
44         <!--<property name="filters">
45             <map>
46                 <entry key="rolesOr" value="rolesOrFilter"></entry>
47             </map>
48         </property>-->
49         <property name="filters">
50             <util:map>
51                 <entry key="rolesOr" value-ref="rolesOrFilter"></entry>
52             </util:map>
53         </property>
54     </bean>
55
56
57     <!-- 创建自定义filter -->
58     <bean  id="rolesOrFilter" class="com.bie.filter.ShiroRolesFilter"></bean>
59
60
61     <!-- 第一步,创建SecurityManager对象 -->
62     <bean id="securityManager" class="org.apache.shiro.web.mgt.DefaultWebSecurityManager">
63         <!-- 将自定义的Realm设置到SecurityManager环境中 -->
64         <!-- 主体提交请求之后就交给我们自定义Realm来认证和授权 -->
65         <property name="realm" ref="customRealm"></property>
66     </bean>
67
68     <!-- 第二步,创建自定义Realm -->
69     <bean id="customRealm" class="com.bie.realm.CustomRealm">
70         <!-- 将加密的设置到自定义的Realm中 -->
71         <property name="credentialsMatcher" ref="credentialsMatcher"></property>
72     </bean>
73
74     <!-- 第三步,加密管理器对象 -->
75     <bean id="credentialsMatcher" class="org.apache.shiro.authc.credential.HashedCredentialsMatcher">
76         <!-- 设置加密的算法为md5 -->
77         <property name="hashAlgorithmName" value="md5"></property>
78         <!-- 设置加密次数 -->
79         <property name="hashIterations" value="1"></property>
80     </bean>
81
82     <!-- 注入securityManager -->
83     <bean id="attributeSourceAdvisor"
84           class="org.apache.shiro.spring.security.interceptor.AuthorizationAttributeSourceAdvisor">
85         <!-- 将securityManager注入 -->
86         <property name="securityManager" ref="securityManager"></property>
87     </bean>
88
89     <!-- 注入bean对象lifecycleBeanPostProcessor -->
90     <bean id="lifecycleBeanPostProcessor" class="org.apache.shiro.spring.LifecycleBeanPostProcessor"></bean>
91
92 </beans>

 浙公网安备 33010602011771号