
SpringBoot整合Servlet、Filter、Listener、访问静态资源、文件上传
1、Springboot整合Servlet,分为两种方式,分别如下所示:
首先说明一下,这里使用的是Springboot2.2.6.RELEASE版本,由于Springboot迭代很快,所以要注意版本问题。
 1 <?xml version="1.0" encoding="UTF-8"?>
 2 <project xmlns="http://maven.apache.org/POM/4.0.0" xmlns:xsi="http://www.w3.org/2001/XMLSchema-instance"
 3          xsi:schemaLocation="http://maven.apache.org/POM/4.0.0 https://maven.apache.org/xsd/maven-4.0.0.xsd">
 4     <modelVersion>4.0.0</modelVersion>
 5     <parent>
 6         <groupId>org.springframework.boot</groupId>
 7         <artifactId>spring-boot-starter-parent</artifactId>
 8         <version>2.2.6.RELEASE</version>
 9         <relativePath/> <!-- lookup parent from repository -->
10     </parent>
11     <groupId>com.bie</groupId>
12     <artifactId>springboot-hello</artifactId>
13     <version>0.0.1-SNAPSHOT</version>
14     <name>springboot-hello</name>
15     <description>Demo project for Spring Boot</description>
16
17     <properties>
18         <java.version>1.8</java.version>
19     </properties>
20
21     <dependencies>
22         <dependency>
23             <groupId>org.springframework.boot</groupId>
24             <artifactId>spring-boot-starter-web</artifactId>
25         </dependency>
26
27         <dependency>
28             <groupId>org.springframework.boot</groupId>
29             <artifactId>spring-boot-starter-test</artifactId>
30             <scope>test</scope>
31             <exclusions>
32                 <exclusion>
33                     <groupId>org.junit.vintage</groupId>
34                     <artifactId>junit-vintage-engine</artifactId>
35                 </exclusion>
36             </exclusions>
37         </dependency>
38     </dependencies>
39
40     <build>
41         <plugins>
42             <plugin>
43                 <groupId>org.springframework.boot</groupId>
44                 <artifactId>spring-boot-maven-plugin</artifactId>
45             </plugin>
46         </plugins>
47     </build>
48
49 </project>
1.1、通过注解扫描完成Servlet组件的注册。首先继承HttpServlet,然后使用注解@WebServlet(name = "annoationServlet", urlPatterns = "/annoationServlet")来完成Springboot对Servlet的整合。
 1 package com.bie.springboothello.servlet;
 2
 3 import javax.servlet.ServletException;
 4 import javax.servlet.annotation.WebServlet;
 5 import javax.servlet.http.HttpServlet;
 6 import javax.servlet.http.HttpServletRequest;
 7 import javax.servlet.http.HttpServletResponse;
 8 import java.io.IOException;
 9
10 /**
11  * Springboot整合Servlet的方式一,通过注解扫描完成Servlet组件的注册。
12  * 1、传统的方式可以在web.xml配置文件中编写配置。
13  * 2、Springboot可以使用注解的方式来进行注解扫描。
14  */
15 @WebServlet(name = "annoationServlet", urlPatterns = "/annoationServlet")
16 public class AnnoationServlet extends HttpServlet {
17
18     @Override
19     protected void doGet(HttpServletRequest request, HttpServletResponse response) throws ServletException, IOException {
20         System.out.println("doGet通过注解扫描完成Servlet组件的注册");
21     }
22
23     @Override
24     protected void doPost(HttpServletRequest request, HttpServletResponse response) throws ServletException, IOException {
25         System.out.println("doPost通过注解扫描完成Servlet组件的注册");
26     }
27
28 }
然后,在SpringBoot启动时会扫描@WebServlet,并将该类实例化。
 1 package com.bie.springboothello;
 2
 3 import org.springframework.boot.SpringApplication;
 4 import org.springframework.boot.autoconfigure.SpringBootApplication;
 5 import org.springframework.boot.web.servlet.ServletComponentScan;
 6
 7 @SpringBootApplication
 8 @ServletComponentScan // 在SpringBoot启动时会扫描@WebServlet,并将该类实例化
 9 public class SpringbootHelloApplication {
10
11     public static void main(String[] args) {
12         SpringApplication.run(SpringbootHelloApplication.class, args);
13     }
14
15 }
1.2、通过方法完成Servlet组件的注册。
 1 package com.bie.springboothello.servlet;
 2
 3 import javax.servlet.ServletException;
 4 import javax.servlet.http.HttpServlet;
 5 import javax.servlet.http.HttpServletRequest;
 6 import javax.servlet.http.HttpServletResponse;
 7 import java.io.IOException;
 8
 9 /**
10  * 通过方法完成Servlet组件的注册。
11  */
12 public class MethodServlet extends HttpServlet {
13
14     @Override
15     protected void doGet(HttpServletRequest request, HttpServletResponse response) throws ServletException, IOException {
16         System.out.println("doGet通过方法完成Servlet组件的注册。");
17     }
18
19     @Override
20     protected void doPost(HttpServletRequest request, HttpServletResponse response) throws ServletException, IOException {
21         System.out.println("doPost通过方法完成Servlet组件的注册。");
22     }
23
24
25 }
通过在主启动类里面,编写返回ServletRegistrationBean类型的方法,ServletRegistrationBean该对象就是为我们注册Servlet的对象。
 1 package com.bie.springboothello;
 2
 3 import com.bie.springboothello.servlet.MethodServlet;
 4 import org.springframework.boot.SpringApplication;
 5 import org.springframework.boot.autoconfigure.SpringBootApplication;
 6 import org.springframework.boot.web.servlet.ServletRegistrationBean;
 7 import org.springframework.context.annotation.Bean;
 8
 9 @SpringBootApplication
10 public class SpringbootHelloApplication {
11
12     /**
13      * 1、ServletRegistrationBean该对象就是为我们注册Servlet的对象。
14      *
15      * @return
16      */
17     @Bean // 将该对象注册到容器中。
18     public ServletRegistrationBean getServletRegistrationBean() {
19         // 实例化自己定义的Servlet对象
20         ServletRegistrationBean registrationBean = new ServletRegistrationBean(new MethodServlet());
21         // 指定urlPatterns,完成Servlet的urlPattern的配置。
22         registrationBean.addUrlMappings("/methodServlet");
23         // 返回该对象
24         return registrationBean;
25     }
26
27     public static void main(String[] args) {
28         SpringApplication.run(SpringbootHelloApplication.class, args);
29     }
30
31
32 }
2、Springboot整合 Filter。
2.1、通过注解扫描完成 Filter 组件的注册。首先实现Filter接口,然后实现三个方法,然后使用注解@WebFilter(filterName = "annoationFilter", urlPatterns = "/annoationFilter")来完成Springboot对Filter的整合。
 1 package com.bie.springboothello.listener;
 2
 3 import javax.servlet.*;
 4 import javax.servlet.annotation.WebFilter;
 5 import java.io.IOException;
 6
 7 /**
 8  * SpringBoot整合 Filter方式一,通过注解扫描完成Filter组件的注册。
 9  * 1、urlPatterns是String数组类型的,可以拦截执行的类型。
10  */
11 // @WebFilter(filterName = "annoationFilter", urlPatterns = {"*.do", "*.jsp"})
12 @WebFilter(filterName = "annoationFilter", urlPatterns = "/annoationFilter")
13 public class AnnoationFilter implements Filter {
14
15     @Override
16     public void init(FilterConfig filterConfig) throws ServletException {
17         System.out.println("通过注解扫描完成Filter组件的注册,初始化init方法!");
18     }
19
20     @Override
21     public void doFilter(ServletRequest servletRequest, ServletResponse servletResponse, FilterChain filterChain) throws IOException, ServletException {
22         System.out.println("通过注解扫描完成Filter组件的注册,过滤器doFilter开始执行方法!");
23         filterChain.doFilter(servletRequest, servletResponse);
24         System.out.println("通过注解扫描完成Filter组件的注册,过滤器doFilter执行结束方法!");
25     }
26
27     @Override
28     public void destroy() {
29         System.out.println("通过注解扫描完成Filter组件的注册,销毁destroy方法!");
30     }
31
32 }
然后,在SpringBoot启动时会扫描@WebServlet,并将该类实例化。
 1 package com.bie.springboothello;
 2
 3 import org.springframework.boot.SpringApplication;
 4 import org.springframework.boot.autoconfigure.SpringBootApplication;
 5 import org.springframework.boot.web.servlet.ServletComponentScan;
 6
 7 @SpringBootApplication
 8 @ServletComponentScan // 在SpringBoot启动时会扫描@WebServlet,并将该类实例化
 9 public class SpringbootHelloApplication {
10
11     public static void main(String[] args) {
12         SpringApplication.run(SpringbootHelloApplication.class, args);
13     }
14
15
16 }
2.2、通过方法完成 Filter 组件的注册。
 1 package com.bie.springboothello.filter;
 2
 3 import javax.servlet.*;
 4 import java.io.IOException;
 5
 6 /**
 7  * SpringBoot整合 Filter方式一,通过方法完成 Filter 组件的注册。
 8  */
 9 public class MethodFilter implements Filter {
10
11     @Override
12     public void init(FilterConfig filterConfig) throws ServletException {
13         System.out.println("通过方法完成 Filter 组件的注册,初始化init方法!");
14     }
15
16     @Override
17     public void doFilter(ServletRequest servletRequest, ServletResponse servletResponse, FilterChain filterChain) throws IOException, ServletException {
18         System.out.println("通过方法完成 Filter 组件的注册,过滤器doFilter开始执行方法!");
19         filterChain.doFilter(servletRequest, servletResponse);
20         System.out.println("通过方法完成 Filter 组件的注册,过滤器doFilter执行结束方法!");
21     }
22
23     @Override
24     public void destroy() {
25         System.out.println("通过方法完成 Filter 组件的注册,销毁destroy方法!");
26     }
27
28 }
通过在主启动类里面,编写返回 FilterRegistrationBean 类型的方法,FilterRegistrationBean 该对象就是为我们注册Servlet的对象。
 1 package com.bie.springboothello;
 2
 3 import com.bie.springboothello.filter.MethodFilter;
 4 import org.springframework.boot.SpringApplication;
 5 import org.springframework.boot.autoconfigure.SpringBootApplication;
 6 import org.springframework.boot.web.servlet.FilterRegistrationBean;
 7 import org.springframework.context.annotation.Bean;
 8
 9 @SpringBootApplication
10 public class SpringbootHelloApplication {
11
12     /**
13      * FilterRegistrationBean该对象就是为我们注册 Filter 的对象。
14      *
15      * @return
16      */
17     @Bean // 注册Bean
18     public FilterRegistrationBean getFilterRegistrationBean() {
19         // 实例化自己定义的Servlet对象
20         FilterRegistrationBean registrationBean = new FilterRegistrationBean(new MethodFilter());
21         // 指定urlPatterns,完成Servlet的urlPattern的配置。
22         // bean.addUrlPatterns(new String[]{"*.do","*.jsp"});
23         registrationBean.addUrlPatterns("/methodFilter");
24         // 返回该对象
25         return registrationBean;
26     }
27
28     public static void main(String[] args) {
29         SpringApplication.run(SpringbootHelloApplication.class, args);
30     }
31
32
33 }
3、Springboot整合 Listener。
3.1、通过注解扫描完成 Listener 组件的注册。首先实现 ServletContextListener 接口,然后实现两个个方法,使用注解@WebListener将该监听器添加到容器中。
 1 package com.bie.springboothello.listener;
 2
 3 import javax.servlet.ServletContextEvent;
 4 import javax.servlet.ServletContextListener;
 5 import javax.servlet.annotation.WebListener;
 6
 7 /**
 8  * 监听器,需要什么监听器取决于要实现那个监听器.Springboot整合Listener
 9  */
10 @WebListener
11 public class AnnoationListener implements ServletContextListener {
12
13     @Override
14     public void contextInitialized(ServletContextEvent sce) {
15         System.out.println("通过注解扫描完成Listener组件的注册,Listener...init......");
16     }
17
18     @Override
19     public void contextDestroyed(ServletContextEvent sce) {
20         System.out.println("通过注解扫描完成Listener组件的注册,Listener...destroyed......");
21     }
22
23 }
然后,在SpringBoot启动时会扫描@WebListener,并将该类实例化。
 1 package com.bie.springboothello;
 2
 3 import org.springframework.boot.SpringApplication;
 4 import org.springframework.boot.autoconfigure.SpringBootApplication;
 5 import org.springframework.boot.web.servlet.ServletComponentScan;
 6
 7 @SpringBootApplication
 8 @ServletComponentScan // 在SpringBoot启动时会扫描@WebServlet,并将该类实例化
 9 public class SpringbootHelloApplication {
10
11     public static void main(String[] args) {
12         SpringApplication.run(SpringbootHelloApplication.class, args);
13     }
14
15
16 }
3.2、通过方法完成 Listener 组件注册。
 1 package com.bie.springboothello.listener;
 2
 3 import javax.servlet.ServletContextEvent;
 4 import javax.servlet.ServletContextListener;
 5
 6 public class MethodListener implements ServletContextListener {
 7
 8     @Override
 9     public void contextInitialized(ServletContextEvent sce) {
10         System.out.println("通过方法完成 Listener 组件注册,Listener...init......");
11     }
12
13     @Override
14     public void contextDestroyed(ServletContextEvent sce) {
15         System.out.println("通过方法完成 Listener 组件注册,Listener...destroyed......");
16     }
17 }
通过在主启动类里面,编写返回 ServletListenerRegistrationBean<MethodListener> 类型的方法,ServletListenerRegistrationBean<MethodListener>该对象就是为我们注册Listener的对象。
 1 package com.bie.springboothello;
 2
 3 import com.bie.springboothello.listener.MethodListener;
 4 import org.springframework.boot.SpringApplication;
 5 import org.springframework.boot.autoconfigure.SpringBootApplication;
 6 import org.springframework.boot.web.servlet.ServletListenerRegistrationBean;
 7 import org.springframework.context.annotation.Bean;
 8
 9 @SpringBootApplication
10 public class SpringbootHelloApplication {
11
12     /**
13      * 提供方法注册Listener监听器
14      *
15      * @return
16      */
17     @Bean
18     public ServletListenerRegistrationBean<MethodListener> getServletListenerRegistrationBean() {
19         // 泛型就是需要实例化的监听器对象。
20         ServletListenerRegistrationBean<MethodListener> registrationBean = new ServletListenerRegistrationBean<MethodListener>(new MethodListener());
21         return registrationBean;
22     }
23
24     public static void main(String[] args) {
25         SpringApplication.run(SpringbootHelloApplication.class, args);
26     }
27
28
29 }
4、Springboot访问静态资源。
4.1、SpringBoot 从 classpath/static 的目录,注意,目录名称必须是 static,这里的classpath就是指的src\main\resources目录。
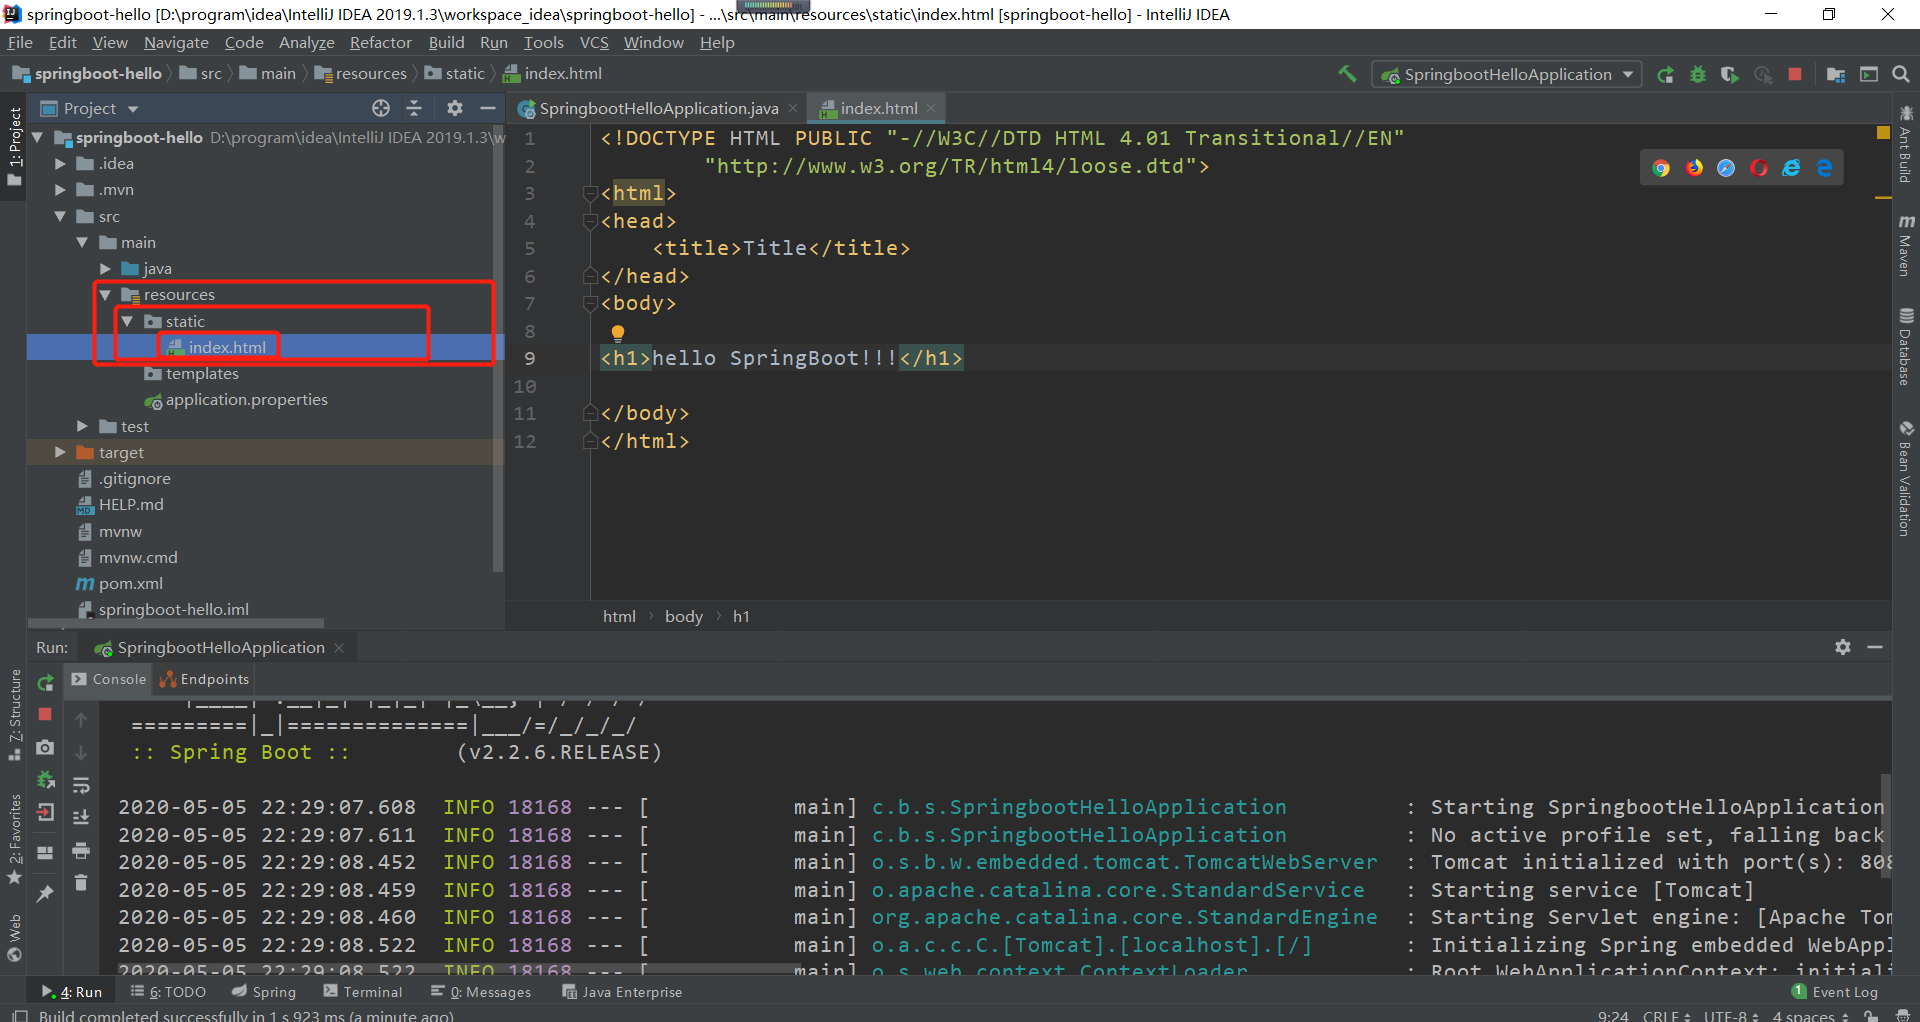
可以使用http://127.0.0.1:8080/index.html进行访问即可。
4.2、ServletContext 根目录下进行查找,注意,在 src/main/webapp目录名称必须要webapp。ServletContext目录就是src/main下面的webapp这个目录。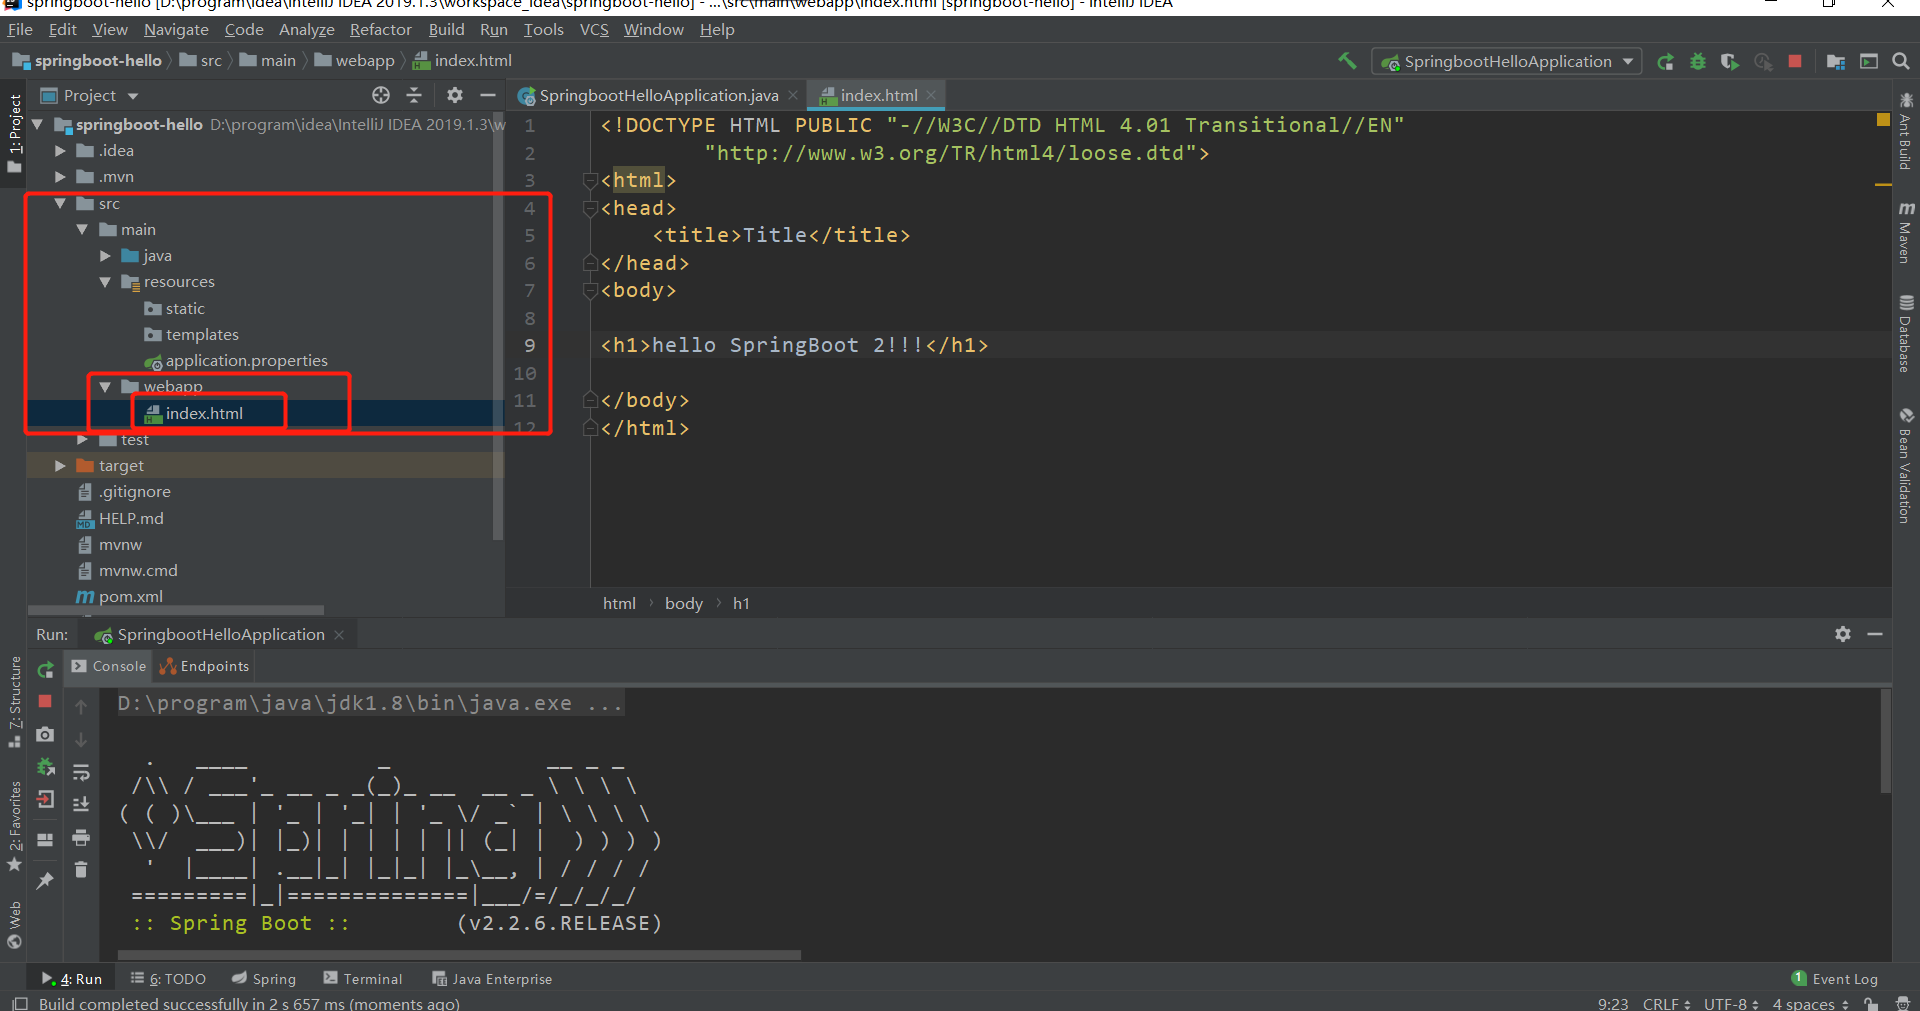
可以使用http://127.0.0.1:8080/index.html进行访问即可。
5、SpringBoot文件上传。遇到的错误,如下所示:
 1 .   ____          _            __ _ _
 2  /\\ / ___'_ __ _ _(_)_ __  __ _ \ \ \ \
 3 ( ( )\___ | '_ | '_| | '_ \/ _` | \ \ \ \
 4  \\/  ___)| |_)| | | | | || (_| |  ) ) ) )
 5   '  |____| .__|_| |_|_| |_\__, | / / / /
 6  =========|_|==============|___/=/_/_/_/
 7  :: Spring Boot ::        (v2.2.6.RELEASE)
 8
 9 2020-05-06 19:37:38.233  INFO 8744 --- [           main] c.b.s.SpringbootHelloApplication         : Starting SpringbootHelloApplication on DESKTOP-V37QSSE with PID 8744 (D:\program\idea\IntelliJ IDEA 2019.1.3\workspace_idea\springboot-hello\target\classes started by biehl in D:\program\idea\IntelliJ IDEA 2019.1.3\workspace_idea\springboot-hello)
10 2020-05-06 19:37:38.245  INFO 8744 --- [           main] c.b.s.SpringbootHelloApplication         : No active profile set, falling back to default profiles: default
11 2020-05-06 19:37:39.598  INFO 8744 --- [           main] o.s.b.w.embedded.tomcat.TomcatWebServer  : Tomcat initialized with port(s): 8080 (http)
12 2020-05-06 19:37:39.613  INFO 8744 --- [           main] o.apache.catalina.core.StandardService   : Starting service [Tomcat]
13 2020-05-06 19:37:39.614  INFO 8744 --- [           main] org.apache.catalina.core.StandardEngine  : Starting Servlet engine: [Apache Tomcat/9.0.33]
14 2020-05-06 19:37:39.701  INFO 8744 --- [           main] o.a.c.c.C.[Tomcat].[localhost].[/]       : Initializing Spring embedded WebApplicationContext
15 2020-05-06 19:37:39.701  INFO 8744 --- [           main] o.s.web.context.ContextLoader            : Root WebApplicationContext: initialization completed in 1316 ms
16 2020-05-06 19:37:39.881  INFO 8744 --- [           main] o.s.s.concurrent.ThreadPoolTaskExecutor  : Initializing ExecutorService 'applicationTaskExecutor'
17 2020-05-06 19:37:39.938  INFO 8744 --- [           main] o.s.b.a.w.s.WelcomePageHandlerMapping    : Adding welcome page: class path resource [static/index.html]
18 2020-05-06 19:37:40.047  INFO 8744 --- [           main] o.s.b.w.embedded.tomcat.TomcatWebServer  : Tomcat started on port(s): 8080 (http) with context path ''
19 2020-05-06 19:37:40.050  INFO 8744 --- [           main] c.b.s.SpringbootHelloApplication         : Started SpringbootHelloApplication in 2.303 seconds (JVM running for 5.065)
20 2020-05-06 19:38:03.806  INFO 8744 --- [nio-8080-exec-1] o.a.c.c.C.[Tomcat].[localhost].[/]       : Initializing Spring DispatcherServlet 'dispatcherServlet'
21 2020-05-06 19:38:03.807  INFO 8744 --- [nio-8080-exec-1] o.s.web.servlet.DispatcherServlet        : Initializing Servlet 'dispatcherServlet'
22 2020-05-06 19:38:03.812  INFO 8744 --- [nio-8080-exec-1] o.s.web.servlet.DispatcherServlet        : Completed initialization in 5 ms
23 文件的名称: 电脑密码.txt
24 2020-05-06 19:38:41.227 ERROR 8744 --- [nio-8080-exec-3] o.a.c.c.C.[.[.[/].[dispatcherServlet]    : Servlet.service() for servlet [dispatcherServlet] in context with path [] threw exception
25
26 java.io.IOException: org.apache.tomcat.util.http.fileupload.FileUploadException: Cannot write uploaded file to disk!
27     at org.apache.catalina.core.ApplicationPart.write(ApplicationPart.java:122) ~[tomcat-embed-core-9.0.33.jar:9.0.33]
28     at org.springframework.web.multipart.support.StandardMultipartHttpServletRequest$StandardMultipartFile.transferTo(StandardMultipartHttpServletRequest.java:256) ~[spring-web-5.2.5.RELEASE.jar:5.2.5.RELEASE]
29     at com.bie.springboothello.uploadFile.FileUploadController.fileUpload(FileUploadController.java:31) ~[classes/:na]
30     at sun.reflect.NativeMethodAccessorImpl.invoke0(Native Method) ~[na:1.8.0_191]
31     at sun.reflect.NativeMethodAccessorImpl.invoke(NativeMethodAccessorImpl.java:62) ~[na:1.8.0_191]
32     at sun.reflect.DelegatingMethodAccessorImpl.invoke(DelegatingMethodAccessorImpl.java:43) ~[na:1.8.0_191]
33     at java.lang.reflect.Method.invoke(Method.java:498) ~[na:1.8.0_191]
34     at org.springframework.web.method.support.InvocableHandlerMethod.doInvoke(InvocableHandlerMethod.java:190) ~[spring-web-5.2.5.RELEASE.jar:5.2.5.RELEASE]
35     at org.springframework.web.method.support.InvocableHandlerMethod.invokeForRequest(InvocableHandlerMethod.java:138) ~[spring-web-5.2.5.RELEASE.jar:5.2.5.RELEASE]
36     at org.springframework.web.servlet.mvc.method.annotation.ServletInvocableHandlerMethod.invokeAndHandle(ServletInvocableHandlerMethod.java:105) ~[spring-webmvc-5.2.5.RELEASE.jar:5.2.5.RELEASE]
37     at org.springframework.web.servlet.mvc.method.annotation.RequestMappingHandlerAdapter.invokeHandlerMethod(RequestMappingHandlerAdapter.java:879) ~[spring-webmvc-5.2.5.RELEASE.jar:5.2.5.RELEASE]
38     at org.springframework.web.servlet.mvc.method.annotation.RequestMappingHandlerAdapter.handleInternal(RequestMappingHandlerAdapter.java:793) ~[spring-webmvc-5.2.5.RELEASE.jar:5.2.5.RELEASE]
39     at org.springframework.web.servlet.mvc.method.AbstractHandlerMethodAdapter.handle(AbstractHandlerMethodAdapter.java:87) ~[spring-webmvc-5.2.5.RELEASE.jar:5.2.5.RELEASE]
40     at org.springframework.web.servlet.DispatcherServlet.doDispatch(DispatcherServlet.java:1040) ~[spring-webmvc-5.2.5.RELEASE.jar:5.2.5.RELEASE]
41     at org.springframework.web.servlet.DispatcherServlet.doService(DispatcherServlet.java:943) ~[spring-webmvc-5.2.5.RELEASE.jar:5.2.5.RELEASE]
42     at org.springframework.web.servlet.FrameworkServlet.processRequest(FrameworkServlet.java:1006) ~[spring-webmvc-5.2.5.RELEASE.jar:5.2.5.RELEASE]
43     at org.springframework.web.servlet.FrameworkServlet.doPost(FrameworkServlet.java:909) ~[spring-webmvc-5.2.5.RELEASE.jar:5.2.5.RELEASE]
44     at javax.servlet.http.HttpServlet.service(HttpServlet.java:660) ~[tomcat-embed-core-9.0.33.jar:9.0.33]
45     at org.springframework.web.servlet.FrameworkServlet.service(FrameworkServlet.java:883) ~[spring-webmvc-5.2.5.RELEASE.jar:5.2.5.RELEASE]
46     at javax.servlet.http.HttpServlet.service(HttpServlet.java:741) ~[tomcat-embed-core-9.0.33.jar:9.0.33]
47     at org.apache.catalina.core.ApplicationFilterChain.internalDoFilter(ApplicationFilterChain.java:231) ~[tomcat-embed-core-9.0.33.jar:9.0.33]
48     at org.apache.catalina.core.ApplicationFilterChain.doFilter(ApplicationFilterChain.java:166) ~[tomcat-embed-core-9.0.33.jar:9.0.33]
49     at org.apache.tomcat.websocket.server.WsFilter.doFilter(WsFilter.java:53) ~[tomcat-embed-websocket-9.0.33.jar:9.0.33]
50     at org.apache.catalina.core.ApplicationFilterChain.internalDoFilter(ApplicationFilterChain.java:193) ~[tomcat-embed-core-9.0.33.jar:9.0.33]
51     at org.apache.catalina.core.ApplicationFilterChain.doFilter(ApplicationFilterChain.java:166) ~[tomcat-embed-core-9.0.33.jar:9.0.33]
52     at org.springframework.web.filter.RequestContextFilter.doFilterInternal(RequestContextFilter.java:100) ~[spring-web-5.2.5.RELEASE.jar:5.2.5.RELEASE]
53     at org.springframework.web.filter.OncePerRequestFilter.doFilter(OncePerRequestFilter.java:119) ~[spring-web-5.2.5.RELEASE.jar:5.2.5.RELEASE]
54     at org.apache.catalina.core.ApplicationFilterChain.internalDoFilter(ApplicationFilterChain.java:193) ~[tomcat-embed-core-9.0.33.jar:9.0.33]
55     at org.apache.catalina.core.ApplicationFilterChain.doFilter(ApplicationFilterChain.java:166) ~[tomcat-embed-core-9.0.33.jar:9.0.33]
56     at org.springframework.web.filter.FormContentFilter.doFilterInternal(FormContentFilter.java:93) ~[spring-web-5.2.5.RELEASE.jar:5.2.5.RELEASE]
57     at org.springframework.web.filter.OncePerRequestFilter.doFilter(OncePerRequestFilter.java:119) ~[spring-web-5.2.5.RELEASE.jar:5.2.5.RELEASE]
58     at org.apache.catalina.core.ApplicationFilterChain.internalDoFilter(ApplicationFilterChain.java:193) ~[tomcat-embed-core-9.0.33.jar:9.0.33]
59     at org.apache.catalina.core.ApplicationFilterChain.doFilter(ApplicationFilterChain.java:166) ~[tomcat-embed-core-9.0.33.jar:9.0.33]
60     at org.springframework.web.filter.CharacterEncodingFilter.doFilterInternal(CharacterEncodingFilter.java:201) ~[spring-web-5.2.5.RELEASE.jar:5.2.5.RELEASE]
61     at org.springframework.web.filter.OncePerRequestFilter.doFilter(OncePerRequestFilter.java:119) ~[spring-web-5.2.5.RELEASE.jar:5.2.5.RELEASE]
62     at org.apache.catalina.core.ApplicationFilterChain.internalDoFilter(ApplicationFilterChain.java:193) ~[tomcat-embed-core-9.0.33.jar:9.0.33]
63     at org.apache.catalina.core.ApplicationFilterChain.doFilter(ApplicationFilterChain.java:166) ~[tomcat-embed-core-9.0.33.jar:9.0.33]
64     at org.apache.catalina.core.StandardWrapperValve.invoke(StandardWrapperValve.java:202) ~[tomcat-embed-core-9.0.33.jar:9.0.33]
65     at org.apache.catalina.core.StandardContextValve.invoke(StandardContextValve.java:96) [tomcat-embed-core-9.0.33.jar:9.0.33]
66     at org.apache.catalina.authenticator.AuthenticatorBase.invoke(AuthenticatorBase.java:541) [tomcat-embed-core-9.0.33.jar:9.0.33]
67     at org.apache.catalina.core.StandardHostValve.invoke(StandardHostValve.java:139) [tomcat-embed-core-9.0.33.jar:9.0.33]
68     at org.apache.catalina.valves.ErrorReportValve.invoke(ErrorReportValve.java:92) [tomcat-embed-core-9.0.33.jar:9.0.33]
69     at org.apache.catalina.core.StandardEngineValve.invoke(StandardEngineValve.java:74) [tomcat-embed-core-9.0.33.jar:9.0.33]
70     at org.apache.catalina.connector.CoyoteAdapter.service(CoyoteAdapter.java:343) [tomcat-embed-core-9.0.33.jar:9.0.33]
71     at org.apache.coyote.http11.Http11Processor.service(Http11Processor.java:373) [tomcat-embed-core-9.0.33.jar:9.0.33]
72     at org.apache.coyote.AbstractProcessorLight.process(AbstractProcessorLight.java:65) [tomcat-embed-core-9.0.33.jar:9.0.33]
73     at org.apache.coyote.AbstractProtocol$ConnectionHandler.process(AbstractProtocol.java:868) [tomcat-embed-core-9.0.33.jar:9.0.33]
74     at org.apache.tomcat.util.net.NioEndpoint$SocketProcessor.doRun(NioEndpoint.java:1594) [tomcat-embed-core-9.0.33.jar:9.0.33]
75     at org.apache.tomcat.util.net.SocketProcessorBase.run(SocketProcessorBase.java:49) [tomcat-embed-core-9.0.33.jar:9.0.33]
76     at java.util.concurrent.ThreadPoolExecutor.runWorker(ThreadPoolExecutor.java:1149) [na:1.8.0_191]
77     at java.util.concurrent.ThreadPoolExecutor$Worker.run(ThreadPoolExecutor.java:624) [na:1.8.0_191]
78     at org.apache.tomcat.util.threads.TaskThread$WrappingRunnable.run(TaskThread.java:61) [tomcat-embed-core-9.0.33.jar:9.0.33]
79     at java.lang.Thread.run(Thread.java:748) [na:1.8.0_191]
80 Caused by: org.apache.tomcat.util.http.fileupload.FileUploadException: Cannot write uploaded file to disk!
81     at org.apache.tomcat.util.http.fileupload.disk.DiskFileItem.write(DiskFileItem.java:396) ~[tomcat-embed-core-9.0.33.jar:9.0.33]
82     at org.apache.catalina.core.ApplicationPart.write(ApplicationPart.java:120) ~[tomcat-embed-core-9.0.33.jar:9.0.33]
83     ... 52 common frames omitted
这里说明一下,我上传的文件名称是中文的,文件大小几百k,不会出现超过1M的问题,当然有的会是这个原因造成的,具体情况具体分析。
1 // 正确的写法
2 filename.transferTo(new File("F:\\BaiduNetdiskDownload" + filename.getOriginalFilename()));
3
4 // 错误的写法
5 // filename.transferTo(new File("F:\\BaiduNetdiskDownload"));
我的前端代码是这样的,简单模拟一下子。
 1 <!DOCTYPE html>
 2 <html>
 3 <head>
 4     <meta charset="UTF-8">
 5     <title>文件上传</title>
 6 </head>
 7 <body>
 8
 9 <!-- 文件上传 -->
10 <form action="/fileUpload" method="post" enctype="multipart/form-data">
11     上传文件:<input type="file" name="filename"/><br/>
12     <input type="submit"/>
13 </form>
14
15 </body>
16 </html>
控制层的代码是这样的。需要注意的是输入框file类型的name属性的值filename必须和MultipartFile filename参数名称一致的。而且form表单的enctype="multipart/form-data"类型必须是这样的。
 1 package com.bie.springboothello.uploadFile;
 2
 3 import org.springframework.web.bind.annotation.RequestMapping;
 4 import org.springframework.web.bind.annotation.RestController;
 5 import org.springframework.web.multipart.MultipartFile;
 6
 7 import java.io.File;
 8 import java.io.IOException;
 9 import java.util.HashMap;
10 import java.util.Map;
11
12 /**
13  *
14  */
15 @RestController // 此类下所有方法的返回值都会做Json格式的转换,标识该类下的方法的返回值会自动做json格式的转换。
16 public class FileUploadController {
17
18     /**
19      * 处理文件上传
20      *
21      * @param filename 此处参数的名称必须和表单的输入框file类型的名称是一致的。
22      * @return
23      */
24     @RequestMapping(value = "fileUpload")
25     public Map<String, Object> fileUpload(MultipartFile filename) throws IOException {
26         // 创建Map对象
27         Map<String, Object> map = new HashMap<String, Object>();
28         // 打印上传的文件的名称
29         System.out.println("文件的名称: " + filename.getOriginalFilename());
30         // 文件的保存
31         filename.transferTo(new File("F:\\BaiduNetdiskDownload" + filename.getOriginalFilename()));
32         // filename.transferTo(new File("F:\\BaiduNetdiskDownload"));
33         // 设置返回值
34         map.put("msg", "ok.");
35         return map;
36     }
37
38 }
运行效果,如下所示:

提交成功之后,可以到指定的磁盘目录进行查看即可。
注意:设置上传文件大小的默认值,Springboot默认的文件上传的大小是10M。注意,不同springboot版本参数设置不同。
 1 server.port=8080
 2
 3 # 设置单个上传文件的大小,springboot1.5.10.RELEASE版本使用的配置
 4 # spring.http.multipart.maxFileSize=200MB
 5 # 设置一次请求上传文件的总容量,springboot1.5.10.RELEASE版本使用的配置
 6 # spring.http.multipart.maxRequestSize=200MB
 7
 8 # 设置单个上传文件的大小,springboot2.2.6.RELEASE版本使用的配置
 9 spring.servlet.multipart.max-file-size=200MB
10 # 设置一次请求上传文件的总容量,springboot2.2.6.RELEASE版本使用的配置
11 spring.servlet.multipart.max-request-size=200MB

 浙公网安备 33010602011771号