Spring笔记一
Spring基本特征
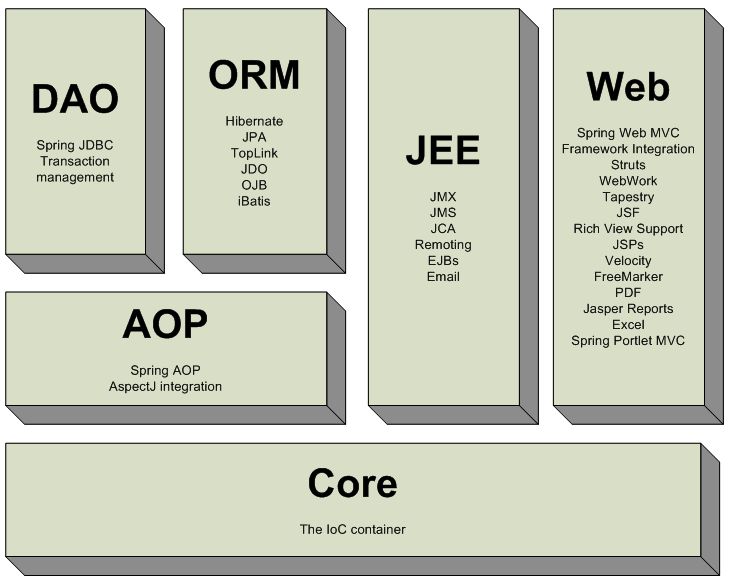
Spring是一个非常活跃的开源框架;它是一个基于Core来构架多层JavaEE系统的框架,它的主要目地是简化企业开发.
Spring以一种非侵入式的方式来管理你的代码,Spring提倡”最少侵入”,这也就意味着你可以适当的时候安装或卸载Spring
开发spring所需要的工具
Spring的jar包
到http://www.springsource.org/download下载spring,然后进行解压缩,在解压目录中找到下面jar文件,拷贝到类路径下
--spring的核心类库 在spring文档的dist下
dist\spring.jar
--引入的第三方类库 都spring文档的lib下
lib\jakarta-commons\commons-logging.jar
如果使用了切面编程(AOP),还需要下列jar文件
lib/aspectj/aspectjweaver.jar和aspectjrt.jar
lib/cglib/cglib-nodep-2.1_3.jar
如果使用了JSR-250中的注解,如@Resource/@PostConstruct/@PreDestroy,还需要下列jar文件
lib\j2ee\common-annotations.jar
注:JSR(Java 规范请求)是指向JCP(Java Community Process)提出新增一个标准化技术规范的正式请求。任何人都可以提交JSR(Java 规范请求),以向Java平台增添新的API和服务。JSR已成为Java界的一个重要标准
Spring配置文件
默认情况下是applicationContext.xml文件。可以建立很多xml文件,工程中一般都是这样配置的。
Spring基本功能详解
3.1 SpringIOC
Spring的控制反转:把对象的创建、初始化、销毁等工作交给spring容器来做。由spring容器控制对象的生命周期。
步骤:
- 启动spring容器
1、 在类路径下寻找配置文件来实例化容器
ApplicationContext ctx = new ClassPathXmlApplicationContext(new String[]{"beans.xml"});可以在整个类路径中寻找xml文件
* 通过这种方式加载。需要将spring的配置文件放到当前项目的classpath路径下
* classpath路径指的是当前项目的src目录,该目录是java源文件的存放位置。
2、 在文件系统路径下寻找配置文件来实例化容器
ApplicationContext ctx = new FileSystemXmlApplicationContext(new String[]{“d:\\beans.xml“});Spring的配置文件可以指定多个,可以通过String数组传入。
注:经常用第一种方法启动容器
- 从spring容器中提取对象
3.2 别名
<beans>
<alias name="person" alias="p"/>
<bean name="person" class="cn.itcast.aliasspring.Person"/>
</beans>
通过这样的配置,可以达到在一个地方命名,在多个地方使用不同的名字的效果。
3.3 Spring容器内部对象
3.3.1创建对象的方式
3.3.1.1 无参构造函数
<bean id=“personService" class="cn.itcast.bean.impl.PersonServiceImpl"/>
构造函数(用的最多)
在配置文件中进入如下的配置:

在客户端

HelloWorld类本身:
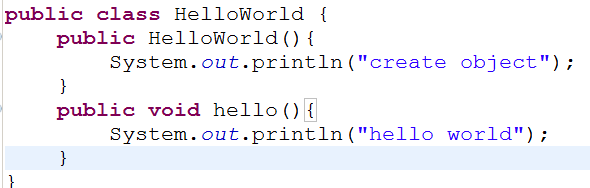
在控制台打印出了”create object”
可以看出:spring内部默认是调用了HelloWorld这个类的默认的构造函数创建对象
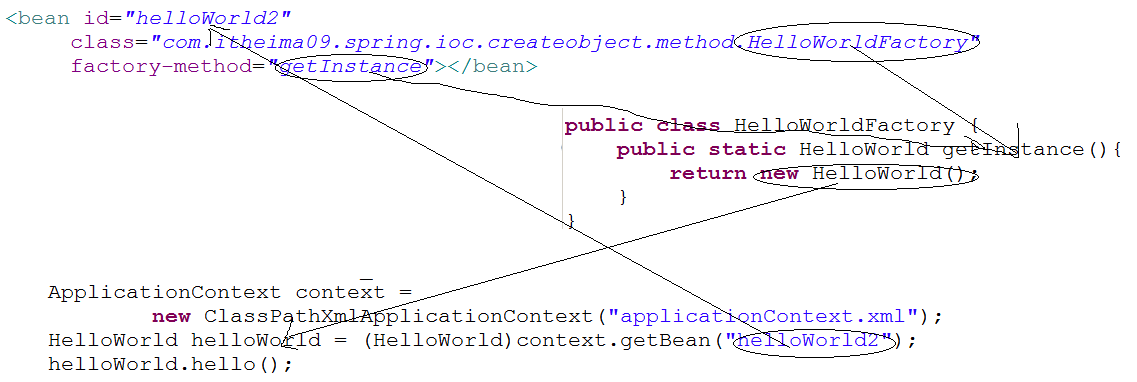
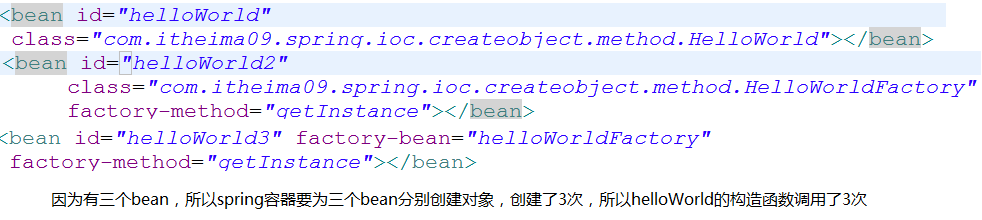
3.3.1.2 静态工厂
<bean id="personService" class="com.itcast.factory.PersonServiceFactory" factory-method="createPersonService" />
public class PersonServiceFactory {
public static PersonService createPersonService(){
return new PersonServiceImpl();
}
}
3.3.1.3 实例工厂
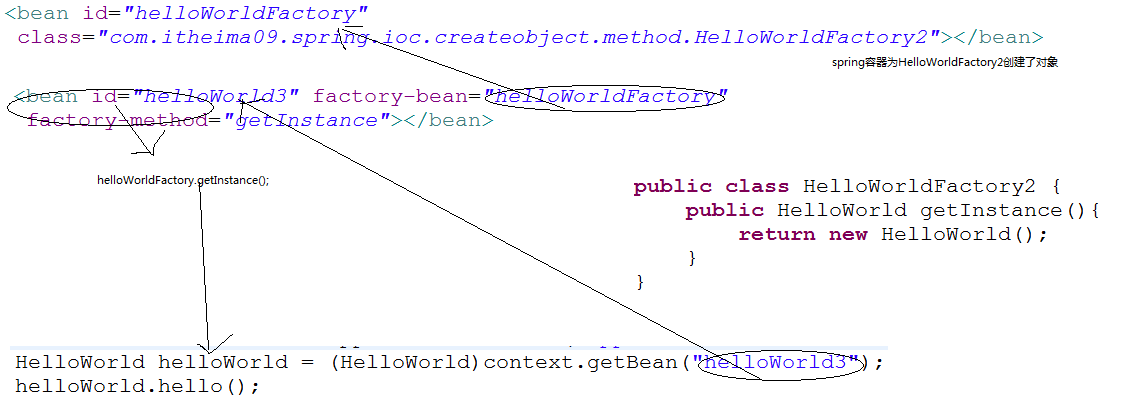
说明:
给工厂类创建了一个对象helloWorldFactory,再利用工厂对象调用工厂方法。
别名

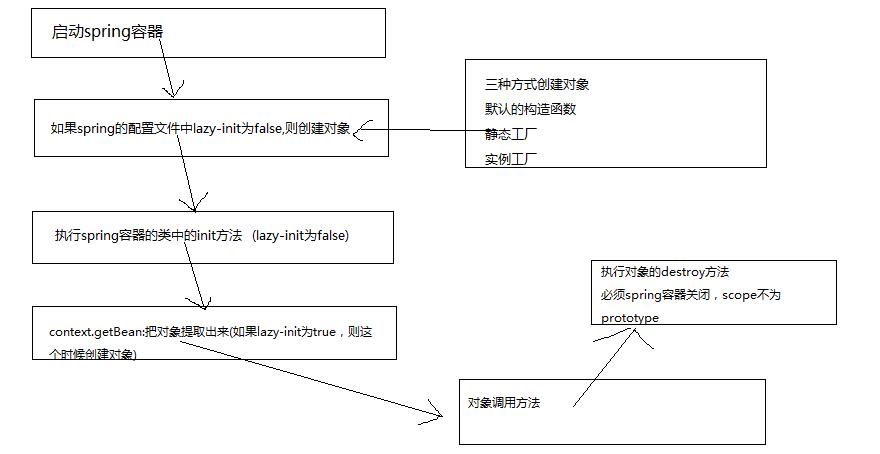
对象的创建时机
案例
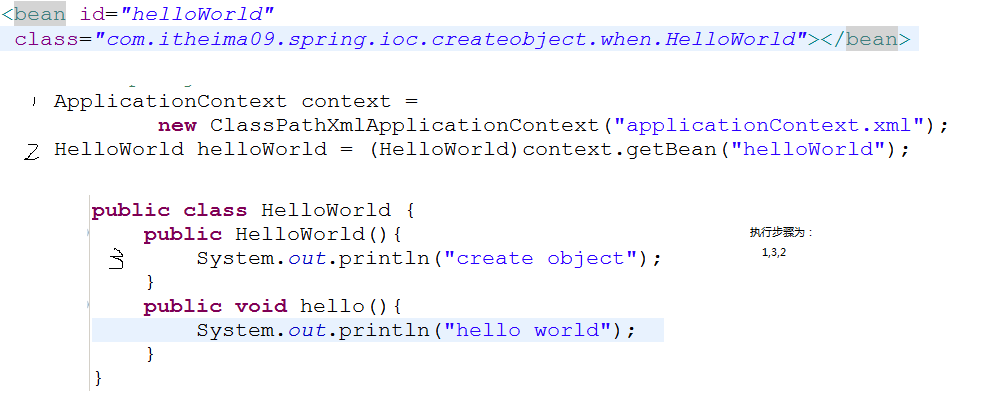
执行步骤为1,3,2
以上两种情况是默认值,当spring容器启动的时候创建对象
在bean有这样一个属性
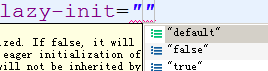
Default 相当于false 在spring容器启动的时候,创建对象
True 在context.getBean时创建对象
False 在spring容器启动的时候创建对象
意义
如果把lazy-init设置为true,则当spring容器启动的时候,检测不到任何错误,这样会存在很大的安全性隐患,所以一般情况下应该设置lazy-init为default/false。
但是如果一个bean中有一个属性,该属性含有大量的数据,这个时候不希望该bean过早的停留在内存中。这个时候需要用到lazy-init为true。
3.3.2对象的scope
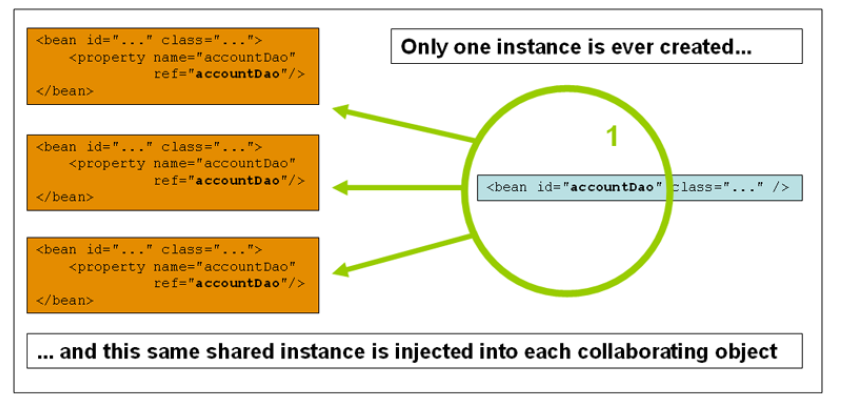
3.3.2.1 singleton(默认值)
在每个Spring IoC容器中一个bean定义只有一个对象实例(共享)。
默认情况下会在容器启动时初始化bean,但我们可以指定Bean节点的lazy-init=“true”来延迟初始化bean,这时候,只有第一次获取bean会才初始化bean。如:
<bean id="xxx" class="cn.itcast.OrderServiceBean" lazy-init="true"/>
如果想对所有bean都应用延迟初始化,可以在根节点beans设置default-lazy-init=“true“,如下:
<beans default-lazy-init="true“ ...>


在默认情况下放入到spring中的bean是单例的
将来service层和dao层所有的类将放入到spring容器中,所以默认情况下这两个层的类的实例都是单例的,所以不能把数据声明到属性中。如果声明在属性中,将会成为共享的。
3.3.2.2 prototype
允许bean可以被多次实例化(使用一次就创建一个实例) . Spring不能对一个prototype bean的整个生命周期负责.这就意味着清楚prototype作用域的对象并释放任何prototype bean所持有的昂贵资源都是客户端的责任。

3.3.2.3 Request
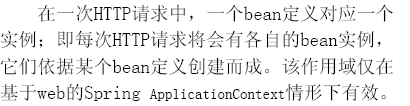
3.3.2.4 Session

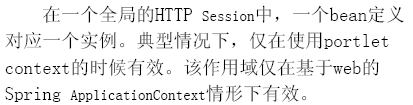
3.3.2.5 Global session
3.3.3初始化bean时机
Spring默认在启动时将所有singleton bean提前进行实例化。提前实例化意味着作为初始化的一部分,ApplicationContext会自动创建并配置所有的singleton bean.通常情况下这是件好事。因为这样在配置中有任何错误能立即发现。
Lazy-init=”true or false”
Lazy-init 为false,spring容器将在启动的时候报错(比较好的一种方式)
Lazy-init 为true,spring容器将在调用该类的时候出错。
3.3.4init、destroy
Spring初始化bean或销毁bean时,有时需要作一些处理工作,因此spring可以在创建和拆卸bean的时候调用bean的两个生命周期方法。
<bean id=“foo” class=“...Foo”
init-method=“setup”
destory-method=“teardown”/>
当foo被载入到Spring容器中时调用init-method方法。当foo从容器中删除时调用destory-method(scope = singleton有效)
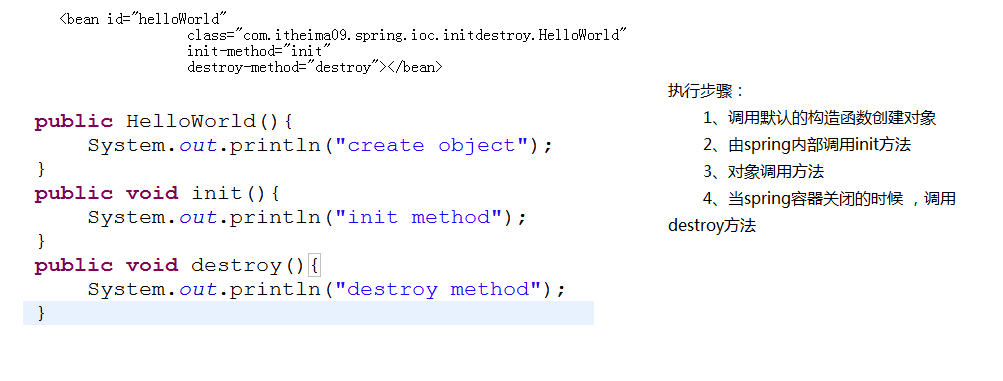
说明:
1、 init方法是由spring内部执行的
2、 只有当spring容器关闭以后才能执行destroy方法,spring容器一般情况下是不会关闭的。只有当web容器销毁掉的时候才可能关闭掉,所以只要一个对象在spring容器中,在spring容器关闭之前,会一直保留。
3、 如果一个bean的配置是scope为”prototype”,则spring容器不负责销毁。
创建时机和scope的结合
Scope为prototype,lazy-init为true
在context.getBean时创建对象
Scopse为prototype,lazy-init为false
在context.getBean时创建对象,lazy-init为false失效
当scpose为prototype时,始终在context.getBean时创建对象
因为Scopse为prototype时,这个实例就变为多例的,lazy-init如果为false,
一开始就创建该实例是没有意义的,所以这时候lazy-init默认为true;
Scopse为singleton
是默认情况
Spring容器做的事情
总结
创建对象
1、 对象的创建方式
2、 对象的创建时机
3、 对象的创建的模式
4、 Init和destroy
5、 创建时机和创建模式的结合
初始化和销毁
3.4 依赖注入(DI)
3.4.1xml形式
3.4.1.1 使用构造器注入
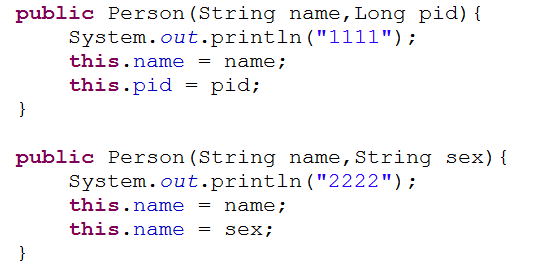

说明:
1、 constructor-arg代表指定的构造器函数的其中的一个参数
2、 可以利用index,ref,value,type来指定唯一的构造器
3、 如果一个bean的配置中没有constructor-arg属性,则必须利用默认的构造函数创建对象。
所以在写一个javabean的时候,应该提供属性的setter方法,默认的构造器,带参数的构造器


 1 <?xml version="1.0" encoding="UTF-8"?>
 2 <beans xmlns="http://www.springframework.org/schema/beans"
 3        xmlns:xsi="http://www.w3.org/2001/XMLSchema-instance"
 4        xsi:schemaLocation="http://www.springframework.org/schema/beans
 5            http://www.springframework.org/schema/beans/spring-beans-2.5.xsd">
 6       <bean id="person" class="com.itheima09.spring.di.xml.constructor.Person">
 7           <!--
 8               指定其中的一个构造器的参数
 9               index 参数的下标  从0开始计算
10               type  类型
11               value  如果是基本类型,则用value赋值
12               ref   如果是引用类型,则用ref赋值
13            -->
14           <constructor-arg index="0" value="aa"></constructor-arg>
15           <constructor-arg index="1" value="2" type="java.lang.Long"></constructor-arg>
16       </bean>
17       <bean id="person1" class="com.itheima09.spring.di.xml.constructor.Person">
18           <property name="student">
19               <ref bean="student"/>
20           </property>
21       </bean>
22       <bean id="student" class="com.itheima09.spring.di.xml.constructor.Student"></bean>
23 </beans>
使用xml的注入方式:
- 通过参数的顺序
<constructor-arg index="0">
<value>张三</value>
</constructor-arg>
<constructor-arg index="1">
<value>56</value>
</constructor-arg>
- B. 通过参数的类型
<constructor-arg type="java.lang.Integer">
<value>56</value>
</constructor-arg>
<constructor-arg type="java.lang.String">
<value>张三</value>
</constructor-arg>
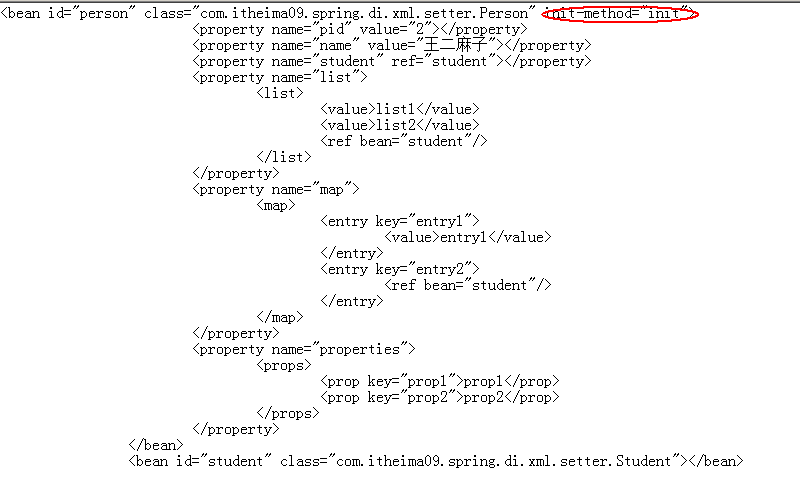
3.4.1.2 使用属性setting方法进行注入
使用xml的注入方式:
- 简单Bean的注入
简单Bean包括两种类型:包装类型和String
<bean id="personService" class="com.itcast.bean.impl.PersonServiceImpl">
<!-- 基本类型,string类型 -->
<property name="age" value="20"></property>
<property name="name" value="张无忌"></property> </bean>
- 引用其他Bean
<bean id="person" class="com.itcast.bean.Person" />
<bean id="personService" class="com.itcast.bean.impl.PersonServiceImpl">
<property name="person" ref="person" />
</bean>
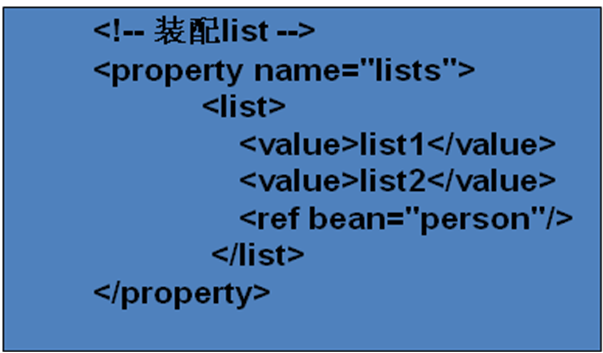
3.4.1.3 装配list集合
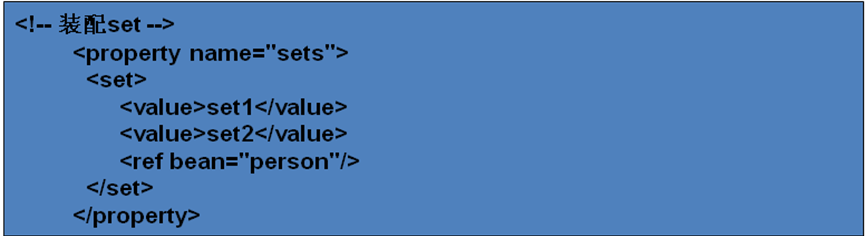
3.4.1.4 装配set集合
3.4.1.5 装配map
<property name="maps">
<map>
<entry key="01">
<value>map01</value>
</entry>
<entry key="02">
<value>map02</value>
</entry>
</map>
</property>
map中的<entry>的数值和<list>以及<set>的一样,可以使任何有效的属性元
素,需要注意的是key值必须是String的。
3.4.1.6 装配Properties
<property name="props">
<props>
<prop key="01">prop1</prop>
<prop key="02">prop2</prop>
</props>
</property>
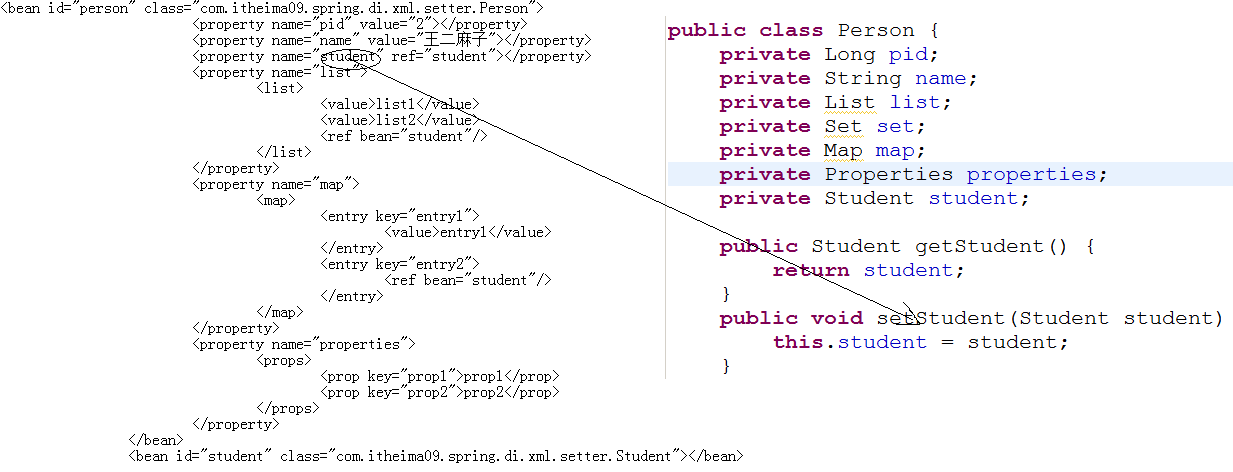
说明:
1、 spring容器实例化person和student两个对象
2、 利用java的反射机制调用属性的setter方法赋值
3、 在客户端利用context.getBean方法把spring容器中的一个对象获取了。
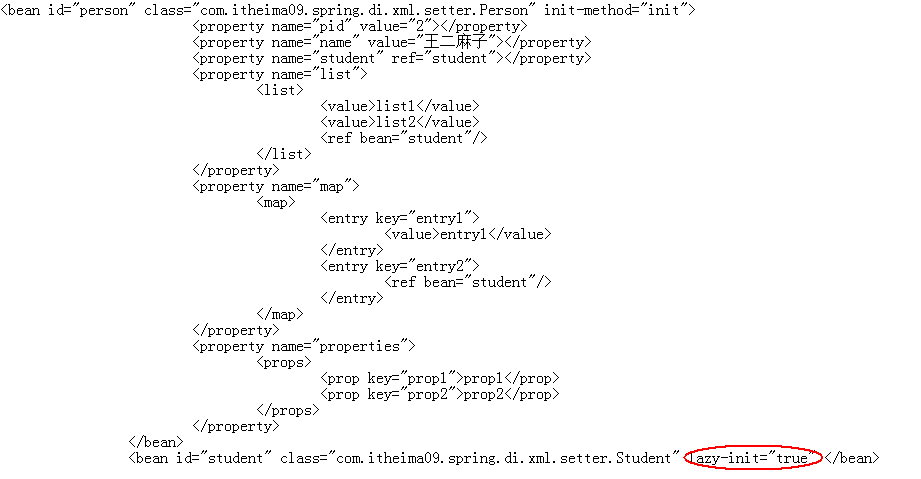
说明:
1、 启动spring容器
2、 实例化person对象和student对象
3、 给person中的属性赋值
4、 调用person的init方法初始化
5、 客户端利用context.getBean获取对象
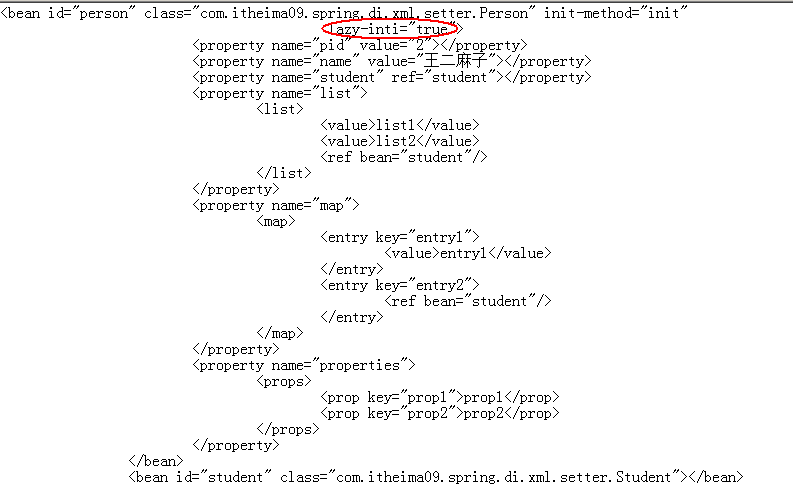
说明:
1、 启动spring容器
2、 实例化person对象
3、 因为person对象依赖于student对象,所以在实例化person对象的时候必须实例化student对象,所以这个时候,在student对象上的lazy-init为true将失效。
1、 启动spring容器
2、 实例化student
3、 在客户端执行context.getBean方法获取person对象
4、 实例化person对象,调用person的构造函数
5、 调用person中的setStudent方法,给person中的student赋值
6、 执行person中的init方法
7、 Person对象调用方法
 1 <?xml version="1.0" encoding="UTF-8"?>
 2 <beans xmlns="http://www.springframework.org/schema/beans"
 3        xmlns:xsi="http://www.w3.org/2001/XMLSchema-instance"
 4        xsi:schemaLocation="http://www.springframework.org/schema/beans
 5            http://www.springframework.org/schema/beans/spring-beans-2.5.xsd">
 6           <!--
 7               把person放入到spring容器中
 8            -->
 9           <bean id="person" class="com.itheima09.spring.di.xml.setter.Person"
10               init-method="init"
11               lazy-init="true">
12               <!--
13                   property用来描述person的属性
14                     name属性代表属性的名称
15                     value属性代表属性的值  属性为基本类型
16                         因为student是引用类型,所以用ref赋值
17                -->
18               <property name="pid" value="2"></property>
19               <property name="name" value="王二麻子"></property>
20               <property name="student" ref="student"></property>
21               <property name="list">
22                   <list>
23                       <value>list1</value>
24                       <value>list2</value>
25                       <ref bean="student"/>
26                   </list>
27               </property>
28               <property name="set">
29                   <set>
30                       <value>set1</value>
31                       <value>set2</value>
32                       <ref bean="student"/>
33                   </set>
34               </property>
35               <property name="map">
36                   <map>
37                       <entry key="entry1">
38                           <value>entry1</value>
39                       </entry>
40                       <entry key="entry2">
41                           <ref bean="student"/>
42                       </entry>
43                   </map>
44               </property>
45               <property name="properties">
46                   <props>
47                       <prop key="prop1">prop1</prop>
48                       <prop key="prop2">prop2</prop>
49                   </props>
50               </property>
51           </bean>
52           <!--
53               把student放入到spring容器中
54            -->
55           <bean id="student"
56               class="com.itheima09.spring.di.xml.setter.Student"></bean>
57 </beans>
IOC和DI的意义
案例1
需求
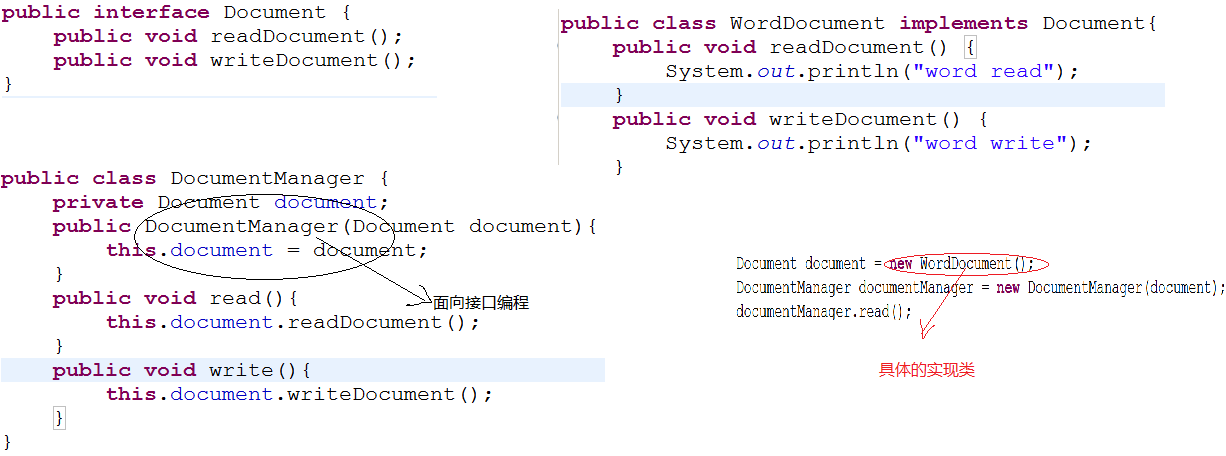
编写一个文档管理系统,在该系统中有如下的结构:
1、 Document:interface
readDocument
writeDocument
2、 WordDocument 是Document的实现类
readDocument
writeDocument
3、 ExcelDocument
readDocument
writerDocument
4、 PDFDocument
readDocument
writeDocument
5、 DocumentManager
Document document;
readDocument()
writeDocument()
做法1
说明:
上述的代码是不完全的面向接口编程
做法2
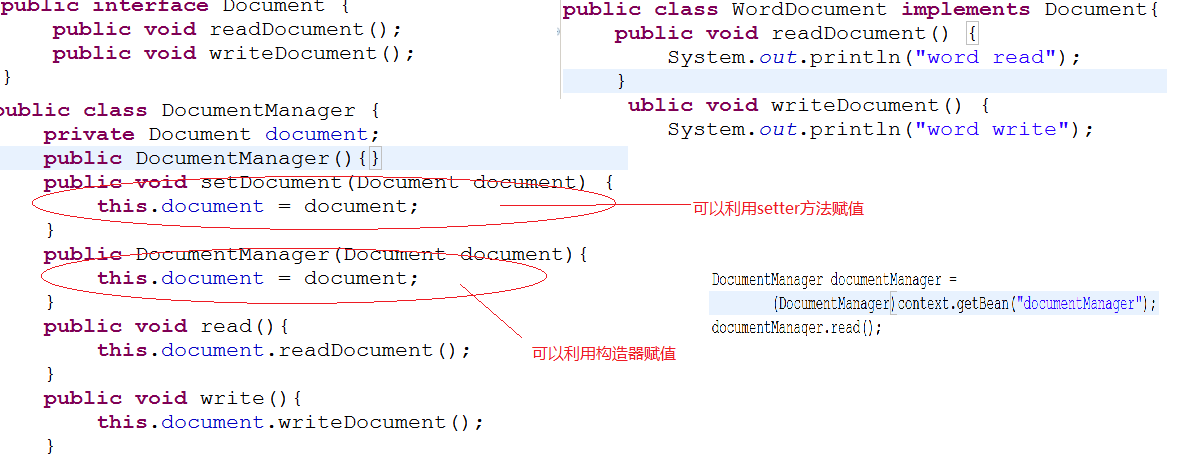
说明:
在代码端没有出现具体的类,完全的面向接口编程。

在spring容器的配置文件中决定了documentManager中的接口的实现类是什么。而这个过程和java代码端没有关系。
案例2
需求
把action调用service,service调用dao用spring来完成
实现
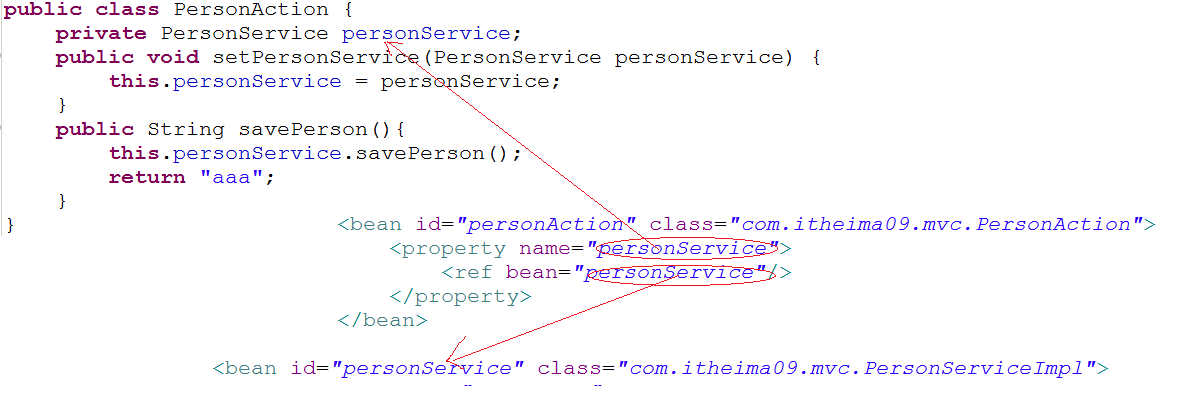
意义
实现了完全的面向接口编程,在代码端没有要关系一个接口的实现类是什么。
3.4.2注解
步骤:
- 在配置文件中,引入context命名空间
 1 <beans xmlns="http://www.springframework.org/schema/beans"
 2
 3 xmlns:xsi="http://www.w3.org/2001/XMLSchema-instance"
 4
 5            xmlns:context="http://www.springframework.org/schema/context"
 6
 7             xsi:schemaLocation="http://www.springframework.org/schema/beans
 8
 9                        http://www.springframework.org/schema/beans/spring- beans-2.5.xsd
10
11                       http://www.springframework.org/schema/context
12
13                    http://www.springframework.org/schema/context/spring-context-2.5.xsd">
- 在配置文件中加入context:annotation-config标签
<context:annotation-config/>
这个配置隐式注册了多个对注释进行解析处理的处理器
AutowiredAnnotationBeanPostProcessor,CommonAnnotationBeanPostProcessor,
PersistenceAnnotationBeanPostProcessor,RequiredAnnotationBeanPostProcessor
注: @Resource注解在spring安装目录的lib\j2ee\common-annotations.jar
3.4.2.1 @Autowired
这两个注解的区别是:@Autowired 默认按类型装配,@Resource默认按名称装配,当找不到与名称匹配的bean才会按类型装配。
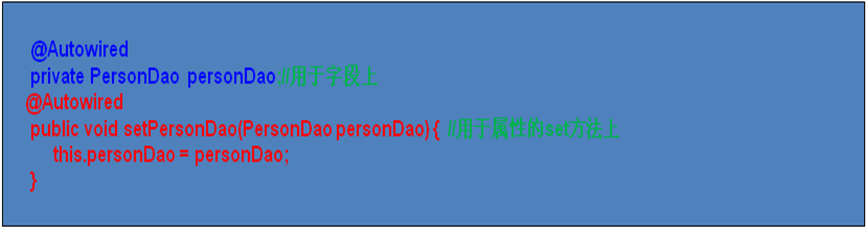
@Autowired注解是按类型装配依赖对象,默认情况下它要求依赖对象必须存在,如果允许null值,可以设置它required属性为false。

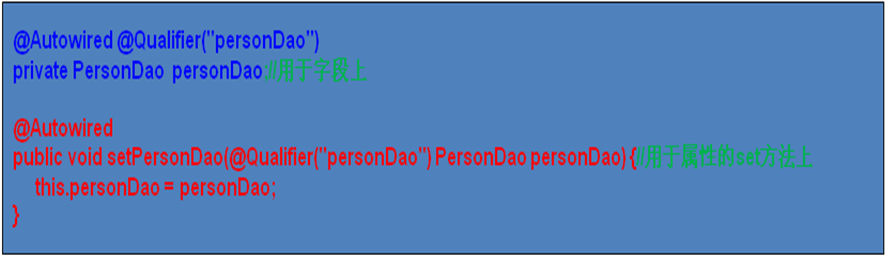
3.4.2.2 @Qualifier
如果我们想使用按名称装配,可以结合@Qualifier注解一起使用。如下:
3.4.2.3 @Resource
1、 @Resource注解和@Autowired一样,也可以标注在字段或属性的setter方法上.
2、 @Resource注解默认按名称装配。
名称可以通过@Resource的name属性指定,如果没有指定name属性,
- 当注解标注在字段上,即默认取字段的名称作为bean名称寻找依赖对象
- 当注解标注在属性的setter方法上,即默认取属性名作为bean名称寻找依赖对象。
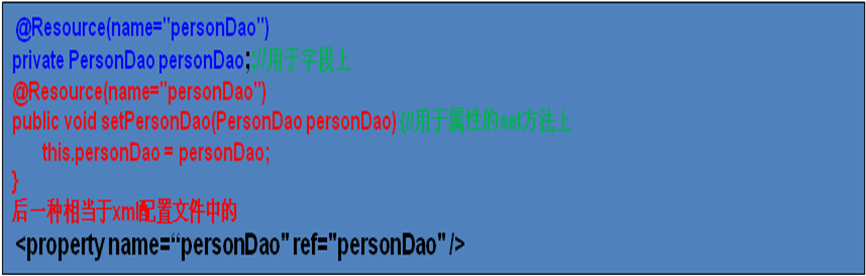
- 注意:如果没有指定name属性,并且按照默认的名称找不到依赖对象时, @Resource注解会回退到按类型装配。但一旦指定了name属性,就只能按名称装配了。
3.4.2.4 @PostConstruct
指定Bean的初始化方法
3.4.2.5 @PreDestroy
指定Bean的销毁方法
3.4.3 自定义注解
自定义的注解(类)
 1 import java.lang.annotation.Documented;
 2 import java.lang.annotation.ElementType;
 3 import java.lang.annotation.Retention;
 4 import java.lang.annotation.RetentionPolicy;
 5 import java.lang.annotation.Target;
 6
 7 @Target(ElementType.TYPE)//ClassInfo注解可以标注在类上
 8 /**
 9  *RetentionPolicy.SOURCE 只能在源代码上使用
10   RetentionPolicy.CLASS   该注解能够使用在源代码和字节码上
11   RetentionPolicy.RUNTIME  该注解能够使用在源代码、字节码、jvm中
12  */
13 @Retention(RetentionPolicy.RUNTIME)
14 @Documented //该注解能够出现在帮助文档中
15 public @interface ClassInfo {
16     //给该注解声明了一个属性name,默认值为""
17     String name() default "";
18 }
自定义的注解(方法)
 1 import java.lang.annotation.Documented;
 2 import java.lang.annotation.ElementType;
 3 import java.lang.annotation.Retention;
 4 import java.lang.annotation.RetentionPolicy;
 5 import java.lang.annotation.Target;
 6
 7 @Target(ElementType.METHOD)
 8 @Retention(RetentionPolicy.RUNTIME)
 9 @Documented
10 public @interface MethodInfo {
11     String value() default "";
12 }
使用:
 1 @ClassInfo(name="该班很牛")
 2 public class Itheima09 {
 3     @MethodInfo("代表的是java初级")
 4     public void java(){
 5
 6     }
 7
 8     @MethodInfo("java高级")
 9     public void superJava(){
10
11     }
12 }
注解解析器:
 1 import java.lang.reflect.Method;
 2
 3 import org.junit.Test;
 4
 5 /**
 6  * 注解解析器
 7  * @author zd
 8  *
 9  */
10 public class AnnotationParse {
11     public static void parse(){
12         Class classt = Itheima09.class;
13         //在该类上存在ClassInfo注解
14         if(classt.isAnnotationPresent(ClassInfo.class)){
15             //从类上得到类的注解
16             ClassInfo classInfo = (ClassInfo)classt.getAnnotation(ClassInfo.class);
17             //输出该注解的name属性
18             System.out.println(classInfo.name());
19         }
20         //获取该类的所有的方法
21         Method[] methods = classt.getMethods();
22         for(Method method:methods){
23             //如果该方法上存在MethodInfo注解
24             if(method.isAnnotationPresent(MethodInfo.class)){
25                 //获取该方法上面的methodinfo注解
26                 MethodInfo methodInfo = method.getAnnotation(MethodInfo.class);
27                 //输出注解中的value属性
28                 System.out.println(methodInfo.value());
29             }
30         }
31     }
32
33     @Test
34     public void test(){
35         AnnotationParse.parse();
36     }
37 }
3.4.4
Spring中的注解

要导入javaee5.0
在spring的配置文件中

说明:
1、 启动spring容器
2、 spring容器内部创建了两个对象person和student
3、 当spring容器解析到

启动依赖注入的注解解析器:
4、 spring容器在容器中查找所有的bean(prerson,student)
5、 看哪些bean的属性上面是否有Resource注解
6、 如果属性上面有该注解,再次检查是否有name属性
7、 如果没有name属性,则会把该注解标注的属性的名称获取到和spring容器中的id做匹配,如果匹配成功,则赋值,如果匹配不成功,则按照类型进行匹配,如果匹配成功,则赋值,如果匹配不成功,则报错。
8、 如果有name属性,则把name属性的值解析出来和spring容器中的id做匹配,如果匹配成功,则赋值,如果匹配不成功,则报错。
9、 从上述的步骤可以看出注解的效率比较低,xml的效率比较高,注解书写比较简单,xml书写比较复杂。
Spring容器的关于di的注解
按照类型匹配

按照ID匹配

注解只能应用与引用类型
类扫描的注解
步骤

说明:在指定的包及子包中扫描
流程分析
1、 启动spring容器
2、 Spring容器解析类扫描的注解解析器,在base-package指定的包及子包中查找所有的类
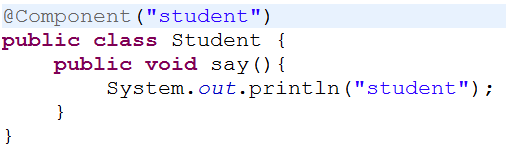
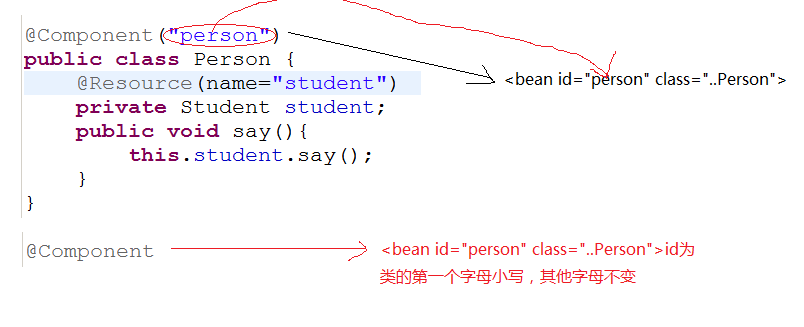
3、 查看哪些类上面是否含有@Component注解
4、 如果该注解的value的属性的值为空,则把类名的第一个字母变成小写,作为id值,放入到spring容器中
5、 如果该注解的value的属性的值不为空,则用value的属性的值作为id值,放入到spring容器中
6、 再次查找在spring容器中的类的所有的属性,按照@Resource的规则给属性赋值
说明
使用了类扫描机制的做法,配置文件中的配置很简单了,但是效率越来越低。
3.5 扫描
前面的例子我们都是使用XML的bean定义来配置组件。在一个稍大的项目中,通常会有上百个组件,如果这些组件采用xml的bean定义来配置,显然会增加配置文件的体积,查找及维护起来也不太方便。spring2.5为我们引入了组件自动扫描机制,它可以在类路径底下寻找标注了@Component、@Service、@Controller、@Repository注解的类,并把这些类纳入进spring容器中管理。它的作用和在xml文件中使用bean节点配置组件是一样的。要使用自动扫描机制,我们需要打开以下配置信息:
1、引入context命名空间 需要在xml配置文件中配置以下信息:
<beans xmlns="http://www.springframework.org/schema/beans"
xmlns:xsi="http://www.w3.org/2001/XMLSchema-instance"
xmlns:context="http://www.springframework.org/schema/context"
xsi:schemaLocation="http://www.springframework.org/schema/beans
http://www.springframework.org/schema/beans/spring-beans-2.5.xsd
http://www.springframework.org/schema/context
http://www.springframework.org/schema/context/spring-context-2.5.xsd">
<context:component-scan base-package="cn.itcast"/>
</beans>
2、在配置文件中添加context:component-scan标签
<context:component-scan base-package="cn.itcast"/>
其中base-package为需要扫描的包(含子包)。
注:
1、在使用组件扫描元素时,AutowiredAnnotationBeanPostProcessor 和CommonAnnotationBeanPostProcessor会隐式地被包括进来。 也就是说,连个组件都会被自动检测并织入 - 所有这一切都不需要在XML中提供任何bean配置元数据。
2、功能介绍
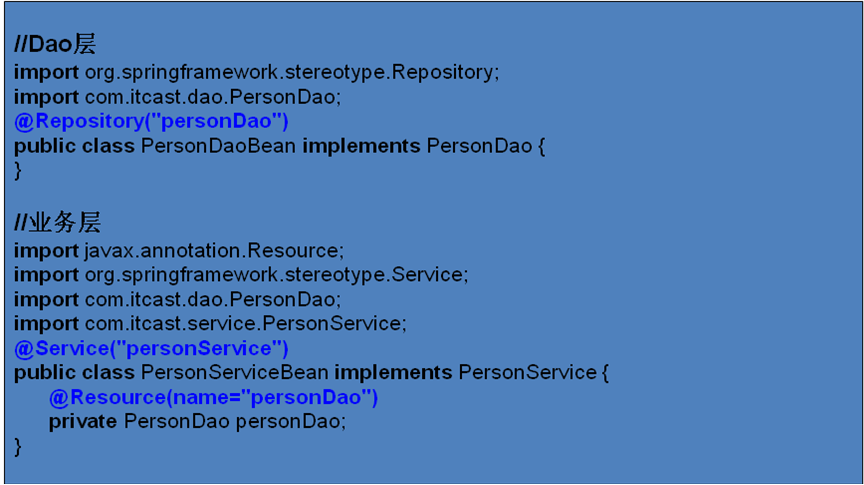
@Service用于标注业务层组件、
@Controller用于标注控制层组件(如struts中的action)、
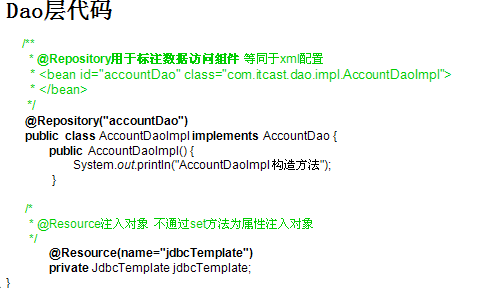
@Repository用于标注数据访问组件,即DAO组件。
而@Component泛指组件,当组件不好归类的时候,我们可以使用这个注解进行标注。
3.6 spring中的继承
A:xml的继承:
Person类如图所示:
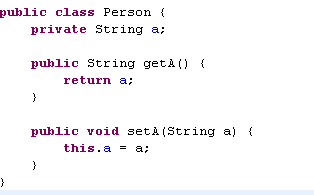
Student类如图所示:

配置文件中:

图中的配置文件中,parent为student在容器中继承person.如果去掉person是不行的。
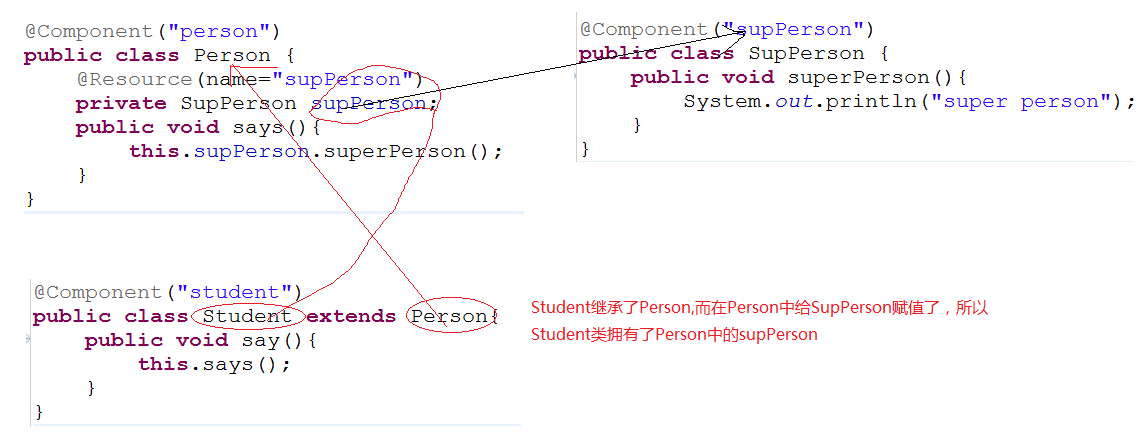
B:注解的继承:
4 面向切面编程
4.1 代理模式
代理模式的英文叫做Proxy或Surrogate,中文都可译为”代理“,所谓代理,就是一个人或者一个机构代表另一个人或者另一个机构采取行动。在一些情况下,一个客户不想或者不能够直接引用一个对象,而代理对象可以在客户端和目标对象之间起到中介的作用
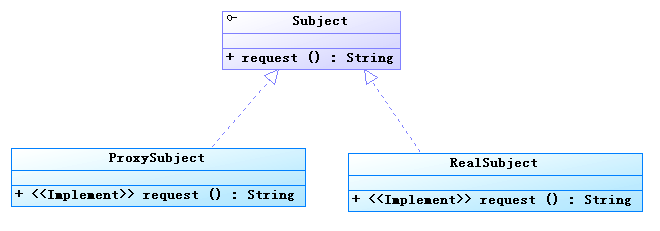
- 抽象主题角色
声明了真实主题和代理主题的共同接口,这样一来在任何可以使用真实主题的地方都可以是使用代理主题
- 代理主题(Proxy)角色:
代理主题角色内部含有对真实主题的引用,从而可以在任何时候操作真实主题对象;代理主题角色提供一个与真实主题角色相同的接口,以便可以在任何时候都可以替代真实主题控制对真实主题的引用,负责在需要的时候创建真实主题对象(和删除真实主题对象);代理角色通常在将客户端调用传递给真实的主题之前或之后,都要执行某个操作,而不是单纯地将调用传递给真实主题对象。
- 真实主题角色
定义了代理角色所代表地真实对象

4.1.1 JDK动态代理
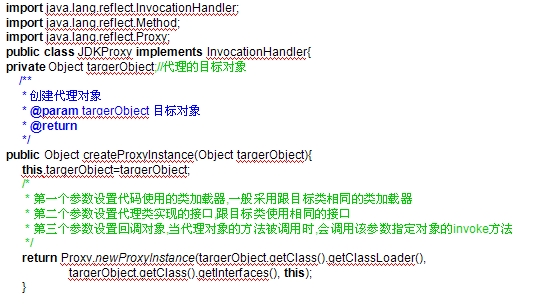
JDK的动态代理必须具备四个条件:
目标接口
目标类
拦截器
代理类
总结:1、因为利用JDKProxy生成的代理类实现了接口,所以目标类中所有的方法在代理类中都有。
2、生成的代理类的所有的方法都拦截了目标类的所有的方法。而拦截器中invoke方法的内容正好就是代理类的各个方法的组成体。
3、利用JDKProxy方式必须有接口的存在。
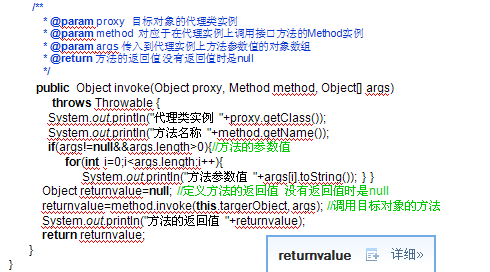
4、invoke方法中的三个参数可以访问目标类的被调用方法的API、被调用方法的参数、被调用方法的返回类型。
接口

目标类

拦截器
客户端

问题
1、 代理对象有多少方法,方法的名称是什么?
因为代理对象和目标类一样,同样的实现了接口,所以接口中有多少方法,代理对象中就有多少个方法,名称和接口中的方法的名称一样。
2、 拦截器中的invoke方法在什么时候执行的?
当在客户端,代理对象调用方法的时候,进入到了invoke方法
3、 拦截器中的invoke方法中的method参数在什么时候传递的值?
当在客户端,代理对象调用方法的时候,进入到了invoke方法,这个时候,method参数就是代理对象调用的方法。
4、 代理对象的方法体的内容是什么?
代理对象的方法体的内容就是invoke方法体的内容
代理对象的方法体:
1、 开启事务
2、 目标方法
3、 事务的提交
4、 代理对象的方法体就把事务和目标方法结合在一起了,这样做的目的就是为了让目标类的目标方法和事务的方法松耦合。
流程图
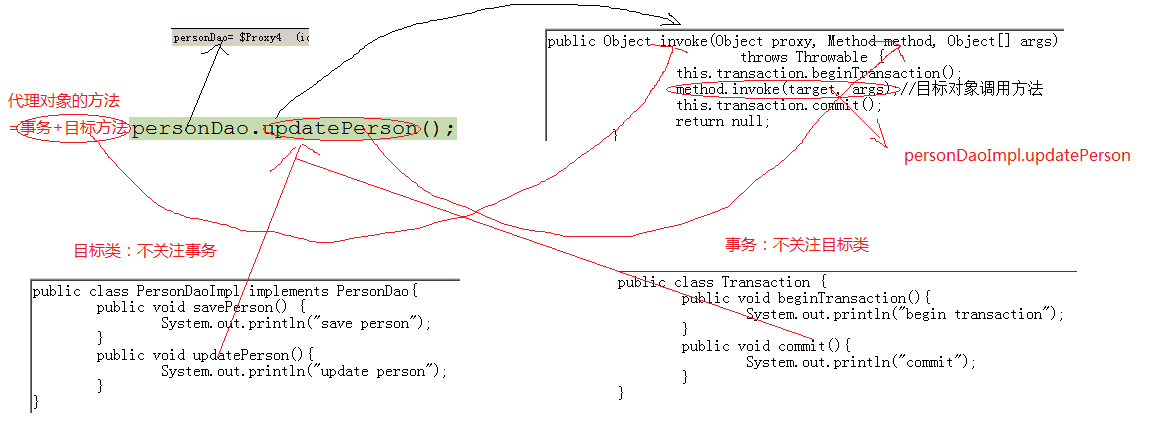
作用:把目标类和事务松耦合
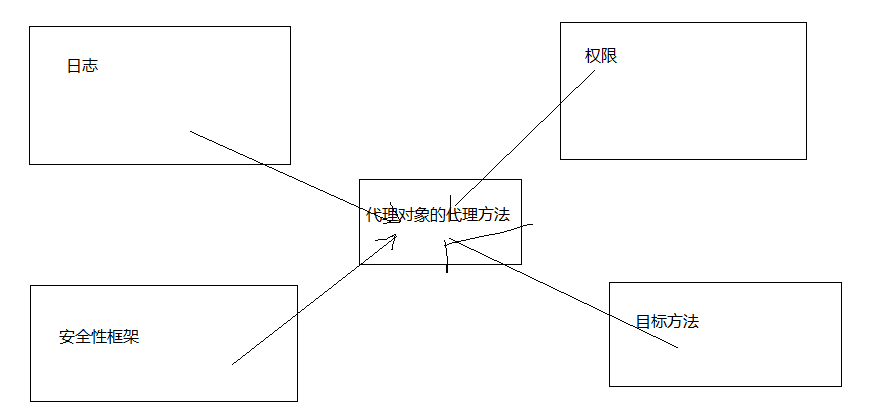
案例
目标接口
目标类

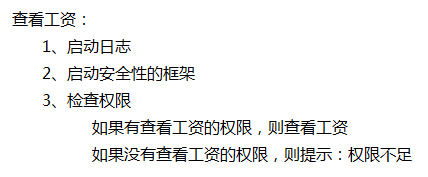
日志
安全性框架
权限类
拦截器
拦截器把这些内容全部结合在一起了。
改进
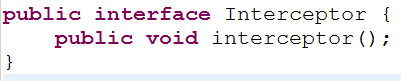
可以把日志、安全性框架等作为一个接口出现
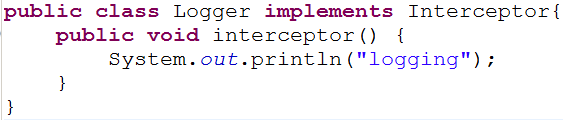
日志:
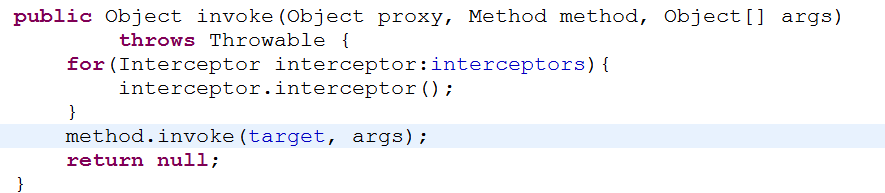
拦截器:
案例1:
1 package com.itheima09.jdkproxy;
2
3 public interface PersonDao {
4     public void savePerson();
5     public void updatePerson();
6 }
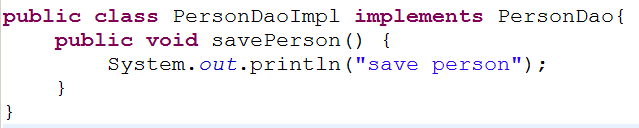
1 public class PersonDaoImpl implements PersonDao{
2     public void savePerson() {
3         System.out.println("save person");
4     }
5     public void updatePerson(){
6         System.out.println("update person");
7     }
8 }
1 public class Transaction {
2     public void beginTransaction(){
3         System.out.println("begin transaction");
4     }
5     public void commit(){
6         System.out.println("commit");
7     }
8 }
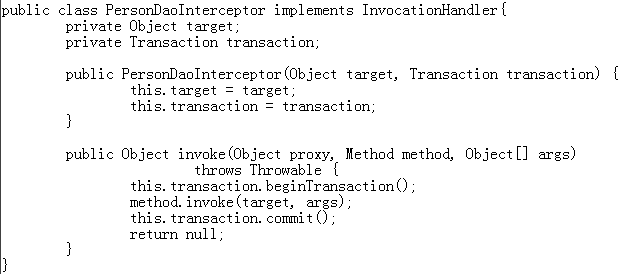
 1 import java.lang.reflect.InvocationHandler;
 2 import java.lang.reflect.Method;
 3
 4 import org.springframework.aop.framework.ProxyFactoryBean;
 5 /**
 6  * 拦截器
 7  *    1、把目标类和事务引入进来
 8  *    2、完成invoke方法
 9  *         1、开启事务
10  *         2、执行save person操作
11  *         3、事务提交
12  * @author zd
13  */
14 public class PersonDaoInterceptor implements InvocationHandler{
15     private Object target;
16     private Transaction transaction;
17
18     public PersonDaoInterceptor(Object target, Transaction transaction) {
19         this.target = target;
20         this.transaction = transaction;
21     }
22
23     public Object invoke(Object proxy, Method method, Object[] args)
24             throws Throwable {
25         if(method.getName().equals("savePerson")
26                 ||method.getName().equals("updatePerson")){
27             //开启事务
28             this.transaction.beginTransaction();
29             //进行save person的操作
30             method.invoke(target, args);//目标对象调用方法
31             this.transaction.commit();
32         }else{
33             method.invoke(target, args);
34         }
35         return null;
36     }
37 }
 1 import java.lang.reflect.Proxy;
 2
 3 import org.junit.Test;
 4
 5 public class PersonDaoTest {
 6     @Test
 7     public void testJDKProxy(){
 8         Object target = new PersonDaoImpl();
 9         Transaction transaction = new Transaction();
10         /**
11          *  创建一个拦截器
12          */
13         PersonDaoInterceptor interceptor = new PersonDaoInterceptor(target, transaction);
14         /**
15          * 1、目标类的类加载器
16          * 2、目标类实现的所有的接口
17          * 3、拦截器
18          */
19         PersonDao personDao = (PersonDao)Proxy.newProxyInstance(
20                     target.getClass().getClassLoader(),
21                     target.getClass().getInterfaces(), interceptor);
22         personDao.updatePerson();
23     }
24 }
案例二:
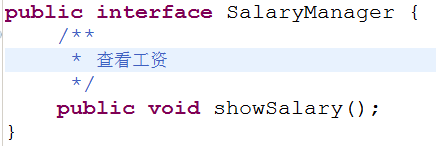
1 public interface SalaryManager {
2     /**
3      * 查看工资
4      */
5     public void showSalary();
6 }
1 public class SalaryManagerImpl implements SalaryManager{
2     public void showSalary() {
3         System.out.println("正在查看工资");
4     }
5 }
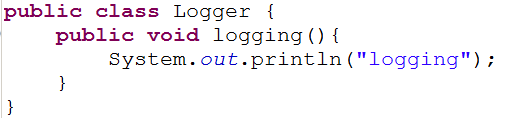
1 public class Logger {
2     public void logging(){
3         System.out.println("logging");
4     }
5 }
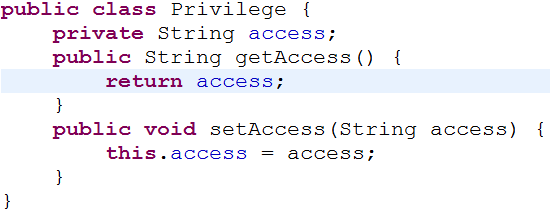
1 public class Privilege {
2     private String access;
3     public String getAccess() {
4         return access;
5     }
6     public void setAccess(String access) {
7         this.access = access;
8     }
9 }
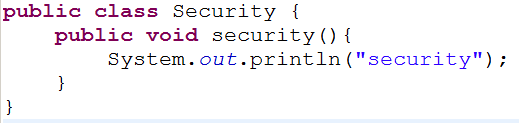
1 public class Security {
2     public void security(){
3         System.out.println("security");
4     }
5 }
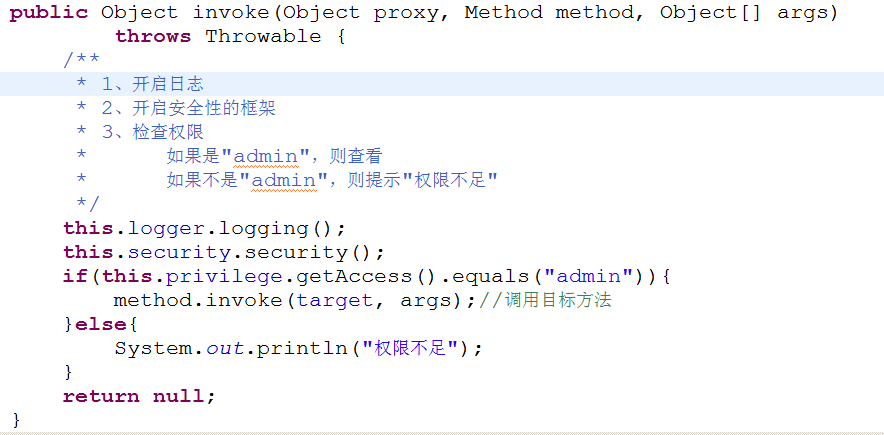
 1 import java.lang.reflect.InvocationHandler;
 2 import java.lang.reflect.Method;
 3
 4 public class SalaryManagerInterceptor implements InvocationHandler{
 5     private Object target;
 6     private Logger logger;
 7     private Security security;
 8     private Privilege privilege;
 9
10     public SalaryManagerInterceptor(Object target, Logger logger,
11             Security security, Privilege privilege) {
12         this.target = target;
13         this.logger = logger;
14         this.security = security;
15         this.privilege = privilege;
16     }
17
18     public Object invoke(Object proxy, Method method, Object[] args)
19             throws Throwable {
20         /**
21          * 1、开启日志
22          * 2、开启安全性的框架
23          * 3、检查权限
24          *      如果是"admin",则查看
25          *      如果不是"admin",则提示"权限不足"
26          */
27         this.logger.logging();
28         this.security.security();
29         if(this.privilege.getAccess().equals("admin")){
30             method.invoke(target, args);//调用目标方法
31         }else{
32             System.out.println("权限不足");
33         }
34         return null;
35     }
36
37 }
 1 import java.lang.reflect.Proxy;
 2
 3 import org.junit.Test;
 4
 5 public class SalaryTest {
 6     @Test
 7     public void testSalary(){
 8         Object target = new SalaryManagerImpl();
 9         Logger logger = new Logger();
10         Security security = new Security();
11         Privilege privilege = new Privilege();
12         privilege.setAccess("asdf");
13         SalaryManagerInterceptor interceptor = new SalaryManagerInterceptor(
14                 target, logger, security, privilege);
15         SalaryManager  proxy = (SalaryManager)Proxy.newProxyInstance(target.getClass().getClassLoader(),
16                 target.getClass().getInterfaces(),
17                 interceptor);
18         proxy.showSalary();
19     }
20 }
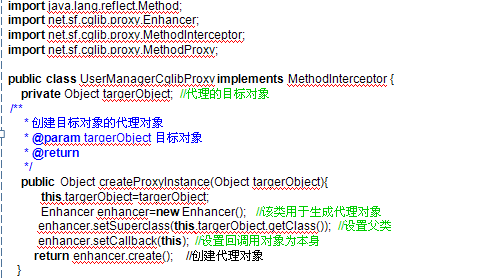
4.1.2 CGLIB做代理(导入架包)
1、 CGlib是一个强大的,高性能,高质量的Code生成类库。它可以在运行期扩展Java类与实现Java接口。
2、 用CGlib生成代理类是目标类的子类。
3、 用CGlib生成 代理类不需要接口
4、 用CGLib生成的代理类重写了父类的各个方法。
5、 拦截器中的intercept方法内容正好就是代理类中的方法体
6、 是用字节码增强技术产生的代理类
1 public class PersonDaoImpl{
2     public void savePerson() {
3         System.out.println("save person");
4     }
5     public void updatePerson(){
6         System.out.println("update person");
7     }
8 }
1 public class Transaction {
2     public void beginTransaction(){
3         System.out.println("begin transaction");
4     }
5     public void commit(){
6         System.out.println("commit");
7     }
8 }
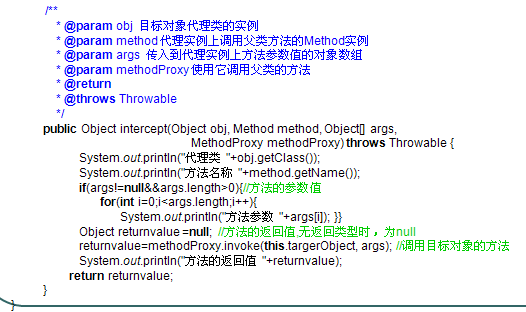
 1 import java.lang.reflect.Method;
 2
 3 import net.sf.cglib.proxy.Enhancer;
 4 import net.sf.cglib.proxy.MethodInterceptor;
 5 import net.sf.cglib.proxy.MethodProxy;
 6
 7 public class PersonDaoInterceptor implements MethodInterceptor{
 8     private Object target;
 9     private Transaction transaction;
10
11     /**
12      * 产生代理类
13      * @return
14      */
15     public Object createProxy(){
16         Enhancer enhancer = new Enhancer();
17         //设置代理类的父类是目标类
18         enhancer.setSuperclass(target.getClass());
19         enhancer.setCallback(this);
20         return enhancer.create();
21     }
22
23     public PersonDaoInterceptor(Object target, Transaction transaction) {
24         this.target = target;
25         this.transaction = transaction;
26     }
27
28     public Object intercept(Object arg0, Method method, Object[] arg2,
29             MethodProxy arg3) throws Throwable {
30         if(method.getName().equals("savePerson")
31                 ||method.getName().equals("updatePerson")){
32             this.transaction.beginTransaction();
33             method.invoke(target, arg2);
34             this.transaction.commit();
35         }else{
36             method.invoke(target, arg2);
37         }
38         return null;
39     }
40 }
 1 import java.lang.reflect.Proxy;
 2
 3 import org.junit.Test;
 4
 5 public class PersonDaoTest {
 6     @Test
 7     public void testJDKProxy(){
 8         Object target = new PersonDaoImpl();
 9         Transaction transaction = new Transaction();
10         /**
11          *  创建一个拦截器
12          */
13         PersonDaoInterceptor interceptor = new PersonDaoInterceptor(target, transaction);
14
15         PersonDaoImpl proxy = (PersonDaoImpl)interceptor.createProxy();
16         proxy.savePerson();
17     }
18 }
spring有两种代理方式:
- 若目标对象实现了若干接口,spring使用JDK的java.lang.reflect.Proxy类代理。
优点:因为有接口,所以使系统更加松耦合
缺点:为每一个目标类创建接口
- 若目标对象没有实现任何接口,spring使用CGLIB库生成目标对象的子类。
优点:因为代理类与目标类是继承关系,所以不需要有接口的存在。
缺点:因为没有使用接口,所以系统的耦合性没有使用JDK的动态代理好。
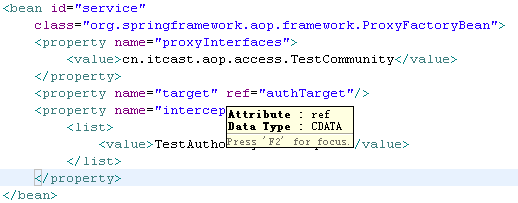
4.1.3 Spring的动态代理
1、 拦截器必须实现MethodInterceptor接口
2、 在spring中的配置
总结:不管采用JDK动态代理生成代理类还是采用CGLIB生成动态代理类。目标类中的所有方法都被拦截下来。而在哪个方法里做比如权限的判断、安全性的检查等一系列工做必须在拦截器中作相应的判断。但是这样的编程形式给程序的编写带来了一定的麻烦。
1、 在拦截器中控制哪些方法将被做权限判断、安全性检查等是一件比较困难的事情。
- 采取这样的配置目标类只能是一个,所以如果用这种方法做权限控制,得写很多代理,这样给代码的书写造成了困难。
- 每一个类中的每一个方法如果都有不同的权限(实际的系统往往都是这样的),在拦截器中的判断代码书写会很困难。
2、 这样的代码也会导致硬编码,也就是说我们必须在拦截器中写一些权限判断等事情,会导致拦截器中代码量的增大,造成维护的麻烦。
4.2 AOP编程
4.2.1概念:
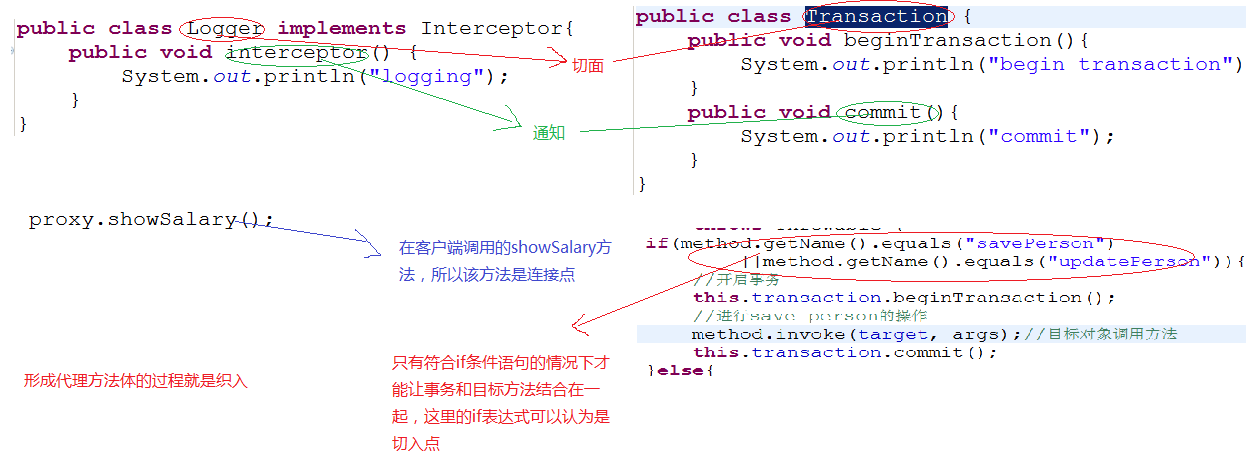
- Aspect(切面):比如说事务、权限等,与业务逻辑没有关系的部分
- joinpoint(连接点):目标类的目标方法。(由客户端在调用的时候决定)
- Pointcut(切入点):所谓切入点是指我们要对那些拦截的方法的定义.(只有符合切入点的条件,才能让通知和目标方法结合在一起)
被纳入spring aop中的目标类的方法。
- Advice(通知):所谓通知是指拦截到joinpoint之后所要做的事情就是通知.通知分为前置通知,后置通知,异常通知,最终通知,环绕通知(切面要完成的功能)————切面中的方法
- Target(目标对象):代理的目标对象
- Weaving(织入):是指把切面应用到目标对象来创建新的代理对象的过程.切面在指定的连接点织入到目标对象
|
JDKProxy代理 |
SpringAop |
|
目标对象 |
目标对象 |
|
拦截器类 |
切面 |
|
拦截器类中的方法 |
通知 |
|
被拦截到的目标类中方法的集合 |
切入点 |
|
在客户端调用的方法(目标类目标方法) |
连接点 |
|
代理类 |
AOP代理 |
|
代理类的代理方法生成的过程 |
织入 |
通知根据拦截目标类中的目标方法的位置不一样可以分为:前置通知、后置通知、最终通知、环绕通知、异常通知
3.
说明:
1、 在开发的过程中,日志、权限、安全性的框架、目标方法完全是松耦合的
2、 在形成代理对象的方法的过程中就把这几个结合在一起了
AOP 术语
通知:
定义:切面也需要完成工作。在 AOP 术语中,切面的工作被称为通知。 工作内容:通知定义了切面是什么以及何时使用。除了描述切面要完成的工作,通知还解决何时执行这个工作。 Spring 切面可应用的 5 种通知类型:
Before——在方法调用之前调用通知 After——在方法完成之后调用通知,无论方法执行成功与否 After-returning——在方法执行成功之后调用通知 After-throwing——在方法抛出异常后进行通知 Around——通知包裹了被通知的方法,在被通知的方法调用之前和调用之后执行自定义的行为
连接点:
定义:连接点是一个应用执行过程中能够插入一个切面的点。 连接点可以是调用方法时、抛出异常时、甚至修改字段时、 切面代码可以利用这些点插入到应用的正规流程中 程序执行过程中能够应用通知的所有点。
切点:
定义:如果通知定义了“什么”和“何时”。那么切点就定义了“何处”。切点会匹配通知所要织入的一个或者多个连接点。 通常使用明确的类或者方法来指定这些切点。 作用:定义通知被应用的位置(在哪些连接点)
切面:
定义:切面是通知和切点的集合,通知和切点共同定义了切面的全部功能——它是什么,在何时何处完成其功能。
引入:
引入允许我们向现有的类中添加方法或属性
织入:
织入是将切面应用到目标对象来创建的代理对象过程。 切面在指定的连接点被织入到目标对象中,在目标对象的生命周期中有多个点可以织入
编译期——切面在目标类编译时期被织入,这种方式需要特殊编译器。AspectJ的织入编译器就是以这种方式织入切面。 类加载期——切面在类加载到 JVM ,这种方式需要特殊的类加载器,他可以在目标类被引入应用之前增强该目标类的字节码。AspectJ5 的 LTW 就支持这种织入方式 运行期——切面在应用运行期间的某个时刻被织入。一般情况下,在织入切面时候,AOP 容器会为目标对象动态的创建代理对象。Spring AOP 就是以这种方式织入切面。
4.2.2 AOP实现的两种模式
4.2.2.1 xml形式
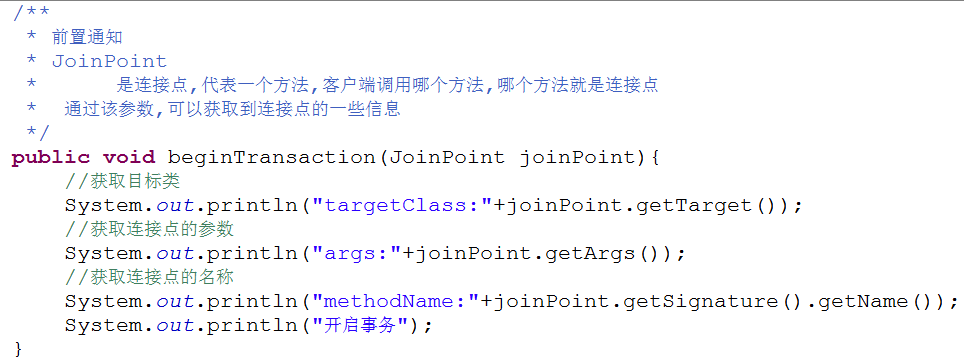
- 前置通知
在spring配置文件中声明切面

在spring配置文件中声明目标类

定义切面、切入点、通知
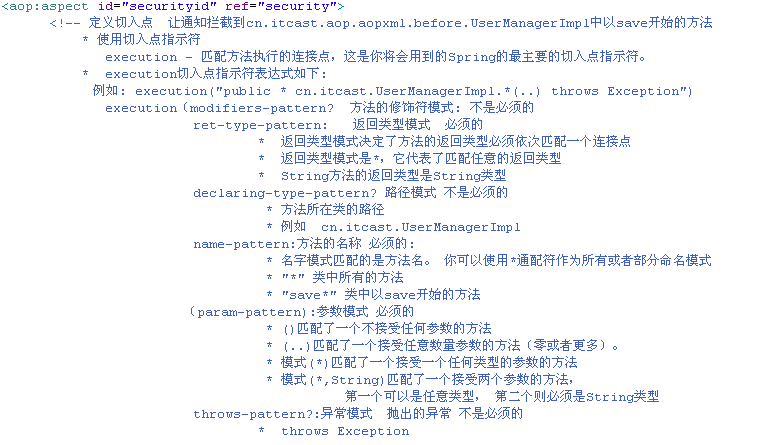
注:见6.2.3.4
说明: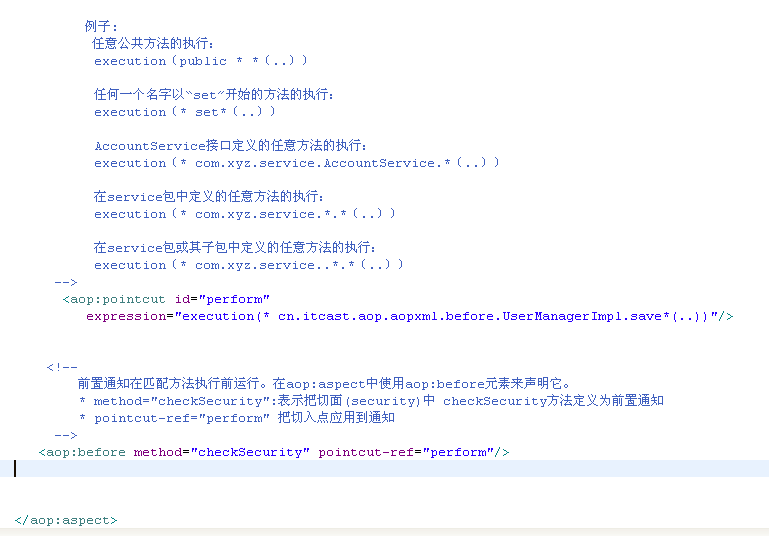
1、在切面类中,没有必要实现接口,但方法名称要与<aop:before method=”checkSecurity” 中的checkSecurity一样。
2、checkSecurity方法中通过JoinPoint参数可以获得目标类的目标方法名称、参数值等信息。
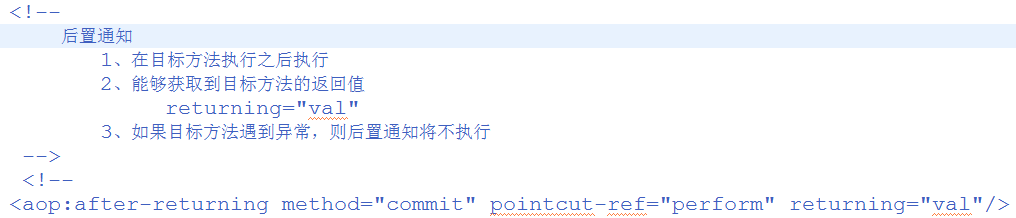
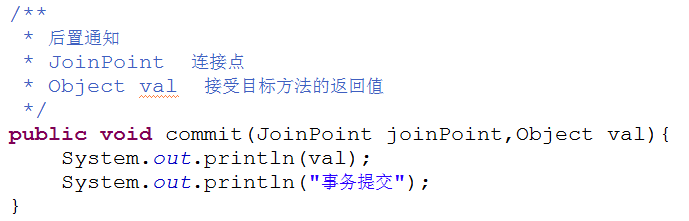
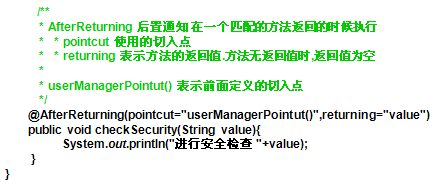
- 后置通知
1、 没有特殊说明的地方和前置通知是一样的。
2、 在spring配置文件中

3、 在拦截器中的方法要和checkSecurity方法一样,有两个参数
JoinPoint point 可以获得目标方法和参数值
Object val 这里的名字要和returning=”val”中保持一致,指的是方法的返回值。
4、 returning=”val”时,通知里可以有返回参数,这个参数只能决定通知里能不能拿到方法的返回值,和客户端没有关系。

5、 在执行目标类的目标方法中遇到异常,则不执行后置通知。
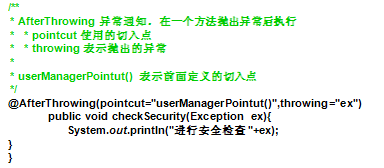
- 异常通知
1、 没有特殊说明的地方和前置通知一样
2、 在spring配置文件中

其中throwing指定了传递异常的参数名称
3、 在异常通知中(拦截器)中,必须是checkSecurity方法。方法中有两个参数
JoinPoint point 可以获得方法的名称、参数
Throwable ex 利用ex.getMessage()可以获得异常信息
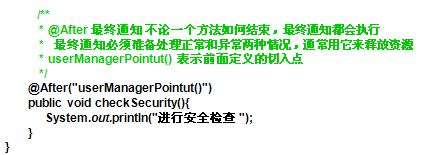
- 最终通知
1、 没有特殊说明,和前置通知的配置一样。
2、 在spring配置文件里:

说明:在最终通知中不受异常的影响。也就是说不论目标方法执行的过程中是否抛出异常,最终通知都将执行。
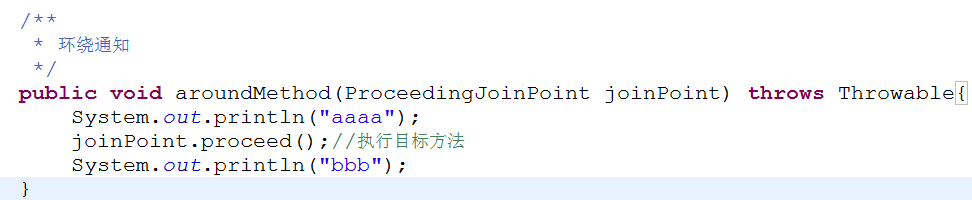
- 环绕通知
1、 没有特殊说明和前置通知的配置保持一致。
2、 在spring文件中

3、 在环绕通知中,方法名称为checkSecurity。参数 类型 为ProceedingJoinPoint。
ProceedingJoinPoint的proceed方法相当于invoke方法,调用目标类的目标方法。ProceedingJoinPoint继承了JoinPoint类
4、 能在方法执行的前后加入额外的代码。
说明:
步骤
目标接口

目标类
切面
Spring的配置文件
执行流程
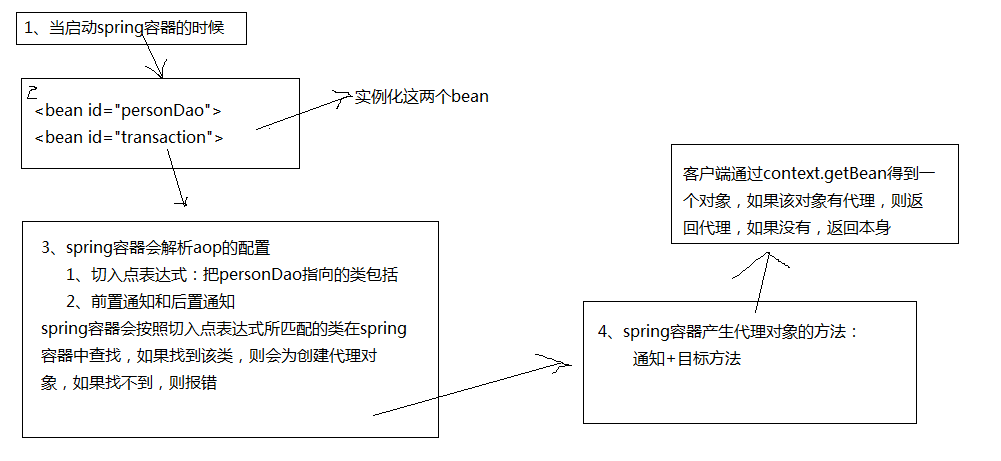
说明:
1、 context.getBean时,如果该类没有生成代理对象,则返回对象本身
2、 如果产生了代理对象,则返回代理对象
3、 如果目标类实现了接口,则采用jdkproxy生成代理对象,如果目标类没有实现接口,则采用cglibproxy生成代理对象,而生成代理对象是由spring容器内部完成的。
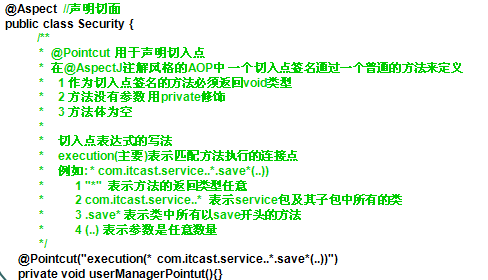
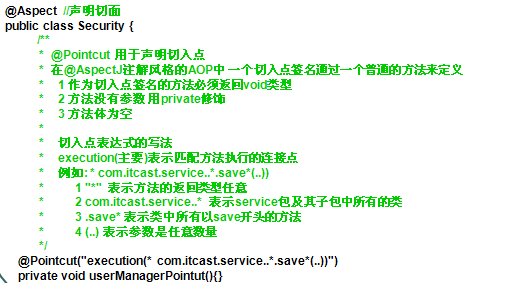
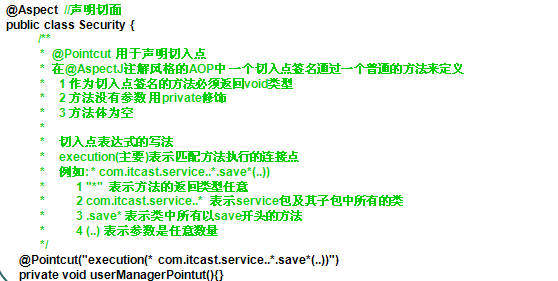
切入点表达式


代表所有的公共方法

代表所有的以set开头的方法

代表com.xyz.service包下的AccoutService类的所有的方法

代表com.xyz.service包下的所有的类的所有的方法

代表com.xyz.service包及子包下的所有的类的所有的方法

代表com.itheima.spring.aop.xml包下的所有的类的有三个参数,第一个参数为Long,第二个参数为String,第三个参数为任意类型的所有的方法


通知
前置通知
在目标方法执行之前执行。

后置通知
在目标方法执行之后执行
可以获取目标方法的返回值
当目标方法遇到异常,不执行
最终通知
无论目标方法是否遇到异常都会执行,相当于代码中的finnaly
异常通知
获取目标方法抛出的异常


环绕通知
能够控制目标方法的执行

案例1springAop:(导入两个架包:aspectjrt.jar 和aspectjweaver.jar)
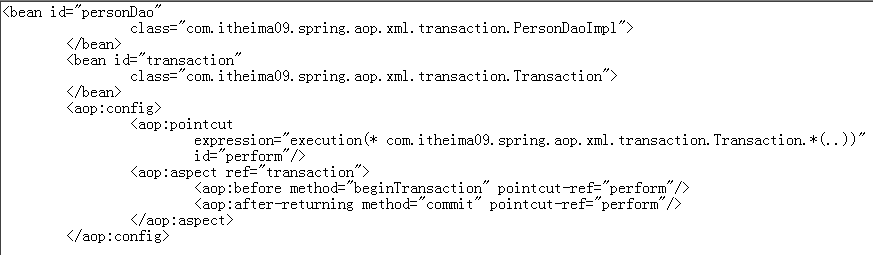
 1 <?xml version="1.0" encoding="UTF-8"?>
 2 <beans xmlns="http://www.springframework.org/schema/beans"
 3         xmlns:aop="http://www.springframework.org/schema/aop"
 4        xmlns:xsi="http://www.w3.org/2001/XMLSchema-instance"
 5        xsi:schemaLocation="http://www.springframework.org/schema/beans
 6            http://www.springframework.org/schema/beans/spring-beans-2.5.xsd
 7            http://www.springframework.org/schema/aop
 8            http://www.springframework.org/schema/aop/spring-aop-2.5.xsd">
 9       <!--
10           引入目标类和切面
11        -->
12       <bean id="personDao"
13           class="com.itheima09.spring.aop.xml.transaction.PersonDaoImpl">
14       </bean>
15       <bean id="transaction"
16           class="com.itheima09.spring.aop.xml.transaction.Transaction">
17       </bean>
18       <!--
19           aop:config的配置
20        -->
21       <aop:config>
22           <!--
23               切入点表达式
24                id为标示符
25            -->
26           <aop:pointcut
27               expression="execution(* com.itheima09.spring.aop.xml.transaction.PersonDaoImpl.*(..))"
28               id="perform"/>
29           <!--
30               ref指向切面
31            -->
32           <aop:aspect ref="transaction">
33               <!--
34                   前置通知  在目标方法输出之前执行
35                   method 前置通知的名字
36                   pointcut-ref 指向切入点表达式
37                -->
38               <aop:before method="beginTransaction" pointcut-ref="perform"/>
39               <aop:after-returning method="commit" pointcut-ref="perform"/>
40           </aop:aspect>
41       </aop:config>
42 </beans>
1 public interface PersonDao {
2     public String savePerson();
3 }
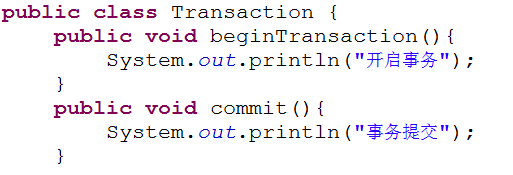
1 public class PersonDaoImpl{
2     public String savePerson() {
3         System.out.println("save person");
4         return "aaaaa";
5     }
6 }
 1 import java.lang.reflect.Method;
 2
 3 import org.junit.Test;
 4
 5 public class Transaction {
 6     public void beginTransaction(){
 7         System.out.println("开启事务");
 8     }
 9     public void commit(){
10         System.out.println("事务提交");
11     }
12
13     @Test
14     public void test(){
15         Class class1 = Object.class;
16         Method[] methods = class1.getMethods();
17         for(Method method:methods){
18             System.out.println(method.toString());
19         }
20     }
21 }
 1 import org.junit.Test;
 2 import org.springframework.context.ApplicationContext;
 3 import org.springframework.context.support.ClassPathXmlApplicationContext;
 4
 5 public class PersonTest {
 6     @Test
 7     public void testProxy(){
 8         ApplicationContext context = new ClassPathXmlApplicationContext("applicationContext.xml");
 9         PersonDaoImpl personDao = (PersonDaoImpl)context.getBean("personDao");
10         personDao.savePerson();
11     }
12 }
案例二:异常的处理:
从配置中可以看出,把service层所有的类当成目标类,只要service层所有的类的所有的方法抛出异常,则exceptionAspect中的异常通知就会获取到目标方法抛出的异常,所以在这里异常通知就是用来处理异常的,而且只有一个方法。并且该切面和所有的其他类都是松耦合的。

 1 <?xml version="1.0" encoding="UTF-8"?>
 2 <beans xmlns="http://www.springframework.org/schema/beans"
 3         xmlns:aop="http://www.springframework.org/schema/aop"
 4        xmlns:xsi="http://www.w3.org/2001/XMLSchema-instance"
 5        xsi:schemaLocation="http://www.springframework.org/schema/beans
 6            http://www.springframework.org/schema/beans/spring-beans-2.5.xsd
 7            http://www.springframework.org/schema/aop
 8            http://www.springframework.org/schema/aop/spring-aop-2.5.xsd">
 9       <!--
10           把personDao,personService,personAction放入到spring容器中
11        -->
12       <bean id="personDao" class="com.itheima09.springaop.xml.ex.exception.dao.PersonDaoImpl"></bean>
13       <bean id="personService" class="com.itheima09.springaop.xml.ex.exception.service.PersonServiceImpl">
14           <property name="personDao">
15               <ref bean="personDao"/>
16           </property>
17       </bean>
18       <bean id="personAction" class="com.itheima09.springaop.xml.ex.exception.action.PersonAction">
19           <property name="personService">
20               <ref bean="personService"/>
21           </property>
22       </bean>
23     <!--
24         引入切面
25      -->
26     <bean id="exceptionAspect"
27         class="com.itheima09.springaop.xml.ex.exception.aspect.ExceptionAspect"></bean>
28     <aop:config>
29         <aop:pointcut
30             expression="execution(* com.itheima09.springaop.xml.ex.exception.service.*.*(..))"
31             id="perform"/>
32         <aop:aspect ref="exceptionAspect">
33             <aop:after-throwing method="throwingMethod" pointcut-ref="perform" throwing="ex"/>
34         </aop:aspect>
35     </aop:config>
36 </beans>
 1 import com.itheima09.springaop.xml.ex.exception.service.PersonService;
 2
 3 public class PersonAction {
 4     private PersonService personService;
 5
 6     public void setPersonService(PersonService personService) {
 7         this.personService = personService;
 8     }
 9
10     public void savePerson() throws Exception{
11         this.personService.savePerson();
12     }
13 }
1 public class ExceptionAspect {
2     public void throwingMethod(Throwable ex){
3         System.out.println(ex.getMessage());
4     }
5 }
1 package com.itheima09.springaop.xml.ex.exception.aspect;
2
3 public class MyException extends Exception{
4     public MyException(String msg) {
5         super(msg);
6     }
7 }
1 package com.itheima09.springaop.xml.ex.exception.dao;
2
3 public interface PersonDao {
4     public void savePerson() throws Exception;
5 }
 1 package com.itheima09.springaop.xml.ex.exception.dao;
 2
 3 import com.itheima09.springaop.xml.ex.exception.aspect.MyException;
 4
 5 public class PersonDaoImpl implements PersonDao{
 6     public void savePerson() throws Exception{
 7         int b = 0;
 8         if(b!=0){
 9             int a = 1/b;
10         }else{
11             throw new MyException("不能除以0");
12         }
13         System.out.println("save person");
14     }
15 }
1 package com.itheima09.springaop.xml.ex.exception.service;
2
3 public interface PersonService {
4     public void savePerson() throws Exception;
5 }
 1 package com.itheima09.springaop.xml.ex.exception.service;
 2
 3 import com.itheima09.springaop.xml.ex.exception.dao.PersonDao;
 4
 5 public class PersonServiceImpl implements PersonService{
 6     private PersonDao personDao;
 7     public PersonDao getPersonDao() {
 8         return personDao;
 9     }
10     public void setPersonDao(PersonDao personDao) {
11         this.personDao = personDao;
12     }
13     public void savePerson() throws Exception{
14         this.personDao.savePerson();
15     }
16 }
 1 package com.itheima09.springaop.xml.ex.exception.test;
 2
 3 import org.junit.Test;
 4 import org.springframework.context.ApplicationContext;
 5 import org.springframework.context.support.ClassPathXmlApplicationContext;
 6
 7 import com.itheima09.springaop.xml.ex.exception.action.PersonAction;
 8
 9 public class ExceptionTest {
10     @Test
11     public void testException() throws Exception{
12         ApplicationContext context = new ClassPathXmlApplicationContext("applicationContext.xml");
13         PersonAction personAction = (PersonAction)context.getBean("personAction");
14         personAction.savePerson();
15     }
16 }
案例三:权限的实现:
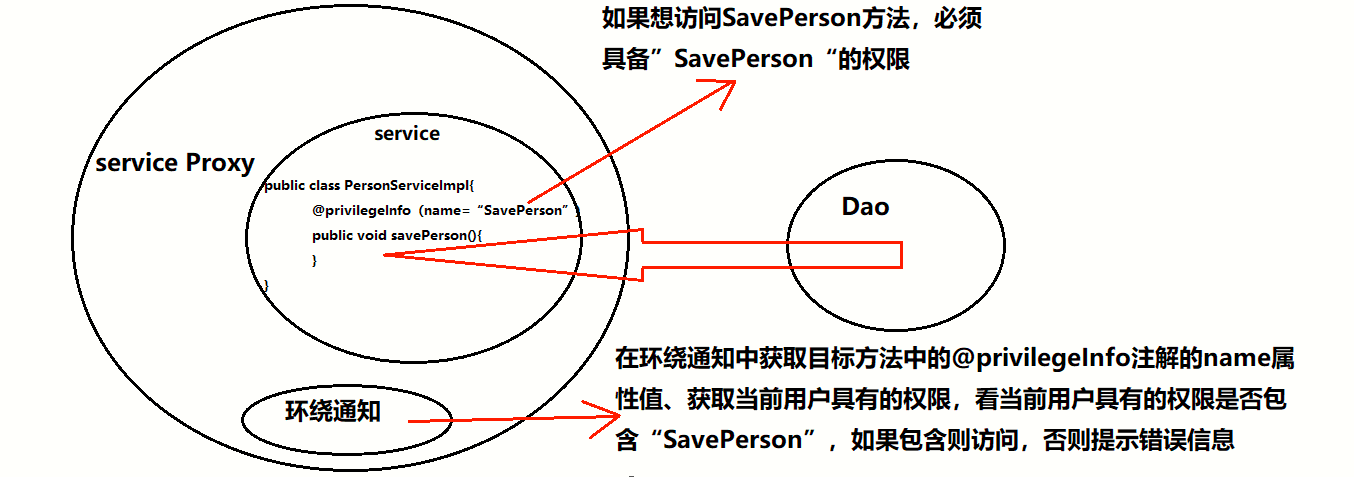
组成
1、 写dao层和service层的类和接口
2、 自定义的注解@PrivilegeInfo
3、 注解解析器:解析目标方法上面的注解的name属性的值
4、 写一个权限类Privilege(name)
5、 写一个关于权限的判断的切面,在切面中写一个环绕通知
实现
 1 <?xml version="1.0" encoding="UTF-8"?>
 2 <beans xmlns="http://www.springframework.org/schema/beans"
 3         xmlns:aop="http://www.springframework.org/schema/aop"
 4        xmlns:xsi="http://www.w3.org/2001/XMLSchema-instance"
 5        xsi:schemaLocation="http://www.springframework.org/schema/beans
 6            http://www.springframework.org/schema/beans/spring-beans-2.5.xsd
 7            http://www.springframework.org/schema/aop
 8            http://www.springframework.org/schema/aop/spring-aop-2.5.xsd">
 9       <bean id="personDao" class="com.itheima09.springaop.xml.privilege.dao.PersonDaoImpl"></bean>
10       <bean id="personService" class="com.itheima09.springaop.xml.privilege.service.PersonServiceImpl">
11           <property name="personDao">
12               <ref bean="personDao"/>
13           </property>
14       </bean>
15       <bean id="privilegeAspect" class="com.itheima09.springaop.xml.privilege.aspect.PrivilegeAspect">
16       </bean>
17       <aop:config>
18           <aop:pointcut
19               expression="execution(* com.itheima09.springaop.xml.privilege.service.*.*(..))"
20               id="perform"/>
21           <aop:aspect ref="privilegeAspect">
22               <aop:around method="controlTargetMethod" pointcut-ref="perform"/>
23           </aop:aspect>
24       </aop:config>
25 </beans>
 1 package com.itheima09.springaop.xml.privilege.annotation;
 2
 3 import java.lang.reflect.Method;
 4
 5 public class AnnotationParse {
 6     public static String parse(Class classt,String methodName) throws Exception{
 7         String privilegeName = "";
 8         //目标方法
 9         Method method = classt.getMethod(methodName);
10         //判断目标方法上是否有PrivilegeInfo
11         if(method.isAnnotationPresent(PrivilegeInfo.class)){
12             //获取目标方法上面的PrivilegeInfo注解
13             PrivilegeInfo privilegeInfo = method.getAnnotation(PrivilegeInfo.class);
14             //获取该注解的name属性的值
15             privilegeName = privilegeInfo.name();
16         }
17         return privilegeName;
18     }
19 }
 1 package com.itheima09.springaop.xml.privilege.annotation;
 2
 3 import java.lang.annotation.ElementType;
 4 import java.lang.annotation.Retention;
 5 import java.lang.annotation.RetentionPolicy;
 6 import java.lang.annotation.Target;
 7
 8 @Target(ElementType.METHOD)
 9 @Retention(RetentionPolicy.RUNTIME)
10 public @interface PrivilegeInfo {
11     String name() default "";
12 }
 1 package com.itheima09.springaop.xml.privilege.aspect;
 2
 3 import java.util.ArrayList;
 4 import java.util.List;
 5
 6 import org.aspectj.lang.ProceedingJoinPoint;
 7
 8 import com.itheima09.springaop.xml.privilege.annotation.AnnotationParse;
 9 import com.itheima09.springaop.xml.privilege.bean.Privilege;
10
11 public class PrivilegeAspect {
12     /**
13      * 该用户能够访问到的权限
14      */
15     private List<Privilege> privileges = new ArrayList<Privilege>();
16
17     public List<Privilege> getPrivileges() {
18         return privileges;
19     }
20
21     public void setPrivileges(List<Privilege> privileges) {
22         this.privileges = privileges;
23     }
24
25     /*
26      * 环绕通知
27      */
28     public void controlTargetMethod(ProceedingJoinPoint joinPoint) throws Throwable{
29         /**
30          * 1、获取用户能够访问到的权限
31          * 2、获取访问目标方法的权限
32          * 3、检查用户的权限中是否包含目标方法的权限
33          *      如果包含
34          *          则访问目标方法
35          *      如果不包含
36          *           则提示不能访问
37          */
38         //目标类的class形式
39         Class targetClass = joinPoint.getTarget().getClass();
40         //目标方法
41         String methodName = joinPoint.getSignature().getName();
42         //能够访问目标方法的权限
43         String privilegeName = AnnotationParse.parse(targetClass, methodName);
44         boolean flag = false;
45         //检查用户的权限是否包含访问目标方法应该具备的权限
46         for(Privilege privilege:this.privileges){
47             if(privilege.getName().equals(privilegeName)){
48                 flag = true;
49                 break;
50             }
51         }
52         if(flag){//可以访问目标方法
53             joinPoint.proceed();//访问目标方法
54         }else{
55             System.out.println("权限不足");
56         }
57     }
58 }
 1 package com.itheima09.springaop.xml.privilege.bean;
 2
 3 public class Privilege {
 4     private String name;
 5     public String getName() {
 6         return name;
 7     }
 8     public void setName(String name) {
 9         this.name = name;
10     }
11 }
1 package com.itheima09.springaop.xml.privilege.dao;
2
3 public interface PersonDao {
4     public void savePerson();
5     public void updatePerson();
6 }
 1 package com.itheima09.springaop.xml.privilege.dao;
 2
 3 public class PersonDaoImpl implements PersonDao{
 4     public void savePerson() {
 5         System.out.println("save person");
 6     }
 7     public void updatePerson() {
 8         System.out.println("update person");
 9     }
10 }
1 package com.itheima09.springaop.xml.privilege.service;
2
3 public interface PersonService {
4     public void savePerson();
5     public void updatePerson();
6 }
 1 package com.itheima09.springaop.xml.privilege.service;
 2
 3 import com.itheima09.springaop.xml.privilege.annotation.PrivilegeInfo;
 4 import com.itheima09.springaop.xml.privilege.dao.PersonDao;
 5
 6 public class PersonServiceImpl implements PersonService{
 7     private PersonDao personDao;
 8     public void setPersonDao(PersonDao personDao) {
 9         this.personDao = personDao;
10     }
11     @PrivilegeInfo(name="savePerson")
12     public void savePerson() {
13         this.personDao.savePerson();
14     }
15     @PrivilegeInfo(name="updatePerson")
16     public void updatePerson() {
17         this.personDao.updatePerson();
18     }
19 }
 1 package com.itheima09.springaop.xml.privilege.test;
 2
 3 import org.junit.Test;
 4 import org.springframework.context.ApplicationContext;
 5 import org.springframework.context.support.ClassPathXmlApplicationContext;
 6
 7 import com.itheima09.springaop.xml.privilege.aspect.PrivilegeAspect;
 8 import com.itheima09.springaop.xml.privilege.bean.Privilege;
 9 import com.itheima09.springaop.xml.privilege.service.PersonService;
10
11 public class PrivilegeTest {
12     @Test
13     public void test(){
14         ApplicationContext context = new ClassPathXmlApplicationContext("applicationContext.xml");
15         PrivilegeAspect privilegeAspect = (PrivilegeAspect)context.getBean("privilegeAspect");
16         /**
17          * 给用户初始化权限值
18          */
19         Privilege privilege1 = new Privilege();
20         privilege1.setName("asdf");
21         Privilege privilege2 = new Privilege();
22         privilege2.setName("updatePerson");
23         privilegeAspect.getPrivileges().add(privilege1);
24         privilegeAspect.getPrivileges().add(privilege2);
25         PersonService personService = (PersonService)context.getBean("personService");
26         personService.savePerson();
27     }
28 }
案例三:多个切面
 1 <?xml version="1.0" encoding="UTF-8"?>
 2 <beans xmlns="http://www.springframework.org/schema/beans"
 3         xmlns:aop="http://www.springframework.org/schema/aop"
 4        xmlns:xsi="http://www.w3.org/2001/XMLSchema-instance"
 5        xsi:schemaLocation="http://www.springframework.org/schema/beans
 6            http://www.springframework.org/schema/beans/spring-beans-2.5.xsd
 7            http://www.springframework.org/schema/aop
 8            http://www.springframework.org/schema/aop/spring-aop-2.5.xsd">
 9     <bean id="salaryManager" class="com.itheima09.springaop.xml.salary.SalaryManagerImpl"></bean>
10     <bean id="logger" class="com.itheima09.springaop.xml.salary.Logger"></bean>
11     <bean id="security" class="com.itheima09.springaop.xml.salary.Security"></bean>
12     <bean id="privilege" class="com.itheima09.springaop.xml.salary.Privilege">
13         <property name="access" value="afds"></property>
14     </bean>
15     <bean id="aroundClass" class="com.itheima09.springaop.xml.salary.AroundClass"></bean>
16
17     <aop:config>
18         <aop:pointcut
19             expression="execution(* com.itheima09.springaop.xml.salary.SalaryManagerImpl.*(..))"
20             id="perform"/>
21         <aop:aspect ref="logger">
22             <aop:before method="logging" pointcut-ref="perform"/>
23         </aop:aspect>
24         <aop:aspect ref="security">
25             <aop:before method="security" pointcut-ref="perform"/>
26         </aop:aspect>
27         <aop:aspect ref="privilege">
28             <aop:around method="controlTarget" pointcut-ref="perform"/>
29         </aop:aspect>
30         <aop:aspect ref="aroundClass">
31             <aop:around method="aroundMethod" pointcut-ref="perform"/>
32         </aop:aspect>
33     </aop:config>
34 </beans>
1 package com.itheima09.springaop.xml.salary;
2
3 public class Logger {
4     public void logging(){
5         System.out.println("logging");
6     }
7 }
 1 package com.itheima09.springaop.xml.salary;
 2
 3 import org.aspectj.lang.ProceedingJoinPoint;
 4
 5 public class Privilege {
 6     private String access;
 7     public String getAccess() {
 8         return access;
 9     }
10     public void setAccess(String access) {
11         this.access = access;
12     }
13     public Object controlTarget(ProceedingJoinPoint joinPoint) throws Throwable{
14         Object obj = null;
15         if(this.getAccess().equals("admin")){
16             obj = joinPoint.proceed();//调用目标方法
17         }else{
18             System.out.println("权限不足");
19         }
20         return obj;
21     }
22 }
1 package com.itheima09.springaop.xml.salary;
2
3 public interface SalaryManager {
4     /**
5      * 查看工资
6      */
7     public String showSalary();
8 }
1 package com.itheima09.springaop.xml.salary;
2
3 public class SalaryManagerImpl implements SalaryManager{
4     public String showSalary() {
5         System.out.println("正在查看工资");
6         return "aaaa";
7     }
8 }
1 package com.itheima09.springaop.xml.salary;
2
3 public class Security {
4     public void security(){
5         System.out.println("security");
6     }
7 }
 1 package com.itheima09.springaop.xml.salary;
 2
 3 import org.aspectj.lang.ProceedingJoinPoint;
 4
 5 public class AroundClass {
 6     public void aroundMethod(ProceedingJoinPoint joinPoint) throws Throwable{
 7         System.out.println("----------------");
 8         joinPoint.proceed();
 9     }
10 }
 1 package com.itheima09.springaop.xml.salary;
 2
 3 import org.junit.Test;
 4 import org.springframework.context.ApplicationContext;
 5 import org.springframework.context.support.ClassPathXmlApplicationContext;
 6
 7 public class SalaryTest {
 8     @Test
 9     public void test(){
10         ApplicationContext context = new ClassPathXmlApplicationContext("applicationContext.xml");
11         SalaryManager salaryManager = (SalaryManager)context.getBean("salaryManager");
12         String s = salaryManager.showSalary();
13         System.out.println(s);
14     }
15 }
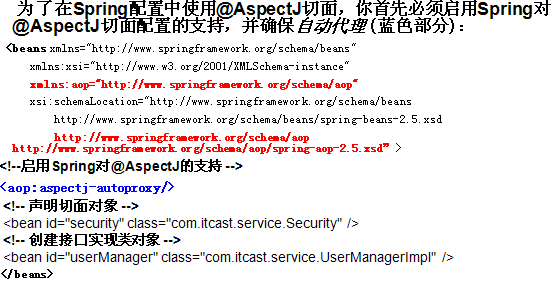
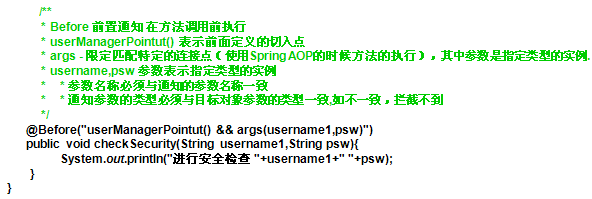
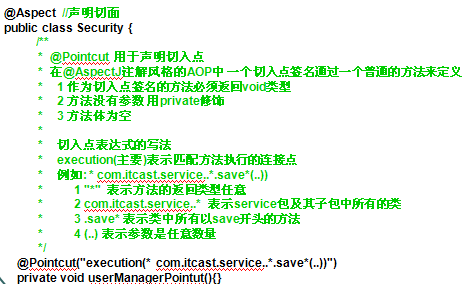
4.2.2.2Aop注解形式
-
前置通知

注意:@Aspectj是按照类型匹配的。
-
后置通知
-
异常通知


-
最终通知
-
环绕通知

5 Spring数据库
5.1 Spring+JDBC
5.1.1 Jdbc编程特点
静态代码+动态变量 = jdbc编程。在spring中动态变量可以用注入的形式给予。这样的编程方式适合包装成模板。静态代码构成了模板,而动态变量则是需要传入的参数。
5.1.2引入DataSource
在spring中注入DataSource
 1 <?xml version="1.0" encoding="UTF-8"?>
 2 <beans xmlns="http://www.springframework.org/schema/beans"
 3        xmlns:xsi="http://www.w3.org/2001/XMLSchema-instance"
 4        xsi:schemaLocation="http://www.springframework.org/schema/beans
 5            http://www.springframework.org/schema/beans/spring-beans-2.5.xsd">
 6     <!--
 7         按照指定的路径加载配置文件
 8      -->
 9     <bean
10         class="org.springframework.beans.factory.config.PropertyPlaceholderConfigurer">
11         <property name="locations">
12             <value>classpath:jdbc.properties</value>
13         </property>
14     </bean>
15
16       <bean id="dataSource" destroy-method="close"
17         class="org.apache.commons.dbcp.BasicDataSource">
18         <property name="driverClassName" value="${jdbc.driverClassName}" />
19         <property name="url" value="${jdbc.url}" />
20         <property name="username" value="${jdbc.username}" />
21         <property name="password" value="${jdbc.password}" />
22     </bean>
23
24     <!--
25         abstract="true" 告诉spring容器不要为该bean创建对象
26      -->
27     <!--
28         第一种写法
29      -->
30     <bean id="itheima09Template"
31         class="com.itheima09.spring.jdbc.template.Itheima09Template"
32         abstract="true">
33         <property name="dataSource">
34             <ref bean="dataSource"/>
35         </property>
36     </bean>
37
38
39 </beans>
1 jdbc.driverClassName=com.mysql.jdbc.Driver
2 jdbc.url=jdbc\:mysql\://localhost\:3306/hibernate02
3 jdbc.username=root
4 jdbc.password=123456
 1 package com.mikey.www;
 2
 3 import java.sql.Connection;
 4
 5 import javax.sql.DataSource;
 6
 7 import org.junit.Test;
 8 import org.springframework.context.ApplicationContext;
 9 import org.springframework.context.support.ClassPathXmlApplicationContext;
10
11 public class DataSourceTest {
12     @Test
13     public void testDataSource(){
14         ApplicationContext context=new ClassPathXmlApplicationContext("applicationContext.xml");
15         DataSource dataSource=(DataSource) context.getBean("dataSource");
16         System.out.println(dataSource);
17     }
18
19 }
5.1.3 核心类JdbcTemplate
1、 基于模板的设置(为什么可以设置成基于模板的形式)
2、 完成了资源的创建和释放的工作
3、 简化为我们对JDBC的操作
4、 完成了对JDBC的核心流程的工作,包括SQL语句的创建和执行
5、 仅需要传递DataSource就可以把它实例化
6、 JdbcTemplate只需要创建一次
7、 JdbcTemplate是线程安全类
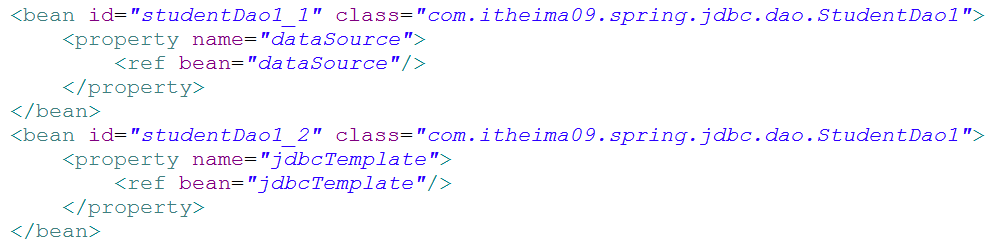
5.1.4 使用JdbcTemplate
在Dao类中,用JdbcTemplate作为属性,用spring对JdbcTemplate进行注入。再对JdbcTemplate进行DataSource注入。
注:为什么只要对JdbcTemplate注入DataSource就可以了?
5.1.5 继承JdbcDaoSupport
在Dao类中,继承JdbcDaoSupport。因为JdbcDaoSupport已经有了JdbcTemplate的引用,所以只要继承JdbcDaoSupport就相当于有了JdbcTemplate属性。
方案1

方案2


方案3


5.1.6 使用properties文件
 1 <bean class="org.springframework.beans.factory.config.PropertyPlaceholderConfigurer">
 2
 3     <property name="locations">
 4
 5        <list>
 6
 7            <value>jdbc.properties</value>
 8
 9        </list>
10
11     </property>
12
13 </bean>
5.1.7 RowMapper的使用
1、 产生原因:在Jdbc的操作中,有很多情况下是要将ResultSet里的数据封装到一个持久化Bean里,再把持久化Bean封装到集合中。这样会造成大量的代码的重复,不利于代码重用。而RowMapper正好解决了这个问题。
2、 使用:
1、 写一个类实现RowMapper接口
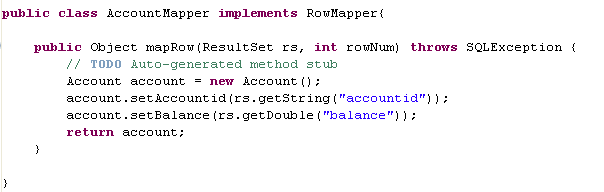
2、 在回调接口中,作为参数进行传入即可。

5.1.8声明式事务管理
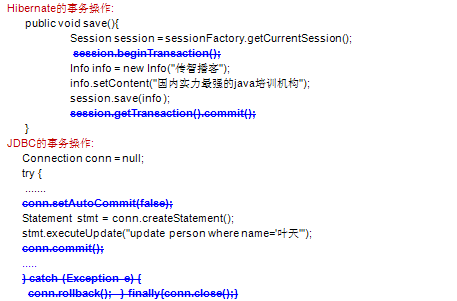
概念
程序员不再负责处理事务,事务处理交给spring容器来做。
具体的详解
程序员负责两个内容:
1、 对表的crud操作:目标类的目标方法
2、 告诉spring容器什么样的目标方法采用什么样的事务策略
Spring容器负责:(切面)
负责事务的处理
实现原理
采用了aop技术来实现的。
事务的架构
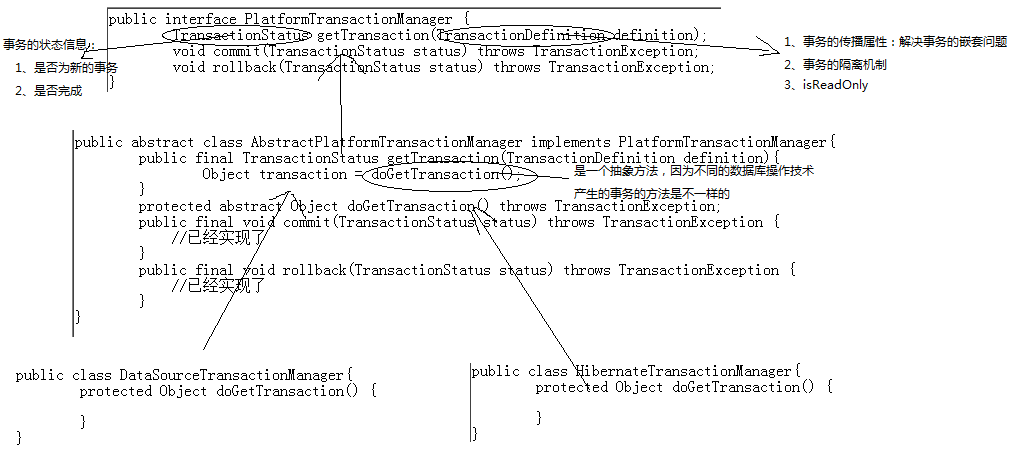
事务的定义
事务的状态
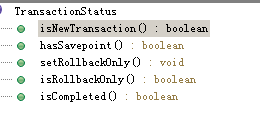
说明:通过spring的事务处理架构,再通过配置文件具体的实现事务的类,就可以让spring容器知道是什么样的技术来操作数据库,通过对事务状态的判断,通过事务的定义就可以知道具体的目标方法采用什么样的事务策略来处理了。
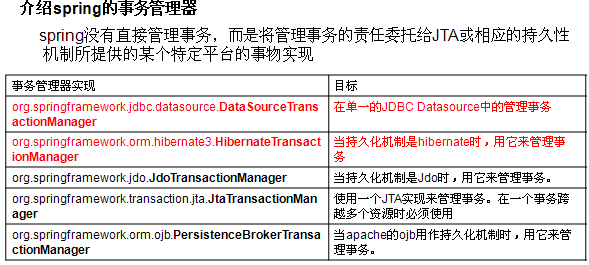
5.1.8.1Spring的事务管理器
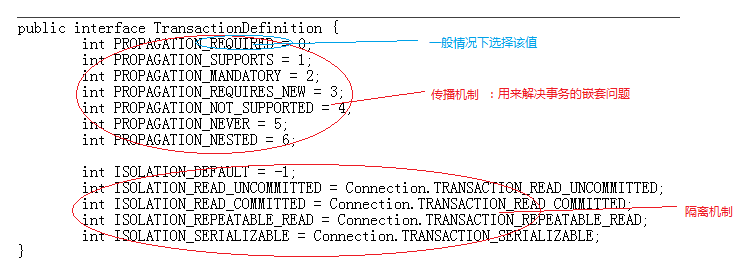
5.1.8.2Spring事务的传播属性

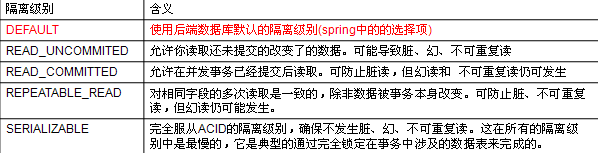
5.1.8.3Spring事务的隔离级别
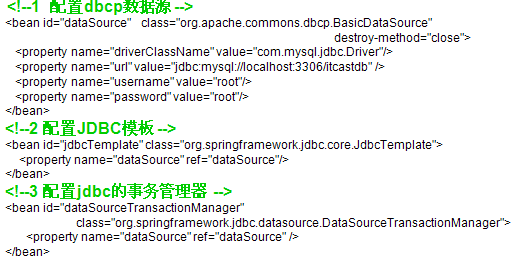
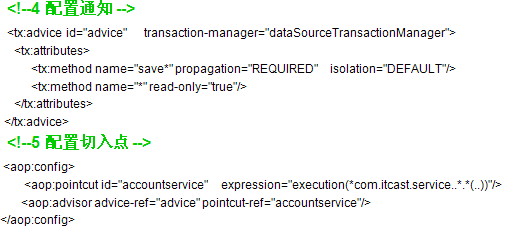
5.1.8.4以XML配置的 形式

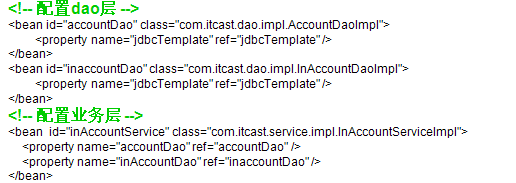
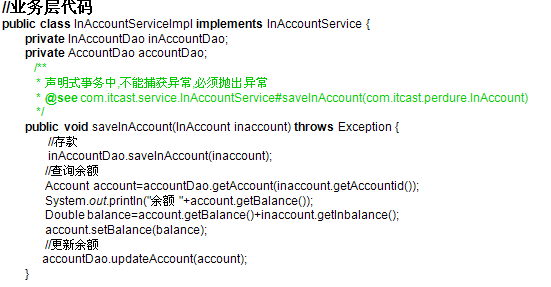
5.1.8.5以注解方式配置


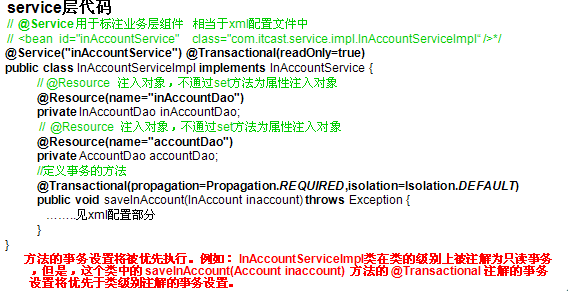
案例
1 jdbc.driverClassName=com.mysql.jdbc.Driver
2 jdbc.url=jdbc\:mysql\://localhost\:3306/itheima09_hibernate
3 jdbc.username=root
4 jdbc.password=root
 1 <?xml version="1.0" encoding="UTF-8"?>
 2 <beans xmlns="http://www.springframework.org/schema/beans"
 3        xmlns:aop="http://www.springframework.org/schema/aop"
 4        xmlns:tx="http://www.springframework.org/schema/tx"
 5        xmlns:xsi="http://www.w3.org/2001/XMLSchema-instance"
 6        xsi:schemaLocation="http://www.springframework.org/schema/beans
 7            http://www.springframework.org/schema/beans/spring-beans-2.5.xsd
 8            http://www.springframework.org/schema/aop
 9            http://www.springframework.org/schema/aop/spring-aop-2.5.xsd
10            http://www.springframework.org/schema/tx
11            http://www.springframework.org/schema/tx/spring-tx-2.5.xsd">
12     <!--
13         引入dataSource
14         把dao层和service层的类导入进来
15      -->
16     <bean
17         class="org.springframework.beans.factory.config.PropertyPlaceholderConfigurer">
18         <property name="locations">
19             <value>classpath:jdbc.properties</value>
20         </property>
21     </bean>
22       <bean id="dataSource" destroy-method="close"
23         class="org.apache.commons.dbcp.BasicDataSource">
24         <property name="driverClassName" value="${jdbc.driverClassName}" />
25         <property name="url" value="${jdbc.url}" />
26         <property name="username" value="${jdbc.username}" />
27         <property name="password" value="${jdbc.password}" />
28     </bean>
29     <bean id="studentDao" class="com.itheima09.spring.jdbc.transaction.dao.StudentDaoImpl">
30         <property name="dataSource">
31             <ref bean="dataSource"/>
32         </property>
33     </bean>
34     <bean id="studentService" class="com.itheima09.spring.jdbc.transaction.service.StudentServiceImpl">
35         <property name="studentDao">
36             <ref bean="studentDao"/>
37         </property>
38     </bean>
39     <!--
40         事务管理器
41           告诉spring容器要采用什么样的技术处理事务
42      -->
43     <bean id="transactionManager" class="org.springframework.jdbc.datasource.DataSourceTransactionManager">
44         <property name="dataSource">
45             <ref bean="dataSource"/>
46         </property>
47     </bean>
48     <!--
49         配置声明的事务策略
50           id  唯一标示
51           transaction-manager  事务管理器
52      -->
53     <tx:advice id="tx" transaction-manager="transactionManager">
54         <tx:attributes>
55             <!--
56                 以save开头的方法,采用的传播属性是默认值,隔离机制是默认值,是读写事务
57              -->
58             <tx:method
59                 name="save*"
60                 propagation="REQUIRED"
61                 isolation="DEFAULT"
62                 read-only="false"/>
63         </tx:attributes>
64     </tx:advice>
65     <aop:config>
66         <aop:pointcut
67             expression="execution(* com.itheima09.spring.jdbc.transaction.service.*.*(..))"
68             id="perform"/>
69         <aop:advisor advice-ref="tx" pointcut-ref="perform"/>
70     </aop:config>
71 </beans>
1 package com.itheima09.spring.jdbc.transaction.dao;
2
3 public interface StudentDao {
4     public void saveStudent(String sql);
5 }
1 package com.itheima09.spring.jdbc.transaction.dao;
2
3 import org.springframework.jdbc.core.support.JdbcDaoSupport;
4
5 public class StudentDaoImpl extends JdbcDaoSupport implements StudentDao{
6     public void saveStudent(String sql) {
7         this.getJdbcTemplate().execute(sql);
8     }
9 }
1 package com.itheima09.spring.jdbc.transaction.service;
2
3 public interface StudentService {
4     public void saveStudent();
5 }
 1 package com.itheima09.spring.jdbc.transaction.service;
 2
 3 import com.itheima09.spring.jdbc.transaction.dao.StudentDao;
 4
 5 public class StudentServiceImpl implements StudentService{
 6     private StudentDao studentDao;
 7
 8     public void setStudentDao(StudentDao studentDao) {
 9         this.studentDao = studentDao;
10     }
11     public void saveStudent() {
12         this.studentDao.saveStudent("insert into student(name,description) values('1','1')");
13         int a = 1/0;
14         this.studentDao.saveStudent("insert into student(name,description) values('1','1')");
15     }
16 }
 1 package com.itheima09.spring.jdbc.transaction.test;
 2
 3 import org.junit.Test;
 4 import org.springframework.context.ApplicationContext;
 5 import org.springframework.context.support.ClassPathXmlApplicationContext;
 6
 7 import com.itheima09.spring.jdbc.transaction.service.StudentService;
 8
 9 public class StudentServiceTest {
10     @Test
11     public void testStudent(){
12         ApplicationContext context = new ClassPathXmlApplicationContext("applicationContext.xml");
13         StudentService studentService = (StudentService)context.getBean("studentService");
14         studentService.saveStudent();
15     }
16 }
5.1.9使用CGLIB以XML形式配置事务
1、 业务逻辑类不能实现接口
2、 客户端调用返回的是目标类(代理类的父类)
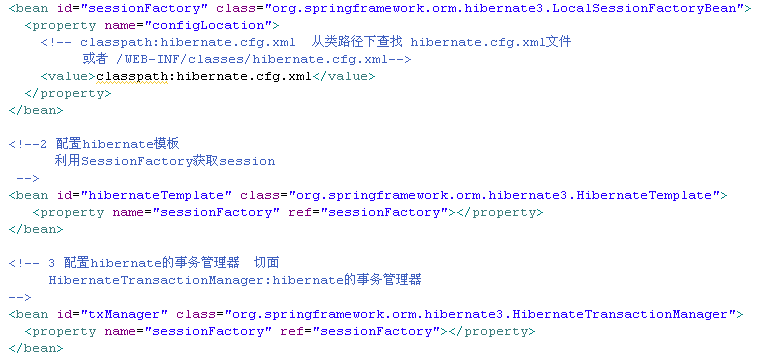
5.2 Spring+Hibernate
5.2.1 HibernateTemplate模板
1、 如果一个DAO类继承了HibernateDaoSupport,只需要在spring配置文件中注入SessionFactory就可以了。
2、 如果一个DAO类没有继承HibernateDaoSupport,需要有一个SessionFactory的属性,并且在配置文件中进行注入。
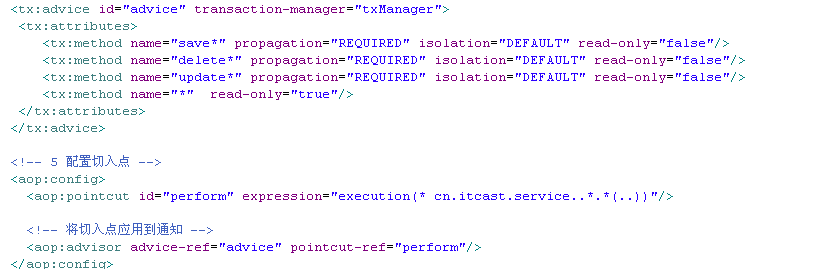
5.2.2 声明式事务
配置XML文件
注解形式:
1、 在配置文件中引用spring的自动扫描机制。

2、 在配置文件中引入注解解析器

3、 在service层通过@Transaction进行注解
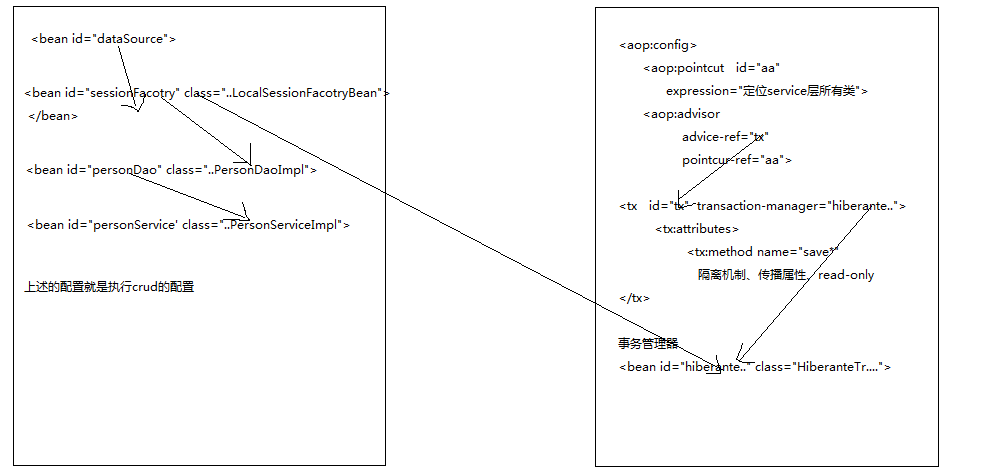
组成
1、 hibernate的配置文件
2、 持久化类和映射文件
3、 Dao层和service层所有的类
4、 Spring的配置文件
5、 客户端
Spring的配置文件
关于session
从上图可以看出,程序员使用sessionFactory产生session,从而进行crud的操作
Spring容器利用sessionFactory产生session,进行事务的操作,所以spring容器产生
的session和程序员用的session肯定是同一个session,所以在spring声明式事务处理的
时候,session必须由当前线程产生。
案例:
 1 <?xml version='1.0' encoding='utf-8'?>
 2 <!DOCTYPE hibernate-configuration PUBLIC
 3         "-//Hibernate/Hibernate Configuration DTD 3.0//EN"
 4         "http://hibernate.sourceforge.net/hibernate-configuration-3.0.dtd">
 5 <hibernate-configuration>
 6     <!--
 7         一个session-factory代表一个数据库
 8      -->
 9 <session-factory>
10     <!--
11         链接数据库的用户名
12     -->
13     <property name="connection.username">root</property>
14     <!--
15         链接数据库的密码
16     -->
17     <property name="connection.password">root</property>
18     <!--
19         链接数据库的驱动
20     -->
21     <property name="connection.driver_class">
22         com.mysql.jdbc.Driver
23     </property>
24     <!--
25         链接数据库的url
26     -->
27     <property name="connection.url">
28         jdbc:mysql://localhost:3306/itheima09_hibernate
29     </property>
30     <!--
31         方言
32         告诉hibernate用什么样的数据库
33     -->
34     <property name="dialect">
35         org.hibernate.dialect.MySQLDialect
36     </property>
37     <!--
38         validate 加载hibernate时,验证数据库的结构
39         update  加载hibernate时,检查数据库,如果表不存在,则创建,如果存在,则更新
40         create  每次加载hiberante,都会创建表
41         create-drop  每次加载hiberante,创建,卸载hiberante时,销毁
42     -->
43     <property name="hbm2ddl.auto">update</property>
44     <!--
45         显示sql语句
46     -->
47     <property name="show_sql">true</property>
48     <!--
49         格式化sql语句
50     -->
51     <property name="format_sql">true</property>
52     <!--
53         加载映射文件
54     -->
55     <mapping
56         resource="com/itheima09/spring/hibernate/transaction/domain/Person.hbm.xml" />
57 </session-factory>
58 </hibernate-configuration>
1 jdbc.driverClassName=com.mysql.jdbc.Driver
2 jdbc.url=jdbc\:mysql\://localhost\:3306/itheima09_hibernate
3 jdbc.username=root
4 jdbc.password=root
 1 <?xml version="1.0" encoding="UTF-8"?>
 2 <beans xmlns="http://www.springframework.org/schema/beans"
 3     xmlns:aop="http://www.springframework.org/schema/aop" xmlns:tx="http://www.springframework.org/schema/tx"
 4     xmlns:xsi="http://www.w3.org/2001/XMLSchema-instance"
 5     xsi:schemaLocation="http://www.springframework.org/schema/beans
 6            http://www.springframework.org/schema/beans/spring-beans-2.5.xsd
 7            http://www.springframework.org/schema/aop
 8            http://www.springframework.org/schema/aop/spring-aop-2.5.xsd
 9            http://www.springframework.org/schema/tx
10            http://www.springframework.org/schema/tx/spring-tx-2.5.xsd">
11     <!-- 引入dataSource 把dao层和service层的类导入进来 -->
12     <bean
13         class="org.springframework.beans.factory.config.PropertyPlaceholderConfigurer">
14         <property name="locations">
15             <value>classpath:jdbc.properties</value>
16         </property>
17     </bean>
18     <bean id="dataSource" destroy-method="close"
19         class="org.apache.commons.dbcp.BasicDataSource">
20         <property name="driverClassName" value="${jdbc.driverClassName}" />
21         <property name="url" value="${jdbc.url}" />
22         <property name="username" value="${jdbc.username}" />
23         <property name="password" value="${jdbc.password}" />
24     </bean>
25
26     <bean id="sessionFactory"
27         class="org.springframework.orm.hibernate3.LocalSessionFactoryBean">
28         <property name="dataSource">
29             <ref bean="dataSource" />
30         </property>
31         <!-- 导入映射文件所在的路径 -->
32         <property name="mappingDirectoryLocations">
33             <list>
34                 <value>classpath:com/itheima09/spring/hibernate/transaction/domain
35                 </value>
36             </list>
37         </property>
38         <!-- 其他配置 -->
39         <property name="hibernateProperties">
40             <props>
41                 <prop key="hibernate.dialect">org.hibernate.dialect.MySQL5Dialect</prop>
42                 <prop key="hbm2ddl.auto">update</prop>
43             </props>
44         </property>
45     </bean>
46     <bean id="sessionFactory2"
47         class="org.springframework.orm.hibernate3.LocalSessionFactoryBean">
48         <property name="configLocation">
49             <value>classpath:hibernate.cfg.xml</value>
50         </property>
51     </bean>
52     <bean id="personDao"
53         class="com.itheima09.spring.hibernate.transaction.dao.PersonDaoImpl">
54         <property name="sessionFactory">
55             <ref bean="sessionFactory" />
56         </property>
57     </bean>
58     <bean id="personService"
59         class="com.itheima09.spring.hibernate.transaction.service.PersonServiceImpl">
60         <property name="personDao">
61             <ref bean="personDao" />
62         </property>
63     </bean>
64     <!-- 配置事务管理器 -->
65     <bean id="transactionManager" class="org.springframework.orm.hibernate3.HibernateTransactionManager">
66         <property name="sessionFactory">
67             <ref bean="sessionFactory"/>
68         </property>
69     </bean>
70     <tx:advice id="tx" transaction-manager="transactionManager">
71         <tx:attributes>
72             <tx:method name="save*"
73                     isolation="DEFAULT"
74                     propagation="REQUIRED"
75                     read-only="false"/>
76         </tx:attributes>
77     </tx:advice>
78     <aop:config>
79         <aop:pointcut
80             expression="execution(* com.itheima09.spring.hibernate.transaction.service.*.*(..))"
81             id="perform" />
82         <aop:advisor advice-ref="tx" pointcut-ref="perform" />
83     </aop:config>
84 </beans>
1 package com.itheima09.spring.hibernate.transaction.dao;
2
3 import com.itheima09.spring.hibernate.transaction.domain.Person;
4
5 public interface PersonDao {
6     public void savePerson(Person person);
7     public void queryPerson();
8     public void queryPersonCallback();
9 }
 1 <?xml version="1.0" encoding="utf-8"?>
 2 <!DOCTYPE hibernate-mapping PUBLIC "-//Hibernate/Hibernate Mapping DTD 3.0//EN"
 3 "http://hibernate.sourceforge.net/hibernate-mapping-3.0.dtd">
 4 <hibernate-mapping>
 5     <!--
 6         描述一个持久化类
 7          name属性为持久化类的全名
 8          table 该持久化类对应的表名  默认情况下为类名
 9          catalog 为数据库的名称
10      -->
11     <class name="com.itheima09.spring.hibernate.transaction.domain.Person">
12         <!--
13             id对应表中的主键
14               name为持久化类中属性的名称
15               length 为对应数据库表中相应字段的长度
16               column  属性的名称对应的表的字段名称   不写则默认和属性的名称一致
17          -->
18         <id name="pid" length="5" type="java.lang.Long" column="pid">
19             <!--
20                 主键的生成器
21              -->
22             <generator class="increment"></generator>
23         </id>
24         <property name="name" column="name" type="java.lang.String" length="20">
25         </property>
26         <property name="description" column="description" type="java.lang.String" length="50">
27         </property>
28     </class>
29 </hibernate-mapping>
 1 package com.itheima09.spring.hibernate.transaction.domain;
 2
 3 import java.io.Serializable;
 4
 5 import org.hibernate.impl.SessionFactoryImpl;
 6
 7 public class Person implements Serializable{
 8     private Long pid;
 9     private String name;
10     private String description;
11
12
13
14     public Long getPid() {
15         return pid;
16     }
17     public void setPid(Long pid) {
18         this.pid = pid;
19     }
20     public String getName() {
21         return name;
22     }
23     public void setName(String name) {
24         this.name = name;
25     }
26     public String getDescription() {
27         return description;
28     }
29     public void setDescription(String description) {
30         this.description = description;
31     }
32 }
5.3回调函数:
作用:
在dao里经常有这样的语句
1 public E findById(Serializable id)
2     {
3         return (E) getHibernateTemplate().get(clazz, id);
4     }
HibernateTemplate类源码
1 public Object get(Class entityClass, Serializable id) throws DataAccessException {
2         return get(entityClass, id, null);
3     }
 1 public Object get(final Class entityClass, final Serializable id, final LockMode lockMode)
 2             throws DataAccessException {
 3         return execute(new HibernateCallback() {
 4             public Object doInHibernate(Session session) throws HibernateException {
 5                 if (lockMode != null) {
 6                     return session.get(entityClass, id, lockMode);
 7                 }
 8                 else {
 9                     return session.get(entityClass, id);
10                 }
11             }
12         }, true);
13     }
1 public Object execute(HibernateCallback action) throws DataAccessException {
2         return execute(action, isExposeNativeSession());
3     }
 1 public Object execute(HibernateCallback action, boolean exposeNativeSession) throws DataAccessException {
 2         Assert.notNull(action, "Callback object must not be null");
 3         Session session = getSession();
 4         boolean existingTransaction = SessionFactoryUtils.isSessionTransactional(session, getSessionFactory());
 5         if (existingTransaction) {
 6             logger.debug("Found thread-bound Session for HibernateTemplate");
 7         }
 8         FlushMode previousFlushMode = null;
 9         try {
10             previousFlushMode = applyFlushMode(session, existingTransaction);
11             enableFilters(session);
12             Session sessionToExpose = (exposeNativeSession ? session : createSessionProxy(session));
13             Object result = action.doInHibernate(sessionToExpose);          flushIfNecessary(session, existingTransaction);
14             return result;
15         }
16         catch (HibernateException ex) {
17             throw convertHibernateAccessException(ex);
18         }
19         catch (SQLException ex) {
20             throw convertJdbcAccessException(ex);
21         }
22         catch (RuntimeException ex) {
23             // Callback code threw application exception...
24             throw ex;
25         }
26         finally {
27             if (existingTransaction) {
28                 logger.debug("Not closing pre-bound Hibernate Session after HibernateTemplate");
29                 disableFilters(session);
30                 if (previousFlushMode != null) {
31                     session.setFlushMode(previousFlushMode);
32                 }
33             }
34             else {
35                 // Never use deferred close for an explicitly new Session.
36                 if (isAlwaysUseNewSession()) {
37                     SessionFactoryUtils.closeSession(session);
38                 }
39                 else {
40                     SessionFactoryUtils.closeSessionOrRegisterDeferredClose(session, getSessionFactory());
41                 }
42             }
43         }
44     }
HibernateTemplate类是对hibernate操作的封装。如果要自己写hibernate的操作,最麻烦的是那些要检查的错误,而且每一个地方都一样。不一样的地方只是真正对数据库操作的语句。spring的想法是一样的代码抽取出来写成一个HibernateTemplate中的execute方法。execute的方法参数是HibernateCallback接口类。HibernateCallback里面定义了一个doInHibernate的方法。因为这个方法是变的。比如你是查找数据方法应该就是:session.load()。删除数据就是session.delete().这样的话查询数据库的方法用execute方法。
HibernateCallback 接口类
public interface HibernateCallback {
    Object doInHibernate(Session session) throws HibernateException, SQLException;
}
然后使用内部类的形式把HibernateCallback中的方法doInHibernate实例化。
new HibernateCallback() {
            public Object doInHibernate(Session session) throws HibernateException {
                if (lockMode != null) {
                    return session.get(entityClass, id, lockMode);
                }
                else {
                    return session.get(entityClass, id);
                }
            }
总的想法就是不变的东西可以抽象出一个方法。比如对异常的检查。变的东西,比如对数据库的操作,抽象出一个接口的方法。
总结
JAVA的CALLBACK通过接口来实现。
例:
1.HibernateTemplate,内联类
2.内联类实现接口HibernateCallback的doInHibernate 方法
3.HibernateTemplate拥有一个参数为HibernateCallback接口类型的函数execute(HibernateCallback action)方法.
4.调用HibernateTemplate的get方法时,将内联类传给了excute方法
5.执行excute方法时,(你调用它)
已取得内联类,就可以随时回调它所实现的HibernateCallback接口中的方法了,
这时它反过来调用你的方法(它调用你),这就是回调了.
Javaeye两个会员的理解,我觉得比较到位.
冉翔:
就是调用系统的一个方法,传进去一个接口的实现类 or 匿名类。
然后系统的方法调用接口申明的方法,并且注入相应的参数
Buaawhl:
IoC, Functor, Visitor 都是 callback。
就是一个 Template Methond 里面的flow不变,某一个步骤的具体操作变化,这个变化部需要 从外部(参数,或者属性,或者 override parent method)注入。
类似于从前的 C 回调函数指针。
MainFlow ( callback ){
step1;
....
callback( someThing );
....
stepN;
}
注意配置文件里applictionContext.xml
 1 <bean id="transactionManager" class="org.springframework.orm.hibernate3.HibernateTransactionManager">
 2   <property name="sessionFactory"><ref local="sessionFactory"/></property>
 3 </bean>
 4 <bean id="baseTransactionProxy" abstract="true" class="org.springframework.transaction.interceptor.TransactionProxyFactoryBean">
 5   <property name="transactionManager">
 6    <ref bean="transactionManager" />
 7   </property>
 8   <property name="transactionAttributes">
 9   <props>
10    <prop key="save*">PROPAGATION_REQUIRED</prop>
11    <prop key="update*">PROPAGATION_REQUIRED</prop>
12    <prop key="find*">PROPAGATION_REQUIRED</prop>
13    <prop key="*">PROPAGATION_REQUIRED,readOnly</prop>
14   </props>
15   </property>
16 </bean>

案例:
1 package com.itheima09.spring.hibernate.callback;
2
3 import org.hibernate.Session;
4
5 public interface HibernateCallback {
6     public Object doInHibernate(Session session);
7 }
 1 package com.itheima09.spring.hibernate.callback;
 2
 3 import java.util.List;
 4
 5 import org.hibernate.Session;
 6 import org.hibernate.SessionFactory;
 7 import org.hibernate.Transaction;
 8
 9 public class SpringHibernateCore {
10     private SessionFactory sessionFactory;
11     public void setSessionFactory(SessionFactory sessionFactory) {
12         this.sessionFactory = sessionFactory;
13     }
14     public Object doExecute(HibernateCallback action){
15         Object obj = null;
16         Session session = sessionFactory.openSession();
17         obj = action.doInHibernate(session);
18         session.close();
19         return obj;
20     }
21     public List find(final String hql){
22         return (List)this.doExecute(new HibernateCallback() {
23             public Object doInHibernate(Session session) {
24                 return session.createQuery(hql).list();
25             }
26         });
27     }
28 }
29
 1 package com.itheima09.spring.hibernate.callback;
 2
 3 import java.util.List;
 4
 5 import com.itheima09.spring.hibernate.transaction.domain.Person;
 6
 7 public class PersonDaoCallback extends SpringHibernateCore{
 8     public void queryPerson(){
 9         List<Person> pList = this.find("from Person");
10         System.out.println(pList.size());
11     }
12 }
 1 <?xml version="1.0" encoding="UTF-8"?>
 2 <beans xmlns="http://www.springframework.org/schema/beans"
 3     xmlns:aop="http://www.springframework.org/schema/aop" xmlns:tx="http://www.springframework.org/schema/tx"
 4     xmlns:xsi="http://www.w3.org/2001/XMLSchema-instance"
 5     xsi:schemaLocation="http://www.springframework.org/schema/beans
 6            http://www.springframework.org/schema/beans/spring-beans-2.5.xsd
 7            http://www.springframework.org/schema/aop
 8            http://www.springframework.org/schema/aop/spring-aop-2.5.xsd
 9            http://www.springframework.org/schema/tx
10            http://www.springframework.org/schema/tx/spring-tx-2.5.xsd">
11     <!-- 引入dataSource 把dao层和service层的类导入进来 -->
12     <bean
13         class="org.springframework.beans.factory.config.PropertyPlaceholderConfigurer">
14         <property name="locations">
15             <value>classpath:jdbc.properties</value>
16         </property>
17     </bean>
18     <bean id="dataSource" destroy-method="close"
19         class="org.apache.commons.dbcp.BasicDataSource">
20         <property name="driverClassName" value="${jdbc.driverClassName}" />
21         <property name="url" value="${jdbc.url}" />
22         <property name="username" value="${jdbc.username}" />
23         <property name="password" value="${jdbc.password}" />
24     </bean>
25
26     <bean id="sessionFactory"
27         class="org.springframework.orm.hibernate3.LocalSessionFactoryBean">
28         <property name="dataSource">
29             <ref bean="dataSource" />
30         </property>
31         <!-- 导入映射文件所在的路径 -->
32         <property name="mappingDirectoryLocations">
33             <list>
34                 <value>classpath:com/itheima09/spring/hibernate/transaction/domain
35                 </value>
36             </list>
37         </property>
38         <!-- 其他配置 -->
39         <property name="hibernateProperties">
40             <props>
41                 <prop key="hibernate.dialect">org.hibernate.dialect.MySQL5Dialect</prop>
42                 <prop key="hbm2ddl.auto">update</prop>
43             </props>
44         </property>
45     </bean>
46     <bean id="sessionFactory2"
47         class="org.springframework.orm.hibernate3.LocalSessionFactoryBean">
48         <property name="configLocation">
49             <value>classpath:hibernate.cfg.xml</value>
50         </property>
51     </bean>
52
53     <bean id="personDaoCallback" class="com.itheima09.spring.hibernate.callback.PersonDaoCallback">
54         <property name="sessionFactory">
55             <ref bean="sessionFactory2"/>
56         </property>
57     </bean>
58 </beans>
Struts2+spring+hibernate
6.1 需要添加的jar包
6.2 Spring融合web服务器
1、 在web.xml文件中,添加如下配置:
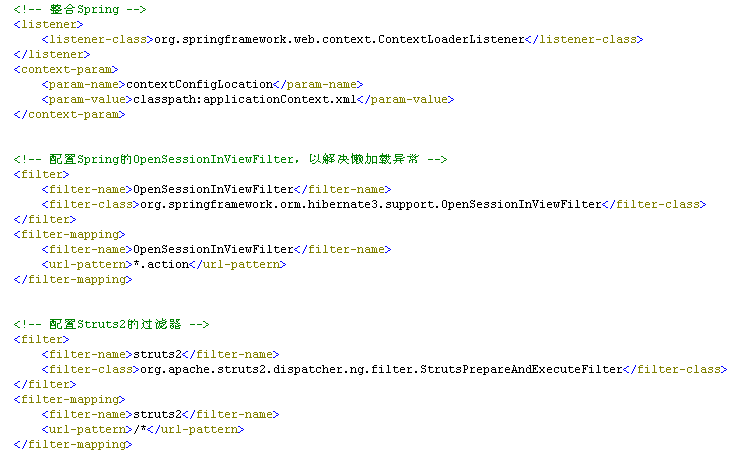
说明:
在web.xml中加载applicationContext.xml文件有几种方式:
如果spring配置文件被命名为applicationContext.xml,并且放在WEB-INF目录下,则不需要配置<context-param>,因为ContextLoaderListener默认在WEB-INF目录下寻找名为applicationContext.xml的文件。若存在多个Spring配置文件,则在<param-value>中依次列出,之间以逗号隔开。
<context-param>
<param-name>contextConfigLocation</param-name>
<param-value>/WEB-INF/classes/applicationContext.xml</param-value>
</context-param>
<listener>
<listener-class>org.springframework.web.context.ContextLoaderListener</listener-class>
</listener>
- 也可以利用上图中的方式来配置:
利用classpath来配置
- 我们一般采用classpath的方式来配置
上面的配置说明在web容器启动的时候,spring容器也启动了。
6.3 struts.xml文件
在struts.xml文件中,添加struts2的常量:
struts.objectFactory = spring
在spring中的文件配置:
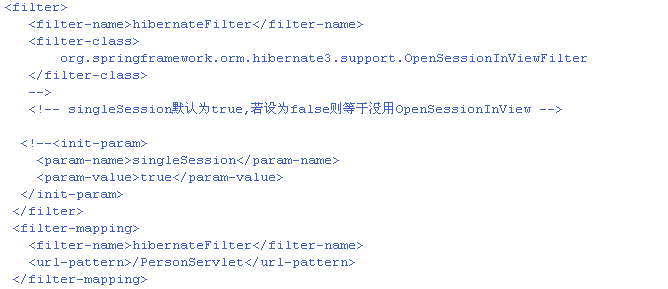
6.4 OpenInSessionView
由于使用的是spring的声明式事务处理方式,所以在调用this.getHibernateTemplate().load方法时,使用了hibernate的懒加载技术。当把一个实体Bean从数据库中加载完以后,只能加载其ID值。这个时候spring的声明式事务处理方式已经把session给关闭掉了。所以当值在页面输出时会产生异常。
处理方式为:OpenSessionInview模式。
Ssh的整合具体步骤
项目整合
原则
谁能先测试先写谁
步骤
创建web project
把工程改成utf-8的编码
在lib下导包
数据库的驱动包
Struts2的jar包
struts2-spring-plugin-2.3.1.2.jar struts2与spring整合的jar包
hibernate的jar 包
spring的jar包
创建三个src folder
Src
存放源代码
Config
存放配置文件
Test
存放测试类
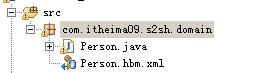
在src下创建一个包放持久化类和映射文件
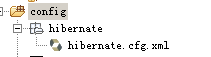
在config下创建一个package:hibernate.cfg.xml
在该包下创建hibernate的配置文件
在classpath下准备jdbc.properties
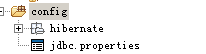
在config下创建package:spring
在applicationContext-db.xml文件中:

在spring的配置文件中引入sessionFactory

对sessionFactory进行测试
创建dao层和service层的接口和类
在spring的配置文件中配置声明式事务处理
对声明式事务处理进行测试
创建action层的包和类
把action放入到spring的配置文件中

准备struts2的配置文件
编写struts-person.xml

写web.xml
配置一个监听器
配置一个过滤器
Ssh的整合的目的
问题
1、 struts2的action为什么必须交给spring容器产生?
Action与service要做到完全的松耦合,所以在action中的service必须由spring容器进行注入,那么要完成该注入,action必须在spring容器中。所以action必须由spring容器产生。
2、 在整合的整个过程中,spring容器用到了哪些知识点?
1、 为了松耦合action与service,service与dao,使用了ioc和di
2、 为了不让程序员接触到事务,使用了声明式的事务处理
3、 有可能会用springaop处理权限、日志等内容
3、 在整合的过程中,struts2用到了哪些知识点?
1、 mvc的作用
2、 使用插件的机制使得struts2与spring整合在一起了,实际上就是把Struts2中的action交给spring处理了。
4、 在整合的过程中,hibernate充当了什么角色?数据库的操作由hibernate充当
Tomcat启动
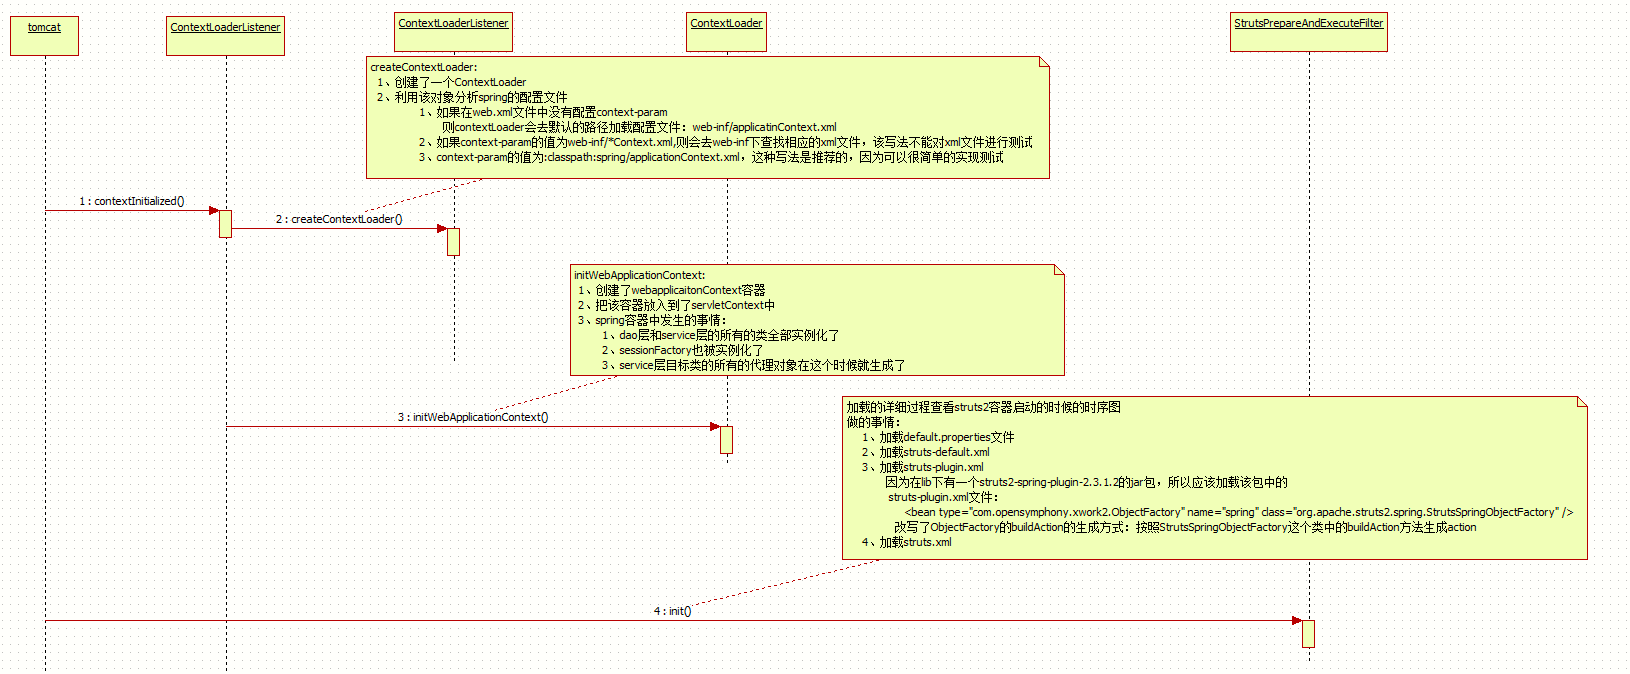
流程图:

案例:
配置文件 :
1 jdbc.driverClassName=com.mysql.jdbc.Driver
2 jdbc.url=jdbc\:mysql\://localhost\:3306/itheima09_hibernate
3 jdbc.username=root
4 jdbc.password=root
1 <?xml version="1.0" encoding="UTF-8" ?>
2 <!DOCTYPE struts PUBLIC
3         "-//Apache Software Foundation//DTD Struts Configuration 2.0//EN"
4         "http://struts.apache.org/dtds/struts-2.0.dtd">
5
6 <struts>
7     <constant name="struts.devMode" value="true"/>
8     <include file="struts/struts-person.xml"></include>
9 </struts>
 1 <?xml version="1.0" encoding="UTF-8" ?>
 2 <!DOCTYPE struts PUBLIC
 3         "-//Apache Software Foundation//DTD Struts Configuration 2.0//EN"
 4         "http://struts.apache.org/dtds/struts-2.0.dtd">
 5
 6 <struts>
 7     <package name="person" namespace="/" extends="struts-default">
 8         <action name="personAction_*" method="{1}" class="personAction">
 9             <result name="index">index.jsp</result>
10         </action>
11     </package>
12 </struts>
 1 <?xml version="1.0" encoding="UTF-8"?>
 2 <beans xmlns="http://www.springframework.org/schema/beans"
 3     xmlns:aop="http://www.springframework.org/schema/aop" xmlns:tx="http://www.springframework.org/schema/tx"
 4     xmlns:xsi="http://www.w3.org/2001/XMLSchema-instance"
 5     xsi:schemaLocation="http://www.springframework.org/schema/beans
 6            http://www.springframework.org/schema/beans/spring-beans-2.5.xsd
 7            http://www.springframework.org/schema/aop
 8            http://www.springframework.org/schema/aop/spring-aop-2.5.xsd
 9            http://www.springframework.org/schema/tx
10            http://www.springframework.org/schema/tx/spring-tx-2.5.xsd">
11     <import resource="applicationContext-db.xml"/>
12     <import resource="applicationContext-person.xml"/>
13 </beans>
 1 <?xml version="1.0" encoding="UTF-8"?>
 2 <beans xmlns="http://www.springframework.org/schema/beans"
 3     xmlns:aop="http://www.springframework.org/schema/aop" xmlns:tx="http://www.springframework.org/schema/tx"
 4     xmlns:xsi="http://www.w3.org/2001/XMLSchema-instance"
 5     xsi:schemaLocation="http://www.springframework.org/schema/beans
 6            http://www.springframework.org/schema/beans/spring-beans-2.5.xsd
 7            http://www.springframework.org/schema/aop
 8            http://www.springframework.org/schema/aop/spring-aop-2.5.xsd
 9            http://www.springframework.org/schema/tx
10            http://www.springframework.org/schema/tx/spring-tx-2.5.xsd">
11     <bean id="sessionFactory"
12         class="org.springframework.orm.hibernate3.LocalSessionFactoryBean">
13         <property name="configLocation">
14             <value>classpath:hibernate/hibernate.cfg.xml</value>
15         </property>
16     </bean>
17     <!--
18         事务管理器
19      -->
20     <bean id="transactionManager" class="org.springframework.orm.hibernate3.HibernateTransactionManager">
21         <property name="sessionFactory">
22             <ref bean="sessionFactory"/>
23         </property>
24     </bean>
25     <tx:advice id="tx" transaction-manager="transactionManager">
26         <tx:attributes>
27             <tx:method name="save*"
28                 read-only="false"/>
29         </tx:attributes>
30     </tx:advice>
31     <aop:config>
32         <aop:pointcut
33             expression="execution(* com.itheima09.s2sh.service.impl.*.*(..))"
34             id="perform"/>
35         <aop:advisor advice-ref="tx" pointcut-ref="perform"/>
36     </aop:config>
37 </beans>
 1 <?xml version="1.0" encoding="UTF-8"?>
 2 <beans xmlns="http://www.springframework.org/schema/beans"
 3     xmlns:aop="http://www.springframework.org/schema/aop" xmlns:tx="http://www.springframework.org/schema/tx"
 4     xmlns:xsi="http://www.w3.org/2001/XMLSchema-instance"
 5     xsi:schemaLocation="http://www.springframework.org/schema/beans
 6            http://www.springframework.org/schema/beans/spring-beans-2.5.xsd
 7            http://www.springframework.org/schema/aop
 8            http://www.springframework.org/schema/aop/spring-aop-2.5.xsd
 9            http://www.springframework.org/schema/tx
10            http://www.springframework.org/schema/tx/spring-tx-2.5.xsd">
11     <bean id="personDao" class="com.itheima09.s2sh.dao.impl.PersonDaoImpl">
12         <property name="sessionFactory">
13             <ref bean="sessionFactory"/>
14         </property>
15     </bean>
16     <bean id="personService" class="com.itheima09.s2sh.service.impl.PersonServiceImpl">
17         <property name="personDao">
18             <ref bean="personDao"/>
19         </property>
20     </bean>
21     <bean id="personAction"
22         class="com.itheima09.s2sh.action.PersonAction" scope="prototype">
23         <property name="personService">
24             <ref bean="personService"/>
25         </property>
26     </bean>
27 </beans>
 1 <?xml version='1.0' encoding='utf-8'?>
 2 <!DOCTYPE hibernate-configuration PUBLIC
 3         "-//Hibernate/Hibernate Configuration DTD 3.0//EN"
 4         "http://hibernate.sourceforge.net/hibernate-configuration-3.0.dtd">
 5 <hibernate-configuration>
 6     <!--
 7         一个session-factory代表一个数据库
 8      -->
 9 <session-factory>
10     <!--
11         链接数据库的用户名
12     -->
13     <property name="connection.username">root</property>
14     <!--
15         链接数据库的密码
16     -->
17     <property name="connection.password">root</property>
18     <!--
19         链接数据库的驱动
20     -->
21     <property name="connection.driver_class">
22         com.mysql.jdbc.Driver
23     </property>
24     <!--
25         链接数据库的url
26     -->
27     <property name="connection.url">
28         jdbc:mysql://localhost:3306/itheima09_hibernate
29     </property>
30     <!--
31         方言
32         告诉hibernate用什么样的数据库
33     -->
34     <property name="dialect">
35         org.hibernate.dialect.MySQLDialect
36     </property>
37     <!--
38         validate 加载hibernate时,验证数据库的结构
39         update  加载hibernate时,检查数据库,如果表不存在,则创建,如果存在,则更新
40         create  每次加载hiberante,都会创建表
41         create-drop  每次加载hiberante,创建,卸载hiberante时,销毁
42     -->
43     <property name="hbm2ddl.auto">update</property>
44     <!--
45         显示sql语句
46     -->
47     <property name="show_sql">true</property>
48     <!--
49         格式化sql语句
50     -->
51     <property name="format_sql">true</property>
52     <!--
53         加载映射文件
54     -->
55     <mapping resource="com/itheima09/s2sh/domain/Person.hbm.xml" />
56 </session-factory>
57 </hibernate-configuration>
Action:
 1 package com.itheima09.s2sh.action;
 2
 3 import com.itheima09.s2sh.domain.Person;
 4 import com.itheima09.s2sh.service.PersonService;
 5 import com.opensymphony.xwork2.ActionSupport;
 6
 7 public class PersonAction extends ActionSupport{
 8     private PersonService personService;
 9     public void setPersonService(PersonService personService) {
10         this.personService = personService;
11     }
12     public String savePerson(){
13         Person person = new Person();
14         person.setName("asdf");
15         this.personService.savePerson(person);
16         return "index";
17     }
18 }
Dao:
1 package com.itheima09.s2sh.dao;
2
3 import com.itheima09.s2sh.domain.Person;
4
5 public interface PersonDao {
6     public void savePerson(Person person);
7 }
 1 package com.itheima09.s2sh.dao.impl;
 2
 3 import org.springframework.orm.hibernate3.support.HibernateDaoSupport;
 4
 5 import com.itheima09.s2sh.dao.PersonDao;
 6 import com.itheima09.s2sh.domain.Person;
 7
 8 public class PersonDaoImpl extends HibernateDaoSupport implements PersonDao{
 9     public void savePerson(Person person) {
10         this.getHibernateTemplate().save(person);
11     }
12 }
 1 package com.itheima09.s2sh.domain;
 2
 3 import java.io.Serializable;
 4
 5 import org.hibernate.impl.SessionFactoryImpl;
 6
 7 public class Person implements Serializable{
 8     private Long pid;
 9     private String name;
10     private String description;
11
12
13
14     public Long getPid() {
15         return pid;
16     }
17     public void setPid(Long pid) {
18         this.pid = pid;
19     }
20     public String getName() {
21         return name;
22     }
23     public void setName(String name) {
24         this.name = name;
25     }
26     public String getDescription() {
27         return description;
28     }
29     public void setDescription(String description) {
30         this.description = description;
31     }
32 }
 1 <?xml version="1.0" encoding="utf-8"?>
 2 <!DOCTYPE hibernate-mapping PUBLIC "-//Hibernate/Hibernate Mapping DTD 3.0//EN"
 3 "http://hibernate.sourceforge.net/hibernate-mapping-3.0.dtd">
 4 <hibernate-mapping>
 5     <!--
 6         描述一个持久化类
 7          name属性为持久化类的全名
 8          table 该持久化类对应的表名  默认情况下为类名
 9          catalog 为数据库的名称
10      -->
11     <class name="com.itheima09.s2sh.domain.Person">
12         <!--
13             id对应表中的主键
14               name为持久化类中属性的名称
15               length 为对应数据库表中相应字段的长度
16               column  属性的名称对应的表的字段名称   不写则默认和属性的名称一致
17          -->
18         <id name="pid" length="5" type="java.lang.Long" column="pid">
19             <!--
20                 主键的生成器
21              -->
22             <generator class="increment"></generator>
23         </id>
24         <property name="name" column="name" type="java.lang.String" length="20">
25         </property>
26         <property name="description" column="description" type="java.lang.String" length="50">
27         </property>
28     </class>
29 </hibernate-mapping>
service:
1 package com.itheima09.s2sh.service;
2
3 import com.itheima09.s2sh.domain.Person;
4
5 public interface PersonService {
6     public void savePerson(Person person);
7 }
 1 package com.itheima09.s2sh.service.impl;
 2
 3 import com.itheima09.s2sh.dao.PersonDao;
 4 import com.itheima09.s2sh.domain.Person;
 5 import com.itheima09.s2sh.service.PersonService;
 6
 7 public class PersonServiceImpl implements PersonService{
 8     private PersonDao personDao;
 9     public void setPersonDao(PersonDao personDao) {
10         this.personDao = personDao;
11     }
12     @Override
13     public void savePerson(Person person) {
14         this.personDao.savePerson(person);
15     }
16 }
Test:
 1 package com.itheima09.s2sh.test;
 2
 3 import org.junit.Test;
 4
 5 import com.itheima09.s2sh.domain.Person;
 6 import com.itheima09.s2sh.service.PersonService;
 7
 8 public class PersonTest extends SpringUtils{
 9     @Test
10     public void testSavePerson(){
11         PersonService personService = (PersonService)context.getBean("personService");
12         Person person = new Person();
13         person.setName("aa");
14         personService.savePerson(person);
15     }
16 }
 1 package com.itheima09.s2sh.test;
 2
 3 import org.junit.Test;
 4
 5 public class SessionFactoryTest extends SpringUtils{
 6     @Test
 7     public void testCreateTable(){
 8
 9     }
10 }
 1 package com.itheima09.s2sh.test;
 2
 3 import org.springframework.context.ApplicationContext;
 4 import org.springframework.context.support.ClassPathXmlApplicationContext;
 5
 6 public class SpringUtils {
 7     public static ApplicationContext context;
 8     static{
 9         context = new ClassPathXmlApplicationContext("spring/applicationContext.xml");
10     }
11 }


 浙公网安备 33010602011771号