Hyperledger Caliper
Caliper 简介
Caliper是一个区块链性能基准框架,允许用户使用自定义用例测试不同的区块链解决方案,并获得一组性能测试结果。
Caliper is a blockchain benchmark framework which allows users to measure the performance of a specific blockchain implementation with a set of predefined use cases. Caliper will produce reports containing a number of performance indicators, such as TPS (Transactions Per Second), transaction latency, resource utilisation etc. The intent is for Caliper results to be used as a reference in supporting the choice of a blockchain implementation suitable for the user-specific use-cases. Given the variety of blockchain configurations, network setup, as well as the specific use-cases in mind, it is not intended to be an authoritative performance assessment, nor to be used for simple comparative purposes (e.g. blockchain A does 5 TPS and blockchain B does 10 TPS, therefore B is better). The Caliper project references the definitions, metrics, and terminology as defined by the Performance & Scalability Working Group (PSWG).
支持的区块链解决方案
- Hyperledger Besu
- Hyperledger Burrow
- Ethereum
- Hyperledger Fabric
- FISCO BCOS
- Hyperledger Iroha
- Hyperledger Sawtooth
支持的性能指标
- Transaction/read throughput
- Transaction/read latency (minimum, maximum, average, percentile)
- Resource consumption (CPU, Memory, Network IO, …)
See the PSWG white paper for the exact definitions and corresponding measurement methods.
安装Caliper
概览
Caliper is published as the @hyperledger/caliper-cli NPM package and the hyperledger/caliper Docker image, both containing the CLI binary. Refer to the Installing from NPM and Using the Docker image sections for the available versions and their intricacies.
Installing and running Caliper usually consists of the following steps, thoroughly detailed by the remaining sections:
- Acquire the Caliper CLI either from NPM or from DockerHub.
- Execute a bind command through the CLI. This step pulls the specified version of SDK packages for the selected platform.
- Start the benchmark through the CLI or by starting the Docker container.
The examples in the rest of the documentation use the caliper-benchmarks repository as the Caliper workspace since it contains many sample artifacts for benchmarking. Make sure you check out the appropriate tag/commit of the repository, matching the version of Caliper you use.
To clone the caliper-benchmarks repository, run:
git clone https://github.com/hyperledger/caliper-benchmarks.git
cd caliper-benchmarks
git checkout <your Caliper version>
Note: If you are running your custom benchmark, then change this directory path (and other related configurations) accordingly in the examples.
The Caliper CLI
Unless you are embedding the Caliper packages in your own application, you will probably use Caliper through its command line interface (CLI). The other sections will introduce the different ways of acquiring and calling the Caliper CLI. This section simply focuses on the API it provides.
Note: The following examples assume a locally installed CLI in the
~/caliper-benchmarksdirectory, hence thenpxcall before thecaliperbinary. Refer to the Local NPM install section for the specifics.
安装相关依赖
To install the Fabric SDK dependencies of the adapter, configure the binding command as follows:
Set the caliper-bind-sut setting key to fabric
Set the caliper-bind-sdk setting key to a supported SDK binding.
You can set the above keys either from the command line:
user@ubuntu:~/caliper-benchmarks$ npx caliper bind --caliper-bind-sut fabric --caliper-bind-sdk 1.4.0
or from environment variables:
user@ubuntu:~/caliper-benchmarks$ export CALIPER_BIND_SUT=fabric
user@ubuntu:~/caliper-benchmarks$ export CALIPER_BIND_SDK=1.4.0
user@ubuntu:~/caliper-benchmarks$ npx caliper bind
or from various other sources.
The entry point of the CLI is the caliper binary. You can confirm whether the CLI is installed correctly by checking its version:
user@ubuntu:~/caliper-benchmarks$ npx caliper --version
v0.2.0
The CLI provides multiple commands to perform different tasks. To check the available commands and their descriptions, execute:
user@ubuntu:~/caliper-benchmarks$ npx caliper --help
caliper <command>

Commands:
  caliper bind [options]       Bind Caliper to a specific SUT and its SDK version
  caliper launch <subcommand>  Launch a Caliper process either in a master or worker role.
  caliper completion           generate completion script

Options:
  --help, -h  Show usage information  [boolean]
  --version   Show version information  [boolean]

Examples:
  caliper bind
  caliper launch master
  caliper launch worker
For more information on Hyperledger Caliper: https://hyperledger.github.io/caliper/
You can also request the help page of a specific command, as demonstrated by the next subsections.
Note: the command options can be set either through the command line, or from various other sources supported by the configuration mechanism of Caliper. This flexibility makes it easy to embed the CLI in different environments.
The bind command
Acquiring Caliper is as easy as installing a single NPM package, or pulling a single Docker image. However, this single point of install necessitates an additional step of telling Caliper which platform to target and which platform SDK version to use. This step is called binding, provided by the bind CLI command.
To have a look at the help page of the command, execute:
user@ubuntu:~/caliper-benchmarks$ npx caliper bind --help
Usage:
  caliper bind --caliper-bind-sut fabric:1.4.1 --caliper-bind-cwd ./ --caliper-bind-args="-g"

Options:
  --help, -h           Show usage information  [boolean]
  --version            Show version information  [boolean]
  --caliper-bind-sut   The name and version of the platform and its SDK to bind to  [string]
  --caliper-bind-cwd   The working directory for performing the SDK install  [string]
  --caliper-bind-args  Additional arguments to pass to "npm install". Use the "=" notation when setting this parameter  [string]
  --caliper-bind-file  Yaml file to override default (supported) package versions when binding an SDK  [string]
The binding step technically consists of an extra npm install call with the appropriate packages and install settings, fully managed by the CLI. The following parameters can be set for the command:
- SUT/platform name and SDK version: specifies the name of the target platform and its SDK version to install e.g.,
fabric:1.4.1 - Working directory: the directory from which the
npm installcommand must be performed. Defaults to the current working directory - User arguments: additional arguments to pass to
npm install, e.g.,--save
The following SUT name (column header) and SDK version (column value) combinations are supported:
| besu | burrow | ethereum | fabric | fisco-bcos | iroha | sawtooth |
|---|---|---|---|---|---|---|
| 1.3.2 | 0.23.0 | 1.2.1 | 1.0.0 | 2.0.0 | 0.6.3 | 1.0.0 |
| latest | latest | latest | 1.1.0 | latest | latest | 1.0.1 |
| 1.2.0 | 1.0.2 | |||||
| 1.3.0 | 1.0.4 | |||||
| 1.4.0 | 1.0.5 | |||||
| 1.4.1 | latest | |||||
| 1.4.3 | ||||||
| 1.4.4 | ||||||
| 1.4.5 | ||||||
| 1.4.6 | ||||||
| 1.4.7 | ||||||
| latest |
Note: the
latestvalue always points to the last explicit versions in the columns. However, it is recommended to explicitly specify the SDK version to avoid any surprise between two benchmark runs.
The bind command is useful when you plan to run multiple benchmarks against the same SUT version. Bind once, then run different benchmarks without the need to bind again. As you will see in the next sections, the launcher commands for the master and worker processes can also perform the binding step if the required parameter is present.
Note: the built-in bindings can be overridden by setting the
caliper-bind-fileparameter to a YAML file path. The file must match the structure of the default binding file. This way you can use experimental SDK versions that are not (yet) officially supported by Caliper. This also means that we cannot provide help for such SDK versions!
启动命令
Caliper runs a benchmark by using worker processes to generate the workload, and by using a master process to coordinate the different benchmark rounds among the worker processes. Accordingly, the CLI provides commands for launching both master and worker processes.
To have a look at the help page of the command, execute:
user@ubuntu:~/caliper-benchmarks$ npx caliper launch --help
caliper launch <subcommand>

Launch a Caliper process either in a master or worker role.

Commands:
  caliper launch master [options]  Launch a Caliper master process to coordinate the benchmark run
  caliper launch worker [options]  Launch a Caliper worker process to generate the benchmark workload

Options:
  --help, -h  Show usage information  [boolean]
  --version   Show version information  [boolean]
The launch master command
The Caliper master process can be considered as the entry point of a distributed benchmark run. It coordinates (and optionally spawns) the worker processes throughout the benchmark run.
To have a look at the help page of the command, execute:
user@ubuntu:~/caliper-benchmarks$ npx caliper launch master --help
Usage:
 caliper launch master --caliper-bind-sut fabric:1.4.1 [other options]

Options:
  --help, -h           Show usage information  [boolean]
  --version            Show version information  [boolean]
  --caliper-bind-sut   The name and version of the platform to bind to  [string]
  --caliper-bind-cwd   The working directory for performing the SDK install  [string]
  --caliper-bind-args  Additional arguments to pass to "npm install". Use the "=" notation when setting this parameter  [string]
  --caliper-bind-file  Yaml file to override default (supported) package versions when binding an SDK  [string]
As you can see, the launch master command can also process the parameters of the bind command, just in case you would like to perform the binding and the benchmark run in one step.
However, the command requires the following parameters to be set:
- caliper-workspace: the directory serving as the root of your project. Every relative path in other configuration files or settings will be resolved from this directory. The workspace concept was introduced to make Caliper projects portable across different machines.
- caliper-benchconfig: the path of the file containing the configuration of the test rounds, as detailed in the Architecture page. Should be relative to the workspace path.
- caliper-networkconfig: the path of the file containing the network configuration/description for the selected SUT, detailed in the configuration pages of the respective adapters. Should be relative to the workspace path.
The launch worker command
The Caliper worker processes are responsible for generating the workload during the benchmark run. Usually more than one worker process is running, coordinated by the single master process.
To have a look at the help page of the command, execute:
user@ubuntu:~/caliper-benchmarks$ npx caliper launch worker --help
Usage:
 caliper launch master --caliper-bind-sut fabric:1.4.1 [other options]

Options:
  --help, -h           Show usage information  [boolean]
  --version            Show version information  [boolean]
  --caliper-bind-sut   The name and version of the platform to bind to  [string]
  --caliper-bind-cwd   The working directory for performing the SDK install  [string]
  --caliper-bind-args  Additional arguments to pass to "npm install". Use the "=" notation when setting this parameter  [string]
  --caliper-bind-file  Yaml file to override default (supported) package versions when binding an SDK  [string]
As you can see, you can configure the worker processes the same way as the master process. Including the optional binding step, but also the three mandatory parameters mentioned in the previous section.
Installing from NPM
Caliper is published as the @hyperledger/caliper-cli NPM package, providing a single point of install for every supported adapter.
Versioning semantics
Before explaining the steps for installing Caliper, let’s take a look at the Versions page of the CLI package. You will see a list of tags and versions. If you are new to NPM, think of versions as immutable pointers to a specific version (duh) of the source code, while tags are mutable pointers to a specific version. So tags can change where they point to. Easy, right?
But why is all this important to you? Because Caliper is still in its pre-release life-cycle (< v1.0.0), meaning that even minor version bumps are allowed to introduce breaking changes. And if you use Caliper in your project, you might run into some surprises depending on how you install Caliper from time to time.
Note: Until Caliper reaches v1.0.0, always use the explicit version numbers when installing from NPM. So let’s forget about the
latestandunstabletags, as of now they are just a mandatory hindrance of NPM. As you will see, we deliberately do not provide such tags for the Docker images.
Now that we ignored the tags, let’s see the two types of version numbers you will encounter:
0.2.0: Version numbers of this form denote releases deemed stable by the maintainers. Such versions have a corresponding GitHub tag, both in thecaliperandcaliper-benchmarksrepositories. Moreover, the latest stable version is documented by thelatestversion of the documentation page. So make sure to align the different versions if you run into some issue.0.3.0-unstable-20200206065953: Such version “numbers” denote unstable releases that are published upon every merged pull request (hence the timestamp at the end), and eventually will become a stable version, e.g.,0.3.0. This way you always have access to the NPM (and Docker) artifacts pertaining to themasterbranch of the repository. Let’s find and fix the bugs of new features before they make it to the stable release!
Note: The newest unstable release always corresponds to the up-to-date version of the related repositories, and the
vNextversion of the documentation page!
Pre-requisites
The following tools are required to install the CLI from NPM:
- node-gyp, python2, make, g++ and git (for fetching and compiling some packages during install)
- Node.js v8.X LTS or v10.X LTS (for running Caliper)
- Docker and Docker Compose (only needed when running local examples, or using Caliper through its Docker image)
Local NPM install
Note: this is the highly recommended way to install Caliper for your project. Keeping the project dependencies local makes it easier to setup multiple Caliper projects. Global dependencies would require re-binding every time before a new benchmark run (to ensure the correct global dependencies).
- Set your NPM project details with
npm init(or just executenpm init -y) in your workspace directory (if you haven’t done this already, i.e., you don’t have apackage.jsonfile). - Install the Caliper CLI as you would any other NPM package. It is highly recommended to explicitly specify the version number, e.g.,
@hyperledger/caliper-cli@0.2.0 - Bind the CLI to the required platform SDK (e.g.,
fabricwith the1.4.0SDK). - Invoke the local CLI binary (using npx) with the appropriate parameters. You can repeat this step for as many Fabric 1.4.0 benchmarks as you would like.
Putting it all together:
user@ubuntu:~/caliper-benchmarks$ npm init -y
user@ubuntu:~/caliper-benchmarks$ npm install --only=prod \
    @hyperledger/caliper-cli@0.2.0
user@ubuntu:~/caliper-benchmarks$ npx caliper bind \
    --caliper-bind-sut fabric:1.4.0
user@ubuntu:~/caliper-benchmarks$ npx caliper launch master \
    --caliper-workspace . \
    --caliper-benchconfig benchmarks/scenario/simple/config.yaml \
    --caliper-networkconfig networks/fabric/fabric-v1.4.1/2org1peergoleveldb/fabric-go.yaml
We could also perform the binding automatically when launching the master process (note the extra parameter for caliper launch master):
user@ubuntu:~/caliper-benchmarks$ npm init -y
user@ubuntu:~/caliper-benchmarks$ npm install --only=prod \
    @hyperledger/caliper-cli@0.2.0
user@ubuntu:~/caliper-benchmarks$ npx caliper launch master \
    --caliper-bind-sut fabric:1.4.0 \
    --caliper-workspace . \
    --caliper-benchconfig benchmarks/scenario/simple/config.yaml \
    --caliper-networkconfig networks/fabric/fabric-v1.4.1/2org1peergoleveldb/fabric-go.yaml
Note: specifying the
--only=prodparameter in step 2 will ensure that the default latest SDK dependencies for every platform will not be installed. Since we perform an explicit binding anyway (and only for a single platform), this is the desired approach, while also saving some storage and time.
Note: always make sure that the versions of the SUT, the bound SDK and the used artifacts match!
Global NPM install
Note: make sure that you have a really good reason for installing the Caliper CLI globally. The recommended approach is the local install. That way your project is self-contained and you can easily setup multiple projects (in multiple directories) that each target a different SUT (or just different SUT versions). Installing or re-binding dependencies globally can get tricky.
There are some minor differences compared to the local install:
- You don’t need a
package.jsonfile. - You can perform the install, bind and run steps from anywhere (just specify the workspace accordingly).
- You need to install the CLI globally (
-gflag). - You need to tell the binding step to install the packages also globally (
--caliper-bind-argsparameter). - You can omit the
npxcommand, sincecaliperwill be in yourPATH.
user@ubuntu:~$ npm install -g --only=prod @hyperledger/caliper-cli@0.2.0
user@ubuntu:~$ caliper bind \
    --caliper-bind-sut fabric:1.4.0 \
    --caliper-bind-args=-g
user@ubuntu:~$ caliper launch master \
    --caliper-workspace ~/caliper-benchmarks \
    --caliper-benchconfig benchmarks/scenario/simple/config.yaml \
    --caliper-networkconfig networks/fabric/fabric-v1.4.1/2org1peergoleveldb/fabric-go.yaml
Note: for global install you don’t need to change the directory to your workspace, you can simply specify
--caliper-workspace ~/caliper-benchmarks. But this way you can’t utilize the auto complete feature of your commandline for the relative paths of the artifacts.
Depending on your NPM settings, your user might need write access to directories outside of its home directory. This usually results in “Access denied” errors. The following pointers here can guide you to circumvent the problem.
Using the Docker image
Caliper is published as the hyperledger/caliper Docker image, providing a single point of usage for every supported adapter. The image builds upon the node:10.16-alpine image to keep the image size as low as possible.
The important properties of the image are the following:
- Working directory:
/hyperledger/caliper/workspace - The commands are executed by the
nodeuser (created in the base image) - The environment variable
CALIPER_WORKSPACEis set to the/hyperledger/caliper/workspacedirectory - The entry point is the globally installed
caliperbinary - The environment variable
CALIPER_BIND_ARGSis set to-g, so the binding step also occurs globally. - The default command is set to
--version. This must be overridden when using the image.
This has the following implications:
- It is recommended to mount your local workspace to the
/hyperledger/caliper/workspacecontainer directory. The defaultCALIPER_WORKSPACEenvironment variable value points to this location, so you don’t need to specify it explicitly, one less setting to modify. - You need to choose a command to execute, either
launch masterorlaunch worker. Check the Docker and Docker-Compose examples for the exact syntax. - The binding step is still necessary, similarly to the NPM install approach. Whether you use the
launch masterorlaunch workercommand, you only need to set the required binding parameter. The easiest way to do this is through theCALIPER_BIND_SUTenvironment variable. - You need to set the required parameters for the launched master or worker. The easiest way to do this is through the
CALIPER_BENCHCONFIGandCALIPER_NETWORKCONFIGenvironment variables.
Starting a container
Parts of starting a Caliper container (following the recommendations above):
- Pick the required image version
- Mount your local working directory to a container directory
- Set the required binding and run parameters
Note: the latest (or any other) tag is not supported, i.e, you explicitly have to specify the image version you want:
hyperledger/caliper:0.2.0, just like it’s the recommended approach for the NPM packages.
Putting it all together, split into multiple lines for clarity, and naming the container caliper:
user@ubuntu:~/caliper-benchmarks$ docker run \
    -v $PWD:/hyperledger/caliper/workspace \
    -e CALIPER_BIND_SUT=fabric:1.4.0 \
    -e CALIPER_BENCHCONFIG=benchmarks/scenario/simple/config.yaml \
    -e CALIPER_NETWORKCONFIG=networks/fabric/fabric-v1.4.1/2org1peergoleveldb/fabric-go.yaml \
    --name caliper hyperledger/caliper:0.2.0 launch master
Note: the above network configuration file contains a start script to spin up a local Docker-based Fabric network, which will not work in this form. So make sure to remove the start (and end) script, and change the node endpoints to remote addresses.
Using docker-compose
The above command is more readable when converted to a docker-compose.yaml file:
version: '2'

services:
    caliper:
        container_name: caliper
        image: hyperledger/caliper:0.2.0
        command: launch master
        environment:
        - CALIPER_BIND_SUT=fabric:1.4.0
        - CALIPER_BENCHCONFIG=benchmarks/scenario/simple/config.yaml
        - CALIPER_NETWORKCONFIG=networks/fabric/fabric-v1.4.1/2org1peergoleveldb/fabric-go.yaml
        volumes:
        - ~/caliper-benchmarks:/hyperledger/caliper/workspace
Once you navigate to the directory containing the docker-compose.yaml file, just execute:
docker-compose up
Note: if you would like to test a locally deployed SUT, then you also need to add the necessary SUT containers to the above file and make sure that Caliper starts last (using the
depends_onattribute).
Installing locally from source
Note: this section is intended only for developers who would like to modify the Caliper code-base and experiment with the changes locally before raising pull requests. You should perform the following steps every time you make a modification you want to test, to correctly propagate any changes.
The workflow of modifying the Caliper code-base usually consists of the following steps:
- Bootstrapping the repository
- Modifying and testing the code
- Publishing package changes locally
- Building the Docker image
Bootstrapping the Caliper repository
To install the basic dependencies of the repository, and to resolve the cross-references between the different packages in the repository, you must execute the following commands from the root of the repository directory:
npm i: Installs development-time dependencies, such as Lerna and the license checking package.npm run repoclean: Cleans up thenode_modulesdirectory of all packages in the repository. Not needed for a freshly cloned repository.npm run bootstrap: Installs the dependencies of all packages in the repository and links any cross-dependencies between the packages. It will take some time to finish installation. If it is interrupted byctrl+c, please recover thepackage.jsonfile first and then runnpm run bootstrapagain.
Or as a one-liner:
user@ubuntu:~/caliper$ npm i && npm run repoclean -- --yes && npm run bootstrap
Note: do not run any of the above commands with
sudo, as it will cause the bootstrap process to fail.
Testing the code
The easiest way to test your changes is to run the CI process locally. Currently, the CI process runs benchmarks for specific adapters. You can trigger these tests by running the following script from the root directory of the repository, setting the BENCHMARK environment variable to the platform name:
user@ubuntu:~/caliper$ BENCHMARK=fabric ./.travis/benchmark-integration-test-direct.sh
The following platform tests (i.e., valid BENCHMARK values) are available:
- besu
- ethereum
- fabric
- fisco-bcos
- sawtooth
The scripts will perform the following tests (also necessary for a successful pull request):
- Linting checks
- Licence header checks
- Unit tests
- Running sample benchmarks
If you would like to run other examples, then you can directly access the CLI in the packages/caliper-cli directory, without publishing anything locally.
Note: the SDK dependencies in this case are fixed (the binding step is not supported with this approach), and you can check (and change) them in the
package.jsonfiles of the corresponding packages. In this case the repository needs to be bootstrapped again.
user@ubuntu:~/caliper$ node ./packages/caliper-cli/caliper.js launch master \
    --caliper-workspace ~/caliper-benchmarks \
    --caliper-benchconfig benchmarks/scenario/simple/config.yaml \
    --caliper-networkconfig networks/fabric/fabric-v1.4.1/2org1peergoleveldb/fabric-go.yaml
Publishing to local NPM repository
The NPM publishing and installing steps for the modified code-base can be tested through a local NPM proxy server, Verdaccio. The steps to perform are the following:
- Start a local Verdaccio server to publish to
- Publish the packages from the local (and possible modified) Caliper repository to the Verdaccio server
- Install and bind the CLI from the Verdaccio server
- Run the integration tests or any sample benchmark
The packages/caliper-publish directory contains an internal CLI for easily managing the following steps. So the commands of the following sections must be executed from the packages/caliper-publish directory:
user@ubuntu:~/caliper$ cd ./packages/caliper-publish
Note: use the
--helpflag for the following CLI commands and sub-commands to find out more details.
Starting Verdaccio
To setup and start a local Verdaccio server, simply run the following command:
user@ubuntu:~/caliper/packages/caliper-publish$ ./publish.js verdaccio start
...
[PM2] Spawning PM2 daemon with pm2_home=.pm2
[PM2] PM2 Successfully daemonized
[PM2] Starting /home/user/projects/caliper/packages/caliper-tests-integration/node_modules/.bin/verdaccio in fork_mode (1 instance)
[PM2] Done.
┌───────────┬────┬──────┬────────┬────────┬─────────┬────────┬─────┬───────────┬────────┬──────────┐
│ App name  │ id │ mode │ pid    │ status │ restart │ uptime │ cpu │ mem       │ user   │ watching │
├───────────┼────┼──────┼────────┼────────┼─────────┼────────┼─────┼───────────┼────────┼──────────┤
│ verdaccio │ 0  │ fork │ 115203 │ online │ 0       │ 0s     │ 3%  │ 25.8 MB   │ user   │ disabled │
└───────────┴────┴──────┴────────┴────────┴─────────┴────────┴─────┴───────────┴────────┴──────────┘
 Use `pm2 show <id|name>` to get more details about an app
The Verdaccio server is now listening on the following address: http://localhost:4873
Publishing the packages
Once Verdaccio is running, you can run the following command to publish every Caliper package locally:
user@ubuntu:~/caliper/packages/caliper-publish$ ./publish.js npm --registry "http://localhost:4873"
...
+ @hyperledger/caliper-core@0.3.0-unstable-20200206065953
[PUBLISH] Published package @hyperledger/caliper-core@0.3.0-unstable-20200206065953
...
+ @hyperledger/caliper-fabric@0.3.0-unstable-20200206065953
[PUBLISH] Published package @hyperledger/caliper-fabric@0.3.0-unstable-20200206065953
...
+ @hyperledger/caliper-cli@0.3.0-unstable-20200206065953
[PUBLISH] Published package @hyperledger/caliper-cli@0.3.0-unstable-20200206065953
Take note of the dynamic version number you see in the logs, you will need it to install you modified Caliper version from Verdaccio (the unstable tag is also present on NPM, so Verdaccio would probably pull that version instead of your local one).
Since the published packages include a second-precision timestamp in their versions, you can republish any changes immediately without restarting the Verdaccio server and without worrying about conflicting packages.
Running package-based tests
Once the packages are published to the local Verdaccio server, we can use the usual NPM install approach. The only difference is that now we specify the local Verdaccio registry as the install source instead of the default, public NPM registry:
user@ubuntu:~/caliper-benchmarks$ npm init -y
user@ubuntu:~/caliper-benchmarks$ npm install --registry=http://localhost:4873 --only=prod \
    @hyperledger/caliper-cli@0.3.0-unstable-20200206065953
user@ubuntu:~/caliper-benchmarks$ npx caliper bind --caliper-bind-sut fabric:1.4.0
user@ubuntu:~/caliper-benchmarks$ npx caliper launch master \
    --caliper-workspace . \
    --caliper-benchconfig benchmarks/scenario/simple/config.yaml \
    --caliper-networkconfig networks/fabric/fabric-v1.4.1/2org1peergoleveldb/fabric-go.yaml
Note: we used the local registry only for the Caliper packages. The binding happens through the public NPM registry. Additionally, we performed the commands through npx and the newly installed CLI binary (i.e., not directly calling the CLI code file).
Building the Docker image
Once the modified packages are published to the local Verdaccio server, you can rebuild the Docker image. The Dockerfile is located in the packages/caliper-publish directory.
To rebuild the Docker image, execute the following:
user@ubuntu:~/caliper/packages/caliper-publish$ ./publish.js docker
...
Successfully tagged hyperledger/caliper:0.3.0-unstable-20200206065953
[BUILD] Built Docker image "hyperledger/caliper:0.3.0-unstable-20200206065953"
Now you can proceed with the Docker-based benchmarking as described in the previous sections.
Note: once you are done with the locally published packages, you can clean them up the following way:
user@ubuntu:~/caliper/packages/caliper-publish$ ./publish.js verdaccio stop
简单案例
体系结构
Architecture
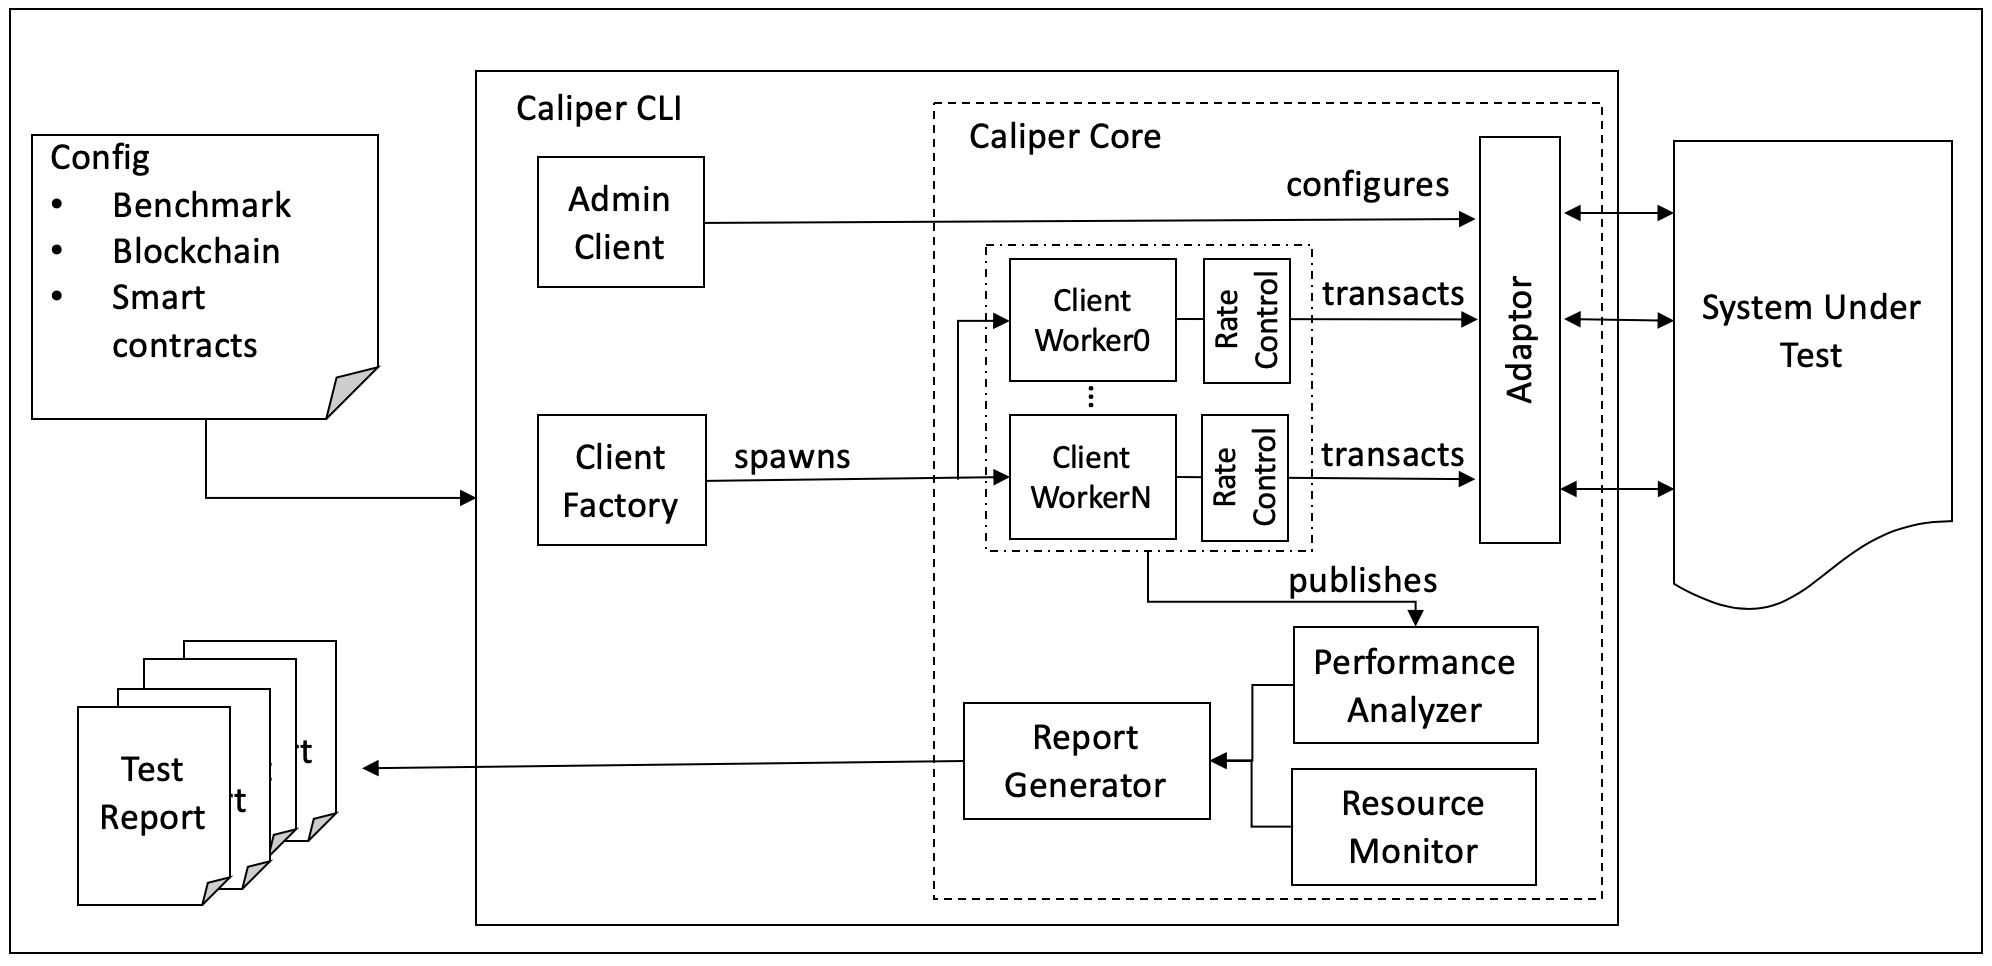
Adaptation Layer(适配层)
适配层用于将现有的区块链系统集成到Caliper框架中。每个适配器使用相应的区块链SDK或RESTful API实现’Caliper Blockchain NBI’。目前支持Hyperledger Fabric1.0-1.4、Sawtooth、Iroha、和burrow。Caliper后续将实现对以太坊和其他区块链系统的支持。
Interface&Core Layer(接口及核心层)
接口和核心层提供 Blockchain NBI、资源监控、性能监控、报告生成模块,并为上层应用提供四种相应的北向接口:
- Blockchain operating interfaces: 包含诸如在后端区块链上部署智能合约、调用合约、从账本查询状态等操作。
- Resource Monitor: 包含启动/停止监视器和获取后端区块链系统资源消耗状态的操作,包括CPU、内存、网络IO等。现在提供两种监视器,一种是监视本地/远程docker容器,另一种则是监控本地进程。未来将实现更多功能。
- Performance Analyzer: 包含读取预定义性能统计信息(包括TPS、延迟、成功交易数等)和打印基准测试结果的操作。在调用区块链北向接口时,每个交易的关键指标(如创建交易的时间、交易提交时间、交易返回结果等)都会被记录下来,并用于生成最终的预定义性能指标统计信息。
- Report Generator: 生成HTML格式测试报告。
Application Layer(应用层)
应用程序层包含针对典型区块链方案实施的测试。每次测试都需要设置对应的配置文件,用于定义后端区块链网络信息和测试参数信息。基于这些配置,可以完成区块链系统的性能测试。
我们预置了一个默认的基准测试引擎以帮助开发人员理解框架并快速实施自己的测试。下面将介绍如何使用基准测试引擎。当然,开发人员也可以不使用测试框架,直接使用NBI完成自有区块链系统的测试。
Benchmark Engine
Configuration File
我们使用两种配置文件。一种是基准配置文件,它定义基准测试参数,如负载量(workload)等。另一种是区块链网络配置文件,它指定了有助于与待测试的系统(SUT)交互的必要信息。
以下是基准配置文件示例:
test:
  name: simple
  description: This is an example benchmark for caliper
  clients:
    type: local
    number: 5
  rounds:
  - label: open
    txNumber:
    - 5000
    - 5000
    - 5000
    rateControl:
    - type: fixed-rate
      opts:
        tps: 100
    - type: fixed-rate
      opts:
        tps: 200
    - type: fixed-rate
      opts:
        tps: 300
    arguments:
      money: 10000
    callback: benchmark/simple/open.js
  - label: query
    txNumber:
    - 5000
    - 5000
    rateControl:
    - type: fixed-rate
      opts:
        tps: 300
    - type: fixed-rate
      opts:
        tps: 400
    callback" : benchmark/simple/query.js
monitor:
  type:
  - docker
  - process
  docker:
    name:
    - peer0.org1.example.com
    - http://192.168.1.100:2375/orderer.example.com
  process:
  - command: node
    arguments: local-client.js
    multiOutput: avg
  interval: 1
- test - 定义测试的元数据和指定工作负载下的多轮测试。
- name&description : 测试名及其描述,该信息会被报告生成器使用,并显示在测试报告中。
- clients : 定义客户端类型和相关参数,其中’type’应该设置为’local’。
- local: 此例中,Caliper的主进程将会创建多个子进程,每个子进程将会作为客户端向后端区块链系统发送交易。客户端的数量由’number’定义。
- label : 当前测试标签名称。例如,可以使用当前交易目的名称(如开户)作为标签名称,来说明当前性能测试的交易类型。该值还可用作blockchain.getContext()中的Context名称。又例如,开发人员可能希望测试不同Fabric通道的性能,在这种情况下,具有不同标签的测试可以绑定到不同的Fabric通道。
- txNumber : 定义一个子轮测试数组,每个轮次有不同的交易数量。例如, [5000,400] 表示在第一轮中将生成总共5000个交易,在第二轮中将生成400个交易。
- txDuration : 定义基于时间测试的子轮数组。例如 [150,400] 表示将进行两次测试,第一次测试将运行150秒,第二次运行将运行400秒。如果当前配置文件中同时指定了txNumber和txDuration,系统将优先根据txDuration设置运行测试。
- rateControl : 定义每个子轮测试期间使用的速率控制数组。如果未指定,则默认为“固定速率”,将以1TPS速率发送交易开始测试。如果已定义,务必保证所选用的速率控制机制名称正确并且提供对应的发送速率及所需参数。在每一轮测试中, txNumber 或 txDuration 在 rateControl 中具有相应的速率控制项。有关可用速率控制器以及如何实现自定义速率控制器的更多信息,请参阅 速率控制部分。
- trim : 对客户端结果执行修剪(trim)操作,以消除warm-up和cool-down阶段对于测试结果的影响。如果已指定修剪区间,该设置将被应用于该轮测试结果的修剪中。例如, 在
txNumber测试模式中,值30表示每个客户端发送的最初和最后的30个交易结果将被修剪掉; 在txDuration模式下, 则从每个客户端发送的前30秒和后30秒的交易结果将会被忽略掉。 - arguments : 用户自定义参数,将被传递到用户自定义的测试模块中。
- callback : 指明用户在该轮测试中定义的测试模块。请参阅User defined test module 获取更多信息。
- monitor - 定义资源监视器和受监视对象的类型,以及监视的时间间隔。
- docker : docker monitor用于监视本地或远程主机上的指定docker容器。Docker Remote API用于检索远程容器的统计信息。保留的容器名称“all”表示将监视主机上的所有容器。在上面的示例中,监视器将每秒检索两个容器的统计信息,一个是名为“peer0.org1.example.com”的本地容器,另一个是位于主机’192.168.1.100’上的名为“orderer.example.com”的远程容器。2375是该主机上Docker的侦听端口。
- process : 进程监视器用于监视指定的本地进程。例如,用户可以使用此监视器来监视模拟区块链客户端的资源消耗。’command’和’arguments’属性用于指定进程。如果找到多个进程,’multiOutput’属性用于定义输出的含义。’avg’表示输出是这些过程的平均资源消耗,而’sum’表示输出是总和消耗。
- others : 待后续补充。
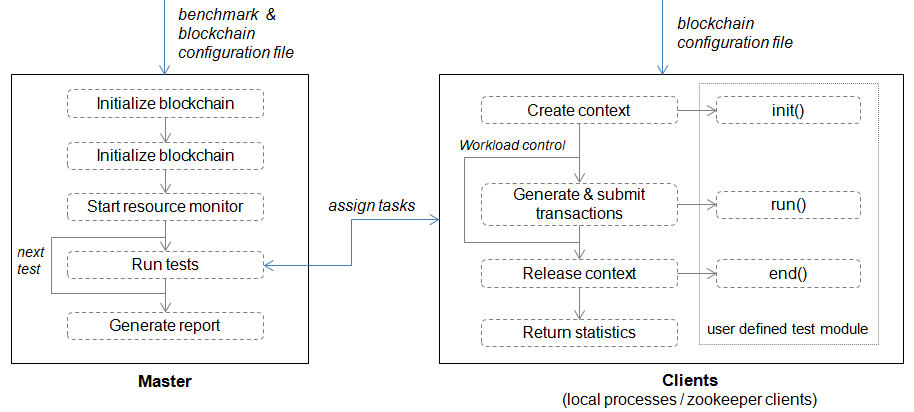
Master
实现默认测试流程,其中包含三个阶段:
-
准备阶段:在此阶段,主进程使用区块链配置文件创建并初始化内部区块链对象,按照配置中指定的信息部署智能合约,并启动监控对象以监控后端区块链系统的资源消耗。
-
测试阶段: 在此阶段,主进程根据配置文件执行测试,将根据定义的workload生成任务并将其分配给客户端子进程。最后将存储各个客户端返回的性能统计信息以供后续分析。
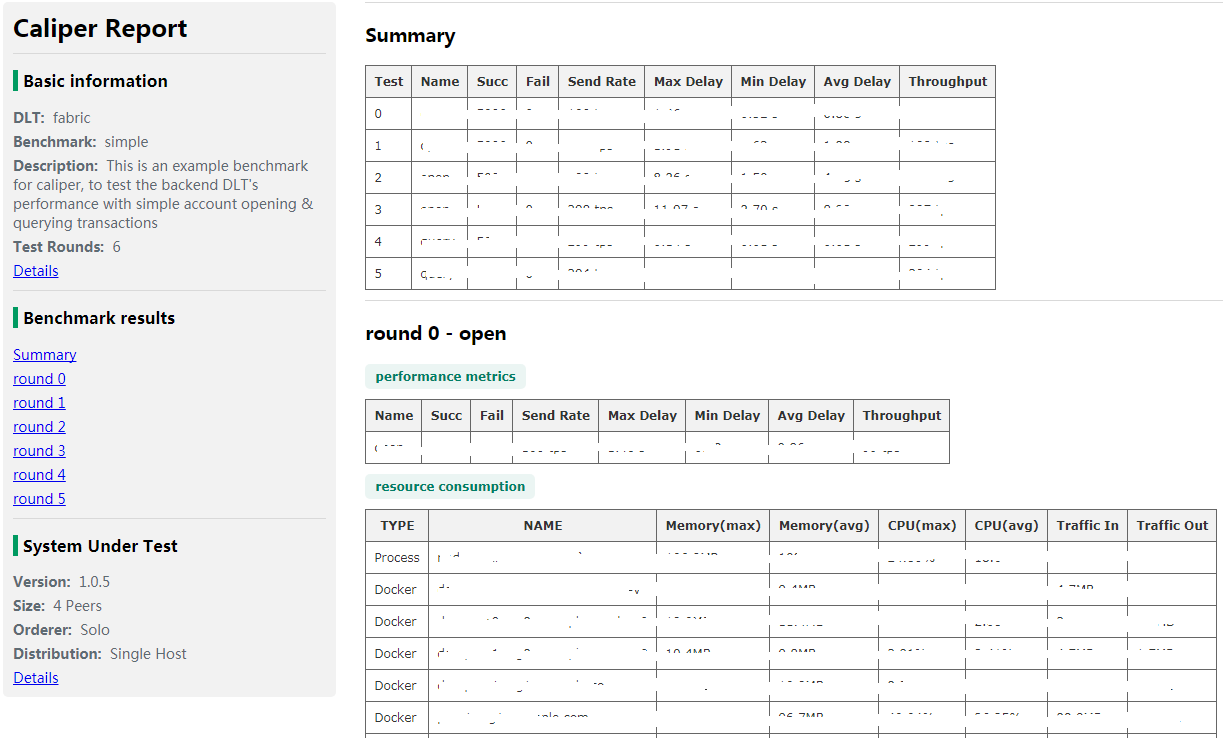
-
报告阶段: 分析每个测试轮次的所有客户端的统计数据,并自动生成HTML格式报告。报告示例如下:
Clients
Local Clients
在此模式下,主进程使用Node.js集群模块启动多个本地客户端(子进程)来执行实际的测试工作。由于Node.js本质上是单线程的,因此本地集群可用于提高客户端在多核机器上的性能。
此模式下,总工作负载被平均分配给子进程。每个子进程相当于区块链客户端,子进程拥有临时生成的context,可以和后端区块链系统交互。context通常包含客户端的标识和加密信息,在测试结束后context将被释放。
- 对于Hyperledger Fabric,context也绑定到特定channel,该绑定关系在Fabric配置文件中有相关定义。
测试时客户端将调用用户定义的测试模块,该模块包含了自定义的测试逻辑。测试模块的相关信息后文会给出解释。
本地客户端在第一轮测试时启动,并在完成所有测试后被销毁。
User Defined Test Module
该模块实现交易生成和提交交易的功能。通过这种方式,开发人员可以实现自己的测试逻辑并将其与基准引擎集成。 测试模块主要实现3个函数,所有这些函数都应该返回一个Promise对象。
init- 将在每个测试轮次开始时由客户端调用。所需参数包括当前区块链对象、上下文以及从基准配置文件中读取的用户定义的参数。在该函数内可以保存区块链对象和context供以后使用,其他初始化工作也可在此处实现。run- 应使用Caliper的区块链API在此处生成和提交实际的事务。客户端将根据工作负载重复调用此函数。建议每次调用只提交一个事务;如果每次提交多个事务,则实际工作负载可能与配置的工作负载不同。请确保该函数应以异步方式运行。end- 将在每轮测试结束时调用,任何结束时需要释放信息的工作都应在此处执行。
Benchmark 配置
- Burrow Configuration
- Ethereum Configuration
- FISCO BCOS Configuration
- Fabric Configuration
- Iroha Configuration
- Sawtooth Configuration
Overview
The benchmark configuration file is one of the required configuration files necessary to run a Caliper benchmark. In contrast to the runtime configurations, used for tweaking the internal behavior of Caliper, the benchmark configuration pertains only to the execution of the benchmark workload and collection of the results.
Note: In theory, a benchmark configuration is independent of the system under test (SUT) and the internal configuration of Caliper. However, this independence might be limited by the implementation details of the benchmark workload module, which could target only a single SUT type.
The benchmark configuration consists of three main parts:
- Test settings
- Observer settings
- Monitoring settings
For a complete benchmark configuration example, refer to the last section.
Note: The configuration file can be either a YAML or JSON file, conforming to the format described below. The benchmark configuration file path can be specified for the master and worker processes using the
caliper-benchconfigsetting key.
Benchmark test settings
The settings related to the benchmark workload all reside under the root test attribute, which has some general child attributes, and the important rounds attribute.
| Attribute | Description |
|---|---|
| test.name | Short name of the benchmark to display in the report. |
| test.description | Detailed description of the benchmark to display in the report. |
| test.clients | Object of worker-related configurations. |
| test.clients.type | Currently unused. |
| test.clients.number | Specifies the number of worker processes to use for executing the workload. |
| test.rounds | Array of objects, each describing the settings of a round. |
| test.rounds[i].label | A short name of the rounds, usually corresponding to the types of submitted TXs. |
| test.rounds[i].txNumber | The number of TXs Caliper should submit during the round. |
| test.rounds[i].txDuration | The length of the round in seconds during which Caliper will submit TXs. |
| test.rounds[i].rateControl | The object describing the rate controller to use for the round. |
| test.rounds[i].callback | The path to the benchmark workload module that will construct the TXs to submit |
| test.rounds[i].arguments | Arbitrary object that will be passed to the workload module as configuration. |
A benchmark configuration with the above structure will define a benchmark run that consists of multiple rounds. Each round is associated with a rate controller that is responsible for the scheduling of TXs, and a workload module that will generate the actual content of the scheduled TXs.
Observer settings
The observer configuration determines how the master process gathers progress information from the worker processes. The configuration resides under the observer attribute. Refer to the observer configuration page for the details.
Monitoring settings
The monitoring configuration determines what kind of metrics the master process can gather and from where. The configuration resides under the monitor attribute. Refer to the monitor configuration page for the details.
Example
The example configuration below says the following:
- Perform the benchmark run using 5 worker processes.
- There will be two rounds.
- The first
initround will submit 500 TXs at a fixed 25 TPS send rate. - The content of the TXs are determined by the
init.jsworkload module. - The second
queryround will submit TXs for 60 seconds at a fixed 5 TPS send rate. - The content of the TXs are determined by the
query.jsworkload module. - The master process will observe the progress of the worker processes through a separate Prometheus instance at every 5 seconds.
- The master process should include the predefined metrics of all local Docker containers in the report.
- The master process should include the custom metric
Endorse Time (s)based on the provided query for every available (peer) instance.
test:
  clients:
    type: local
    number: 5
  rounds:
  - label: init
    txNumber: 500
    rateControl:
      type: fixed-rate
      opts:
        tps: 25
    callback: benchmarks/samples/fabric/marbles/init.js
  - label: query
    txDuration: 60
    rateControl:
    - type: fixed-rate
      opts:
        tps: 5
    callback: benchmarks/samples/fabric/marbles/query.js
observer:
  type: prometheus
  interval: 5
monitor:
  interval: 1
  type: ['docker', 'prometheus']
  docker:
    containers: ['all']
  prometheus:
    url: "http://prometheus:9090"
    push_url: "http://pushGateway:9091"
    metrics:
      ignore: [prometheus, pushGateway, cadvisor, grafana, node-exporter]
      include:
        Endorse Time (s):
          query: rate(endorser_propsal_duration_sum{chaincode="marbles:v0"}[5m])/rate(endorser_propsal_duration_count{chaincode="marbles:v0"}[5m])
          step: 1
          label: instance
          statistic: avg
工作模型
Overview
Workload modules are the essence of a Caliper benchmark since it is their responsibility to construct and submit TXs. Accordingly, workload modules implement the logic pertaining to your business, benchmark or user behavior. Think of the workload modules as the brain of an emulated SUT client, deciding what kind of TX to submit at the given moment.
Implementing the workload module
Workload modules are Node.JS modules that expose a certain API. There are no further restrictions on the implementation, thus arbitrary logic (using further arbitrary components) can be implemented.
The API
A workload module must export the following three asynchronous functions:
-
init(blockchain: BlockchainInterface, context: object, args: object)The
initfunction is called before a round is started. It receives:- the SUT adapter instance in the
blockchainparameter; - the adapter-specific
contextcreated by the adapter (usually containing additional data about the network); - and the user-provided settings object as
argswhich is set in the benchmark configuration file’stest.rounds[i].argumentsattribute (if the workload module is configurable).
- the SUT adapter instance in the
-
run() => Promise<TxResult[]>The
runfunction is called every time the set rate controller enables the next TX. The function must assemble the content of the next TX (using arbitrary logic) and call theinvokeSmartContractorquerySmartContractfunctions of theblockchainadapter instance. See the adapter configuration pages for the exact usage of the mentioned functions.At the end, the function must return the result of the invoke/query call!
-
end()The
endfunction is called after the round has ended. The workload module can perform resource cleanup or any other maintenance activity at this point.
Example
A complete (albeit simple) example of a workload module implementation:
/*
* Licensed under the Apache License, Version 2.0 (the "License");
* you may not use this file except in compliance with the License.
* You may obtain a copy of the License at
*
* http://www.apache.org/licenses/LICENSE-2.0
*
* Unless required by applicable law or agreed to in writing, software
* distributed under the License is distributed on an "AS IS" BASIS,
* WITHOUT WARRANTIES OR CONDITIONS OF ANY KIND, either express or implied.
* See the License for the specific language governing permissions and
* limitations under the License.
*/

'use strict';

const logger = require('@hyperledger/caliper-core').CaliperUtils.getLogger('my-module');

// save the objects during init
let bc, contx;

/**
* Initializes the workload module before the start of the round.
* @param {BlockchainInterface} blockchain The SUT adapter instance.
* @param {object} context The SUT-specific context for the round.
* @param {object} args The user-provided arguments for the workload module.
*/
module.exports.init = async (blockchain, context, args) => {
    bc = blockchain;
    contx = context;
    logger.debug('Initialized workload module');
};

module.exports.run = async () => {
    let txArgs = {
        // TX arguments for "mycontract"
    };

    return bc.invokeSmartContract(contx, 'mycontract', 'v1', txArgs, 30);
};

module.exports.end = async () => {
    // Noop
    logger.debug('Disposed of workload module');
};
Configuring the workload module
To use your workload module for a given round, you only need to reference it in the benchmark configuration file:
- Set the
test.rounds[i].callbackattribute to the path of your workload module file. The path can be either an absolute path, or a relative path to the configured workspace path. - If your module supports different settings, set the
test.rounds[i].argumentsattribute object accordingly. It will be passed to your module upon initialization.
Tips & Tricks
The following advices might help you to improve your workload module implementation.
- You can use (
require) any Node.JS module in your code (including the core Caliper module). Modularization is important for keeping your implementation clean and manageable. - If you use third-party modules, then it is your responsibility to make them available to your workload module. This usually requires an
npm installcall in your module directory before you start Caliper. - Caliper provides some core utilities that might make your life easier, such as logging and runtime configuration. Use them, don’t reinvent the wheel!
- The
runfunction is on the hot path of the worker workload generation loop. Do computation-intensive tasks with care, it might hurt the scheduling precision of TXs! You can perform expensive pre-processing tasks in theinitfunction instead.
参考资料
doc:https://hyperledger.github.io/caliper/vLatest/getting-started/
github: https://github.com/hyperledger/caliper
wiki:
https://wiki.hyperledger.org/display/caliper
https://hyperledger.github.io/caliper/
https://hyperledger.github.io/caliper/vLatest/getting-started/
相关博文:
https://www.codercto.com/a/33837.html

 浙公网安备 33010602011771号