Chrom Develop Extensions
Chrome插件
Extensions are small software programs that customize the browsing experience. They enable users to tailor Chrome functionality and behavior to individual needs or preferences. They are built on web technologies such as HTML, JavaScript, and CSS.
An extension must fulfill a single purpose that is narrowly defined and easy to understand. A single extension can include multiple components and a range of functionality, as long as everything contributes towards a common purpose.
![]() User interfaces should be minimal and have intent. They can range from a simple icon, such as the Google Mail Checker extension shown on the right, to overriding an entire page.
User interfaces should be minimal and have intent. They can range from a simple icon, such as the Google Mail Checker extension shown on the right, to overriding an entire page.
Extension files are zipped into a single .crx package that the user downloads and installs. This means extensions do not depend on content from the web, unlike ordinary web apps.
Extensions are distributed through the Chrome Developer Dashboard and published to the Chrome Web Store. For more information, see the store developer documentation.
Hello Extensions
Take a small step into extensions with this quick Hello Extensions example. Start by creating a new directory to store the extension's files, or download them from the sample page.
Next, add a file called manifest.json and include the following code:
  {
    "name": "Hello Extensions",
    "description" : "Base Level Extension",
    "version": "1.0",
    "manifest_version": 2
  }
Every extension requires a manifest, though most extensions will not do much with just the manifest. For this quick start, the extension has a popup file and icon declared under the browser_action field:
  {
    "name": "Hello Extensions",
    "description" : "Base Level Extension",
    "version": "1.0",
    "manifest_version": 2,
    "browser_action": {
      "default_popup": "hello.html",
      "default_icon": "hello_extensions.png"
    }
  }
Download hello_extensions.png here and then create a file titled hello.html:
  <html>
    <body>
      <h1>Hello Extensions</h1>
    </body>
  </html>
The extension now displays hello.html when the icon is clicked. The next step is to include a command in the manifest.json that enables a keyboard shortcut. This step is fun, but not necessary:
  {
    "name": "Hello Extensions",
    "description" : "Base Level Extension",
    "version": "1.0",
    "manifest_version": 2,
    "browser_action": {
      "default_popup": "hello.html",
      "default_icon": "hello_extensions.png"
    },
    "commands": {
      "_execute_browser_action": {
        "suggested_key": {
          "default": "Ctrl+Shift+F",
          "mac": "MacCtrl+Shift+F"
        },
        "description": "Opens hello.html"
      }
    }

  }
The last step is to install the extension on your local machine.
- Navigate to
chrome://extensionsin your browser. You can also access this page by clicking on the Chrome menu on the top right side of the Omnibox, hovering over More Tools and selecting Extensions. - Check the box next to Developer Mode.
- Click Load Unpacked Extension and select the directory for your "Hello Extensions" extension.
Congratulations! You can now use your popup-based extension by clicking the hello_world.png icon or by pressing Ctrl+Shift+F on your keyboard.
快速开始
Extensions are made of different, but cohesive, components. Components can include background scripts, content scripts, an options page, UI elements and various logic files. Extension components are created with web development technologies: HTML, CSS, and JavaScript. An extension's components will depend on its functionality and may not require every option.
This tutorial will build an extension that allows the user to change the background color of any page on developer.chrome.com. It will use many core components to give an introductory demonstration of their relationships.
To start, create a new directory to hold the extension's files.
The completed extension can be downloaded here.
Create the Manifest
Extensions start with their manifest. Create a file called manifest.json and include the following code, or download the file here.
  {
    "name": "Getting Started Example",
    "version": "1.0",
    "description": "Build an Extension!",
    "manifest_version": 2
  }
The directory holding the manifest file can be added as an extension in developer mode in its current state.
- Open the Extension Management page by navigating to
chrome://extensions.- The Extension Management page can also be opened by clicking on the Chrome menu, hovering over More Tools then selecting Extensions.
- Enable Developer Mode by clicking the toggle switch next to Developer mode.
- Click the LOAD UNPACKED button and select the extension directory.
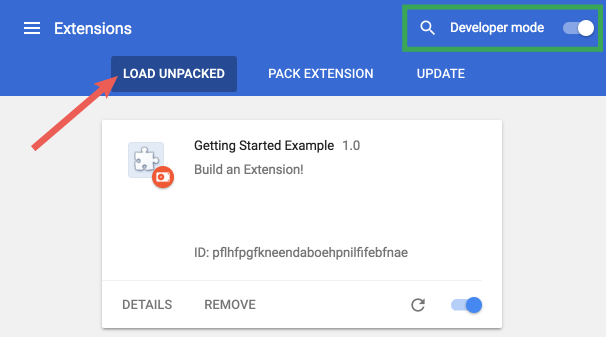
Ta-da! The extension has been successfully installed. Because no icons were included in the manifest, a generic toolbar icon will be created for the extension.
Add Instruction
Although the extension has been installed, it has no instruction. Introduce a background script by creating a file titled background.js, or downloading it here, and placing it inside the extension directory.
Background scripts, and many other important components, must be registered in the manifest. Registering a background script in the manifest tells the extension which file to reference, and how that file should behave.
  {
    "name": "Getting Started Example",
    "version": "1.0",
    "description": "Build an Extension!",
    "background": {
      "scripts": ["background.js"],
      "persistent": false
    },
    "manifest_version": 2
  }
The extension is now aware that it includes a non-persistent background script and will scan the registered file for important events it needs to listen for.
This extension will need information from a persistent variable as soon as its installed. Start by including a listening event for runtime.onInstalled in the background script. Inside the onInstalled listener, the extension will set a value using the storage API. This will allow multiple extension components to access that value and update it.
  chrome.runtime.onInstalled.addListener(function() {
    chrome.storage.sync.set({color: '#3aa757'}, function() {
      console.log("The color is green.");
    });
  });
Most APIs, including the storage API, must be registered under the "permissions" field in the manifest for the extension to use them.
  {
    "name": "Getting Started Example",
    "version": "1.0",
    "description": "Build an Extension!",
    "permissions": ["storage"],
    "background": {
      "scripts": ["background.js"],
      "persistent": false
    },
    "manifest_version": 2
  }
Navigate back to the extension management page and click the Reload link. A new field, Inspect views, becomes available with a blue link, background page.

Click the link to view the background script's console log, "The color is green."
Introduce a User Interface
Extensions can have many forms of a user interface, but this one will use a popup. Create and add a file titled popup.html to the directory, or download it here. This extension uses a button to change the background color.
  <!DOCTYPE html>
  <html>
    <head>
      <style>
        button {
          height: 30px;
          width: 30px;
          outline: none;
        }
      </style>
    </head>
    <body>
      <button id="changeColor"></button>
    </body>
  </html>
Like the background script, this file needs to be designated as a popup in the manifest under page_action.
  {
    "name": "Getting Started Example",
    "version": "1.0",
    "description": "Build an Extension!",
    "permissions": ["storage"],
    "background": {
      "scripts": ["background.js"],
      "persistent": false
    },
    "page_action": {
      "default_popup": "popup.html"
    },
    "manifest_version": 2
  }
Designation for toolbar icons is also included under page_action in the default_icons field. Download the images folder here, unzip it, and place it in the extension's directory. Update the manifest so the extension knows how to use the images.
  {
    "name": "Getting Started Example",
    "version": "1.0",
    "description": "Build an Extension!",
    "permissions": ["storage"],
    "background": {
      "scripts": ["background.js"],
      "persistent": false
    },
    "page_action": {
      "default_popup": "popup.html",
      "default_icon": {
        "16": "images/get_started16.png",
        "32": "images/get_started32.png",
        "48": "images/get_started48.png",
        "128": "images/get_started128.png"
      }
    },
    "manifest_version": 2
  }
Extensions also display images on the extension management page, the permissions warning, and favicon. These images are designated in the manifest under icons.
  {
    "name": "Getting Started Example",
    "version": "1.0",
    "description": "Build an Extension!",
    "permissions": ["storage"],
    "background": {
      "scripts": ["background.js"],
      "persistent": false
    },
    "page_action": {
      "default_popup": "popup.html",
      "default_icon": {
        "16": "images/get_started16.png",
        "32": "images/get_started32.png",
        "48": "images/get_started48.png",
        "128": "images/get_started128.png"
      }
    },
    "icons": {
      "16": "images/get_started16.png",
      "32": "images/get_started32.png",
      "48": "images/get_started48.png",
      "128": "images/get_started128.png"
    },
    "manifest_version": 2
  }
If the extension is reloaded at this stage, it will include a grey-scale icon, but will not contain any functionality differences. Because page_action is declared in the manifest, it is up to the extension to tell the browser when the user can interact with popup.html.
Add declared rules to the background script with the declarativeContent API within the runtime.onInstalled listener event.
  chrome.runtime.onInstalled.addListener(function() {
    chrome.storage.sync.set({color: '#3aa757'}, function() {
      console.log('The color is green.');
    });
    chrome.declarativeContent.onPageChanged.removeRules(undefined, function() {
      chrome.declarativeContent.onPageChanged.addRules([{
        conditions: [new chrome.declarativeContent.PageStateMatcher({
          pageUrl: {hostEquals: 'developer.chrome.com'},
        })
        ],
            actions: [new chrome.declarativeContent.ShowPageAction()]
      }]);
    });
  });
The extension will need permission to access the declarativeContent API in its manifest.
  {
    "name": "Getting Started Example",
  ...
    "permissions": ["declarativeContent", "storage"],
  ...
  }

The browser will now show a full-color page action icon in the browser toolbar when users navigate to a URL that contains "developer.chrome.com". When the icon is full-color, users can click it to view popup.html.
The last step for the popup UI is adding color to the button. Create and add a file called popup.js with the following code to the extension directory, or downloaded here.
  let changeColor = document.getElementById('changeColor');

  chrome.storage.sync.get('color', function(data) {
    changeColor.style.backgroundColor = data.color;
    changeColor.setAttribute('value', data.color);
  });
This code grabs the button from popup.html and requests the color value from storage. It then applies the color as the background of the button. Include a script tag to popup.js in popup.html.
<!DOCTYPE html>
<html>
...
  <body>
    <button id="changeColor"></button>
    <script src="popup.js"></script>
  </body>
</html>
Reload the extension to view the green button.
Layer Logic
The extension now knows the popup should be available to users on developer.chrome.com and displays a colored button, but needs logic for further user interaction. Update popup.js to include the following code.
  let changeColor = document.getElementById('changeColor');
  ...
  changeColor.onclick = function(element) {
    let color = element.target.value;
    chrome.tabs.query({active: true, currentWindow: true}, function(tabs) {
      chrome.tabs.executeScript(
          tabs[0].id,
          {code: 'document.body.style.backgroundColor = "' + color + '";'});
    });
  };
The updated code adds an onclick event the button, which triggers a programatically injected content script. This turns the background color of the page the same color as the button. Using programmatic injection allows for user-invoked content scripts, instead of auto inserting unwanted code into web pages.
The manifest will need the activeTab permission to allow the extension temporary access to the tabs API. This enables the extension to call tabs.executeScript.
  {
    "name": "Getting Started Example",
  ...
    "permissions": ["activeTab", "declarativeContent", "storage"],
  ...
  }
The extension is now fully functional! Reload the extension, refresh this page, open the popup and click the button to turn it green! However, some users may want to change the background to a different color.
Give Users Options
The extension currently only allows users to change the background to green. Including an options page gives users more control over the extension's functionality, further customizing their browsing experience.
Start by creating a file in the directory called options.html and include the following code, or download it here.
  <!DOCTYPE html>
  <html>
    <head>
      <style>
        button {
          height: 30px;
          width: 30px;
          outline: none;
          margin: 10px;
        }
      </style>
    </head>
    <body>
      <div id="buttonDiv">
      </div>
      <div>
        <p>Choose a different background color!</p>
      </div>
    </body>
    <script src="options.js"></script>
  </html>
Then register the options page in the manifest,
  {
    "name": "Getting Started Example",
    ...
    "options_page": "options.html",
    ...
    "manifest_version": 2
  }
Reload the extension and click DETAILS.

Scroll down the details page and select Extension options to view the options page, although it will currently appear blank.

Last step is to add the options logic. Create a file called options.js in the extension directory with the following code, or download it here.
  let page = document.getElementById('buttonDiv');
  const kButtonColors = ['#3aa757', '#e8453c', '#f9bb2d', '#4688f1'];
  function constructOptions(kButtonColors) {
    for (let item of kButtonColors) {
      let button = document.createElement('button');
      button.style.backgroundColor = item;
      button.addEventListener('click', function() {
        chrome.storage.sync.set({color: item}, function() {
          console.log('color is ' + item);
        })
      });
      page.appendChild(button);
    }
  }
  constructOptions(kButtonColors);
Four color options are provided then generated as buttons on the options page with onclick event listeners. When the user clicks a button, it updates the color value in the extension's global storage. Since all of the extension's files pull the color information from global storage no other values need to be updated.
概述
Extensions are zipped bundles of HTML, CSS, JavaScript, images, and other files used in the web platform, that customize the Google Chrome browsing experience. Extensions are built using web technology and can use the same APIs the browser provides to the open web.
Extensions have a wide range of functional possibilities. They can modify web content users see and interact with or extend and change the behavior of the browser itself.
Consider extensions the gateway to making the Chrome browser the most personalized browser.
Extension Files
Extensions vary in types of files and amount of directories, but they are all required to have a manifest. Some basic, but useful, extensions may consist of just the manifest and its toolbar icon.
The manifest file, titled manifest.json, gives the browser information about the extension, such as the most important files and the capabilities the extension might use.
  {
    "name": "My Extension",
    "version": "2.1",
    "description": "Gets information from Google.",
    "icons": {
      "128": "icon_16.png",
      "128": "icon_32.png",
      "128": "icon_48.png",
      "128": "icon_128.png"
    },
    "background": {
      "persistent": false,
      "scripts": ["background_script.js"]
    },
    "permissions": ["https://*.google.com/", "activeTab"],
    "browser_action": {
      "default_icon": "icon_16.png",
      "default_popup": "popup.html"
    }
  }
Extensions must have an icon that sits in the browser toolbar. Toolbar icons allow easy access and keep users aware of which extensions are installed. Most users will interact with an extension that uses a popup by clicking on the icon.
 |
|
| This Google Mail Checker extension uses a browser action. | This Mappy extension uses a page action and content script. |
Referring to files
An extension's files can be referred to by using a relative URL, just as files in an ordinary HTML page.
<img src="images/my_image.png">
Additionally, each file can also be accessed using an absolute URL.
chrome-extension://<extensionID>/<pathToFile>
In the absolute URL, the <extensionID> is a unique identifier that the extension system generates for each extension. The IDs for all loaded extensions can be viewed by going to the URL chrome://extensions. The <pathToFile> is the location of the file under the extension's top folder; it matches the relative URL.
While working on an unpacked extension the extension ID can change. Specifically, the ID of an unpacked extension will change if the extension is loaded from a different directory; the ID will change again when the extension is packaged. If an extension's code relies on an absolute URL, it can use the chrome.runtime.getURL() method to avoid hardcoding the ID during development.
Architecture
An extension’s architecture will depend on its functionality, but many robust extensions will include multiple components:
Background Script
The background script is the extension's event handler; it contains listeners for browser events that are important to the extension. It lies dormant until an event is fired then performs the instructed logic. An effective background script is only loaded when it is needed and unloaded when it goes idle.
UI Elements
An extension's user interface should be purposeful and minimal. The UI should customize or enhance the browsing experience without distracting from it. Most extensions have a browser action or page action, but can contain other forms of UI, such as context menus, use of the omnibox, or creation of a keyboard shortcut.
Extension UI pages, such as a popup, can contain ordinary HTML pages with JavaScript logic. Extensions can also call tabs.create or window.open() to display additional HTML files present in the extension.
An extension using a page action and a popup can use the declarative content API to set rules in the background script for when the popup is available to users. When the conditions are met, the background script communicates with the popup to make it’s icon clickable to users.

Content scripts
Extensions that read or write to web pages utilize a content script. The content script contains JavaScript that executes in the contexts of a page that has been loaded into the browser. Content scripts read and modify the DOM of web pages the browser visits.

Content scripts can communicate with their parent extension by exchanging messages and storing values using the storage API.

Options Page
Just as extensions allow users to customize the Chrome browser, the options page enables customization of the extension. Options can be used to enable features and allow users to choose what functionality is relevant to their needs.
Using Chrome APIs
In addition to having access to the same APIs as web pages, extensions can also use extension-specific APIs that create tight integration with the browser. Extensions and webpages can both access the standard window.open() method to open a URL, but extensions can specify which window that URL should be displayed in by using the Chrome API tabs.create method instead.
Asynchronous vs. synchronous methods
Most Chrome API methods are asynchronous: they return immediately without waiting for the operation to finish. If an extension needs to know the outcome of an asynchronous operation it can pass a callback function into the method. The callback is executed later, potentially much later, after the method returns.
If the extension needed to navigate the user’s currently selected tab to a new URL, it would need to get the current tab’s ID and then update that tab’s address to the new URL.
If the tabs.query method were synchronous, it may look something like below.
  //THIS CODE DOESN'T WORK
  var tab = chrome.tabs.query({'active': true}); //WRONG!!!
  chrome.tabs.update(tab.id, {url:newUrl});
  someOtherFunction();
This approach will fail because query() is asynchronous. It returns without waiting for the work to complete, and does not return a value. A method is asynchronous when the callback parameter is available in its signature.
  // Signature for an asynchronous method
  chrome.tabs.query(object queryInfo, function callback)
To correctly query a tab and update its URL the extension must use the callback parameter.
  //THIS CODE WORKS
  chrome.tabs.query({'active': true}, function(tabs) {
    chrome.tabs.update(tabs[0].id, {url: newUrl});
  });
  someOtherFunction();
In the above code, the lines are executed in the following order: 1, 4, 2. The callback function specified to query() is called and then executes line 2, but only after information about the currently selected tab is available. This happens sometime after query() returns. Although update() is asynchronous the code doesn’t use a callback parameter, since the extension doesn’t do anything with the results of the update.
  // Synchronous methods have no callback option and returns a type of string
  string chrome.runtime.getURL()
This method synchronously returns the URL as a string and performs no other asynchronous work.
More details
For more information, explore the Chrome API reference docs and watch the following video.
Communication between pages
Different components in an extension often need to communicate with each other. Different HTML pages can find each other by using the chrome.extension methods, such as getViews() and getBackgroundPage(). Once a page has a reference to other extension pages the first one can invoke functions on the other pages and manipulate their DOMs. Additionally, all components of the extension can access values stored using the storage API and communicate through message passing.
Saving data and incognito mode
Extensions can save data using the storage API, the HTML5 web storage API , or by making server requests that result in saving data. When the extension needs to save something, first consider if it's from an incognito window. By default, extensions don't run in incognito windows.
Incognito mode promises that the window will leave no tracks. When dealing with data from incognito windows, extensions should honor this promise. If an extension normally saves browsing history, don't save history from incognito windows. However, extensions can store setting preferences from any window, incognito or not.
To detect whether a window is in incognito mode, check the incognito property of the relevant tabs.Tab or windows.Window object.
function saveTabData(tab) {
  if (tab.incognito) {
    return;
  } else {
    chrome.storage.local.set({data: tab.url});
  }
}
开发扩展
After reading the Getting Started tutorial and Overview, use this guide as an outline to extension components and abilities. Developers are encouraged to explore and expand extension functionality.
| Customize extension user interface | |
|---|---|
| Browser Actions | Add an icon, tooltip, badge, and popup to the toolbar. |
| Commands | Add keyboard shortcuts that trigger actions. |
| Context Menus | Add items to Google Chrome's context menu. |
| Omnibox | Add keyword functionality to the address bar. |
| Override Pages | Create a version of the New Tab, Bookmark, or History page. |
| Page Actions | Dynamically display icons in the toolbar. |
| Build extension utilities | |
|---|---|
| Accessibility (a11y) | Make an extension accessible to people with disabilities. |
| Background Scripts | Detect and react when something interesting happens. |
| Internationalization | Work with language and locale. |
| Identity | Get OAuth2 access tokens. |
| Management | Manage extensions that are installed and running. |
| Message Passing | Communicate from a content script to its parent extension, or vice versa. |
| Options Pages | Let users customize an extension. |
| Permissions | Modify an extension's permissions. |
| Storage | Store and retrieve data. |
| Modify and observe the Chrome Browser | |
|---|---|
| Bookmarks | Create, organize, and manipulate bookmark behavior. |
| Browsing Data | Remove browsing data from a user's local profile. |
| Downloads | Programmatically initiate, monitor, manipulate, and search for downloads. |
| Font Settings | Manage Chrome's font settings. |
| History | Interact with the browser's record of visited pages. |
| Privacy | Control Chrome privacy features. |
| Proxy | Manage Chrome's proxy settings. |
| Sessions | Query and restore tabs and windows from a browsing session. |
| Tabs | Create, modify, and rearrange tabs in the browser. |
| Top Sites | Access users most visited URLs. |
| Themes | Change the overall appearance of the browser. |
| Windows | Create, modify, and rearrange windows in the browser. |
| Modify and observe the web | |
|---|---|
| Active Tab | Securely access websites by removing most needs for <all_urls> host permission. |
| Content Settings | Customize websites features such as cookies, JavaScript, and plugins. |
| Content Scripts | Run JavaScript code in the context of web pages. |
| Cookies | Explore and modify the browser's cookie system. |
| Cross-Origin XHR | Use XMLHttpRequest to send and receive data from remote servers. |
| Declarative Content | Perform actions on the content of a page without requiring permission. |
| Desktop Capture | Capture content of screen, individual windows or tabs. |
| Page Capture | Save a tab's source information as MHTML. |
| Tab Capture | Interact with tab media streams. |
| Web Navigation | Status updates of navigation requests in-flight. |
| Web Request | Observe and analyze traffic. Intercept block, or modify requests in-flight. |
| Package, deploy and update | |
|---|---|
| Autoupdating | Update extensions automatically. |
| Hosting | Host extensions on Google or a designated server. |
| Other Deployment Options | Distribute extensions on a designated network or with other software. |
| Packaging | Create a .crx file to distribute an extension outside of the Chrome Webstore. |
| Expand Chrome DevTools | |
|---|---|
| Debugger | Instrument network interaction, debug JavaScript, mutate the DOM and CSS. |
| Devtools | Add features to Chrome Developer Tools. |
简单插件
https://developer.chrome.com/extensions/samples
Chrome插件网站
参考资料
官方文档:https://developer.chrome.com/extensions/devguide
中文文档:https://crxdoc-zh.appspot.com/extensions/devguide
参考博客:
https://www.cnblogs.com/rubekid/p/11769395.html
https://juejin.im/post/5c15091851882542026d89eb
https://blog.csdn.net/itpinpai/article/details/80348923
扫一扫关注我


 浙公网安备 33010602011771号