SPRING MICROSERVICES IN ACTION
What is microservice
背景
在微服务的概念成型之前,绝大部分基于WEB的应用都是使用单体的风格来进行构建的。在单体架构中,应用程序作为单个可部署的软件制品交付,
所有的UI(用户接口)、业务、数据库访问逻辑都被打包在一个应用程序中并且部署在一个应用服务器上。
随着单体应用的规模和复杂度的增长,在该应用上进行开发的团队的沟通与合作成本没有减少。
当各个团队需要修改代码时,整个应用程序都要重新构建、重新测试和部署。
起源
微服务的概念最初是在2014年前后蔓延到软件开发社区当中[马丁福勒]
微服务是一个小的、松耦合的分布式服务。微服务允许将一个大型应用分解为具有严格职责定义的便于管理的组件。
信奉的概念:分解分离的应用程序的功能,使他们完全彼此独立。
微服务架构具有以下特征
1.应用程序逻辑分解为具有明确定义了职责范围的细粒度组件、这些组件互相协调提供解决方案
2.每个组件都有一个小的职责领域、并且完全独立部署。可跨多个应用程序复用。
3.微服务通信基于一些基本的原则、采用HTTP和JSON轻量级通信协议,在消费者和服务者间进行数据交换。
4.构建在微服务上的应用程序能够使用多种编程语言和技术进行构建
5.小、独立、分布书、松耦合
为什么要改变构建应用的方式
1.其软件的复杂度上升
2.客户期待更快的交付
3.性能和可伸缩性
云到底是什么
基础设施即服务(Infrastructure as a Service )      IaaS
平台其服务(Platform as a Service )               PaaS
软件即服务 (Software as a Service )               SasS
容器即服务 (Container as a CaaS   )         CaaS
部署环境
1.物理服务器
2.虚拟机镜像
3.虚拟容器
微服务不只是编写代码
1.大小适中
2.位置透明
3.有弹性
4.可重复
5.可伸缩
核心微服务开发模式
服务粒度:
将业务划分为微服务
通信协议:
xml
json
thrift
接口设计:
如何设计实际的接口服务,便于开发人员进行服务调用
服务的配置管理:
如何管理微服务的配置,以便在不同的云环境之间移动时,不必要跟改核心应用程序代码或配置
服务之间的事件处理:
如何使用事件解藕微服务,以便最小化服务之间的硬编码依赖关系 ,并提高应用程序的弹性。
微服务路由模式
服务发现
如何使微服务变得可以被发现,以便将客户端应用程序在不需要将服务位置硬编码到应用程序中
服务路由
如何为所有的服务提供单个入口点,以便将安全策略和路由规则统一应用于微服务应用程序中的多个服务和服务实例
微服务客户端弹性模式
客户端负载均衡
如何在服务器客户端上缓存服务实例的位置,以便对微服务的多个实例调用负载均衡到该微服务的所有健康实例
断路器模式
如何阻止客户继续调用出现故障的或遭遇性能问题的服务
后备模式
当服务调用失败,如何提供“插件”机制,允许服务的客户端尝试通过调用微服务之外的其他方法来执行工作
舱壁模式
微服务应用程序采用多个分布式资源来执行工作
微服务安全日志
验证
如何确定调用服务的客户端就是他们声称的那个主体
授权
如何确定调用微服务的客户端是否允许执行他们正在进行的操作
凭证管理和传播
如何避免客户端每次都要提供凭据信息才能访问事物中涉及的服务调用
微服务日志记录和跟踪模式
日志关联
一个用户会调用多个服务,如何将这些服务所产生的日志关联到一起
日志聚合
将微服务(及其各个实例)生成的所有日志合并到一个可查询的数据库中以及使用关联ID来协助搜索聚合日志
微服务跟踪
将所有服务中的可视化客户端事物流程,事物所涉及的服务的性能特性
微服务构建和部署测试
构建和部署管道
如何构建一个可重复的构建和部署过程,只需一键即可构建和部署到组织中的任何环境
基础设施即代码
如何将服务的基础设施作为可在源代码下执行和管理的代码去对待
不可变服务
一旦创建了微服务镜像,如何确保它在部署之后永远不会更改
凤凰服务器
服务器运行时间越长就越发生配置漂移。如何确保微服务的服务器定期被拆卸,并重新创建一个不可变的镜像
使用Spring Cloud 构建微服务
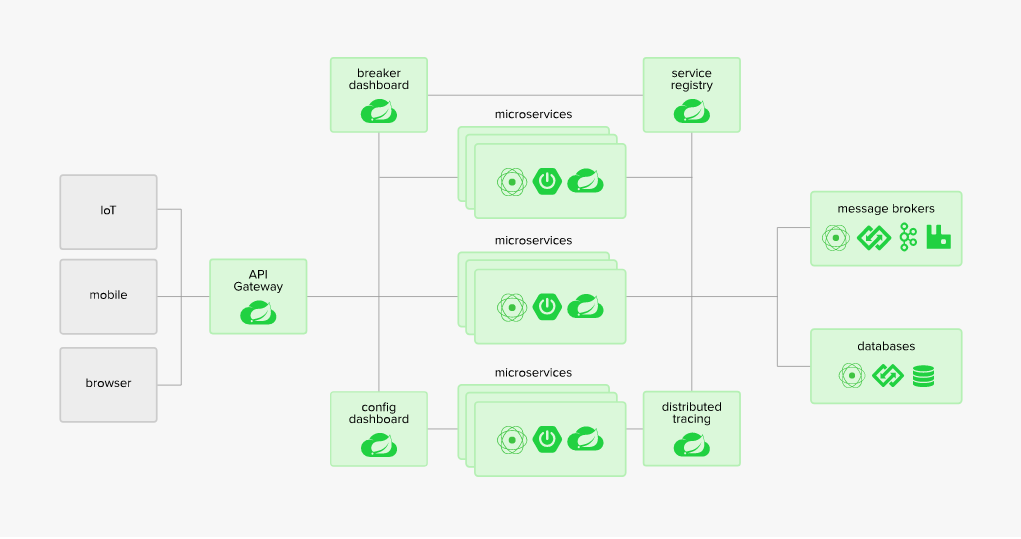
spring cloud config
spring cloud config 通过集中式服务来处理应用程序配置数据的管理,因此应用程序配置数据(特别是环境特定配置数据)与部署的微服务完全分离。这确保了无论启动多少个微服务实例,这些微服务实例始终都有相同的配置。spring cloud config 拥有自己的属性管理存储库,也可以与以下开源项目集成

Consul------是一个开源的服务发现工具,允许服务实例向该服务注册自己。服务客户端可以向Consul 咨询服务实例的位置。consul 还包括可以被spring cloud config使用的基于键值存储的数据库,能够用来存储应用程序的配置数据。

Eureka-----=是一个开源的Netflix项目,像Consul一样,提供类似的服务发现功能。Eureka同样有一个可以被Spring cloud config 使用的键值数据库。
spring cloud 服务发现
通过spring cloud 服务发现,开发人员可以从客户端消费的服务中抽象出部署服务器的物理位置(IP或者服务器名称)服务消费者通过逻辑名称而不是物理位置来调用服务器的业务逻辑。
spring cloud 服务发现也处理服务实例的注册和注销(在服务实例启动和关闭时)Spring cloud 服务法系可以使用Consul 和 Eureka作为服务发现引擎
spring cloud 与 Netflix Hystrix 和 Netflix Ribbon
spirng cloud 与 Netflix 的开源项目进行大量的整合,对于微服务客户端弹性模式,spring  cloud 封装了Netflix Hystrix 库和Netflix Ribbon 项目,开发人员可以轻松的在微服务中使用他们。

Netflix Hystrix库 ----> 可快速实现服务客户端弹性模式,如断路器模式,舱壁模式

Netflix Ribbo ----> 项目简化了与诸如Eureka这样的服务发现代理的集成,但他也为服务消费者提供了客户端对服务器的调用的负载均衡。即使在服务代理暂时不可用的情况下,客户端也可以进行服务调用。
spring cloud 与 Netflix Zuul
spring cloud 使用 Netflix Zuul 项目作为微服务应用程序提供服务路由功能。Zuul是代理服务请求的服务网关,确保在调用目标之前,对微服务的所有调用都经过一个前门,通过集中的服务调用,开发人员可以强制执行标准服务策略,如安全授权验证,内容过滤和路由规则
spring cloud stream
spring cloud stream 是一种可让开发人员轻松的将轻量级消息处理集成到微服务中的支持技术。
开发人员可以构建智能的微服务,它可以使用在应用程序中出现的异步事件,此外使用spirng cloud steam 可以快速将微服务与消息代理进行整合,如RabbitMQ、Kafka
spring cloud sleuth
spring cloud sleuth 允许将唯一跟踪标识符集成到应用程序所使用的HTTP调用和消息通道(RabbitMQ、Kafka)之中。这些跟踪ID能够让开发人员在事物流经应用程序中的不同服务时跟踪事务。有了spring cloud sleuth,这些跟踪ID将子自动添加到微服务生成的任何日志记录当中
spring cloud sleuth 与日志聚合技术工具(如:Parpertrail)和跟踪工具(如:Zipkin)结合时能够展现出真正的威力。
Papertail 是一个基于云的日志记录平台,用于将日志从不同的微服务实时聚合到一个可查询的数据库中。
Zipkin可以获取spring cloud sleuth 生成的数据,并允许开发人员可视化单个事物涉及的服务调用流程
spring cloud security
spirng cloud security 是一个验证和授权框架,可以控制哪些人可以服务服务,以及他们可以用服务做什么。
spring cloud security 是基于令牌的,允许服务通过验证服务器发出的令牌彼此进行通信。接收调用的每个服务可以检查HTTP调用中提供的令牌,以确认用户的身份以及用户对该服务的访问权限。

此外、spring cloud security 支持JWT , JWT 框架标准化了创建OAuth2令牌的格式,并为创建的令牌进行数字签名提供了标准。
实例代码


package com.mikey.microservicedemo;
import com.netflix.hystrix.contrib.javanica.annotation.HystrixCommand;
import org.springframework.boot.SpringApplication;
import org.springframework.boot.autoconfigure.SpringBootApplication;
import org.springframework.cloud.client.circuitbreaker.EnableCircuitBreaker;
import org.springframework.cloud.netflix.eureka.EnableEurekaClient;
import org.springframework.http.HttpMethod;
import org.springframework.http.ResponseEntity;
import org.springframework.web.bind.annotation.RequestMapping;
import org.springframework.web.bind.annotation.RestController;
import org.springframework.web.client.RestTemplate;

@SpringBootApplication
@RestController
@RequestMapping("hello")
@EnableCircuitBreaker//TODO:使服务能够使用 Hystrix 和 Ribbon 库
@EnableEurekaClient //TODO: 告诉服务,他因该使用Eureka服务发现来代理注册自身,并且服务调用是使用服务发现来“查找”远程服务的位置
public class MicroservicedemoApplication {

    public static void main(String[] args) {
        SpringApplication.run(MicroservicedemoApplication.class, args);
    }

    @HystrixCommand(threadPoolKey = "helloThreadPool")
    public String helloRemoteServiceCall(String fistName,String lastName) {//TODO:包装器使用Hystrix断路器调用helloRemoteServiceCall方法
        RestTemplate restTemplate = new RestTemplate();
        ResponseEntity<String> restExchange = restTemplate.exchange(
                "http://logical-service-id/name/[ca]{firstName}/{lastName}", //TODO:使用一个装饰好的RestTemplate类来获取一个“逻辑”服务ID,Eureka在幕后查找服务的物理位置
                HttpMethod.GET,
                null,
                String.class,
                fistName,lastName);
        return restExchange.getBody();
    }
}
本章小结
1.微服务是非常小的功能部件,负责一个特定的范围领域
2.微服务并没有行业标准,与其他早期的web服务协议不同,微服务采用原则导向的方法,并与REST和JSON的概念相一致!
3.编写微型服务很容易,但完全可以将其用于生产环境则需要额外的深谋远虑,微服务开发模式:核心开发模式,路由模式,客户端弹性模式,安全模式,日志记录和跟踪模式以及构建和部署模式。
4.虽然微服务和语言无关,两个Spring框架,spring boot 和 spring cloud 有助于构建微服务。
5.spring boot 用于简化基于REST的JSON微服务的构建,其目标是让用户只需要少量的注解,就能快速构建微服务。
6.spirng cloud 是Netflix 和 HashiCorp等公司开源技术的集合,他们已经用spring 注解进行了包装,从而显著简化了这些服务 的设置和配置。
使用Spring Boot 构建微服务
传统的软件制品细粒度有以下特点
1.紧耦合
2.有漏洞
3.单体的
基于微服务的架构具有以下特点
1.有约束的
2.松耦合的
3.抽象的
4.独立的
基于云应用程序特点
1.拥有庞大而多样化的用户群体
2.极高的运行时间要求
3.不均匀的容量需求
服务粒度划分思想
1.开始的时候可以让微服务涉及的范围跟广泛一些,然后将其重构到更小的服务
2.重点关注服务如何相互交互
3.随着对问题域的理解不断增长,服务的职责将随着时间的推移而改变
糟糕微服务的味道
1.服务承担过多的职责
2.该服务正在跨大量表来管理数据
3.测试用例过多
4.问题域的一部分像兔子一样繁殖
5.微服务彼此间严重相互依赖
6.微服务成为简单的CRUD
定义服务接口
1.拥抱REST的理念
2.使用URI来传达意图
3.请求和响应使用JSON
4.使用HTTP状态码来传达结果
何时不应该使用微服务
1.构建分布式系统的复杂性
2.虚拟服务器/容器散乱
3.应用程序的类型
4.数据事务和一致性
本章小结
1.要想通过微服务获得成功,需要综合架构师、软件开发人员、DevOps的视角
2.微服务是一种强大的架构范型、他有缺点和优点。并非所有的应用程序都应该所微服务应用程序。
3.从架构师的角度来看,微服务是小型的、独立的和分布式的。微服务应具有狭窄的边界,并管理一小组数据。
4.从开发人员的角度来看,微服务通常使用REST风格的设计构建,JSON作为服务发送和接收数据的净荷
5.Spring Boot是构建微服务的理想框架,因为它允许开发人员使用简单的注解即可构建基于REST的JSON服务
6.从DevOps的角度来看。微服务如何打包、部署和监控至关重要
7.开箱即用。Spring boot允许用户单个可执行JAR文件交付服务。JAR文件中的嵌入式Tomcat服务器承载该服务
8.Spring boot框架附带的Spring Actuator会公开有关服务运行健康状况信息以及有关服务运行时的信息
使用Spring Cloud配置服务器控制配置
管理配置
原则:
1.分离------>我们希望将服务配置信息与服务的实际物理部署完全分开。应用程序配置不应该与服务实例一起部署。相反,配置信息应该作为环境变量传递给正在启动的服务,或者在服务启动时从集中式存储库中读取。
2.抽象------>将访问配置数据的功能抽象到一个服务接口中。应用程序使用基于REST的JSON服务来检索配置数据,而不是编写直接访问服务存储库的代码(也就是从文件或者JDBC从数据库获取。
3.集中------>因为基于云的应用程序可能会有数百个服务,所以最小化用于保存配置信息的不同存储库的数量是至关重要的。将应用程序配置集中在尽可能少的存储库中。
4.稳定------>因为应用程序的配置信息与部署的访问完全隔离并集中存放,所以不管采用何种方案实现。至关重要的一点就是保证其高可用和英语冗余

关键点:将配置信息与实际代码分开之后,开发人员将创建一个需要进行管理和版本控制的外部依赖项。
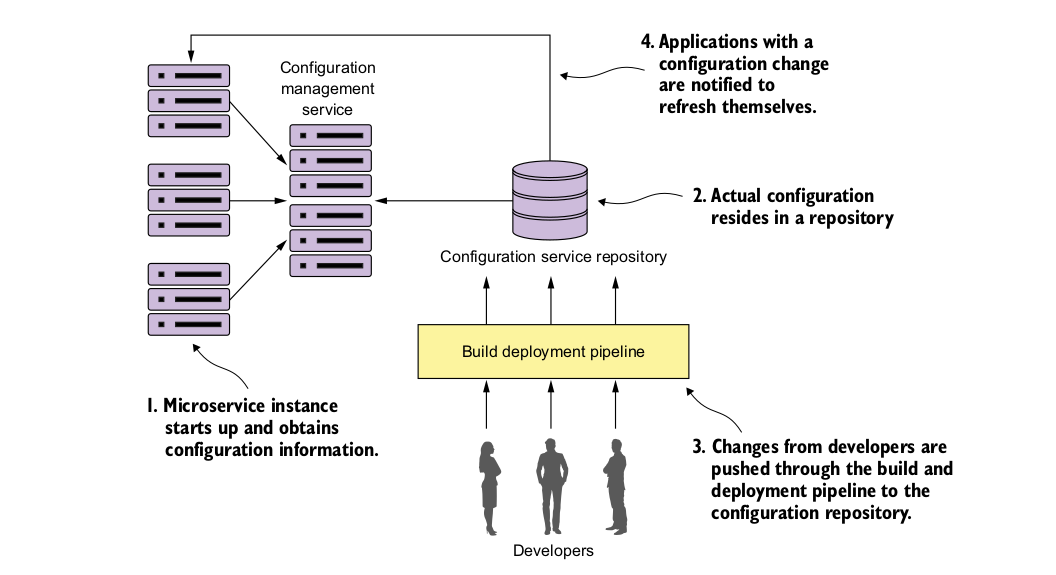
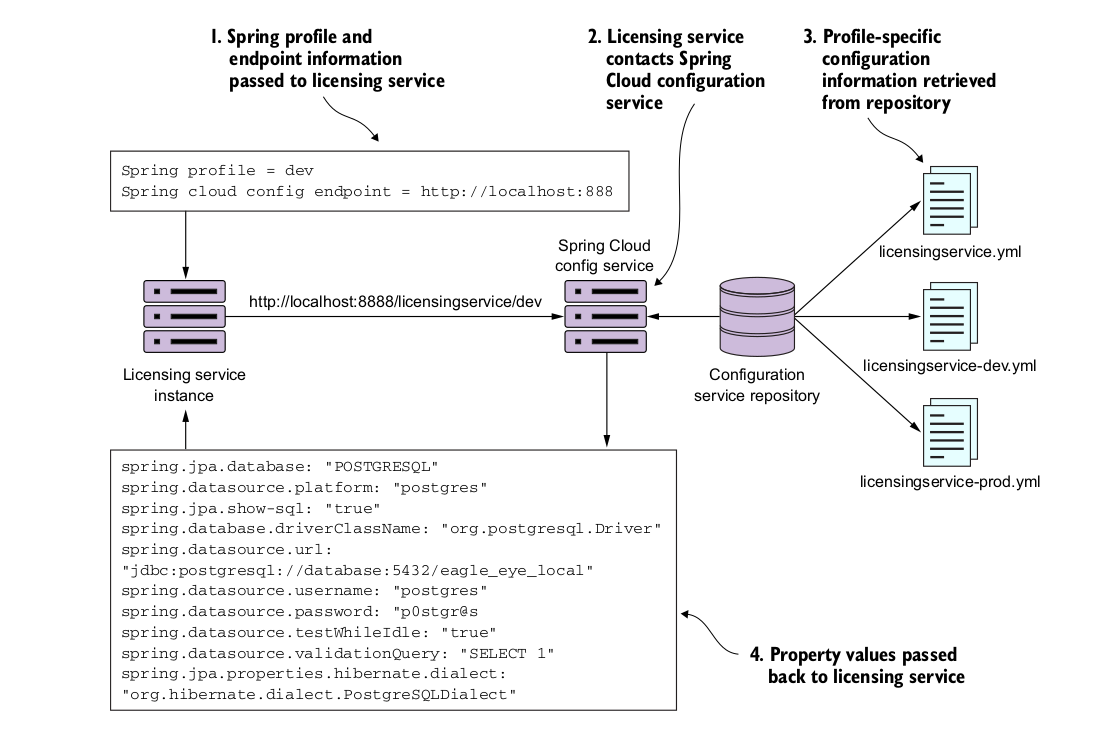
配置管理架构
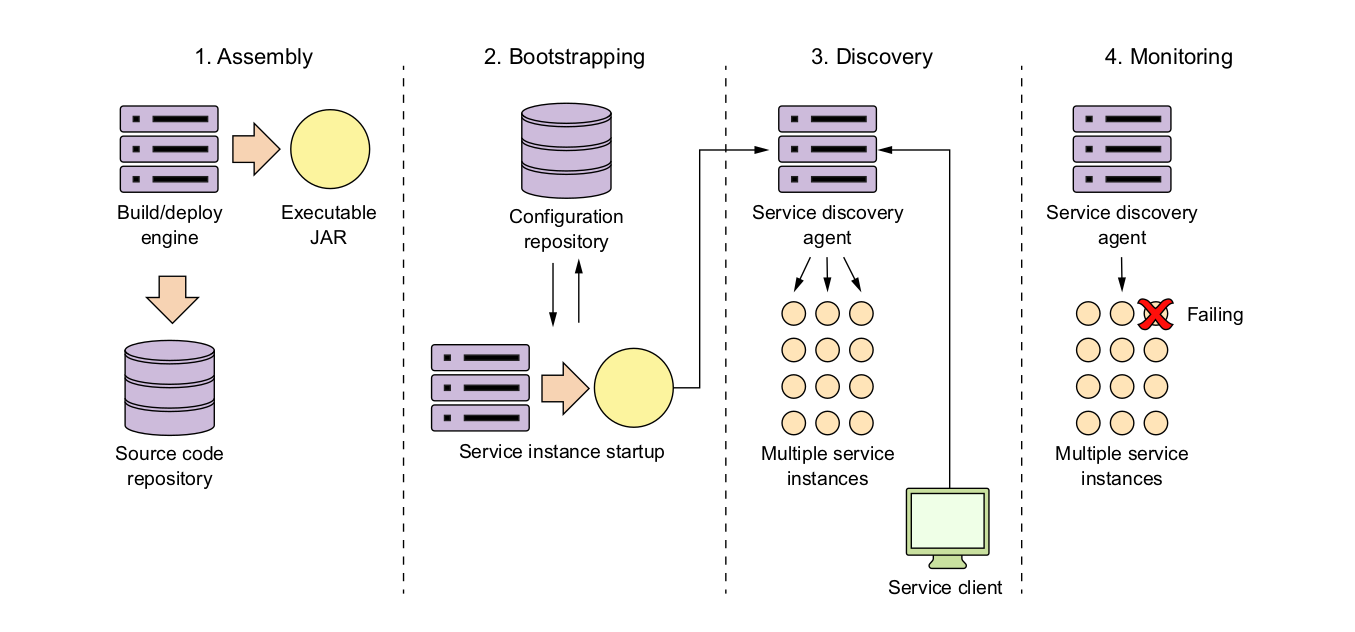
1.当一个微服务实例出现时,它将调用一个服务点来读取其所在环境的特定配置信息。配置管理的连接信息(连接凭证,服务端点)将在微服务启动时被传递给微服务
2.实际的配置信息驻留在存储库中,基于配置存储库的实现,可以选择使用不同的实现来保存配置数据。配置存储库的实现选择可以包括源代码控制下的文件,关系型数据库或键值数据库
3.应用程序配置数据的实际管理与应用程序的部署方式无关。配置管理的更改通常通过构建和部署管道来处理,其中配置的更改可以通过版本信息进行标记,并通过不同的环境进行部署
4.进行配置管理更改时,必须通知使用该应用程序配置数据的服务,并刷新应用程序数据的副本。
实现配置的选择
| Project Name | Descripton | Characteristics |
| Etcd |
Open source project written in Go. Used |
Very fast and scalable |
| Eureka |
Written by Netflix. Extremely battle-tested. |
Distribute key-value store. |
| Consul |
Written by Hashicorp. Similar to Etcd and |
Fast |
| ZooKeeper |
An Apache project that offers distributed |
Oldest, most battle-tested of the solutions |
| Spring Cloud configuration server |
An open source project that offers a |
Non-distributed key/value store |
需要完成的内容:
1.创建一个Spring Cloud配置服务器,并演示两种不同的机制来提供应用程序配置数据,一种使用文件系统,另一种使用Git存储库。
2.继续构建许可证服务以从数据库中检索数据
3.将Spring Cloud 配置服务挂钩(hook)到许可证服务,以提供应用程序配置数据。
构建Spring Cloud配置服务器
<?xml version="1.0" encoding="UTF-8"?>
<project xmlns:xsi="http://www.w3.org/2001/XMLSchema-instance" xmlns="http://maven.apache.org/POM/4.0.0" xsi:schemaLocation="http://maven.apache.org/POM/4.0.0 http://maven.apache.org/xsd/maven-4.0.0.xsd">
  <modelVersion>4.0.0</modelVersion>

  <groupId>com.thoughtmechanix</groupId>
  <artifactId>licensing-service</artifactId>
  <version>0.0.1-SNAPSHOT</version>
  <packaging>jar</packaging>

  <name>Eagle Eye Licensing Service</name>
  <description>Licensing Service</description>

  <parent>
    <groupId>org.springframework.boot</groupId>
    <artifactId>spring-boot-starter-parent</artifactId>
    <version>1.4.4.RELEASE</version>
  </parent>
  <dependencyManagement>
    <dependencies>
      <dependency>
        <groupId>org.springframework.cloud</groupId>
        <artifactId>spring-cloud-dependencies</artifactId>
        <version>Camden.SR5</version>
        <type>pom</type>
        <scope>import</scope>
      </dependency>
    </dependencies>
  </dependencyManagement>

  <dependencies>
    <dependency>
      <groupId>org.springframework.boot</groupId>
      <artifactId>spring-boot-starter-data-jpa</artifactId>
    </dependency>
    <dependency>
      <groupId>org.springframework.boot</groupId>
      <artifactId>spring-boot-starter-web</artifactId>
    </dependency>
    <dependency>
      <groupId>org.springframework.boot</groupId>
      <artifactId>spring-boot-starter-actuator</artifactId>
    </dependency>
    <dependency>
      <groupId>org.springframework.cloud</groupId>
      <artifactId>spring-cloud-starter-config</artifactId>
    </dependency>

    <dependency>
      <groupId>org.springframework.cloud</groupId>
      <artifactId>spring-cloud-config-client</artifactId>
    </dependency>
    <dependency>
      <groupId>com.h2database</groupId>
      <artifactId>h2</artifactId>
    </dependency>

    <dependency>
      <groupId>postgresql</groupId>
      <artifactId>postgresql</artifactId>
      <version>9.1-901.jdbc4</version>
    </dependency>
      <dependency>
        <groupId>org.springframework.security</groupId>
        <artifactId>spring-security-rsa</artifactId>
    </dependency>
  </dependencies>

  <properties>
    <project.build.sourceEncoding>UTF-8</project.build.sourceEncoding>
    <java.version>1.8</java.version>
    <project.build.sourceEncoding>UTF-8</project.build.sourceEncoding>
    <start-class>com.thoughtmechanix.licenses.Application</start-class>
    <docker.image.name>johncarnell/tmx-licensing-service</docker.image.name>
    <docker.image.tag>chapter3</docker.image.tag>
  </properties>

  <build>
     <plugins>
         <!-- We use the Resources plugin to filer Dockerfile and run.sh, it inserts actual JAR filename -->
         <!-- The final Dockerfile will be created in target/dockerfile/Dockerfile -->
         <plugin>
             <artifactId>maven-resources-plugin</artifactId>
             <executions>
                 <execution>
                     <id>copy-resources</id>
                     <!-- here the phase you need -->
                     <phase>validate</phase>
                     <goals>
                         <goal>copy-resources</goal>
                     </goals>
                     <configuration>
                         <outputDirectory>${basedir}/target/dockerfile</outputDirectory>
                         <resources>
                             <resource>
                                 <directory>src/main/docker</directory>
                                 <filtering>true</filtering>
                             </resource>
                         </resources>
                     </configuration>
                 </execution>
             </executions>
         </plugin>
         <plugin>
             <groupId>com.spotify</groupId>
             <artifactId>docker-maven-plugin</artifactId>
             <version>0.4.10</version>
             <configuration>
                 <imageName>${docker.image.name}:${docker.image.tag}</imageName>
                 <dockerDirectory>${basedir}/target/dockerfile</dockerDirectory>
                 <resources>
                     <resource>
                         <targetPath>/</targetPath>
                         <directory>${project.build.directory}</directory>
                         <include>${project.build.finalName}.jar</include>
                     </resource>
                 </resources>
             </configuration>
         </plugin>
         <plugin>
             <groupId>org.springframework.boot</groupId>
             <artifactId>spring-boot-maven-plugin</artifactId>
         </plugin>
     </plugins>
 </build>
</project>
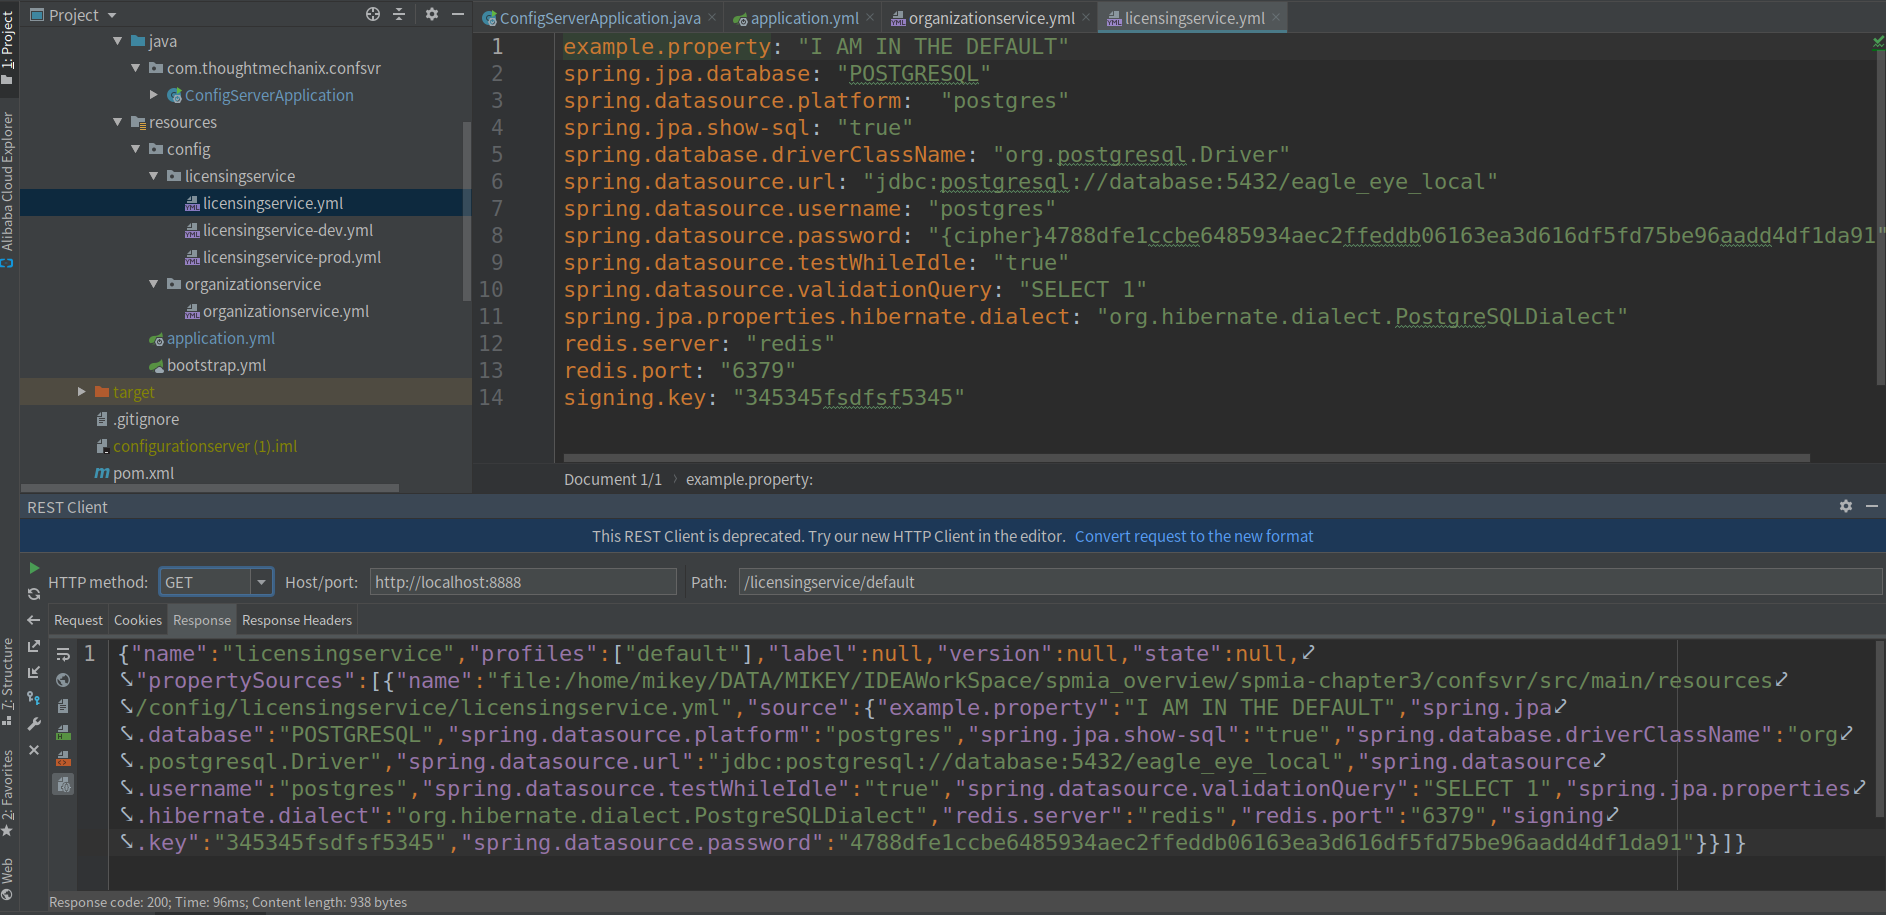
编写配置文件:
resources
--licensingservice
example.property: "I AM IN THE DEFAULT"
spring.jpa.database: "POSTGRESQL"
spring.datasource.platform: "postgres"
spring.jpa.show-sql: "true"
spring.database.driverClassName: "org.postgresql.Driver"
spring.datasource.url: "jdbc:postgresql://database:5432/eagle_eye_local"
spring.datasource.username: "postgres"
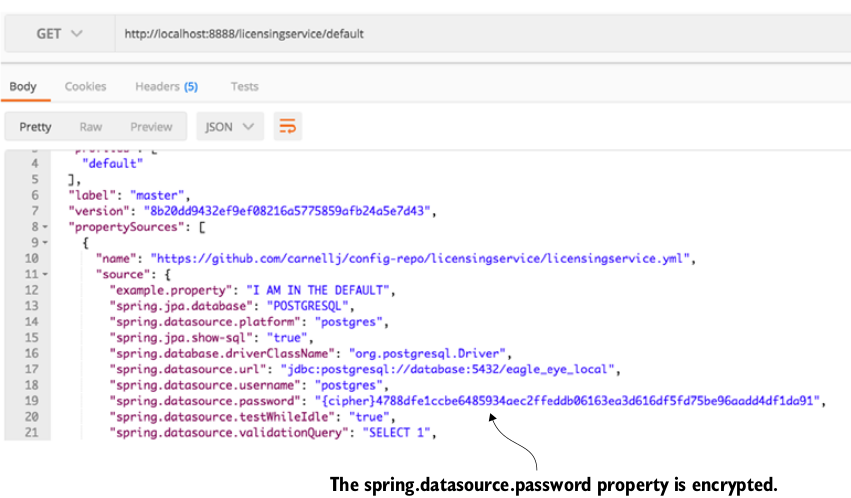
spring.datasource.password: "{cipher}4788dfe1ccbe6485934aec2ffeddb06163ea3d616df5fd75be96aadd4df1da91"
spring.datasource.testWhileIdle: "true"
spring.datasource.validationQuery: "SELECT 1"
spring.jpa.properties.hibernate.dialect: "org.hibernate.dialect.PostgreSQLDialect"
redis.server: "redis"
redis.port: "6379"
signing.key: "345345fsdfsf5345"
--organizationservice
example.organization.property: "I AM THE DEFAULT ORGANIZATION SERVICE"
值的注意的是:
在构建配置服务时,它将成为在环境中运行的另一个微服务。一旦建立配置服务,服务的内容就可以通过基于HTTP的REST端点进行访问。
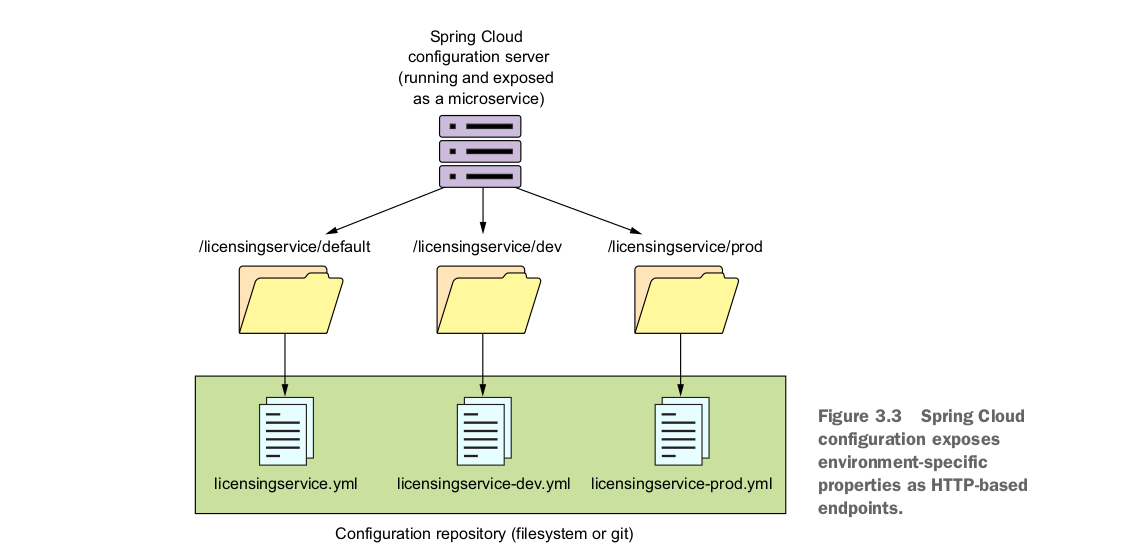
The naming convention for the application configuration files are appname-env.yml.

for example :
licensingservice.yml
licensingservice-dev.yml
licensingservice-prod.yml
创建Spring Cloud Config 引导类
package com.thoughtmechanix.confsvr;

import org.springframework.boot.SpringApplication;
import org.springframework.boot.autoconfigure.SpringBootApplication;
import org.springframework.cloud.config.server.EnableConfigServer;

@SpringBootApplication
@EnableConfigServer //TODO: 使服务成为Spring Cloud Config 服务
public class ConfigServerApplication {
    public static void main(String[] args) {
        SpringApplication.run(ConfigServerApplication.class, args);
    }
}
带有文件系统的Spring Cloud 配置服务器
###
Classpath and file-based solution
###

server:
   port: 8888
spring:
  profiles:
    active: native
  cloud:
     config:
       server:
           native:
              searchLocations: file://<chapter 3>/confsvr/src/main/resources/config/licensingservice,
                               file://<chapter 3>confsvr/src/main/resources/config/organizationservice
##              #searchLocations: classpath:config/,classpath:config/licensingservice
访问:
将Spirng Cloud Config 与 Spring Boot 客户端集成
1.建立许可证服务对Spring Cloud Config 服务器的依赖
<?xml version="1.0" encoding="UTF-8"?>
<project xmlns:xsi="http://www.w3.org/2001/XMLSchema-instance" xmlns="http://maven.apache.org/POM/4.0.0" xsi:schemaLocation="http://maven.apache.org/POM/4.0.0 http://maven.apache.org/xsd/maven-4.0.0.xsd">
  <modelVersion>4.0.0</modelVersion>

  <groupId>com.thoughtmechanix</groupId>
  <artifactId>licensing-service</artifactId>
  <version>0.0.1-SNAPSHOT</version>
  <packaging>jar</packaging>

  <name>Eagle Eye Licensing Service</name>
  <description>Licensing Service</description>

  <parent>
    <groupId>org.springframework.boot</groupId>
    <artifactId>spring-boot-starter-parent</artifactId>
    <version>1.4.4.RELEASE</version>
  </parent>
  <dependencyManagement>
    <dependencies>
      <dependency>
        <groupId>org.springframework.cloud</groupId>
        <artifactId>spring-cloud-dependencies</artifactId>
        <version>Camden.SR5</version>
        <type>pom</type>
        <scope>import</scope>
      </dependency>
    </dependencies>
  </dependencyManagement>

  <dependencies>
<!--      告诉Springboot将要在服务中使用Java Persistence Api (jpa)-->
    <dependency>
      <groupId>org.springframework.boot</groupId>
      <artifactId>spring-boot-starter-data-jpa</artifactId>
    </dependency>
    <dependency>
      <groupId>org.springframework.boot</groupId>
      <artifactId>spring-boot-starter-web</artifactId>
    </dependency>
    <dependency>
      <groupId>org.springframework.boot</groupId>
      <artifactId>spring-boot-starter-actuator</artifactId>
    </dependency>
    <dependency>
      <groupId>org.springframework.cloud</groupId>
      <artifactId>spring-cloud-starter-config</artifactId>
    </dependency>
<!--      告诉springboot拉取spring cloud config 客户端所需的所有依赖-->
    <dependency>
      <groupId>org.springframework.cloud</groupId>
      <artifactId>spring-cloud-config-client</artifactId>
    </dependency>
    <dependency>
      <groupId>com.h2database</groupId>
      <artifactId>h2</artifactId>
    </dependency>
<!--      告诉springboot拉取Postgres Jdbc驱动器-->
    <dependency>
      <groupId>postgresql</groupId>
      <artifactId>postgresql</artifactId>
      <version>9.1-901.jdbc4</version>
    </dependency>
      <dependency>
        <groupId>org.springframework.security</groupId>
        <artifactId>spring-security-rsa</artifactId>
    </dependency>
  </dependencies>

  <properties>
    <project.build.sourceEncoding>UTF-8</project.build.sourceEncoding>
    <java.version>1.8</java.version>
    <project.build.sourceEncoding>UTF-8</project.build.sourceEncoding>
    <start-class>com.thoughtmechanix.licenses.Application</start-class>
    <docker.image.name>johncarnell/tmx-licensing-service</docker.image.name>
    <docker.image.tag>chapter3</docker.image.tag>
  </properties>

  <build>
     <plugins>
         <!-- We use the Resources plugin to filer Dockerfile and run.sh, it inserts actual JAR filename -->
         <!-- The final Dockerfile will be created in target/dockerfile/Dockerfile -->
         <plugin>
             <artifactId>maven-resources-plugin</artifactId>
             <executions>
                 <execution>
                     <id>copy-resources</id>
                     <!-- here the phase you need -->
                     <phase>validate</phase>
                     <goals>
                         <goal>copy-resources</goal>
                     </goals>
                     <configuration>
                         <outputDirectory>${basedir}/target/dockerfile</outputDirectory>
                         <resources>
                             <resource>
                                 <directory>src/main/docker</directory>
                                 <filtering>true</filtering>
                             </resource>
                         </resources>
                     </configuration>
                 </execution>
             </executions>
         </plugin>
         <plugin>
             <groupId>com.spotify</groupId>
             <artifactId>docker-maven-plugin</artifactId>
             <version>0.4.10</version>
             <configuration>
                 <imageName>${docker.image.name}:${docker.image.tag}</imageName>
                 <dockerDirectory>${basedir}/target/dockerfile</dockerDirectory>
                 <resources>
                     <resource>
                         <targetPath>/</targetPath>
                         <directory>${project.build.directory}</directory>
                         <include>${project.build.finalName}.jar</include>
                     </resource>
                 </resources>
             </configuration>
         </plugin>
         <plugin>
             <groupId>org.springframework.boot</groupId>
             <artifactId>spring-boot-maven-plugin</artifactId>
         </plugin>
     </plugins>
 </build>
</project>
2.配置许可证服务以使用Spring Cloud Config
spring: #三个必要配置的属性
  application:
    name: licensingservice #指定许可证服务的名称,以便Spring Cloud Config 客户端知道正在查找哪个服务
  profiles:
    active:
      default #指定服务应运行的默认profile oprofile映射到环境
  cloud:
    config:
      uri: http://localhost:8888 #指定Spring cloud config 服务器的位置
3.使用Spring Cloud 配置服务器连接数据源
https://github.com/carnellj/spmia-chapter3
4.使用@Value注解直接读取属性
package com.thoughtmechanix.licenses.config;

import org.springframework.beans.factory.annotation.Value;
import org.springframework.stereotype.Component;

@Component
public class ServiceConfig{

  @Value("${example.property}")
  private String exampleProperty;

  public String getExampleProperty(){
    return exampleProperty;
  }
}
5.使用Spring Cloud 配置服务器和Git
server:
  port: 8888
spring:
  cloud:
    config:
      server:
        encrypt.enabled: false
        git:
          uri: https://github.com/carnellj/config-repo/
          searchPaths: licensingservice,organizationservice
          username: native-cloud-apps
          password: 0ffended
6.使用Spring Cloud 配置服务器刷新属性
package com.thoughtmechanix.licenses;

import org.springframework.boot.autoconfigure.EnableAutoConfiguration;
import org.springframework.boot.SpringApplication;
import org.springframework.boot.autoconfigure.SpringBootApplication;
import org.springframework.cloud.context.config.annotation.RefreshScope;

@SpringBootApplication
@RefreshScope //TODO:配置服务器刷新属性
public class Application {
    public static void main(String[] args) {
        SpringApplication.run(Application.class, args);
    }
}
保护敏感信息
默认情况下,spring cloud 配置服务器在应用程序配置文件中以纯文本格式存储所有属性,包括像数据库凭据这样的敏感信息。

Spring Cloud Config 支持使用对称加密(共享密钥)和非对称加密(公钥/私钥)
1.下载并安装加密所需的Oracle JCE jar
适用java8 JCE 下载地址: https://www.oracle.com/technetwork/java/javase/downloads/jce8-download-2133166.html
解压:unzip -O CP936 jce_policy-8.zip

查看安装教程
cat README.txt
----------------------------------------------------------------------
Installation
----------------------------------------------------------------------

Notes:

  o Unix (Solaris/Linux/Mac OS X) and Windows use different pathname
    separators, so please use the appropriate one ("\", "/") for your
    environment.

  o <java-home> (below) refers to the directory where the JRE was
    installed. It is determined based on whether you are running JCE
    on a JRE or a JRE contained within the Java Development Kit, or
    JDK(TM). The JDK contains the JRE, but at a different level in the
    file hierarchy. For example, if the JDK is installed in
    /home/user1/jdk1.8.0 on Unix or in C:\jdk1.8.0 on Windows, then
    <java-home> is:

        /home/user1/jdk1.8.0/jre           [Unix]
        C:\jdk1.8.0\jre                    [Windows]

    If on the other hand the JRE is installed in /home/user1/jre1.8.0
    on Unix or in C:\jre1.8.0 on Windows, and the JDK is not
    installed, then <java-home> is:

        /home/user1/jre1.8.0               [Unix]
        C:\jre1.8.0                        [Windows]

  o On Windows, for each JDK installation, there may be additional
    JREs installed under the "Program Files" directory. Please make
    sure that you install the unlimited strength policy JAR files
    for all JREs that you plan to use.


Here are the installation instructions:

1)  Download the unlimited strength JCE policy files.

2)  Uncompress and extract the downloaded file.

    This will create a subdirectory called jce.
    This directory contains the following files:

        README.txt                   This file
        local_policy.jar             Unlimited strength local policy file
        US_export_policy.jar         Unlimited strength US export policy file

3)  Install the unlimited strength policy JAR files.

    In case you later decide to revert to the original "strong" but
    limited policy versions, first make a copy of the original JCE
    policy files (US_export_policy.jar and local_policy.jar). Then
    replace the strong policy files with the unlimited strength
    versions extracted in the previous step.

    The standard place for JCE jurisdiction policy JAR files is:

        <java-home>/lib/security           [Unix]
        <java-home>\lib\security           [Windows]

2.创建加密密钥
关于对称密钥,要注意以下几点:
1.对称密钥的长度应该是12个或更多字符,最好是一个随机的字符集。
2.不要丢失对称密钥。一旦使用加密密钥加密某些东西,如果没有对称密钥就无法解密。
对称加密密钥 环境变量
export ENCRYPT_KEY = IMSYMMETRIC
3.加密和解密属性
在启动Spring Cloud Config 实例时,Spring Cloud Config 将检测到环境变量ENVRYPT_KEY 已设置,并自动将两个新端点(/ecrypt和/decrypt)添加到Spring Cloud Config 服务。我们将使用/encrypr端点进行加密。
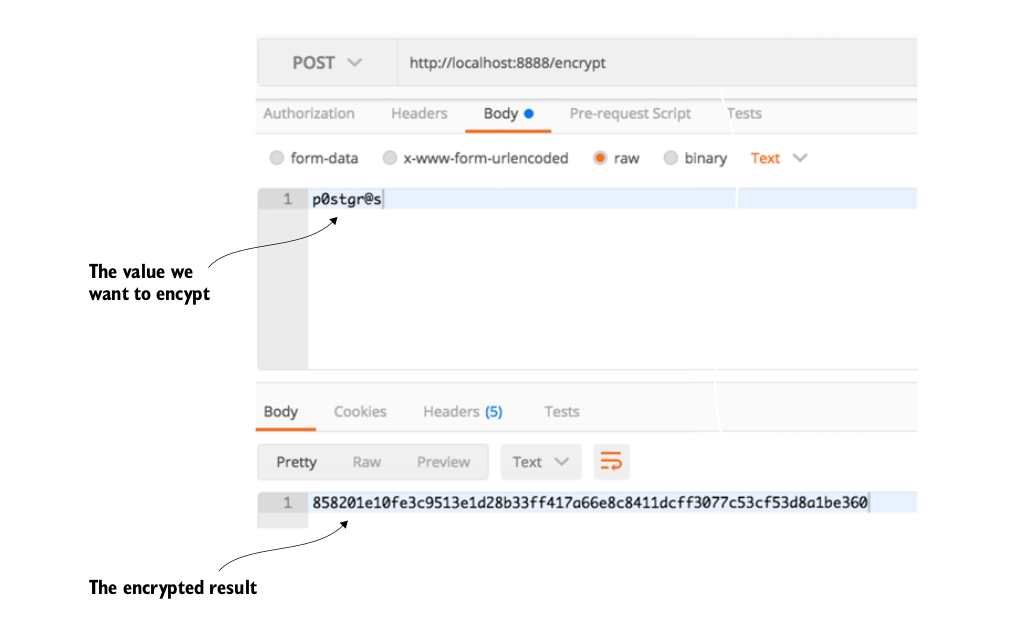
要解密这个值,可以使用/decrypt端点,在调用中传递已加密的字符串。
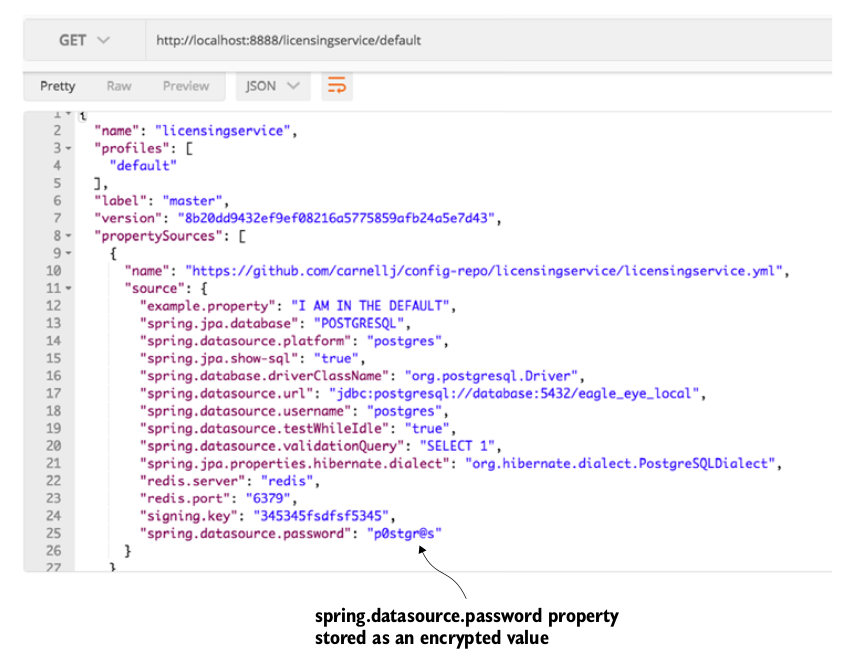
现在可以使用以下语法将已加密的属性添加到Github或基于文件系统的许可证服务的配置文件中

spring cloud config 服务器要求所有已加密的属性前加上{cipher}。{cipher}告诉spirng cloud config 它正在处理已加密的值,启动Spring cloud config 服务器,并使用GET方法访问:
http://loaclhost:8888/licensingservice/default
但是访问default时还是以明文的形式传递
4.配置微服务以在客户端使用加密
要让客户端对属性进行加密,需要做以下三件事情:
1.配置Spring Cloud Config 不要在服务器端解密属性
2.在许可证服务器上设置对称密钥
3.将spring-security-rsa  JAR 添加到许可证服务的pom.xml文件中
1.配置Spring Cloud Config 不要在服务器端解密属性
spring:
  cloud:
    config:
      server:
        encrypt.enabled: false  #配置Spring Cloud Config 不要在服务器端解密属性
2.在许可证服务器上设置对称密钥
因为许可证服务现在负责解密已经加密的属性,所以需要在许可证服务上设置对称加密,方法是确保ENCRYPT_KEY 环境变量与Spring Cloud Config 服务器使用的对称密钥相同(如IMSYMMETRIC)
3.将spring-security-rsa JAR 添加到许可证服务的pom.xml文件中
<dependency>
<groupId>org.springframework.security</groupId>
<artifactId>spring-security-rsa</artifactId>
</dependency>
4.结果
本章小结
1.Spring Cloud 配置服务器允许使用特定值创建应用程序属性
2.Spring  使用 Spring profile 来启动服务,以确定要从 Spring Cloud Config 服务检索哪些环境变量属性。
3.Spring Cloud 配置服务可以使用基于文件或者Git的应用程序配置存储库来存储应用程序属性。
4.Spring Cloud 配置服务运行使用对称加密和非对称加密对敏感属性文件进行加密。
服务发现
服务模型
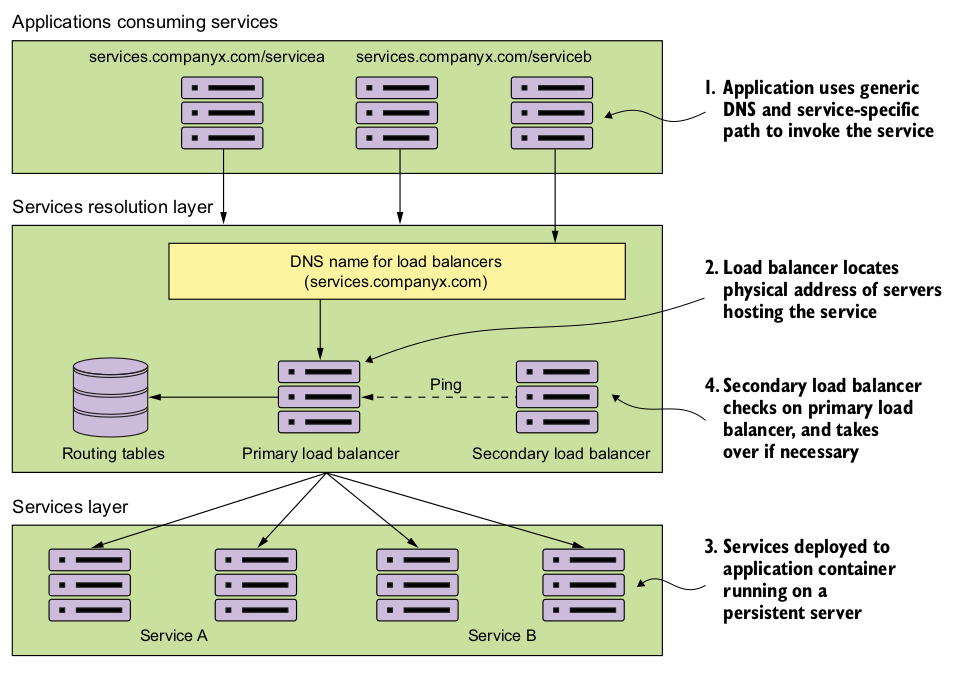
这种模型适用于在企业数据中心内部运行的应用程序,以及在一组静态服务器上运行少量服务的情况,但对基于云的微服务应用程序来说,这种模型并不适用
原因:
1.单点故障------虽然负载均衡可以实现高可用,但这是整个基础设施的单点故障
2.有限的水平可伸缩------在服务器集群中到单个负载均衡集群的情况下,跨多个服务器水平伸缩负载均衡基础设施的能力有限。
3.静态管理------大多数传统的负载均衡器不是为快速注册和注销服务设计的,他们使用集中式数据库来存储规则的路由,添加新路由的唯一方法通常是通过供应商专有API(Application Programming Interface 应用程序编程接口)来进行添加。
4.复杂------由于负载均衡器充当服务的代理,它必须将服务消费者的请求映射到物理服务。
云中的服务发现
特点
1.高可用------服务发现需要能够支持“热”集群环境,在服务发现集群中可以跨多个节点共享服务查找。如果一个节点变得不可用,集群的其他节点应该能够接管工作
2.点对点------服务发现集群中的每个节点共享服务实例的状态
3.负载均衡------服务发现需要在所有的服务实例之间动态的对请求进行负载均衡,以确保服务调用分布在由它管理的所有服务实例上。在许多方面,服务发现取代了许多早期Web应用程序实现中使用的跟静态的、手动管理的负载均衡器
4.有弹性------服务发现的客户端应该在本地“缓存”服务信息。本地缓存允许服务发现功能逐步降级,这样如果服务发现服务变得不可用,应用程序仍然可以基于本地缓存中维护的信息来运行和定位服务。
5.容错------服务发现需要检测出服务实例什么时候是不健康的,并从可以接收客户端请求的可用服务列表中移除该实例。服务发现应该在没有人为干预的情况下,对这些故障进行检测,并采取行动。
6.了解基于云的服务发现代理的工作方式的概念架构
7.展示即使在服务发现代理不可用时,客户端缓存和负载均衡如何使服务能继续发挥作用
8.了解然后使用Spring Cloud 和 Netflix的Eureka服务发现代理实现服务发现功能
1.服务发现架构
服务注册
服务地址的客户端查找
信息共享
健康检测
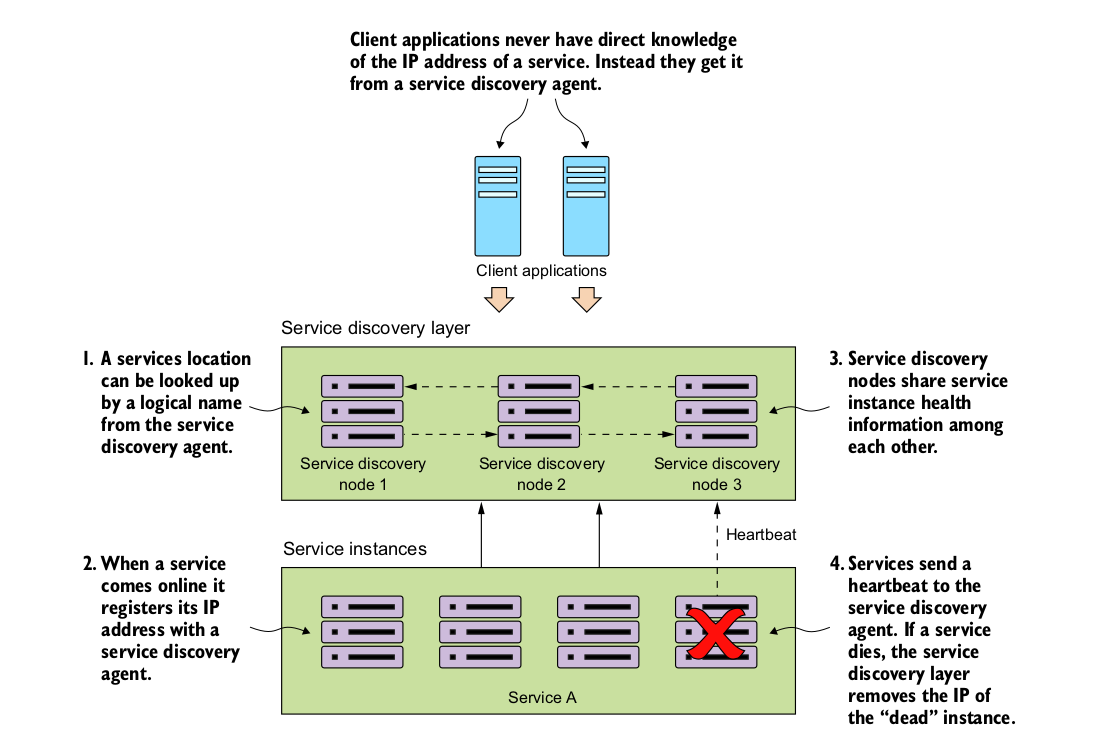
服务通常只在一个服务发现实例中进行注册。大多数服务发现的实现使用数据传播的点对点模型,每个服务实例的数据都被传递到服务发现集群中的所有其他节点。

每个服务实例将通过服务发现服务去推送服务实例状态,或者服务发现服务从服务实例拉取状态。任何未能返回良好的健康检查信息的服务都将从服务实例池中删除。

分析:
服务在向服务发现服务进行注册之后,这个服务就可以被需要使用这项服务功能的应用程序或其他服务使用,客户端可以使用不同的模型来发现服务,在每次调用服务时,
客户端可以只依赖于服务发现引擎来解析服务位置,使用这种方法,每次调用注册的微服务实例时,服务发现引擎就会被调用。但是,这种方法很脆弱,因为服务客户端
完全依赖服务发现引擎来查找和调用服务。
  一种更健壮的方法是使用所谓的客户端负载均衡,如下

在这个模型中,当服务消费者需要调用一个服务时:
1.它将联系服务发现服务,获取它请求的所有服务实例,然后在服务消费者的机器上本地缓存数据。
2.每当客户端需要调用该服务时,服务消费者将从缓存中查找该服务的位置信息。通常客户端缓存将使用简单负载均衡算法,如:轮询负载均衡算法,以确保服务调用分布在多个服务实例之间。
3.然后,客户端将定期与服务发现服务进行联系,并刷新服务实例的缓存。客户端缓存最终会一致,但是始终存在这样的风险:
    客户端联系服务发现实例以进行刷新和调用时,调用可能胡会被定向到不健康的服务器上。
如果在调用服务的过程中,服务调用失败,那么本地的服务发现缓存将失效,服务发现客户端,将尝试从服务发现代理刷新数据
2.使用Spring 和 Netflix Eureka进行服务发现实战
创建一个服务发现代理来实现服务发现,然后通过代理注册两个服务。接着通过使用服务发现检索到的信息,让一个服务调用另一个服务。
服务发现:spring cloud 和 Netflix 的Eureka
负载均衡:spirng cloud 和 Netflix 的Ribbon
过程图:

1.随着服务的启动,许可证和组织服务将通过Eureka服务进行注册。这个注册过程将告诉Eureka每个服务实例的物理位置和端口号,以及正在启动的服务的服务ID。
2.当许可证服务调用组织服务时,许可证服务将使用Netflix Ribbon 库来提供客户端负载均衡。Ribbon将联系Eureka服务去检索服务位置信息,然后在本地进行缓存。
3.Netflix Ribbon库将定期对Eureka服务进行ping操作,并刷新服务位置的本地缓存。任何新的组织服务实例现在都将在本地对许可证服务可见,而任何不健康实例都将从本地缓存中移除。
3.构建Spring Eureka服务
<?xml version="1.0" encoding="UTF-8"?>
<project xmlns:xsi="http://www.w3.org/2001/XMLSchema-instance" xmlns="http://maven.apache.org/POM/4.0.0" xsi:schemaLocation="http://maven.apache.org/POM/4.0.0 http://maven.apache.org/xsd/maven-4.0.0.xsd">
  <modelVersion>4.0.0</modelVersion>

  <groupId>com.thoughtmechanix</groupId>
  <artifactId>eurekasvr</artifactId>
  <version>0.0.1-SNAPSHOT</version>
  <packaging>jar</packaging>

  <name>Eureka Server</name>
  <description>Eureka Server demo project</description>

  <parent>
    <groupId>org.springframework.boot</groupId>
    <artifactId>spring-boot-starter-parent</artifactId>
    <version>1.4.4.RELEASE</version>
  </parent>
  <dependencyManagement>
    <dependencies>
      <dependency>
        <groupId>org.springframework.cloud</groupId>
        <artifactId>spring-cloud-dependencies</artifactId>
        <version>Camden.SR5</version>
        <type>pom</type>
        <scope>import</scope>
      </dependency>
    </dependencies>
  </dependencyManagement>

  <dependencies>
    <dependency>
      <groupId>org.springframework.cloud</groupId>
      <artifactId>spring-cloud-starter-eureka-server</artifactId>
    </dependency>
  </dependencies>

  <!--Docker build Config-->
  <properties>
    <project.build.sourceEncoding>UTF-8</project.build.sourceEncoding>
    <start-class>com.thoughtmechanix.eurekasvr.EurekaServerApplication</start-class>
    <java.version>1.8</java.version>
    <docker.image.name>johncarnell/tmx-eurekasvr</docker.image.name>
    <docker.image.tag>chapter4</docker.image.tag>
  </properties>

  <build>
     <plugins>
         <!-- We use the Resources plugin to filer Dockerfile and run.sh, it inserts actual JAR filename -->
         <!-- The final Dockerfile will be created in target/dockerfile/Dockerfile -->
         <plugin>
             <artifactId>maven-resources-plugin</artifactId>
             <executions>
                 <execution>
                     <id>copy-resources</id>
                     <!-- here the phase you need -->
                     <phase>validate</phase>
                     <goals>
                         <goal>copy-resources</goal>
                     </goals>
                     <configuration>
                         <outputDirectory>${basedir}/target/dockerfile</outputDirectory>
                         <resources>
                             <resource>
                                 <directory>src/main/docker</directory>
                                 <filtering>true</filtering>
                             </resource>
                         </resources>
                     </configuration>
                 </execution>
             </executions>
         </plugin>
         <plugin>
             <groupId>com.spotify</groupId>
             <artifactId>docker-maven-plugin</artifactId>
             <version>0.4.10</version>
             <configuration>
                 <imageName>${docker.image.name}:${docker.image.tag}</imageName>
                 <dockerDirectory>${basedir}/target/dockerfile</dockerDirectory>
                 <resources>
                     <resource>
                         <targetPath>/</targetPath>
                         <directory>${project.build.directory}</directory>
                         <include>${project.build.finalName}.jar</include>
                     </resource>
                 </resources>
             </configuration>
         </plugin>
         <plugin>
             <groupId>org.springframework.boot</groupId>
             <artifactId>spring-boot-maven-plugin</artifactId>
         </plugin>
     </plugins>
 </build>

</project>
#Default port is 8761
server:
  port: 8761 #Eureka 服务器将要监听的端口

eureka:
  client:
    registerWithEureka: false #不要使用Eureka服务进行注册
    fetchRegistry: false #不要在本地缓存注册表信息
  server:
    waitTimeInMsWhenSyncEmpty: 5 #在服务器接收请求之前等待的初始时间
  serviceUrl:
    defaultZone: http://localhost:8761
package com.thoughtmechanix.eurekasvr;

import org.springframework.boot.SpringApplication;
import org.springframework.boot.autoconfigure.SpringBootApplication;
import org.springframework.cloud.netflix.eureka.server.EnableEurekaServer;

@SpringBootApplication
@EnableEurekaServer
public class EurekaServerApplication {
    public static void main(String[] args) {
        SpringApplication.run(EurekaServerApplication.class, args);
    }
}
每次服务注册需要30s的时间才能显示在Eureka服务中,因为Eureka需要从服务器接收三次连续心跳包ping,每次心跳包ping间隔10s,然后才能使用这个服务。
4.通过Spring Eureka注册服务
引入Eureka库,以便可以使用Eureka注册服务
<dependency>
<groupId>org.springframework.cloud</groupId>
<artifactId>spring-cloud-starter-eureka</artifactId>
</dependency>
eureka:
  instance:
    preferIpAddress: true #注册服务的IP而不是服务名称
  client:
    registerWithEureka: true #向Eureka注册服务
    fetchRegistry: true
    serviceUrl: #拉取注册表的本地副本
        defaultZone: http://localhost:8761/eureka/ #Eureka服务的位置
spring:
  application:
    name: organizationservice  #将使用Eureka注册的服务的逻辑名称
  profiles:
    active:
      default
  cloud:
    config:
      enabled: true
为什么偏向于IP地址
在默认情况下,Eureka在尝试注册服务时,将会使用主机名让外界与它进行联系。这种方式,在基于服务器的环境中运行良好,在这样的环境中,服务将被分配一个DNS支持的主机名。但是在基于容器的部署中(如Docker),容器将以随机生成的主机名启动,并且该容器没有DNS记录。
如果没有将eureka.instance.preperIpAddress设置为true,那么客户端将无法正确的解析主机名的位置,因为该容器不存在DNS记录,设置preferIpAddress属性将通知Eureka服务,客户端想要通过IP地址进行通告。

eureka.client.registerWithEureka属性是一个触发器,它可以告诉组织服务通过Eureka注册本身。
这个属性用于告知Spring Eureka客户端以获取注册表的本地副本。将此属性设置为true将在本地缓存注册表,而不是每次查找服务都调用Eureka服务。每隔30s,客户端软件就会重新联系Eureka服务以便查看注册表是否有任何变化

eureka.serviceUrl.defaultZone包含客户端用于解析服务位置的Eureka服务的列表,该列表以逗号进行分隔
Eureka高可用
建立多个URL服务并不足以实现高可用。eureka.serviceUrl.defaultZone属性仅为客户端提供一个进行通信的Eureka服务列表。除此之外还需要建立多个Eureka服务,以便相互复制注册表的内容。
一组Eureka注册表相互之间使用点对点通信模型进行通信,在这种模型中,必须对每个Eureka服务进行配置,以了解集群中的其他节点。
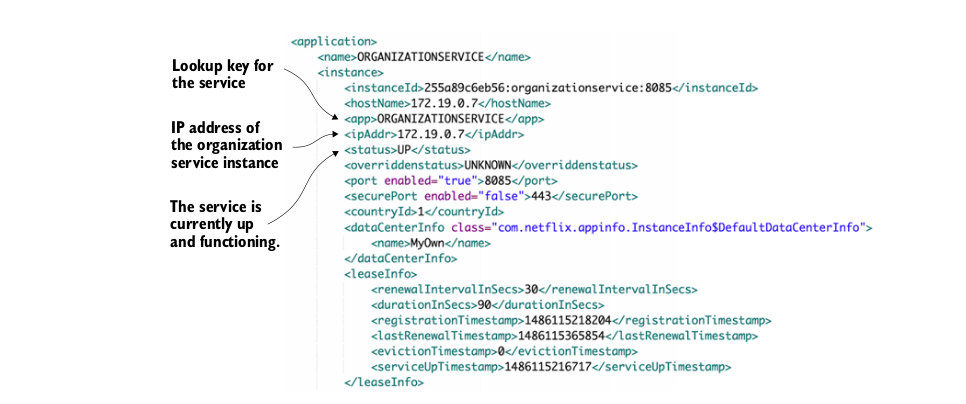
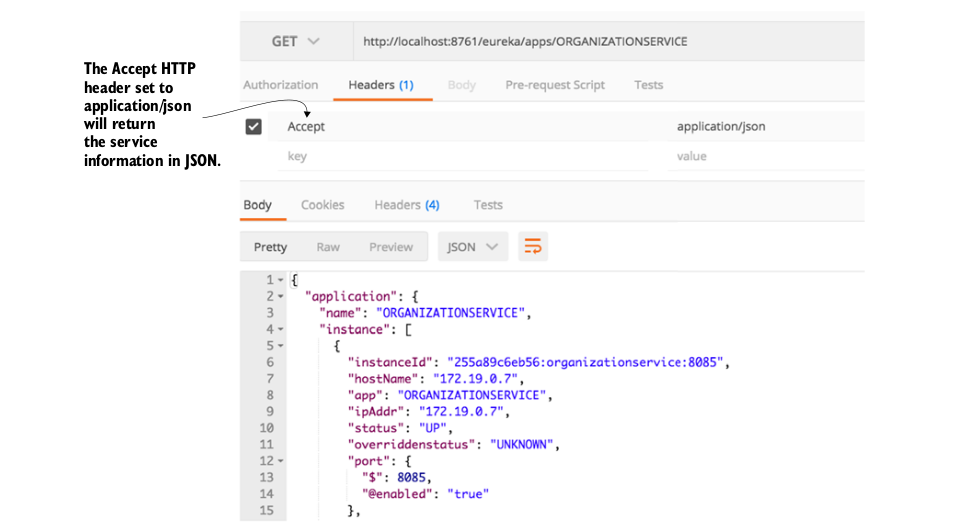
查看服务的所有实例:
http://<eureka service>:8761/eureka/apps/<APPID>
For instance, to see the organization service in the registry you can call
http://localhost:8761/eureka/apps/organizationservice
//在Eureka和服务启动时要保持耐心:
    当服务通过Eureka注册时,Eureka将在30s内等待3次连续的健康检查,然后才能通过Eureka获取该服务。这个热身过程让开发者们感到疑惑,因为如果他们在服务启动后立即调用他们的服务,他们会认为Eureka还没有注册他们的服务。
这一点在Docker 环境运行的代码示例中很明显,因为Eureka服务和应用程序服务(许可证服务和组织服务)都是在同一时间启动的。在生产环境中,Eureka服务已经在运行,如果读者正在部署现有的服务,那么旧服务仍然可以用于接收请求。
5.使用服务发现来查找服务
研究3个不同的Spring/Netflix客户端库,服务消费者可以使用他们来和Ribbon进行交互。从最低级别到高级别,这些库包含了不同的与Ribbon进行交互的抽象层次:
     Spring DiscoveryClient
     启用了RestTemplate的Spring DiscoveryClient
   Netflix Feign客户端
package com.thoughtmechanix.licenses.controllers;

import com.thoughtmechanix.licenses.model.License;
import com.thoughtmechanix.licenses.services.LicenseService;
import com.thoughtmechanix.licenses.config.ServiceConfig;
import org.springframework.beans.factory.annotation.Autowired;
import org.springframework.web.bind.annotation.RequestBody;
import org.springframework.web.bind.annotation.RequestMapping;
import org.springframework.http.HttpStatus;
import org.springframework.web.bind.annotation.RestController;
import org.springframework.web.bind.annotation.RequestMethod;
import org.springframework.web.bind.annotation.PathVariable;
import org.springframework.web.bind.annotation.ResponseStatus;

import java.util.List;

@RestController
@RequestMapping(value="v1/organizations/{organizationId}/licenses")
public class LicenseServiceController {
    @Autowired
    private LicenseService licenseService;

    @Autowired
    private ServiceConfig serviceConfig;

    @RequestMapping(value="/",method = RequestMethod.GET)
    public List<License> getLicenses( @PathVariable("organizationId") String organizationId) {

        return licenseService.getLicensesByOrg(organizationId);
    }

    @RequestMapping(value="/{licenseId}",method = RequestMethod.GET)
    public License getLicenses( @PathVariable("organizationId") String organizationId,
                                @PathVariable("licenseId") String licenseId) {

        return licenseService.getLicense(organizationId, licenseId, "");
    }

    @RequestMapping(value="/{licenseId}/{clientType}",method = RequestMethod.GET) //TODO:clientType确定Spring REST要使用的客户端的类型
    public License getLicensesWithClient( @PathVariable("organizationId") String organizationId,
                                          @PathVariable("licenseId") String licenseId,
                                          @PathVariable("clientType") String clientType) {

        return licenseService.getLicense(organizationId,licenseId, clientType);
    }

    @RequestMapping(value="{licenseId}",method = RequestMethod.PUT)
    public void updateLicenses( @PathVariable("licenseId") String licenseId, @RequestBody License license) {
        licenseService.updateLicense(license);
    }

    @RequestMapping(value="/",method = RequestMethod.POST)
    public void saveLicenses(@RequestBody License license) {
        licenseService.saveLicense(license);
    }

    @RequestMapping(value="{licenseId}",method = RequestMethod.DELETE)
    @ResponseStatus(HttpStatus.NO_CONTENT)
    public void deleteLicenses( @PathVariable("licenseId") String licenseId, @RequestBody License license) {
         licenseService.deleteLicense(license);
    }
}
package com.thoughtmechanix.licenses.services;

import com.thoughtmechanix.licenses.clients.OrganizationDiscoveryClient;
import com.thoughtmechanix.licenses.clients.OrganizationFeignClient;
import com.thoughtmechanix.licenses.clients.OrganizationRestTemplateClient;
import com.thoughtmechanix.licenses.config.ServiceConfig;
import com.thoughtmechanix.licenses.model.License;
import com.thoughtmechanix.licenses.model.Organization;
import com.thoughtmechanix.licenses.repository.LicenseRepository;
import org.springframework.beans.factory.annotation.Autowired;
import org.springframework.stereotype.Service;

import java.util.List;
import java.util.UUID;

@Service
public class LicenseService {

    @Autowired
    private LicenseRepository licenseRepository;

    @Autowired
    ServiceConfig config;


    @Autowired
    OrganizationFeignClient organizationFeignClient;

    @Autowired
    OrganizationRestTemplateClient organizationRestClient;

    @Autowired
    OrganizationDiscoveryClient organizationDiscoveryClient;


    private Organization retrieveOrgInfo(String organizationId, String clientType){
        Organization organization = null;

        switch (clientType) {
            case "feign":
                System.out.println("I am using the feign client");
                organization = organizationFeignClient.getOrganization(organizationId);
                break;
            case "rest":
                System.out.println("I am using the rest client");
                organization = organizationRestClient.getOrganization(organizationId);
                break;
            case "discovery":
                System.out.println("I am using the discovery client");
                organization = organizationDiscoveryClient.getOrganization(organizationId);
                break;
            default:
                organization = organizationRestClient.getOrganization(organizationId);
        }

        return organization;
    }

    /**
     * 服务方法
     * @param organizationId
     * @param licenseId
     * @param clientType
     * @return
     */
    public License getLicense(String organizationId,String licenseId, String clientType) {
        License license = licenseRepository.findByOrganizationIdAndLicenseId(organizationId, licenseId);

        Organization org = retrieveOrgInfo(organizationId, clientType);

        return license
                .withOrganizationName( org.getName())
                .withContactName( org.getContactName())
                .withContactEmail( org.getContactEmail() )
                .withContactPhone( org.getContactPhone() )
                .withComment(config.getExampleProperty());
    }

    public List<License> getLicensesByOrg(String organizationId){
        return licenseRepository.findByOrganizationId( organizationId );
    }

    public void saveLicense(License license){
        license.withId( UUID.randomUUID().toString());

        licenseRepository.save(license);

    }

    public void updateLicense(License license){
      licenseRepository.save(license);
    }

    public void deleteLicense(License license){
        licenseRepository.delete( license.getLicenseId());
    }

}
使用Spring DiscoveryClient查找服务实例
/*
*Spring DiscoveryClient 提供了对Ribbon和Ribbon中缓存的注册服务的最底层访问。使用DiscoveryClient可以查询Ribbon注册的所有服务以及这些服务对应的URL
*/
package com.thoughtmechanix.licenses;

import org.springframework.boot.SpringApplication;
import org.springframework.boot.autoconfigure.SpringBootApplication;
import org.springframework.cloud.client.discovery.EnableDiscoveryClient;
import org.springframework.cloud.netflix.feign.EnableFeignClients;
import org.springframework.cloud.client.loadbalancer.LoadBalanced;
import org.springframework.context.annotation.Bean;
import org.springframework.web.client.RestTemplate;
import java.util.Collections;
import java.util.List;

@SpringBootApplication
@EnableDiscoveryClient //TODO:激活Spring DiscoveryClient /// @EnableDiscoveryClient注解是Spring cloud的触发器,其作用是使应用程序能够使DiscoveryClient和Ribbon库
@EnableFeignClients
public class Application {

  @LoadBalanced
  @Bean
  public RestTemplate getRestTemplate(){
      return new RestTemplate();
  }

  public static void main(String[] args) {
        SpringApplication.run(Application.class, args);
  }
}
package com.thoughtmechanix.licenses.clients;


import com.thoughtmechanix.licenses.model.Organization;
import org.springframework.beans.factory.annotation.Autowired;
import org.springframework.cloud.client.ServiceInstance;
import org.springframework.cloud.client.discovery.DiscoveryClient;
import org.springframework.http.HttpMethod;
import org.springframework.http.ResponseEntity;
import org.springframework.stereotype.Component;
import org.springframework.web.client.RestTemplate;

import java.util.List;

@Component
public class OrganizationDiscoveryClient {

    @Autowired
    private DiscoveryClient discoveryClient;

    public Organization getOrganization(String organizationId) {
        RestTemplate restTemplate = new RestTemplate();
        //获取组织服务的所有实例的列表
        List<ServiceInstance> instances = discoveryClient.getInstances("organizationservice");

        if (instances.size()==0) return null;
        //检索要调用的服务端点
        String serviceUri = String.format("%s/v1/organizations/%s",instances.get(0).getUri().toString(), organizationId);

        ResponseEntity< Organization > restExchange =
                restTemplate.exchange(
                        serviceUri,
                        HttpMethod.GET,
                        null, Organization.class, organizationId);

        return restExchange.getBody();
    }
}
只有在服务需要查询Ribbon以了解哪些服务器和服务实例已经通过它注册时,才应该直接使用DiscoveryClient
上述代码存在以下问题
1.没有利用Ribbon的客户端负载均衡------尽管通过直接调用DiscoveryClient可以获取服务列表,但是要调用哪些返回的服务实例就成了开发人员的责任。
2.开发人员做了太多工作------现在开发人员必须构建一个用来调用服务的URL。尽管这是一件小事,但是编写的代码越少意味着需要调试的代码越少。
/*
*一旦应用程序类中通过@EnableDiscoveryClient注解启用了Spring Discovery由Spirng 框架管理的所有RestTemplate都将注入一个启用Ribbon的拦截器,这个拦截器将改变使用RestTemplate类建URL的行为。直接实例化RestTemplate类可以避免这种行为
*/
使用带有Ribbon功能的Sping RestTemplate调用服务
package com.thoughtmechanix.licenses;

import org.springframework.boot.SpringApplication;
import org.springframework.boot.autoconfigure.SpringBootApplication;
import org.springframework.cloud.client.discovery.EnableDiscoveryClient;
import org.springframework.cloud.netflix.feign.EnableFeignClients;
import org.springframework.cloud.client.loadbalancer.LoadBalanced;
import org.springframework.context.annotation.Bean;
import org.springframework.web.client.RestTemplate;
import java.util.Collections;
import java.util.List;

@SpringBootApplication
@EnableDiscoveryClient //TODO:激活Spring DiscoveryClient /// @EnableDiscoveryClient注解是Spring cloud的触发器,其作用是使应用程序能够使DiscoveryClient和Ribbon库
@EnableFeignClients
public class Application {

  @LoadBalanced //TODO:告诉Spring Cloud创建一个支持Ribbon的RestTemplate类
  @Bean
  public RestTemplate getRestTemplate(){
      return new RestTemplate();
  }

  public static void main(String[] args) {
        SpringApplication.run(Application.class, args);
  }
}
package com.thoughtmechanix.licenses.clients;

import com.thoughtmechanix.licenses.model.Organization;
import org.springframework.beans.factory.annotation.Autowired;
import org.springframework.http.HttpMethod;
import org.springframework.http.ResponseEntity;
import org.springframework.stereotype.Component;
import org.springframework.web.client.RestTemplate;

@Component
public class OrganizationRestTemplateClient {
    @Autowired
    RestTemplate restTemplate;

    public Organization getOrganization(String organizationId){
        ResponseEntity<Organization> restExchange =
                restTemplate.exchange(
                        //使用支持Ribbon的RestTemplate时,使用Eureka服务ID来构建目标URL
                        "http://organizationservice/v1/organizations/{organizationId}",
                        HttpMethod.GET,
                        null, Organization.class, organizationId);

        return restExchange.getBody();
    }
}
URL中的服务器名称与通过Eureka注册的服务组织服务的应用程序ID-------organiaztionservice相匹配
http://{applicationid}/v1/organizations/{organizationId}
启动Ribbon的RestTemplate类,将解析传递给他的URL,并使用传递的内容作为服务器名称,该服务器名称作为从Ribbon查询服务实例的键,实际的服务位置和端口与开发人员完全抽象隔离。
此外,通过使用RestTemplate类,Ribbon将在所有服务实例之间轮询负载均衡所有请求。
使用Netflix Feign客户端调用服务
Netflix 的Feign客户端是Spring启用Ribbon的RestTemplate类的替代方案。Feign库将采用不同的方法来调用REST服务,
方法是让开发人员首先定义一个Java接口,然后使用Spirng Cloud注解来标注接口,以映射Ribbon将要调用的基于Eureka的服务。
Spirng Cloud框架将动态生成一个代理类,用于调用目标REST服务。
package com.thoughtmechanix.licenses;

import org.springframework.boot.SpringApplication;
import org.springframework.boot.autoconfigure.SpringBootApplication;
import org.springframework.cloud.client.discovery.EnableDiscoveryClient;
import org.springframework.cloud.netflix.feign.EnableFeignClients;
import org.springframework.cloud.client.loadbalancer.LoadBalanced;
import org.springframework.context.annotation.Bean;
import org.springframework.web.client.RestTemplate;
import java.util.Collections;
import java.util.List;

@SpringBootApplication
@EnableDiscoveryClient //TODO:激活Spring DiscoveryClient /// @EnableDiscoveryClient注解是Spring cloud的触发器,其作用是使应用程序能够使DiscoveryClient和Ribbon库
@EnableFeignClients //TODO:Feign客户端
public class Application {

  @LoadBalanced //TODO:告诉Spring Cloud创建一个支持Ribbon的RestTemplate类
  @Bean
  public RestTemplate getRestTemplate(){
      return new RestTemplate();
  }

  public static void main(String[] args) {
        SpringApplication.run(Application.class, args);
  }
}
package com.thoughtmechanix.licenses.clients;


import com.thoughtmechanix.licenses.model.Organization;
import org.springframework.cloud.netflix.feign.FeignClient;
import org.springframework.web.bind.annotation.PathVariable;
import org.springframework.web.bind.annotation.RequestMapping;
import org.springframework.web.bind.annotation.RequestMethod;

@FeignClient("organizationservice")
public interface OrganizationFeignClient {
    @RequestMapping(
            method= RequestMethod.GET,
            value="/v1/organizations/{organizationId}",
            consumes="application/json")
    Organization getOrganization(@PathVariable("organizationId") String organizationId);
}
要使用OrganizationFeignClient类,开发人员需要做的只是自动装配并使用它。Feign客户端代码将为开发人员承担所有的编码工作
错误处理
使用标准的Spring RestTemplate类时,所有的服务调用的HTTP状态码都将通过ResponseEntity类的getStatusCode()方法返回。通过Feign客户端,任何被调用的服务返回的HTTP状态码4xxx-5xx都将映射为FeignException。FeignException包含可以被解析为特定的错误消息的JSON体
本章小结
1.服务发现模式用于抽象服务的物理位置。
2.诸如Eureka这样的服务发现引擎可以在不影响客户端的情况下,无缝的向环境中添加和从环境中移除服务实例。
3.通过在进行服务调用的客户端缓存服务的物理位置,客户端负载均衡就可以提供额外的性能和弹性
4.Eureka是Netflix项目,在与Spirng Cloud一起使用时,很容易对Eureka进行建立和配置
5.在Spring cloud 、Netflix Eureka 、Netflix Ribbon中使用了3种不同机制来调用服务:
1使用Spring Cloud 服务DiscoveryClient
2使用Spring Cloud 和支持Ribbon 的RestTemplate
3使用Spring Cloud 和Netflix的Feign客户端
使用Spring Cloud和Netflix Hystrixd 的客户端弹性模式
什么是客户端弹性模式
在远程服务发生错误或表现不佳时保护远程资源(另一个微服务的调用或数据库查询)的客户端免于崩溃。这些模式的目标是让客户端的“快速失败”,而不消耗诸如数据库连接和线程池之类的宝贵资源。
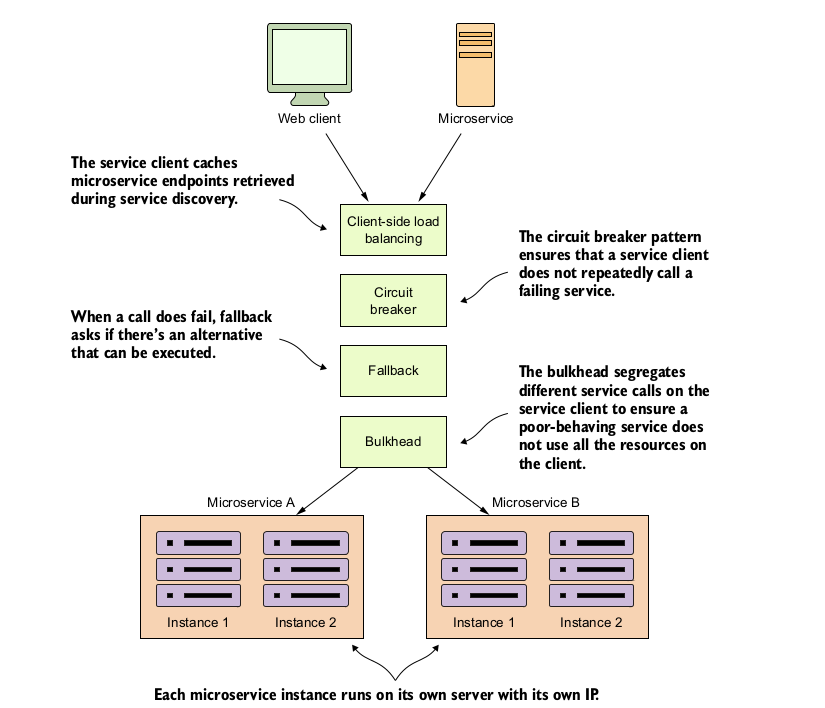
1.客户端负载均衡(client load balance)
客户端服务器负载均衡器位于服务消费者之间,所以负载均衡器可以检测服务实例是否抛出错误或表现不佳,如果客户端负载均衡器检测到问题,它可以从服务位置池中移除该服务实例,并防止将来的服务调用访问该服务实例
2.断路器(circuit break)
断路器模式是模仿电路断路器的客户端弹性模式,在电气系统中,断路器将检测是否有过多电流流过电线,如果断路器检测到问题,它将断开与电气系统的其余部分的连接,并保护下游部件不被烧毁。
//有了软件断路器,当远程服务被调用时,断路器将监视这个调用,如果调用时间太长,断路器将会介入并中断调用。此外,断路器将监视所有远程资源的调用,如果对某一个远程资源的调用失败次数太多,那么断路器就会出现并采取快速失败,阻止将来调用失败的远程资源。
3.后备模式(fallback)
当远程服务调用失败时,服务消费者将执行替代代码路径,并尝试通过其他方式执行操作,而不是生成一个异常。这通常涉及从另一个数据源查找数据或将用户的请求进行排队来处理。用户的调用结果不会显示为提示问题的异常,但用户可能被告知,他们的请求在晚些时候被满足。
4.舱壁模式 (bulkhead)
舱壁模式是建立在造船的概念上的,采用舱壁设计,一艘船被划分为完全隔离和防水的隔间,这称为舱壁。即使船的船体被击穿,由于船体被划分为水密舱(舱壁),舱壁将水限制在被击穿的船的区域内,防止整艘船灌水被并沉没。

//同样的概念可以将应用于必须与多个远程资源交互的服务。通过使用舱壁模式,可以把远程资源的调用分到线程池中,并降低一个缓慢的远程资源调用拖垮整个应用程序的风险,线程池充当服务的“舱壁”每个远程资源都是隔离的,
并分配给线程池。如果一个服务响应缓慢,那么这种服务调用的线程池就会饱和并停止处理请求,而对其他服务的服务调用则不会变得饱和,因为他们被分配给了其他线程池。
为什么客户端负载均衡很重要?
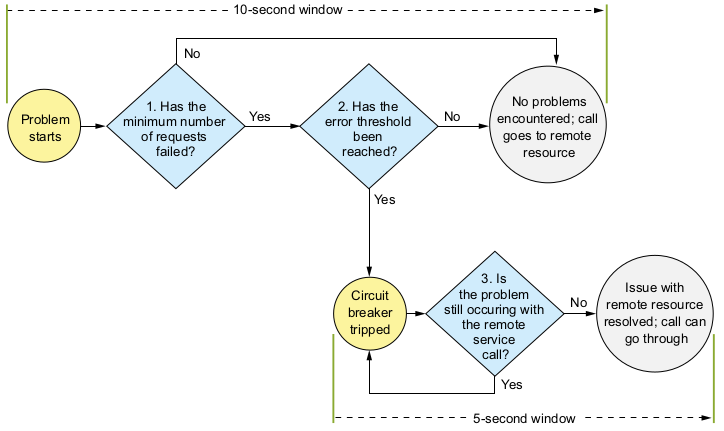
断路跳闸
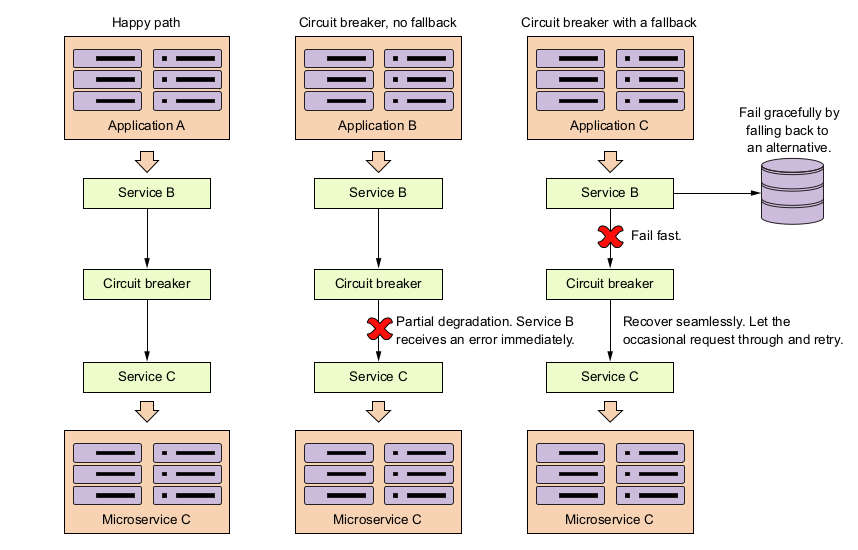
//1.快速失败------当远程服务处于降级状态时,应用程序将会快速失败,并防止通常会拖垮整个应用程序的资源耗尽问题的出现。在大多数中断情况下,最好是部分服务关闭而不是完全关闭
//2.优雅的失败------通过超时和快速失败,断路器模式使应用程序开发人员有能力优雅的失败,或寻求替代机制来执行用户的意图。例如,如果用户尝试从一个数据源检索数据,并且该数据源正在经历服务降级,那么应用程序开发人员可以尝试从其他地方检索该数据。
//3.有了断路器模式作为中介,断路器可以定期检查所请求的资源是否重新上线,并在没有人为干预的情况下重新允许对该资源进行访问。
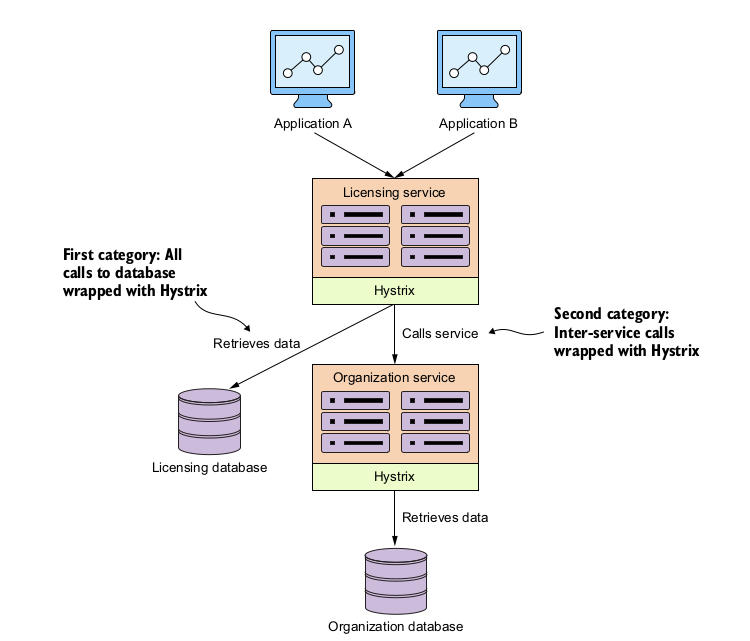
搭建许可证服务器以使用Spring cloud和Hystrix
<?xml version="1.0" encoding="UTF-8"?>
<project xmlns:xsi="http://www.w3.org/2001/XMLSchema-instance" xmlns="http://maven.apache.org/POM/4.0.0" xsi:schemaLocation="http://maven.apache.org/POM/4.0.0 http://maven.apache.org/xsd/maven-4.0.0.xsd">
  <modelVersion>4.0.0</modelVersion>

  <groupId>com.thoughtmechanix</groupId>
  <artifactId>licensing-service</artifactId>
  <version>0.0.1-SNAPSHOT</version>
  <packaging>jar</packaging>

  <name>Eagle Eye Licensing Service</name>
  <description>Licensing Service</description>

  <parent>
    <groupId>org.springframework.boot</groupId>
    <artifactId>spring-boot-starter-parent</artifactId>
    <version>1.4.4.RELEASE</version>
  </parent>
  <dependencyManagement>
    <dependencies>
      <dependency>
        <groupId>org.springframework.cloud</groupId>
        <artifactId>spring-cloud-dependencies</artifactId>
        <version>Camden.SR5</version>
        <type>pom</type>
        <scope>import</scope>
      </dependency>
    </dependencies>
  </dependencyManagement>
  <dependencies>
    <dependency>
      <groupId>org.springframework.boot</groupId>
      <artifactId>spring-boot-starter-data-jpa</artifactId>
    </dependency>
    <dependency>
      <groupId>org.springframework.boot</groupId>
      <artifactId>spring-boot-starter-web</artifactId>
    </dependency>
    <dependency>
      <groupId>org.springframework.boot</groupId>
      <artifactId>spring-boot-starter-actuator</artifactId>
    </dependency>

    <dependency>
      <groupId>org.springframework.cloud</groupId>
      <artifactId>spring-cloud-starter-eureka</artifactId>
    </dependency>

    <dependency>
      <groupId>org.springframework.cloud</groupId>
      <artifactId>spring-cloud-starter-feign</artifactId>
    </dependency>

    <dependency>
      <groupId>org.springframework.cloud</groupId>
      <artifactId>spring-cloud-starter-config</artifactId>
    </dependency>

    <dependency>
      <groupId>org.springframework.cloud</groupId>
      <artifactId>spring-cloud-config-client</artifactId>
    </dependency>

    <dependency>
      <groupId>org.springframework.cloud</groupId>
      <artifactId>spring-cloud-starter-hystrix</artifactId>
    </dependency>

    <dependency>
      <groupId>com.h2database</groupId>
      <artifactId>h2</artifactId>
    </dependency>

    <dependency>
      <groupId>postgresql</groupId>
      <artifactId>postgresql</artifactId>
      <version>9.1-901.jdbc4</version>
    </dependency>
    <dependency>
        <groupId>org.springframework.security</groupId>
        <artifactId>spring-security-rsa</artifactId>
    </dependency>
      <!-- <dependency>
          <groupId>com.netflix.hystrix</groupId>
          <artifactId>hystrix-javanica</artifactId>
          <version>1.5.9</version>
      </dependency> -->
  </dependencies>

  <properties>
    <project.build.sourceEncoding>UTF-8</project.build.sourceEncoding>
    <java.version>1.8</java.version>
    <project.build.sourceEncoding>UTF-8</project.build.sourceEncoding>
    <start-class>com.thoughtmechanix.licenses.Application</start-class>
    <docker.image.name>johncarnell/tmx-licensing-service</docker.image.name>
    <docker.image.tag>chapter6</docker.image.tag>
  </properties>

  <build>
     <plugins>
         <!-- We use the Resources plugin to filer Dockerfile and run.sh, it inserts actual JAR filename -->
         <!-- The final Dockerfile will be created in target/dockerfile/Dockerfile -->
         <plugin>
             <artifactId>maven-resources-plugin</artifactId>
             <executions>
                 <execution>
                     <id>copy-resources</id>
                     <!-- here the phase you need -->
                     <phase>validate</phase>
                     <goals>
                         <goal>copy-resources</goal>
                     </goals>
                     <configuration>
                         <outputDirectory>${basedir}/target/dockerfile</outputDirectory>
                         <resources>
                             <resource>
                                 <directory>src/main/docker</directory>
                                 <filtering>true</filtering>
                             </resource>
                         </resources>
                     </configuration>
                 </execution>
             </executions>
         </plugin>
         <plugin>
             <groupId>com.spotify</groupId>
             <artifactId>docker-maven-plugin</artifactId>
             <version>0.4.10</version>
             <configuration>
                 <imageName>${docker.image.name}:${docker.image.tag}</imageName>
                 <dockerDirectory>${basedir}/target/dockerfile</dockerDirectory>
                 <resources>
                     <resource>
                         <targetPath>/</targetPath>
                         <directory>${project.build.directory}</directory>
                         <include>${project.build.finalName}.jar</include>
                     </resource>
                 </resources>
             </configuration>
         </plugin>
         <plugin>
             <groupId>org.springframework.boot</groupId>
             <artifactId>spring-boot-maven-plugin</artifactId>
         </plugin>
     </plugins>
 </build>
</project>
package com.thoughtmechanix.licenses;

import com.thoughtmechanix.licenses.utils.UserContextInterceptor;
import org.springframework.boot.SpringApplication;
import org.springframework.boot.autoconfigure.SpringBootApplication;
import org.springframework.cloud.client.circuitbreaker.EnableCircuitBreaker;
import org.springframework.cloud.client.loadbalancer.LoadBalanced;
import org.springframework.cloud.netflix.eureka.EnableEurekaClient;
import org.springframework.context.annotation.Bean;
import org.springframework.web.client.RestTemplate;

import java.util.Collections;
import java.util.List;

@SpringBootApplication
@EnableEurekaClient
@EnableCircuitBreaker // TODO:告诉Spring cloud服务将要使用Hystrix
public class Application {

    @LoadBalanced
    @Bean
    public RestTemplate getRestTemplate(){
        RestTemplate template = new RestTemplate();
        List interceptors = template.getInterceptors();
        if (interceptors==null){
            template.setInterceptors(Collections.singletonList(new UserContextInterceptor()));
        }
        else{
            interceptors.add(new UserContextInterceptor());
            template.setInterceptors(interceptors);
        }

        return template;
    }

    public static void main(String[] args) {
        SpringApplication.run(Application.class, args);
    }
}
使用Hystrix实现断路器
Hystrix和spirng cloud使用@HystrixCommand注解来将Java类方法标记为由Hystrix断路器进行管理。当spring框架看到@HystrixCommand时,它将动态生成一个代理,该代理将包装该方法,并通过专门用于处理远程的线程池来管理对该方法的所有调用。
package com.thoughtmechanix.licenses.services;

import com.netflix.hystrix.contrib.javanica.annotation.HystrixCommand;
import com.netflix.hystrix.contrib.javanica.annotation.HystrixProperty;
import com.thoughtmechanix.licenses.clients.OrganizationRestTemplateClient;
import com.thoughtmechanix.licenses.config.ServiceConfig;
import com.thoughtmechanix.licenses.model.License;
import com.thoughtmechanix.licenses.model.Organization;
import com.thoughtmechanix.licenses.repository.LicenseRepository;
import com.thoughtmechanix.licenses.utils.UserContext;
import com.thoughtmechanix.licenses.utils.UserContextHolder;
import org.slf4j.Logger;
import org.slf4j.LoggerFactory;
import org.springframework.beans.factory.annotation.Autowired;
import org.springframework.stereotype.Service;

import java.util.ArrayList;
import java.util.List;
import java.util.Random;
import java.util.UUID;

@Service
public class LicenseService {

    @Autowired
    private LicenseRepository licenseRepository;

    @Autowired
    ServiceConfig config;

    @Autowired
    OrganizationRestTemplateClient organizationRestClient;

    private static final Logger logger = LoggerFactory.getLogger(LicenseService.class);

    @HystrixCommand
    public License getLicense(String organizationId,String licenseId) throws InterruptedException {
       License license = licenseRepository.findByOrganizationIdAndLicenseId(organizationId, licenseId);

        Organization org = getOrganization(organizationId);

        return license
                .withOrganizationName( org.getName())
                .withContactName( org.getContactName())
                .withContactEmail( org.getContactEmail() )
                .withContactPhone( org.getContactPhone() )
                .withComment(config.getExampleProperty());
    }

    @HystrixCommand
    private Organization getOrganization(String organizationId) {
        return organizationRestClient.getOrganization(organizationId);
    }

    private void randomlyRunLong(){
      Random rand = new Random();

      int randomNum = rand.nextInt((3 - 1) + 1) + 1;

      if (randomNum==3) sleep();
    }

    private void sleep(){
        try {
            Thread.sleep(2000);
        } catch (InterruptedException e) {
            e.printStackTrace();
        }
    }


    @HystrixCommand(fallbackMethod = "buildFallbackLicenseList",
            threadPoolKey = "licenseByOrgThreadPool",
            threadPoolProperties =
                    {@HystrixProperty(name = "coreSize",value="30"),
                     @HystrixProperty(name="maxQueueSize", value="10"),
                   },
            commandProperties={
                     @HystrixProperty(name="circuitBreaker.requestVolumeThreshold", value="10"),
                     @HystrixProperty(name="circuitBreaker.errorThresholdPercentage", value="75"),
                     @HystrixProperty(name="circuitBreaker.sleepWindowInMilliseconds", value="7000"),
                     @HystrixProperty(name="metrics.rollingStats.timeInMilliseconds", value="15000"),
                     @HystrixProperty(name="metrics.rollingStats.numBuckets", value="5")}
    )
    public List<License> getLicensesByOrg(String organizationId){
        randomlyRunLong();

        return licenseRepository.findByOrganizationId(organizationId);
    }

    private List<License> buildFallbackLicenseList(String organizationId){
        List<License> fallbackList = new ArrayList<>();
        License license = new License()
                .withId("0000000-00-00000")
                .withOrganizationId( organizationId )
                .withProductName("Sorry no licensing information currently available");

        fallbackList.add(license);
        return fallbackList;
    }

    public void saveLicense(License license){
        license.withId( UUID.randomUUID().toString());

        licenseRepository.save(license);
    }

    public void updateLicense(License license){
      licenseRepository.save(license);
    }

    public void deleteLicense(License license){
        licenseRepository.delete( license.getLicenseId());
    }

}
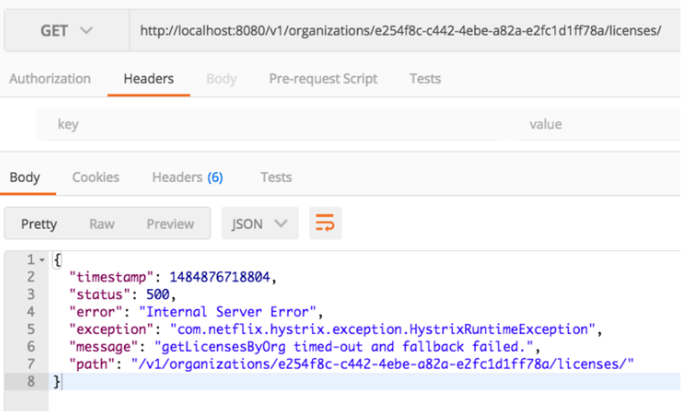
对组织微服务的调用超时
我们可以使用方法级注解使被标记的调用拥有断路器功能,其优点在于无论是访问数据库还是调用微服务,它都是相同的注解。
for instance:在许可证服务中我们需要查找与许可证关联的组织的名称。如果要使用断路器来包装对组织服务的调用的话
一个简单的方法就是将RestTemplate调用分解到自己的方法,并使用@HystrixCommand注解进行标注:
@HystrixCommand
private Organization getOrganization(String organizationId) {
return organizationRestClient.getOrganization(organizationId);
}
//注意:在默认情况下,在指定不带属性的@HystrixCommand注解时,这个注解会将所有的远程服务调用都放在同一线程池下。
定制断路器的超时时间
@HystrixCommand(
  commandProperties=
  {@HystrixProperty(
  name="execution.isolation.thread.timeoutInMilliseconds",
  value="12000")})
public List<License> getLicensesByOrg(String organizationId){
  randomlyRunLong();
  return licenseRepository.findByOrganizationId(organizationId);
}
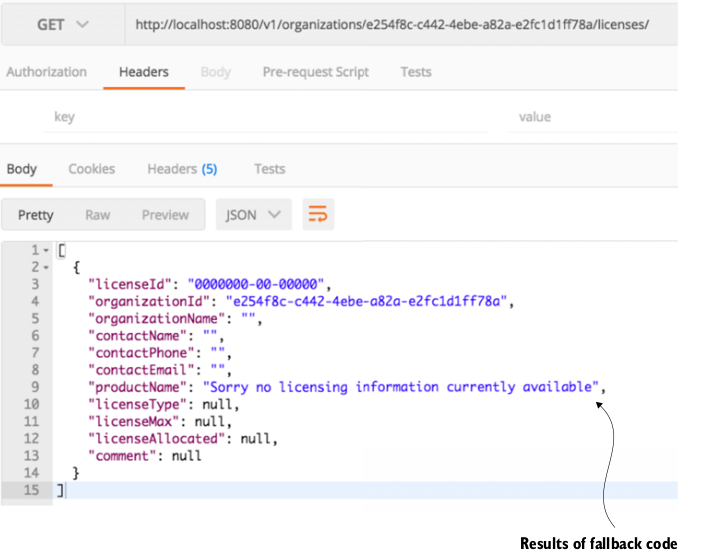
后备模式
fallbackMethod定义了一个方法,如果来自Hystrix的调用失败,那么就会调用该方法。
注意://1.后备方法必须在同一个类中 2.后备方法与原方法必须具有相同的方法签名。
(1)后备是一种在资源超时或失败提供行动方案的机制,如果发现自己使用后备来捕获超时异常,然后只是做日志记录,就应该在try...catch...上
(2)注意使用后备方法所执行的操作。如果在后备服务中调用另一个分布式服务,就可能需要使用@HystrixCommand注解来包装后备方法。记住在主要
   动方案中经历的相同的失败有可能也会影响次要的后备方案。
@HystrixCommand(fallbackMethod = "buildFallbackLicenseList")
public List<License> getLicensesByOrg(String organizationId){
    randomlyRunLong();
return licenseRepository.findByOrganizationId(organizationId);
}
private List<License> buildFallbackLicenseList(String organizationId){
    List<License> fallbackList = new ArrayList<>();
    License license = new License()
  .withId("0000000-00-00000")
  .withOrganizationId( organizationId )
  .withProductName(
  "Sorry no licensing information currently available");
  fallbackList.add(license);
return fallbackList;
}
结果
舱壁模式
//舱壁模式将远程资源调用隔离在他们的自己的线程中,以便控制单个表现不佳的服务,而不会使该容器崩溃。
Hystrix使用线程池来委派所有对远程服务的请求,在默认情况下,所有的Hystrix命令都将共享同一个线程池来处理请求
多种资源类型共享默认的Hystrix线程池:

Hystrix命令绑定到隔离的线程池:
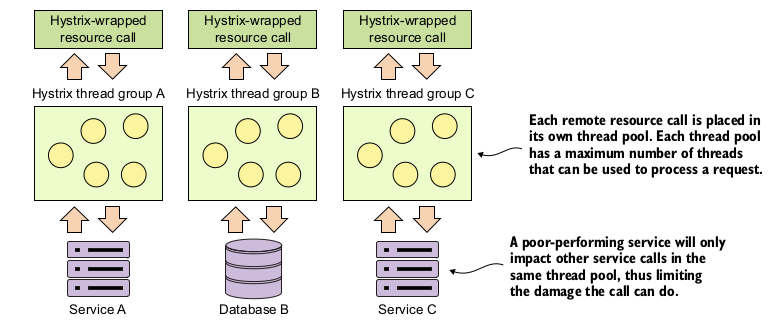
//(1)为getLicensesByOrg()调用建立一个单独的线程池
//(2)设置线程池的线程数
//(3)设置单个线程繁忙时可排队的请求数的队列大小
// 线程池大小  Netflix推荐以下公式:
// 服务在健康状态时每秒支撑的最大请求数X第99百分位延迟时间(以秒为单位)+用于缓冲的少量额外线程


@HystrixCommand(fallbackMethod = "buildFallbackLicenseList",
  threadPoolKey = "licenseByOrgThreadPool",
  threadPoolProperties =
    {@HystrixProperty(name = "coreSize",value="30"),
    @HystrixProperty(name="maxQueueSize", value="10")}
)
public List<License> getLicensesByOrg(String organizationId){
  return licenseRepository.findByOrganizationId(organizationId);
)
微调Hystrix
//Hystrix不仅能超时长时间运行的调用,它还会监控调用失败的次数,如果调用失败的次数足够多,那么Hystrix会在请求发送到远程资源之前,通过调用失败来阻止未来的调用到达服务。
package com.thoughtmechanix.licenses.services;

import com.netflix.hystrix.contrib.javanica.annotation.HystrixCommand;
import com.netflix.hystrix.contrib.javanica.annotation.HystrixProperty;
import com.thoughtmechanix.licenses.clients.OrganizationRestTemplateClient;
import com.thoughtmechanix.licenses.config.ServiceConfig;
import com.thoughtmechanix.licenses.model.License;
import com.thoughtmechanix.licenses.model.Organization;
import com.thoughtmechanix.licenses.repository.LicenseRepository;
import com.thoughtmechanix.licenses.utils.UserContext;
import com.thoughtmechanix.licenses.utils.UserContextHolder;
import org.slf4j.Logger;
import org.slf4j.LoggerFactory;
import org.springframework.beans.factory.annotation.Autowired;
import org.springframework.stereotype.Service;

import java.util.ArrayList;
import java.util.List;
import java.util.Random;
import java.util.UUID;

@Service
public class LicenseService {

    @Autowired
    private LicenseRepository licenseRepository;

    @Autowired
    ServiceConfig config;

    @Autowired
    OrganizationRestTemplateClient organizationRestClient;

    private static final Logger logger = LoggerFactory.getLogger(LicenseService.class);

    @HystrixCommand
    public License getLicense(String organizationId,String licenseId) throws InterruptedException {
       License license = licenseRepository.findByOrganizationIdAndLicenseId(organizationId, licenseId);

        Organization org = getOrganization(organizationId);

        return license
                .withOrganizationName( org.getName())
                .withContactName( org.getContactName())
                .withContactEmail( org.getContactEmail() )
                .withContactPhone( org.getContactPhone() )
                .withComment(config.getExampleProperty());
    }

    @HystrixCommand
    private Organization getOrganization(String organizationId) {
        return organizationRestClient.getOrganization(organizationId);
    }

    private void randomlyRunLong(){
      Random rand = new Random();

      int randomNum = rand.nextInt((3 - 1) + 1) + 1;

      if (randomNum==3) sleep();
    }

    private void sleep(){
        try {
            Thread.sleep(2000);
        } catch (InterruptedException e) {
            e.printStackTrace();
        }
    }


    @HystrixCommand(fallbackMethod = "buildFallbackLicenseList",
            threadPoolKey = "licenseByOrgThreadPool",
            threadPoolProperties =
                    {@HystrixProperty(name = "coreSize",value="30"),
                     @HystrixProperty(name="maxQueueSize", value="10"),
                   },
            commandProperties={
                     @HystrixProperty(name="circuitBreaker.requestVolumeThreshold", value="10"),
                     @HystrixProperty(name="circuitBreaker.errorThresholdPercentage", value="75"),
                     @HystrixProperty(name="circuitBreaker.sleepWindowInMilliseconds", value="7000"),
                     @HystrixProperty(name="metrics.rollingStats.timeInMilliseconds", value="15000"),
                     @HystrixProperty(name="metrics.rollingStats.numBuckets", value="5")}
    )
    public List<License> getLicensesByOrg(String organizationId){
        randomlyRunLong();

        return licenseRepository.findByOrganizationId(organizationId);
    }

    private List<License> buildFallbackLicenseList(String organizationId){
        List<License> fallbackList = new ArrayList<>();
        License license = new License()
                .withId("0000000-00-00000")
                .withOrganizationId( organizationId )
                .withProductName("Sorry no licensing information currently available");

        fallbackList.add(license);
        return fallbackList;
    }

    public void saveLicense(License license){
        license.withId( UUID.randomUUID().toString());

        licenseRepository.save(license);
    }

    public void updateLicense(License license){
      licenseRepository.save(license);
    }

    public void deleteLicense(License license){
        licenseRepository.delete( license.getLicenseId());
    }

}
重新审视Hystrix配置
Hystrix库是高度可配的,可以让开发人员严格控制它定义的断路器模式和舱壁模式的行为。开发人员可以通过修改Hystrix断路器的配置,控制Hystrix在超时远程调用之前需要等待的时间。开发人员还可以控制Hystrix断路器何时跳匝以及重置断路器。
三个配置级别:
1.整个应用程序级别的默认值
2.类级别的默认值
3.在类中定义的线程池级别

@HystrixCommond注解的配置值
| 属性名称 | 默认值 | 描述 |
| fallbackMethod | None |
Identifies the method within the class that will be called if |
| threadPoolKey | None |
Gives the @HystrixCommand a unique name and creates |
| threadPoolProperties | None |
Core Hystrix annotation attribute that’s used to configure |
| coreSize | 10 | Sets the size of the thread pool. |
| maxQueueSize | -1 |
Maximum queue size that will set in front of the thread |
|
circuitBreaker.request- |
20 |
Sets the minimum number of requests that must be pro- |
|
circuitBreaker.error- |
50 |
The percentage of failures that must occur within the roll- |
|
circuitBreaker.sleep- |
5000 |
The number of milliseconds Hystrix will wait before trying a |
|
metricsRollingStats. |
10,000 |
The number of milliseconds Hystrix will collect and monitor |
|
metricsRollingStats |
10 |
The number of metrics buckets Hystrix will maintain within |
线程上下文和Hystrix
当一个@HystrixCommand被执行时,它可以使用两种不同的隔离策略------THREAD(线程)(默认)和SEMAPHORE(信号量)来运行。
当执行@hystrixcommand时,可以使用两种不同的隔离来运行它策略:线程和信号量。默认情况下,hystrix使用线程隔离运行。用于保护调用的每个hystrix命令都运行在一个独立的线程池中不与进行调用的父线程共享其上下文。这意味着海星可以中断在其控制下的线程的执行,而不必担心
中断与执行原始任务的父线程相关联的任何其他活动召唤。通过基于信号量的隔离,hystrix管理受保护的分布式调用。在不启动新线程的情况下通过@hystrixcommand注释中断调用超时时的父线程。在同步容器服务器环境中(tomcat),中断父线程将导致引发异常无法被开发人员捕获。这可能会导致
开发人员编写代码,因为他们无法捕获抛出的异常或执行任何资源清理或错误处理。要控制命令池的隔离设置,可以设置命令-@hystrixcommand注释的properties属性。例如,如果你想在hystrix命令上设置隔离级别以使用信号量隔离,
你会用:
@HystrixCommand(
commandProperties = {
@HystrixProperty(
name="execution.isolation.strategy", value="SEMAPHORE")})
ThreadLoacl与Hystrix
在默认情况下,Hystrix不会将父线程的上下文传播到由Hystrix命令管理的线程中。例如,在默认情况下,对被父线程调用并由@HystrixCommand保护的方法而言,在父线程中设置ThreadLoacl值的值都是不可用的(THREAD隔离级别)
让我们看一个具体的例子。通常以REST为基础要将上下文信息传递给服务调用的环境这将帮助您在操作上管理服务。例如,您可以通过rest调用的http头中的相关id或身份验证令牌然后被传播到任何下游服务调用。相关ID允许您具有唯一的标识符,可以在单个服务调用中跨多个服务调用进行跟踪交易。
要使此值在服务调用中的任何位置都可用,可以使用spring 过滤器类来拦截进入rest服务的每个调用,并从传入的http请求并将此上下文信息存储在自定义用户中-内容对象。然后,只要您的代码需要在rest服务中访问这个值调用,代码可以从threadlocal存储变量检索usercontext
并读取值。下面的清单显示了一个示例spring过滤器,您可以在您的授权服务中使用。
package com.thoughtmechanix.licenses.utils;

import org.slf4j.Logger;
import org.slf4j.LoggerFactory;
import org.springframework.stereotype.Component;

import javax.servlet.Filter;
import javax.servlet.FilterChain;
import javax.servlet.FilterConfig;
import javax.servlet.ServletException;
import javax.servlet.ServletRequest;
import javax.servlet.ServletResponse;
import javax.servlet.http.HttpServletRequest;
import java.io.IOException;

@Component
public class UserContextFilter implements Filter {
    private static final Logger logger = LoggerFactory.getLogger(UserContextFilter.class);

    @Override
    public void doFilter(ServletRequest servletRequest, ServletResponse servletResponse, FilterChain filterChain)
            throws IOException, ServletException {


        HttpServletRequest httpServletRequest = (HttpServletRequest) servletRequest;
        /**
         * 检索调用的HTTP首部中设置的值,将这些值赋给存储在UserContextHolder中的UserContent
         */
        UserContextHolder.getContext().setCorrelationId(  httpServletRequest.getHeader(UserContext.CORRELATION_ID) );
        UserContextHolder.getContext().setUserId(httpServletRequest.getHeader(UserContext.USER_ID));
        UserContextHolder.getContext().setAuthToken(httpServletRequest.getHeader(UserContext.AUTH_TOKEN));
        UserContextHolder.getContext().setOrgId(httpServletRequest.getHeader(UserContext.ORG_ID));

        logger.debug("License Service Incoming Correlation id: {}", UserContextHolder.getContext().getCorrelationId());

        filterChain.doFilter(httpServletRequest, servletResponse);
    }

    @Override
    public void init(FilterConfig filterConfig) throws ServletException {}

    @Override
    public void destroy() {}
}
package com.thoughtmechanix.licenses.utils;


import org.springframework.util.Assert;

public class UserContextHolder {
    //当前线程
    private static final ThreadLocal<UserContext> userContext = new ThreadLocal<UserContext>();

    public static final UserContext getContext(){
        UserContext context = userContext.get();

        if (context == null) {
            context = createEmptyContext();
            userContext.set(context);

        }
        return userContext.get();
    }

    public static final void setContext(UserContext context) {
        Assert.notNull(context, "Only non-null UserContext instances are permitted");
        userContext.set(context);
    }

    public static final UserContext createEmptyContext(){
        return new UserContext();
    }
}
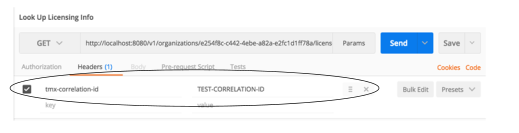
//一旦提交了这个调用,当它流经UserContent、LicenseServiceController、LicenseServer类时,我们可以看到3条日志消息记录传入的关联ID:
UserContext Correlation id: TEST-CORRELATION-ID
LicenseServiceController Correlation id: TEST-CORRELATION-ID
LicenseService.getLicenseByOrg Correlation:
//正如预期的那样,一旦这个调用使用了Hystrix保护的LicenseService.getLicenseByOrg()方法,就无法得到关联ID的值,幸运的是,Hystrix和Spring Cloud提供了一种机制,可以将父线程的上下文传播到有Hystrix线程池管理的线程。这种机制称为“HystrixConcurrencyStrategy”
HystrixConcurrencyStrategy实战
自定义HystrixConcurrentcyStrategy需要执行以下3个操作:
1.定义自定义的Hystrix并发策略
2.定义一个Callable类,将UserContext注入Hystrix命令中
3.配置Spring Cloud以使用自定义Hystrix策略
1.定义自定义的Hystrix并发策略
package com.thoughtmechanix.licenses.hystrix;

import com.netflix.hystrix.HystrixThreadPoolKey;
import com.netflix.hystrix.strategy.concurrency.HystrixConcurrencyStrategy;
import com.netflix.hystrix.strategy.concurrency.HystrixRequestVariable;
import com.netflix.hystrix.strategy.concurrency.HystrixRequestVariableLifecycle;
import com.netflix.hystrix.strategy.properties.HystrixProperty;
import com.thoughtmechanix.licenses.utils.UserContext;
import com.thoughtmechanix.licenses.utils.UserContextHolder;

import java.util.concurrent.BlockingQueue;
import java.util.concurrent.Callable;
import java.util.concurrent.ThreadPoolExecutor;
import java.util.concurrent.TimeUnit;


public class ThreadLocalAwareStrategy extends HystrixConcurrencyStrategy{
    private HystrixConcurrencyStrategy existingConcurrencyStrategy;

    /**
     * Spring cloud已经定义了一个并发类。将已存在的并发策略传入自定义的HystrixConcurrencyStrategy的类的构造器中
     * @param existingConcurrencyStrategy
     */
    public ThreadLocalAwareStrategy(
            HystrixConcurrencyStrategy existingConcurrencyStrategy) {
        this.existingConcurrencyStrategy = existingConcurrencyStrategy;
    }

    @Override
    public BlockingQueue<Runnable> getBlockingQueue(int maxQueueSize) {
        return existingConcurrencyStrategy != null
                ? existingConcurrencyStrategy.getBlockingQueue(maxQueueSize)
                : super.getBlockingQueue(maxQueueSize);
    }

    @Override
    public <T> HystrixRequestVariable<T> getRequestVariable(
            HystrixRequestVariableLifecycle<T> rv) {
        return existingConcurrencyStrategy != null
                ? existingConcurrencyStrategy.getRequestVariable(rv)
                : super.getRequestVariable(rv);
    }

    @Override
    public ThreadPoolExecutor getThreadPool(HystrixThreadPoolKey threadPoolKey,
                                            HystrixProperty<Integer> corePoolSize,
                                            HystrixProperty<Integer> maximumPoolSize,
                                            HystrixProperty<Integer> keepAliveTime, TimeUnit unit,
                                            BlockingQueue<Runnable> workQueue) {
        return existingConcurrencyStrategy != null
                ? existingConcurrencyStrategy.getThreadPool(threadPoolKey, corePoolSize,
                maximumPoolSize, keepAliveTime, unit, workQueue)
                : super.getThreadPool(threadPoolKey, corePoolSize, maximumPoolSize,
                keepAliveTime, unit, workQueue);
    }

    @Override
    public <T> Callable<T> wrapCallable(Callable<T> callable) {

        return existingConcurrencyStrategy != null
                ? existingConcurrencyStrategy
                .wrapCallable(new DelegatingUserContextCallable<T>(callable, UserContextHolder.getContext()))
                : super.wrapCallable(new DelegatingUserContextCallable<T>(callable, UserContextHolder.getContext()));
    }
}
2.定义一个Callable类,将UserContext注入Hystrix命令中
package com.thoughtmechanix.licenses.hystrix;

import com.thoughtmechanix.licenses.utils.UserContext;
import com.thoughtmechanix.licenses.utils.UserContextHolder;
import org.slf4j.Logger;
import org.slf4j.LoggerFactory;
import org.springframework.util.Assert;

import java.util.concurrent.Callable;


public final class DelegatingUserContextCallable<V> implements Callable<V> {
    private static final Logger logger = LoggerFactory.getLogger(DelegatingUserContextCallable.class);
    private final Callable<V> delegate;


    //private final UserContext delegateUserContext;
    private UserContext originalUserContext;

    /**
     * 原始Callable类将被传递到自定义的Callable类,自定义Callable将调用Hystrix保护的代码和来自父线程的UserContent
     * @param delegate
     * @param userContext
     */
    public DelegatingUserContextCallable(Callable<V> delegate,
                                             UserContext userContext) {
        Assert.notNull(delegate, "delegate cannot be null");
        Assert.notNull(userContext, "userContext cannot be null");
        this.delegate = delegate;
        this.originalUserContext = userContext;
    }

    public DelegatingUserContextCallable(Callable<V> delegate) {
        this(delegate, UserContextHolder.getContext());
    }

    /**
     * call方法在被@HystriCommand注解保护的方法之前调用
     * @return
     * @throws Exception
     */
    public V call() throws Exception {
        /**
         * 已设置UserContent.存储UserContent的ThreadLocal变量与运行受Hystrix保护的方法的线程相关联
         */
        UserContextHolder.setContext( originalUserContext );

        try {
            /**
             * UserContent设置后,在Hystrix保护的方法上调用call方法,如LicenseServer.getLicenseByOrg方法
             */
            return delegate.call();
        }
        finally {

            this.originalUserContext = null;
        }
    }

    public String toString() {
        return delegate.toString();
    }


    public static <V> Callable<V> create(Callable<V> delegate,
                                         UserContext userContext) {
        return new DelegatingUserContextCallable<V>(delegate, userContext);
    }
}
3.配置Spring Cloud以使用自定义Hystrix策略
package com.thoughtmechanix.licenses.hystrix;

import com.netflix.hystrix.strategy.HystrixPlugins;
import com.netflix.hystrix.strategy.concurrency.HystrixConcurrencyStrategy;
import com.netflix.hystrix.strategy.eventnotifier.HystrixEventNotifier;
import com.netflix.hystrix.strategy.executionhook.HystrixCommandExecutionHook;
import com.netflix.hystrix.strategy.metrics.HystrixMetricsPublisher;
import com.netflix.hystrix.strategy.properties.HystrixPropertiesStrategy;
import org.springframework.beans.factory.annotation.Autowired;
import org.springframework.context.annotation.Configuration;

import javax.annotation.PostConstruct;

@Configuration
public class ThreadLocalConfiguration {

    /**
     * 当构造配置对象时,它将自动装配在现有的HystrixConcurrencyStrategy中
     */
    @Autowired(required = false)
        private HystrixConcurrencyStrategy existingConcurrencyStrategy;

        @PostConstruct
        public void init() {
            // Keeps references of existing Hystrix plugins.
            //因为要注册一个新的并发策略,所以要获取所有其他的Hystrix组件,然后重新设置Hystrix插件
            HystrixEventNotifier eventNotifier = HystrixPlugins.getInstance()
                    .getEventNotifier();
            HystrixMetricsPublisher metricsPublisher = HystrixPlugins.getInstance()
                    .getMetricsPublisher();
            HystrixPropertiesStrategy propertiesStrategy = HystrixPlugins.getInstance()
                    .getPropertiesStrategy();
            HystrixCommandExecutionHook commandExecutionHook = HystrixPlugins.getInstance()
                    .getCommandExecutionHook();

            HystrixPlugins.reset();
            /**
             * 使用Hystrix插件注册自定义的Hystrix并发策略(ThreadConcurrencyStrategy)
             */
            HystrixPlugins.getInstance().registerConcurrencyStrategy(new ThreadLocalAwareStrategy(existingConcurrencyStrategy));
            /**
             * 然后重新注册Hystrix插件使用所有Hystrix插件
             */
            HystrixPlugins.getInstance().registerEventNotifier(eventNotifier);
            HystrixPlugins.getInstance().registerMetricsPublisher(metricsPublisher);
            HystrixPlugins.getInstance().registerPropertiesStrategy(propertiesStrategy);
            HystrixPlugins.getInstance().registerCommandExecutionHook(commandExecutionHook);
        }
}
//记住:Hystrix只允许有一个HystrixConcurrencyStrategy..spring将尝试自动装配在现有的任何HystrixConcurrencyStrategy(如果它存在)中。最后完成所有的工作后,我们使用Hystrix插件把在init()方法获取的原始Hystrix组件重新注册回来。
本章小结:
1.在设计高分布式应用程序(如:基于微服务的应用程序)时,必须考虑客户端弹性。
2.服务的彻底故障(如:服务器崩溃)是很容易检测和处理的。
3.一个性能不佳的服务可能会引起资源耗尽的连锁效应,因为调用客户端的线程被阻塞,以等待服务完成。
4.三种核心客户端弹性模式:断路器模式、后备模式、舱壁模式。
5.断路器模式试图杀死运行缓慢和降级的系统调用,这样的调用就会快速失败,并防止资源耗尽。
6.后备模式允许开发人员在远程服务调用失败或断路器跳匝的情况下,定义替代代码路径。
7.舱壁模式通过将对远程服务的调用隔离到他们的线程池中,使远程资源调用彼此分离。就算一组服务调用失败,这些失败也不会导致应用程序容器中的所有资源耗尽。
8.Spring cloud 和 Netflix Hystrix库提供断路器、后备模式、舱壁模式的实现。
9.Hystrix库是高度可配置的,可以在全局、类和线程池级别配置。
10.Hystrix支持两种隔离模型:THREAD和SEMAPHONRE。
11.Hystrix默认隔离模型THREAD完全隔离Hystrix保护的调用,但不会将父线程的上下文传播到Hystrix管理的线程。
12.Hystrixd 另一种隔离模型SEMAPHORE不使用单独的线程进行Hystrix调用。虽然这更有效率,但如果Hystrix中断了调用,它也会让服务变得不可预测。
13.Hystrix允许通过自定义HystrixConcurrencyStrategy实现,将线程上下文注入Hystrix管理的线程中。
使用Spring Clooud 和Zuul进行服务路由
背景
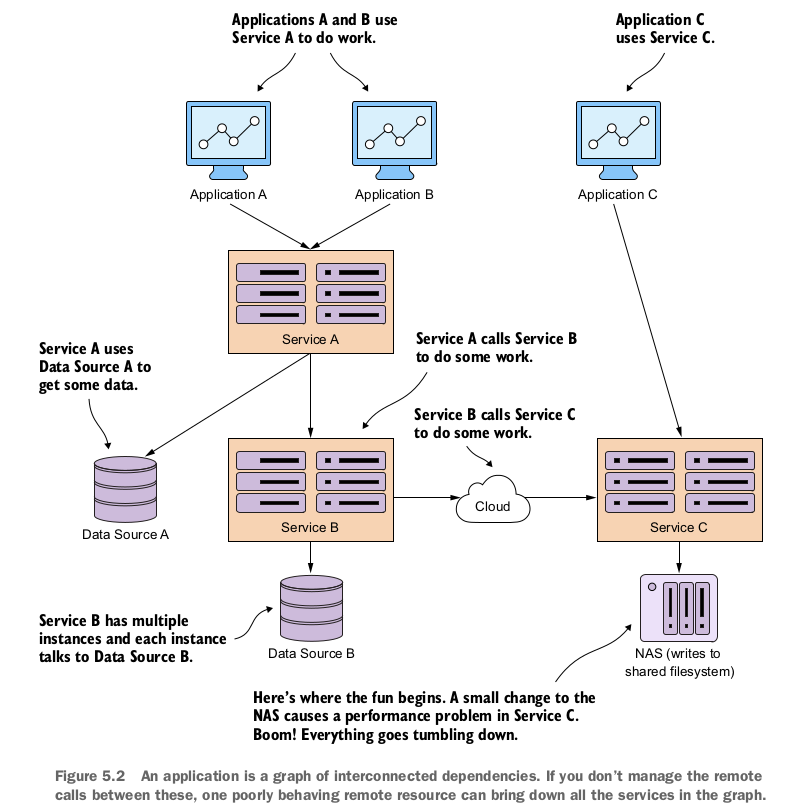
像微服务架构这样的分布式架构中,需要确保跨多个服务调用的关键行为的正常运行,如安全、日志记录和用户跟踪。要实现此功能,开发人员需要在所有服务中始终如一的强制这些特性,而不要每个开发团队都构建自己的解决方案。虽然可以使用公共库或框架来帮助在单个服务中直接构建这些功能,但这样会造成以下影响:
1.在构建每个服务中很难始终实现这些功能。
2.正确的实现这些功能是一个挑战。
3.这会在所有的服务中创建一个顽固的依赖。
使用Spring Cloud和Zuul来完成以下操作
1.将所有的服务调用放在一个URL后面,并使用服务发现将这些调用映射到实际的服务实例。
2.将关联ID注入流经服务网关的每个服务调用中
3.在从客户端发回的HTTP响应中注入关联ID
4.构建一个动态路由机制,将各个具体的组织路由到服务实例端点,该端点与其他人使用的服务实例不同。
什么是服务网关
无服务网关:服务客户端将为每个服务调用不同的端点。

有服务网关:服务网关分离调用的URL,并将路径映射到服务网关后面的服务。

在服务网关中实现的横切关注点包括以下
静态路由------服务网关将所有的服务调用放在单个URL和API路由的后面。这简化了开发,因为开发人员只需知道所有的服务的一个服务端点就可以。
动态路由------服务网关可以检查传入的服务请求,根据来自传入请求的数据和服务调用者的身份执行智能路由。
验证和授权-----由于所有服务调用都要经过服务网关进行路由,所以服务网关是检查服务调用者是否已经进行了验证并被授权进行服务调用的自然场所。
度量数据收集和日志记录------当服务调用通过服务网关时,可以使用服务网关来收集数据和日志信息,还可以使用服务网关确保在用户请求上提供关键信息以确保日志统一。
这并不意味着不应该从单个服务中收集度量数据,而是通过服务网关可以集中收集许多基本度量数据,如服务调用次数和服务响应时间。
难道服务网关不是单点故障和潜在瓶颈吗?
在单独的服务组面前,负载均衡仍然很有用,在这种情况下将负载均衡器放到多个服务网关实例前面的是一个恰当的设计,它确保服务网关实现可以伸缩。将负载均衡器置于所有服务实例的前面并不是一个好主意,因为它将会成为瓶颈。
要保持服务网关编写的代码是无状态的。不要在内存中为服务网关存储任何信息。如果不小心就有可能限制网关的可伸缩性,导致不得不确保数据在所有服务网关实例中被复制。
要保持为服务网关编写的代码是轻量的。服务网关是服务调用“阻塞点”,具有多个数据库调用的复杂代码可能是服务服务网关中难以追踪的性能问题的根源。
Spring cloud 和 Netfilx Zuul简介
Spring cloud 集成了Netflix 开源项目Zuul。Zuul是一个服务网关,它非常容易通过Spirng cloud注解进行创建和使用。Zuul提供了许多功能,具体包括以下:
1.将应用程序中的所有服务的路由映射到一个URL------Zuul不限于一个URL。在Zuul中,开发人员可以定义多个路由条目,使路由映射非常细粒度(每个服务端点都有自己的路由映射)。然后Zuul最常见的用例是构建一个单一的入口点,所有服务客户端调用都要经过这个入口。
2.构建可以对通过网关的请求进行检查和操作的过滤器------这些过滤器允许开发人员在代码中注入策略执行点,以一致的方式对所有服务调用执行大量操作。
//1.建立一个Zuul Springboot项目,并配置适当的Maven依赖项
//2.使用Spring Cloud 注解修改这个Spring Boot 项目,将其声明为Zuul服务
//3.配置Zuul以便Eureka进行通信(可选)
1.建立一个Zuul Springboot项目,并配置适当的Maven依赖项
<dependency>
      <groupId>org.springframework.cloud</groupId>
      <artifactId>spring-cloud-starter-zuul</artifactId>
</dependency>
2.使用Spring Cloud 注解修改这个Spring Boot 项目,将其声明为Zuul服务
package com.thoughtmechanix.zuulsvr;


import org.springframework.boot.SpringApplication;
import org.springframework.boot.autoconfigure.SpringBootApplication;
import org.springframework.boot.autoconfigure.security.oauth2.client.EnableOAuth2Sso;
import org.springframework.cloud.client.loadbalancer.LoadBalanced;
import org.springframework.cloud.netflix.zuul.EnableZuulProxy;
import org.springframework.context.annotation.Bean;
import org.springframework.web.client.RestTemplate;


@SpringBootApplication
@EnableZuulProxy //TODO:Zuul服务器
public class ZuulServerApplication {

    @LoadBalanced
    @Bean
    public RestTemplate getRestTemplate(){
        return new RestTemplate();
    }

    public static void main(String[] args) {
        SpringApplication.run(ZuulServerApplication.class, args);
    }
}
注意:
@EnableZuulServer和EnableZuulProxy区别
EnableZuulServer:此注解将创建一个Zuul服务器,它不会加载任何Zuul反向代理过滤器,也不会使用Netflix Eureka进行服务发现。开发人员想要构建自己的路由服务,而不使用任何Zuul预置的功能时会使用@EnableZuulServer举例来讲,
当开发人员需要使用Zuul与Eureka之外的其他服务发现引擎(如:Consul)进行集成的时候。
3.配置Zuul以便Eureka进行通信(可选)
spring:
  application:
    name: zuulservice
  profiles:
    active:
      default
  cloud:
    config:
      enabled: true

server:
  port: 5555

  #Setting logging levels
logging:
    level:
      com.netflix: WARN
      org.springframework.web: WARN
      com.thoughtmechanix: DEBUG

eureka:
  instance:
    preferIpAddress: true
  client:
    registerWithEureka: true
    fetchRegistry: true
    serviceUrl:
        defaultZone: http://localhost:8761/eureka/


#
#
#  debug:
#    request: true
#
#zuul:
#  prefix:  /api
#  routes:
#    organizationservice: /organization/**
#    licensingservice: /licensing/**
在Zuul中配置路由
Zuul的核心是一个反向代理。反向代理是一个中间件服务器,它位于尝试访问资源的客户端和资源本身之间。客户端甚至不知道它正在与代理之外的服务器进行通信。反向代理负责捕获客户端的请求,然后代表客户端调用远程资源。在微服务架构的情况下,Zuul(反向代理)从客户端接收微服务调用并将其转发给下游服务。服务
客户端认为它只与Zuul通信。Zuul要与下游服务进行沟通,Zuul必须知道如何将进来的调用映射到下游路由。Zuul有几种机制来做到这一点,包括:
1.通过服务发现自动映射路由
2.使用服务发现手动映射路由
3.使用静态URL手动映射路由
1.通过服务发现自动映射路由
Zuul的所有映射都是通过application.yal文件中定义路由来完成的。但是,zuul可以根据其服务ID自动路由请求,而不需要配置。如果没有指定任何路由,zuul将自动使用正在调用的服务的Eureka服务ID,并将其映射到下游服务实例,
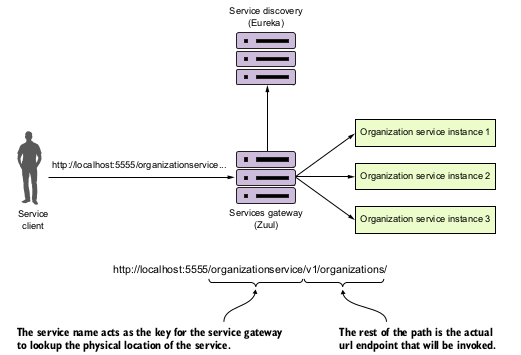
例如如果要调用organizationserice并通过Zuul使用自动路由,则可以使用以下URL作为端点,让客户端调用Zuul服务实例: http://localhost:5555/organizationservice/v1/organizations/e254f8c-c442-4ebe-a82a-e2fc1d1ff78a
server:
  port: 5555

  #Setting logging levels
logging:
    level:
      com.netflix: WARN
      org.springframework.web: WARN
      com.thoughtmechanix: DEBUG

eureka:
  instance:
    preferIpAddress: true
  client:
    registerWithEureka: true
    fetchRegistry: true
    serviceUrl:
        defaultZone: http://localhost:8761/eureka/

zuul:
  prefix:  /api
  routes:
  organizationservice: /organization/**
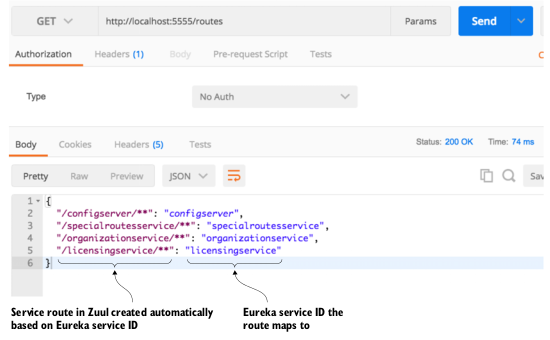
使用Eureka的Zuul的优点在于,开发人员不仅可以拥有一个可以发出调用的单个端点,有了Eureka开发人员还可以添加和删除服务的实例,而无需修改Zuul,例如可以向Eureka添加新服务,Zuul将自动路由到该服务,因为Zuul会与Eureka进行通信,了解实际服务端点的位置。
访问:http://local-host:5555/routes
2.使用服务发现手动映射路由
Zuul允许开发人员更细粒度的明确定义路由映射,而不是单纯依赖服务的Eureka服务ID创建的自动路由。

3.使用静态URL手动映射路由
| Component | describe |
| spring-cloud-aws | |
| spring-cloud-bus | |
| spring-cloud-cli | |
| spring-cloud-commons | |
| spring-cloud-contract | |
| spring-cloud-config | |
| spring-cloud-netflix | |
| spring-cloud-security | |
| spring-cloud-cloudfoundry | |
| spring-cloud-consul | |
| spring-cloud-sleuth | |
| spring-cloud-stream | |
| spring-cloud-zookeeper | |
| spring-boot | |
| spring-cloud-task | |
| spring-cloud-vault | |
| spring-cloud-gateway | |
| spring-cloud-openfeign | |
| spring-cloud-function | |
| spring-cloud-function | |
| spring-cloud-function | |
| spring-cloud-function |

 浙公网安备 33010602011771号